-
干货分享 | 一文了解TSMaster中Seed&key的两种处理方法
在UDS诊断过程中,会涉及到安全访问的问题,也就是常说的Seed&Key。TSMaster中提供了两种 Seed&Key 的处理方法:第一种是直接加载DLL文件;第二种是直接在TSMaster的编译器中直接添加安全算法。
一、加载外部 Seed&Key DLL
TSMaster 诊断模块支持通过 dll 载入 Seed&Key 算法,该算法 dll 跟主流工具的计算接口兼容,接口定义如下图所示:

DLL 加载界面如下图所示:
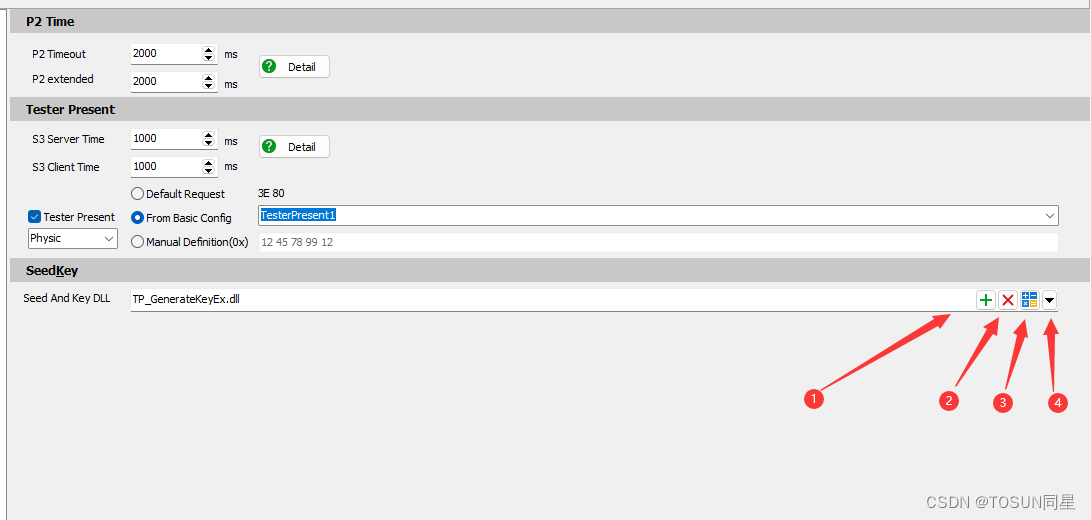
【1】 加载 DLL
【2】 删除 DLL
【3】 DLL 校验器,通过此按钮,用户可以判断自己加载的 dll 接口是否正确,算法是否符合设计要求。如下图所示:

如上图所示界面,用户选择 Seed 的 Level 过后,输入 Demo Seed 值,点击 GenKey 进行判断。如果该 DLL 接口跟模板定义接口统一,则会输出提示信息:Generate Key Success,然后用户根据 Key 值跟目标值对比,进一步确认DLL 中的算法是否符合设计要求。
【4】 打开 TSMaster 安装目录下 Seed&Key 接口工程所在的路径。用户可以拷贝该工程添加自己的 Seed&Key 算法。
“默认SeedKey函数接口
目前,要想被 TSMaster 的诊断模块直接加载,该 DLL 必须实现如下三种函数接口中的一种:
【1】 接口 1:
unsigned int GenerateKeyEx(
const unsigned char* ipSeedArray, /* Array for the seed [in] */
unsigned int iSeedArraySize, /* Length of the array for the seed [in] */
const unsigned int iSecurityLevel, /* Security level [in] */
const char* ipVariant, /* Name of the active variant [in] */
unsigned char* iopKeyArray, /* Array for the key [in, out] */
unsigned int iMaxKeyArraySize, /* Maximum length of the array for the key [in] */
unsigned int& oActualKeyArraySize); /* Length of the key [out] */
【2】 接口 2:
unsigned int GenerateKeyExOpt(
const unsigned char* ipSeedArray, /* Array for the seed [in] */
unsigned int iSeedArraySize, /* Length of the array for the seed [in] */
const unsigned int iSecurityLevel, /* Security level [in] */
const char* ipVariant, /* Name of the active variant [in] */
const char* iPara, /* */
unsigned char* iopKeyArray, /* Array for the key [in, out] */
unsigned int iMaxKeyArraySize, /* Maximum length of the array for the key [in] */
unsigned int& oActualKeyArraySize) /* Length of the key [out] */
【3】 接口 3:bool ASAP1A_CCP_ComputeKeyFromSeed(
const unsigned char* ipSeedArray, /* Array for the seed [in] */
unsigned short iSeedArraySize, /* Length of the array for the seed [in] */
unsigned char* iopKeyArray, /* Array for the key [in, out] */
unsigned short iMaxKeyArraySize, /* Maximum length of the array for the key [in] */
unsigned short* opSizeKey) /* Length of the key [out] */
用户的 DLL 只要实现了上述任意一种函数接口,即可直接加载到 TP 层模块中。如果出现加载失败,主要检查如下情况:
1. 是否用 Release 模式发布,如果是 Debug 模式,常常会有以上失败的情况出现。
2. 是否采用 x86 平台发布,目前 TSMaster 为支持 X86 的版本,用来调试的 DLL 也必须为X86 模式。
“如何兼容其他函数接口
日常使用中,经常出现用户已经开发好了 dll,如果该 dll的接口不是上述三种中的任何一种,就无法直接加载到 TSMaster 的诊断模块中。对于这种情况,推荐采用如下方案来解决此问题:

下面以一个实际的实例来讲解如何兼容用户现有的 DLL 文件。
1. 用户现有的 DLL,名称为 UserSeedKey.dll。该函数内部的 API 函数有:
➢ Seed 等级为 1 的时候,调用函数 void GetKeyFromSeed01(byte* ASeed, byte* AKey);
➢ Seed 等级为 3 的时候,调用函数 void GetKeyFromSeed03(byte* ASeed, byte* AKey);
➢ Seed 等级为 11 的时候,调用函数 void GetKeyFromSeed11(byte* ASeed, byte* AKey);
该 dll 不支持上述默认加载接口,无法直接加载到 TSMaster 中使用。因此,需要把这些 DLL 再包装一层,才能载入到 TSMaster 的诊断模块中。
2. 选择 TSMaster 安装目录中提供的 GenerateKeyEx 的模板工程,在该工程中调用上述 DLL的函数接口。基本思路是:
➢ 采用 Loadlibrary 动态用户现有的 dll。
➢ 根据传入的 Level 参数,采用 GetProcAddress 函数动态获取实际的用于计算 Key 的函数指针。
➢ 如果获取函数指针成功,则使用该函数指针传输 Seed 值,并计算对应的 Key 值。
详细调用示例函数如下图所示:

3. 该 GenerateKeyEx 工程开发结束后,TSMaster 直接加载 GenerateKeyEx 所在的 dll。需要注意的是,用户需要把现有的UserSeedKey.dll 拷贝到TSMaster 根目录或者GenerateKeyEx.dll 所在的目录。如果不拷贝过去,GenerateKeyEx.dll 执行的时候会出现找不到对应依赖 dll 的情况,解锁失败。
总结:
在 TSMaster 安装目录中,提供了封装 Seed&Key 算法的模板工程。如 GenerateKeyEx,GenerateKeyExOpt ASAP1A_CCP_ComputeKeyFromSeed,用户基于此模板工程开发即可得到能够直接加载的 dll 函数。
同时,也提供了二次封装的 dll 的工程,比如 GenerateKeyEx_Wrapper_Demo,该工程演示了如何基于已经存在的 SeedKey 算法库进行包装,生成可以直接加载到 TSMaster 诊断模块中的 dll 的过程。
二、采用内置的算法编辑器
基本步骤如下所示:

注意事项:
【1】 算法函数的接口,TSMaster 目前提供了最常用的接口形式,如果用户有自己特殊的接口形式,无法覆盖住,请联系上海同星把此接口增加到选项中。

【2】 所有的接口函数都定义了返回值 s32。增加此约束,主要是增加函数的严谨性。返回值为 0 表示成功,为其他值则有对应的错误码。用户在编辑代码的时候,最后一行一定不要忘了输入返回值,否则系统执行函数过后,会认为算法执行失败,不予往后面执行。如下所示:

【3】 添加算法过后,点击 OK 退出。TSMaster 内置编译器会自动解释该算法,并准备好在执行诊断的过程中使用。
-
相关阅读:
C++是不是最容易产生猪队友的编程语言之一?
Unity中Shader的深度缓冲区
Go的简单入门:开始使用泛型
【节能学院】Acrel5000web能耗系统在某学院的应用
图详解第六篇:多源最短路径--Floyd-Warshall算法(完结篇)
学python,怎么能不学习scrapy呢!
2022年最新阿里java面试题:java初级+中级+高级面试题(附答案)
hadoop安装的过程中的报错/libhadoop.so.1.0.0
Anaconda使用指南
SDL_Image STB_Image 中文路径
- 原文地址:https://blog.csdn.net/TOSUN_CAN/article/details/132836746