-
docker的安装以及docker中nginx配置
机器 test3 192.168.23.103
1机器初始化配置
1.1关闭防火墙,清空防火墙规则
systemctl stop firewalld iptables -F setenforce 0- 1
- 2
- 3
1.2部署时间同步
yum install ntp ntpdate -y- 1
1.3安装基础软件包
yum install -y wget net-tools nfs-utils lrzsz gcc gcc-c++ make cmake libxml2-devel openssl-devel curl curl-devel unzip sudo ntp libaio-devel wget vim ncurses-devel autoconf automake zlib-devel python-devel epel-release openssh-server socat ipvsadm conntrack- 1
1.4构建docker-ce源
https://developer.aliyun.com/mirror/ yum install -y yum-utils device-mapper-persistent-data lvm2 yum-config-manager --add-repo https://mirrors.aliyun.com/docker-ce/linux/centos/docker-ce.repo sed -i 's+download.docker.com+mirrors.aliyun.com/docker-ce+' /etc/yum.repos.d/docker-ce.repo yum makecache fast yum -y install docker-ce- 1
- 2
- 3
- 4
- 5
- 6
1.5启动docker
systemctl restart docker && systemctl enable docker- 1
2.docker的配置
2.1要是想要docker能被其他服务器访问,要是想要docker相互之间通信没有问题,需要修改内核参数,开启包转发功能,内核参数修改,br_netfilter 模块用于将桥接流量转发至iptables链,
[root@test3 ~]# modprobe br_netfilter 模块可以通过这个命令看有没有开启 [root@test3 ~]# lsmod |grep br_netfilter br_netfilter 22256 0 bridge 151336 1 br_netfilter [root@test3 ~]# cat > /etc/sysctl.d/docker.conf << EOF > net.bridge.bridge-nf-call-ip6tables = 1 > net.bridge.bridge-nf-call-iptables = 1 > net.ipv4.ip_forward = 1 > EOF 具体功能如下 Docker 安装后出现:WARNING: bridge-nf-call-iptables is disabled 的解决办法: net.bridge.bridge-nf-call-ip6tables = 1 net.bridge.bridge-nf-call-iptables = 1 net.ipv4.ip_forward = 1: 将 Linux 系统作为路由或者 VPN 服务就必须要开启 IP 转发功能。当 linux 主机有多个网卡时一个网卡收 到的信息是否能够传递给其他的网卡 ,如果设置成 1 的话 可以进行数据包转发,可以实现 VxLAN 等功 能。不开启会导致 docker 部署应用无法访问。 使模块生效 [root@test3 ~]# sysctl -p /etc/sysctl.d/docker.conf net.bridge.bridge-nf-call-ip6tables = 1 net.bridge.bridge-nf-call-iptables = 1 net.ipv4.ip_forward = 1 重启后模块失效,下面是开机自动加载模块的脚本 在/etc/新建 rc.sysinit 文件 cat /etc/rc.sysinit #!/bin/bash for file in /etc/sysconfig/modules/*.modules ; do [ -x $file ] && $file done cat /etc/sysconfig/modules/br_netfilter.modules modprobe br_netfilter 增加权限 chmod 755 /etc/sysconfig/modules/br_netfilter.modules 这样即使重启也会加载模块- 1
- 2
- 3
- 4
- 5
- 6
- 7
- 8
- 9
- 10
- 11
- 12
- 13
- 14
- 15
- 16
- 17
- 18
- 19
- 20
- 21
- 22
- 23
- 24
- 25
- 26
- 27
- 28
- 29
- 30
- 31
- 32
- 33
- 34
- 35
- 36
- 37
- 38
- 39
- 40
- 41
- 42
- 43
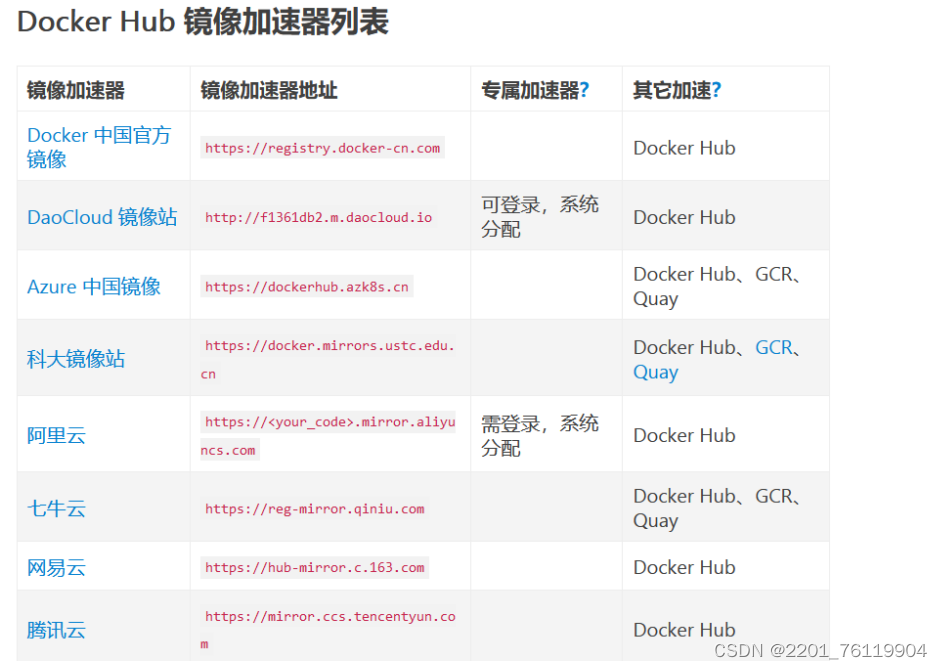
配置阿里云镜像加速器地址
https://cr.console.aliyun.com/cn-hangzhou/instances/mirrors- 1
docker镜像相关的操作
从dockerhub上查找镜像 [root@test3 ~]# docker search centos NAME DESCRIPTION STARS OFFICIAL centos DEPRECATED; The official build of CentOS. 7721 [OK] kasmweb/centos-7-desktop CentOS 7 desktop for Kasm Workspaces 43 bitnami/centos-base-buildpack Centos base compilation image 0 dokken/centos-7 CentOS 7 image for kitchen-dokken 10 dokken/centos-8 CentOS 8 image for kitchen-dokken 6 spack/centos7 CentOS 7 with Spack preinstalled 2 dokken/centos-6 EOL: CentOS 6 image for kitchen-dokken 0 atlas/centos7-atlasos ATLAS CentOS 7 Software Development OS 3 ustclug/centos Official CentOS Image with USTC Mirror 0 spack/centos6 CentOS 6 with Spack preinstalled 1 dokken/centos-stream-8 5 eclipse/centos_jdk8 CentOS, JDK8, Maven 3, git, curl, nmap, mc, … 5 dokken/centos-stream-9 10 corpusops/centos-bare https://github.com/corpusops/docker-images/ 0 corpusops/centos centos corpusops baseimage 0 eclipse/centos_go Centos + Go 0 spack/centos-stream 2 fnndsc/centos-python3 Source for a slim Centos-based Python3 image… 0 eclipse/centos_spring_boot Spring boot ready image based on CentOS 0 openmicroscopy/centos-systemd-ip centos/systemd with iproute, for testing mul… 0 eclipse/centos CentOS based minimal stack with only git and… 1 eclipse/centos_nodejs CentOS based nodejs4 stack 0 eclipse/centos_vertx CentOS + vertx 0 eclipse/centos_wildfly_swarm CentOS, WildFly, Swarm 0 dockette/centos My Custom CentOS Dockerfiles 1 解释说明 NAME: 镜像仓库的名称 DESCRIPTION:镜像的描述 STARS:类似 github 里面的star,表示点赞,喜欢的意思 OFFICIAL:是否 docker 官方发布- 1
- 2
- 3
- 4
- 5
- 6
- 7
- 8
- 9
- 10
- 11
- 12
- 13
- 14
- 15
- 16
- 17
- 18
- 19
- 20
- 21
- 22
- 23
- 24
- 25
- 26
- 27
- 28
- 29
- 30
- 31
- 32
- 33
- 34
拉取镜像
[root@test3 ~]# docker pull centos- 1
查看有哪些镜像
[root@test3 ~]# docker images REPOSITORY TAG IMAGE ID CREATED SIZE centos latest 5d0da3dc9764 2 years ago 231MB- 1
- 2
- 3
把镜像做成离线压缩包
[root@test3 ~]# ls anaconda-ks.cfg [root@test3 ~]# docker save -o centos.tar.gz centos [root@test3 ~]# ls anaconda-ks.cfg centos.tar.gz- 1
- 2
- 3
- 4
- 5
解压
[root@test3 ~]# docker load -i centos.tar.gz Loaded image: centos:latest- 1
- 2
删除镜像
docker rmi -f centos:latest- 1
容器相关的操作
以交互式启动并运行容器
[root@test3 ~]# docker images REPOSITORY TAG IMAGE ID CREATED SIZE centos latest 5d0da3dc9764 2 years ago 231MB [root@test3 ~]# docker run --name=hello -it centos /bin/bash [root@573ed31d77d8 /]# #docker run 运行并创建容器 --name 容器的名字 -i 交互式 -t 分配终端 centos:启动docker 需要的镜像 bin/bash 说明你的shell 类型为bash bash是一种最常用的shell 是大多数 linux 发行版默认的shell 此外还有 c shell 等其他的shell #在起一个终端看一下 docker ps 是查看正在运行的容器 [root@test3 ~]# docker ps CONTAINER ID IMAGE COMMAND CREATED STATUS PORTS NAMES 573ed31d77d8 centos "/bin/bash" 6 seconds ago Up 5 seconds hello CONTAINER ID:容器的id IMAGE:容器使用的镜像 COMMAND:容器运行的命令 STATUS:容器启动的时间 PORTS : 容器的名字 #以守护式进程方式启动容器 [root@test3 ~]# docker run --name=hello1 -itd centos /bin/bash ae2fe03e778aa2fbd0b9ba2ac412ff3b2f17eaf04772028e1ab4670fd9bdd7fe d 表示后台运行 #进入hello1的容器 [root@test3 ~]# docker exec -it hello1 /bin/bash [root@ae2fe03e778a /]# #我们退出会发现 容器他依然运行 [root@test3 ~]# docker exec -it hello1 /bin/bash [root@ae2fe03e778a /]# exit exit [root@test3 ~]# docker ps CONTAINER ID IMAGE COMMAND CREATED STATUS PORTS NAMES ae2fe03e778a centos "/bin/bash" 3 minutes ago Up 3 minutes hello1 [root@test3 ~]# docker ps 会列出正在运行的容器 docker ps -a 会列出正在运行的和已经停止的容器全部都列出来 #查看容器日志 [root@test3 ~]# docker logs hello1 [root@test3 ~]# 运行和停止容器 [root@test3 ~]# docker stop hello1 hello1 [root@test3 ~]# docker ps CONTAINER ID IMAGE COMMAND CREATED STATUS PORTS NAMES [root@test3 ~]# docker ps -a CONTAINER ID IMAGE COMMAND CREATED STATUS PORTS NAMES ae2fe03e778a centos "/bin/bash" 7 minutes ago Exited (0) 8 seconds ago hello1 573ed31d77d8 centos "/bin/bash" 26 minutes ago Exited (0) 8 minutes ago hello [root@test3 ~]# docker start hello1 hello1 [root@test3 ~]# docker ps CONTAINER ID IMAGE COMMAND CREATED STATUS PORTS NAMES ae2fe03e778a centos "/bin/bash" 8 minutes ago Up 2 seconds hello1 [root@test3 ~]# docker rm -f hello hello [root@test3 ~]# docker ps -a CONTAINER ID IMAGE COMMAND CREATED STATUS PORTS NAMES ae2fe03e778a centos "/bin/bash" 8 minutes ago Up 48 seconds hello1- 1
- 2
- 3
- 4
- 5
- 6
- 7
- 8
- 9
- 10
- 11
- 12
- 13
- 14
- 15
- 16
- 17
- 18
- 19
- 20
- 21
- 22
- 23
- 24
- 25
- 26
- 27
- 28
- 29
- 30
- 31
- 32
- 33
- 34
- 35
- 36
- 37
- 38
- 39
- 40
- 41
- 42
- 43
- 44
- 45
- 46
- 47
- 48
- 49
- 50
- 51
- 52
- 53
- 54
- 55
- 56
- 57
- 58
- 59
- 60
- 61
- 62
- 63
- 64
- 65
- 66
- 67
- 68
- 69
docker部署nginx
[root@test3 ~]# docker run --name nginx -p 80 -itd centos 3bd4aa598dd007dc8aba6f43f67d9bd5610e885b724910679edb2694325c8a78 -p 把容器断端口 随机在物理机映射一个端口 #进入容器 [root@test3 ~]# docker exec -it nginx /bin/bash [root@3bd4aa598dd0 /]# #此时安装你会发现他会报错 [root@3bd4aa598dd0 /]# yum install wget Failed to set locale, defaulting to C.UTF-8 CentOS Linux 8 - AppStream 78 B/s | 38 B 00:00 Error: Failed to download metadata for repo 'appstream': Cannot prepare internal mirrorlist: No URLs in mirrorlist [root@3bd4aa598dd0 /]# #解决,删除/etc/yum.repos.d/所有文件,把阿里云的镜像重写进去 [root@3bd4aa598dd0 /]# rm -rf /etc/yum.repos.d/* [root@3bd4aa598dd0 yum.repos.d]# curl -o /etc/yum.repos.d/CentOS-Base.repo https://mirrors.aliyun.com/repo/Centos-vault-8.5.2111.repo % Total % Received % Xferd Average Speed Time Time Time Current Dload Upload Total Spent Left Speed 100 2495 100 2495 0 0 25202 0 --:--:-- --:--:-- --:--:-- 25202 #此时下载就可以了 [root@3bd4aa598dd0 yum.repos.d]# yum install nginx vim -y Failed to set locale, defaulting to C.UTF-8 CentOS-8.5.2111 - Base - mirrors.aliyun.com 1.2 MB/s | 4.6 MB 00:03 CentOS-8.5.2111 - Extras - mirrors.aliyun.com 64 kB/s | 10 kB 00:00 CentOS-8.5.2111 - AppStream - mirrors.aliyun.com 2.1 MB/s | 8.4 MB 00:04 Dependencies resolved. ================================================================================================================================================================================================================== Package Architecture Version Repository Size ================================================================================================================================================================================================================== Installing: nginx x86_64 1:1.14.1-9.module_el8.0.0+184+e34fea82 AppStream 570 k Upgrading: #在容器里更改配置文件,重启nginx [root@3bd4aa598dd0 yum.repos.d]# echo 'docker is nginx' > /usr/share/nginx/html/index.html [root@3bd4aa598dd0 yum.repos.d]# /usr/sbin/nginx #在宿主机上通过 docker ps 可以查看把容器的 80 端口映射到宿主机的那个端口上,可以看出映射到宿主机的32768端口 [root@test3 ~]# docker ps CONTAINER ID IMAGE COMMAND CREATED STATUS PORTS NAMES 3bd4aa598dd0 centos "/bin/bash" 23 hours ago Up 23 hours 0.0.0.0:32768->80/tcp, :::32768->80/tcp nginx #访问测试,或者直接请求容器的ip也行 [root@test3 ~]# curl 127.0.0.1:32768 docker is nginx [root@test3 ~]# curl 172.17.0.3 docker is nginx #流量走向 访问物理节点ip:port(容器在物理节点映射的端口) ——> 容器 ip:port (容器里部署的服务器端口) ——> 就可以访问到容器里部署的应用了- 1
- 2
- 3
- 4
- 5
- 6
- 7
- 8
- 9
- 10
- 11
- 12
- 13
- 14
- 15
- 16
- 17
- 18
- 19
- 20
- 21
- 22
- 23
- 24
- 25
- 26
- 27
- 28
- 29
- 30
- 31
- 32
- 33
- 34
- 35
- 36
- 37
- 38
- 39
- 40
- 41
- 42
- 43
- 44
- 45
- 46
- 47
- 48
- 49
- 50
- 51
- 52
- 53
直接运行nginx
[root@test3 ~]# docker pull nginx Using default tag: latest latest: Pulling from library/nginx a2abf6c4d29d: Pull complete a9edb18cadd1: Pull complete 589b7251471a: Pull complete 186b1aaa4aa6: Pull complete b4df32aa5a72: Pull complete a0bcbecc962e: Pull complete Digest: sha256:0d17b565c37bcbd895e9d92315a05c1c3c9a29f762b011a10c54a66cd53c9b31 Status: Downloaded newer image for nginx:latest docker.io/library/nginx:latest #运行nginx [root@test3 ~]# docker run -d -p 28877:80 nginx 0c0313595bf4632610ae2692a7d8b1efd6321b996c61209d0e8e9f9493881a92 -p 28877:80 将宿主机的 28877端口映射到容器的80端口上 指定版本 # 查询centos镜像版本,也可以在浏览器上访问,看看有哪些版本 curl -s https://registry.hub.docker.com/v1/repositories/centos/tags | jq # 领导让你 基于mysql5.7 部署个镜像 curl -s https://registry.hub.docker.com/v1/repositories/mysql/tags | jq #查看容器ip [root@test3 ~]# docker inspect nginx|grep IPAddress "SecondaryIPAddresses": null, "IPAddress": "172.17.0.3", "IPAddress": "172.17.0.3",- 1
- 2
- 3
- 4
- 5
- 6
- 7
- 8
- 9
- 10
- 11
- 12
- 13
- 14
- 15
- 16
- 17
- 18
- 19
- 20
- 21
- 22
- 23
- 24
- 25
- 26
- 27
- 28
- 29
- 30
- 31
- 32
对外访问nginx1.19.7,直接访问宿主机的80端口就能看到nginx
[root@test3 ~]# docker pull nginx:1.19.7 1.19.7: Pulling from library/nginx 45b42c59be33: Pull complete 8acc495f1d91: Pull complete ec3bd7de90d7: Pull complete 19e2441aeeab: Pull complete f5a38c5f8d4e: Pull complete 83500d851118: Pull complete Digest: sha256:f3693fe50d5b1df1ecd315d54813a77afd56b0245a404055a946574deb6b34fc Status: Downloaded newer image for nginx:1.19.7 docker.io/library/nginx:1.19.7 [root@test3 ~]# docker images REPOSITORY TAG IMAGE ID CREATED SIZE nginx latest 605c77e624dd 2 years ago 141MB centos latest 5d0da3dc9764 2 years ago 231MB nginx 1.19.7 35c43ace9216 3 years ago 133MB [root@test3 ~]# netstat -tunlp|grep 80 tcp 0 0 0.0.0.0:80 0.0.0.0:* LISTEN 6937/nginx: master [root@test3 ~]# systemctl stop nginx [root@test3 ~]# netstat -tunlp|grep 80 [root@test3 ~]# docker run -d -p 80:80 35c43ace9216 474c65449759c39c108f020bbe54c37f781620b9968f22f0896427dc597a3585 #批量停止正在运行中的容器 [root@test3 ~]# docker ps -q 474c65449759 0c0313595bf4 3bd4aa598dd0 [root@test3 ~]# docker stop $(docker ps -q) 474c65449759 0c0313595bf4 3bd4aa598dd0- 1
- 2
- 3
- 4
- 5
- 6
- 7
- 8
- 9
- 10
- 11
- 12
- 13
- 14
- 15
- 16
- 17
- 18
- 19
- 20
- 21
- 22
- 23
- 24
- 25
- 26
- 27
- 28
- 29
- 30
- 31
- 32
- 33
- 34
- 35
docker创建镜像
[root@test3 ~]# docker ps -a CONTAINER ID IMAGE COMMAND CREATED STATUS PORTS NAMES 474c65449759 35c43ace9216 "/docker-entrypoint.…" 2 days ago Exited (0) 2 days ago flamboyant_agnesi 0c0313595bf4 nginx "/docker-entrypoint.…" 4 days ago Exited (0) 2 days ago gifted_pasteur 3bd4aa598dd0 centos "/bin/bash" 5 days ago Exited (0) 2 days ago nginx [root@test3 ~]# docker --help|grep comm exec Execute a command in a running container commit Create a new image from a container's changes Run 'docker COMMAND --help' for more information on a command. [root@test3 ~]# docker commit 3bd linux0224.cc sha256:b8dad6dbee789f541fb34736ee4f55708f9685a7dcec3c45ce7340f7d3d70bea [root@test3 ~]# docker images REPOSITORY TAG IMAGE ID CREATED SIZE linux0224.cc latest b8dad6dbee78 26 seconds ago 368MB nginx latest 605c77e624dd 2 years ago 141MB centos latest 5d0da3dc9764 2 years ago 231MB nginx 1.19.7 35c43ace9216 3 years ago 133MB [root@test3 ~]# docker image ls REPOSITORY TAG IMAGE ID CREATED SIZE linux0224.cc latest b8dad6dbee78 42 seconds ago 368MB nginx latest 605c77e624dd 2 years ago 141MB centos latest 5d0da3dc9764 2 years ago 231MB nginx 1.19.7 35c43ace9216 3 years ago 133MB [root@test3 ~]# docker run -it linux0224.cc bash [root@bc873f3b5d4f /]#- 1
- 2
- 3
- 4
- 5
- 6
- 7
- 8
- 9
- 10
- 11
- 12
- 13
- 14
- 15
- 16
- 17
- 18
- 19
- 20
- 21
- 22
- 23
- 24
- 25
-
相关阅读:
javaEE初阶---博客系统(前后端分离)
【C语言必知必会 | 子系列第二篇】深入剖析顺序结构(2)
JDBC(一)基础知识
软件测试行业到底有没有前景和出路?2022辞职后涨薪5K+,凭什么?
Mysql 内外链接,索引,事务,用户管理以及用C语言链接Mysql
Web IDE落地全记录(一)
vue中ref的作用
Oracle is和as 关键字学习
【Spring Boot】实战:实现Session共享
org.apache.sshd的SshClient客户端 连接服务器执行命令 示例
- 原文地址:https://blog.csdn.net/2201_76119904/article/details/137769201
