-
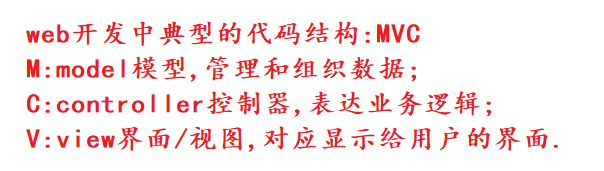
javaEE初阶---博客系统(前后端分离)
引言
之前我们已经写好了博客系统页面的前端部分 , 主要包括 :
- 博客列表页;
- 博客详情页;
- 博客登录页;
- 博客编辑页.
本节内容就是要给这些页面提供对应的后端功能 .
一 : 准备工作
- 创建项目Blog .
- 引入依赖 , 通过maven把代码中需要依赖的jar包导入 ; (Servlet , mysql , jackson)
- 创建目录 .
二 : 创建数据库
我们需要把博客内容和用户信息保存起来 , 就需要使用数据库 . 设计的关键 , 是找到数据库中的实体 , 对于博客系统来说 , 就是博客内容和用户信息 .

为了方便数据库内容在别的主机上部署 , 我们可以把对数据库的操作都写入一个文件中保存起来 .
此处在main目录下创建了db.sql文件 , 并将对数据库操作的语句写入 .三 : 封装数据库操作
把要用到的数据库操作的jdbc代码封装起来 , 以备后用 .- 1
主要有什么操作呢 ?
- 和数据库建立/断开连接 ;
- 针对博客和用户 , 提供get和set方法 ;
- 针对博客和用户的增删查改操作 , 进行封装 .

此处我们先重点关注model中的操作 .3.1 和数据库建立/断开连接
DBUtil.java
package model; import com.mysql.jdbc.jdbc2.optional.MysqlDataSource; import javax.sql.DataSource; import java.sql.Connection; import java.sql.PreparedStatement; import java.sql.ResultSet; import java.sql.SQLException; public class DBUtil { private volatile static DataSource dataSource = null; private static DataSource getDataSource() { if(dataSource == null) { synchronized (DBUtil.class){ if(dataSource == null) { dataSource = new MysqlDataSource(); ((MysqlDataSource)dataSource).setURL("jdbc:mysql://127.0.0.1:3306/blog_system?characterEncoding=utf8&useSSL=false"); ((MysqlDataSource)dataSource).setUser("root"); ((MysqlDataSource)dataSource).setPassword("111111"); } } } return dataSource; } public static Connection getConnection() throws SQLException { return getDataSource().getConnection(); } public static void close(Connection connection, PreparedStatement statement, ResultSet resultSet){ if(resultSet != null){ try { resultSet.close(); } catch (SQLException e) { throw new RuntimeException(e); } } if(statement != null){ try { statement.close(); } catch (SQLException e) { throw new RuntimeException(e); } } if(connection != null){ try { connection.close(); } catch (SQLException e) { throw new RuntimeException(e); } } } }- 1
- 2
- 3
- 4
- 5
- 6
- 7
- 8
- 9
- 10
- 11
- 12
- 13
- 14
- 15
- 16
- 17
- 18
- 19
- 20
- 21
- 22
- 23
- 24
- 25
- 26
- 27
- 28
- 29
- 30
- 31
- 32
- 33
- 34
- 35
- 36
- 37
- 38
- 39
- 40
- 41
- 42
- 43
- 44
- 45
- 46
- 47
- 48
- 49
- 50
- 51
- 52
- 53
- 54
- 55
3.2一篇博客
Blog.java
package model; import java.sql.Timestamp; import java.text.SimpleDateFormat; //这个类用来表示一篇博客 public class Blog { private int blogId; private String title; private String content; private int userId; private Timestamp postTime; public int getBlogId() { return blogId; } public void setBlogId(int blogId) { this.blogId = blogId; } public String getTitle() { return title; } public void setTitle(String title) { this.title = title; } public String getContent() { return content; } public void setContent(String content) { this.content = content; } public int getUserId() { return userId; } public void setUserId(int userId) { this.userId = userId; } // 把时间戳构造成格式化时间. 以 String 的方式来返回. public String getPostTime() { SimpleDateFormat simpleDateFormat = new SimpleDateFormat("yyyy-MM-dd HH:mm:ss"); return simpleDateFormat.format(this.postTime); } public void setPostTime(Timestamp postTime) { this.postTime = postTime; } }- 1
- 2
- 3
- 4
- 5
- 6
- 7
- 8
- 9
- 10
- 11
- 12
- 13
- 14
- 15
- 16
- 17
- 18
- 19
- 20
- 21
- 22
- 23
- 24
- 25
- 26
- 27
- 28
- 29
- 30
- 31
- 32
- 33
- 34
- 35
- 36
- 37
- 38
- 39
- 40
- 41
- 42
- 43
- 44
- 45
- 46
- 47
- 48
- 49
- 50
- 51
- 52
- 53
- 54
- 55
此处注意格式化时间使用了SimpleDateFormat .
3.3 用户
User.java
package model; public class User { private int userId; private String username; private String password; private int isYourBlog = 0; public int getUserId() { return userId; } public void setUserId(int userId) { this.userId = userId; } public String getUsername() { return username; } public void setUsername(String username) { this.username = username; } public String getPassword() { return password; } public void setPassword(String password) { this.password = password; } public int getIsYourBlog() { return isYourBlog; } public void setIsYourBlog(int isYourBlog) { this.isYourBlog = isYourBlog; } }- 1
- 2
- 3
- 4
- 5
- 6
- 7
- 8
- 9
- 10
- 11
- 12
- 13
- 14
- 15
- 16
- 17
- 18
- 19
- 20
- 21
- 22
- 23
- 24
- 25
- 26
- 27
- 28
- 29
- 30
- 31
- 32
- 33
- 34
- 35
- 36
- 37
- 38
- 39
- 40
- 41
注意 : 这里的isYourBlog()方法会在后面的业务逻辑代码中发挥作用 . 如删除博客时 , 如果当前的登录用户和博客作者不是同一个人 , 则没有删除权限 , 否则可以删除当前博客 .
3.4 针对博客的操作
BlogDao.java
package model; import java.sql.Connection; import java.sql.PreparedStatement; import java.sql.ResultSet; import java.sql.SQLException; import java.util.ArrayList; import java.util.List; // 针对博客要实现的功能: // 1. 新增博客 (博客编辑页) // 2. 查询出博客列表 (博客列表页) // 3. 查询出指定博客的详情 (博客详情页) // 4. 删除指定的博客 (可以在博客详情页中加入) public class BlogDao { //此处的blog对象是前端提交给后端的 /** * function : 插入博客 * @param blog */ public void insert(Blog blog){ Connection connection = null; PreparedStatement statement = null; try { //1.建立连接 connection = DBUtil.getConnection(); //2.构造SQL语句 String sql = "insert into blog values(null,?,?,?,now())"; statement = connection.prepareStatement(sql); statement.setString(1, blog.getTitle()); statement.setString(2, blog.getContent()); statement.setInt(3, blog.getUserId()); //3.执行sql int ret = statement.executeUpdate(); if (ret == 1) { System.out.println("插入成功!"); } else { System.out.println("插入失败!"); } } catch (SQLException e) { throw new RuntimeException(e); } finally { DBUtil.close(connection,statement,null); } } /** * function : 查询博客 * @return */ public List<Blog> selectAll() { Connection connection = null; PreparedStatement statement = null; ResultSet resultSet = null; List<Blog> blogs = new ArrayList<>(); try { //1.建立连接 connection = DBUtil.getConnection(); //2.构造sql语句 String sql = "select * from blog order by postTime desc"; statement = connection.prepareStatement(sql); //3.执行sql resultSet = statement.executeQuery(); //4.遍历结果集 while(resultSet.next()) { Blog blog = new Blog(); blog.setBlogId(resultSet.getInt("blogId")); blog.setTitle(resultSet.getString("title")); String content = resultSet.getString("content"); if(content.length() > 150) {//只截取部分页面进行显示即可 content = content.substring(0,150); } blog.setContent(content); blog.setUserId(resultSet.getInt("userId")); blog.setPostTime(resultSet.getTimestamp("postTime")); blogs.add(blog); } } catch (SQLException e) { throw new RuntimeException(e); } finally { DBUtil.close(connection, statement, resultSet); } return blogs; } /** * function : 根据博客作者Id查询博客 * @param blogId * @return */ public Blog selectOne(int blogId){ Connection connection = null; PreparedStatement statement = null; ResultSet resultSet = null; try { // 1. 和数据库建立连接 connection = DBUtil.getConnection(); // 2. 构造 SQL String sql = "select * from blog where blogId = ?"; statement = connection.prepareStatement(sql); statement.setInt(1, blogId); // 3. 执行 SQL resultSet = statement.executeQuery(); // 4. 遍历结果集. 由于是按照 blogId 来查询. blogId 是自增主键, 不能重复. // 此处的查询结果不可能是多条记录. 只能是 1 条或者 0 条. // 所以使用if而不是while if (resultSet.next()) { Blog blog = new Blog(); blog.setBlogId(resultSet.getInt("blogId")); blog.setTitle(resultSet.getString("title")); blog.setContent(resultSet.getString("content")); blog.setPostTime(resultSet.getTimestamp("postTime")); blog.setUserId(resultSet.getInt("userId")); return blog; } } catch (SQLException throwables) { throwables.printStackTrace(); } finally { // 5. 关闭资源 DBUtil.close(connection, statement, resultSet); } return null; } /** * function : 按照作者Id删除一篇博客 * @param blogId */ public void delete(int blogId) { Connection connection = null; PreparedStatement statement = null; try { //1.建立连接 connection = DBUtil.getConnection(); //2.构造SQL语句 String sql = "delete from blog where blogId = ?"; statement = connection.prepareStatement(sql); statement.setInt(1, blogId); int ret = statement.executeUpdate(); if (ret == 1) { System.out.println("删除成功!"); } else { System.out.println("删除失败!"); } } catch (SQLException e) { e.printStackTrace(); } finally { DBUtil.close(connection, statement, null); } } }- 1
- 2
- 3
- 4
- 5
- 6
- 7
- 8
- 9
- 10
- 11
- 12
- 13
- 14
- 15
- 16
- 17
- 18
- 19
- 20
- 21
- 22
- 23
- 24
- 25
- 26
- 27
- 28
- 29
- 30
- 31
- 32
- 33
- 34
- 35
- 36
- 37
- 38
- 39
- 40
- 41
- 42
- 43
- 44
- 45
- 46
- 47
- 48
- 49
- 50
- 51
- 52
- 53
- 54
- 55
- 56
- 57
- 58
- 59
- 60
- 61
- 62
- 63
- 64
- 65
- 66
- 67
- 68
- 69
- 70
- 71
- 72
- 73
- 74
- 75
- 76
- 77
- 78
- 79
- 80
- 81
- 82
- 83
- 84
- 85
- 86
- 87
- 88
- 89
- 90
- 91
- 92
- 93
- 94
- 95
- 96
- 97
- 98
- 99
- 100
- 101
- 102
- 103
- 104
- 105
- 106
- 107
- 108
- 109
- 110
- 111
- 112
- 113
- 114
- 115
- 116
- 117
- 118
- 119
- 120
- 121
- 122
- 123
- 124
- 125
- 126
- 127
- 128
- 129
- 130
- 131
- 132
- 133
- 134
- 135
- 136
- 137
- 138
- 139
- 140
- 141
- 142
- 143
- 144
- 145
- 146
- 147
- 148
- 149
- 150
- 151
- 152
- 153
- 154
- 155
3.5 涉及用户的操作
UserDao.java
package model; import java.sql.Connection; import java.sql.PreparedStatement; import java.sql.ResultSet; import java.sql.SQLException; import java.util.stream.StreamSupport; // 关于 User 表, 涉及到的操作 // 1. 根据用户名来查询用户信息(实现登录) // 2. 根据用户的 id 来查询用户信息 (实现获取文章) public class UserDao { /** * function : 根据用户名查询用户信息 * @param username * @return */ public User selectByName(String username){ Connection connection = null; PreparedStatement statement = null; ResultSet resultSet = null; try { connection = DBUtil.getConnection(); String sql = "select * from user where username = ? "; statement = connection.prepareStatement(sql); statement.setString(1,username); resultSet = statement.executeQuery(); if(resultSet.next()) { User user = new User(); user.setUserId(resultSet.getInt("userId")); user.setUsername(resultSet.getString("username")); user.setPassword(resultSet.getString("password")); return user; } } catch (SQLException e) { throw new RuntimeException(e); } finally { DBUtil.close(connection,statement,resultSet); } return null; } /** * function : 根据博客作者Id查询作者详细信息 * @param userId * @return */ public User selectById(int userId){ Connection connection = null; PreparedStatement statement = null; ResultSet resultSet = null; try { connection = DBUtil.getConnection(); String sql = "select * from user where userId = ? "; statement = connection.prepareStatement(sql); statement.setInt(1,userId); resultSet = statement.executeQuery(); if(resultSet.next()) { User user = new User(); user.setUserId(resultSet.getInt("userId")); user.setUsername(resultSet.getString("username")); user.setPassword(resultSet.getString("password")); return user; } } catch (SQLException e) { throw new RuntimeException(e); } finally { DBUtil.close(connection,statement,resultSet); } return null; } }- 1
- 2
- 3
- 4
- 5
- 6
- 7
- 8
- 9
- 10
- 11
- 12
- 13
- 14
- 15
- 16
- 17
- 18
- 19
- 20
- 21
- 22
- 23
- 24
- 25
- 26
- 27
- 28
- 29
- 30
- 31
- 32
- 33
- 34
- 35
- 36
- 37
- 38
- 39
- 40
- 41
- 42
- 43
- 44
- 45
- 46
- 47
- 48
- 49
- 50
- 51
- 52
- 53
- 54
- 55
- 56
- 57
- 58
- 59
- 60
- 61
- 62
- 63
- 64
- 65
- 66
- 67
- 68
- 69
- 70
- 71
- 72
- 73
- 74
- 75
接着我们编写核心的业务逻辑 , 先把前面写过的博客系统的前端代码拷贝到webapp目录下 , 启动tomcat , 就可以通过浏览器进行访问了 !


四 : 博客列表页
4.1 实现思路
希望实现:页面上显示的数据来自于数据库!- 1
实现博客列表页的关键工作 :
- 在博客列表页加载的时候 , 通过ajax访问服务器 ;
- 从服务器拿到博客列表页的详情数据(通过查数据库) ;
- 页面把拿到的数据 , 显示到界面上 .

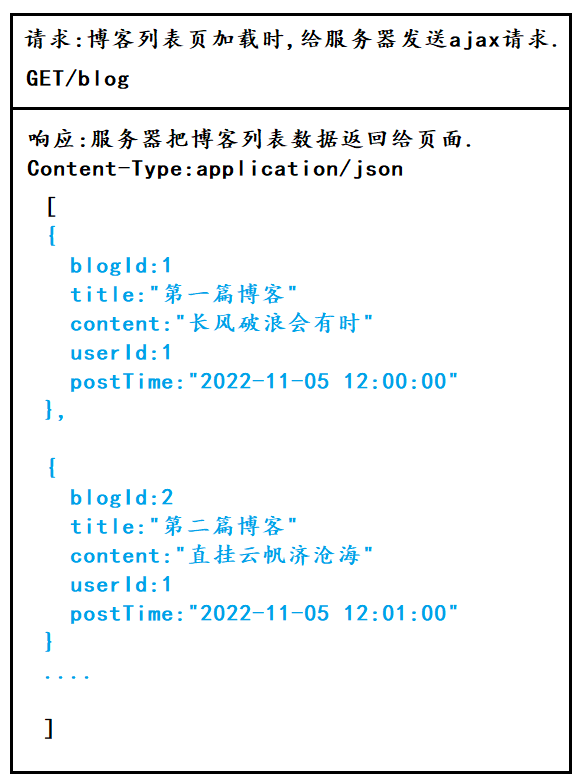
这三个步骤 , 也是我们后面编写所有业务逻辑的思路 !此处给出一种典型的接口约定方式 :
4.2 客户端代码
博客列表页加载时 , 给服务器发送ajax请求 .
<script src="https://code.jquery.com/jquery-3.6.1.min.js"></script> <script> // 通过这个函数, 来从服务器获取到博客列表的数据 function getBlogs() { $.ajax({ type: 'get', url: 'blog', success: function(body) { // 根据返回的 json 数据, 来构造出页面内容, div.blog // jquery ajax 会自动的把响应得到的 body 按照响应的 Content-Type 进行转换格式. // 如果响应的 Content-Type 是 json, 此时就会自动把 body 转成 js 的对象 let container = document.querySelector('.container-right'); for (let blog of body) { let blogDiv = document.createElement('div'); blogDiv.className = 'blog'; // 创建博客标题 let titleDiv = document.createElement('div'); titleDiv.className = 'title'; titleDiv.innerHTML = blog.title; blogDiv.appendChild(titleDiv); // 创建日期 let dateDiv = document.createElement('div'); dateDiv.className = 'date'; dateDiv.innerHTML = blog.postTime; blogDiv.appendChild(dateDiv); // 创建摘要 let descDiv = document.createElement('div'); descDiv.className = 'desc'; descDiv.innerHTML = blog.content; blogDiv.appendChild(descDiv); // 创建查看全文按钮 let a = document.createElement('a'); a.innerHTML = '查看全文 >>'; a.href = 'blog_detail.html?blogId=' + blog.blogId; blogDiv.appendChild(a); // 把 blogDiv 加入外层元素 container.appendChild(blogDiv); } } }); } // 获取博客列表 getBlogs(); </script>- 1
- 2
- 3
- 4
- 5
- 6
- 7
- 8
- 9
- 10
- 11
- 12
- 13
- 14
- 15
- 16
- 17
- 18
- 19
- 20
- 21
- 22
- 23
- 24
- 25
- 26
- 27
- 28
- 29
- 30
- 31
- 32
- 33
- 34
- 35
- 36
- 37
- 38
- 39
- 40
- 41
- 42
- 43
- 44
- 45
完整代码 :
blog_list.html
DOCTYPE html> <html lang="en"> <head> <meta charset="UTF-8"> <meta http-equiv="X-UA-Compatible" content="IE=edge"> <meta name="viewport" content="width=device-width, initial-scale=1.0"> <title>博客列表页title> <link rel="stylesheet" href="css/common.css"> <link rel="stylesheet" href="css/blog_list.css"> head> <body> <div class="nav"> <img src="image/tubiao.jpg" alt=""> <span class="title">我的博客系统span> <span class="spacer">span> <a href="blog_list.html">主页a> <a href="blog_edit.html">写博客a> <a href="logout">注销a> div> <div class="container"> <div class="container-left"> <div class="card"> <img src="image/touxiang.jpg" alt=""> <h3>白h3> <a href="#">gitee 地址a> <div class="counter"> <span>文章span> <span>分类span> div> <div class="counter"> <span>2span> <span>5span> div> div> div> <div class="container-right"> div> div> <script src="https://code.jquery.com/jquery-3.6.1.min.js">script> <script src="js/app.js">script> <script> // 通过这个函数, 来从服务器获取到博客列表的数据 function getBlogs() { $.ajax({ type: 'get', url: 'blog', success: function(body) { // 根据返回的 json 数据, 来构造出页面内容, div.blog // jquery ajax 会自动的把响应得到的 body 按照响应的 Content-Type 进行转换格式. // 如果响应的 Content-Type 是 json, 此时就会自动把 body 转成 js 的对象 let container = document.querySelector('container-right'); for (let blog of body) { let blogDiv = document.createElement('div'); blogDiv.className = 'blog'; // 创建博客标题 let titleDiv = document.createElement('div'); titleDiv.className = 'title'; titleDiv.innerHTML = blog.title; blogDiv.appendChild(titleDiv); // 创建日期 let dateDiv = document.createElement('div'); dateDiv.className = 'date'; dateDiv.innerHTML = blog.postTime; blogDiv.appendChild(dateDiv); // 创建摘要 let descDiv = document.createElement('div'); descDiv.className = 'desc'; descDiv.innerHTML = blog.content; blogDiv.appendChild(descDiv); // 创建查看全文按钮 let a = document.createElement('a'); a.innerHTML = '查看全文 >>'; a.href = 'blog_detail.html?blogId=' + blog.blogId; blogDiv.appendChild(a); // 把 blogDiv 加入外层元素 container.appendChild(blogDiv); } } }); } // 获取博客列表 getBlogs(); script> body> html>- 1
- 2
- 3
- 4
- 5
- 6
- 7
- 8
- 9
- 10
- 11
- 12
- 13
- 14
- 15
- 16
- 17
- 18
- 19
- 20
- 21
- 22
- 23
- 24
- 25
- 26
- 27
- 28
- 29
- 30
- 31
- 32
- 33
- 34
- 35
- 36
- 37
- 38
- 39
- 40
- 41
- 42
- 43
- 44
- 45
- 46
- 47
- 48
- 49
- 50
- 51
- 52
- 53
- 54
- 55
- 56
- 57
- 58
- 59
- 60
- 61
- 62
- 63
- 64
- 65
- 66
- 67
- 68
- 69
- 70
- 71
- 72
- 73
- 74
- 75
- 76
- 77
- 78
- 79
- 80
- 81
- 82
- 83
- 84
- 85
- 86
- 87
- 88
- 89
- 90
- 91
- 92
- 93
- 94
- 95
- 96
- 97
- 98
- 99
- 100
- 101
- 102
- 103
- 104
4.3 服务器代码
编写后端代码
访问服务器获取到数据,把数据返回给页面.- 1
blogServlet.java
package controller; import com.fasterxml.jackson.databind.ObjectMapper; import model.Blog; import model.BlogDao; import model.User; import javax.servlet.ServletException; import javax.servlet.annotation.WebServlet; import javax.servlet.http.HttpServlet; import javax.servlet.http.HttpServletRequest; import javax.servlet.http.HttpServletResponse; import javax.servlet.http.HttpSession; import java.io.IOException; import java.util.List; @WebServlet("/blog") public class BlogServlet extends HttpServlet { private ObjectMapper objectMapper = new ObjectMapper(); @Override protected void doGet(HttpServletRequest req, HttpServletResponse resp) throws ServletException, IOException { resp.setContentType("application/json;charset=utf8"); BlogDao blogDao = new BlogDao(); List<Blog> blogs = blogDao.selectAll();//查询所有博客 String jsonString = objectMapper.writeValueAsString(blogs); resp.getWriter().write(jsonString); } }- 1
- 2
- 3
- 4
- 5
- 6
- 7
- 8
- 9
- 10
- 11
- 12
- 13
- 14
- 15
- 16
- 17
- 18
- 19
- 20
- 21
- 22
- 23
- 24
- 25
- 26
- 27
- 28
- 29

查看数据库中现有的博客 :

启动tomcat服务器 , 查看运行效果 :
五 : 博客详情页
5.1 实现思路
希望实现,点击查看全文,跳转到博客详情页,并显示博客的全貌.- 1
具体 : 先让页面跳转到博客详情页 , 在跳转过程中 , 给url带上当前要获取的博客id . 在blog_detail.html页面中 , 通过ajax从服务器获取到博客详情内容 .
约定前后端交互接口 :

5.2 服务器代码
blogServlet.java
package controller; import com.fasterxml.jackson.databind.ObjectMapper; import model.Blog; import model.BlogDao; import model.User; import javax.servlet.ServletException; import javax.servlet.annotation.WebServlet; import javax.servlet.http.HttpServlet; import javax.servlet.http.HttpServletRequest; import javax.servlet.http.HttpServletResponse; import javax.servlet.http.HttpSession; import java.io.IOException; import java.util.List; @WebServlet("/blog") public class BlogServlet extends HttpServlet { private ObjectMapper objectMapper = new ObjectMapper(); @Override protected void doGet(HttpServletRequest req, HttpServletResponse resp) throws ServletException, IOException { resp.setContentType("application/json;charset=utf8"); String blogId = req.getParameter("blogId"); BlogDao blogDao = new BlogDao(); if (blogId == null) { // 不存在 blogId 这个参数, 这就是获取博客列表. List<Blog> blogs = blogDao.selectAll(); String jsonString = objectMapper.writeValueAsString(blogs); resp.getWriter().write(jsonString); } else { // 存在 blogId 参数, 就是获取博客详情. Blog blog = blogDao.selectOne(Integer.parseInt(blogId)); String jsonString = objectMapper.writeValueAsString(blog); resp.getWriter().write(jsonString); } } }- 1
- 2
- 3
- 4
- 5
- 6
- 7
- 8
- 9
- 10
- 11
- 12
- 13
- 14
- 15
- 16
- 17
- 18
- 19
- 20
- 21
- 22
- 23
- 24
- 25
- 26
- 27
- 28
- 29
- 30
- 31
- 32
- 33
- 34
- 35
- 36
- 37
- 38

5.3 客户端代码
<script src="https://code.jquery.com/jquery-3.6.1.min.js"></script> <script> function getBlog() { $.ajax({ type:'get', url:'blog' + location.search, success : function(body) { // body 就是得到的一个 json 格式的 博客数据. 由于响应的 Content-Type 是 application/json // 因此 jquery 就会自动把响应数据转成 js 对象. let h3 = document.querySelector('.blog-content h3'); h3.innerHTML = body.title; let divDate = document.querySelector('.blog-content .date'); divDate.innerHTML = body.postTime; let divContent = document.querySelector('#content'); divContent.innerHTML = body.content; } }); } //在页面加载之后,要调用代码 getBlog();- 1
- 2
- 3
- 4
- 5
- 6
- 7
- 8
- 9
- 10
- 11
- 12
- 13
- 14
- 15
- 16
- 17
- 18
- 19
- 20
- 21

此处代码还需改进 . 博客编辑页,是一个matkdown格式的数据!就希望当获取到博客详情页的时候 , 也能按照markdown来渲染 ! 如"#一级标题" , 应该被渲染为大字号的"一级标题" ,而不是显示 “#一级标题” . 改进后代码如下 :<script src="https://code.jquery.com/jquery-3.6.1.min.js"></script> <script src="js/app.js"></script> <script> function getBlog() { $.ajax({ type:'get', url:'blog' + location.search, success : function(body) { // body 就是得到的一个 json 格式的 博客数据. 由于响应的 Content-Type 是 application/json // 因此 jquery 就会自动把响应数据转成 js 对象. let h3 = document.querySelector('.blog-content h3'); h3.innerHTML = body.title; let divDate = document.querySelector('.blog-content .date'); divDate.innerHTML = body.postTime; //直接把正文内容设置到innerHTML中 //let divContent = document.querySelector('#content'); //divContent.innerHTML = body.content; //正确做法是进行渲染. editormd.markdownToHTML('content',{ markdown : body.content }); } }); } </script>- 1
- 2
- 3
- 4
- 5
- 6
- 7
- 8
- 9
- 10
- 11
- 12
- 13
- 14
- 15
- 16
- 17
- 18
- 19
- 20
- 21
- 22
- 23
- 24
- 25

实现效果 :
六 : 博客登录页
6.1 实现思路
希望实现 : 输入用户名和密码 , 成功登录 !- 1
约定前后端交互接口 :

6.2服务器代码
LoginServlet.java
package controller; import model.User; import model.UserDao; import javax.servlet.ServletException; import javax.servlet.annotation.WebServlet; import javax.servlet.http.HttpServlet; import javax.servlet.http.HttpServletRequest; import javax.servlet.http.HttpServletResponse; import javax.servlet.http.HttpSession; import java.io.IOException; @WebServlet("/login") public class LoginServlet extends HttpServlet { @Override protected void doPost(HttpServletRequest req, HttpServletResponse resp) throws ServletException, IOException { //告诉服务器如何解析请求 req.setCharacterEncoding("utf8"); //1.从请求中拿到用户名和密码 String username = req.getParameter("username"); String password = req.getParameter("password"); if(username == null || password == null || username.equals("") || password.equals("")) { resp.setContentType("text/html;charset=utf8"); resp.getWriter().write("用户名或密码错误!"); return; } //2.查询数据库,看用户名和密码是否匹配 UserDao userDao = new UserDao(); User user = userDao.selectByName(username); if(user == null) { //用户不存在 resp.setContentType("text/html;charset=utf8"); resp.getWriter().write("用户名或密码错误!"); return; } if(!user.getPassword().equals(password)) { //密码错误 resp.setContentType("text/html;charset=utf8"); resp.getWriter().write("用户名或密码错误!"); return; } //3.登录成功,构造会话 HttpSession session = req.getSession(true); //把获取到的user对象存到session里 session.setAttribute("user",user); //4.返回重定向报文,跳转到博客列表页 resp.sendRedirect("blog_list.html"); } }- 1
- 2
- 3
- 4
- 5
- 6
- 7
- 8
- 9
- 10
- 11
- 12
- 13
- 14
- 15
- 16
- 17
- 18
- 19
- 20
- 21
- 22
- 23
- 24
- 25
- 26
- 27
- 28
- 29
- 30
- 31
- 32
- 33
- 34
- 35
- 36
- 37
- 38
- 39
- 40
- 41
- 42
- 43
- 44
- 45
- 46
- 47
- 48
- 49
- 50
- 51
- 52
- 53
- 54
6.3 客户端代码
blog_login.html
DOCTYPE html> <html lang="en"> <head> <meta charset="UTF-8"> <meta http-equiv="X-UA-Compatible" content="IE=edge"> <meta name="viewport" content="width=device-width, initial-scale=1.0"> <title>登录页title> <link rel="stylesheet" href="css/common.css"> <link rel="stylesheet" href="css/blog_login.css"> head> <body> <div class="nav"> <img src="image/tubiao.jpg" alt=""> <sapn class="title">我的博客系统sapn> <span class="sapcer">span> <a href="blog_list.html">主页a> <a href="blog_edit.html">编辑页a> div> <div class="login-container"> <div class="login-dialog"> <form action="login" method="post"> <h3>登录h3> <div class="row"> <span>用户名span> <input type="text" id="username" name="username"> div> <div class="row"> <span>密码span> <input type="password" id="password" name="password"> div> <div class="row"> <input type="submit" value="提交" id="submit"> div> form> div> div> body> html>- 1
- 2
- 3
- 4
- 5
- 6
- 7
- 8
- 9
- 10
- 11
- 12
- 13
- 14
- 15
- 16
- 17
- 18
- 19
- 20
- 21
- 22
- 23
- 24
- 25
- 26
- 27
- 28
- 29
- 30
- 31
- 32
- 33
- 34
- 35
- 36
- 37
- 38
- 39
- 40
- 41
- 42
- 43
- 44
- 45
- 46
- 47

注意字符集的设置 , 这是必不可少的 :

实现效果 :
如果用户名或密码错误 :

如果用户名和密码都正确 :

七 : 强制用户登录
7.1 实现思路
希望实现在博客列表页/博客详情页里 , 访问页面时验证用户的登录状态 , 如果已登录 , 运行访问 , 即不进行任何操作 ; 如果未登录 , 则强制跳转到博客登录界面 !!!!- 1
约定前后端交互接口 :

7.2 服务器代码
protected void doGet(HttpServletRequest req, HttpServletResponse resp) throws ServletException, IOException { //验证登录状态 HttpSession session = req.getSession(false); if(session == null) { //未登录,直接设置状态码为403 resp.setStatus(403); return; } User user = (User)session.getAttribute("user"); if(user == null) { //未登录,直接设置状态码为403 resp.setStatus(403); return; } //已登录 resp.setStatus(200); }- 1
- 2
- 3
- 4
- 5
- 6
- 7
- 8
- 9
- 10
- 11
- 12
- 13
- 14
- 15
- 16
- 17
完整代码 :
LoginServlet.java
package controller; import model.User; import model.UserDao; import javax.servlet.ServletException; import javax.servlet.annotation.WebServlet; import javax.servlet.http.HttpServlet; import javax.servlet.http.HttpServletRequest; import javax.servlet.http.HttpServletResponse; import javax.servlet.http.HttpSession; import java.io.IOException; @WebServlet("/login") public class LoginServlet extends HttpServlet { @Override protected void doPost(HttpServletRequest req, HttpServletResponse resp) throws ServletException, IOException { //告诉服务器如何解析请求 req.setCharacterEncoding("utf8"); //1.从请求中拿到用户名和密码 String username = req.getParameter("username"); String password = req.getParameter("password"); if(username == null || password == null || username.equals("") || password.equals("")) { resp.setContentType("text/html;charset=utf8"); resp.getWriter().write("用户名或密码错误!"); return; } //2.查询数据库,看用户名和密码是否匹配 UserDao userDao = new UserDao(); User user = userDao.selectByName(username); if(user == null) { //用户不存在 resp.setContentType("text/html;charset=utf8"); resp.getWriter().write("用户名或密码错误!"); return; } if(!user.getPassword().equals(password)) { //密码错误 resp.setContentType("text/html;charset=utf8"); resp.getWriter().write("用户名或密码错误!"); return; } //3.登录成功,构造会话 HttpSession session = req.getSession(true); //把获取到的user对象存到session里 session.setAttribute("user",user); //4.返回重定向报文,跳转到博客列表页 resp.sendRedirect("blog_list.html"); } @Override protected void doGet(HttpServletRequest req, HttpServletResponse resp) throws ServletException, IOException { //验证登录状态 HttpSession session = req.getSession(false); if(session == null) { //未登录,直接设置状态码为403 resp.setStatus(403); return; } User user = (User)session.getAttribute("user"); if(user == null) { //未登录,直接设置状态码为403 resp.setStatus(403); return; } //已登录 resp.setStatus(200); } }- 1
- 2
- 3
- 4
- 5
- 6
- 7
- 8
- 9
- 10
- 11
- 12
- 13
- 14
- 15
- 16
- 17
- 18
- 19
- 20
- 21
- 22
- 23
- 24
- 25
- 26
- 27
- 28
- 29
- 30
- 31
- 32
- 33
- 34
- 35
- 36
- 37
- 38
- 39
- 40
- 41
- 42
- 43
- 44
- 45
- 46
- 47
- 48
- 49
- 50
- 51
- 52
- 53
- 54
- 55
- 56
- 57
- 58
- 59
- 60
- 61
- 62
- 63
- 64
- 65
- 66
- 67
- 68
- 69
- 70
- 71
- 72
- 73
7.3 客户端代码
function checkLogin() { $.ajax({ type:'get', url:'login', success:function(body) { }, error:function(){ //403强制跳转到登录页面 location.assign('blog_login.html'); } }); }- 1
- 2
- 3
- 4
- 5
- 6
- 7
- 8
- 9
- 10
- 11
- 12
- 13
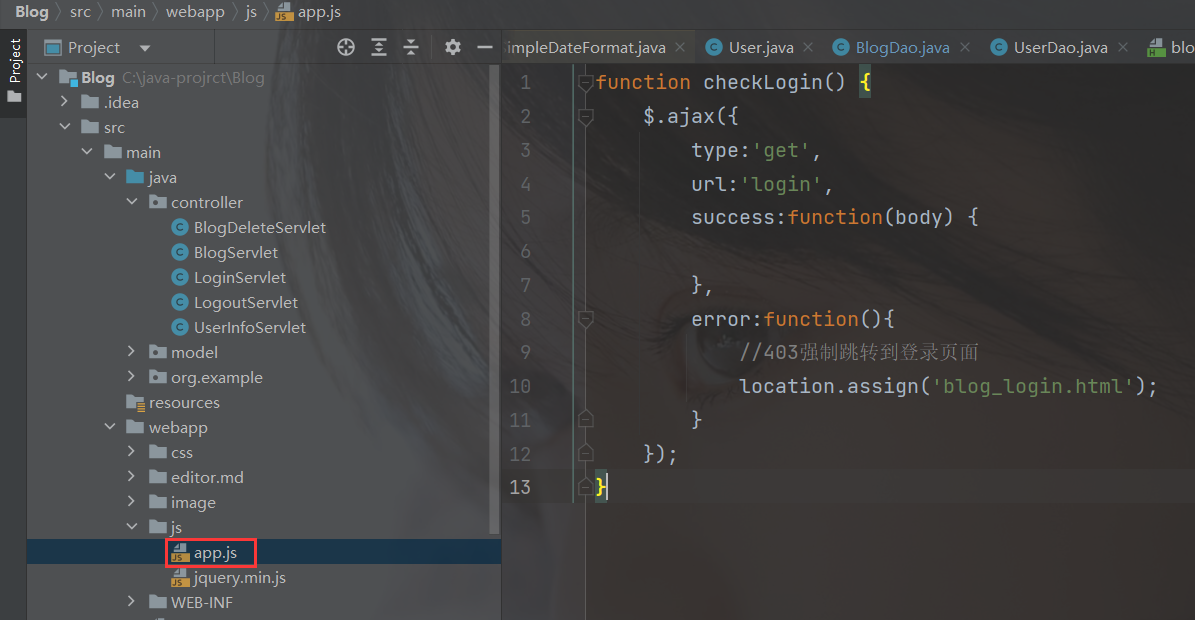
因为在博客列表页/博客详情页里都要用到这一功能 , 且代码完全相同 , 所以将这部分代码写到一个单独的js文件中 , 并在博客列表页和博客详情页的代码中进行引用即可 . 添加这行代码即可 :

此时重启tomcat服务器 , 并访问博客列表页 , 会强制跳转到博客登录页 , 效果如下 :

抓个包 , 看看访问博客列表页时 , 会触发哪些请求 :


此时一登录 , 即跳转到博客列表页 .

八 : 页面显示用户信息
8.1 实现思路
希望实现 , 动态获取当前页面的用户信息 !- 1

也就是这部分内容 ! 先实现动态获取用户名 !
- 如果是博客列表页 , 此处显示当前登录的用户信息 ;
- 如果是博客详情页 , 次出现时文章的作者 . 如 , 罗翔登录 , 博客列表页就显示"罗翔" ; 罗翔查看张三的文章 , 那么博客详情页就显示"张三" .
约定前后端交互接口 :

8.2 客户端代码
博客列表页 :
// 获取当前用户的信息 function getUserInfo() { $.ajax({ type: 'get', url: 'userInfo', success: function (body) { // 让后端在查询失败的时候, 不要返回 200 , 而是返回 403 . // 避免在前端触发 success 分支. let h3 = document.querySelector('.card h3'); h3.innerHTML = body.username; } }); } getUserInfo();- 1
- 2
- 3
- 4
- 5
- 6
- 7
- 8
- 9
- 10
- 11
- 12
- 13
- 14
- 15
完整代码 :
blog_list.html
DOCTYPE html> <html lang="en"> <head> <meta charset="UTF-8"> <meta http-equiv="X-UA-Compatible" content="IE=edge"> <meta name="viewport" content="width=device-width, initial-scale=1.0"> <title>博客列表页title> <link rel="stylesheet" href="css/common.css"> <link rel="stylesheet" href="css/blog_list.css"> head> <body> <div class="nav"> <img src="image/tubiao.jpg" alt=""> <span class="title">我的博客系统span> <span class="spacer">span> <a href="blog_list.html">主页a> <a href="blog_edit.html">写博客a> <a href="logout">注销a> div> <div class="container"> <div class="container-left"> <div class="card"> <img src="image/touxiang.jpg" alt=""> <h3>白h3> <a href="#">gitee 地址a> <div class="counter"> <span>文章span> <span>分类span> div> <div class="counter"> <span>2span> <span>5span> div> div> div> <div class="container-right"> div> div> <script src="https://code.jquery.com/jquery-3.6.1.min.js">script> <script src="js/app.js">script> <script> // 通过这个函数, 来从服务器获取到博客列表的数据 function getBlogs() { $.ajax({ type: 'get', url: 'blog', success: function(body) { // 根据返回的 json 数据, 来构造出页面内容, div.blog // jquery ajax 会自动的把响应得到的 body 按照响应的 Content-Type 进行转换格式. // 如果响应的 Content-Type 是 json, 此时就会自动把 body 转成 js 的对象 let container = document.querySelector('container-right'); for (let blog of body) { let blogDiv = document.createElement('div'); blogDiv.className = 'blog'; // 创建博客标题 let titleDiv = document.createElement('div'); titleDiv.className = 'title'; titleDiv.innerHTML = blog.title; blogDiv.appendChild(titleDiv); // 创建日期 let dateDiv = document.createElement('div'); dateDiv.className = 'date'; dateDiv.innerHTML = blog.postTime; blogDiv.appendChild(dateDiv); // 创建摘要 let descDiv = document.createElement('div'); descDiv.className = 'desc'; descDiv.innerHTML = blog.content; blogDiv.appendChild(descDiv); // 创建查看全文按钮 let a = document.createElement('a'); a.innerHTML = '查看全文 >>'; a.href = 'blog_detail.html?blogId=' + blog.blogId; blogDiv.appendChild(a); // 把 blogDiv 加入外层元素 container.appendChild(blogDiv); } } }); } // 获取博客列表 getBlogs(); // 检查登录状态 checkLogin(); // 获取当前用户的信息 function getUserInfo() { $.ajax({ type: 'get', url: 'userInfo', success: function (body) { // 让后端在查询失败的时候, 不要返回 200 , 而是返回 403 . // 避免在前端触发 success 分支. let h3 = document.querySelector('.card h3'); h3.innerHTML = body.username; } }); } getUserInfo(); script> body> html>- 1
- 2
- 3
- 4
- 5
- 6
- 7
- 8
- 9
- 10
- 11
- 12
- 13
- 14
- 15
- 16
- 17
- 18
- 19
- 20
- 21
- 22
- 23
- 24
- 25
- 26
- 27
- 28
- 29
- 30
- 31
- 32
- 33
- 34
- 35
- 36
- 37
- 38
- 39
- 40
- 41
- 42
- 43
- 44
- 45
- 46
- 47
- 48
- 49
- 50
- 51
- 52
- 53
- 54
- 55
- 56
- 57
- 58
- 59
- 60
- 61
- 62
- 63
- 64
- 65
- 66
- 67
- 68
- 69
- 70
- 71
- 72
- 73
- 74
- 75
- 76
- 77
- 78
- 79
- 80
- 81
- 82
- 83
- 84
- 85
- 86
- 87
- 88
- 89
- 90
- 91
- 92
- 93
- 94
- 95
- 96
- 97
- 98
- 99
- 100
- 101
- 102
- 103
- 104
- 105
- 106
- 107
- 108
- 109
- 110
- 111
- 112
- 113
- 114
- 115
- 116
- 117
- 118
- 119
- 120
- 121
- 122
- 123
博客详情页 :
//获取用户信息 function getUserInfo() { $.ajax({ type: 'get', url: 'userInfo' + location.search, success: function (body) { // 让后端在查询失败的时候, 不要返回 200 , 而是返回 403 . // 避免在前端触发 success 分支. let h3 = document.querySelector('.card h3'); h3.innerHTML = body.username; } }); } getUserInfo();- 1
- 2
- 3
- 4
- 5
- 6
- 7
- 8
- 9
- 10
- 11
- 12
- 13
- 14
8.3 服务器代码
package controller; import com.fasterxml.jackson.databind.ObjectMapper; import model.Blog; import model.BlogDao; import model.User; import model.UserDao; import javax.servlet.ServletException; import javax.servlet.annotation.WebServlet; import javax.servlet.http.HttpServlet; import javax.servlet.http.HttpServletRequest; import javax.servlet.http.HttpServletResponse; import javax.servlet.http.HttpSession; import java.io.IOException; /* * 动态显示页面用户信息 * */ @WebServlet("/userInfo") public class UserInfoServlet extends HttpServlet { private ObjectMapper objectMapper = new ObjectMapper(); @Override protected void doGet(HttpServletRequest req, HttpServletResponse resp) throws ServletException, IOException { String blogId = req.getParameter("blogId"); // 先获取一下当前是哪个用户登录的 HttpSession session = req.getSession(false); if (session == null) { resp.setStatus(403); resp.setContentType("text/html;charset=utf8"); resp.getWriter().write("当前未登录!"); return; } User user = (User) session.getAttribute("user"); if (user == null) { resp.setStatus(403); resp.setContentType("text/html;charset=utf8"); resp.getWriter().write("当前未登录!"); return; } if (blogId == null) { // 请求来自博客列表页, 直接返回登录的用户信息. user.setPassword("");//密码不要进行传输 resp.setContentType("application/json; charset=utf8"); String jsonString = objectMapper.writeValueAsString(user); resp.getWriter().write(jsonString); } else { // 请求来自博客详情页, 返回文章作者信息. BlogDao blogDao = new BlogDao(); Blog blog = blogDao.selectOne(Integer.parseInt(blogId)); if (blog == null) { resp.setStatus(403); resp.setContentType("text/html;charset=utf8"); resp.getWriter().write("当前 blogId 有误!"); return; } UserDao userDao = new UserDao(); // author 是博客的作者 User author = userDao.selectById(blog.getUserId()); if (author == null) { resp.setStatus(403); resp.setContentType("text/html;charset=utf8"); resp.getWriter().write("未找到当前博客对应的作者!"); return; } author.setPassword(""); resp.setContentType("application/json; charset=utf8"); String jsonString = objectMapper.writeValueAsString(author); resp.getWriter().write(jsonString); } } }- 1
- 2
- 3
- 4
- 5
- 6
- 7
- 8
- 9
- 10
- 11
- 12
- 13
- 14
- 15
- 16
- 17
- 18
- 19
- 20
- 21
- 22
- 23
- 24
- 25
- 26
- 27
- 28
- 29
- 30
- 31
- 32
- 33
- 34
- 35
- 36
- 37
- 38
- 39
- 40
- 41
- 42
- 43
- 44
- 45
- 46
- 47
- 48
- 49
- 50
- 51
- 52
- 53
- 54
- 55
- 56
- 57
- 58
- 59
- 60
- 61
- 62
- 63
- 64
- 65
- 66
- 67
- 68
- 69
- 70
- 71
- 72
- 73
- 74
- 75
此时查看数据库中的用户 :

为验证代码逻辑 , 我们添加一名用户 , 并以该用户身份登录 , 查看别人写的文章 :
重新登录 :


这篇文章的作者是"白" .
如何更换头像呢 ? 可以自己写两个Servlet , 一个负责图片的上传 , 上传成功后保存在指定的目录 , 并修改数据库 ; 另一个负责获取图片信息 . 也可以通过第三方图床提供的API , 比如阿里的oss…
如何修改文章和分类呢 ? 为简单起见 , 此处设置分类恒定为1 , 仅对文章数量进行动态获取 . 三步走战略 :
约定前后端交互接口 :

客户端代码 :首先在span中添加id属性 :
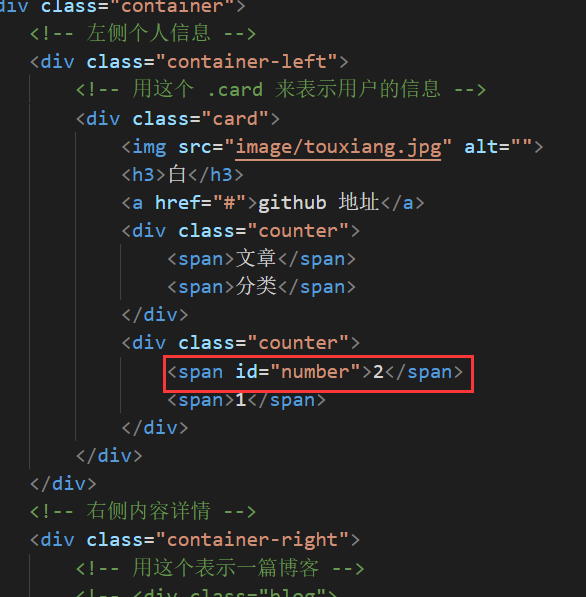
然后在blog_list.html和blog_detail.html文件里添加下列代码 :
//获取博客数量 function getArticles(){ $.ajax({ type:"get", url:'article', success:function(body){ console.log(body); let article = document.querySelector('#number'); article.innerHTML = body; } }); } getArticles();- 1
- 2
- 3
- 4
- 5
- 6
- 7
- 8
- 9
- 10
- 11
- 12
- 13
- 14
服务器代码 :
在BlogDao中添加一个函数 , 用于从数据库中获取博客数量 :
public int countBlog(){ Connection connection = null; PreparedStatement statement = null; ResultSet resultSet = null; try { //1.建立连接 connection = DBUtil.getConnection(); //2.构造SQL语句 String sql = "select * from blog "; statement = connection.prepareStatement(sql); //3.执行sql resultSet = statement.executeQuery(); //4.返回记录条数 int count = 0; while(resultSet.next()){ count++; } return count; } catch (SQLException e) { throw new RuntimeException(e); } finally { DBUtil.close(connection, statement, resultSet); } }- 1
- 2
- 3
- 4
- 5
- 6
- 7
- 8
- 9
- 10
- 11
- 12
- 13
- 14
- 15
- 16
- 17
- 18
- 19
- 20
- 21
- 22
- 23
- 24
package controller; import model.BlogDao; import javax.servlet.ServletException; import javax.servlet.annotation.WebServlet; import javax.servlet.http.HttpServlet; import javax.servlet.http.HttpServletRequest; import javax.servlet.http.HttpServletResponse; import java.io.IOException; @WebServlet("/article") public class ArticleServlet extends HttpServlet { @Override protected void doGet(HttpServletRequest req, HttpServletResponse resp) throws ServletException, IOException { BlogDao blogDao = new BlogDao(); int num = blogDao.countBlog(); String numStr = Integer.toString(num); resp.getWriter().write(numStr); } }- 1
- 2
- 3
- 4
- 5
- 6
- 7
- 8
- 9
- 10
- 11
- 12
- 13
- 14
- 15
- 16
- 17
- 18
- 19
- 20
- 21
- 22
实现效果 :
当前共5篇文章 , 文章数显示为5 :

增加一篇博客 :

文章数同步更新 !
九 : 注销
9.1 实现思路
希望实现清除当前用户的登录转台(删除会话) , 跳转到博客登录页 .- 1
约定前后端交互接口 :

9.2 服务器代码
LogoutServlet.java
package controller; import javax.servlet.ServletException; import javax.servlet.annotation.WebServlet; import javax.servlet.http.HttpServlet; import javax.servlet.http.HttpServletRequest; import javax.servlet.http.HttpServletResponse; import javax.servlet.http.HttpSession; import java.io.IOException; /* * 实现注销 */ @WebServlet("/logout") public class LogoutServlet extends HttpServlet { @Override protected void doGet(HttpServletRequest req, HttpServletResponse resp) throws ServletException, IOException { // 注销要做的是删除用户的会话信息. 因此就得先确认用户有没有会话. // req 对象没有直接提供一个 删除会话 的操作~~ // 此处做法是 , 保留会话对象 , 但是把会话里的 user 给删了. HttpSession session = req.getSession(false); if(session == null) { resp.setStatus(403); resp.sendRedirect("blog_login.html"); } session.removeAttribute("user"); resp.sendRedirect("blog_login.html"); } }- 1
- 2
- 3
- 4
- 5
- 6
- 7
- 8
- 9
- 10
- 11
- 12
- 13
- 14
- 15
- 16
- 17
- 18
- 19
- 20
- 21
- 22
- 23
- 24
- 25
- 26
- 27
- 28
- 29
- 30

9.3 客户端代码
直接通过a标签实现即可 !!

查看效果 :
十 : 发布博客
10.1 实现思路
希望实现在博客编辑页点击发布文章,文章就成功发布,即可以在存储在数据库中同时被博客列表页看到.- 1
约定前后端交互接口 :

10.2 客户端代码
blog_edit.html
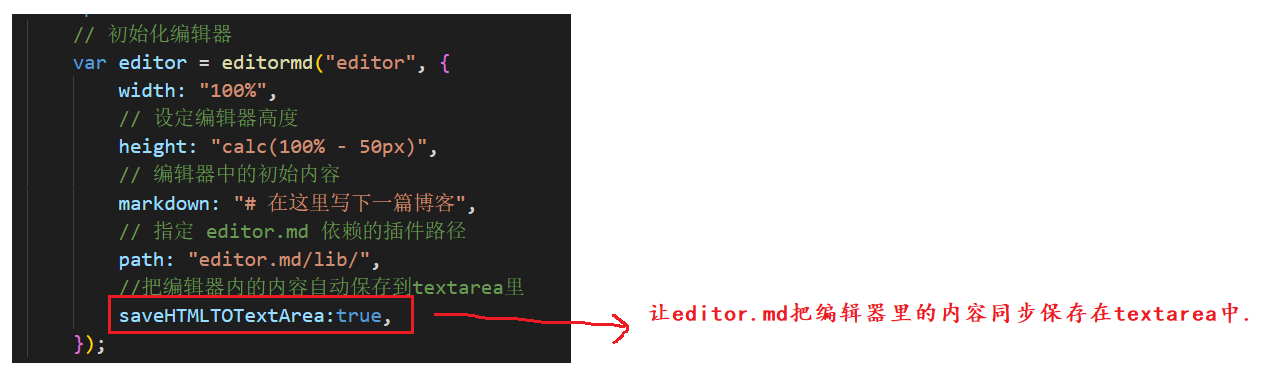
DOCTYPE html> <html lang="en"> <head> <meta charset="UTF-8"> <meta http-equiv="X-UA-Compatible" content="IE=edge"> <meta name="viewport" content="width=device-width, initial-scale=1.0"> <title>博客编辑页title> <link rel="stylesheet" href="css/common.css"> <link rel="stylesheet" href="css/blog_edit.css"> <link rel="stylesheet" href="editor.md/css/editormd.min.css" /> <script src="js/jquery.min.js">script> <script src="editor.md/lib/marked.min.js">script> <script src="editor.md/lib/prettify.min.js">script> <script src="editor.md/editormd.js">script> head> <body> <div class="nav"> <img src="image/tubiao.jpg" alt=""> <span class="title">我的博客系统span> <span class="spacer">span> <a href="blog_list.html">主页a> <a href="blog_edit.html">编辑页a> <a href="logout">注销a> div> <div class="blog-edit-container"> <form action="blog" method="post" style="height:100%"> <div class="title"> <input type="text" id="title" placeholder="请输入文章标题" name="title"> <input type="submit" id="submit" value="发布文章"> div> <div id="editor"> <textarea name="content" style="display: none;" >textarea> div> form> div> <script> // 初始化编辑器 var editor = editormd("editor", { width: "100%", // 设定编辑器高度 height: "calc(100% - 50px)", // 编辑器中的初始内容 markdown: "# 在这里写下一篇博客", // 指定 editor.md 依赖的插件路径 path: "editor.md/lib/", //把编辑器内的内容自动保存到textarea里 saveHTMLTOTextArea:true, }); script> body> html>- 1
- 2
- 3
- 4
- 5
- 6
- 7
- 8
- 9
- 10
- 11
- 12
- 13
- 14
- 15
- 16
- 17
- 18
- 19
- 20
- 21
- 22
- 23
- 24
- 25
- 26
- 27
- 28
- 29
- 30
- 31
- 32
- 33
- 34
- 35
- 36
- 37
- 38
- 39
- 40
- 41
- 42
- 43
- 44
- 45
- 46
- 47
- 48
- 49
- 50
- 51
- 52
- 53
- 54
- 55
- 56
- 57
- 58
- 59
- 60
- 61

10.3 服务器代码
拿到请求中的博客数据同时写入数据库 !
@Override protected void doPost(HttpServletRequest req, HttpServletResponse resp) throws ServletException, IOException { req.setCharacterEncoding("utf8"); // 1. 获取到用户的登录状态. HttpSession session = req.getSession(false); if (session == null) { resp.setStatus(403); return; } User user = (User) session.getAttribute("user"); if (user == null) { resp.setStatus(403); return; } // 2. 读取请求的内容 String title = req.getParameter("title"); String content = req.getParameter("content"); if (title == null || title.equals("") || content == null || content.equals("")) { resp.setStatus(400); resp.setContentType("text/html; charset=utf8"); resp.getWriter().write("请求中的标题或正文不完整!"); return; } // 3. 构造 Blog 对象, 并插入到数据库中. Blog blog = new Blog(); blog.setTitle(title); blog.setContent(content); blog.setUserId(user.getUserId()); BlogDao blogDao = new BlogDao(); blogDao.insert(blog); // 4. 插入成功之后, 跳转到博客列表页. resp.sendRedirect("blog_list.html"); }- 1
- 2
- 3
- 4
- 5
- 6
- 7
- 8
- 9
- 10
- 11
- 12
- 13
- 14
- 15
- 16
- 17
- 18
- 19
- 20
- 21
- 22
- 23
- 24
- 25
- 26
- 27
- 28
- 29
- 30
- 31
- 32
- 33
完整代码 :
BlogServlet.java
package controller; import com.fasterxml.jackson.databind.ObjectMapper; import model.Blog; import model.BlogDao; import model.User; import javax.servlet.ServletException; import javax.servlet.annotation.WebServlet; import javax.servlet.http.HttpServlet; import javax.servlet.http.HttpServletRequest; import javax.servlet.http.HttpServletResponse; import javax.servlet.http.HttpSession; import java.io.IOException; import java.util.List; @WebServlet("/blog") public class BlogServlet extends HttpServlet { private ObjectMapper objectMapper = new ObjectMapper(); @Override protected void doGet(HttpServletRequest req, HttpServletResponse resp) throws ServletException, IOException { resp.setContentType("application/json;charset=utf8"); String blogId = req.getParameter("blogId"); BlogDao blogDao = new BlogDao(); if (blogId == null) { // 不存在 blogId 这个参数, 这就是获取博客列表. List<Blog> blogs = blogDao.selectAll(); String jsonString = objectMapper.writeValueAsString(blogs); resp.getWriter().write(jsonString); } else { // 存在 blogId 参数, 就是获取博客详情. Blog blog = blogDao.selectOne(Integer.parseInt(blogId)); String jsonString = objectMapper.writeValueAsString(blog); resp.getWriter().write(jsonString); } } @Override protected void doPost(HttpServletRequest req, HttpServletResponse resp) throws ServletException, IOException { req.setCharacterEncoding("utf8"); // 1. 获取到用户的登录状态. HttpSession session = req.getSession(false); if (session == null) { resp.setStatus(403); return; } User user = (User) session.getAttribute("user"); if (user == null) { resp.setStatus(403); return; } // 2. 读取请求的内容 String title = req.getParameter("title"); String content = req.getParameter("content"); if (title == null || title.equals("") || content == null || content.equals("")) { resp.setStatus(400); resp.setContentType("text/html; charset=utf8"); resp.getWriter().write("请求中的标题或正文不完整!"); return; } // 3. 构造 Blog 对象, 并插入到数据库中. Blog blog = new Blog(); blog.setTitle(title); blog.setContent(content); blog.setUserId(user.getUserId()); BlogDao blogDao = new BlogDao(); blogDao.insert(blog); // 4. 插入成功之后, 跳转到博客列表页. resp.sendRedirect("blog_list.html"); } }- 1
- 2
- 3
- 4
- 5
- 6
- 7
- 8
- 9
- 10
- 11
- 12
- 13
- 14
- 15
- 16
- 17
- 18
- 19
- 20
- 21
- 22
- 23
- 24
- 25
- 26
- 27
- 28
- 29
- 30
- 31
- 32
- 33
- 34
- 35
- 36
- 37
- 38
- 39
- 40
- 41
- 42
- 43
- 44
- 45
- 46
- 47
- 48
- 49
- 50
- 51
- 52
- 53
- 54
- 55
- 56
- 57
- 58
- 59
- 60
- 61
- 62
- 63
- 64
- 65
- 66
- 67
- 68
- 69
- 70
- 71
实现效果 :
查询数据库中的所有文章 :

此时共有3篇 ;写文章并发布 :

点击发布文章后 , 跳转到博客详情页 !

点击查看全文 , 跳转到博客详情页 .

查询数据库 :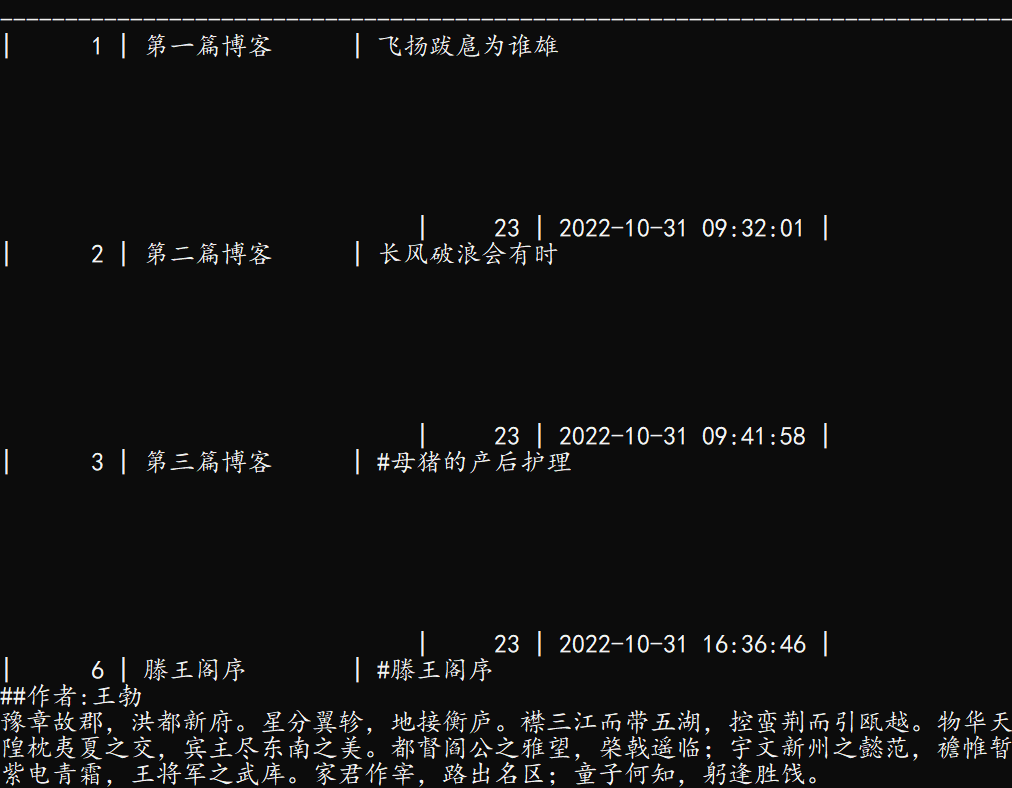
此时文章已然在列 , 就是这显示有点糊 .十一 : 删除文章
11.1 实现思路
希望实现在详情页点击删除按钮,删除一篇文章!- 1
分析
- 如果当前博客作者是登录用户自己 , ,则在详情页中显示这个删除按钮 ;
- 如果当前登录用户不是博客的作者 , 则不显示删除按钮 .
约定前后端交互接口 :

11.2 客户端代码

//获取用户信息 function getUserInfo() { $.ajax({ type: 'get', url: 'userInfo' + location.search, success: function (body) { // 让后端在查询失败的时候, 不要返回 200 , 而是返回 403 . // 避免在前端触发 success 分支. let h3 = document.querySelector('.card h3'); h3.innerHTML = body.username; if(body.isYourBlog){ let deleteA = document.createElement('a'); // location.search 就是当前页面 url 的 query string, 也就是?blogId=1 这样的结果. deleteA.href = 'blogDelete'+location.search; deleteA.innerHTML = '删除'; let navDiv = document.querySelector('.nav'); navDiv.appendChild(deleteA); } } }); }- 1
- 2
- 3
- 4
- 5
- 6
- 7
- 8
- 9
- 10
- 11
- 12
- 13
- 14
- 15
- 16
- 17
- 18
- 19
- 20
- 21
- 22
- 23
11.3 服务器代码
package controller; import model.Blog; import model.BlogDao; import model.User; import javax.servlet.ServletException; import javax.servlet.annotation.WebServlet; import javax.servlet.http.HttpServlet; import javax.servlet.http.HttpServletRequest; import javax.servlet.http.HttpServletResponse; import javax.servlet.http.HttpSession; import java.io.IOException; @WebServlet("/blogDelete") public class BlogDeleteServlet extends HttpServlet { @Override protected void doGet(HttpServletRequest req, HttpServletResponse resp) throws ServletException, IOException { //1.先判定用户的登录状态,如果未登录,无法删除 HttpSession session = req.getSession(false); if(session == null) { resp.setStatus(403); return; } User user = (User)session.getAttribute("user"); if(user == null) { resp.setStatus(403); return; } //2.获取到blogId String blogId = req.getParameter("blogId"); if(blogId == null || blogId.equals("")) { resp.setContentType("text/html;charset=utf8"); resp.getWriter().write("要删除的文章不存在!"); return; } //3.删除数据库中的数据 BlogDao blogDao = new BlogDao(); blogDao.delete(Integer.parseInt(blogId)); //4.跳转到博客列表页 resp.sendRedirect("blog_list.html"); } }- 1
- 2
- 3
- 4
- 5
- 6
- 7
- 8
- 9
- 10
- 11
- 12
- 13
- 14
- 15
- 16
- 17
- 18
- 19
- 20
- 21
- 22
- 23
- 24
- 25
- 26
- 27
- 28
- 29
- 30
- 31
- 32
- 33
- 34
- 35
- 36
- 37
- 38
- 39
- 40
- 41
- 42
- 43
- 44
效果如下 :

抓个包试试 :

十二 : 总结
博客系统基本完成 ! 一共两个表 , 四个页面 , 6个Servlet , 代码比较简单 . 更复杂的网站 , 也是在此基础上进行的横向扩充 , 关键是掌握前后端交互的写法 . 后续可以对博客系统进行进一步完善 , 添加更多功能 !
当前的博客系统 , 只能在自己的机器上运行 , 自己来访问 , 别人是无法访问的 ! 咱们自己的电脑IP就是一个NAT内网中的内网IP , 是不能被其他局域网里的设备直接访问的 , 要想让我们的程序被别人访问 , 就需要有外网IP !!! 而拥有外网IP的最简单方法 , 就是买一个云服务器 !
云服务器就是一个主机 , 在人家厂商的机房里 , 但是可以通过网络远程操作 , 其配置非常低(远低于我当前正在使用的这台笔记本电脑) , 但优势是具有外网IP .
云服务器也好 , 未来在公司中接触到的服务器也好 , 90%以上都会使用到Linux操作系统 , 所以下一节我将会介绍Linux系统的基本使用 .
本节内容结束 !!!
-
相关阅读:
字符函数和字符串函数
渗透测试站点推荐
抛弃模板,一种Prompt Learning用于命名实体识别任务的新范式
11——go语言数字类型
章文嵩:开源为我打开一扇窗
python输出3位数的水仙花数
使用X-SCANNER扫描工具
Spring封装数据结果
openGauss学习笔记-115 openGauss 数据库管理-设置安全策略-设置密码安全策略
npm run build 打包报错 - 添加 parallel: false, 解决
- 原文地址:https://blog.csdn.net/baijaiyu/article/details/127701326
