-
Django第三章(模版系统全局变量-if判断-for循环-过滤器-模版继承/引用-引用静态文件)
模版系统
Django模版系统:用于自动渲染一个文本文件,一般用于HTML页面。模版引擎渲染的最终HTML内容返回给客户端浏览器。模版文件有两部分组成:静态部分,例如html,css,js 动态部分,django模版语言,类似于jinja语法- 1
- 2
事例一
1.定义视图path('hello/',views.hello, name='myapp_hello')- 1

2.定义路由

编写一个hello函数def hello(request): user = {'name': '张帆','property': {'sex': '男','age':30}} return render(request,'template.html',{'user':user})- 1
- 2
- 3
3.编写html模版
template.html模版DOCTYPE html> <html lang="en"> <head> <meta charset="UTF-8"> <title>模版测试title> head> <body> {{ user }}<br> 姓名:{{ user.name }}<br> 性别:{{ user.property.sex }}<br> 年来:{{ user.property.age }}<br> body> html>- 1
- 2
- 3
- 4
- 5
- 6
- 7
- 8
- 9
- 10
- 11
- 12
- 13

最终实现html文件的解析变量定义:在函数视图render中的context传入,类似于字典对象。 变量在模版中引用,格式:{{ key }}- 1
- 2
变量 :设置全局变量
1.0 在项目目录下创建一个contexts.py文件

2.0 修改settings.py

3.0 在html模版文件中引用


后续直接引用即可 {{ username }}条件判断
if 条件判断:
·判定给定的条件是否满足,根据判定的结果决定执行的语句。

简单测试条件判断


当{% if user.property.age == 30 %} 访问输出相等

测试循环
1.编写hello路由def hello(request): #return HttpResponse("这是第一个模块") login_user = "zhangfan" user = {'zhangsan': {'name': '张三','sex': '男','age':30,'lable':['it','运维工程师']}, 'lisi': {'name': '李四', 'sex': '男', 'age': 28, 'lable': ['it', '前端前端']}, 'wanger': {'name': '王二', 'sex': '男', 'age': 25, 'lable': ['it', '后端工程师']}, }- 1
- 2
- 3
- 4
- 5
- 6
- 7
2.编写html模版

3.测试,列出所有的key

4.通过for循环将字典所有信息打印到表格中
编写html模版<table border="1"> <thead> <tr> <th>用户名th> <th>姓名th> <th>性别th> <th>年龄th> <th>标签th> tr> thead> <tbody> {% for k,v in user.items %} <tr> <td>{{ k }}td> <td>{{ v.name }}td> <td>{{ v.sex }}td> <td>{{ v.age }}td> <td>{{ v.lable }}td> tr> {% endfor %} tbody> table>- 1
- 2
- 3
- 4
- 5
- 6
- 7
- 8
- 9
- 10
- 11
- 12
- 13
- 14
- 15
- 16
- 17
- 18
- 19
- 20
- 21
- 22

4.1在吧标签用for循环完善


最终效果如图所示常用的过滤器

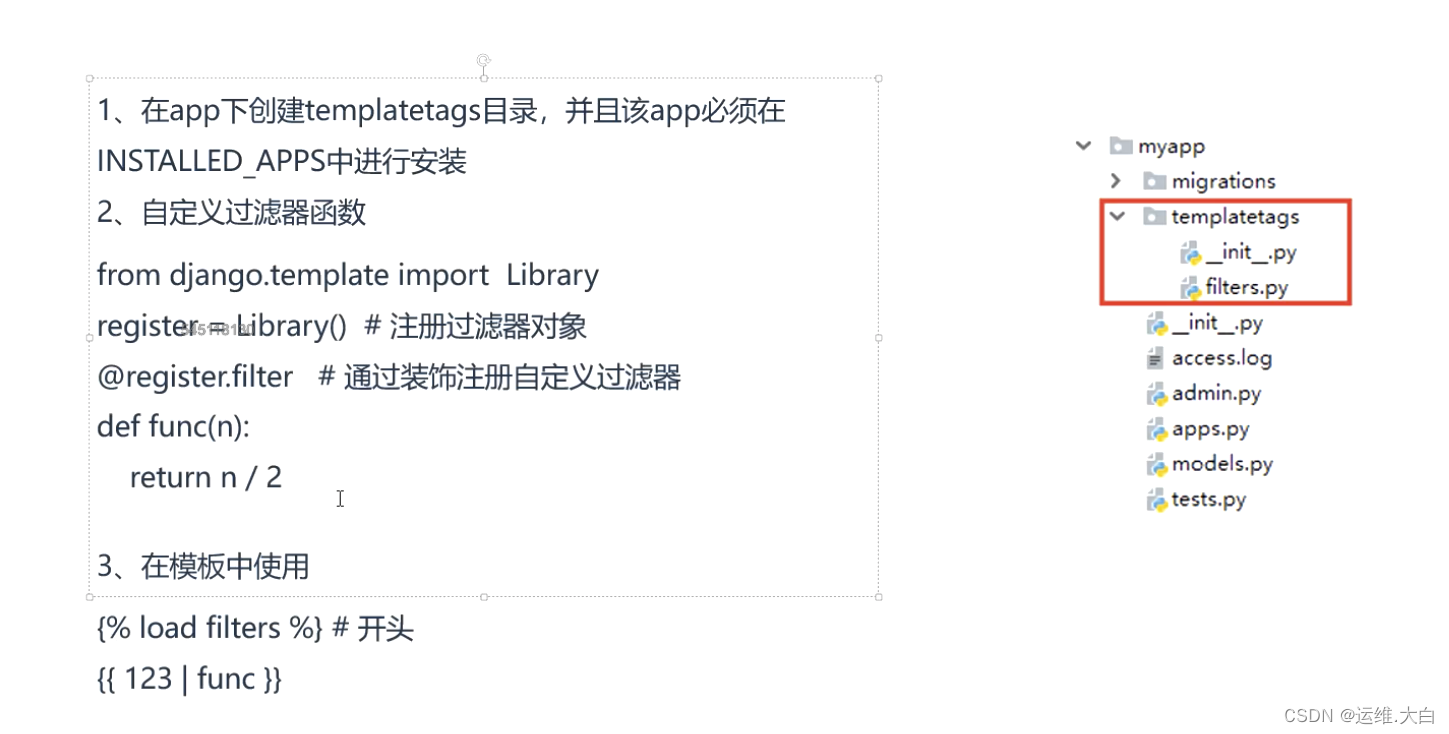
自定义过滤器
模版继承

1.0编写基础模版DOCTYPE html> <html lang="en"> <head> <meta charset="UTF-8"> <title>首页title> <style> .nav { background-color: chartreuse; color: black; } .content { background-color: cornflowerblue; color: black; } .footer { background-color: red; color: black; } style> head> <body> <div class="nav"> <h1>头部区域h1> div> <div class="content"> {% block context %} {% endblock %} div> <div class="footer"> <h1>底部区域h1> div>- 1
- 2
- 3
- 4
- 5
- 6
- 7
- 8
- 9
- 10
- 11
- 12
- 13
- 14
- 15
- 16
- 17
- 18
- 19
- 20
- 21
- 22
- 23
- 24
- 25
- 26
- 27
- 28
- 29
- 30
- 31
- 32
- 33
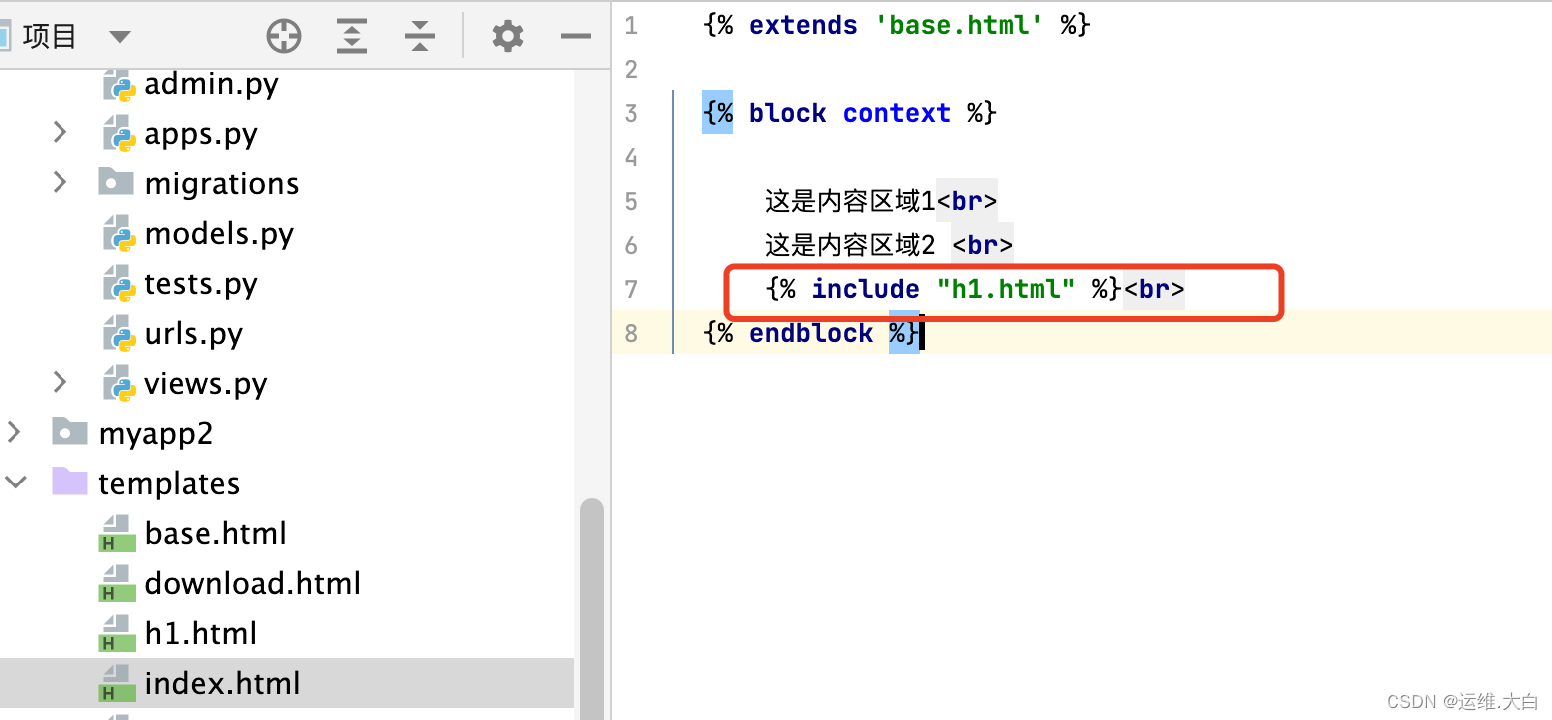
2.0 引用模版


3.0测试其他模版引用

内容区域不变更新开头和结尾

最终实现多模版的复用模版导入


引用静态文件

1 修改项目配置文件
BASE_DIR = os.path.dirname(os.path.dirname(os.path.abspath(__file__))) STATICFILES_DIRS = ( os.path.join(BASE_DIR,'static'), )- 1
- 2
- 3
- 4

-
相关阅读:
uqrcode+uni-app 微信小程序生成二维码
现代企业架构框架-技术架构
深度学习:VGG(Vision Geometrical Group)论文详细讲解
lv11 嵌入式开发 ARM体系结构理论基础(寄存器)3
Linux安装nodejs问题
拼多多面试题
创新案例|鞋服巨头Nike如何以DTC战略实现可持续增长
【prometheus】k8s集群部署AlertManager实现邮件和钉钉告警
【前端版】分布式医疗云平台【登陆页面修改、页面 title 修改、登陆接口准备说明、把前端和后端统一使用 git 管理、启动前端 VUE 项目、用户登陆】(十七)
MySQL(4)索引实践(2)
- 原文地址:https://blog.csdn.net/weixin_43546282/article/details/127716541
