-
5.vue知识点vue router
在做单页面应用的时候很方便,可以在界面中定义的各种区域进行组件替换,每个路由应该对应一个组件
一、定义路由跳转的步骤
1.定义要跳转的组件
- 组件:Foorouter
- 代码
<template> <div> <div> <div>this is foorouterdiv> div> div> template>- 1
- 2
- 3
- 4
- 5
- 6
- 7
- 代码
- 组件:Barrouter
- 代码
<template> <div> <div>this is barrouterdiv> <p>username:{{username}}p> <button @click="goBack">回到上一层button> div> template> <script> export default { computed: { username:function(){ // 我们很快就会看到 `params` 是什么 return 'Nelson' } }, methods: { goBack() { console.log("window.history:",window.history) window.history.length > 1 ? this.$router.go(-1) : this.$router.push('/') } } } script>- 1
- 2
- 3
- 4
- 5
- 6
- 7
- 8
- 9
- 10
- 11
- 12
- 13
- 14
- 15
- 16
- 17
- 18
- 19
- 20
- 21
- 22
- 23
- 24
- 代码
2.为组件定义路由(跳转路径)
- 代码
const routes = [ { path: '/foorouter', component: Foorouter }, { path: '/barrouter', component: Barrouter } ]- 1
- 2
- 3
- 4
3.将定义好的路由作为参数创建router实例
- 代码
const router = new VueRouter({ routes })- 1
- 2
- 3
4.将创建的router实例挂载到app(根节点)上,在整个应用中都具有了这个路由功能
- 代码

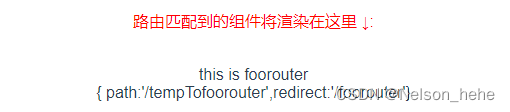
5.然后在页面定义路由出口,路由匹配到的组件会渲染在这个出口
-
说明
这里是默认的出口,还有命名视图,后面会介绍 -
代码
<p class="title">路由匹配到的组件将渲染在这里 ↓:p> <router-view>router-view>- 1
- 2
-
效果

6.路由导航
-
说明
可以使用定义导航链接,将路由导航传给to属性 -
代码
<router-link to="/foorouter">Go to Foorouter-link> <router-link to="/barrouter">Go to Barrouter-link>- 1
- 2
-
效果

二、动态路由匹配
1.使用动态路由参数(用’:'来标记参数)控制多个路径复用一个组件
-
在一.2步骤中,定义一个动态路由

-
User组件
<template> <div> <div>Userdiv> Hello {{$route.params.id}} <br> {{message}} div> template> <script> export default { watch:{ $route(to,from){ //对路由变化作出响应 console.log('From: '+from.path); console.log('To: '+to.path); } }, computed:{ message:function(){ return '这是'+this.$route.params.id+'页面。' } } } script>- 1
- 2
- 3
- 4
- 5
- 6
- 7
- 8
- 9
- 10
- 11
- 12
- 13
- 14
- 15
- 16
- 17
- 18
- 19
- 20
- 21
- 22
- 23
- 24
-
在页面定义路由导航
在两个导航中会分别把foorouter、barrouter作为参数匹配到.$route.params动态参数id中,在组件中可以使用this.$route.params调用 (如上面的User组件的massage计算属性中)<router-link to="/user/foorouter">Go to UserFoorouter-link> <router-link to="/user/barrouter">Go to UserBarrouter-link>- 1
- 2
-
效果

2.路由优先级
-
说明
- 有时候一个路径会匹配多个路由,路由匹配会优先匹配第一个符合条件的路由
- 在图中框起来的路径设置会匹配到任意链接,也就是后面所设置的都会失效,往往这种需要放到所有设置的最后,用来匹配其他默认情况(比如404提示页面)
-
代码

3.对路由参数的变化作出响应
-
说明
可以简单地 watch (监测变化) $route 对象
比如 1 中定义的User组件定义了响应方法,当外部页面点击两个链接,路径会变化,从而执行对应方法 -
代码

-
效果

三、嵌套路由
-
说明
就是在路由的组件内部再定义路由出口,内部的路径需要在children属性中定义,注意不要加/ ,因为/代表根路径,定义内部路由的时候需要在外部路由的基础上定义相对匹配路径 -
代码
- 嵌套路由定义

- 外部组件:NestComponent
内部定义了路由出口<template> <div> <h2>NestComponent: {{ $route.params.nestID }}h2> <router-view>router-view> div> template>- 1
- 2
- 3
- 4
- 5
- 6
- 内部嵌套组件:NestUser
<template> <div> <div>Nest-Userdiv> Hello {{$route.params.nestID}} <br> 嵌套内部的组件NestUser div> template> <script> export default { } script>- 1
- 2
- 3
- 4
- 5
- 6
- 7
- 8
- 9
- 10
- 11
- 12
- 13
- 14
- 内部嵌套组件:NestUserAdmin
<template> <div> <div class="notice">Nest-UserAdmindiv> Hello {{$route.params.nestID}} <div class="notice">嵌套内部的组件NestUserAdmindiv> div> template> <script> export default { watch:{ $route(to,from){ //对路由变化作出响应 console.log('From: '+from.path); console.log('To: '+to.path); } } } script> <style> .notice{ color: red; font-size: 30px; } style>- 1
- 2
- 3
- 4
- 5
- 6
- 7
- 8
- 9
- 10
- 11
- 12
- 13
- 14
- 15
- 16
- 17
- 18
- 19
- 20
- 21
- 22
- 23
- 24
- 25
- 嵌套路由定义
-
效果

-
注意
上面代码中内部组件监听$route变化是不起作用的,需要在外部组件监听。
四、编程式导航
1.push
-
说明
- 通过 $router.push(location) 方法,往window.history中添加跳转
- window.history中记录了页面的跳转记录,所以可以通过 this.$router.go(n) 实现回退(n为负值)和前进n步的页面跳转
-
代码
<button v-on:click='addRouterItem'>编程式导航:push跳转路由信息button>- 1
addRouterItem:function(){ const userid='TurnTo' this.$router.push({path:`/Nest/${userid}/user`}) console.log('Success Turn To Router Item') },- 1
- 2
- 3
- 4
- 5
-
效果

还可以用 this.$router.push({ name: ‘user’, params: { userId: ‘123’ }}) 的形式来访问user/123页面,当有path的时候,params参数失效
2.replace
-
说明
replace和push功能类似,但是注意它是直接替换window.history中这个当前的记录,而不是在window.history中添加,所以在使用this.$router.go()方法时 后退不会回到刚才的页面 。 -
效果
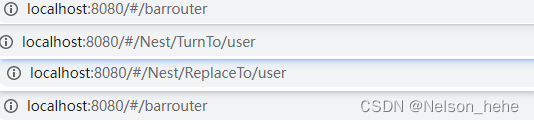
如图,在第三个页面的时候直接点击页面返回按钮,则回到的是第一次的页面
五、命名路由
- 代码
- 定义路径和路由名useridrouter

<button v-on:click='GoNamedRouterItem'>跳转命名路由信息button>- 1
- 定义跳转方法
GoNamedRouterItem:function(){ this.$router.push({name:'useridrouter'}) }- 1
- 2
- 3
- 定义路径和路由名useridrouter
- 效果

六、命名视图
未命名的默认名为default - 1
1.一般命名视图
- 说明
可以同时展示多个视图,每个视图对应一个组件,如果想要控制哪个命名视图解耦合必须为每个视图设置prop - 代码
- 在路由列表中添加
{ path:'/multiview/', components:{ viewone:ViewOneComp, viewtwo:ViewTwoComp, viewthree:ViewThreeComp } }- 1
- 2
- 3
- 4
- 5
- 6
- 7
- 8
- 在页面上定义三个命名视图viewone、viewtwo、viewthree
<div class="title">-----------------测试多视图-----------------div> <button v-on:click='GoToMultiRouters'>跳转到命名(多)视图button> <button v-on:click='HideMultiRouters'>隐藏命名(多)视图button> <router-view name="viewone">router-view> <router-view name="viewtwo">router-view> <router-view name="viewthree">router-view>- 1
- 2
- 3
- 4
- 5
- 6
- 在路由列表中添加
- 效果
2.嵌套命名多视图
- 说明
其实就是在嵌套视图的基础上,显示多个命名子视图,其中未命名的视图名称默认为default - 代码
- 页面内容
<template> <div> <h1>显示嵌套命名(多)视图</h1> <button v-on:click="ShowEmailView">显示Email视图</button> <button v-on:click="ShowProfileView">显示Profile视图</button> <router-view></router-view> <router-view name="helper"></router-view> </div> </template> <script> export default { methods:{ ShowEmailView:function(){ this.$router.push('/settings/emails'); }, ShowProfileView:function(){ this.$router.push('/settings/profile'); } } } </script>- 1
- 2
- 3
- 4
- 5
- 6
- 7
- 8
- 9
- 10
- 11
- 12
- 13
- 14
- 15
- 16
- 17
- 18
- 19
- 20
- 21
- 22
- 在路由列表中定义路由
{ path:'/settings/', component:UserSettings, children:[{ path:'emails', component:UserSettingEmail },{ path:'profile', components:{ default:UserSettingProfile, helper:UserSettingProfilePreview } }] },- 1
- 2
- 3
- 4
- 5
- 6
- 7
- 8
- 9
- 10
- 11
- 12
- 13
- 14
- 页面内容
- 效果

七、重定向与别名
1.静态重定向
- 代码
GoToRedirectFoo:function(){ this.$router.push('/tempTofoorouter') },- 1
- 2
- 3
{ path:'/tempTofoorouter',redirect:'/foorouter'},- 1
- 效果
2.动态重定向
-
代码
在routes路由设置中redirect传入一个函数,返回重定向路径,其中to是包含目的路径的对象{ path:'/user',redirect:to=>{ console.log("to:",to) return to.path+'/nel' } },- 1
- 2
- 3
- 4
- 5
函数中可以定义怎么对原目的路径进行处理,返回新的路径。
GoToRedirectBar:function(){ this.$router.push('/user') },- 1
- 2
- 3
-
效果

3.别名
- 说明
在路由设置中使用alias属性设置 - 代码
{ path:'/foorouter',component:Foorouter,alias:'/aliasfoo'}- 1
- 注意别名和重定向的区别
- 重定向:/a重定向到/b,显示/b对应的组件,URL也发生变化
- 别名:/a 别名为 /b 当访问/a,/b时都对应同一组件,URL也分别是/a,/b;不会因为访问/a而发生URL变化
八、路由组件传参
-
说明
使用 props 将组件和路由解耦可以向路由组件传递prop -
代码
- 当组件路由设置中 属性props设置为true,$route.params全部变成组件属性
{ path: '/user/:id/:message', component: User,props:true}- 1
- 在组件中就可以不用再使用this.$route.params调用属性了,而是通过props传值的形式将$route.params里面的值作为属性使用
<template> <div> <div>Userdiv> Hello {{id}} <br> {{message}} div> template> <script> export default { props:['id','message'], } script>- 1
- 2
- 3
- 4
- 5
- 6
- 7
- 8
- 9
- 10
- 11
- 12
- 13
- 使用组件
<router-link to="/user/foorouter/这是通过props传递param的页面">Go to UserFoorouter-link>- 1
- 当组件路由设置中 属性props设置为true,$route.params全部变成组件属性
-
效果

参考
- 组件:Foorouter
-
相关阅读:
达梦定时迁移数据
NestJS 中的 gRPC 微服务通信
ArcGIS加载免费在线历史影像作为底图(不需要插件)
Path.Combine的坑
stream().sorted()以及java中常用的比较器
10KM无人机高清图传通信模组,低延迟、抗干扰,飞睿智能无线MESH组网模块
24.聚类算法的介绍
记录路由配置之显示进度条
工业节碳分论坛精彩回顾 | 第二届始祖数字化可持续发展峰会
基于grpc从零开始搭建一个准生产分布式应用(6) - 06 - MapStruct常见问题汇总
- 原文地址:https://blog.csdn.net/hehe_soft_engineer/article/details/126852448
