-
SpringCloud -Gateway
SpringCloud -Gateway
1.Gateway 介绍
1.看一个需求,引出网关服务
1、有一个前后端分离项目, 分析如图

2、使用网关服务, 重构项目架构

2.Gateway 网络拓扑图!!

3.Gateway 是什么

- Gateway 是在 Spring 生态系统之上构建的 API 网关服务,基于 Spring ,Spring Boot 和 Project Reactor 等技术。
- Gateway 旨在提供一种简单而有效的方式来对 API 进行路由,以及提供一些强大的过滤器功能, 例如∶熔断、限流、重试、反向代理、日志监控等
4.官网
5.Gateway 核心功能
1.鉴权
2.流量控制
3.熔断
4.日志监控
5.反向代理
6.Gateway VS Zuul
1.Gateway 和 Zuul 区别
- SpringCloud Gateway 作为 Spring Cloud 生态系统中的网关,目标是替代 Zuul
- SpringCloud Gateway 是基于 Spring WebFlux 框架实现的
- Spring WebFlux 框架底层则使用了高性能的 Reactor 模式通信框架 Netty , 提升了网关性能
2.Gateway 特性
Spring Cloud Gateway 基于 Spring Framework(支持 Spring WebFlux),Project Reactor 和 Spring Boot 进行构建,具有如下特性:
动态路由
可以对路由指定 Predicate(断言)和Filter(过滤器)
集成Hystrix的断路器功能
集成 Spring Cloud 服务发现功能
请求限流功能
支持路径重写
2.Gateway 基本原理
1.Gateway 核心组件
图示

- web 请求,通过一些匹配条件,定位到真正的服务节点/微服务模块,在这个转发过程 的前后,进行一些精细化控制。
- predicate: 就是匹配条件
- filter: 可以理解为是网关的过滤机制。有了 predicate 和 filter,再加上目标 URL.就可以实现一个具体的路由
1.Route(路由)
一句话: 路由是构建网关的基本模块,它由 ID,目标 URI,一系列的断言和过滤器组成, 如果断言为 true 则匹配该路由
2.Predicate(断言)
1、一句话: 对 HTTP 请求中的所有内容(例如请求头或请求参数)进行匹配,如果请求 与断言相匹配则进行路由
2、简单举例, 比如配置路径, - Path=/member/get/** #断言,路径相匹配的进行路由 转发 , 如果 Http 请求的路径不匹配, 则不进行路由转发
3.Filter(过滤器)
1、一句话: 使用过滤器,可以在请求被路由前或者之后对请求进行处理 2、你可以理解成, 在对 Http 请求断言匹配成功后, 可以通过网关的过滤机制, 对 Http 请 求处理
3、简单举例:
filters: -AddRequestParameter=color, blue #过滤器在匹配的请求头加上一对请求头,名称 为 color 值为 blue , 比如原来的 http 请求是 http://localhost:10000/member/get/1 ==过滤器处理=> http://localhost:10000/member/get/1?color=blue- 1
- 2
2.How It Works 工作机制


- 客户端向 Spring Cloud Gateway 发出请求。然后在 Gateway Handler Mapping 中找到 与请求相匹配的路由,将其发送到 Gateway Web Handler。
- Handler 再通过指定的过滤器链来将请求发送到我们实际的服务执行业务逻辑,然后返 回。
- 过滤器之间用虚线分开是因为过滤器可能会在发送代理请求之前(“pre”)或之后 (“post”)执行业务逻辑。
- Filter 在"pre"类型的过滤器可以做参数校验、权限校验、流量监控、日志输出、协议转 换等,
- 在"post"类型的过滤器中可以做响应内容、响应头的修改,日志的输出,流量监控等 有着非常重要的作用。
一句话说:路由转发+执行过滤器链
3.搭建 Gateway 微服务
1.搭建 Gateway-应用实例
1.需求分析/图解
– 引入 Gateway 项目架构:在前面我们使用member-service-consumer-openfeign-80作为消费服务利用openfeign或者restTemplate去远程调用provider10000和provider10002,这样做局限性比较大,随着服务的增多,我们需要构建很多的消费服务,程序员需要写很多和服务端相同的接口去远程调用服务不利于后期维护,而SpringCloud-GateWay就可以很好解决这些问题,是用SpringCloud-GateWay我们只需对外暴网关的接口,通过网关去调用真正的服务,不仅如此SpirngCloud-GateWay的路由、过滤、断言等核心组件也提供了非常强大的功能,只需要配置各网关和各个服务之间远程调用的路径映射关系就可以实现服务的分发。

说明
- 通过网关暴露的接口,实现调用真正的服务
- 网关本身也是一个微服务模块
2.代码实现
1.创建 e-commerce-gateway-20000网关模块

2.修改pom.xml
<dependencies> <dependency> <groupId>org.springframework.cloudgroupId> <artifactId>spring-cloud-starter-gatewayartifactId> dependency> <dependency> <groupId>org.springframework.cloudgroupId> <artifactId>spring-cloud-starter-netflix-eureka-clientartifactId> dependency> <dependency> <groupId>org.projectlombokgroupId> <artifactId>lombokartifactId> <optional>trueoptional> dependency> <dependency> <groupId>com.llp.springcloudgroupId> <artifactId>e_commerce_center-common-apiartifactId> <version>1.0-SNAPSHOTversion> dependency> dependencies>- 1
- 2
- 3
- 4
- 5
- 6
- 7
- 8
- 9
- 10
- 11
- 12
- 13
- 14
- 15
- 16
- 17
- 18
- 19
- 20
- 21
- 22
- 23
- 24
- 25
- 26
- 27
- 28
- 29
- 30
3.创建application.yml,核心配置
server: port: 20000 spring: application: #如果有多个gateway可以将每个gateway服务名配置为e-commerce-gateway便于注册中心管理和负载均衡 name: e-commerce-gateway-20000 cloud: gateway: #路由,Listroutes可以配置多个 routes: #路由的id,要求唯一 - id: member_route_01 #gateway 最终访问的url 是 url=uri+Path #匹配后提供服务的路由地址: 也可以是外网 http://www.baidu.com #比如: 客户端/浏览器请求 url http://localhost:20000/member/get/1 #如果根据Path匹配成功 最终访问的url/转发url 就是 url=http://localhost:10001/member/get/1 #如果匹配失败, 则有gateway返回404信息 #疑问: 这里配置的 uri 是固定,在当前这种情况其实可以没有Eureka Server(注册中心) #灵活方式的配置,就会使用到Eureka Server uri: http://localhost:10001 #断言,可以有多种形式 predicates: - Path=/member/get/** - id: member_route_02 uri: http://localhost:10001 predicates: - Path=/member/save/**- 1
- 2
- 3
- 4
- 5
- 6
- 7
- 8
- 9
- 10
- 11
- 12
- 13
- 14
- 15
- 16
- 17
- 18
- 19
- 20
- 21
- 22
- 23
- 24
- 25
- 26
- 27
- 28
4.创建主启动类
@SpringBootApplication public class GateWayApplication20000 { public static void main(String[] args) { SpringApplication.run(GateWayApplication20000.class,args); } }- 1
- 2
- 3
- 4
- 5
- 6
3.测试

4.注意事项和细节
- 从上面的示例可以看出我们并没有使用到注册中心,而这也印证了SpringCloud-GateWay是独立的并不依赖于注册中心,可以单独的使用。
- SpringCloud-GateWay 核心组件由:路由、断言、过滤器组成
- 路由指定路由id和uri、断言指定可以访问的路径、过滤器则对请求参数要求做了补充;
- 通常SpringCloud-GateWay都会配合注册中心进行使用,网关本身也是微服务的一个模块也需要注册到注册中心以便于利用服务发现实现远程调用。
2.Gateway 路由配置-配置类方式
GateWay两种配置方式:
1.application.yml 中配置 (推荐)
2: 编写配置类注入,修改代码需要重启服务
不管是通过配置类还是配置文件的方式,需要的参数都是不会变的,只要抓住这一点无非就是实现的形式上的改变
/** * 配置类注入路由 */ @Configuration public class GateWayRoutesConfig { /** * 在理解通过配置类注入/配置 路由,可以对照前面的application.yml来对比理解 # cloud: # gateway: # #路由,Listroutes # routes: # #路由的id,要求唯一 # - id: member_route_01 # uri: http://localhost:10001 # predicates: # - Path=/member/get/** # - id: member_route_02 # uri: http://localhost:10001 # predicates: # - Path=/member/save/** */ @Bean public RouteLocator routeLocator(RouteLocatorBuilder routeLocatorBuilder) { RouteLocatorBuilder.Builder routes = routeLocatorBuilder.routes(); //这里其实就是lamda表达式的简化,刚开始可以使用匿名内部类的方式去实现,然后在进行简化理解 //注意:member_route04对于路由id不能重复 return routes.route("member_route04", r -> r.path("/member/get/**") .uri("http://localhost:10001")) .build(); } @Bean public RouteLocator myRouteLocator05(RouteLocatorBuilder routeLocatorBuilder) { RouteLocatorBuilder.Builder routes = routeLocatorBuilder.routes(); return routes.route("member_route05", r -> r.path("/member/save/**") .uri("http://localhost:10001")) .build(); } }- 1
- 2
- 3
- 4
- 5
- 6
- 7
- 8
- 9
- 10
- 11
- 12
- 13
- 14
- 15
- 16
- 17
- 18
- 19
- 20
- 21
- 22
- 23
- 24
- 25
- 26
- 27
- 28
- 29
- 30
- 31
- 32
- 33
- 34
- 35
- 36
- 37
- 38
3.动态路由
1.需求分析/图
– 示意图

2.代码实现
说明:在前面我们使用GateWay并没有使用到注册中心的服务发现,而如果服务端是多台服务时通过指定固定的uri去访问显然是不行,也无法实现服务端的负载均衡,此时引入注册中心实现动态路由配置的价值就体现出来了。
1.修改 e-commerce-gateway-20000 的 application.yml
server: port: 20000 spring: application: #如果有多个gateway可以将每个gateway服务配置为e-commerce-gateway便于注册中心做负载均衡 name: e-commerce-gateway-20000 cloud: gateway: discovery: locator: #开启 Flag that enables DiscoveryClient gateway integration,即启用 DiscoveryClient 服务发现(建议开启) #这里我们注册中心使用的是eureka其实开不开启都是可以的,但是如果使用的是其他注册中心是需要开启的 enabled: true #路由,Listroutes可以配置多个 routes: #路由的id,要求唯一 - id: member_route_01 #uri: http://localhost:10001 #说明: lb 是协议名 member-service-provider 是服务名,默认负载均衡是轮询的方式 lb---> loadbalance uri: lb://member-service-provider #断言,可以有多种形式 predicates: - Path=/member/get/** - id: member_route_02 uri: http://localhost:10001 predicates: - Path=/member/save/** #配置eureka-client eureka: instance: hostname: e-commerce-service client: #将自己注册到eureka-server register-with-eureka: true #表示从eureka-server获取注册信息 #如果是单节点是可以不配置的,但如果是集群则必须配置为true,才能配合Ribbon实现负载均衡功能 fetch-registry: true service-url: #表示将自己注册到哪个eureka-server defaultZone: http://eureka9001.com:9001/eureka/,http://eureka9002.com:9002/eureka/- 1
- 2
- 3
- 4
- 5
- 6
- 7
- 8
- 9
- 10
- 11
- 12
- 13
- 14
- 15
- 16
- 17
- 18
- 19
- 20
- 21
- 22
- 23
- 24
- 25
- 26
- 27
- 28
- 29
- 30
- 31
- 32
- 33
- 34
- 35
- 36
- 37
- 38
- 39
- 40
- 41
- 42
- 43
- 44
3.测试
两次访问一次打到了10000一次打到了10002,可以看到


4.注意事项和细节
1.配置好动态路由后 Gateway 会根据注册中心上微服务名,为请求创建动态路由,实现动态 路由功能
2.使用的 lb 协议支持负载均衡-轮询算法
3.配置自己的负载均衡算法, 测试完毕恢复成原来的轮询算法
那么使用GateWay我们如何配置自己的负载均衡算法呢?
1.GateWay、Openfeign实现负载均衡底层都是使用ribbon实现的,因此和ribbon负载均衡的配置是一样的。
2ribbon实现负载均衡常见的方式

3.代码实现,创建负载均衡配置类
@Configuration public class RibbionRuleConfig { //配置注入自己的负载均衡算法 @Bean public IRule myRibbonRule() { //随机方式 return new RandomRule(); } }- 1
- 2
- 3
- 4
- 5
- 6
- 7
- 8
- 9
4.轮询方式是比较合理的也是最常用的负载均衡配置
4.Predicate/断言
1.基本介绍
1.一句话: Predicate 就是一组匹配规则,当请求匹配成功,就执行对应的 Route, 匹配失败,放弃 处理/转发
2.Route Predicate Factories - 文档地址 : https://cloud.spring.io/spring-cloud-static/spring-cloud-gateway/2.2.1.RELEASE/reference/html/#gateway-request-predicates-factories

3.说明:
(1)Spring Cloud Gateway包括许多内置的Route Predicate工厂, 所有这些Predicate都与 HTTP请求的不同属性匹配, 可以组合使用.
(2)Spring Cloud Gateway 创建 Route 对象时,使用RoutePredicateFactory 创建 Predicate 对象,Predicate 对象可以赋值给Route。
(3)所有这些谓词都匹配HTTP请求的不同属性。多种谓词工厂可以组合
2.Route Predicate 实例
1.After Route Predicate
1.需求分析/图解
需求: 只有 2022-11-18 12:35:50 之后的请求才进行匹配/转发, 不满足该条件的,不处理
2.代码实现
-

-
修改 e-commerce-gateway-20000(官网服务)的 application.yml
spring: application: name: e-commerce-gateway-20000 cloud: gateway: discovery: locator: enabled: true routes: - id: member_route_01 uri: lb://member-service-provider #断言,可以有多种形式 predicates: - Path=/member/get/** #当前时间在2022-11-18 12:35:50后才能访问 - After=2022-11-18T12:35:50.808+08:00[Asia/Shanghai] - id: member_route_02 uri: http://localhost:10001 predicates: - Path=/member/save/**- 1
- 2
- 3
- 4
- 5
- 6
- 7
- 8
- 9
- 10
- 11
- 12
- 13
- 14
- 15
- 16
- 17
- 18
- 19
- 20
-
如何获取时间格式, 创建一个测试类,来获取当前时间,再根据需要修改
public class GetDate { public static void main(String[] args) { //2022-09-13T21:30:20.808+08:00[Asia/Shanghai] ZonedDateTime now =ZonedDateTime.now(); System.out.println(now); } }- 1
- 2
- 3
- 4
- 5
- 6
- 7
3.测试

#时间调整到当前时间之前,再次测试可以正常访问了 predicates: - Path=/member/get/** - After=2022-01-18T12:35:50.808+08:00[Asia/Shanghai]- 1
- 2
- 3
- 4

2.Before Route Predicate
1.需求分析/图解
需求: 只有 2022-11-18 12:35:50 之前的请求才进行匹配/转发, 不满足该条件的,不处理
2.代码实现
-

-
修改 e-commerce-gateway-20000(官网服务)的 application.yml
predicates: - Path=/member/get/** #当前时间在2022-11-18 12:35:50之前可以访问 - Before=2022-11-18T12:35:50.808+08:00[Asia/Shanghai]- 1
- 2
- 3
- 4
3.测试
3.Between Route Predicate
1.需求分析/图解
需求: 只有2022-01-18 12:35:50 -和2022-05-18 12:35:50之间的请求才进行匹配/转 发, 不满足该条件的,不处理
2.代码实现
-
-
修改 e-commerce-gateway-20000(官网服务)的 application.yml
predicates: - Path=/member/get/** #当前时间在2022-01-18 12:35:50 - 2022-05-18 12:35:50可以访问 #注意:1.时间先后顺序 后面一个时间必须在前一个时间之后 2.两个时间之间用逗号分隔 - Between=2022-01-18T12:35:50.808+08:00[Asia/Shanghai],2022-05-18T12:35:50.808+08:00[Asia/Shanghai]- 1
- 2
- 3
- 4
- 5
3.测试
4.Cookie Route Predicate
1.需求分析/图解
需求: 请求带有 cookie 键: user 值: llp才匹配/断言成功
2.代码实现
-

注意: chocolate 是 cookie 名字 ch.p 是 cookie 的值,是按照正则表达式来匹配的
-
修改 e-commerce-gateway-20000(官网服务)的 application.yml
predicates: - Path=/member/get/** #请求带有cookie 键为user 值为llp - Cookie=user, llp- 1
- 2
- 3
- 4
3.测试


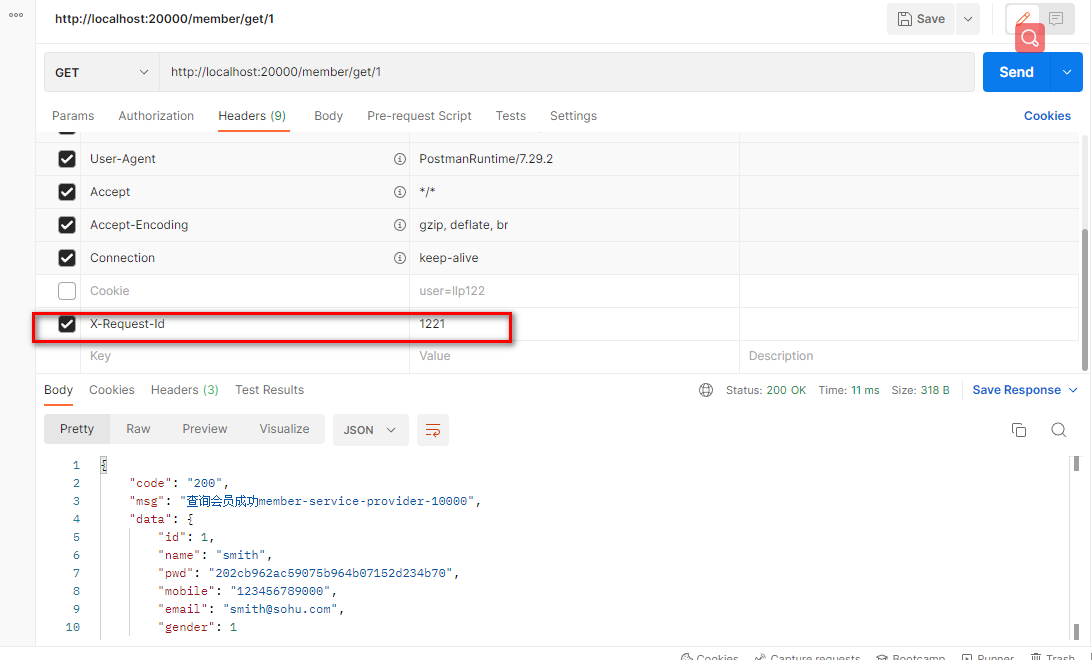
5.Header Route Predicate
1.需求分析/图解
需求: 请求头 Header 有 X-Request-Id, 并且值 hello 才匹配/断言成功
2.代码实现
-

注意: X-Request-Id 是 header 的名称, \d+ 是一个正则表达式
-
修改 e-commerce-gateway-20000(官网服务)的 application.yml
predicates: - Path=/member/get/** #请求必须携带请求头X-Request-Id 且值为 1~多个数字 - Header=X-Request-Id, \d+- 1
- 2
- 3
- 4
3.测试

6.Host Route Predicate
1.需求分析/图解
需求: 请求 Host 是
**.llp.**才匹配/断言成功 , 比如 Host www.llp110.com2.代码实现
-

注意: Host 可以有多个, 使用逗号间隔
-
修改 e-commerce-gateway-20000(官网服务)的 application.yml
predicates: - Path=/member/get/** #请求host必须是**.llp110.**或者**.csdn.**才能访问,**表示通配符 - Host=**.llp110.**,**.csdn.**- 1
- 2
- 3
- 4
3.测试
也可以修改HOST文件通过,域名去访问比如, www.llp110.com/member/get/1


7.Method Route Predicate
1.需求分析/图解
需求: 请求是 Get 方式才匹配/断言成功
2.代码实现
-

注意: 请求方式可以有多个, 使用逗号间隔
-
修改 e-commerce-gateway-20000(官网服务)的 application.yml
predicates: - Path=/member/get/** #请求方式是GET或者POST请求才能访问 - Method=GET,POST- 1
- 2
- 3
- 4
3.测试

8.Path Route Predicate
1.需求分析/图解
自己玩
2.代码实现

注意:Path 可以有多个, 使用逗号间隔
2.修改 e-commerce-gateway-20000(官网服务)的 application.yml
predicates: #请求路径匹配才能访问,多个路径用逗号分隔 - Path=/member/get/**,/member/save/**- 1
- 2
- 3
3.测试

9.Query Route Predicate
1.需求分析/图解
需求: 请求有参数 email ,并且满足电子邮件的基本格式, 才能匹配/断言成功
2.代码实现

注意:red 是参数名 gree. 是值, 支持正则表达式
2.修改 e-commerce-gateway-20000(官网服务)的 application.yml
predicates: - Path=/member/get/**,/member/save/** #请求参数含有参数名为emial,且值为邮箱的格式(1到多个数字或者字母 @ 大小写字母 . 大小写字母)才能访问 - Query=email, [\w-]+@([a-zA-Z]+\.)+[a-zA-Z]+- 1
- 2
- 3
- 4
3.测试

10.RemoteAddr Route Predicate
1.需求分析/图解
需求: 请求的 IP 是 127.0.0.1, 才能匹配/断言成功
2.代码实现

注意:RemoteAddr指调用端的ip,(调用网关的电脑ip) - RemoteAddr=192.168.1.1/24 , 1/24网段
2.修改 e-commerce-gateway-20000(官网服务)的 application.yml
predicates: - Path=/member/get/**,/member/save/** #因为这里服务都在本机启动,远程调用网关的电脑就是我的本机,因此ip就是127.0.0.1 - RemoteAddr=127.0.0.1- 1
- 2
- 3
- 4
3.测试

11.Weight Route Predicate
1.需求分析/图解
需求: 80%概率访问weight_high映射的路径,20%概率访问weight_low映射的路径
2.代码实现

注意:根据权重进行断言
2.修改 e-commerce-gateway-20000(官网服务)的 application.yml
#表示weight_high占有80%的概率,即最终会访问https://www.baidu.com/?tn=62095104_19_oem_dg/member/get/** #weight_low表示由8=20%的概率 - id: weight_high uri: https://www.baidu.com/?tn=62095104_19_oem_dg predicates: - Weight=group1, 8 - Path=/member/get/** - id: weight_low uri: lb://member-service-provider predicates: - Weight=group1, 2 - Path=/member/get/**- 1
- 2
- 3
- 4
- 5
- 6
- 7
- 8
- 9
- 10
- 11
- 12
3.测试


5.Filter/过滤器
1.基本介绍

说明
(1)SpringCloud GateWay的路由过滤器可用于修改进入的HTTP请求和返回的HTTP响应
(2)Spring Cloud Gateway 内置了多种路由过滤器,他们都由GatewayFilter的工厂类来产生
2.类型
1.GatewayFilter

2.GlobalFilter

3.GatewayFilter 使用
需求:给匹配的请求添加请求参数,并在服务端接收请求参数
1.说明
开发直接使用 GatewayFilter 较少,一般是自定义过滤器
2.参考实例

-
修改 e-commerce-gateway-20000(网关服务) 的 application.yml
predicates: - Path=/member/get/**,/member/save/** #添加过滤器,请求参数添加 color=red, name=kele filters: - AddRequestParameter=color, red - AddRequestParameter=name, kele- 1
- 2
- 3
- 4
- 5
- 6
-
验 证 , 修 改
@GetMapping("/member/get/{id}") public Result getMemberById(@PathVariable("id") Long id, HttpServletRequest request) { String color = request.getParameter("color"); String name = request.getParameter("name"); Member member = memberService.queryMemberById(id); //使用Result把查询到的结果返回 if (member != null) { return Result.success("查询会员成功member-service-provider-10000 name=" +name+","+"color="+color, member); } else { return Result.error("402","ID= " + id + "不存在"); } }- 1
- 2
- 3
- 4
- 5
- 6
- 7
- 8
- 9
- 10
- 11
- 12
- 13
- 14
- 15
-
测试

4.自定义 GlobalFilter
1.需求分析/图解
- 自定义全局 GlobalFilter 过滤器
- 如果请求参数 user=llp, pwd=123456 则放行, 否则不能通过验证
2.代码实现
创建src\main\java\com\llp\springcloud\filter\CustomerGateWayFilter.java
/** * 自定义filter */ @Component public class CustomerGateWayFilter implements GlobalFilter, Ordered { /** * 执行自定义过滤业务的核心方法 * @param exchange * @param chain * @return */ @Override public Mono<Void> filter(ServerWebExchange exchange, GatewayFilterChain chain) { System.out.println("==========CustomGateWayFilter=========== "); // http://localhost:20000/member/get/2?pwd=123456&user=llp // getFirst不论user处于哪一个位置,都获取其所在位置的第一个元素 //Listlist = exchange.getRequest().getQueryParams().get("user"); String user = exchange.getRequest().getQueryParams().getFirst("user"); String pwd = exchange.getRequest().getQueryParams().getFirst("pwd"); //如果user==llp&&pwd=123456则放行,否则则不允许访问 if(!("llp".equals(user)&&"123456".equals(pwd))){ System.out.println("=========非法用户============="); //设置响应状态码 exchange.getResponse().setStatusCode(HttpStatus.NOT_ACCEPTABLE); return exchange.getResponse().setComplete(); } //放行 return chain.filter(exchange); } /** * order 表示该过滤器执行的顺序,数字越小,优先级越高 * @return */ @Override public int getOrder() { return 0; } }- 1
- 2
- 3
- 4
- 5
- 6
- 7
- 8
- 9
- 10
- 11
- 12
- 13
- 14
- 15
- 16
- 17
- 18
- 19
- 20
- 21
- 22
- 23
- 24
- 25
- 26
- 27
- 28
- 29
- 30
- 31
- 32
- 33
- 34
- 35
- 36
- 37
- 38
- 39
- 40
3.测试


-
相关阅读:
上交所实时行情文件汇总
70. 爬楼梯
腾讯云16核服务器性能测评_轻量和CVM配置大全
全网最全的知识库管理工具综合评测和推荐:FlowUs、Baklib、简道云
JS高级 之 防抖debounce - throttle节流
【力扣2011】执行操作后的变量值
Reids实战——优惠券秒杀(全局唯一ID生成策略)
Postman连接MySQL数据库并操作
动手学习深度学习 09:循环神经网络
高比例清洁能源接入下计及需求响应的配电网重构(matlab代码)
- 原文地址:https://blog.csdn.net/qq_44981526/article/details/126843957
