-
MMDetection自定义模型训练
如有错误,恳请指出。
在去年MLP-Mixer出来之后,出现过一段短时间内的高潮,我也将相关的MLP结构全部的复现了一遍。不过当时苦于只能跑分类数据集,不能简单的将网络结构移植到其他的下游任务,只能作罢。
后来了解了MMDetection,这个一个集成的开源目标检测框架。主旨是让我们能够比较方便的测试我们自己设计的结构。不过,缺点就是,框架封装得太多,不好细改,也难以调试。但是优点是替换结构方便。
网上关于MMDetection的资料还比较少,这篇博客也算是我踩了比较多的坑多得到的结果。下面的内容,就记录如何使用MMDetection来替换我们自己实现的backbone结构。在这里,记录我设计的backbone结构替换掉DETR模型的ResNet来进行训练。使用的数据集是一个关于口罩检测的数据集。
1. 设计Backbone
创建一个新的py文件,这里我的文件名是
spinmlp.py,将其放在mmdet/models/backbones/的路径下,也就是mmdet/models/backbones/spinmlp.py。import torch.nn as nn ...... from ..builder import BACKBONES @BACKBONES.register_module() class SpinMLP(nn.Module): def __init__(self, patch_size, in_c, hidden_dim, expansion_factor, num_blocks, num_classes=80, weightattn=True, Backbone=True): super().__init__() self.num_blocks = num_blocks # self.token_dim = (image_size[0] // patch_size[0]) * (image_size[1] // patch_size[1]) self.patch_embed = nn.Conv2d(in_c, hidden_dim, kernel_size=patch_size, stride=patch_size) self.stages = nn.Sequential( *[nn.Sequential( SpinMLPBlock(hidden_dim, expansion_factor, weightattn) ) for i in range(self.num_blocks)] ) # 作为backbone,这里不需要为期添加一个head,只需要作为特征即可 self.head = nn.Linear(hidden_dim, num_classes) if Backbone is False else None self._init_weights() ......- 1
- 2
- 3
- 4
- 5
- 6
- 7
- 8
- 9
- 10
- 11
- 12
- 13
- 14
- 15
- 16
- 17
- 18
- 19
- 20
- 21
- 22
- 23
2. 导入模块
这一步很重要。
基于刚刚设计好的backbone模块,这里将一下行添加到
mmdet/models/backbones/__init__.pyfrom .spinmlp import SpinMLP- 1
同时,在
__all__中添加backbone的名称,如下所示: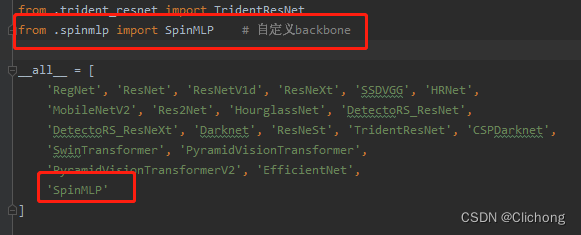
还有一个添加配置的方法是:custom_imports = dict( imports=[ 'mmdet.models.backbones.spinmlp', ], allow_failed_imports=False)- 1
- 2
- 3
- 4
- 5
但是,这种方法我尝试过是配置无效的。
3. 配置文件
在MMDetection中我们知道,各种文件都是通过配置来进行构建。由于我使用了新的数据集,也替换了新的网路结构,所以我新建了一个新的配置文件,名称为:
detr_spinmlp_8x8_150e_mask.py将原本是resnet的替换为我设计的spinmlp结构:
# model settings model = dict( type='DETR', backbone=dict( type='SpinMLP', patch_size=(16, 16), # [1, 2048, 28, 28] in_c=3, hidden_dim=1024, expansion_factor=4, num_blocks=4, num_classes=80, weightattn=True, Backbone=True),- 1
- 2
- 3
- 4
- 5
- 6
- 7
- 8
- 9
- 10
- 11
- 12
- 13
4. 模型训练
根据官方的文档资料的自定义模型部分:https://mmdetection.readthedocs.io/en/latest/tutorials/customize_models.html
基于以上如此操作之后,应该就能直接在命令行中运行了,但是在我这里报了一个错误:
KeyError: ‘SpinMLP is not in the models registry’
详细如下所示:

注意,这里的错误是我在命令行运行时所报的错误,随后我尝试在Pycharm进行运行(需要更改工作目录和config参数),神奇的在Pycharm可以正常的训练与验证。那么,这就说明其实我的配置是正确的。
为了寻找到在终端不能运行,而在Pycharm中可以运行的原因,我查看了下网上的相关资料,并没有找到合适的解决方法。随后,在MMDetection中找到的一个和我问题一一的issue:import custom model error
后来我找到了解决的方案。我们可以用mmdet中已有的backbone进行训练,是因为这些backbone本身已经被registry,而我们自定义的backbone,需要重新的registry。

随后,我重新pip之后,在命令行输入指令,即可成功。- 终端训练:

- Pycharm训练:

支持,自定义模型训练圆满成功。
ps:有时候不仅仅是自定义的模型,还有一些内置的模型可能也会出现
'xxx is not in the models registry'的问题,一方面可能是mmdet的版本有问题,可以尝试换一个版本;另外一个原因就是配置有问题。而且,这里再补充一个我训练时候觉得很不对劲的bug。我的服务器使用的是4张3090,我设置1卡跑的时候,0卡还是存在2-3g的占用,如下所示:

所以,进行实验的时候需要0卡空余一点空间,才可以正常运行,否则同样会出现OOM的问题。
5. 完整配置
这里附上我使用自定义的模型,使用detr的训练方法,进行口罩数据集的检测的完整配置文件:
- detr_spinmlp_8x2_150e_mask.py
_base_ = [ '../_base_/default_runtime.py' ] # custom_imports = dict( # imports=[ # 'mmdet.models.backbones.spinmlp.py', # ], # allow_failed_imports=False) # model settings model = dict( type='DETR', backbone=dict( type='SpinMLP', patch_size=(16, 16), # [1, 2048, 28, 28] in_c=3, hidden_dim=2048, expansion_factor=4, num_blocks=4, num_classes=80, weightattn=True, Backbone=True), bbox_head=dict( type='DETRHead', num_classes=3, # 类别设置 in_channels=2048, transformer=dict( type='Transformer', encoder=dict( type='DetrTransformerEncoder', num_layers=6, transformerlayers=dict( type='BaseTransformerLayer', # 同样继承自mmcv attn_cfgs=[ dict( type='MultiheadAttention', # MultiheadAttention继承自mmcv embed_dims=256, num_heads=8, dropout=0.1) ], feedforward_channels=2048, ffn_dropout=0.1, operation_order=('self_attn', 'norm', 'ffn', 'norm'))), decoder=dict( type='DetrTransformerDecoder', return_intermediate=True, num_layers=6, transformerlayers=dict( type='DetrTransformerDecoderLayer', attn_cfgs=dict( type='MultiheadAttention', embed_dims=256, num_heads=8, dropout=0.1), feedforward_channels=2048, ffn_dropout=0.1, operation_order=('self_attn', 'norm', 'cross_attn', 'norm', 'ffn', 'norm')), )), positional_encoding=dict( type='SinePositionalEncoding', num_feats=128, normalize=True), loss_cls=dict( type='CrossEntropyLoss', bg_cls_weight=0.1, use_sigmoid=False, loss_weight=1.0, class_weight=1.0), loss_bbox=dict(type='L1Loss', loss_weight=5.0), loss_iou=dict(type='GIoULoss', loss_weight=2.0)), # training and testing settings train_cfg=dict( assigner=dict( type='HungarianAssigner', cls_cost=dict(type='ClassificationCost', weight=1.), reg_cost=dict(type='BBoxL1Cost', weight=5.0, box_format='xywh'), iou_cost=dict(type='IoUCost', iou_mode='giou', weight=2.0))), test_cfg=dict(max_per_img=100)) # dataset settings dataset_type = 'CocoDataset' data_root = 'data/mask/' classes = ('with_mask', 'without_mask', 'mask_weared_incorrect') img_norm_cfg = dict( mean=[123.675, 116.28, 103.53], std=[58.395, 57.12, 57.375], to_rgb=True) # train_pipeline, NOTE the img_scale and the Pad's size_divisor is different # from the default setting in mmdet. train_pipeline = [ dict(type='LoadImageFromFile'), dict(type='LoadAnnotations', with_bbox=True), dict(type='RandomFlip', flip_ratio=0.5), dict(type='Resize', img_scale=(480, 480), multiscale_mode='value', ratio_range=None), # 需要设置为宽高等长 dict(type='Normalize', **img_norm_cfg), dict(type='Pad', pad_to_square=True), # The size and size_divisor must be None when pad2square is True dict(type='DefaultFormatBundle'), dict(type='Collect', keys=['img', 'gt_bboxes', 'gt_labels']) ] # test_pipeline, NOTE the Pad's size_divisor is different from the default # setting (size_divisor=32). While there is little effect on the performance # whether we use the default setting or use size_divisor=1. test_pipeline = [ dict(type='LoadImageFromFile'), dict( type='MultiScaleFlipAug', img_scale=(480, 480), # 需要设置为宽高等长 flip=False, transforms=[ dict(type='Resize', multiscale_mode='value', ratio_range=None), dict(type='RandomFlip'), dict(type='Normalize', **img_norm_cfg), dict(type='Pad', pad_to_square=True), dict(type='ImageToTensor', keys=['img']), dict(type='Collect', keys=['img']) ]) ] data = dict( samples_per_gpu=2, workers_per_gpu=1, train=dict( type=dataset_type, classes=classes, ann_file=data_root + 'annotations/train.json', # 训练集标注文件存放路径 img_prefix=data_root + 'train/', # 训练集图像存放路径 pipeline=train_pipeline), val=dict( type=dataset_type, classes=classes, ann_file=data_root + 'annotations/val.json', img_prefix=data_root + 'val/', pipeline=test_pipeline), test=dict( type=dataset_type, classes=classes, ann_file=data_root + 'annotations/val.json', img_prefix=data_root + 'val/', pipeline=test_pipeline)) # optimizer setting optimizer = dict( type='AdamW', lr=0.0001, weight_decay=0.0001, paramwise_cfg=dict( custom_keys={'backbone': dict(lr_mult=0.1, decay_mult=1.0)})) # config setting evaluation = dict(interval=5, metric='bbox') # 5个epoch验证一次 optimizer_config = dict(grad_clip=dict(max_norm=0.1, norm_type=2)) checkpoint_config = dict(interval=20) # 20个epoch保存一次权重 log_config = dict(interval=20, hooks=[dict(type='TextLoggerHook')]) # learning policy lr_config = dict(policy='step', step=[100]) runner = dict(type='EpochBasedRunner', max_epochs=10)- 1
- 2
- 3
- 4
- 5
- 6
- 7
- 8
- 9
- 10
- 11
- 12
- 13
- 14
- 15
- 16
- 17
- 18
- 19
- 20
- 21
- 22
- 23
- 24
- 25
- 26
- 27
- 28
- 29
- 30
- 31
- 32
- 33
- 34
- 35
- 36
- 37
- 38
- 39
- 40
- 41
- 42
- 43
- 44
- 45
- 46
- 47
- 48
- 49
- 50
- 51
- 52
- 53
- 54
- 55
- 56
- 57
- 58
- 59
- 60
- 61
- 62
- 63
- 64
- 65
- 66
- 67
- 68
- 69
- 70
- 71
- 72
- 73
- 74
- 75
- 76
- 77
- 78
- 79
- 80
- 81
- 82
- 83
- 84
- 85
- 86
- 87
- 88
- 89
- 90
- 91
- 92
- 93
- 94
- 95
- 96
- 97
- 98
- 99
- 100
- 101
- 102
- 103
- 104
- 105
- 106
- 107
- 108
- 109
- 110
- 111
- 112
- 113
- 114
- 115
- 116
- 117
- 118
- 119
- 120
- 121
- 122
- 123
- 124
- 125
- 126
- 127
- 128
- 129
- 130
- 131
- 132
- 133
- 134
- 135
- 136
- 137
- 138
- 139
- 140
- 141
- 142
- 143
- 144
- 145
- 146
- 147
- 148
- 149
- 150
- 151
- 152
- 153
- 154
- 155
- 156
- 157
-
相关阅读:
【更新】ARCGIS之成片区开发方案报备坐标txt格式批量导出工具(定制开发版)
针对springcloud gateway 跨域问题解决方案
Top 8 免费 iOS 系统恢复软件榜单
无代码开发平台权限设置入门教程
MATLAB算法实战应用案例精讲-【智能优化算法】灰狼算法(GWO) (附MATLAB和Python源码)
Linux安装Redis操作
深度学习——第1章 深度学习的概念及神经网络的工作原理
【mysql】【win】Windows安装配置mysql
git commit 提交信息规范
一个函数如何实现return好几个返回值(借鉴学习前辈的文章,链接放文章里了)
- 原文地址:https://blog.csdn.net/weixin_44751294/article/details/126804581
