-
Kubernetes快速部署
Kubernetes快速部署
文章目录
一. 部署k8s
-
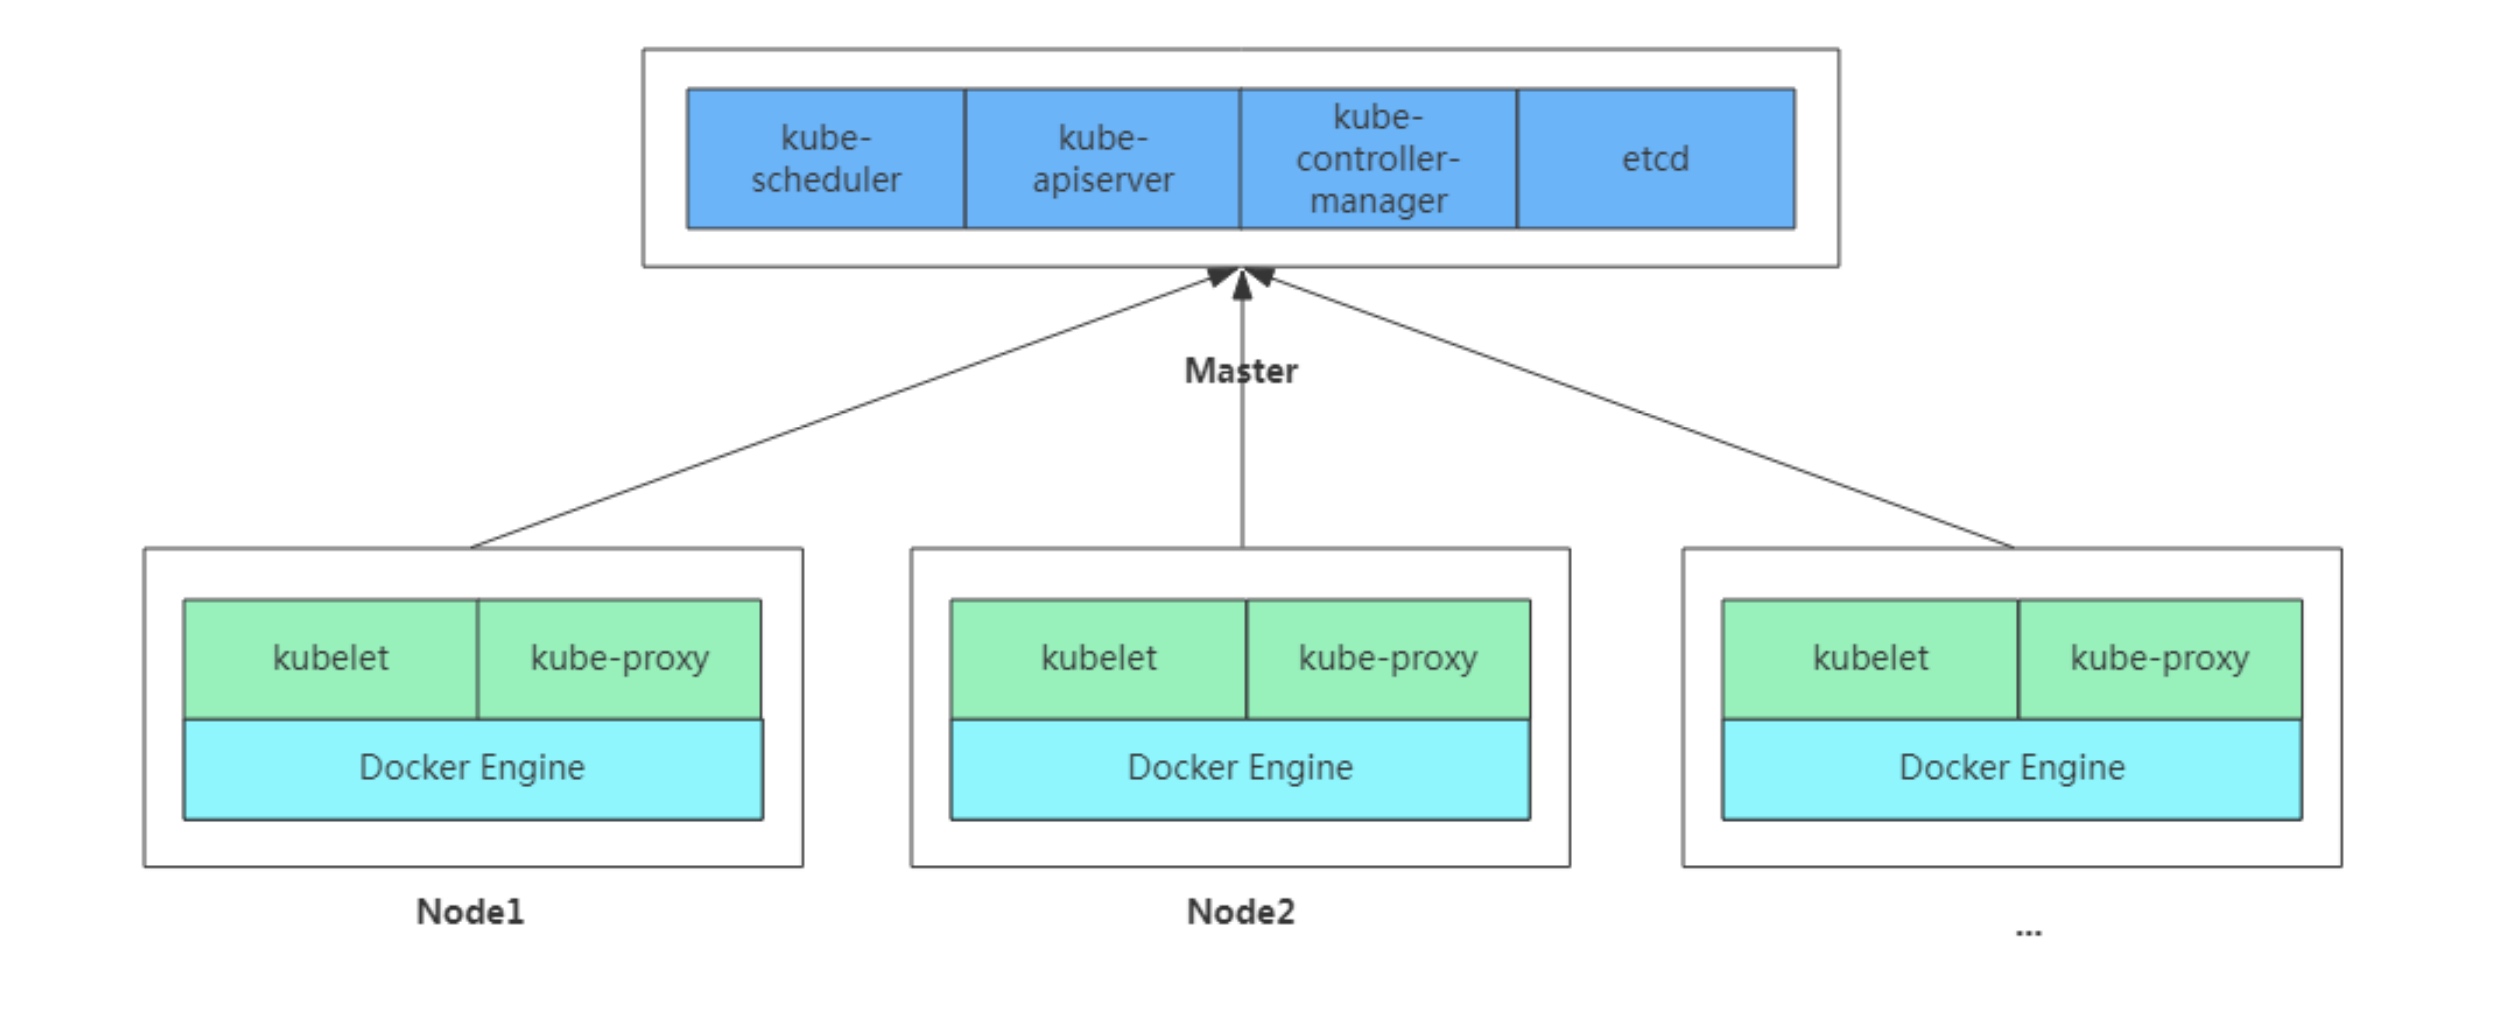
kubeadm是官方社区推出的一个用于快速部署kubernetes集群的工具
-
这个工具能通过两条指令完成一个kubernetes集群的部署:
# 创建一个 Master 节点 $ kubeadm init # 将一个 Node 节点加入到当前集群中 $ kubeadm join <Master节点的IP和端口>- 1
- 2
- 3
- 4
- 5
- 部署方式:
- 二进制部署
- kubeadm部署
ss -antlp 查看哪个服务或端口- 1
1. 安装要求
1.1 在开始之前,部署Kubernetes集群机器需要满足以下几个条件:
-
至少3台机器,操作系统 CentOS7+
-
硬件配置:2GB或更多RAM,2个CPU或更多CPU,硬盘20GB或更多
-
集群中所有机器之间网络互通
-
可以访问外网,需要拉取镜像
-
禁止swap分区
2. 环境
域名 主机 IP k8s-master linux7 192.168.232.128 k8s-node1 linux4 192.168.232.132 k8s-node2 linux6 192.168.232.134 - 我的环境:master:4gh核 node1和2 2g2核
2.1 准备环境,所有主机都要做
一.关闭防火墙和selinux: 1. [root@k8s-master ~]# systemctl disable --now firewalld Removed /etc/systemd/system/multi-user.target.wants/firewalld.service. Removed /etc/systemd/system/dbus-org.fedoraproject.FirewallD1.service. [root@k8s-master ~]# sed -i 's/enforcing/disabled/' /etc/selinux/config [root@k8s-master ~]# 2. [root@k8s-node1 ~]# systemctl disable --now firewalld [root@k8s-node1 ~]# sed -i 's/enforcing/disabled/' /etc/selinux/config 3. [root@k8s-node2 ~]# systemctl disable --now firewalld [root@k8s-node2 ~]# sed -i 's/enforcing/disabled/' /etc/selinux/config 二.关闭swap: 1. [root@k8s-master ~]# vim /etc/fstab #/dev/mapper/rhel-swap //注释 [root@k8s-master ~]# free -m total used free shared buff/cache available Mem: 3709 227 3245 8 237 3245 Swap: 0 0 0 [root@k8s-master ~]# 2. [root@k8s-node1 ~]# vim /etc/fstab 3. [root@k8s-node2 ~]# vim /etc/fstab 三.添加hosts: 1. [root@k8s-master ~]# cat >> /etc/hosts << EOF 192.168.232.128 k8s-master 192.168.232.132 k8s-node1 192.168.232.134 k8s-node2 EOF [root@k8s-master ~]# cat /etc/hosts 127.0.0.1 localhost localhost.localdomain localhost4 localhost4.localdomain4 ::1 localhost localhost.localdomain localhost6 localhost6.localdomain6 192.168.232.128 k8s-master 192.168.232.132 k8s-node1 192.168.232.134 k8s-node2 [root@k8s-master ~]# 2. [root@k8s-node1 ~]# cat >> /etc/hosts << EOF 192.168.232.128 k8s-master 192.168.232.132 k8s-node1 192.168.232.134 k8s-node2 EOF [root@k8s-node1 ~]# 3. [root@k8s-node2 ~]# cat >> /etc/hosts << EOF 192.168.232.128 k8s-master 192.168.232.132 k8s-node1 192.168.232.134 k8s-node2 EOF [root@k8s-node2 ~]# 四.验证: [root@k8s-master ~]# ping k8s-master PING k8s-master (192.168.232.128) 56(84) bytes of data. 64 bytes from k8s-master (192.168.232.128): icmp_seq=1 ttl=64 time=0.021 ms ^C --- k8s-master ping statistics --- 1 packets transmitted, 1 received, 0% packet loss, time 0ms rtt min/avg/max/mdev = 0.021/0.021/0.021/0.000 ms [root@k8s-master ~]# ping k8s-node1 PING k8s-node1 (192.168.232.132) 56(84) bytes of data. 64 bytes from k8s-node1 (192.168.232.132): icmp_seq=1 ttl=64 time=0.278 ms ^C --- k8s-node1 ping statistics --- 1 packets transmitted, 1 received, 0% packet loss, time 0ms rtt min/avg/max/mdev = 0.278/0.278/0.278/0.000 ms [root@k8s-master ~]# ping k8s-node2 PING k8s-node2 (192.168.232.134) 56(84) bytes of data. 64 bytes from k8s-node2 (192.168.232.134): icmp_seq=1 ttl=64 time=0.245 ms ^C --- k8s-node2 ping statistics --- 1 packets transmitted, 1 received, 0% packet loss, time 0ms rtt min/avg/max/mdev = 0.245/0.245/0.245/0.000 ms [root@k8s-master ~]# 五.将桥接的IPv4流量传递到iptables的链: 1. [root@k8s-master ~]# cat > /etc/sysctl.d/k8s.conf << EOF net.bridge.bridge-nf-call-ip6tables = 1 net.bridge.bridge-nf-call-iptables = 1 EOF [root@k8s-master ~]# cat /etc/sysctl.d/k8s.conf net.bridge.bridge-nf-call-ip6tables = 1 net.bridge.bridge-nf-call-iptables = 1 [root@k8s-master ~]# sysctl --system # 生效 * Applying /usr/lib/sysctl.d/10-default-yama-scope.conf ... kernel.yama.ptrace_scope = 0 * Applying /usr/lib/sysctl.d/50-coredump.conf ... kernel.core_pattern = |/usr/lib/systemd/systemd-coredump %P %u %g %s %t %c %h %e kernel.core_pipe_limit = 16 * Applying /usr/lib/sysctl.d/50-default.conf ... kernel.sysrq = 16 kernel.core_uses_pid = 1 kernel.kptr_restrict = 1 net.ipv4.conf.all.rp_filter = 1 net.ipv4.conf.all.accept_source_route = 0 net.ipv4.conf.all.promote_secondaries = 1 net.core.default_qdisc = fq_codel fs.protected_hardlinks = 1 fs.protected_symlinks = 1 * Applying /usr/lib/sysctl.d/50-libkcapi-optmem_max.conf ... net.core.optmem_max = 81920 * Applying /usr/lib/sysctl.d/50-pid-max.conf ... kernel.pid_max = 4194304 * Applying /etc/sysctl.d/99-sysctl.conf ... * Applying /etc/sysctl.d/k8s.conf ... * Applying /etc/sysctl.conf ... #应用/etc/sysctl.conf看到这个文件显示生效了 [root@k8s-master ~]# 2. [root@k8s-node1 ~]# cat > /etc/sysctl.d/k8s.conf << EOF net.bridge.bridge-nf-call-ip6tables = 1 net.bridge.bridge-nf-call-iptables = 1 EOF [root@k8s-node1 ~]# [root@k8s-node1 ~]# sysctl --system * Applying /etc/sysctl.d/99-sysctl.conf ... * Applying /etc/sysctl.d/k8s.conf ... * Applying /etc/sysctl.conf ... [root@k8s-node1 ~]# 3. [root@k8s-node2 ~]# cat > /etc/sysctl.d/k8s.conf << EOF net.bridge.bridge-nf-call-ip6tables = 1 net.bridge.bridge-nf-call-iptables = 1 EOF [root@k8s-node2 ~]# [root@k8s-node2 ~]# sysctl --system * Applying /etc/sysctl.d/99-sysctl.conf ... * Applying /etc/sysctl.d/k8s.conf ... * Applying /etc/sysctl.conf ... [root@k8s-node2 ~]# 六.时间同步: 1. [root@k8s-master ~]# yum -y install chrony [root@k8s-master ~]# systemctl enable --now chronyd [root@k8s-master ~]# vim /etc/chrony.conf pool time1.aliyum.com iburst 2. [root@k8s-node1 ~]# yum -y install chrony [root@k8s-node1 ~]# systemctl enable --now chronyd [root@k8s-node1 ~]# vim /etc/chrony.conf 3. [root@k8s-node2 ~]# yum -y install chrony [root@k8s-node2 ~]# systemctl enable --now chronyd [root@k8s-node2 ~]# vim /etc/chrony.conf 七.免密认证: [root@k8s-master ~]# ssh-keygen -t rsa [root@k8s-master ~]# ssh-copy-id k8s-master [root@k8s-master ~]# ssh-copy-id k8s-node1 [root@k8s-master ~]# ssh-copy-id k8s-node2 [root@k8s-master ~]# ssh k8s-node1 Last failed login: Tue Sep 6 10:05:32 CST 2022 from 192.168.232.128 on ssh:notty There was 1 failed login attempt since the last successful login. Last login: Tue Sep 6 09:35:13 2022 from 192.168.232.1 [root@k8s-node1 ~]# exit logout Connection to k8s-node1 closed. [root@k8s-master ~]# ssh k8s-node2 Last failed login: Tue Sep 6 10:05:50 CST 2022 from 192.168.232.128 on ssh:notty There was 1 failed login attempt since the last successful login. Last login: Tue Sep 6 09:35:20 2022 from 192.168.232.1 [root@k8s-node2 ~]# exit logout Connection to k8s-node2 closed. [root@k8s-master ~]# ssh k8s-master Last failed login: Tue Sep 6 10:05:03 CST 2022 from 192.168.232.128 on ssh:notty There was 1 failed login attempt since the last successful login. Last login: Tue Sep 6 09:35:09 2022 from 192.168.232.1 [root@k8s-master ~]# exit logout Connection to k8s-master closed. [root@k8s-master ~]# 八: 重启主机- 1
- 2
- 3
- 4
- 5
- 6
- 7
- 8
- 9
- 10
- 11
- 12
- 13
- 14
- 15
- 16
- 17
- 18
- 19
- 20
- 21
- 22
- 23
- 24
- 25
- 26
- 27
- 28
- 29
- 30
- 31
- 32
- 33
- 34
- 35
- 36
- 37
- 38
- 39
- 40
- 41
- 42
- 43
- 44
- 45
- 46
- 47
- 48
- 49
- 50
- 51
- 52
- 53
- 54
- 55
- 56
- 57
- 58
- 59
- 60
- 61
- 62
- 63
- 64
- 65
- 66
- 67
- 68
- 69
- 70
- 71
- 72
- 73
- 74
- 75
- 76
- 77
- 78
- 79
- 80
- 81
- 82
- 83
- 84
- 85
- 86
- 87
- 88
- 89
- 90
- 91
- 92
- 93
- 94
- 95
- 96
- 97
- 98
- 99
- 100
- 101
- 102
- 103
- 104
- 105
- 106
- 107
- 108
- 109
- 110
- 111
- 112
- 113
- 114
- 115
- 116
- 117
- 118
- 119
- 120
- 121
- 122
- 123
- 124
- 125
- 126
- 127
- 128
- 129
- 130
- 131
- 132
- 133
- 134
- 135
- 136
- 137
- 138
- 139
- 140
- 141
- 142
- 143
- 144
- 145
- 146
- 147
- 148
- 149
- 150
- 151
- 152
- 153
- 154
- 155
- 156
- 157
- 158
- 159
- 160
- 161
- 162
- 163
- 164
- 165
- 166
- 167
- 168
- 169
- 170
- 171
- 172
- 173
- 174
- 175
- 176
- 177
- 178
- 179
- 180
- 181
- 182
- 183
- 184
- 185
- 186
- 187
- 188
- 189
- 190
- 191
- 192
- 193
- 194
- 195
- 196
- 197
- 198
- 199
- 200
- 201
3. 所有节点安装Docker/kubeadm/kubelet
- Kubernetes默认CRI(容器运行时)为Docker,因此先安装Docker
3.1 安装Docker
一. 下载docker-ce源 1. [root@k8s-master ~]# cd /etc/yum.repos.d/ [root@k8s-master yum.repos.d]# wget https://mirrors.aliyun.com/docker-ce/linux/centos/docker-ce.repo -O /etc/yum.repos.d/docker-ce.repo [root@k8s-master yum.repos.d]# ls CentOS-Base.repo epel-testing-modular.repo redhat.repo docker-ce.repo epel-testing.repo epel-modular.repo epel.repo [root@k8s-master yum.repos.d]# 2. [root@k8s-node1 ~]# wget https://mirrors.aliyun.com/docker-ce/linux/centos/docker-ce.repo -O /etc/yum.repos.d/docker-ce.repo 3. [root@k8s-node2 ~]# wget https://mirrors.aliyun.com/docker-ce/linux/centos/docker-ce.repo -O /etc/yum.repos.d/docker-ce.repo 二.安装docker-ce 1. [root@k8s-master ~]# yum -y install docker-ce [root@k8s-master ~]# systemctl enable --now docker Created symlink /etc/systemd/system/multi-user.target.wants/docker.service → /usr/lib/systemd/system/docker.service. [root@k8s-master ~]# [root@k8s-master ~]# docker --version Docker version 20.10.17, build 100c701 2. [root@k8s-node1 ~]# yum -y install docker-ce [root@k8s-node1 ~]# systemctl enable --now docker Created symlink /etc/systemd/system/multi-user.target.wants/docker.service 鈫� /usr/lib/systemd/system/docker.service. [root@k8s-node1 ~]# [root@k8s-node1 ~]# docker --version Docker version 20.10.17, build 100c701 3. [root@k8s-node2 ~]# yum -y install docker-ce [root@k8s-node2 ~]# systemctl enable --now docker Created symlink /etc/systemd/system/multi-user.target.wants/docker.service 鈫� /usr/lib/systemd/system/docker.service. [root@k8s-node2 ~]# [root@k8s-node2 ~]# docker --version Docker version 20.10.17, build 100c701 三.配置加速器 1. [root@k8s-master ~]# cat > /etc/docker/daemon.json << EOF { "registry-mirrors": ["https://szudx43q.mirror.aliyuncs.com"], "exec-opts": ["native.cgroupdriver=systemd"], "log-driver": "json-file", "log-opts": { "max-size": "100m" }, "storage-driver": "overlay2" } EOF [root@k8s-master ~]# cat /etc/docker/daemon.json { "registry-mirrors": ["https://szudx43q.mirror.aliyuncs.com"], ////自己的加速器地址在阿里云https://cr.console.aliyun.com/cn-hangzhou/instances/mirrors "exec-opts": ["native.cgroupdriver=systemd"], "log-driver": "json-file", "log-opts": { "max-size": "100m" }, "storage-driver": "overlay2" } [root@k8s-master ~]# systemctl daemon-reload [root@k8s-master ~]# systemctl restart docker 2. [root@k8s-node1 ~]# cat > /etc/docker/daemon.json << EOF { "registry-mirrors": ["https://szudx43q.mirror.aliyuncs.com"], "exec-opts": ["native.cgroupdriver=systemd"], "log-driver": "json-file", "log-opts": { "max-size": "100m" }, "storage-driver": "overlay2" } EOF 3. [root@k8s-node2 ~]# cat > /etc/docker/daemon.json << EOF { "registry-mirrors": ["https://szudx43q.mirror.aliyuncs.com"], "exec-opts": ["native.cgroupdriver=systemd"], "log-driver": "json-file", "log-opts": { "max-size": "100m" }, "storage-driver": "overlay2" } EOF- 1
- 2
- 3
- 4
- 5
- 6
- 7
- 8
- 9
- 10
- 11
- 12
- 13
- 14
- 15
- 16
- 17
- 18
- 19
- 20
- 21
- 22
- 23
- 24
- 25
- 26
- 27
- 28
- 29
- 30
- 31
- 32
- 33
- 34
- 35
- 36
- 37
- 38
- 39
- 40
- 41
- 42
- 43
- 44
- 45
- 46
- 47
- 48
- 49
- 50
- 51
- 52
- 53
- 54
- 55
- 56
- 57
- 58
- 59
- 60
- 61
- 62
- 63
- 64
- 65
- 66
- 67
- 68
- 69
- 70
- 71
- 72
- 73
- 74
- 75
- 76
- 77
- 78
- 79
- 80
- 81
- 82
- 83
- 84
- 85
- 86
- 87
- 88
- 89
- 90
- 91
- 92
- 93
- 94
- 95
- 96
- 97
- 98
- 99
- 100
- 101
- 102
- 103
- 104
3.2 添加kubernetes阿里云YUM软件源
1. [root@k8s-master ~]# cat > /etc/yum.repos.d/kubernetes.repo << EOF [kubernetes] name=Kubernetes baseurl=https://mirrors.aliyun.com/kubernetes/yum/repos/kubernetes-el7-x86_64 enabled=1 gpgcheck=0 repo_gpgcheck=0 gpgkey=https://mirrors.aliyun.com/kubernetes/yum/doc/yum-key.gpg https://mirrors.aliyun.com/kubernetes/yum/doc/rpm-package-key.gpg EOF 2. [root@k8s-node2 ~]# cat > /etc/yum.repos.d/kubernetes.repo << EOF [kubernetes] name=Kubernetes baseurl=https://mirrors.aliyun.com/kubernetes/yum/repos/kubernetes-el7-x86_64 enabled=1 gpgcheck=0 repo_gpgcheck=0 gpgkey=https://mirrors.aliyun.com/kubernetes/yum/doc/yum-key.gpg https://mirrors.aliyun.com/kubernetes/yum/doc/rpm-package-key.gpg EOF [root@k8s-node1 ~]# 3. [root@k8s-node1 ~]# cat > /etc/yum.repos.d/kubernetes.repo << EOF [kubernetes] name=Kubernetes baseurl=https://mirrors.aliyun.com/kubernetes/yum/repos/kubernetes-el7-x86_64 enabled=1 gpgcheck=0 repo_gpgcheck=0 gpgkey=https://mirrors.aliyun.com/kubernetes/yum/doc/yum-key.gpg https://mirrors.aliyun.com/kubernetes/yum/doc/rpm-package-key.gpg EOF [root@k8s-node2 ~]#- 1
- 2
- 3
- 4
- 5
- 6
- 7
- 8
- 9
- 10
- 11
- 12
- 13
- 14
- 15
- 16
- 17
- 18
- 19
- 20
- 21
- 22
- 23
- 24
- 25
- 26
- 27
- 28
- 29
- 30
- 31
- 32
- 33
- 34
3.3 安装kubeadm,kubelet和kubectl
- 由于版本更新频繁,这里指定版本号部署:这里安装v1.25.0
1. [root@k8s-master ~]# yum install -y kubelet-1.25.0 kubeadm-1.25.0 kubectl-1.25.0 [root@k8s-master ~]# systemctl enable kubelet Created symlink /etc/systemd/system/multi-user.target.wants/kubelet.service → /usr/lib/systemd/system/kubelet.service. [root@k8s-master ~]# 2. [root@k8s-node1 ~]# yum install -y kubelet-1.25.0 kubeadm-1.25.0 kubectl-1.25.0 [root@k8s-node1 ~]# rpm -qa|grep kubelet kubelet-1.25.0-0.x86_64 [root@k8s-node1 ~]# rpm -qa|grep kubeadm kubeadm-1.25.0-0.x86_64 [root@k8s-node1 ~]# rpm -qa|grep kubectl kubectl-1.25.0-0.x86_64 [root@k8s-node1 ~]# [root@k8s-node1 ~]# systemctl enable kubelet Created symlink /etc/systemd/system/multi-user.target.wants/kubelet.service 鈫� /usr/lib/systemd/system/kubelet.service. 3. [root@k8s-node2 ~]# yum install -y kubelet-1.25.0 kubeadm-1.25.0 kubectl-1.25.0 [root@k8s-node2 ~]# systemctl enable kubelet Created symlink /etc/systemd/system/multi-user.target.wants/kubelet.service 鈫� /usr/lib/systemd/system/kubelet.service.- 1
- 2
- 3
- 4
- 5
- 6
- 7
- 8
- 9
- 10
- 11
- 12
- 13
- 14
- 15
- 16
- 17
- 18
- 19
- 20
- 21
- 22
- 23
- 24
4. 部署Kubernetes Master
- 在 192.168.232.128 (k8s-master)执行
4.1 执行init
[root@k8s-master ~]# cd /etc/containerd/ [root@k8s-master containerd]# ls config.toml [root@k8s-master containerd]# vim config.toml #disabled_plugins = ["cri"] //注释掉 [root@k8s-master containerd]# systemctl restart containerd [root@k8s-master ~]# kubeadm init --apiserver-advertise-address 192.168.232.128 --image-repository registry.aliyuncs.com/google_containers --kubernetes-version v1.25.0 --service-cidr 10.96.0.0/12 --pod-network-cidr 10.244.0.0/16 出现这个问题: [kubelet-check] Initial timeout of 40s passed. 解决: [root@k8s-master ~]# mkdir /etc/containerd -p [root@k8s-master ~]# containerd config default > /etc/containerd/con [root@k8s-master ~]# vim /etc/containerd/config.toml [root@k8s-master ~]# sandbox_image = "registry.cn-beijing.aliyuncs.com/abcdocker/pause:3.6" 进入之后全局配置 :%s#k8s.gcr.io#registry.cn-beijing.aliyuncs.com/abcdocker#g [root@k8s-master ~]# systemctl restart containerd [root@k8s-master ~]# kubeadm init --apiserver-advertise-address 192.168.232.128 --image-repository registry.aliyuncs.com/google_containers --kubernetes-version v1.25.0 --service-cidr 10.96.0.0/12 --pod-network-cidr 10.244.0.0/16 解释: # kubeadm init \ --apiserver-advertise-address=192.168.122.131 \ #这是指定地址 --image-repository registry.aliyuncs.com/google_containers \ #这是因为源在国外要想拉取只能翻墙或者去阿里云里面用谷歌的(因为谷歌拉下来了) --kubernetes-version v1.20.0 \ #版本号 --service-cidr=10.96.0.0/12 \ #service网络 --pod-network-cidr=10.244.0.0/16 #pod网络,默认的 将初始化保存一下 [root@k8s-master ~]# cat k8s.txt Your Kubernetes control-plane has initialized successfully! 您的Kubernetes控制平面初始化成功! To start using your cluster, you need to run the following as a regular user: 要开始使用你的集群,你需要以普通用户的身份运行以下命令: /////普通用户做下面几部 mkdir -p $HOME/.kube sudo cp -i /etc/kubernetes/admin.conf $HOME/.kube/config sudo chown $(id -u):$(id -g) $HOME/.kube/config ////// Alternatively, if you are the root user, you can run: #如果是管理员的话需要把下面的配置写到文件里面去 /// export KUBECONFIG=/etc/kubernetes/admin.conf //// You should now deploy a pod network to the cluster. Run "kubectl apply -f [podnetwork].yaml" with one of the options listed at:#你需要部署你的网络到kubectl apply -f [podnetwork].yaml里面去,而文件的位置在下面 https://kubernetes.io/docs/concepts/cluster-administration/addons/ Then you can join any number of worker nodes by running the following on each as root: kubeadm join 192.168.232.128:6443 --token 2fczj6.ezb1syjg7bpix9gu \ --discovery-token-ca-cert-hash sha256:500bce1ee33fa0c362b6c928f2d45905ee47daae5868e67cc8b37a7ed60a1a13 [root@k8s-master ~]# 根据上面文件提醒,由于我是root账户,所以只需要写一条配置文件就好 [root@k8s-master ~]# echo 'export KUBECONFIG=/etc/kubernetes/admin.conf' > /etc/profile.d/k8s.sh [root@k8s-master ~]# source /etc/profile.d/k8s.sh [root@k8s-master ~]# cat /etc/profile.d/k8s.sh export KUBECONFIG=/etc/kubernetes/admin.conf [root@k8s-master ~]# echo $KUBECONFIG /etc/kubernetes/admin.conf 查看node状态 [root@k8s-master ~]# kubectl get nodes NAME STATUS ROLES AGE VERSION k8s-master NotReady control-plane 15m v1.25.0 [root@k8s-master ~]#- 1
- 2
- 3
- 4
- 5
- 6
- 7
- 8
- 9
- 10
- 11
- 12
- 13
- 14
- 15
- 16
- 17
- 18
- 19
- 20
- 21
- 22
- 23
- 24
- 25
- 26
- 27
- 28
- 29
- 30
- 31
- 32
- 33
- 34
- 35
- 36
- 37
- 38
- 39
- 40
- 41
- 42
- 43
- 44
- 45
- 46
- 47
- 48
- 49
- 50
- 51
- 52
- 53
- 54
- 55
- 56
- 57
- 58
- 59
- 60
- 61
- 62
- 63
- 64
- 65
- 66
- 67
- 68
- 69
- 70
- 71
- 72
- 73
- 74
- 75
- 76
- 77
- 78
- 79
- 80
4.2 使用kubectl工具
普通用户做下面几部: # mkdir -p $HOME/.kube # sudo cp -i /etc/kubernetes/admin.conf $HOME/.kube/config # sudo chown $(id -u):$(id -g) $HOME/.kube/config # kubectl get nodes- 1
- 2
- 3
- 4
- 5
- 6
5. 安装Pod网络插件(CNI)
[root@k8s-master ~]# kubectl apply -f https://raw.githubusercontent.com/coreos/flannel/master/Documentation/kube-flannel.yml namespace/kube-flannel created clusterrole.rbac.authorization.k8s.io/flannel created clusterrolebinding.rbac.authorization.k8s.io/flannel created serviceaccount/flannel created configmap/kube-flannel-cfg created daemonset.apps/kube-flannel-ds created 确保能够访问到quay.io这个registery 或者使用这种方法:二选一 [root@k8s-master ~]# wget https://raw.githubusercontent.com/flannel-io/flannel/master/Documentation/kube-flannel.yml [root@k8s-master ~]# kubectl apply -f kube-flannel.yml- 1
- 2
- 3
- 4
- 5
- 6
- 7
- 8
- 9
- 10
- 11
- 12
- 13
- 14
6. 加入Kubernetes Node
- 在192.168.232.132、192.168.232.134上(Node)执行。
[root@k8s-node1 ~]# kubeadm join 192.168.232.128:6443 --token 2fczj6.ezb1syjg7bpix9gu \ --discovery-token-ca-cert-hash sha256:500bce1ee33fa0c362b6c928f2d45905ee47daae5868e67cc8b37a7ed60a1a13 出现问题: [preflight] Running pre-flight checks [WARNING FileExisting-tc]: tc not found in system path error execution phase preflight: [preflight] Some fatal errors occurred: [ERROR CRI]: container runtime is not running: output: E0906 18:46:53.158450 904093 remote_runtime.go:925] "Status from runtime service failed" err="rpc error: code = Unimplemented desc = unknown service runtime.v1alpha2.RuntimeService" time="2022-09-06T18:46:53+08:00" level=fatal msg="getting status of runtime: rpc error: code = Unimplemented desc = unknown service runtime.v1alpha2.RuntimeService" , error: exit status 1 [preflight] If you know what you are doing, you can make a check non-fatal with `--ignore-preflight-errors=...` To see the stack trace of this error execute with --v=5 or higher 解决: [root@k8s-master ~]# cd /etc/containerd/ [root@k8s-master containerd]# ls config.toml [root@k8s-master containerd]# scp config.toml k8s-node1:/etc/containerd/ config.toml 100% 6952 3.3MB/s 00:00 [root@k8s-master containerd]# scp config.toml k8s-node2:/etc/containerd/ config.toml 100% 6952 2.8MB/s 00:00 [root@k8s-master containerd]# 然后重启node节点 1. [root@k8s-node1 ~]# systemctl restart containerd 2. [root@k8s-node2 ~]# systemctl restart containerd 再次执行 1. [root@k8s-node1 ~]# kubeadm join 192.168.232.128:6443 --token 2fczj6.ezb1syjg7bpix9gu --discovery-token-ca-cert-hash sha256:500bce1ee33fa0c362b6c928f2d45905ee47daae5868e67cc8b37a7ed60a1a13 出现这个显示成功 This node has joined the cluster: * Certificate signing request was sent to apiserver and a response was received. * The Kubelet was informed of the new secure connection details. Run 'kubectl get nodes' on the control-plane to see this node join the cluster. 该节点已加入集群: *向apiserver发送证书签名请求,并收到响应。 * Kubelet被告知新的安全连接细节。 在控制平面上运行'kubectl get nodes',可以看到这个节点加入了集群。 2. [root@k8s-node2 ~]# kubeadm join 192.168.232.128:6443 --token 2fczj6.ezb1syjg7bpix9gu --discovery-token-ca-cert-hash sha256:500bce1ee33fa0c362b6c928f2d45905ee47daae5868e67cc8b37a7ed60a1a13 This node has joined the cluster: * Certificate signing request was sent to apiserver and a response was received. * The Kubelet was informed of the new secure connection details. Run 'kubectl get nodes' on the control-plane to see this node join the cluster. [root@k8s-node2 ~]#- 1
- 2
- 3
- 4
- 5
- 6
- 7
- 8
- 9
- 10
- 11
- 12
- 13
- 14
- 15
- 16
- 17
- 18
- 19
- 20
- 21
- 22
- 23
- 24
- 25
- 26
- 27
- 28
- 29
- 30
- 31
- 32
- 33
- 34
- 35
- 36
- 37
- 38
- 39
- 40
- 41
- 42
- 43
- 44
- 45
- 46
- 47
- 48
- 49
- 50
- 51
- 52
- 53
- 54
- 55
- 56
- 57
- 58
- 59
- 60
- 61
7. 在node节点上配置使
kubectl get nodes命令可以使用将两个文件传过去 1. [root@k8s-master ~]# cat /etc/profile.d/k8s.sh export KUBECONFIG=/etc/kubernetes/admin.conf [root@k8s-master ~]# scp /etc/kubernetes/admin.conf k8s-node1:/etc/kubernetes/ admin.conf 100% 5643 3.4MB/s 00:00 [root@k8s-master ~]# scp /etc/kubernetes/admin.conf k8s-node2:/etc/kubernetes/ admin.conf 100% 5643 1.2KB/s 00:04 [root@k8s-master ~]# scp /etc/profile.d/k8s.sh k8s-node1:/etc/profile.d/ k8s.sh 100% 45 27.0KB/s 00:00 [root@k8s-master ~]# scp /etc/profile.d/k8s.sh k8s-node2:/etc/profile.d/ k8s.sh 100% 45 26.5KB/s 00:00 [root@k8s-master ~]# 2. 查看,并生效 [root@k8s-node1 ~]# cat /etc/profile.d/k8s.sh export KUBECONFIG=/etc/kubernetes/admin.conf [root@k8s-node1 ~]# ls /etc/kubernetes/admin.conf /etc/kubernetes/admin.conf [root@k8s-node1 ~]# bash [root@k8s-node1 ~]# [root@k8s-node1 ~]# kubectl get nodes NAME STATUS ROLES AGE VERSION k8s-master Ready control-plane 5h35m v1.25.0 k8s-node1 Ready <none> 18m v1.25.0 k8s-node2 Ready <none> 17m v1.25.0 [root@k8s-node1 ~]# 3. 查看,并生效 [root@k8s-node2 ~]# docker images REPOSITORY TAG IMAGE ID CREATED SIZE [root@k8s-node2 ~]# cat /etc/profile.d/k8s.sh export KUBECONFIG=/etc/kubernetes/admin.conf [root@k8s-node2 ~]# ls /etc/kubernetes/admin.conf /etc/kubernetes/admin.conf [root@k8s-node2 ~]# bash [root@k8s-node2 ~]# [root@k8s-node2 ~]# kubectl get nodes NAME STATUS ROLES AGE VERSION k8s-master Ready control-plane 5h35m v1.25.0 k8s-node1 Ready <none> 18m v1.25.0 k8s-node2 Ready <none> 17m v1.25.0 [root@k8s-node2 ~]#- 1
- 2
- 3
- 4
- 5
- 6
- 7
- 8
- 9
- 10
- 11
- 12
- 13
- 14
- 15
- 16
- 17
- 18
- 19
- 20
- 21
- 22
- 23
- 24
- 25
- 26
- 27
- 28
- 29
- 30
- 31
- 32
- 33
- 34
- 35
- 36
- 37
- 38
- 39
- 40
- 41
- 42
- 43
- 44
- 45
- 46
8. 测试kubernetes集群
- 在Kubernetes集群中创建一个pod,验证是否正常运行:
# kubectl create deployment nginx --image=nginx # kubectl expose deployment nginx --port=80 --type=NodePort # kubectl get pod,svc create deployment nginx --image=nginx deployment:控制器 名字为:nginx 镜像为:nginx kubectl expose deployment nginx --port=80 --type=NodePort expose:暴露 port:端口 type:节点端口 kubectl get pod,svc get:获取 svc/service:(服务)- 1
- 2
- 3
- 4
- 5
- 6
- 7
- 8
- 9
- 10
- 11
- 12
- 13
- 14
- 15
- 16
- 17
- 访问地址:http://NodeIP:Port
8.1 在Kubernetes集群中创建一个pod,验证是否正常运行
[root@k8s-master ~]# kubectl create deployment nginx --image=nginx deployment.apps/nginx created [root@k8s-master ~]# kubectl expose deployment nginx --port=80 --type=NodePort service/nginx exposed [root@k8s-master ~]# kubectl get pod,svc//也可分开 NAME READY STATUS RESTARTS AGE pod/nginx-76d6c9b8c-s85j8 1/1 Running 0 65s NAME TYPE CLUSTER-IP EXTERNAL-IP PORT(S) AGE service/kubernetes ClusterIP 10.96.0.1 <none> 443/TCP 5h38m service/nginx NodePort 10.105.183.188 <none> 80:30735/TCP 14s [root@k8s-master ~]# [root@k8s-master ~]# kubectl get pod NAME READY STATUS RESTARTS AGE nginx-76d6c9b8c-s85j8 1/1 Running 0 11m [root@k8s-master ~]# kubectl get svc NAME TYPE CLUSTER-IP EXTERNAL-IP PORT(S) AGE kubernetes ClusterIP 10.96.0.1 <none> 443/TCP 5h49m nginx NodePort 10.105.183.188 <none> 80:30735/TCP 11m [root@k8s-master ~]# 访问: [root@k8s-master ~]# curl 10.105.183.188 <!DOCTYPE html> <html> <head> <title>Welcome to nginx! <style> html { color-scheme: light dark; } body { width: 35em; margin: 0 auto; font-family: Tahoma, Verdana, Arial, sans-serif; } </style> </head> <body> <h1>Welcome to nginx! <p>If you see this page, the nginx web server is successfully installed and working. Further configuration is required.</p> <p>For online documentation and support please refer to <a href="http://nginx.org/">nginx.org</a>.<br/> Commercial support is available at <a href="http://nginx.com/">nginx.com</a>.</p> <p><em>Thank you for using nginx.</em></p> </body> </html> [root@k8s-master ~]#- 1
- 2
- 3
- 4
- 5
- 6
- 7
- 8
- 9
- 10
- 11
- 12
- 13
- 14
- 15
- 16
- 17
- 18
- 19
- 20
- 21
- 22
- 23
- 24
- 25
- 26
- 27
- 28
- 29
- 30
- 31
- 32
- 33
- 34
- 35
- 36
- 37
- 38
- 39
- 40
- 41
- 42
- 43
- 44
- 45
- 46
- 47
- 48
- 49
- 50
- 在浏览器访问:http://192.168.232.128:30735/ 节点ip+暴露的端口
![[外链图片转存失败,源站可能有防盗链机制,建议将图片保存下来直接上传(img-Z90Aw1iH-1662463603356)(image-20220906192118549.png)]](https://1000bd.com/contentImg/2023/10/30/232247137.png)
9. 简单命令使用
[root@k8s-master ~]# docker images REPOSITORY TAG IMAGE ID CREATED SIZE [root@k8s-master ~]# kubectl get nodes NAME STATUS ROLES AGE VERSION k8s-master Ready control-plane 5h20m v1.25.0 k8s-node1 Ready <none> 3m31s v1.25.0 k8s-node2 Ready <none> 2m6s v1.25.0 [root@k8s-master ~]# kubectl get pods No resources found in default namespace. [root@k8s-master ~]# kubectl get ns NAME STATUS AGE default Active 5h21m kube-flannel Active 5h2m kube-node-lease Active 5h21m kube-public Active 5h21m kube-system Active 5h21m [root@k8s-master ~]# kubectl get -n kube-system pods NAME READY STATUS RESTARTS AGE coredns-c676cc86f-44bsf 1/1 Running 0 5h22m coredns-c676cc86f-fbb7f 1/1 Running 0 5h22m etcd-k8s-master 1/1 Running 0 5h22m kube-apiserver-k8s-master 1/1 Running 0 5h22m kube-controller-manager-k8s-master 1/1 Running 0 5h22m kube-proxy-65lcn 1/1 Running 0 5h22m kube-proxy-lw4z2 1/1 Running 0 4m29s kube-proxy-zskvf 1/1 Running 0 5m54s kube-scheduler-k8s-master 1/1 Running 0 5h22m [root@k8s-master ~]# 查看容器在哪运行的就在后面加一个 -o 选项 [root@k8s-master ~]# kubectl get -n kube-system pods -o wide NAME READY STATUS RESTARTS AGE IP NODE NOMINATED NODE READINESS GATES coredns-c676cc86f-44bsf 1/1 Running 0 5h25m 10.244.0.3 k8s-master <none> <none> coredns-c676cc86f-fbb7f 1/1 Running 0 5h25m 10.244.0.2 k8s-master <none> <none> etcd-k8s-master 1/1 Running 0 5h25m 192.168.232.128 k8s-master <none> <none> kube-apiserver-k8s-master 1/1 Running 0 5h25m 192.168.232.128 k8s-master <none> <none> kube-controller-manager-k8s-master 1/1 Running 0 5h25m 192.168.232.128 k8s-master <none> <none> kube-proxy-65lcn 1/1 Running 0 5h25m 192.168.232.128 k8s-master <none> <none> kube-proxy-lw4z2 1/1 Running 0 7m38s 192.168.232.134 k8s-node2 <none> <none> kube-proxy-zskvf 1/1 Running 0 9m3s 192.168.232.132 k8s-node1 <none> <none> kube-scheduler-k8s-master 1/1 Running 0 5h25m 192.168.232.128 k8s-master <none> <none> [root@k8s-master ~]#- 1
- 2
- 3
- 4
- 5
- 6
- 7
- 8
- 9
- 10
- 11
- 12
- 13
- 14
- 15
- 16
- 17
- 18
- 19
- 20
- 21
- 22
- 23
- 24
- 25
- 26
- 27
- 28
- 29
- 30
- 31
- 32
- 33
- 34
- 35
- 36
- 37
- 38
- 39
- 40
- 41
- 42
- 43
- 44
- 45
- 46
- 47
- 48
- 49
- 50
[root@k8s-master ~]# ss -antl State Recv-Q Send-Q Local Address:Port Peer Address:Port Process LISTEN 0 128 127.0.0.1:2381 0.0.0.0:* LISTEN 0 128 127.0.0.1:10257 0.0.0.0:* LISTEN 0 128 127.0.0.1:10259 0.0.0.0:* LISTEN 0 128 0.0.0.0:22 0.0.0.0:* LISTEN 0 128 127.0.0.1:34713 0.0.0.0:* LISTEN 0 128 127.0.0.1:10248 0.0.0.0:* LISTEN 0 128 127.0.0.1:10249 0.0.0.0:* LISTEN 0 128 192.168.232.128:2379 0.0.0.0:* LISTEN 0 128 127.0.0.1:2379 0.0.0.0:* LISTEN 0 128 192.168.232.128:2380 0.0.0.0:* LISTEN 0 128 *:10256 *:* LISTEN 0 128 [::]:22 [::]:* LISTEN 0 128 *:10250 *:* LISTEN 0 128 *:6443 *:* [root@k8s-master ~]#- 1
- 2
- 3
- 4
- 5
- 6
- 7
- 8
- 9
- 10
- 11
- 12
- 13
- 14
- 15
- 16
- 17
10.
1. [root@k8s-master ~]# kubectl get nodes NAME STATUS ROLES AGE VERSION k8s-master Ready control-plane 6h5m v1.25.0 k8s-node1 Ready <none> 48m v1.25.0 k8s-node2 Ready <none> 47m v1.25.0 [root@k8s-master ~]# reboot 2. [root@k8s-node1 ~]# kubectl get nodes NAME STATUS ROLES AGE VERSION k8s-master Ready control-plane 6h3m v1.25.0 k8s-node1 Ready <none> 46m v1.25.0 k8s-node2 Ready <none> 45m v1.25.0 [root@k8s-node1 ~]# 3. [root@k8s-node2 ~]# kubectl get nodes NAME STATUS ROLES AGE VERSION k8s-master Ready control-plane 6h3m v1.25.0 k8s-node1 Ready <none> 46m v1.25.0 k8s-node2 Ready <none> 45m v1.25.0 [root@k8s-node2 ~]#- 1
- 2
- 3
- 4
- 5
- 6
- 7
- 8
- 9
- 10
- 11
- 12
- 13
- 14
- 15
- 16
- 17
- 18
- 19
- 20
- 21
- 22
- 23
- 24
-
-
相关阅读:
ip报头和ip报文切片组装问题
05-React Antd UI库
金山wps golang面试题总结
Kafka笔记
如何保证消息的顺序性
数据结构与算法 | 第一章:概论
QT信号和槽机制实现及源码阅读
一面数据: Hadoop 迁移云上架构设计与实践
白嫖免费版gpt与wetab插件的使用
Java进程与线程
- 原文地址:https://blog.csdn.net/mushuangpanny/article/details/126732021
