-
SSM 尚筹网 Vue3 + Vite + Java
SSM 尚筹网
2022年3月27日15:07:51
文章目录
1.Maven结构:
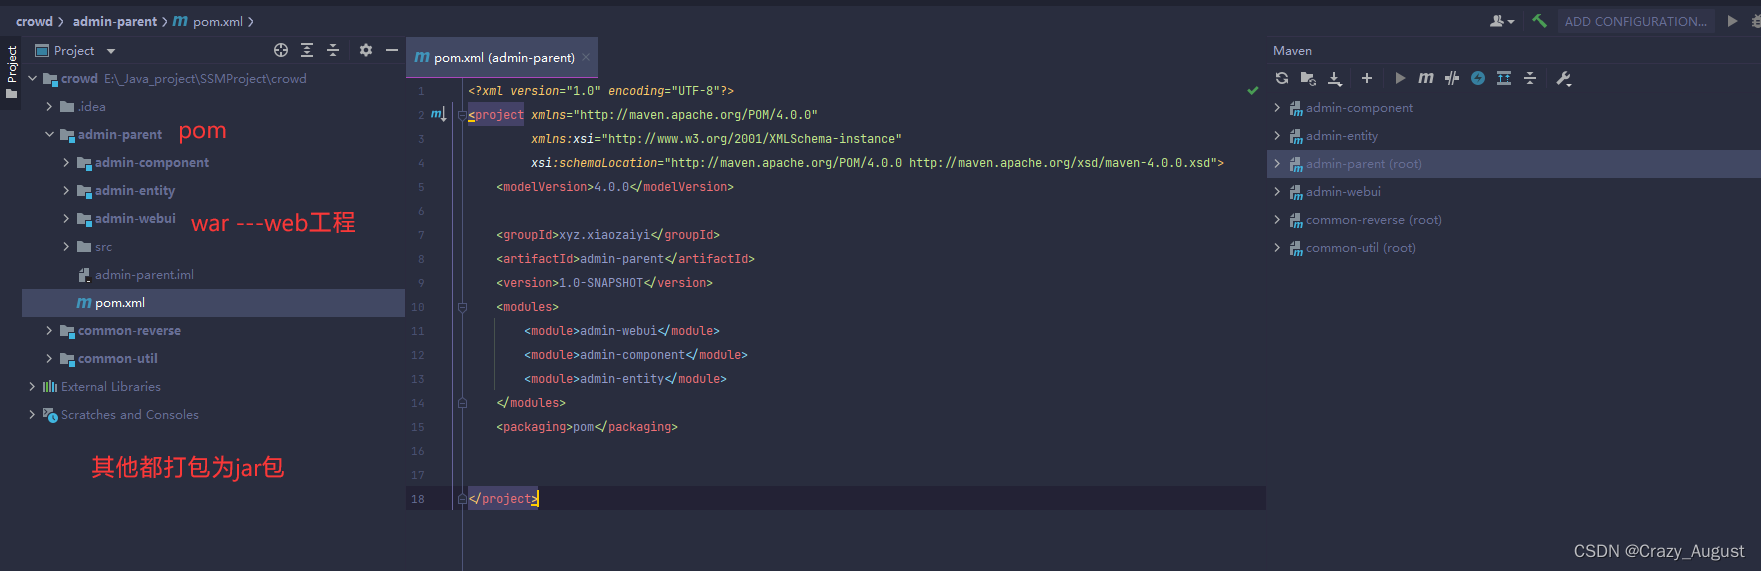
1.基于Maven的MyBatis逆向工程
1.逆向工程为 common-reverse
2.配置Maven(pom.xml)
pom.xml
<dependencies> <dependency> <groupId>org.mybatisgroupId> <artifactId>mybatisartifactId> <version>3.5.9version> dependency> dependencies> <build> <plugins> <plugin> <groupId>org.mybatis.generatorgroupId> <artifactId>mybatis-generator-maven-pluginartifactId> <version>1.4.0version> <configuration> <configurationFile> configurationFile> <verbose>trueverbose> <overwrite>trueoverwrite> configuration> <dependencies> <dependency> <groupId>org.mybatis.generatorgroupId> <artifactId>mybatis-generator-coreartifactId> <version>1.4.0version> dependency> <dependency> <groupId>com.alibabagroupId> <artifactId>druidartifactId> <version>1.2.8version> dependency> <dependency> <groupId>mysqlgroupId> <artifactId>mysql-connector-javaartifactId> <version>8.0.22version> dependency> dependencies> plugin> <plugin> <groupId>org.apache.maven.pluginsgroupId> <artifactId>maven-compiler-pluginartifactId> <configuration> <source>7source> <target>7target> configuration> plugin> plugins> build>- 1
- 2
- 3
- 4
- 5
- 6
- 7
- 8
- 9
- 10
- 11
- 12
- 13
- 14
- 15
- 16
- 17
- 18
- 19
- 20
- 21
- 22
- 23
- 24
- 25
- 26
- 27
- 28
- 29
- 30
- 31
- 32
- 33
- 34
- 35
- 36
- 37
- 38
- 39
- 40
- 41
- 42
- 43
- 44
- 45
- 46
- 47
- 48
- 49
- 50
- 51
- 52
- 53
- 54
- 55
- 56
- 57
- 58
- 59
- 60
3.在Resources目录下新建文件 generatorConfig.xml
generatorConfig.xml
DOCTYPE generatorConfiguration PUBLIC "-//mybatis.org//DTD MyBatis Generator Configuration 1.0//EN" "http://mybatis.org/dtd/mybatis-generator-config_1_0.dtd"> <generatorConfiguration> <context id="msqlTables" targetRuntime="MyBatis3"> <commentGenerator> <property name="suppressAllComments" value="true" /> commentGenerator> <jdbcConnection driverClass="com.mysql.cj.jdbc.Driver" connectionURL="jdbc:mysql://localhost:3306/ssm_crowd?serverTimezone=UTC" userId="root" password="123456"> jdbcConnection> <javaTypeResolver> <property name="forceBigDecimals" value="false" /> javaTypeResolver> <javaModelGenerator targetProject=".\src\main\java" targetPackage="xyz.xiaozaiyi.crowd.entity"> <property name="enableSubPackages" value="false" /> <property name="trimStrings" value="true" /> javaModelGenerator> <sqlMapGenerator targetProject=".\src\main\java" targetPackage="xyz.xiaozaiyi.crowd.mapper"> <property name="enableSubPackages" value="false" /> sqlMapGenerator> <javaClientGenerator type="XMLMAPPER" targetProject=".\src\main\java" targetPackage="xyz.xiaozaiyi.crowd.mapper"> <property name="enableSubPackages" value="false" /> javaClientGenerator> <table tableName="t_admin" domainObjectName="Admin" /> context> generatorConfiguration>- 1
- 2
- 3
- 4
- 5
- 6
- 7
- 8
- 9
- 10
- 11
- 12
- 13
- 14
- 15
- 16
- 17
- 18
- 19
- 20
- 21
- 22
- 23
- 24
- 25
- 26
- 27
- 28
- 29
- 30
- 31
- 32
- 33
- 34
- 35
- 36
- 37
- 38
- 39
- 40
- 41
- 42
- 43
- 44
- 45
- 46
- 47
- 48
- 49
- 50
- 51
- 52
- 53
4.开始构建


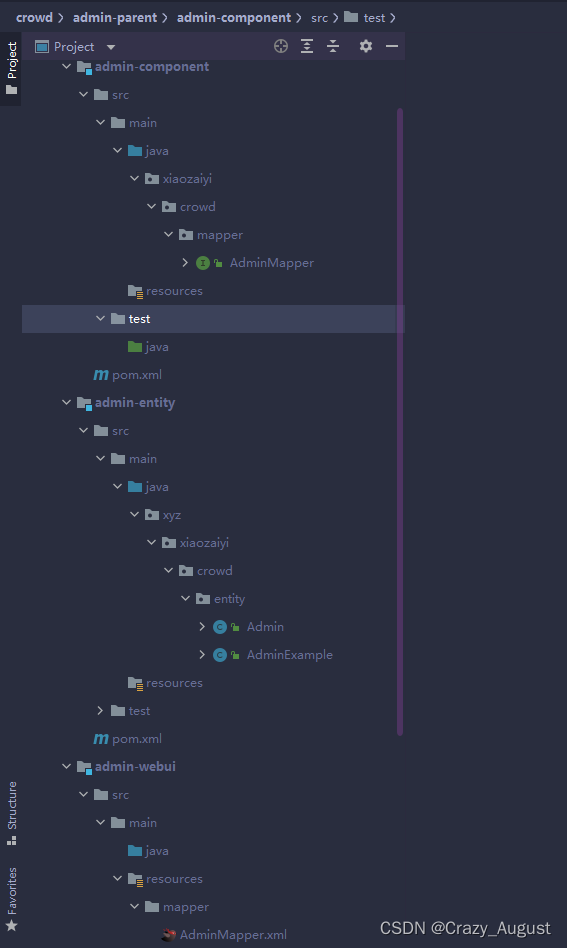
2.资源归为
把逆向工程生成的文件分别移动或者复制到如下位置
3. 父工程管理

版本声明
<properties> <spring.version>5.2.11.RELEASEspring.version> <spring.security.version>5.4.2spring.security.version> properties>- 1
- 2
- 3
- 4
- 5
- 6
- 7
<dependencyManagement> <dependencies> <dependency> <groupId>org.springframeworkgroupId> <artifactId>spring-ormartifactId> <version>${spring.version}version> dependency> <dependency> <groupId>org.springframeworkgroupId> <artifactId>spring-webmvcartifactId> <version>${spring.version}version> dependency> <dependency> <groupId>org.springframeworkgroupId> <artifactId>spring-testartifactId> <version>${spring.version}version> dependency> <dependency> <groupId>org.aspectjgroupId> <artifactId>aspectjweaverartifactId> <version>1.9.6version> <scope>runtimescope> dependency> <dependency> <groupId>cglibgroupId> <artifactId>cglibartifactId> <version>3.3.0version> dependency> <dependency> <groupId>com.alibabagroupId> <artifactId>druidartifactId> <version>1.2.8version> dependency> <dependency> <groupId>mysqlgroupId> <artifactId>mysql-connector-javaartifactId> <version>8.0.22version> dependency> <dependency> <groupId>org.mybatisgroupId> <artifactId>mybatisartifactId> <version>3.5.9version> dependency> <dependency> <groupId>org.mybatisgroupId> <artifactId>mybatis-springartifactId> <version>2.0.5version> dependency> <dependency> <groupId>com.github.pagehelpergroupId> <artifactId>pagehelperartifactId> <version>5.2.0version> dependency> <dependency> <groupId>ch.qos.logbackgroupId> <artifactId>logback-classicartifactId> <version>1.3.0-alpha5version> <scope>testscope> dependency> <dependency> <groupId>org.slf4jgroupId> <artifactId>slf4j-apiartifactId> <version>2.0.0-alpha1version> dependency> <dependency> <groupId>org.slf4jgroupId> <artifactId>jcl-over-slf4jartifactId> <version>2.0.0-alpha1version> dependency> <dependency> <groupId>org.slf4jgroupId> <artifactId>jul-to-slf4jartifactId> <version>2.0.0-alpha1version> dependency> <dependency> <groupId>com.fasterxml.jackson.coregroupId> <artifactId>jackson-coreartifactId> <version>2.11.3version> dependency> <dependency> <groupId>com.fasterxml.jackson.coregroupId> <artifactId>jackson-databindartifactId> <version>2.11.3version> dependency> <dependency> <groupId>javax.servletgroupId> <artifactId>javax.servlet-apiartifactId> <version>4.0.1version> <scope>providedscope> dependency> <dependency> <groupId>com.google.code.gsongroupId> <artifactId>gsonartifactId> <version>2.8.6version> dependency> <dependency> <groupId>org.springframework.securitygroupId> <artifactId>spring-security-webartifactId> <version>5.4.2version> dependency> <dependency> <groupId>org.springframework.securitygroupId> <artifactId>spring-security-configartifactId> <version>5.4.2version> dependency> <dependency> <groupId>org.springframework.securitygroupId> <artifactId>spring-security-taglibsartifactId> <version>5.4.2version> dependency> <dependency> <groupId>junitgroupId> <artifactId>junitartifactId> <version>4.13.1version> <scope>testscope> dependency> dependencies> dependencyManagement>- 1
- 2
- 3
- 4
- 5
- 6
- 7
- 8
- 9
- 10
- 11
- 12
- 13
- 14
- 15
- 16
- 17
- 18
- 19
- 20
- 21
- 22
- 23
- 24
- 25
- 26
- 27
- 28
- 29
- 30
- 31
- 32
- 33
- 34
- 35
- 36
- 37
- 38
- 39
- 40
- 41
- 42
- 43
- 44
- 45
- 46
- 47
- 48
- 49
- 50
- 51
- 52
- 53
- 54
- 55
- 56
- 57
- 58
- 59
- 60
- 61
- 62
- 63
- 64
- 65
- 66
- 67
- 68
- 69
- 70
- 71
- 72
- 73
- 74
- 75
- 76
- 77
- 78
- 79
- 80
- 81
- 82
- 83
- 84
- 85
- 86
- 87
- 88
- 89
- 90
- 91
- 92
- 93
- 94
- 95
- 96
- 97
- 98
- 99
- 100
- 101
- 102
- 103
- 104
- 105
- 106
- 107
- 108
- 109
- 110
- 111
- 112
- 113
- 114
- 115
- 116
- 117
- 118
- 119
- 120
- 121
- 122
- 123
- 124
- 125
- 126
- 127
- 128
- 129
- 130
- 131
- 132
- 133
- 134
- 135
- 136
- 137
- 138
- 139
- 140
- 141
- 142
- 143
- 144
- 145
- 146
- 147
- 148
- 149
- 150
4.SSM整合步骤
-
在子工程加入相应依赖
-
配置 jdbc.properties
-
创建Spring 配置文件 applicationContext.xml
- 加载 jdbc.properties属性文件
- 配置数据源 (并且测试)
- 配置SqlSessionFactoryBean整合Mybatis
- 指定mybatis全局配置文件位置
- 配置Mybatis的Mapper配置文件位置
- 装配数据源
- 配置mapperScannerConfigurer来扫描Mapper所在的包
4.1日志系统

<dependency> <groupId>ch.qos.logbackgroupId> <artifactId>logback-classicartifactId> <version>1.3.0-alpha5version> <scope>testscope> dependency>- 1
- 2
- 3
- 4
- 5
- 6
加入 logback 依赖即可.如果需要配置在类路径下创建 logback.xml(名字指定)
<configuration debug="true"> <appender name="STDOUT" class="ch.qos.logback.core.ConsoleAppender"> <encoder> <pattern>[%d{HH:mm:ss.SSS}] [%-5level] [%thread] [%logger] [%msg]%n pattern> encoder> appender> <root level="INFO"> <appender-ref ref="STDOUT"/> root> <logger name="xiaozaiyi.crowd.mapper" level="DEBUG"/> configuration>- 1
- 2
- 3
- 4
- 5
- 6
- 7
- 8
- 9
- 10
- 11
- 12
- 13
- 14
- 15
- 16
- 17
- 18
- 19
- 20
- 21
4.2 声明式事务

基于xml配置文件的方式配置事务管理 spring-mybatis-tx.xml
步骤:
- 创建Spring专门管理事务的配置文件
- 配置自动扫描包 (service 层)
<context:component-scan base-package="xiaozaiyi.crowd.service.imp" use-default-filters="false"> <context:include-filter type="annotation" expression="org.springframework.stereotype.Service"/> context:component-scan>- 1
- 2
- 3
- 4
- 5
- 6
- 7
- 事物控制配置
- 配置控制数据源
- 配置事物切面
<aop:config> <aop:pointcut id="txPoint" expression="execution(* xiaozaiyi.crowd.server..*.*(..))"/> <aop:advisor advice-ref="txAdvice" pointcut-ref="txPoint"/> aop:config>- 1
- 2
- 3
- 4
- 5
- 6
- 7
- 配置事务通知
<tx:advice id="txAdvice" transaction-manager="dataSourceTransactionManager"> <tx:attributes> <tx:method name="get*" read-only="true"/> <tx:method name="find*" read-only="true"/> <tx:method name="query*" read-only="true"/> <tx:method name="count*" read-only="true"/> <tx:method name="save*" propagation="REQUIRES_NEW" rollback-for="java.lang.Exception"/> <tx:method name="update*" propagation="REQUIRES_NEW" rollback-for="java.lang.Exception"/> <tx:method name="remove*" propagation="REQUIRES_NEW" rollback-for="java.lang.Exception"/> <tx:method name="batch*" propagation="REQUIRES_NEW" rollback-for="java.lang.Exception"/> tx:attributes> tx:advice>- 1
- 2
- 3
- 4
- 5
- 6
- 7
- 8
- 9
- 10
- 11
- 12
- 13
- 14
- 15
- 16
- 17
- 18
- 19
- 20
- 21
- 22
- 23
- 24
- 25
- 配置表述层 web.xml

web.xml
<web-app xmlns="http://xmlns.jcp.org/xml/ns/javaee" xmlns:xsi="http://www.w3.org/2001/XMLSchema-instance" xsi:schemaLocation="http://xmlns.jcp.org/xml/ns/javaee http://xmlns.jcp.org/xml/ns/javaee/web-app_4_0.xsd" version="4.0"> <context-param> <param-name>contextConfigLocationparam-name> <param-value>classpath:applicationContext.xmlparam-value> context-param> <listener> <listener-class>org.springframework.web.context.ContextLoaderListenerlistener-class> listener> <servlet> <servlet-name>DispatcherServletservlet-name> <servlet-class>org.springframework.web.servlet.DispatcherServletservlet-class> <init-param> <param-name>contextConfigLocationparam-name> <param-value>classpath:springmvc.xmlparam-value> init-param> servlet> <servlet-mapping> <servlet-name>DispatcherServletservlet-name> <url-pattern>/url-pattern> servlet-mapping> <filter> <filter-name>CharacterEncodingFilterfilter-name> <filter-class>org.springframework.web.filter.CharacterEncodingFilterfilter-class> <init-param> <param-name>encodingparam-name> <param-value>UTF-8param-value> init-param> <init-param> <param-name>forceRequestEncodingparam-name> <param-value>trueparam-value> init-param> <init-param> <param-name>forceResponseEncodingparam-name> <param-value>trueparam-value> init-param> filter> <filter-mapping> <filter-name>CharacterEncodingFilterfilter-name> <url-pattern>/*url-pattern> filter-mapping> web-app>- 1
- 2
- 3
- 4
- 5
- 6
- 7
- 8
- 9
- 10
- 11
- 12
- 13
- 14
- 15
- 16
- 17
- 18
- 19
- 20
- 21
- 22
- 23
- 24
- 25
- 26
- 27
- 28
- 29
- 30
- 31
- 32
- 33
- 34
- 35
- 36
- 37
- 38
- 39
- 40
- 41
- 42
- 43
- 44
- 45
- 46
- 47
- 48
- 49
2.功能开发
1.管理员登录

Java提供了
MessageDigestmd5加密接口String algorithm = "md5"; MessageDigest messageDigest = MessageDigest.getInstance(algorithm);- 1
- 2
1.1 异常映射
- 首先在web.xml配置DispatcherServlet异常控制器
<servlet> <servlet-name>DispatcherServletservlet-name> <servlet-class>org.springframework.web.servlet.DispatcherServletservlet-class> <init-param> <param-name>contextConfigLocationparam-name> <param-value>classpath:springmvc.xmlparam-value> init-param> <init-param> <param-name>throwExceptionIfNoHandlerFoundparam-name> <param-value>trueparam-value> init-param> <load-on-startup>1load-on-startup> servlet> <servlet-mapping> <servlet-name>DispatcherServletservlet-name> <url-pattern>/url-pattern> servlet-mapping>- 1
- 2
- 3
- 4
- 5
- 6
- 7
- 8
- 9
- 10
- 11
- 12
- 13
- 14
- 15
- 16
- 17
- 18
- 创建一个异常类 CustomException.java
import lombok.Data; /** * @author : Crazy_August * @description : * @Time: 2022-03-31 22:18 */ @Data public class CustomException extends RuntimeException { static final long serialVersionUID = -7034897190745766939L; private Integer code; public CustomException() { super(); } public CustomException(String message) { super(message); } public CustomException(Integer code, String message) { super(message); this.code = code; } 省略一些继承父类方法... }- 1
- 2
- 3
- 4
- 5
- 6
- 7
- 8
- 9
- 10
- 11
- 12
- 13
- 14
- 15
- 16
- 17
- 18
- 19
- 20
- 21
- 22
- 23
- 24
- 25
- 26
- 异常映射 @ControllerAdvice
package xiaozaiyi.crowd.controller; import org.springframework.http.converter.HttpMessageNotReadableException; import org.springframework.web.bind.MissingServletRequestParameterException; import org.springframework.web.bind.annotation.ControllerAdvice; import org.springframework.web.bind.annotation.ExceptionHandler; import org.springframework.web.bind.annotation.ResponseBody; import org.springframework.web.servlet.NoHandlerFoundException; import xiaozaiyi.crowd.exception.CustomException; import xiaozaiyi.crowd.util.ResultEntity; /** * @author : Crazy_August * @description : * @Time: 2022-03-31 21:25 */ @ControllerAdvice public class RestExceptionController { //400错误 @ExceptionHandler({HttpMessageNotReadableException.class, MissingServletRequestParameterException.class}) @ResponseBody public ResultEntity requestNotReadable() { return ResultEntity.error(400, "数据类型不匹配"); } //自定义异常 @ExceptionHandler({CustomException.class}) @ResponseBody public ResultEntity loginFailed(CustomException e) { return ResultEntity.error(e.getCode(), e.getMessage()); } /** * 捕获404异常 * @return */ @ExceptionHandler({NoHandlerFoundException.class}) @ResponseBody public ResultEntity NoResourceException() { System.out.println("NoResourceException"); return ResultEntity.error(404, "请求地址不存在"); } @ExceptionHandler({Exception.class}) @ResponseBody public ResultEntity server500() { return ResultEntity.error(500, "未知错误"); } }- 1
- 2
- 3
- 4
- 5
- 6
- 7
- 8
- 9
- 10
- 11
- 12
- 13
- 14
- 15
- 16
- 17
- 18
- 19
- 20
- 21
- 22
- 23
- 24
- 25
- 26
- 27
- 28
- 29
- 30
- 31
- 32
- 33
- 34
- 35
- 36
- 37
- 38
- 39
- 40
- 41
- 42
- 43
- 44
- 45
- 46
- 47
- 48
- 49
- 50
哪有那么多的才子佳人,哪有那么多的山盟海誓,哪有那么多的王子公主,哪有那么多的良辰美景,花前月下

2.用户管理
数据库表
CREATE TABLE t_role( id INT NOT NULL auto_increment COMMENT '主键', `name` VARCHAR(100) NOT NULL COMMENT '角色名称', PRIMARY KEY(id) )- 1
- 2
- 3
- 4
- 5
同用户管理
3.菜单维护
数据库表
CREATE TABLE if not EXISTS t_menu( `id` INT NOT NULL auto_increment, `pid` INT NULL DEFAULT NULL, `name` VARCHAR(255) NOT NULL, `router` VARCHAR(255), PRIMARY KEY (`id`) ); INSERT INTO `t_menu` VALUES (1, NULL, '系统权限菜单', NULL); INSERT INTO `t_menu` VALUES (2, 1, '控制面板', '/admin/main'); INSERT INTO `t_menu` VALUES (3, 1, '权限管理', NULL); INSERT INTO `t_menu` VALUES (4, 3, '用户维护', '/admin/main/user'); INSERT INTO `t_menu` VALUES (5, 3, '角色维护', '/admin/main/role'); INSERT INTO `t_menu` VALUES (6, 3, '菜单维护', '/admin/main/permission'); INSERT INTO `t_menu` VALUES (7, 1, '业务审核', NULL); INSERT INTO `t_menu` VALUES (8, 7, '实名认证审核', '/admin/main/auth-cert'); INSERT INTO `t_menu` VALUES (9, 7, '广告审核', '/admin/main/auth-adv'); INSERT INTO `t_menu` VALUES (10, 7, '项目审核', '/admin/main/auth-project'); INSERT INTO `t_menu` VALUES (11, 1, '业务管理', NULL); INSERT INTO `t_menu` VALUES (12, 11, '资质维护', '/admin/main/cert'); INSERT INTO `t_menu` VALUES (13, 11, '分类管理', '/admin/main/type'); INSERT INTO `t_menu` VALUES (14, 11, '流程管理', '/admin/main/process'); INSERT INTO `t_menu` VALUES (15, 11, '广告管理', '/admin/main/advertisement'); INSERT INTO `t_menu` VALUES (16, 11, '消息模板', '/admin/main/message'); INSERT INTO `t_menu` VALUES (17, 11, '项目分类', '/admin/main/project-type'); INSERT INTO `t_menu` VALUES (18, 11, '项目标签', '/admin/main/tag'); INSERT INTO `t_menu` VALUES (19, 1, '参数管理', '/admin/main/param');- 1
- 2
- 3
- 4
- 5
- 6
- 7
- 8
- 9
- 10
- 11
- 12
- 13
- 14
- 15
- 16
- 17
- 18
- 19
- 20
- 21
- 22
- 23
- 24
- 25
- 26
- 27
-
菜单的难点
多层级,需要用到树的概念

在数据库的表示方法
在java代码中对查询到的数据进行组装
Menu.java
@Data public class Menu { private Integer id; private Integer pid; private String name; private String router; // 存放子节点 private List<Menu> children; public List<Menu> getChildren() { // 如果为空就创建一个list,为了防止空指针异常 if (children == null) { children = new ArrayList<Menu>(); } return children; } }- 1
- 2
- 3
- 4
- 5
- 6
- 7
- 8
- 9
- 10
- 11
- 12
- 13
- 14
- 15
- 16
- 17
- 18
- 19
- 20
2.通过两种方式进行数据组装
方式一: 暴力解法,时间复杂度 o(n2)
@Override public Menu getAllMenu() { // 先过去数据库查到的数据 List<Menu> menusList = menuMapper.selectByExample(null); // 1.用来存储一个根节点 Menu rootMenu = null; // 2.遍历所有的菜单 for (Menu item : menusList) { // 3.获取pid属性 Integer pid = item.getPid(); //4.检测是否为null if (pid == null) { // 5.如果是null,说明是根节点 rootMenu = item; continue; } // 6.如果不是null,说明不是根节点,说明是子节点,可以直接添加到父节点的children集合中 // 7.再次遍历所有的菜单,找到子节点的父节点 for (Menu maybeFather : menusList) { // 8.获取父节点的id Integer maybeFatherId = maybeFather.getId(); // 9.检测父节点的id是否和子节点的pid相等 if (Objects.equals(maybeFatherId,pid)) { // 10.如果相等,说明找到了父节点,将子节点添加到父节点的children集合中 maybeFather.getChildren().add(item); break; } } } // 11.返回根节点 return rootMenu; }- 1
- 2
- 3
- 4
- 5
- 6
- 7
- 8
- 9
- 10
- 11
- 12
- 13
- 14
- 15
- 16
- 17
- 18
- 19
- 20
- 21
- 22
- 23
- 24
- 25
- 26
- 27
- 28
- 29
- 30
- 31
- 32
方式二 : 利用Map进行改进
/** * 方式二 * @return 返回根节点 */ @Override public Menu getAllMenus() { List<Menu> menuList = menuMapper.selectByExample(null); // 1.用来存储一个根节点 Menu rootMenu = null; // 创建一个集合,用来存储 id 和 Menu 对象对应的关系便于查找父节点 Map<Integer, Menu> menuMap = new HashMap<>(); // 2.遍历所有的菜单 for (Menu menu : menuList) { // 3.获取id属性 Integer id = menu.getId(); menuMap.put(id, menu); } //再次遍历给父节点填充子元素 for (Menu menu : menuList) { // 4.获取子节点的pid属性 Integer pid = menu.getPid(); // 5.检测是否为null if (pid == null) { // 6.如果是null,说明是根节点 rootMenu = menu; continue; } // 7. 如果不是null,说明不是根节点,说明是子节点,可以直接添加到父节点的children集合中 Integer childrenPid = menu.getPid(); Menu pidMenu = menuMap.get(childrenPid); if (pidMenu == null) { pidMenu = new Menu(); } // 8. 将子节点添加到父节点的children集合中 pidMenu.getChildren().add(menu); } return rootMenu; }- 1
- 2
- 3
- 4
- 5
- 6
- 7
- 8
- 9
- 10
- 11
- 12
- 13
- 14
- 15
- 16
- 17
- 18
- 19
- 20
- 21
- 22
- 23
- 24
- 25
- 26
- 27
- 28
- 29
- 30
- 31
- 32
- 33
- 34
- 35
- 36
- 37
- 38
- 39
- 40

4.角色分配
思路: 需要中间表来建立用户和角色身份关系

CREATE IF NOT EXISTS TABLE t_inner_admin_role( id INT NOT NULL auto_increment, `admin_id` INT, `role_id` INT, PRIMARY KEY(id) );- 1
- 2
- 3
- 4
- 5
- 6
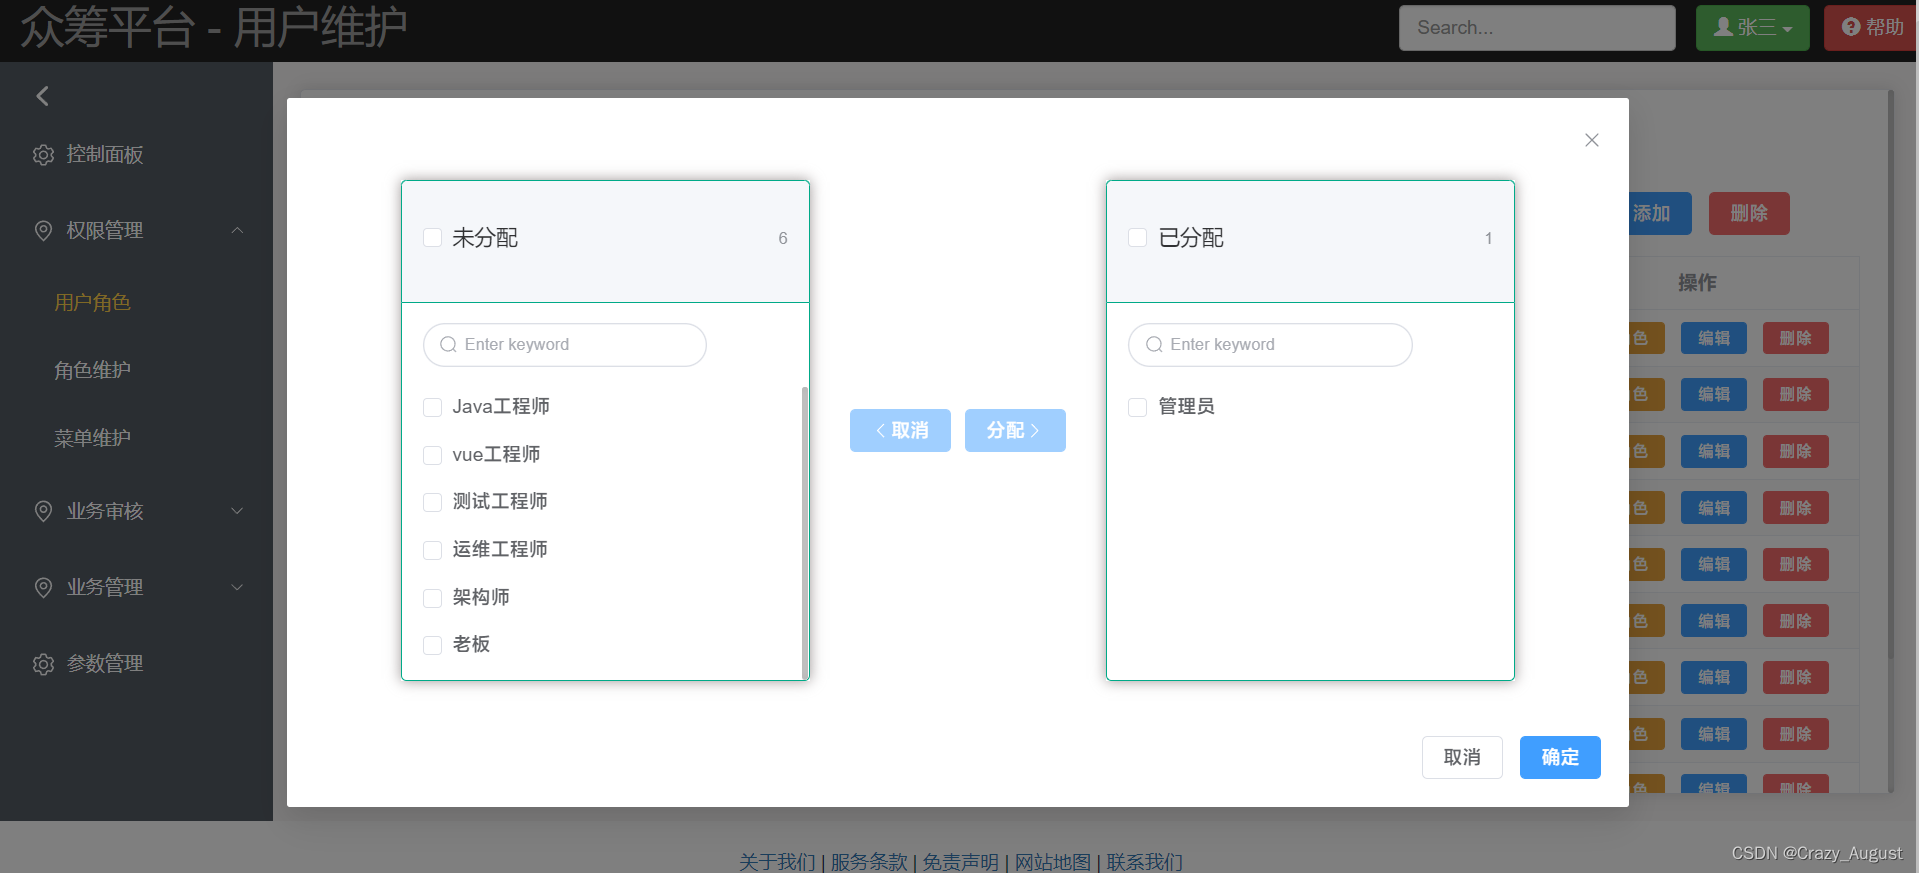
小总结: 在使用
element-plus的穿梭框右边的数据要绑定到v-model上
git 命令 ,清除缓存 暂存区
git rm -r --cached .加载配置文件可以加入多个
<init-param> <param-name>contextConfigLocationparam-name> <param-value> classpath:springmvc.xml classpath:spring-mybatis-tx.xml param-value> init-param>- 1
- 2
- 3
- 4
- 5
- 6
- 7
5.权限维护
- SQL: t_auth.sql
-- Table structure for t_auth CREATE TABLE IF NOT EXISTS t_auth( `id` INT NOT NULL auto_increment, `name` VARCHAR(200), `label` VARCHAR(200), `category_id` INT, PRIMARY KEY(id) ) -- ---------------------------- -- Records of t_auth -- ---------------------------- INSERT INTO `t_auth` VALUES (Null, Null, '用户模块', NULL); INSERT INTO `t_auth` VALUES (Null, 'user:get', '查询', 1); INSERT INTO `t_auth` VALUES (Null, 'user:add', '新增', 1); INSERT INTO `t_auth` VALUES (Null, 'user:update', '更新', 1); INSERT INTO `t_auth` VALUES (Null, 'user:delete', '删除', 1); INSERT INTO `t_auth` VALUES (Null, Null, '角色模块', NULL); INSERT INTO `t_auth` VALUES (Null, 'role:get', '查询', 6); INSERT INTO `t_auth` VALUES (Null, 'role:add', '新增', 6); INSERT INTO `t_auth` VALUES (Null, 'role:update', '更新', 6); INSERT INTO `t_auth` VALUES (Null, 'role:delete', '删除', 6); INSERT INTO `t_auth` VALUES (11, Null, '权限维护模块', NULL); INSERT INTO `t_auth` VALUES (Null, 'auth:get', '查询', 11); INSERT INTO `t_auth` VALUES (Null, 'auth:add', '新增', 11); INSERT INTO `t_auth` VALUES (Null, 'auth:update', '更新', 11); INSERT INTO `t_auth` VALUES (Null, 'auth:delete', '删除', 11);- 1
- 2
- 3
- 4
- 5
- 6
- 7
- 8
- 9
- 10
- 11
- 12
- 13
- 14
- 15
- 16
- 17
- 18
- 19
- 20
- 21
- 22
- 23
- 24
- 25
- 26
- 27

6.分配权限
1.关联角色和权限的中间表 t_inner_role_auth.sql
CREATE TABLE IF NOT EXISTS t_inner_role_auth( id INT NOT NULL auto_increment, `role_id` INT, `auth_id` INT, PRIMARY KEY(id) );- 1
- 2
- 3
- 4
- 5
- 6
Tag:
map 转为 list
List<Integer> result = map.keySet().stream() .collect(Collectors.toList()); result.forEach(System.out::println); List<String> result2 = map.values().stream() .collect(Collectors.toList()); result2.forEach(System.out::println); System.out.println("\n3. Export Map Value to List..., say no to banana"); List<String> result3 = map.keySet().stream() .filter(x -> !"banana".equalsIgnoreCase(x)) .collect(Collectors.toList()); result3.forEach(System.out::println);- 1
- 2
- 3
- 4
- 5
- 6
- 7
- 8
- 9
- 10
- 11
- 12

3.权限认证 springSecurity
Security /sɪˈkjʊərəti / 安全
类似产品:Shiro
3.1 spring security 简介
spring security 的核心功能主要包括:
- 认证 (你是谁)
- 授权 (你能干什么)
- 攻击防护 (防止伪造身份)
工作流程图:

- 导入jar包
<dependency> <groupId>org.springframework.securitygroupId> <artifactId>spring-security-configartifactId> <version>${spring.security.version}version> dependency> <dependency> <groupId>org.springframework.securitygroupId> <artifactId>spring-security-taglibsartifactId> <version>${spring.security.version}version> dependency>- 1
- 2
- 3
- 4
- 5
- 6
- 7
- 8
- 9
- 10
- 配置 web.xml
重点:
<filter> <filter-name>springSecurityFilterChainfilter-name> <filter-class>org.springframework.web.filter.DelegatingFilterProxyfilter-class> filter> <filter-mapping> <filter-name>springSecurityFilterChainfilter-name> <url-pattern>/*url-pattern> filter-mapping>- 1
- 2
- 3
- 4
- 5
- 6
- 7
- 8
- 9
- 10
- 创建基于注解的java配置类 此类需要基础
webSecurityConfigurationAdapter
@Configuration //启动web环境下权限控制功能 @EnableWebSecurity public class WebAppSecurityConfig extends WebSecurityConfigurerAdapter { }- 1
- 2
- 3
- 4
- 5
- 6
启动报错如下:
org.springframework.beans.factory.NoSuchBeanDefinitionException: No bean named 'springSecurityFilterChain' available

启动流程图:
**tig:**三大组件的启动顺序:
- ContextLoaderListener 初始化,创建Spring 的IOC容器
- DelegatingFilterProxy 初始化,查找IOC容器,查找Bean
- DispatcherServlet 初始化,创建SpringMVC的IOC容器
解决方案一 : 两个IOC容器合二为一, 不使用ContextLoadderListener,让DispatcherServlet加载所有Spring配置文件
解决方案二:改源码
修改DelegatingFilterProxy的源码,修改两处:-
初始化时直接跳过查找IOC容器的环节,
-
第一次请求的时候直接找SpringMVC的 IOC容器

org.springframework.web.filte —> DelegatingFilterProxy.java
@Override protected void initFilterBean() throws ServletException { synchronized (this.delegateMonitor) { if (this.delegate == null) { // If no target bean name specified, use filter name. if (this.targetBeanName == null) { this.targetBeanName = getFilterName(); } // Fetch Spring root application context and initialize the delegate // 此处对源码进行了修改 WebApplicationContext wac = findWebApplicationContext(); // if (wac != null) { // this.delegate = initDelegate(wac); // } // 此处对源码进行了修改结束 } } } @Override public void doFilter(ServletRequest request, ServletResponse response, FilterChain filterChain) throws ServletException, IOException { // Lazily initialize the delegate if necessary. Filter delegateToUse = this.delegate; if (delegateToUse == null) { synchronized (this.delegateMonitor) { delegateToUse = this.delegate; if (delegateToUse == null) { // 此处对源码进行了修改 //把原来查找IOC容器代码注释掉 //WebApplicationContext wac = findWebApplicationContext(); //按我们自己的需要重新编写 //1.获取ServletContext对象 ServletContext sc = this.getServletContext(); //2.拼接 SpringMVC 将IOC容器存入 ServletContext 域的时候使用的属性名,web.xml所配置的名称 String servletName = "DispatcherServlet"; String attrName = FrameworkServlet.SERVLET_CONTEXT_PREFIX + servletName; //3.根据attrName从获取ServletContext域中获取IOC容器对象 WebApplicationContext wac = (WebApplicationContext) sc.getAttribute(attrName); // 此处对源码进行了修改结束 if (wac == null) { throw new IllegalStateException("No WebApplicat... fo"); } delegateToUse = initDelegate(wac); } this.delegate = delegateToUse; } } }- 1
- 2
- 3
- 4
- 5
- 6
- 7
- 8
- 9
- 10
- 11
- 12
- 13
- 14
- 15
- 16
- 17
- 18
- 19
- 20
- 21
- 22
- 23
- 24
- 25
- 26
- 27
- 28
- 29
- 30
- 31
- 32
- 33
- 34
- 35
- 36
- 37
- 38
- 39
- 40
- 41
- 42
- 43
- 44
- 45
- 46
- 47
- 48
- 49
- 50
- 51
- 52
- 53
- 54
3.2引入Redis
<dependency> <groupId>org.springframework.datagroupId> <artifactId>spring-data-redisartifactId> <version>2.6.3version> dependency> <dependency> <groupId>redis.clientsgroupId> <artifactId>jedisartifactId> <version>3.7.1version> dependency>- 1
- 2
- 3
- 4
- 5
- 6
- 7
- 8
- 9
- 10
- 11
一定一定要版本对应问题!!!,查问题一个下午…
3.3登录功能重做

概念速查:
Authentication接口: 它的实现类,表示当前访问系统的用户,封装了用户相关信息。AuthenticationManager接口:定义了认证Authentication的方法UserDetailsService接口:加载用户特定数据的核心接口。里面定义了一个根据用户名查询用户信息的方法。UserDetails接口:提供核心用户信息。通过UserDetailsService根据用户名获取处理的用户信息要封装成UserDetails对象返回。然后将这些信息封装到Authentication对象中。3.3.1 思路分析
登录
①自定义登录接口
调用 ProviderManager 的方法进行认证 如果认证通过生成 jwt
把用户信息存入redis中
②自定义UserDetailsService
在这个实现类中去查询数据库
校验:
①定义Jwt认证过滤器
获取token
解析token获取其中的userid
从redis中获取用户信息
存入SecurityContextHolder
配置过滤器
tig: spring中在过滤器异常无法被全局异常捕获
@ControllerAdviceExceptionHandler({xxx.class})解决方案:
在 过滤器中 捕获异常,抛到controller
try { if (Objects.isNull(loginUser)) { // 携带信息 throw new CustomException(200, CrowdConstant.NO_LOGIN_USER); } .... } catch (Exception e) { request.setAttribute("exception", e); request.getRequestDispatcher("/server/filter").forward(request, response); }- 1
- 2
- 3
- 4
- 5
- 6
- 7
- 8
- 9
- 10
在Controller中获取:
/** * 处理在过滤器中抛出的异常 * @return */ @RequestMapping("/server/filter") public ResultEntity filterRefuse(HttpServletRequest request) { CustomException errorMessage = (CustomException)request.getAttribute("exception"); throw new CustomException(errorMessage.getCode(), errorMessage.getMessage()); }- 1
- 2
- 3
- 4
- 5
- 6
- 7
- 8
- 9
3.3.2 密码加密
- 创建 BCryptPasswordEncoder bean容器
@Bean public PasswordEncoder passwordEncoder() { return new BCryptPasswordEncoder(); }- 1
- 2
- 3
- 4
-
装配
@Autowired private PasswordEncoder bCryptPasswordEncoder;- 1
- 2
-
使用
bCryptPasswordEncoder.encode()
3.4 权限控制
-
在SpringSecurity中,会使用默认的 FilterSecurityInterceptor 来进行权限校验。在 FilterSecurityInterceptor 中会从SecurityContextHolder获取其中的Authentication,然后获取其中的权限信息。当前用户是否拥有访问当前资源所需的权限。
所以我们在项目中只需要把当前登录用户的权限信息也存入 Authentication。
然后设置我们的资源所需要的权限即可。
-
使用
- 先开启相关配置。在配置类上加入注解
@EnableGlobalMethodSecurity(prePostEnabled = true) - 然后就可以使用对应的注解。@PreAuthorize,基于方法上的注解
- 先开启相关配置。在配置类上加入注解
@RequestMapping("update") @PreAuthorize("hasAuthority('user:update')") public ResultEntity updateAdmin(@RequestBody Admin admin) { boolean success = adminService.updateAdmin(admin); if (!success) { return ResultEntity.success(100, CustomConstant.UPDATE_FAILED); } return ResultEntity.success(200, CustomConstant.UPDATE_SUCCESS); }- 1
- 2
- 3
- 4
- 5
- 6
- 7
- 8
- 9

拥有对应的权限才可以访问方法.

3.其他注解
表达式中可以使用 # 号 ,比如:
在表达式中, 可以使用 #user 来代表方法中的参数 user@PreAuthorize ("#user.name == authentication.principal.username") public void deleteUser(User user){}- 1
- 2
@PreFilter()集合类型参数的方法 ,@PreFilter(value = “filterObject%2 == 0”),filterObject就是每个item@preFilter:在方法执行前对传入的参数进行过滤。只能对集合类型的数据进行过滤。
@PostFilter:在方法执行后对方法返回值进行规律。只能对集合类型的数据进行过滤。
4. 会员系统模块
1.项目设计
1.架构图
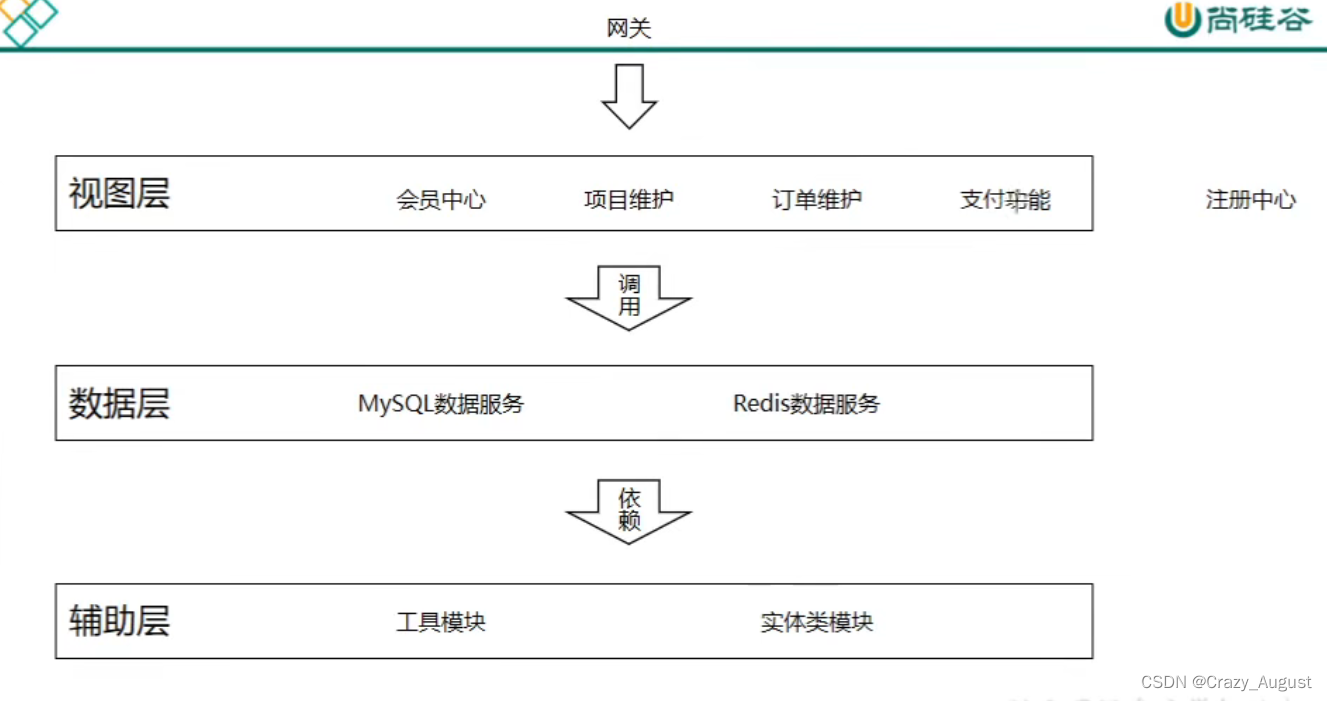
2.需要创建的工程
-
父工程、聚合工程: crowd-parent (pom)
-
注册中心: crowd-eureka 1000
-
实体类模块: crowd-entity
-
mysql数据服务: crowd-mysql-provider 2000
-
redis数据服务 : crowd-redis-provider 3000
-
会员中心: crowd-authentication-consumer 5000
-
项目维护 : crowd-project-consumer 6000
-
订单维护 :crowd-order-consumer 7000
-
支付功能 :crowd-pay-consumer 8000
-
网关: crowd-zuul 80
- 使用 getaway代替 80
-
接口: crowd-service-api 4000
3.配置相关依赖
1.crowd-parent --> pom.xml
<dependencyManagement> <dependencies> <dependency> <groupId>org.springframework.cloudgroupId> <artifactId>spring-cloud-dependenciesartifactId> <version>Hoxton.SR8version> <type>pomtype> <scope>importscope> dependency> <dependency> <groupId>org.springframework.bootgroupId> <artifactId>spring-boot-dependenciesartifactId> <version>2.6.7version> <type>pomtype> <scope>importscope> dependency> <dependency> <groupId>com.baomidougroupId> <artifactId>mybatis-plus-boot-starterartifactId> <version>3.5.1version> dependency> <dependency> <groupId>com.alibabagroupId> <artifactId>druid-spring-boot-starterartifactId> <version>1.2.9version> dependency> dependencies> dependencyManagement>- 1
- 2
- 3
- 4
- 5
- 6
- 7
- 8
- 9
- 10
- 11
- 12
- 13
- 14
- 15
- 16
- 17
- 18
- 19
- 20
- 21
- 22
- 23
- 24
- 25
- 26
- 27
- 28
- 29
- 30
- 31
- 32
2.注册中心: crowd-eureka --> pom.xml
<dependency> <groupId>org.springframework.cloudgroupId> <artifactId>spring-cloud-starter-netflix-eureka-serverartifactId> dependency>- 1
- 2
- 3
- 4
2.1 配置eureka的启动类
@EnableEurekaServer @SpringBootApplication public class EurekaMainApplication { public static void main(String[] args) { SpringApplication.run(EurekaMainApplication.class, args); } }- 1
- 2
- 3
- 4
- 5
- 6
- 7
2.2 配置 yaml 文件
server: port: 1000 spring: application: name: august-eureka eureka: instance: hostname: localhost client: service-url: defaultZone: http://${eureka.instance.hostname}:${server.port}/eureka fetch-registry: false # #是否从eureka中拉取注册信息 register-with-eureka: false # 不需要在自己的注册中心注册- 1
- 2
- 3
- 4
- 5
- 6
- 7
- 8
- 9
- 10
- 11
- 12
- 13
- 14
**启动报错:**Error creating bean with name ‘configurationPropertiesBeans’ defined in class path resource
解决方案: 修改父工程的pom.xml文件,把
spring-boot-dependencies的版本改为 2.3.12.RELEASE<dependency> <groupId>org.springframework.bootgroupId> <artifactId>spring-boot-dependenciesartifactId> <version>2.3.12.RELEASEversion> <type>pomtype> <scope>importscope> dependency>- 1
- 2
- 3
- 4
- 5
- 6
- 7
- 8
启动服务成功,访问 localhost:1000

3.实体类模块: crowd-entity
Tig:
VO
View Object 视图对象
用途: 1.接收前端发来的数据
2.把数据发回浏览器
PO
Persisttent Object 持久化对象
用途:1.将数据封装到PO对象存入数据库
2.将数据库的数据查询存入PO对象
一个PO对象对应数据库的一张表
DO
Data Object 数据对象
用途:1.从redis查询得到的数据封装为DO对象
2.从ElasticSearch查询得到的数据封装为DO对象
3.从Solr 查询到的数据封装为DO对象…
DTO
Data Transfer Object 数据传输对象
用途:1. 从Consumer 发送数据到 Provider
- Provider返回数据到Consumer
4.mysql数据服务: crowd-mysql-provider
<dependencies> <dependency> <groupId>org.springframework.cloudgroupId> <artifactId>spring-cloud-starter-netflix-eureka-clientartifactId> dependency> <dependency> <groupId>com.baomidougroupId> <artifactId>mybatis-plus-boot-starterartifactId> dependency> <dependency> <groupId>com.alibabagroupId> <artifactId>druid-spring-boot-starterartifactId> dependency> <dependency> <groupId>org.springframework.bootgroupId> <artifactId>spring-boot-testartifactId> dependency> <dependency> <groupId>mysqlgroupId> <artifactId>mysql-connector-javaartifactId> dependency> dependencies>- 1
- 2
- 3
- 4
- 5
- 6
- 7
- 8
- 9
- 10
- 11
- 12
- 13
- 14
- 15
- 16
- 17
- 18
- 19
- 20
- 21
- 22
- 23
- 24
- 25
- 26
- 27
- 配置 yml 文件
server: port: 2000 spring: application: name: august-mysql datasource: druid: driver-class-name: com.mysql.cj.jdbc.Driver username: root password: 123456 url: jdbc:mysql://localhost:3306/ssm_crowd?useSSL=false&useUnicode=true&characterEncoding=UTF-8&serverTimezone=Asia/Shanghai eureka: client: service-url: defaultZone: http://localhost:1000/eureka mybatis-plus: configuration: log-prefix: t_ logging: level: xiaozaiyi.crowd.mapper: debug xiaozaiyi.crowd.test: debug- 1
- 2
- 3
- 4
- 5
- 6
- 7
- 8
- 9
- 10
- 11
- 12
- 13
- 14
- 15
- 16
- 17
- 18
- 19
- 20
- 21
- 22
3.编写启动类:
报错: Request execution error. endpoint=DefaultEndpoint{ serviceUrl='http://localhost:8761/eureka/}
检查自己的配置:
eureka: client: service-url: defaultZone: http://localhost:1000/eureka- 1
- 2
- 3
- 4
解决方案: 检查defaultZone 是不是拼写错误.
在启动出现: Completed shut down of DiscoveryClient,服务启动完成马上停止
解决方案: 说明缺少web依赖,在pom.xml文件加入
<dependency> <groupId>org.springframework.bootgroupId> <artifactId>spring-boot-starter-webartifactId> dependency>- 1
- 2
- 3
- 4
4.编写sql,以及在entity中编写对应PO:
-- ---------------------------- -- Table structure for t_member -- ---------------------------- CREATE TABLE `t_member` ( `id` int NOT NULL AUTO_INCREMENT, `login_acct` varchar(255) CHARACTER SET utf8 COLLATE utf8_general_ci NOT NULL, `user_password` char(200) CHARACTER SET utf8 COLLATE utf8_general_ci NOT NULL, `user_name` varchar(255) CHARACTER SET utf8 COLLATE utf8_general_ci DEFAULT NULL, `email` varchar(255) DEFAULT NULL, `auth_status` int DEFAULT NULL COMMENT '实名认证状态0 - 未实名认证, 1 - 实名认证申\r\n请中, 2 - 已实名认证', `user_type` int DEFAULT NULL COMMENT ' 0 - 个人, 1 - 企业', `real_name` varchar(255) CHARACTER SET utf8 COLLATE utf8_general_ci DEFAULT NULL, `card_num` varchar(255) CHARACTER SET utf8 COLLATE utf8_general_ci DEFAULT NULL, `acct_type` int DEFAULT NULL COMMENT '0 - 企业, 1 - 个体, 2 - 个人, 3 - 政府', PRIMARY KEY (`id`) ) ENGINE=InnoDB AUTO_INCREMENT=2 DEFAULT CHARSET=utf8mb3;- 1
- 2
- 3
- 4
- 5
- 6
- 7
- 8
- 9
- 10
- 11
- 12
- 13
- 14
- 15
- 16
5.redis数据服务 : crowd-redis-provider
<dependencies> <dependency> <groupId>org.springframework.bootgroupId> <artifactId>spring-boot-starter-data-redisartifactId> dependency> <dependency> <groupId>org.springframework.cloudgroupId> <artifactId>spring-cloud-starter-netflix-eureka-clientartifactId> dependency> <dependency> <groupId>org.springframework.bootgroupId> <artifactId>spring-boot-starter-webartifactId> dependency> dependencies>- 1
- 2
- 3
- 4
- 5
- 6
- 7
- 8
- 9
- 10
- 11
- 12
- 13
- 14
- 15
- 16
- 17
配置文件:
server: port: 3000 spring: application: name: august-redis redis: host: localhost port: 6379 database: 0 eureka: client: service-url: defaultZo- 1
- 2
- 3
- 4
- 5
- 6
- 7
- 8
- 9
- 10
- 11
- 12
- 13
- 14
- 15
6.接口:crowd-service-api
1.pom.xml
<dependencies> <dependency> <groupId>org.springframework.cloudgroupId> <artifactId>spring-cloud-starter-openfeignartifactId> dependency> <dependency> <groupId>org.springframework.cloudgroupId> <artifactId>spring-cloud-starter-netflix-eureka-clientartifactId> dependency> <dependency> <groupId>org.springframework.bootgroupId> <artifactId>spring-boot-starter-webartifactId> dependency> dependencies>- 1
- 2
- 3
- 4
- 5
- 6
- 7
- 8
- 9
- 10
- 11
- 12
- 13
- 14
- 15
- application.yml
server: port: 4000 spring: application: name: august-api eureka: client: service-url: defaultZone: http://localhost:1000/eureka logging: level: # feign日志以什么级别监控哪个接口 xiaozaiyi.crowd*: debug- 1
- 2
- 3
- 4
- 5
- 6
- 7
- 8
- 9
- 10
- 11
- 12
- 13
3.启动类
@SpringBootApplication(exclude= DataSourceAutoConfiguration.class) //要加入此注解表示开启feign @EnableFeignClients public class ServiceApiMainApplication { public static void main(String[] args) { SpringApplication.run(ServiceApiMainApplication.class, args); } }- 1
- 2
- 3
- 4
- 5
- 6
- 7
- 8
4.编写Feign接口,调用远程provider
/** * 调用远程 redis provider */ // 注册中心的微服务名称,也可以使用 url 表示 @FeignClient("august-redis") //浏览器请求到达这里 public interface IRedisClient { @RequestMapping("set/redis/key/value") R<String> setRedisKeyValue(@RequestParam("key") String key, @RequestParam("value") String value); @RequestMapping("set/redis/key/value/timeout") R<String> setRedisKeyValueWithTimeout( @RequestParam("key") String key, @RequestParam("value") String value, @RequestParam("time") long time, @RequestParam("timeUnit") TimeUnit timeUnit ); @RequestMapping("get/redis/value/by/key") R<String> getRedisValueByKey(@RequestParam("key") String key); @RequestMapping("remove/redis/value/by/key") R<String> removeRedisValueByKey(@RequestParam("key") String key); }- 1
- 2
- 3
- 4
- 5
- 6
- 7
- 8
- 9
- 10
- 11
- 12
- 13
- 14
- 15
- 16
- 17
- 18
- 19
- 20
- 21
5.编写provider对应的Controller
@RestController public class RedisController { @Autowired private StringRedisTemplate stringRedisTemplate; //路径要和Feign保存一致,并且参数注解不能省略 @RequestMapping("set/redis/key/value") R<String> setRedisKeyValue(@RequestParam("key") String key, @RequestParam("value") String value) { try { ValueOperations<String, String> operations = stringRedisTemplate.opsForValue(); operations.set(key, value); return R.status(true); } catch (Exception e) { return R.fail(e.getMessage()); } } ......- 1
- 2
- 3
- 4
- 5
- 6
- 7
- 8
- 9
- 10
- 11
- 12
- 13
- 14
- 15
- 16
7.会员中心: crowd-authentication-consumer
配置同上
8.网关: crowd-zuul
1.pom.xml
<dependencies> <dependency> <groupId>org.springframework.cloudgroupId> <artifactId>spring-cloud-starter-netflix-eureka-clientartifactId> dependency> <dependency> <groupId>org.springframework.cloudgroupId> <artifactId>spring-cloud-starter-netflix-zuulartifactId> dependency> <dependency> <groupId>org.springframework.bootgroupId> <artifactId>spring-boot-starter-webartifactId> dependency> dependencies>- 1
- 2
- 3
- 4
- 5
- 6
- 7
- 8
- 9
- 10
- 11
- 12
- 13
- 14
- 15
- 16
2.配置类
server: port: 80 spring: application: name: august-gateway eureka: client: service-url: defaultZone: http://localhost:1000/eureka zuul: ignored-services: "*" sensitive-headers: "*" routes: portal: service-id: august-authentication path: /**- 1
- 2
- 3
- 4
- 5
- 6
- 7
- 8
- 9
- 10
- 11
- 12
- 13
- 14
- 15
- 16
4. 会员代码编写
// 0. 把 VO 转为 PO MemberPO memberPO = new MemberPO(); BeanUtils.copyProperties(memberVO,memberPO);- 1
- 2
- 3
1.windos 查看端口进程
netstat -ano |findstr "4000" taskkill -f -pid 6680- 1
- 2
2.zuul网关改为gateway
原因: 由于zuul网关作出的全局异常处理解决一天还是不能解决,菜鸡留下没有技术的眼泪,后改用gateway来代替zuul…
gateway 有大量的过滤器来自定义.
首先导入gateway依赖
<dependency> <groupId>org.springframework.cloudgroupId> <artifactId>spring-cloud-starter-gatewayartifactId> dependency>- 1
- 2
- 3
- 4
注意: 依赖中发现的springMvc与gateway不能兼容,需要删除spring-boot-starter-web相关引用
server: port: 80 spring: application: name: august-gateway main: allow-bean-definition-overriding: true cloud: gateway: discovery: locator: enabled: true # 启动 discovery 网关集成,可以实现服务发现 routes: - id: member uri: lb://august-authentication predicates: - Path=/member/** filters: eureka: client: service-url: defaultZone: http://localhost:1000/eureka exclude: auth: #不需要授权验证的请求地址,可设置多个,使用逗号分隔开,会跳过AuthFilter授权验证 path: /member/register,/member/get/phone/code,/member/login,/error- 1
- 2
- 3
- 4
- 5
- 6
- 7
- 8
- 9
- 10
- 11
- 12
- 13
- 14
- 15
- 16
- 17
- 18
- 19
- 20
- 21
- 22
- 23
- 24
- 25
- 26
- 27
- 28
1.配置跨域
创建配置类: CorsConfig.java
@Configuration public class CorsConfig { @Bean public CorsWebFilter corsFilter() { CorsConfiguration config = new CorsConfiguration(); config.addAllowedMethod("*"); config.addAllowedOrigin("*"); config.addAllowedHeader("*"); UrlBasedCorsConfigurationSource source = new UrlBasedCorsConfigurationSource(new PathPatternParser()); source.registerCorsConfiguration("/**", config); return new CorsWebFilter(source); } }- 1
- 2
- 3
- 4
- 5
- 6
- 7
- 8
- 9
- 10
- 11
- 12
- 13
2.统一的格式的json数据返回到前端
我们只需要重写 DefaultErrorAttributes类的部分方法即可.

这是默认实现:

我们需要建立一个类继承 DefaultErrorAttributes 重写一下
public Map方法注意: status是必须返回的,因为后面的代码需要调用,判断状态,所以这个字段是必须.为了防止空指针异常

代码:
/** * @author : Crazy_August * @description : * @Time: 2022-04-27 20:50 */ @Component public class MyErrorAttributes extends DefaultErrorAttributes { private final Logger logger = LoggerFactory.getLogger(MyErrorAttributes.class); @Override public Map<String, Object> getErrorAttributes(ServerRequest request, ErrorAttributeOptions options) { Map<String, Object> errorAttributes = new HashMap<>(); try { CustomException error = (CustomException) getError(request); String message = error.getMessage(); Integer code = error.getCode(); errorAttributes.put("message", message); errorAttributes.put("status", code); errorAttributes.put("success", true); } catch (Exception e) { logger.error(e.getMessage()); errorAttributes.put("status", 500); errorAttributes.put("message", e.getMessage()); } return errorAttributes; } }- 1
- 2
- 3
- 4
- 5
- 6
- 7
- 8
- 9
- 10
- 11
- 12
- 13
- 14
- 15
- 16
- 17
- 18
- 19
- 20
- 21
- 22
- 23
- 24
- 25
- 26
2.方案二:

全球org.springframework.web.server基本。WebExceptionHandler,呈现ErrorAttributes,异常处理的接口
代码:
/** * @author : Crazy_August * @description : * @Time: 2022-04-27 22:30 */ public class MyErrorWebExceptionHandler extends DefaultErrorWebExceptionHandler { public MyErrorWebExceptionHandler(ErrorAttributes errorAttributes, ResourceProperties resourceProperties, ErrorProperties errorProperties, ApplicationContext applicationContext) { super(errorAttributes, resourceProperties, errorProperties, applicationContext); } /** * 获取异常属性 */ @Override protected Map<String, Object> getErrorAttributes(ServerRequest request, ErrorAttributeOptions options) { int code = 500; Throwable error = super.getError(request); if (error instanceof NotFoundException) { code = 404; } if (error instanceof ResponseStatusException) { code = ((ResponseStatusException) error).getStatus().value(); } return response(code, this.buildMessage(request, error)); } /** * 指定响应处理方法为JSON处理的方法 * * @param errorAttributes */ @Override protected RouterFunction<ServerResponse> getRoutingFunction(ErrorAttributes errorAttributes) { return RouterFunctions.route(RequestPredicates.all(), this::renderErrorResponse); } /** * 构建异常信息 * * @param request * @param ex * @return */ private String buildMessage(ServerRequest request, Throwable ex) { StringBuilder message = new StringBuilder("Failed to handle request ["); message.append(request.methodName()); message.append(" "); message.append(request.uri()); message.append("]"); if (ex != null) { message.append(": "); message.append(ex.getMessage()); } return message.toString(); } /** * 构建返回的JSON数据格式 * * @param status 状态码 * @param message 信息 * @return */ public static Map<String, Object> response(int status, String message) { Map<String, Object> map = new HashMap<>(16); map.put("code", status); map.put("message", message); map.put("data", null); map.put("status", status); return map; } }- 1
- 2
- 3
- 4
- 5
- 6
- 7
- 8
- 9
- 10
- 11
- 12
- 13
- 14
- 15
- 16
- 17
- 18
- 19
- 20
- 21
- 22
- 23
- 24
- 25
- 26
- 27
- 28
- 29
- 30
- 31
- 32
- 33
- 34
- 35
- 36
- 37
- 38
- 39
- 40
- 41
- 42
- 43
- 44
- 45
- 46
- 47
- 48
- 49
- 50
- 51
- 52
- 53
- 54
- 55
- 56
- 57
- 58
- 59
- 60
- 61
- 62
- 63
- 64
- 65
- 66
- 67
- 68
- 69
- 70
- 71
- 72
- 73
- 74
- 75
- 76
- 77
- 78
同样,
map.put("status", status)不能省.第二步创建配置类:
/** * 异常处理配置类 */ @Configuration @AutoConfigureBefore(ErrorWebFluxAutoConfiguration.class) @EnableConfigurationProperties({ServerProperties.class, ResourceProperties.class}) public class ErrorHandlerConfiguration { private final ServerProperties serverProperties; private final ApplicationContext applicationContext; private final ResourceProperties resourceProperties; private final List<ViewResolver> viewResolvers; private final ServerCodecConfigurer serverCodecConfigurer; public ErrorHandlerConfiguration(ServerProperties serverProperties, ResourceProperties resourceProperties, ObjectProvider<List<ViewResolver>> viewResolversProvider, ServerCodecConfigurer serverCodecConfigurer, ApplicationContext applicationContext) { this.serverProperties = serverProperties; this.applicationContext = applicationContext; this.resourceProperties = resourceProperties; this.viewResolvers = viewResolversProvider.getIfAvailable(Collections::emptyList); this.serverCodecConfigurer = serverCodecConfigurer; } @Bean @Order(Ordered.HIGHEST_PRECEDENCE) public ErrorWebExceptionHandler errorWebExceptionHandler(ErrorAttributes errorAttributes) { MyErrorWebExceptionHandler exceptionHandler = new MyErrorWebExceptionHandler( errorAttributes, this.resourceProperties, this.serverProperties.getError(), this.applicationContext); exceptionHandler.setViewResolvers(this.viewResolvers); exceptionHandler.setMessageWriters(this.serverCodecConfigurer.getWriters()); exceptionHandler.setMessageReaders(this.serverCodecConfigurer.getReaders()); return exceptionHandler; } }- 1
- 2
- 3
- 4
- 5
- 6
- 7
- 8
- 9
- 10
- 11
- 12
- 13
- 14
- 15
- 16
- 17
- 18
- 19
- 20
- 21
- 22
- 23
- 24
- 25
- 26
- 27
- 28
- 29
- 30
- 31
- 32
- 33
- 34
- 35
- 36
- 37
- 38
- 39
- 40
- 41
- 42
- 43
- 44
3.登录验证
crowd-gateway —> SecurityFilter.java
在此过滤器认证时候带token,并且redis上存有信息
/** * 身份认证过滤 * * @author : Crazy_August * @description : * @Time: 2022-04-27 19:40 */ @Component public class SecurityFilter implements GlobalFilter, Ordered { private final Logger log = LoggerFactory.getLogger(SecurityFilter.class); @Autowired private StringRedisTemplate stringRedisTemplate; /** * 读取配置文件中排除不需要授权的URL */ @Value("${exclude.auth.path}") private String excludeAuthUrl; private AntPathMatcher pathMatcher = new AntPathMatcher(); @Override public Mono<Void> filter(ServerWebExchange exchange, GatewayFilterChain chain) { // 1.对于排除的 url 放行 String path = exchange.getRequest().getURI().getPath(); log.info(path); log.info(excludeAuthUrl); if (!StringUtils.isEmpty(excludeAuthUrl)) { String[] excludePaths = excludeAuthUrl.split(","); // 在排除的url放行 for (String pattern : excludePaths) { if (pathMatcher.match(pattern, path)) { return chain.filter(exchange); } } } // 需要过滤的请求 boolean authorization = exchange.getRequest().getHeaders().containsKey("authorization"); if (!authorization) { throw new CustomException(HttpStatus.SC_OK, CustomConstant.NULL_TOKEN); } List<String> authorizationList = exchange.getRequest().getHeaders().get("authorization"); String token = authorizationList.get(0); if (!StringUtils.hasText(token)) { //"token为空,禁止访问!" throw new RuntimeException(CustomConstant.ERROR_TOKEN); } // 如果带了 Bearer 并且是第一次访问 if (token.startsWith("Bearer null")) { //"token格式不正确,禁止访问!" throw new CustomException(HttpStatus.SC_OK, CustomConstant.ERROR_TOKEN); } String[] split = token.split(" "); // 解析 token String Id; try { Claims claims = JwtUtil.parseJWT(split[1]); Id = claims.getSubject(); } catch (Exception e) { throw new CustomException(HttpStatus.SC_OK, CustomConstant.ERROR_TOKEN); } // 从redis中获取用户信息 String redisId = CustomConstant.REDIS_PREFIX + Id; // 获取 得到用户信息 String accessTokenById = stringRedisTemplate.opsForValue().get(redisId); if (StringUtils.isEmpty(accessTokenById)) { throw new CustomException(HttpStatus.SC_OK, CustomConstant.NO_LOGIN_USER); } return chain.filter(exchange); } @Override public int getOrder() { return 0; } }- 1
- 2
- 3
- 4
- 5
- 6
- 7
- 8
- 9
- 10
- 11
- 12
- 13
- 14
- 15
- 16
- 17
- 18
- 19
- 20
- 21
- 22
- 23
- 24
- 25
- 26
- 27
- 28
- 29
- 30
- 31
- 32
- 33
- 34
- 35
- 36
- 37
- 38
- 39
- 40
- 41
- 42
- 43
- 44
- 45
- 46
- 47
- 48
- 49
- 50
- 51
- 52
- 53
- 54
- 55
- 56
- 57
- 58
- 59
- 60
- 61
- 62
- 63
- 64
- 65
- 66
- 67
- 68
- 69
- 70
- 71
- 72
- 73
- 74
- 75
- 76
- 77
- 78
- 79
- 80
- 81
4.登录退出
1.Authentication-consumer的controller接收请求
@GetMapping("/logout") public R<MemberVO> memberLogout(HttpServletRequest request) { String authorizationToken = request.getHeader("authorization"); String[] split = authorizationToken.split(" "); String token = split[1]; R<MemberVO> memberVOR = memberService.memberLogout(token); return R.status(memberVOR.isSuccess(), memberVOR.getMessage()); }- 1
- 2
- 3
- 4
- 5
- 6
- 7
- 8
2.删除redis的缓存信息
@Override public R<MemberVO> memberLogout(String token) { String userId = null; try { // 获取 jwt 解析出用户 id; Claims claims = JwtUtil.parseJWT(token); userId = claims.getSubject(); } catch (Exception e) { R.fail(CustomConstant.IDENTITY_IS_OVERDUE); } String redisValueByUserId = CustomConstant.REDIS_PREFIX + userId; // 删除 redis 信息 R<String> stringR = iRedisClientFeign.removeRedisValueByKey(redisValueByUserId); boolean success = stringR.isSuccess(); if (!success){ return R.fail(CustomConstant.LOGOUT_ERROR); } return R.success(CustomConstant.LOGOUT_SUCCESS); }- 1
- 2
- 3
- 4
- 5
- 6
- 7
- 8
- 9
- 10
- 11
- 12
- 13
- 14
- 15
- 16
- 17
- 18
- 19
5.验证码发送
1.手机验证码发送
依赖:
dependency> <groupId>com.aliyungroupId> <artifactId>alibabacloud-dysmsapi20170525artifactId> <version>1.0.1version> dependency> <dependency> <groupId>org.springframeworkgroupId> <artifactId>spring-coreartifactId> <version>5.3.15version> <scope>compilescope> dependency>- 1
- 2
- 3
- 4
- 5
- 6
- 7
- 8
- 9
- 10
- 11
- 12
/** * 发送验证码 * * @param phoneNumbers 手机号 * @param code 验证码 * @return 响应字符串 */ public static String sendSmS(String phoneNumbers, String code) { Properties properties = new Properties(); properties.getProperty("configuration.properties"); InputStream resourceAsStream = SendUtil.class.getClassLoader().getResourceAsStream("configuration.properties"); // 解决中文乱码问题 BufferedReader bf = null; if (resourceAsStream != null) { bf = new BufferedReader(new InputStreamReader(resourceAsStream)); } try { properties.load(bf); String accessKeyId = properties.getProperty("aliyun.sms.accessKeyId"); String accessKeySecret = properties.getProperty("aliyun.sms.accessKeySecret"); String signName = properties.getProperty("aliyun.sms.signName"); String templateCode = properties.getProperty("aliyun.sms.templateCode"); // 配置 Credentials 认证信息,包括 ak, secret, token StaticCredentialProvider provider = StaticCredentialProvider.create(Credential.builder() .accessKeyId(accessKeyId) .accessKeySecret(accessKeySecret) .build()); // 配置产品 Client AsyncClient client = AsyncClient.builder() .region("undefined") // 产品服务区域 ID .credentialsProvider(provider) .overrideConfiguration( ClientOverrideConfiguration.create() .setEndpointOverride("dysmsapi.aliyuncs.com") ) .build(); String phoneCode = "{'code':" + code + "}"; SendSmsRequest sendSmsRequest = SendSmsRequest.builder() .signName(signName) .templateCode(templateCode) .phoneNumbers(phoneNumbers) .templateParam(phoneCode) .build(); // 异步获取接口请求返回值 CompletableFuture<SendSmsResponse> response = client.sendSms(sendSmsRequest); // 同步阻塞获取返回值方式 SendSmsResponse resp = null; try { resp = response.get(); SendSmsResponseBody body = resp.getBody(); String jsonBody = new Gson().toJson(body); return jsonBody; } catch (Exception e) { e.printStackTrace(); return null; } finally { // Finally, close the client client.close(); } } catch (Exception e) { e.printStackTrace(); } finally { try { bf.close(); } catch (Exception e) { e.printStackTrace(); } } return null; }- 1
- 2
- 3
- 4
- 5
- 6
- 7
- 8
- 9
- 10
- 11
- 12
- 13
- 14
- 15
- 16
- 17
- 18
- 19
- 20
- 21
- 22
- 23
- 24
- 25
- 26
- 27
- 28
- 29
- 30
- 31
- 32
- 33
- 34
- 35
- 36
- 37
- 38
- 39
- 40
- 41
- 42
- 43
- 44
- 45
- 46
- 47
- 48
- 49
- 50
- 51
- 52
- 53
- 54
- 55
- 56
- 57
- 58
- 59
- 60
- 61
- 62
- 63
- 64
- 65
- 66
- 67
- 68
- 69
- 70
- 71
- 72
- 73
- 74
2.QQ邮件发送
依赖:
<dependency> <groupId>com.sun.mailgroupId> <artifactId>javax.mailartifactId> <version>1.6.2version> dependency>- 1
- 2
- 3
- 4
- 5
public static String sendEmail() throws MessagingException, GeneralSecurityException { Properties properties = new Properties(); MailSSLSocketFactory sf = new MailSSLSocketFactory(); sf.setTrustAllHosts(true); properties.put("mail.transport.protocol", "smtp"); // 连接协议 properties.put("mail.smtp.host", "smtp.qq.com"); // 主机名 properties.put("mail.smtp.port", 465); // 端口号 properties.put("mail.smtp.socketFactory.port", 465); properties.put("mail.smtp.auth", true); properties.put("mail.smtp.ssl.enable", true); // 设置是否使用ssl安全连接,一般都使用 properties.put("mail.smtp.ssl.socketFactory", sf); properties.put("mail.debug", true); // 设置是否显示debug信息,true会在控制台显示相关信息 properties.put("mail.user", "193**922@qq.com"); properties.put("mail.password", "tne***dkcaejbe"); //开启pop3/smtp时的验证码 // 得到回话对象 Session session = Session.getDefaultInstance(properties, new Authenticator() { @Override protected PasswordAuthentication getPasswordAuthentication() { return new PasswordAuthentication( properties.getProperty("mail.user"), properties.getProperty("mail.password")); //发件人邮件用户名、授权码; } }); session.setDebug(true);//代表启用debug模式,可以在控制台输出smtp协议应答的过程 // 获取邮件对象 Message message = new MimeMessage(session); // 设置发件人邮箱地址 message.setFrom(new InternetAddress("19**94922@qq.com")); // 设置收件人邮箱地址 message.setRecipient(Message.RecipientType.TO, new InternetAddress("2027485027@qq.com")); // 一个收件人 // message.setRecipients(Message.RecipientType.TO, new InternetAddress[]{new InternetAddress("xxx@qq.com"), new InternetAddress("xxx@qq.com"), new InternetAddress("xxx@qq.com")}); // 多个收件人 // 设置邮件标题 message.setSubject("这是一封测试邮件"); // 设置邮件内容 message.setText("这是测试邮件的正文"); Transport.send(message); return null; }- 1
- 2
- 3
- 4
- 5
- 6
- 7
- 8
- 9
- 10
- 11
- 12
- 13
- 14
- 15
- 16
- 17
- 18
- 19
- 20
- 21
- 22
- 23
- 24
- 25
- 26
- 27
- 28
- 29
- 30
- 31
- 32
- 33
- 34
- 35
- 36
- 37
- 38
- 39
- 40
- 41
- 42
- 43
- 44
- 45
报错: No appropriate protocol (protocol is disabled or cipher suites are inappropriate)或者 could not connect to host “smtp.qq.com”, port: 465, response: -1
看看是不是导入依赖问题
正确依赖:
<dependency> <groupId>com.sun.mailgroupId> <artifactId>javax.mailartifactId> <version>1.6.2version> dependency>- 1
- 2
- 3
- 4
- 5
错误依赖:
<dependency> <groupId>javax.mailgroupId> <artifactId>mailartifactId> <version>1.4.7version> dependency>- 1
- 2
- 3
- 4
- 5
查了半天…
6.OSS腾讯云上传
1.创建账号等过程省略…,主要是获取到 secretId 、 secretKey
2.导入依赖
<dependency> <groupId>com.qcloudgroupId> <artifactId>cos_apiartifactId> <version>5.6.75version> dependency>- 1
- 2
- 3
- 4
- 5
- 6
3.配置文件 configuration.properties
qcloud.secretId=AKIDJxxxxiiTxByYsw qcloud.secretKey=oLxxxxL7 qcloud.bucket.name=auguxxxx2 qcloud.oss.area=ap-chengdu qcloud.oss.url=https://axx922.c- 1
- 2
- 3
- 4
- 5
4.工具类
package xiaozaiyi.crowd.util; import com.qcloud.cos.COSClient; import com.qcloud.cos.ClientConfig; import com.qcloud.cos.auth.BasicCOSCredentials; import com.qcloud.cos.auth.COSCredentials; import com.qcloud.cos.http.HttpProtocol; import com.qcloud.cos.model.*; import com.qcloud.cos.region.Region; import lombok.Data; import xiaozaiyi.crowd.exception.CustomException; import java.io.*; import java.util.*; /** * 腾讯云 oss 存储 * * @author : Crazy_August * @description : * @Time: 2022-04-30 15:04 */ @Data public class QOssUploadUtil { private static String url; private static String bucketName; private static String secretId; private static String secretKey; private static String OSSArea; private static COSClient cosClient; static { Map<String, String> configuration = configuration(); if (configuration != null) { url = configuration.get("url"); bucketName = configuration.get("bucketName"); secretId = configuration.get("secretId"); secretKey = configuration.get("secretKey"); OSSArea = configuration.get("OSSArea"); } } /** * 上传文件 * * @param file 上传的本地文件路径 * @return 上传后的文件访问路径 */ public static String uploadResource(String file) { COSClient cosClient = getCOSClient(secretId, secretKey, OSSArea); Calendar cal = Calendar.getInstance(); int month = cal.get(Calendar.MONTH) + 1; int day = cal.get(Calendar.DAY_OF_MONTH); String folderName = month + "-" + day; String fileMainName = UUID.randomUUID().toString().replace("-", ""); // 从原始文件名中获取文件扩展名 String fileExtension = file.substring(file.lastIndexOf(".")); // 文件名 String fileName = folderName + "/" + fileMainName + fileExtension; // 文件路径 // 指定要上传的文件 File localFile = new File(file); // 指定文件上传到 COS 上的路径,即对象键。例如对象键为 folder/picture.jpg,则表示将文件 picture.jpg 上传到 folder 路径下 PutObjectRequest putObjectRequest = new PutObjectRequest(bucketName, fileName, localFile); PutObjectResult putObjectResult = cosClient.putObject(putObjectRequest); String eTag = putObjectResult.getETag(); if (eTag == null) { throw new CustomException(100, "上传失败"); } cosClient.setBucketAcl(bucketName, CannedAccessControlList.PublicRead); // 返回文件的访问地址 return url + "/" + fileName; } /** * 下载文件到本地 * * @param key 文件名 * @param outputFilePath 下载到本地的路径 */ public static void downloadResource(String key, String outputFilePath) { COSClient cosClient = getCOSClient(secretId, secretKey, OSSArea); GetObjectRequest getObjectRequest = new GetObjectRequest(bucketName, key); COSObject cosObject = cosClient.getObject(getObjectRequest); COSObjectInputStream cosObjectInput = cosObject.getObjectContent(); // 关闭输入流 try { cosObjectInput.close(); } catch (Exception e) { e.printStackTrace(); throw new CustomException(100, "下载失败"); } String outputPath = outputFilePath + File.separator + key.substring(key.indexOf("/") + 1); File downFile = new File(outputPath); getObjectRequest = new GetObjectRequest(bucketName, key); ObjectMetadata downObjectMeta = cosClient.getObject(getObjectRequest, downFile); String eTag = downObjectMeta.getETag(); if (eTag == null) { throw new CustomException(100, "下载失败"); } } /** * 创建桶 * * @param bucketName */ public static void createBucket(String bucketName) { COSClient cosClient = getCOSClient(secretId, secretKey, ""); // 创建存储空间 CreateBucketRequest createBucketRequest = new CreateBucketRequest(bucketName); // 设置 bucket 的权限为 Private(私有读写)、其他可选有 PublicRead(公有读私有写)、PublicReadWrite(公有读写) createBucketRequest.setCannedAcl(CannedAccessControlList.Private); try { Bucket bucketResult = cosClient.createBucket(createBucketRequest); } catch (Exception e) { e.printStackTrace(); throw new CustomException(100, "创建存储空间失败"); } } /** * 删除桶 * * @param bucketName */ public static void removeBucket(String bucketName) { COSClient cosClient = getCOSClient(secretId, secretKey, OSSArea); try { cosClient.listBuckets().forEach(System.out::println); cosClient.deleteBucket(bucketName); } catch (Exception e) { e.printStackTrace(); throw new CustomException(100, "删除创建存储失败"); } } /** * 删除文件 * * @param fileName * @return */ public static void removeResource(String fileName) { COSClient cosClient = getCOSClient(secretId, secretKey, OSSArea); try { cosClient.deleteObject(bucketName, fileName); } catch (Exception e) { e.printStackTrace(); throw new CustomException(100, "删除文件失败"); } } /** * 读取配置文件 * * @return 返回配置文件 Map */ private static Map<String, String> configuration() { Map<String, String> configProps = new HashMap<>(); Properties properties = new Properties(); InputStream resourceAsStream = QOssUploadUtil.class.getClassLoader().getResourceAsStream("configuration.properties"); // 解决中文乱码问题 BufferedReader bf = null; if (resourceAsStream != null) { bf = new BufferedReader(new InputStreamReader(resourceAsStream)); } try { properties.load(resourceAsStream); String secretId = properties.getProperty("qcloud.secretId"); String secretKey = properties.getProperty("qcloud.secretKey"); // 指定文件将要存放的存储桶 String bucketName = properties.getProperty("qcloud.bucket.name"); // 设置 bucket 的地域, String OSSArea = properties.getProperty("qcloud.oss.area"); String url = properties.getProperty("qcloud.oss.url"); configProps.put("url", url); configProps.put("secretId", secretId); configProps.put("secretKey", secretKey); configProps.put("bucketName", bucketName); configProps.put("OSSArea", OSSArea); } catch (IOException e) { e.printStackTrace(); return null; } finally { try { if (bf != null) { bf.close(); } } catch (IOException e) { e.printStackTrace(); } try { assert resourceAsStream != null; resourceAsStream.close(); } catch (IOException e) { e.printStackTrace(); } } return configProps; } /** * 返回 COSClient * * @return COSClient */ private static COSClient getCOSClient(String secretId, String secretKey, String OSSArea) { COSClient cosClient; try { // 1 初始化用户身份信息(secretId, secretKey)。 COSCredentials cred = new BasicCOSCredentials(secretId, secretKey); // 2 设置 bucket 的地域, COS 地域的简称请参照 https://cloud.tencent.com/document/product/436/6224 Region region = new Region(OSSArea); ClientConfig clientConfig = new ClientConfig(region); // 这里建议设置使用 https 协议 clientConfig.setHttpProtocol(HttpProtocol.https); // 设置OSSClient允许打开的最大HTTP连接数,默认为1024个。 clientConfig.setMaxConnectionsCount(1024); // 设置Socket层传输数据的超时时间,默认为50000毫秒。 clientConfig.setSocketTimeout(50000); // 设置建立连接的超时时间,默认为50000毫秒。 clientConfig.setConnectionTimeout(50000); // 设置从连接池中获取连接的超时时间(单位:毫秒),默认不超时。 clientConfig.setConnectionRequestTimeout(1000); // 3 生成 cos 客户端。 cosClient = new COSClient(cred, clientConfig); } catch (Exception e) { e.printStackTrace(); throw new CustomException(100, "获取cos客户端失败"); } return cosClient; } }- 1
- 2
- 3
- 4
- 5
- 6
- 7
- 8
- 9
- 10
- 11
- 12
- 13
- 14
- 15
- 16
- 17
- 18
- 19
- 20
- 21
- 22
- 23
- 24
- 25
- 26
- 27
- 28
- 29
- 30
- 31
- 32
- 33
- 34
- 35
- 36
- 37
- 38
- 39
- 40
- 41
- 42
- 43
- 44
- 45
- 46
- 47
- 48
- 49
- 50
- 51
- 52
- 53
- 54
- 55
- 56
- 57
- 58
- 59
- 60
- 61
- 62
- 63
- 64
- 65
- 66
- 67
- 68
- 69
- 70
- 71
- 72
- 73
- 74
- 75
- 76
- 77
- 78
- 79
- 80
- 81
- 82
- 83
- 84
- 85
- 86
- 87
- 88
- 89
- 90
- 91
- 92
- 93
- 94
- 95
- 96
- 97
- 98
- 99
- 100
- 101
- 102
- 103
- 104
- 105
- 106
- 107
- 108
- 109
- 110
- 111
- 112
- 113
- 114
- 115
- 116
- 117
- 118
- 119
- 120
- 121
- 122
- 123
- 124
- 125
- 126
- 127
- 128
- 129
- 130
- 131
- 132
- 133
- 134
- 135
- 136
- 137
- 138
- 139
- 140
- 141
- 142
- 143
- 144
- 145
- 146
- 147
- 148
- 149
- 150
- 151
- 152
- 153
- 154
- 155
- 156
- 157
- 158
- 159
- 160
- 161
- 162
- 163
- 164
- 165
- 166
- 167
- 168
- 169
- 170
- 171
- 172
- 173
- 174
- 175
- 176
- 177
- 178
- 179
- 180
- 181
- 182
- 183
- 184
- 185
- 186
- 187
- 188
- 189
- 190
- 191
- 192
- 193
- 194
- 195
- 196
- 197
- 198
- 199
- 200
- 201
- 202
- 203
- 204
- 205
- 206
- 207
- 208
- 209
- 210
- 211
- 212
- 213
- 214
- 215
- 216
- 217
- 218
- 219
- 220
- 221
- 222
- 223
- 224
- 225
- 226
- 227
- 228
- 229
- 230
- 231
- 232
- 233
- 234
- 235
- 236
- 237
- 238
- 239
- 240
- 241
- 242
- 243
- 244
- 245
- 246
- 247
7.发起项目模块
主要编写 crowd-project-consumer 这个微服务
1.建立sql
-- ---------------------------- -- Table structure for t_project_item_pic -- ---------------------------- CREATE TABLE `t_project_item_pic` ( `id` int NOT NULL AUTO_INCREMENT, `project_id` int DEFAULT NULL COMMENT '项目id', `item_pic_path` varchar(255) CHARACTER SET utf8 COLLATE utf8_general_ci DEFAULT NULL COMMENT '图片路径', PRIMARY KEY (`id`) USING BTREE ) ENGINE=InnoDB DEFAULT CHARSET=utf8mb3; -- ---------------------------- -- Table structure for t_project_tag -- ---------------------------- CREATE TABLE `t_project_tag` ( `id` int NOT NULL AUTO_INCREMENT, `project_id` int DEFAULT NULL COMMENT '项目id', `tag_id` int DEFAULT NULL COMMENT '标签id', PRIMARY KEY (`id`) USING BTREE ) ENGINE=InnoDB DEFAULT CHARSET=utf8mb3; -- ---------------------------- -- Table structure for t_project_type -- ---------------------------- DROP TABLE IF EXISTS `t_project_type`; CREATE TABLE `t_project_type` ( `id` int(11) NOT NULL AUTO_INCREMENT, `projectid` int(11) NULL DEFAULT NULL, `typeid` int(11) NULL DEFAULT NULL, PRIMARY KEY (`id`) USING BTREE ) -- ---------------------------- -- Table structure for t_return -- ---------------------------- DROP TABLE IF EXISTS `t_return`; CREATE TABLE `t_return` ( `id` int(11) NOT NULL AUTO_INCREMENT, `projectid` int(11) NULL DEFAULT NULL, `type` int(4) NULL DEFAULT NULL COMMENT '0 - 实物回报, 1 虚拟物品回报', `supportmoney` int(11) NULL DEFAULT NULL COMMENT '支持金额', `content` varchar(255) NULL DEFAULT NULL COMMENT '回报内容', `count` int(11) NULL DEFAULT NULL COMMENT '回报产品限额,“0”为不限回报数量', `signalpurchase` int(11) NULL DEFAULT NULL COMMENT '是否设置单笔限购', `purchase` int(11) NULL DEFAULT NULL COMMENT '具体限购数量', `freight` int(11) NULL DEFAULT NULL COMMENT '运费,“0”为包邮', `invoice` int(4) NULL DEFAULT NULL COMMENT '0 - 不开发票, 1 - 开发票', `returndate` int(11) NULL DEFAULT NULL COMMENT '项目结束后多少天向支持者发送回报', `describ_pic_path` varchar(255) NULL DEFAULT NULL COMMENT '说明图片路径', PRIMARY KEY (`id`) USING BTREE ) CREATE TABLE `t_tag` ( `id` int(11) NOT NULL AUTO_INCREMENT, `pid` int(11) NULL DEFAULT NULL, `name` varchar(255) NULL DEFAULT NULL, PRIMARY KEY (`id`) ) DROP TABLE IF EXISTS `t_type`; CREATE TABLE `t_type` ( `id` int(11) NOT NULL AUTO_INCREMENT, `name` varchar(255) NULL DEFAULT NULL COMMENT '分类名称', `remark` varchar(255) NULL DEFAULT NULL COMMENT '分类介绍', PRIMARY KEY (`id`) )- 1
- 2
- 3
- 4
- 5
- 6
- 7
- 8
- 9
- 10
- 11
- 12
- 13
- 14
- 15
- 16
- 17
- 18
- 19
- 20
- 21
- 22
- 23
- 24
- 25
- 26
- 27
- 28
- 29
- 30
- 31
- 32
- 33
- 34
- 35
- 36
- 37
- 38
- 39
- 40
- 41
- 42
- 43
- 44
- 45
- 46
- 47
- 48
- 49
- 50
- 51
- 52
- 53
- 54
- 55
- 56
- 57
- 58
- 59
- 60
- 61
- 62
- 63
- 64
2.编写 java 实体类和VO类

3.操作流程图
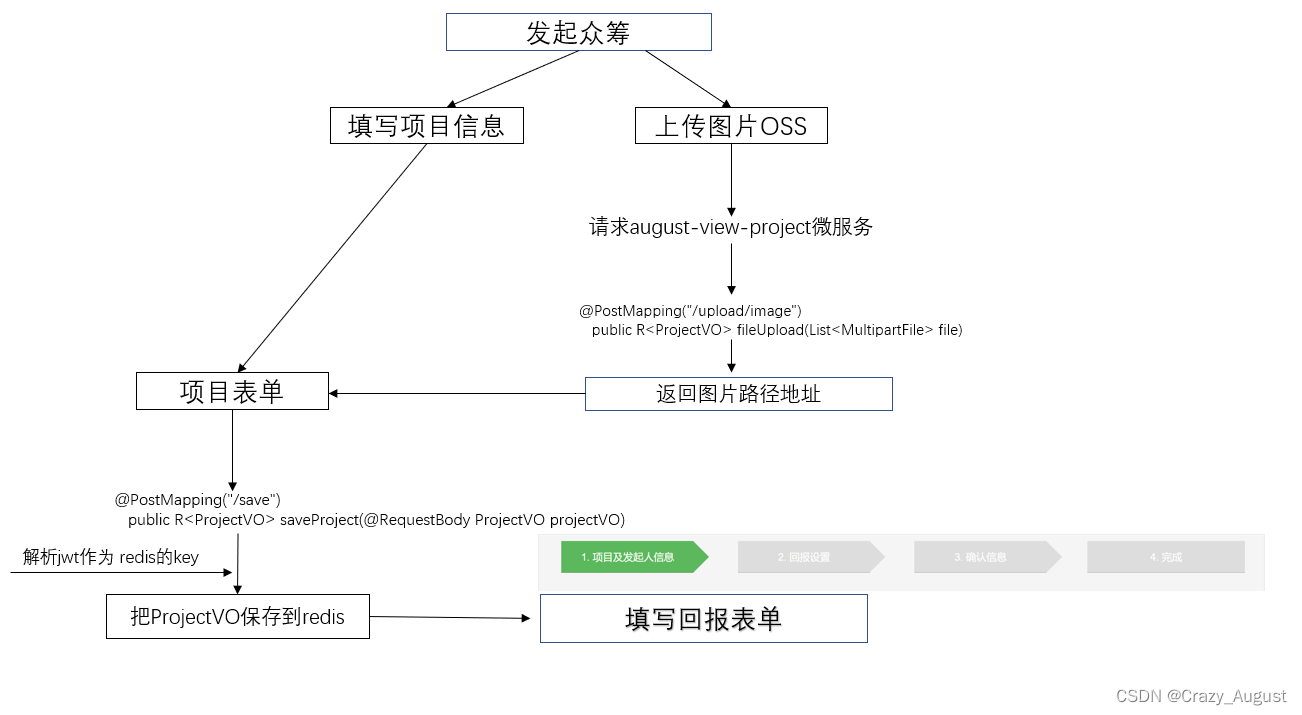


4.详细代码见工程
部分功能截图
- 项目发起

- 回报设置

-
确认信息

-
提交结果

8.前台显示
创建VO
@Data @AllArgsConstructor @NoArgsConstructor public class ProjectTypeVO implements Serializable { private static final long serialVersionUID = 1L; private Integer id; private String name; private String remark; private List<PortalProjectVo> portalProjectVoList; }- 1
- 2
- 3
- 4
- 5
- 6
- 7
- 8
- 9
- 10
@Data @AllArgsConstructor @NoArgsConstructor public class PortalProjectVo implements Serializable { private static final long serialVersionUID = 1L; private Integer projectId; private String projectName; // 项目头图 private String headerPicturePath; // 发布时间 private String deployDate; // 项目进度 private Integer completion; // 项目支持人数 private Integer supporter; // 项目支持金额 private BigDecimal money; }- 1
- 2
- 3
- 4
- 5
- 6
- 7
- 8
- 9
- 10
- 11
- 12
- 13
- 14
- 15
- 16
- 17
- 18
获取数据的sql
<mapper namespace="xiaozaiyi.crowd.mapper.ProjectMapper"> <resultMap id="selectProjectTypeVOListResultMap" type="xiaozaiyi.crowd.vo.ProjectTypeVO"> <id property="id" column="id"/> <result property="name" column="name"/> <result property="remark" column="remark"/> <collection property="portalProjectVoList" ofType="xiaozaiyi.crowd.vo.PortalProjectVo" column="id"select="xiaozaiyi.crowd.mapper.ProjectMapper.selectProjectProjectVOList" /> resultMap> <select id="selectProjectTypeVOList" resultMap="selectProjectTypeVOListResultMap"> select id, `name`, remark from t_type select> <select id="selectProjectProjectVOList" resultType="xiaozaiyi.crowd.vo.PortalProjectVo"> SELECT tp.id projectId, project_name projectName, header_picture_path headerPicturePath, deploy_date deployDate, `completion` completion, supporter supporter, money money FROM t_project tp LEFT JOIN t_project_type tpt ON tp.id = tpt.project_id WHERE tpt.type_id = #{id} ORDER BY tp.id DESC LIMIT 0,4 select> mapper>- 1
- 2
- 3
- 4
- 5
- 6
- 7
- 8
- 9
- 10
- 11
- 12
- 13
- 14
- 15
- 16
- 17
- 18
- 19
- 20
- 21
- 22
- 23
- 24
- 25
- 26
- 27
- 28
- 29
- 30
- 31
- 32
- 33
- 34
- 35

9.详情页面
建立VO
DetailProjectVO.java
package xiaozaiyi.crowd.vo; import lombok.AllArgsConstructor; import lombok.Data; import lombok.NoArgsConstructor; import java.math.BigDecimal; import java.util.List; /** * @author : Crazy_August * @description : 项目详情信息 * @Time: 2022-05-07 19:30 */ @Data @NoArgsConstructor @AllArgsConstructor public class DetailProjectVO { private Integer id; private String projectName; private String projectDesc; private String followerNum; private Integer status; private String money; private BigDecimal supportMoney; // 百分比 private String percentage; private String deployDate; // 众筹天数 private Integer day; private Integer lastDate; private Integer supportNum; private String headerPicturePath; private List<String> detailPicturePath; private List<DetailReturnVO> detailReturnVOList; }- 1
- 2
- 3
- 4
- 5
- 6
- 7
- 8
- 9
- 10
- 11
- 12
- 13
- 14
- 15
- 16
- 17
- 18
- 19
- 20
- 21
- 22
- 23
- 24
- 25
- 26
- 27
- 28
- 29
- 30
- 31
- 32
- 33
- 34
- 35
DetailReturnVO.java
package xiaozaiyi.crowd.vo; import lombok.AllArgsConstructor; import lombok.Data; import lombok.NoArgsConstructor; import java.io.Serializable; import java.math.BigDecimal; @Data @NoArgsConstructor @AllArgsConstructor public class DetailReturnVO implements Serializable { private static final long serialVersionUID = 1L; private Integer id; // 支持金额 private BigDecimal supportMoney; // 回报内容介绍 private String content; // 总回报数量,0为不限制 private Integer count; // 是否限制单笔购买数量,0 表示不限购,1表示限购 private Integer signalPurchase; // 如果单笔限购,那么具体的限购数量 private Integer purchase; // 运费,“0”为包邮 private Integer freight; // 众筹结束后返还回报物品天数 private Integer returnDate; }- 1
- 2
- 3
- 4
- 5
- 6
- 7
- 8
- 9
- 10
- 11
- 12
- 13
- 14
- 15
- 16
- 17
- 18
- 19
- 20
- 21
- 22
- 23
- 24
- 25
- 26
- 27
- 28
- 29
- 30
- 31
- 32
- 33
- 34
- 35
- 36
- 37
- 38
- 39
10.接入支付宝支付
网站:https://open.alipay.com/
1.使用沙箱环境
获取基本信息,配置密钥

2.java配置
aliyun: pay: # 支付宝公钥 alipay-public-key: xxx app-id: 2021000119691212 charset: utf-8 # 支付宝网关 gateway-url: https://openapi.alipaydev.com/gateway.do # 商户私钥,您的PKCS8格式RSA2私钥 merchant-private-key: xxxx notify-url: http://你的url/notify # 页面跳转同步通知页面路径 return-url: http://你的url/return # 签名方式 sign-type: RSA2 # 支付宝网关 log-path: "D:\\" format: "json"- 1
- 2
- 3
- 4
- 5
- 6
- 7
- 8
- 9
- 10
- 11
- 12
- 13
- 14
- 15
- 16
- 17
- 18
配置类:
AliPayResourceConfig.java
@Data @AllArgsConstructor @NoArgsConstructor @Component @ConfigurationProperties(prefix = "aliyun.pay") public class AliPayResourceConfig { private String appId; // 商户私钥,您的PKCS8格式RSA2私钥 private String merchantPrivateKey; // 支付宝公钥,查看地址:https://openhome.alipay.com/platform/keyManage.htm 对应APPID下的支付宝公钥。 private String alipayPublicKey; // 服务器异步通知页面路径 需http://格式的完整路径,不能加?id=123这类自定义参数,必须外网可以正常访问 // public static String notifyUrl = "http://工程公网访问地址/alipay.trade.page.pay-JAVA-UTF-8/notify_url.jsp"; private String notifyUrl; // // 页面跳转同步通知页面路径 需http://格式的完整路径,不能加?id=123这类自定义参数,必须外网可以正常访问00000 // public static String returnUrl = "http://工程公网访问地址/alipay.trade.page.pay-JAVA-UTF-8/return_url.jsp"; private String returnUrl; // 签名方式 // public static String sign_type = "RSA2"; private String signType; // 字符编码格式 // public static String charset = "utf-8"; private String charset; // 支付宝网关 // public static String gateWayUrl = "https://openapi.alipay.com/gateway.do"; private String gatewayUrl; // 日志路径 private String logPath; private String format; }- 1
- 2
- 3
- 4
- 5
- 6
- 7
- 8
- 9
- 10
- 11
- 12
- 13
- 14
- 15
- 16
- 17
- 18
- 19
- 20
- 21
- 22
- 23
- 24
- 25
- 26
- 27
- 28
- 29
- 30
- 31
PayController.java
@RestController public class PayController { @Autowired private AliPayResourceConfig aliPayResourceConfig; @RequestMapping("/") public String pay() throws AlipayApiException { String gatewayUrl = aliPayResourceConfig.getGatewayUrl(); String appId = aliPayResourceConfig.getAppId(); String privateKey = aliPayResourceConfig.getMerchantPrivateKey(); String alipayPublicKey = aliPayResourceConfig.getAlipayPublicKey(); String format = aliPayResourceConfig.getFormat(); String charset = aliPayResourceConfig.getCharset(); String signType = aliPayResourceConfig.getSignType(); String notifyUrl = aliPayResourceConfig.getNotifyUrl(); String returnUrl = aliPayResourceConfig.getReturnUrl(); //获得初始化的AlipayClient 实例 DefaultAlipayClient alipayClient = new DefaultAlipayClient(gatewayUrl, appId, privateKey, format, charset, alipayPublicKey, signType); AlipayTradePagePayRequest alipayRequest = new AlipayTradePagePayRequest(); alipayRequest.setNotifyUrl(notifyUrl); alipayRequest.setReturnUrl(returnUrl); JSONObject bizContent = new JSONObject(); bizContent.put("out_trade_no", "20213211321301001"); bizContent.put("total_amount", 5000); bizContent.put("subject", "Iphone6 16G"); bizContent.put("product_code", "FAST_INSTANT_TRADE_PAY"); alipayRequest.setBizContent(bizContent.toJSONString()); AlipayTradePagePayResponse alipayTradePagePayResponse = alipayClient.pageExecute(alipayRequest); System.out.println(alipayTradePagePayResponse.getBody()); return alipayTradePagePayResponse.getBody(); } }- 1
- 2
- 3
- 4
- 5
- 6
- 7
- 8
- 9
- 10
- 11
- 12
- 13
- 14
- 15
- 16
- 17
- 18
- 19
- 20
- 21
- 22
- 23
- 24
- 25
- 26
- 27
- 28
- 29
- 30
- 31
- 32
11.订单模块

1.订单SQL
-- ---------------------------- -- Table structure for t_order -- ---------------------------- CREATE TABLE `t_order`( `id` int(11) NOT NULL AUTO_INCREMENT COMMENT '主键', `order_num` VARCHAR(100) NULL DEFAULT NULL COMMENT '订单号', `pay_order_num` VARCHAR(100) NULL DEFAULT NULL COMMENT '支付宝流水号', `order_amount` double(10, 5) NULL DEFAULT NULL COMMENT '订单金额', `invoice` int(11) NULL DEFAULT NULL COMMENT '是否开发票(0 不开,1 开)', `invoice_title` VARCHAR(100) NULL DEFAULT NULL COMMENT '发票抬头', `order_remark` VARCHAR(100) NULL DEFAULT NULL COMMENT '订单备注', `address_id` VARCHAR(100) NULL DEFAULT NULL COMMENT '收货地址 id', PRIMARY KEY (`id`) ) -- ---------------------------- -- Table structure for t_order_project -- ---------------------------- CREATE TABLE `t_project` ( `id` int NOT NULL AUTO_INCREMENT COMMENT '主键', `project_name` varchar(255) DEFAULT NULL COMMENT '项目名称', `project_description` varchar(255) DEFAULT NULL COMMENT '项目描述', `money` bigint DEFAULT NULL COMMENT '筹集金额', `day` int DEFAULT NULL COMMENT '筹集天数', `status` int DEFAULT NULL COMMENT '0-即将开始,1-众筹中,2-众筹成功,3-众筹失败\r\n', `deploy_date` varchar(20) CHARACTER SET utf8 COLLATE utf8_general_ci DEFAULT NULL COMMENT '项目发起时间', `support_money` bigint DEFAULT NULL COMMENT '已筹集到的金额', `supporter` int DEFAULT NULL COMMENT '支持人数', `completion` int DEFAULT NULL COMMENT '百分比完成度', `member_id` int DEFAULT NULL COMMENT '发起人的会员id', `create_date` varchar(20) CHARACTER SET utf8 COLLATE utf8_general_ci DEFAULT NULL COMMENT '项目创建时间', `follower` int DEFAULT NULL COMMENT '关注人数', `header_picture_path` varchar(255) DEFAULT NULL COMMENT '头图路径', PRIMARY KEY (`id`) USING BTREE ) ENGINE=InnoDB DEFAULT CHARSET=utf8mb3;- 1
- 2
- 3
- 4
- 5
- 6
- 7
- 8
- 9
- 10
- 11
- 12
- 13
- 14
- 15
- 16
- 17
- 18
- 19
- 20
- 21
- 22
- 23
- 24
- 25
- 26
- 27
- 28
- 29
- 30
- 31
- 32
- 33
- 34
- 35
- 36
….实在是太多了详细代码请看
12.项目部署
本次就将项目部署在虚拟机上.
1.将 Springboot项目打包成可执行jar
需要到maven的一个插件
<build> <plugins> <plugin> <groupId>org.springframework.bootgroupId> <artifactId>spring-boot-maven-pluginartifactId> <executions> <execution> <goals> <goal>repackagegoal> goals> execution> executions> plugin> plugins> build>- 1
- 2
- 3
- 4
- 5
- 6
- 7
- 8
- 9
- 10
- 11
- 12
- 13
- 14
- 15
然后本别打包
后得到如下文件

上传到虚拟机上…
2.使用到docker容器部署
安装步骤省略….
拉取mysql redis jdk8 镜像.
- 分别启动mysql,redis
docker run -p 3306:3306 --name mysql --network=crowd -v /docker/mysql/conf:/etc/mysql/conf.d -v /docker/mysql/logs:/logs \ -v /docker/mysql/data:/var/lib/mysql \ -e MYSQL_ROOT_PASSWORD=123456 \ -d mysql .....- 1
- 2
- 3
- 4
- 5
- 6
- 7
4.进入容器启动java项目
java -jar crowd-eureka-1.0-SNAPSHOT.jar >eureka.log & java -jar crowd-authentication-consumer-1.0-SNAPSHOT.jar >consumer.log & java -jar crowd-gateway-1.0-SNAPSHOT.jar >gateway.log & java -jar crowd-mysql-provider-1.0-SNAPSHOT.jar >mysql-provider.log & java -jar crowd-order-consumer-1.0-SNAPSHOT.jar >order-consumer.log & java -jar crowd-pay-consumer-1.0-SNAPSHOT.jar >pay-consumer.log & java -jar crowd-project-consumer-1.0-SNAPSHOT.jar >project-consumer.log & java -jar crowd-redis-provider-1.0-SNAPSHOT.jar >redis-provider.log & java -jar crowd-service-api-1.0-SNAPSHOT.jar >service-api.log &- 1
- 2
- 3
- 4
- 5
- 6
- 7
- 8
- 9


13.结束
这个项目断断续续积累使用了 2022年3月27日15:07:51 - 2022年8月27日23:22:26 刚好五个月时间,其实前面功能差不多完成已经差不多了,只是还没有真真的部署,然后花了一些时间简单部署了一下.
前端使用的是 Vue3 + Vite 技术,后端主要是学习Spring….
其实这个项目给了我挺大的收获.在此过程遇到了挺多的问题…
1.spring ICO 容器 和SpringMVC 容器的关系
2.xml文件配置包扫描的规则……
3.zull网关的使用.由于听说已经过时了…所以也没有深究,然后使用 getaway 代替了 zull 作为网关
4.支付宝的回调问题…虽然支付成功了.但是由于使用了前后端分离,和教程的有所差别.也是本次项目最大的遗憾(未完成支付成功后,调到自己的页面)—–>其实用前端监听可以实现,但是我觉得应该不是这样解决的…
学到这里告下一段落了,学习的道路还很长,Go for it….
-
相关阅读:
【第6节】Lagent & AgentLego 智能体应用搭建
亚马逊测评自养号,如何进行系统性的学习?
Python读取hbase数据库
8 年 Java 开发含泪刷题,架构岗现在好难进,有点崩溃
GO语言之Goroutine和channel
mysql workbench使用schema视图导出表和列结构到excel
非凡十年,且看临工重机的“数智化”之变!
Django4——配置使用django-ckeditor富文本编辑器超详细图文教程
YOLO V5、SAM、RESNET50模型在GPU环境下搭建过程
mysql卸载不干净时,如何干净利索的卸载mysql数据库(完整版)
- 原文地址:https://blog.csdn.net/weixin_45454773/article/details/126564260