-
手写简易Spring

项目描述
项目描述:
- 手写Spring启动以及扫描流程
- 手下getBean()流程
- 手写Bean生命周期流程
- 手写依赖注入流程
- 手写BeanPOSTProcessor机制
- 手写AOP机制
0. Spring创建工厂的两种方式

1. 手写Spring前准备工作

注意:下面有些代码有的只是简单写了一下大致流程,具体细节会在之后实现。
Spring实现包中
Component注解
@Retention(RetentionPolicy.RUNTIME) // 表示在.class被装载时将被读取,在程序运行期间,将一直保留。 @Target(ElementType.TYPE) // 表示这个注解只能写在类上 public @interface Component { String value() default ""; // 表示beanName }- 1
- 2
- 3
- 4
- 5
- 6

ComponentScan注解
@Retention(RetentionPolicy.RUNTIME) // 表示在.class被装载时将被读取,在程序运行期间,将一直保留。 @Target(ElementType.TYPE) // 表示这个注解只能写在类上 public @interface ComponentScan { String value(); // 用来让用户指定扫描路径,默认值为空 }- 1
- 2
- 3
- 4
- 5
- 6
- 7
- 8

ZhouyuApplicationContext类
public class ZhouyuApplicationContext { private Class configClass; public ZhouyuApplicationContext(Class configClass) { this.configClass = configClass; // 解析配置类 // 解析ComponentScan注解 ---> 扫描路径 ---> 扫描 } public Object getBean(String beanName){ return null; } }- 1
- 2
- 3
- 4
- 5
- 6
- 7
- 8
- 9
- 10
- 11
- 12
- 13
- 14
- 15
- 16
zhouyu使用包中
UserService类
@Component("userService") public class UserService { }- 1
- 2
- 3
- 4
AppConfig类
@ComponentScan("com.zhouyu.service") // 扫描哪个包 public class AppConfig { }- 1
- 2
- 3
Test类
public class Test { public static void main(String[] args) { ZhouyuApplicationContext applicationContext = new ZhouyuApplicationContext(AppConfig.class); Object userService = applicationContext.getBean("userService"); } }- 1
- 2
- 3
- 4
- 5
- 6
- 7

2. 启动和扫描逻辑具体实现
BeanDefinition类:
public class BeanDefinition { private Class clazz; // 表示当前某一个bean的类型 private String scope; // 当前bean的作用域(单例还是多例) public Class getClazz() { return clazz; } public void setClazz(Class clazz) { this.clazz = clazz; } public String getScope() { return scope; } public void setScope(String scope) { this.scope = scope; } }- 1
- 2
- 3
- 4
- 5
- 6
- 7
- 8
- 9
- 10
- 11
- 12
- 13
- 14
- 15
- 16
- 17
- 18
- 19
- 20
- 21
- 22

Scope类:
@Retention(RetentionPolicy.RUNTIME) // 表示在.class被装载时将被读取,在程序运行期间,将一直保留。 @Target(ElementType.TYPE) // 表示这个注解只能写在类上 public @interface Scope { String value(); // 用来让用户指定扫描路径,默认值为空 }- 1
- 2
- 3
- 4
- 5
- 6

ZhouyuApplicationContext类
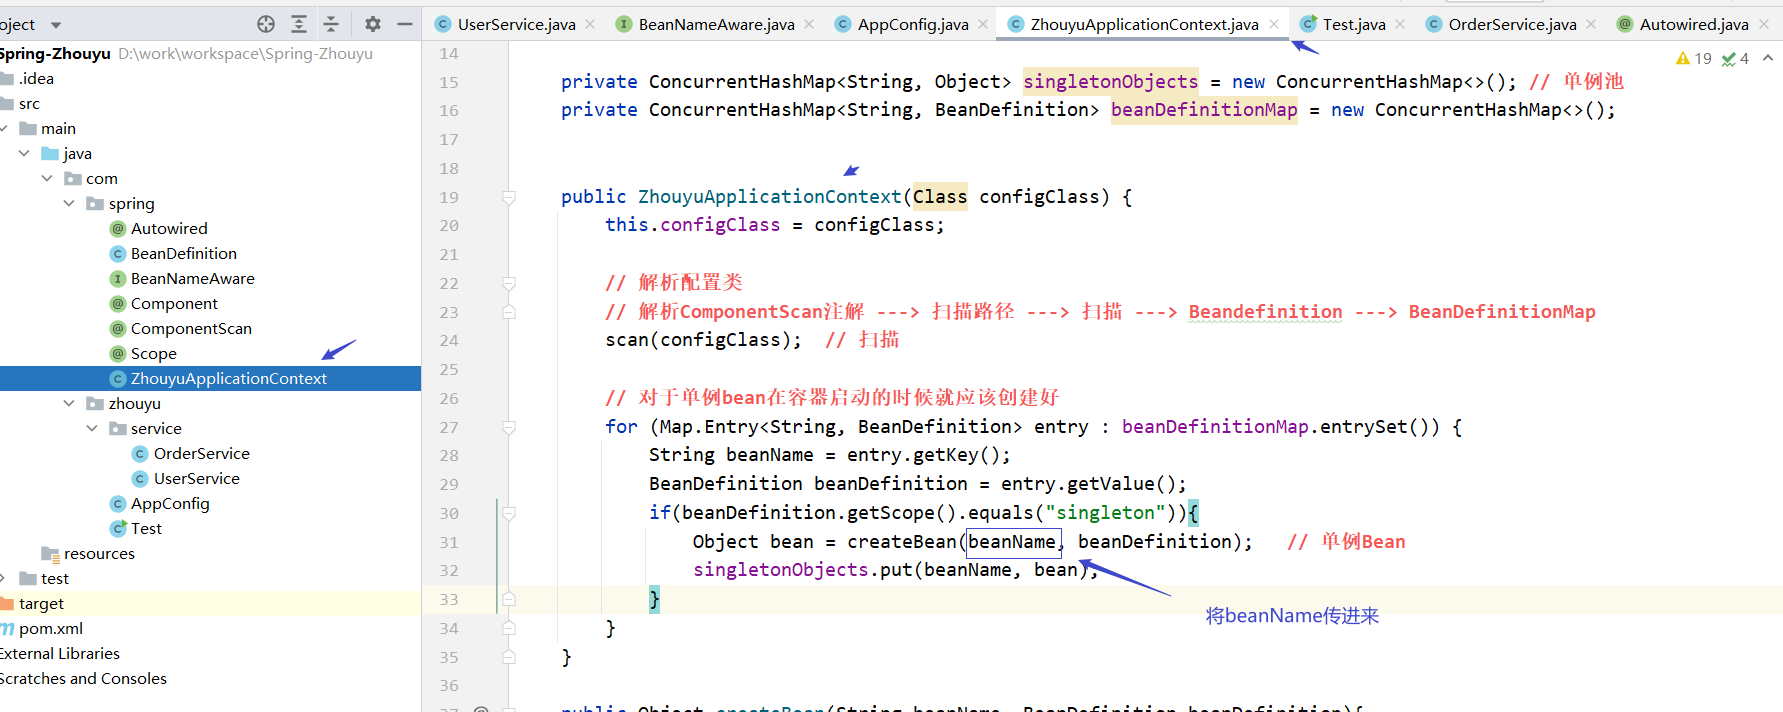
public class ZhouyuApplicationContext { private Class configClass; private ConcurrentHashMap<String, Object> singletonObjects = new ConcurrentHashMap<>(); // 单例池 private ConcurrentHashMap<String, BeanDefinition> beanDefinitionMap = new ConcurrentHashMap<>(); public ZhouyuApplicationContext(Class configClass) { this.configClass = configClass; // 解析配置类 // 解析ComponentScan注解 ---> 扫描路径 ---> 扫描 ---> Beandefinition ---> BeanDefinitionMap scan(configClass); // 扫描 // 对于单例bean在容器启动的时候就应该创建好 for (Map.Entry<String, BeanDefinition> entry : beanDefinitionMap.entrySet()) { String beanName = entry.getKey(); BeanDefinition beanDefinition = entry.getValue(); if(beanDefinition.getScope().equals("singleton")){ Object bean = createBean(beanDefinition); // 单例Bean singletonObjects.put(beanName, bean); } } } public Object createBean(BeanDefinition beanDefinition){ // 创建bean Class clazz = beanDefinition.getClazz(); try { Object instance = clazz.getDeclaredConstructor().newInstance(); // 通过反射调用无参的构造方法得到一个对象 return instance; } catch (InstantiationException e) { e.printStackTrace(); } catch (IllegalAccessException e) { e.printStackTrace(); } catch (InvocationTargetException e) { e.printStackTrace(); } catch (NoSuchMethodException e) { e.printStackTrace(); } return null; } private void scan(Class configClass) { //获取ComponentScan注解 ComponentScan componentScanAnnotation = (ComponentScan) configClass.getDeclaredAnnotation(ComponentScan.class); String path = componentScanAnnotation.value(); // 扫描路径 com.zhouyu.service path = path.replace(".", "/"); // 将 . 替换为 / // 扫描 // 三种类加载器 // Bootstrap --->jre/lib // Ext --->jre/ext/lib // App --->classpath 其实就是target中的classes目录 ClassLoader classLoader = ZhouyuApplicationContext.class.getClassLoader(); // App类加载器 URL resource = classLoader.getResource(path);// 相对路径,相对的就是classpath路径 File file = new File(resource.getFile()); // 将resource转成file if(file.isDirectory()){ // 判断当前file是不是一个目录 File[] files = file.listFiles(); // 将目录下的所有文件拿出来 for (File f : files) { String fileName = f.getAbsolutePath(); // 得到的这个路径是绝对路径,我们需要截取其中我们需要的 if(fileName.endsWith(".class")){ // 是类文件的话才处理 // 将路径中不需要的去掉,把 \ 改为 . ,去掉最后的class // 从com开始截取,截取到.class(不含.class),例如 com\zhouyu\service\UserService String className = fileName.substring(fileName.indexOf("com"), fileName.indexOf(".class")); // 将 \ 替换为 . \\ 中第一个\表示将第二个\转义为普通的\ className = className.replace("\\", "."); try { Class<?> clazz = classLoader.loadClass(className); // // 加载类\ if (clazz.isAnnotationPresent(Component.class)){ // 判断是否有Component注解 // 表示当前这个类是一个bean // 解析类,判断当前类是单例bean还是prototype类型bean // 解析类 --> BeanDefinition Component componentAnnotation = clazz.getDeclaredAnnotation(Component.class); String beanName = componentAnnotation.value(); // 当前这个类的bean名字 BeanDefinition beanDefinition = new BeanDefinition(); beanDefinition.setClazz(clazz); if(clazz.isAnnotationPresent(Scope.class)){ // 存在Scope注解就获取这个类的Scope注解 Scope scopeAnnotation = clazz.getDeclaredAnnotation(Scope.class); beanDefinition.setScope(scopeAnnotation.value()); // 有scope注解就设置为注解中的值 } else { // 没有Scope注解表示当前这个bean是单例的 beanDefinition.setScope("singleton"); } beanDefinitionMap.put(beanName, beanDefinition); } } catch (ClassNotFoundException e) { e.printStackTrace(); } } } } } public Object getBean(String beanName){ if(beanDefinitionMap.containsKey(beanName)){ BeanDefinition beanDefinition = beanDefinitionMap.get(beanName); if(beanDefinition.getScope().equals("singleton")){ // 单例bean Object o = singletonObjects.get(beanName); return o; }else { //多例 // 每次都创建新的bean对象 Object bean = createBean(beanDefinition); return bean; } } else { // 不存在这个bean的话就抛出空指针 throw new NullPointerException(); } } }- 1
- 2
- 3
- 4
- 5
- 6
- 7
- 8
- 9
- 10
- 11
- 12
- 13
- 14
- 15
- 16
- 17
- 18
- 19
- 20
- 21
- 22
- 23
- 24
- 25
- 26
- 27
- 28
- 29
- 30
- 31
- 32
- 33
- 34
- 35
- 36
- 37
- 38
- 39
- 40
- 41
- 42
- 43
- 44
- 45
- 46
- 47
- 48
- 49
- 50
- 51
- 52
- 53
- 54
- 55
- 56
- 57
- 58
- 59
- 60
- 61
- 62
- 63
- 64
- 65
- 66
- 67
- 68
- 69
- 70
- 71
- 72
- 73
- 74
- 75
- 76
- 77
- 78
- 79
- 80
- 81
- 82
- 83
- 84
- 85
- 86
- 87
- 88
- 89
- 90
- 91
- 92
- 93
- 94
- 95
- 96
- 97
- 98
- 99
- 100
- 101
- 102
- 103
- 104
- 105
- 106
- 107
- 108
- 109
- 110
- 111
- 112
- 113
- 114
- 115
- 116
- 117
- 118
- 119


实现之后可以测试一下单例bean和多例bean,看是否成功


3. 依赖注入模拟实现

@Autowired注解
@Retention(RetentionPolicy.RUNTIME) // 表示在.class被装载时将被读取,在程序运行期间,将一直保留。 @Target({ElementType.METHOD, ElementType.FIELD}) // 表示这个注解写在方法、属性上 public @interface Autowired { }- 1
- 2
- 3
- 4
- 5

ZhouyuApplicationContext

OrderService
@Component("orderService") public class OrderService { }- 1
- 2
- 3
- 4
UserService
@Component("userService") public class UserService { @Autowired private OrderService orderService; public void test(){ System.out.println(orderService); } }- 1
- 2
- 3
- 4
- 5
- 6
- 7
- 8
- 9
- 10

测试类Test
public class Test { public static void main(String[] args) { ZhouyuApplicationContext applicationContext = new ZhouyuApplicationContext(AppConfig.class); UserService userService = (UserService) applicationContext.getBean("userService"); userService.test(); } }- 1
- 2
- 3
- 4
- 5
- 6
- 7
- 8

4. BeanNameAware接口回调模拟实现
如果我们想要在 UserService 中声明一个成员变量 BeanName,让Spring在启动时候将 UserService 在工厂中的名字传给这个值,我们应该如何实现呢,这就需要用到 BeanNameAware 接口了。
BeanNameAware
public interface BeanNameAware { void setBeanName(String name); }- 1
- 2
- 3
- 4

UserService
@Component("userService") public class UserService implements BeanNameAware { @Autowired private OrderService orderService; private String beanName; // 想要给这个字符串赋这个类在工厂中的名字 @Override public void setBeanName(String name) { // Spring 会来调这个方法,把当前bean的名字传给这个方法即name beanName = name; } public void test(){ System.out.println(orderService); System.out.println(beanName); } }- 1
- 2
- 3
- 4
- 5
- 6
- 7
- 8
- 9
- 10
- 11
- 12
- 13
- 14
- 15
- 16
- 17
- 18
- 19
- 20
- 21

最后我们需要在Spring中在启动时将bean的名字传给setBeanName并且调用setBeanName方法
ZhouyuApplicationContext

还有几处调用createBean的地方需要修改

最后测试一下

5. InitializingBean初始化机制模拟实现
如果想要在初始化的时候专门有一个方法用于处理一些逻辑时,我们应该怎么做呢?
InitializingBean
public interface InitializingBean { void afterPropertiesSet() throws Exception; }- 1
- 2
- 3
- 4

UserService

ZhouyuApplicationContext

测试

6. BeanPostProcessor模拟实现
BeanPostProcessor 是 Spring 对外提供的扩展机制
BeanPostProcessor接口
public interface BeanPostProcessor { // 初始化前执行这个方法 Object postProcessBeforeInitialization(Object bean, String beanName); // 初始化后执行这个方法 Object postProcessAfterInitialization(Object bean, String beanName); }- 1
- 2
- 3
- 4
- 5
- 6
- 7
- 8

我们如何使用 BeanPostProcessor 呢?
我们新创建一个类,然后让其实现 BeanPostProcessor接口,实现其中的两个方法,一个在初始化bean前调用,一个在初始化bean后调用,在其中写我们自己想要写的逻辑。
/** * 加上 @Component 注解,在spring中注册 * 扫描时发现这个类实现了 BeanPostProcessor 接口,Spring 就知道了当前这个bean是一个比较特殊的bean * 和UserService不一样,Spring 等会还要来调用这个方法的 */ @Component public class ZhouyuBeanPostProcessor implements BeanPostProcessor { // spring在创建任何bean的时候都会执行下面的两个方法 @Override public Object postProcessBeforeInitialization(Object bean, String beanName) { // 初始化前调用这个方法 // 针对一个bean或者多个bean同时处理都行 if(beanName.equals("userService")){ System.out.println("初始化前"); ((UserService)bean).setName("周瑜好帅"); } return bean; } @Override public Object postProcessAfterInitialization(Object bean, String beanName) { // 初始化后调用这个方法 System.out.println("初始化后"); return bean; } }- 1
- 2
- 3
- 4
- 5
- 6
- 7
- 8
- 9
- 10
- 11
- 12
- 13
- 14
- 15
- 16
- 17
- 18
- 19
- 20
- 21
- 22
- 23
- 24
- 25
- 26
- 27
- 28

那么在 Spring 中我们如何实现呢?
ZhouyuApplicationContext


测试

7. AOP模拟实现
AOP 其实就是利用 BeanPostProcessor 实现的,并且它就是在初始化后这一步实现的。

UserService

测试

-
相关阅读:
如何用cmd命令快速搭建FTP服务
Sharding-JDBC源码解析与vivo的定制开发
C++类与结构体、this指针(二)
解决报错:fatal: in unpopulated submodule *
计算机Java项目|Springboot学生读书笔记共享
GZ038 物联网应用开发赛题第1套
Unirech腾讯云国际代充-云服务器cvm常见问题解答
阴影text-shadow和box-shadow详解
QCon 回顾 | Data Fabric:逻辑统一、物理分散
ubuntu20.04安装cv2
- 原文地址:https://blog.csdn.net/qq_50313418/article/details/126452827