-
Vue基础知识点 — webpack
Vue基础知识点 - webpack
- 1、webpack
- 1)webpack 简单介绍
- 2)webpack 的基本使用
- 打包代码
- webpack.config.js配置、package.json配置 :js模块化打包
- webpack使用css文件配置:loader、css模块化打包
- webpack使用less文件配置:less模块化打包
- webpack使用图片文件配置:图片模块化打包
- webpack ES6 转 ES5
- webpack使用 Vue配置
- Vue中的 el 和 template
- Vue中的抽离写法: vue-loader、vue-template-compiler
- webpack使用Plugin:增加打包文件版权说明信息
- webpack使用HtmlWebpackPlugin:打包html文件
- webpack使用UglifyjsWebpackPlugin:压缩、丑化js代码
- webpack使用webpack-dev-server:搭建本地服务器
- webpack配置文件的分离
1、webpack
1)webpack 简单介绍
webpack 与grunt/gulp的对比
grunt/gulp:他们的核心是Task
- 我们可以配置一系列的task,并且定义task要处理的事物(eg: ES6、ts转换,图片压缩,scss转成css)
- 之后让 grunt/gulp来依次执行这些task,而且让整个流程自动化
- 所以grunt/gulp被称为前端自动化任务管理工具
什么时候用grunt/gulp
- 工程模块依赖非常简单,甚至是没有用到模块化的概念
- 只需要进行简单的合并、压缩,就使用grunt/gulp即可
- 但是如果整个项目使用了模块化管理,而且相互依赖非常强,我们需要使用功能更加强大的webpack
grunt/gulp和webpack有什么不同
- grunt/gulp更加强调的是前端流程的自动化,模块化不是它的核心
- webpack更加强调模块化开发管理,而文件压缩合并、预处理等功能,是它附带的功能
webpack 与 node、npm的关系
webpack是模块化打包工具
webpack为了正常运行,必须依赖node环境
node环境为了能够正常执行很多代码,必须其中包含各种依赖的包
这时需要使用npm工具(node packages manager)关系图解:

webpack 的安装
安装webpack首先需要安装node.js,node.js自带了软件包管理工具 npm
查看node版本:
node -v- 1
全局安装webpack
npm install webpack@3.6.0 -g- 1
局部安装webpack
npm install webpack@3.6.0 --save-dev- 1
2)webpack 的基本使用
为什么需要使用webpack?
有时候我们需要把我们的代码打包,发送给服务器,发布项目。此前,模块化代码的导入、导出方式有CommonJS,ES6。但是使用CommonJS直接导入、导出时,浏览器不能直接解析,需要借助webpack将我们的代码进行打包打包代码
这里以一个简单的例子来介绍代码打包
文件结构如下:

index.html:是项目的入口文件
dist:是用来存放打包后的代码的文件(刚开始是没有东西的,这个目录是我打包后的)
src:主要用来编写各种主要项目代码
main.js:进行文件的导入
mathUtils:编写代码,进行代码导出mathUtils.js中的代码:
function sum(a, b) { return a + b; } function mul(a, b) { return a * b; } function sub(a, b) { return a - b; } //1.使用CommonJS的方式进行打包 module.exports = { sum, mul, sub }- 1
- 2
- 3
- 4
- 5
- 6
- 7
- 8
- 9
- 10
- 11
- 12
- 13
- 14
- 15
main.js中的代码:
//啊啊啊,文件的路径不要写错啦啦啦!!! 当前文件夹 ./ const {sum, mul, sub} = require('./mathUtils.js'); console.log(sum(20, 30)); console.log(mul(40, 50)); console.log(sub(60, 20));- 1
- 2
- 3
- 4
- 5
然后可以使用webpack进行打包啦
将终端目录切换到当前项目的目录,使用 cd 指令
输入命令:webpack ./src/main.js -o ./dist/bundle.js- 1
翻译一下:将当前文件夹src中的main.js文件,打包输出为当前文件夹dist下的bundle.js文件中
报错了怎么办
很正常的,不要着急
- 使用管理员的方式启动相应的软件
- 向上面一样,版本新的webpack,需要在中间加上 -o
打包后的文件结构:

打包完之后,就可以在index.html中引入打包后的文件了。
index.html中的代码:
DOCTYPE html> <html lang="en"> <head> <meta charset="UTF-8"> <title>index.htmltitle> head> <body> <script src="dist/bundle.js/main.js">script> body> html>- 1
- 2
- 3
- 4
- 5
- 6
- 7
- 8
- 9
- 10
显示效果:

注意:这个过程中自己犯的错误
module: 你又又又写错了,都看了不下3遍了,你又又又写成了modlue。module:组件,模块的意思,真的无语死了还可以使用webpack对ES6中的导入、导出进行打包。
例子接上一个,只是做了一个小扩展文件结构:

info.js中的代码:export const name = 'YiBo'; export const age = 18; export const height = 1.82- 1
- 2
- 3
src中 main.js 中添加后的代码为:
const {sum, mul, sub} = require('./mathUtils.js'); import {name, age, height} from './info'; console.log(sum(20, 30)); console.log(mul(40, 50)); console.log(sub(60, 20)); console.log(name); console.log(age); console.log(height);- 1
- 2
- 3
- 4
- 5
- 6
- 7
- 8
- 9
弄完之后,还需要对webpack进行一次打包:
webpack ./src/main.js -o ./dist/bundle.js- 1
代码运行后显示效果:

webpack.config.js配置、package.json配置 :js模块化打包
why要进行webpack.config.js的配置
在使用webpack进行打包的过程中,我们发现每次使用webpack都需要使用很多的代码,eg:
webpack ./src/main.js -o ./dist/bundle.js,这样使用真的真的很不方便,需要一种简写的方式运行webpack,eg: 直接输入webpack就可以自动打包,所以,这时,需要进行webpack.config.js文件的配置。在webpack.config.js中进行配置时,我们需要导入node包中的path模块,为了保证模块的正常导入,我们需要执行:
npm init代码,进行相应的配置,生成package.json文件执行npm init之后,终端中显示的内容:

生成的package.json文件为:
{ "name": "meetwebpack", "version": "1.0.0", "description": "", "main": "index.js", "scripts": { "test": "echo \"Error: no test specified\" && exit 1" }, "author": "", "license": "ISC" }- 1
- 2
- 3
- 4
- 5
- 6
- 7
- 8
- 9
- 10
- 11
- 12
进行webpack.config.js文件配置:
需要在项目中新建一个webpack.config.js文件
最终webpack.config.js中的代码为:const path = require('path'); //导入node包中的path module.exports = { entry: './src/main.js', output: { //需要动态获取路径,不然会报错, __dirname保存的是当前文件的路径 path: path.resolve(__dirname, 'dist'), filename: 'bundle.js' } }- 1
- 2
- 3
- 4
- 5
- 6
- 7
- 8
- 9
弄好之后,在终端中使用
webpack指令,即可完成打包。文件结构:

显示效果:(注意:这里复用的基本上都是上一个例子的代码)

补充:发现在使用
webpack ./src/main.js -o ./dist/bundle.js进行打包时,发现最终生成的是bundle.js文件夹,文件夹里面有main.js文件,而这个main.js文件就是打包好的那个文件。而使用webpack.config.js文件之后,使用webpack进行打包后,生成的就是正常的bundle.js文件为了更加方便的使用webpack,可以对webpack再做一层映射
在package.json中进行
在“script”中添加了"build" : “webpack” 内容{ "name": "meetwebpack", "version": "1.0.0", "description": "", "main": "index.js", "scripts": { "test": "echo \"Error: no test specified\" && exit 1", "build": "webpack" }, "author": "", "license": "ISC" }- 1
- 2
- 3
- 4
- 5
- 6
- 7
- 8
- 9
- 10
- 11
- 12
在终端中调用
npm run build是可以正常打包的。why要做这一层映射,有什么好处
这样做之后,每次执行这个命令(npm run build),其实它是先用的是本地的webpack。
所以,需要在项目中安装一下本地的webpack,这里安装的是开发时的版本
npm install webpack@3.6.0 --save-dev- 1
package.json文件中的内容:
{ "name": "meetwebpack", "version": "1.0.0", "description": "", "main": "index.js", "scripts": { "test": "echo \"Error: no test specified\" && exit 1", "build": "webpack" }, "author": "", "license": "ISC", "devDependencies": { "webpack": "^3.6.0" } }- 1
- 2
- 3
- 4
- 5
- 6
- 7
- 8
- 9
- 10
- 11
- 12
- 13
- 14
- 15
- 16
文件目录结构:

webpack使用css文件配置:loader、css模块化打包
简单介绍一下loader:
loader是webpack中非常核心的概念。
loader的使用过程:- 步骤1:通过npm安装需要使用的 loader
- 步骤2:在webpack.config.js中的module关键字下进行配置
怎么好点学习 loader 有关内容:
- 去webpack官网
- 点击官网导航栏下的LOADERS,即可很好地查看学习内容
why需要进行css配置
由于在开发过程中,我们会有很多的css文件,如果一个个的引入就太麻烦了,这时候我们可以用webpack对所有的css文件进行打包,这样的话,是比较符合实际过程的开发的。但是进行css配置时,需要安装相应的 loader
安装 css-loader、style-loader
css-loader:解析css文件后,使用import加载,并且返回CSS代码
style-loader:将模块的导出作为样式添加到DOM中官方给出的安装代码
npm install --save-dev css-loader- 1
npm install style-loader --save-dev- 1
注意:演示案例基本上是基于js模块化打包的案例进行讲解的(就是上一个的案例)
安装完之后,可以去package.json文件中查看安装的版本
安装完成后,进行配置:在webpack.config.js中配置
webpack.config.js中的代码:
const path = require('path'); //导入node包中的path module.exports = { entry: './src/main.js', output: { //需要动态获取路径,不然会报错, __dirname保存的是当前文件的路径 path: path.resolve(__dirname, 'dist'), filename: 'bundle.js' }, module: { rules: [ { test: /\.css$/, //1.css-loader只负责将css文件加载,是不负责解析的 //2.style-loader负责将样式添加到DOM中 //3.使用多个loader时,是从右向左读的 use: ['style-loader', 'css-loader'] } ] } }- 1
- 2
- 3
- 4
- 5
- 6
- 7
- 8
- 9
- 10
- 11
- 12
- 13
- 14
- 15
- 16
- 17
- 18
- 19
- 20
案例中的目录结构:

normal.css中的代码:
body { background-color: #42b983; }- 1
- 2
- 3
main.js中的代码:(入口文件)
// 1.使用commonJS模块化规范 const {sum, mul, sub} = require('./js/mathUtils.js'); console.log(sum(20, 30)); console.log(mul(40, 50)); console.log(sub(60, 20)); //2.使用ES6中的模块化规范 import {name, age, height} from './js/info'; console.log(name); console.log(age); console.log(height); // 3.依赖css文件 require('./css/normal.css')- 1
- 2
- 3
- 4
- 5
- 6
- 7
- 8
- 9
- 10
- 11
- 12
- 13
- 14
运行文件:
npm run build报错!!!

版本问题:不兼容,版本回退
//安装style-loader: npm install --save-dev style-loader@1.2.1 //安装css-loader: npm install --save-dev css-loader@1.0.1- 1
- 2
- 3
- 4
再次打包:
npm run build成功打包:

运行index.html文件: 界面发生改变

webpack使用less文件配置:less模块化打包
在实际开发过程中,我们也需要对less文件进行模块化打包
在官网上查找安装 less-loader 的代码
npm install --save-dev less-loader less- 1
在webpack.config.js文件中进行配置
const path = require('path'); //导入node包中的path module.exports = { entry: './src/main.js', output: { //需要动态获取路径,不然会报错, __dirname保存的是当前文件的路径 path: path.resolve(__dirname, 'dist'), filename: 'bundle.js' }, module: { rules: [ { test: /\.css$/, //1.css-loader只负责将css文件加载,是不负责解析的 //2.style-loader负责将样式添加到DOM中 //3.使用多个loader时,是从右向左读的 use: ['style-loader', 'css-loader'] }, { test: /\.less$/, use: [{ loader: "style-loader" // creates style nodes from JS strings }, { loader: "css-loader" // translates CSS into CommonJS }, { loader: "less-loader" // compiles Less to CSS }] } ] } }- 1
- 2
- 3
- 4
- 5
- 6
- 7
- 8
- 9
- 10
- 11
- 12
- 13
- 14
- 15
- 16
- 17
- 18
- 19
- 20
- 21
- 22
- 23
- 24
- 25
- 26
- 27
- 28
- 29
- 30
案例中的目录结构:

special.less中的代码:
@fontSize: 50px; @fontColor: white; body { font-size: @fontSize; color: @fontColor; }- 1
- 2
- 3
- 4
- 5
- 6
main.js中的代码:(入口文件)
// 1.使用commonJS模块化规范 const {sum, mul, sub} = require('./js/mathUtils.js'); console.log(sum(20, 30)); console.log(mul(40, 50)); console.log(sub(60, 20)); //2.使用ES6中的模块化规范 import {name, age, height} from './js/info'; console.log(name); console.log(age); console.log(height); // 3.依赖css文件 require('./css/normal.css'); // 4.依赖css文件 require('./css/special.less'); document.writeln('今天也要好好加油呀!
')- 1
- 2
- 3
- 4
- 5
- 6
- 7
- 8
- 9
- 10
- 11
- 12
- 13
- 14
- 15
- 16
- 17
- 18
进行打包: npm run build
报错!!! 安装版本太高重新安装less-loader
npm install --save-dev less-loader@4.1.0 less@3.9.0- 1
安装完成之后,再重新打包一次
显示效果:

注意:每次改变代码之后,都需要使用 npm run build,重新打包一次
webpack使用图片文件配置:图片模块化打包
在实际的开发过程中,我们也需要对图片对象进行打包
为了让图片能够正常的打包,我们需要安装对应的loader文件。
在官网上查找安装 url-loader 的代码
npm install --save-dev url-loader- 1
可以在package.json文件中查看安装的url-loader安装的版本。
在webpack.config.js文件中进行配置
const path = require('path'); //导入node包中的path module.exports = { entry: './src/main.js', output: { //需要动态获取路径,不然会报错, __dirname保存的是当前文件的路径 path: path.resolve(__dirname, 'dist'), filename: 'bundle.js' }, module: { rules: [ { test: /\.css$/, //1.css-loader只负责将css文件加载,是不负责解析的 //2.style-loader负责将样式添加到DOM中 //3.使用多个loader时,是从右向左读的 use: ['style-loader', 'css-loader'] }, { test: /\.less$/, use: [{ loader: "style-loader" // creates style nodes from JS strings }, { loader: "css-loader" // translates CSS into CommonJS }, { loader: "less-loader" // compiles Less to CSS }] }, { test: /\.(png|jpg|gif)$/, use: [ { loader: 'url-loader', options: { limit: 8192 //这个是8k的限制:1024*8=8192 } } ] } ] } }- 1
- 2
- 3
- 4
- 5
- 6
- 7
- 8
- 9
- 10
- 11
- 12
- 13
- 14
- 15
- 16
- 17
- 18
- 19
- 20
- 21
- 22
- 23
- 24
- 25
- 26
- 27
- 28
- 29
- 30
- 31
- 32
- 33
- 34
- 35
- 36
- 37
- 38
- 39
- 40
- 41
文件的目录结构:

在normal.css中引入图片文件:图片大小小于8kb
body { /*background-color: #42b983;*/ background: url(../img/one.jpg); /*在css文件中引用图片对象*/ }- 1
- 2
- 3
- 4
进行打包: npm run build
报错!!!
原因:安装的url-loader版本不兼容
重新安装 url-loader
npm install url-loader@1.1.2 --save-dev- 1
安装完成之后,使用
npm run build再进行一次打包打包完成:

运行index.html,显示效果:

此时图片是以base64的方式保存的

做一点改变:在normal.css中引入图片文件:图片大小 大于8kb
body { /*background-color: #42b983;*/ background: url(../img/two.jpg); /*在css文件中引用图片对象*/ }- 1
- 2
- 3
- 4
直接使用
npm run build进行打包,报错!!!
需要安装 file-loader
官网查找安装方式:会报错,版本兼容性太差
npm install file-loader --save-dev- 1
需要安装低版本的 file-loader
npm install file-loader@3.0.1 --save-dev- 1
再进行打包:
npm run build打包成功,运行 index.html,不显示效果
原因分析:图片的路径地址不对,打包生成的图片在dist文件夹中,而我们引用的url是在img文件夹中,会出现图片文件找不到的错误。
此时文件的目录结构为:

为了让图片的路径为dist文件夹中的图片路径,需要更改webpack.config.js中的配置
publicPath: ‘/dist’
const path = require('path'); //导入node包中的path module.exports = { entry: './src/main.js', output: { //需要动态获取路径,不然会报错, __dirname保存的是当前文件的路径 path: path.resolve(__dirname, 'dist'), filename: 'bundle.js', publicPath: 'dist/' //为了使打包后的图片文件能够正常显示 }, module: { rules: [ { test: /\.css$/, //1.css-loader只负责将css文件加载,是不负责解析的 //2.style-loader负责将样式添加到DOM中 //3.使用多个loader时,是从右向左读的 use: ['style-loader', 'css-loader'] }, { test: /\.less$/, use: [{ loader: "style-loader" // creates style nodes from JS strings }, { loader: "css-loader" // translates CSS into CommonJS }, { loader: "less-loader" // compiles Less to CSS }] }, { test: /\.(png|jpg|gif)$/, use: [ { loader: 'url-loader', options: { //如果图片小于limit时,会将图片编译成base64的字符串形式 //如果图片大于limit时,需要使用file-loader进行加载 limit: 8192 //这个是8k的限制:1024*8=8192 } } ] } ] } }- 1
- 2
- 3
- 4
- 5
- 6
- 7
- 8
- 9
- 10
- 11
- 12
- 13
- 14
- 15
- 16
- 17
- 18
- 19
- 20
- 21
- 22
- 23
- 24
- 25
- 26
- 27
- 28
- 29
- 30
- 31
- 32
- 33
- 34
- 35
- 36
- 37
- 38
- 39
- 40
- 41
- 42
- 43
- 44
再次打包:
npm run build运行 index.html

如果同时有多张图片都打包到dist中,就显得太乱了,我们希望它可以打包到dist/img文件下
此时,需要在webpack.config.js中进行配置
name: 'img/[name].[hash:8].[ext]'const path = require('path'); //导入node包中的path module.exports = { entry: './src/main.js', output: { //需要动态获取路径,不然会报错, __dirname保存的是当前文件的路径 path: path.resolve(__dirname, 'dist'), filename: 'bundle.js', publicPath: 'dist/' }, module: { rules: [ { test: /\.css$/, //1.css-loader只负责将css文件加载,是不负责解析的 //2.style-loader负责将样式添加到DOM中 //3.使用多个loader时,是从右向左读的 use: ['style-loader', 'css-loader'] }, { test: /\.less$/, use: [{ loader: "style-loader" // creates style nodes from JS strings }, { loader: "css-loader" // translates CSS into CommonJS }, { loader: "less-loader" // compiles Less to CSS }] }, { test: /\.(png|jpg|gif)$/, use: [ { loader: 'url-loader', options: { //如果图片小于limit时,会将图片编译成base64的字符串形式 //如果图片大于limit时,需要使用file-loader进行加载 limit: 8192, //这个是8k的限制:1024*8=8192 name: 'img/[name].[hash:8].[ext]' //生成的图片文件在img文件夹下,拥有自己的name,hash值8位,扩展名extension } } ] } ] } }- 1
- 2
- 3
- 4
- 5
- 6
- 7
- 8
- 9
- 10
- 11
- 12
- 13
- 14
- 15
- 16
- 17
- 18
- 19
- 20
- 21
- 22
- 23
- 24
- 25
- 26
- 27
- 28
- 29
- 30
- 31
- 32
- 33
- 34
- 35
- 36
- 37
- 38
- 39
- 40
- 41
- 42
- 43
- 44
- 45
再进行打包:
npm run build图片正常显示,文件的目录结构为:

webpack ES6 转 ES5
why需要ES6转ES5
我们开发的各种项目文件是需要运行到各大浏览器中去的,但是大部分的浏览器都支持ES5,为了能够使代码能够正常的运行,我们需要将ES6代码文件转为ES5。安装babel-loader、babel-core、babel-preset-es2015
npm install --save-dev babel-loader@7 babel-core babel-preset-es2015- 1
在webpack.config.js中进行相关的配置
const path = require('path'); //导入node包中的path module.exports = { entry: './src/main.js', output: { //需要动态获取路径,不然会报错, __dirname保存的是当前文件的路径 path: path.resolve(__dirname, 'dist'), filename: 'bundle.js', publicPath: 'dist/' }, module: { rules: [ { test: /\.css$/, //1.css-loader只负责将css文件加载,是不负责解析的 //2.style-loader负责将样式添加到DOM中 //3.使用多个loader时,是从右向左读的 use: ['style-loader', 'css-loader'] }, { test: /\.less$/, use: [{ loader: "style-loader" // creates style nodes from JS strings }, { loader: "css-loader" // translates CSS into CommonJS }, { loader: "less-loader" // compiles Less to CSS }] }, { test: /\.(png|jpg|gif)$/, use: [ { loader: 'url-loader', options: { //如果图片小于limit时,会将图片编译成base64的字符串形式 //如果图片大于limit时,需要使用file-loader进行加载 limit: 8192, //这个是8k的限制:1024*8=8192 name: 'img/[name].[hash:8].[ext]' //生成的图片文件在img文件夹下,拥有自己的name,hash值8位,扩展名extension } } ] }, { test: /\.js$/, exclude: /(node_modules|bower_components)/, use: { loader: 'babel-loader', options: { presets: ['es2015'] } } } ] } }- 1
- 2
- 3
- 4
- 5
- 6
- 7
- 8
- 9
- 10
- 11
- 12
- 13
- 14
- 15
- 16
- 17
- 18
- 19
- 20
- 21
- 22
- 23
- 24
- 25
- 26
- 27
- 28
- 29
- 30
- 31
- 32
- 33
- 34
- 35
- 36
- 37
- 38
- 39
- 40
- 41
- 42
- 43
- 44
- 45
- 46
- 47
- 48
- 49
- 50
- 51
- 52
- 53
- 54
- 55
进行打包:
npm run build
此时,打包的bundle.js文件中没有ES6相关的语法,转为了ES5。
webpack使用 Vue配置
使用 npm 安装Vue
这里安装的是vue2.多的版本
npm install vue@2.6.14 --save- 1
在main.js中引入vue:
// 1.使用commonJS模块化规范 const {sum, mul, sub} = require('./js/mathUtils.js'); console.log(sum(20, 30)); console.log(mul(40, 50)); console.log(sub(60, 20)); //2.使用ES6中的模块化规范 import {name, age, height} from './js/info'; console.log(name); console.log(age); console.log(height); // 3.依赖css文件 require('./css/normal.css'); // 4.依赖css文件 require('./css/special.less'); document.writeln('今天也要好好加油呀!
') // 5.使用vue进行开发 import Vue from 'vue' const app = new Vue({ el: '#app', data: { message: 'hello webpack' } })- 1
- 2
- 3
- 4
- 5
- 6
- 7
- 8
- 9
- 10
- 11
- 12
- 13
- 14
- 15
- 16
- 17
- 18
- 19
- 20
- 21
- 22
- 23
- 24
- 25
- 26
- 27
在index.html中编写相应代码:
DOCTYPE html> <html lang="en"> <head> <meta charset="UTF-8"> <title>index.htmltitle> head> <body> <div id="app"> <h2>{{message}}h2> div> <script src="dist/bundle.js">script> body> html>- 1
- 2
- 3
- 4
- 5
- 6
- 7
- 8
- 9
- 10
- 11
- 12
- 13
进行打包:
npm run build
运行index.html文件,报错!!!
简单介绍一下:runtime-only、runtime-compiler
- runtime-only:代码中,不可以有任何的 template
- runtime-compiler:代码中,可以有template,因为有compiler可以用于编译template
why出现这个错误
在这个过程中,会将el:‘#app’,挂载的这个app当成一个template模板,无法正常编译这个模板,就会报错。在webpack.config.js中更改配置
resolve: { alias: { 'vue$': 'vue/dist/vue.esm.js' //在执行vue文件时,会使用vue.esm.js执行,这里可进行编译 } }- 1
- 2
- 3
- 4
- 5
const path = require('path'); //导入node包中的path module.exports = { entry: './src/main.js', output: { //需要动态获取路径,不然会报错, __dirname保存的是当前文件的路径 path: path.resolve(__dirname, 'dist'), filename: 'bundle.js', publicPath: 'dist/' }, module: { rules: [ { test: /\.css$/, //1.css-loader只负责将css文件加载,是不负责解析的 //2.style-loader负责将样式添加到DOM中 //3.使用多个loader时,是从右向左读的 use: ['style-loader', 'css-loader'] }, { test: /\.less$/, use: [{ loader: "style-loader" // creates style nodes from JS strings }, { loader: "css-loader" // translates CSS into CommonJS }, { loader: "less-loader" // compiles Less to CSS }] }, { test: /\.(png|jpg|gif)$/, use: [ { loader: 'url-loader', options: { //如果图片小于limit时,会将图片编译成base64的字符串形式 //如果图片大于limit时,需要使用file-loader进行加载 limit: 8192, //这个是8k的限制:1024*8=8192 name: 'img/[name].[hash:8].[ext]' //生成的图片文件在img文件夹下,拥有自己的name,hash值8位,扩展名extension } } ] }, { test: /\.js$/, exclude: /(node_modules|bower_components)/, use: { loader: 'babel-loader', options: { presets: ['es2015'] } } } ] }, resolve: { alias: { 'vue$': 'vue/dist/vue.esm.js' //在执行vue文件时,会使用vue.esm.js执行,这里可进行编译 } } }- 1
- 2
- 3
- 4
- 5
- 6
- 7
- 8
- 9
- 10
- 11
- 12
- 13
- 14
- 15
- 16
- 17
- 18
- 19
- 20
- 21
- 22
- 23
- 24
- 25
- 26
- 27
- 28
- 29
- 30
- 31
- 32
- 33
- 34
- 35
- 36
- 37
- 38
- 39
- 40
- 41
- 42
- 43
- 44
- 45
- 46
- 47
- 48
- 49
- 50
- 51
- 52
- 53
- 54
- 55
- 56
- 57
- 58
- 59
- 60
再进行打包:
npm run build
运行 index.html 文件
Vue中的 el 和 template
在Vue中使用 template 的话,它会替换掉 el 中的内容
why要使用vue中的 template
在开发项目时,如果只有一个index.html文件,那么将要展示的对象都定义在这个index.html界面中,显得界面凌乱,并且也是不可取的,所以我们可以把这些内容写在template中,并且 template 会替换掉 el 中的内容
index.html中的代码:
DOCTYPE html> <html lang="en"> <head> <meta charset="UTF-8"> <title>index.htmltitle> head> <body> <div id="app">div> <script src="dist/bundle.js">script> body> html>- 1
- 2
- 3
- 4
- 5
- 6
- 7
- 8
- 9
- 10
- 11
main.js中的代码:
// 1.使用commonJS模块化规范 const {sum, mul, sub} = require('./js/mathUtils.js'); console.log(sum(20, 30)); console.log(mul(40, 50)); console.log(sub(60, 20)); //2.使用ES6中的模块化规范 import {name, age, height} from './js/info'; console.log(name); console.log(age); console.log(height); // 3.依赖css文件 require('./css/normal.css'); // 4.依赖css文件 require('./css/special.less'); document.writeln('今天也要好好加油呀!
') // 5.使用vue进行开发 import Vue from 'vue' new Vue({ el: '#app', template: ``, data: { message: 'hello webpack' } }){{message}}
- 1
- 2
- 3
- 4
- 5
- 6
- 7
- 8
- 9
- 10
- 11
- 12
- 13
- 14
- 15
- 16
- 17
- 18
- 19
- 20
- 21
- 22
- 23
- 24
- 25
- 26
- 27
- 28
- 29
- 30
- 31
- 32
- 33
进行打包:
npm run build
运行index.html文件
Vue中的抽离写法: vue-loader、vue-template-compiler
why需要进行代码抽离
如前所述,当我们编写代码一直都在Vue实例中编写,对于template来说,如果编写的代码过多,就显得很难看,很不好,所以对于一些代码文件进行分离是十分有必要的。将vue实例中进行DOM显示操作的代码抽取到组件中,将组件注册到vue实例的template中,即可完成代码的部分抽离
main.js中的文件:
// 1.使用commonJS模块化规范 const {sum, mul, sub} = require('./js/mathUtils.js'); console.log(sum(20, 30)); console.log(mul(40, 50)); console.log(sub(60, 20)); //2.使用ES6中的模块化规范 import {name, age, height} from './js/info'; console.log(name); console.log(age); console.log(height); // 3.依赖css文件 require('./css/normal.css'); // 4.依赖css文件 require('./css/special.less'); document.writeln('今天也要好好加油呀!
') // 5.使用vue进行开发 import Vue from 'vue' const App = { template: ``, data() { return { message: 'hello webpack' } }, methods: { btnClick() { console.log('您点击了我一下!!!'); } } } new Vue({ el: '#app', template:'{{message}}
', components: { App } }) - 1
- 2
- 3
- 4
- 5
- 6
- 7
- 8
- 9
- 10
- 11
- 12
- 13
- 14
- 15
- 16
- 17
- 18
- 19
- 20
- 21
- 22
- 23
- 24
- 25
- 26
- 27
- 28
- 29
- 30
- 31
- 32
- 33
- 34
- 35
- 36
- 37
- 38
- 39
- 40
- 41
- 42
- 43
- 44
- 45
- 46
- 47
index.html中的文件
DOCTYPE html> <html lang="en"> <head> <meta charset="UTF-8"> <title>index.htmltitle> head> <body> <div id="app">div> <script src="dist/bundle.js">script> body> html>- 1
- 2
- 3
- 4
- 5
- 6
- 7
- 8
- 9
- 10
- 11
进行文件打包:
npm run build
运行index.html文件
这样抽离后,代码整体还并不算简便,我们发现抽取的组件是一个对象,所以,我们可以使用ES6中的export 和 import的方式进行下一步的抽取
我们可以建立一个vue文件夹,在文件夹中 new一个app.js文件,这个文件用来进行组件代码的编写
文件的目录结构为:

app.js 中的代码: 其实就是上一个组件中的代码 export
export default { template: ``, data() { return { message: 'hello webpack' } }, methods: { btnClick() { console.log('您点击了我一下!!!'); } } }{{message}}
- 1
- 2
- 3
- 4
- 5
- 6
- 7
- 8
- 9
- 10
- 11
- 12
- 13
- 14
- 15
- 16
- 17
- 18
main.js中的代码: import
// 1.使用commonJS模块化规范 const {sum, mul, sub} = require('./js/mathUtils.js'); console.log(sum(20, 30)); console.log(mul(40, 50)); console.log(sub(60, 20)); //2.使用ES6中的模块化规范 import {name, age, height} from './js/info'; console.log(name); console.log(age); console.log(height); // 3.依赖css文件 require('./css/normal.css'); // 4.依赖css文件 require('./css/special.less'); document.writeln('今天也要好好加油呀!
') // 5.使用vue进行开发 import Vue from 'vue' import App from './vue/app' new Vue({ el: '#app', template:'', components: { App } }) - 1
- 2
- 3
- 4
- 5
- 6
- 7
- 8
- 9
- 10
- 11
- 12
- 13
- 14
- 15
- 16
- 17
- 18
- 19
- 20
- 21
- 22
- 23
- 24
- 25
- 26
- 27
- 28
- 29
进行打包:
npm run build
运行 index.html 文件
这些分离出来的代码也行,但是我们发现组件中的模板和 js 代码也没有进行分离,所以,我们可以进行下一步的代码抽取,将 template 模板和 js 代码进行分离
需要在vue文件夹中新建一个App.vue文件,在App.vue 文件中完成 template 模板和js的代码分离
文件的目录结构为:

App.vue中的代码为:
<template> <div> <h2 class="title">{{message}}</h2> <button @click="btnClick">按钮</button> </div> </template> <script> export default { name: "App", data() { return { message: 'hello webpack' } }, methods: { btnClick() { console.log('您点击了我一下!!!'); } } } </script> <style scoped> .title { color: green; } </style>- 1
- 2
- 3
- 4
- 5
- 6
- 7
- 8
- 9
- 10
- 11
- 12
- 13
- 14
- 15
- 16
- 17
- 18
- 19
- 20
- 21
- 22
- 23
- 24
- 25
- 26
- 27
- 28
main.js中的文件为:
// 1.使用commonJS模块化规范 const {sum, mul, sub} = require('./js/mathUtils.js'); console.log(sum(20, 30)); console.log(mul(40, 50)); console.log(sub(60, 20)); //2.使用ES6中的模块化规范 import {name, age, height} from './js/info'; console.log(name); console.log(age); console.log(height); // 3.依赖css文件 require('./css/normal.css'); // 4.依赖css文件 require('./css/special.less'); document.writeln('今天也要好好加油呀!
') // 5.使用vue进行开发 import Vue from 'vue' import App from './vue/App.vue' //导入了App.vue文件 new Vue({ el: '#app', template:'', components: { App } }) - 1
- 2
- 3
- 4
- 5
- 6
- 7
- 8
- 9
- 10
- 11
- 12
- 13
- 14
- 15
- 16
- 17
- 18
- 19
- 20
- 21
- 22
- 23
- 24
- 25
- 26
- 27
- 28
- 29
进行打包:
npm run build
运行index.html文件 报错!!!
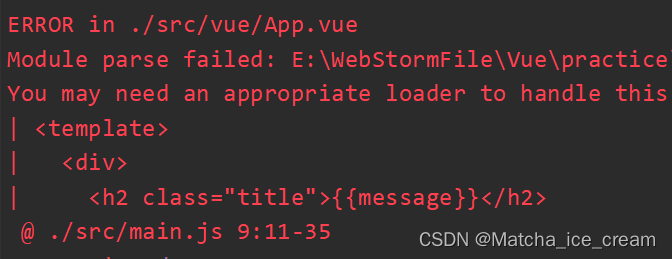
原因分析:它不能解析.vue文件,需要合适的 loader 辅助解析
注意:如果在导入的时候使用的是import App from './vue/App',那么它不会报错,但是也不会显示任何的样式效果,因为没有暴露出.vue后缀名。安装 vue-loader、vue-template-compiler
npm install --save-dev vue-loader vue-template-compiler- 1
在webpack.config.js中进行配置
{ test: /\.vue$/, use: ['vue-loader'] }- 1
- 2
- 3
- 4
const path = require('path'); //导入node包中的path module.exports = { entry: './src/main.js', output: { //需要动态获取路径,不然会报错, __dirname保存的是当前文件的路径 path: path.resolve(__dirname, 'dist'), filename: 'bundle.js', publicPath: 'dist/' }, module: { rules: [ { test: /\.css$/, //1.css-loader只负责将css文件加载,是不负责解析的 //2.style-loader负责将样式添加到DOM中 //3.使用多个loader时,是从右向左读的 use: ['style-loader', 'css-loader'] }, { test: /\.less$/, use: [{ loader: "style-loader" // creates style nodes from JS strings }, { loader: "css-loader" // translates CSS into CommonJS }, { loader: "less-loader" // compiles Less to CSS }] }, { test: /\.(png|jpg|gif)$/, use: [ { loader: 'url-loader', options: { //如果图片小于limit时,会将图片编译成base64的字符串形式 //如果图片大于limit时,需要使用file-loader进行加载 limit: 8192, //这个是8k的限制:1024*8=8192 name: 'img/[name].[hash:8].[ext]' //生成的图片文件在img文件夹下,拥有自己的name,hash值8位,扩展名extension } } ] }, { test: /\.js$/, exclude: /(node_modules|bower_components)/, use: { loader: 'babel-loader', options: { presets: ['es2015'] } } }, { test: /\.vue$/, use: ['vue-loader'] } ] }, resolve: { alias: { 'vue$': 'vue/dist/vue.esm.js' //在执行vue文件时,会使用vue.esm.js执行,这里可进行编译 } } }- 1
- 2
- 3
- 4
- 5
- 6
- 7
- 8
- 9
- 10
- 11
- 12
- 13
- 14
- 15
- 16
- 17
- 18
- 19
- 20
- 21
- 22
- 23
- 24
- 25
- 26
- 27
- 28
- 29
- 30
- 31
- 32
- 33
- 34
- 35
- 36
- 37
- 38
- 39
- 40
- 41
- 42
- 43
- 44
- 45
- 46
- 47
- 48
- 49
- 50
- 51
- 52
- 53
- 54
- 55
- 56
- 57
- 58
- 59
- 60
- 61
- 62
- 63
- 64
进行打包:
npm run build
报错!!!

应该是版本过高,出现的兼容性问题
在package.json文件中更改 vue-loader的版本:
"vue-loader": "^13.0.5"
package.json文件:{ "name": "meetwebpack", "version": "1.0.0", "description": "", "main": "index.js", "scripts": { "test": "echo \"Error: no test specified\" && exit 1", "build": "webpack" }, "author": "", "license": "ISC", "devDependencies": { "babel-core": "^6.26.3", "babel-loader": "^7.1.5", "babel-preset-es2015": "^6.24.1", "css-loader": "^1.0.1", "file-loader": "^3.0.1", "less": "^3.9.0", "less-loader": "^4.1.0", "style-loader": "^1.2.1", "url-loader": "^1.1.2", "vue-loader": "^13.0.5", "vue-template-compiler": "^2.6.14", "webpack": "^3.6.0" }, "dependencies": { "vue": "^2.6.14" } }- 1
- 2
- 3
- 4
- 5
- 6
- 7
- 8
- 9
- 10
- 11
- 12
- 13
- 14
- 15
- 16
- 17
- 18
- 19
- 20
- 21
- 22
- 23
- 24
- 25
- 26
- 27
- 28
- 29
- 30
再进行安装
npm install更改完成后,进行打包:
npm run build
运行index.html
使用vue文件进行代码的抽离之后,我们便可以使用.vue文件进行组件化开发了。
这里新建一个Cpn.vue文件,进行组件代码的编写
文件的目录结构为:
Cpn.vue中的代码:
<template> <div> <h2>我是cpn的标题</h2> <p>{{message}}</p> </div> </template> <script> export default { name: "Cpn", data() { return { message: "good luck for you" } } } </script> <style scoped> </style>- 1
- 2
- 3
- 4
- 5
- 6
- 7
- 8
- 9
- 10
- 11
- 12
- 13
- 14
- 15
- 16
- 17
- 18
- 19
- 20
- 21
在App.vue中复用这个组件:
<template> <div> <h2 class="title">{{message}}</h2> <button @click="btnClick">按钮</button> <Cpn/> <Cpn/> </div> </template> <script> import Cpn from './Cpn.vue' export default { name: "App", data() { return { message: 'hello webpack' } }, methods: { btnClick() { console.log('您点击了我一下!!!'); } }, components: { Cpn } } </script> <style scoped> .title { color: green; } </style>- 1
- 2
- 3
- 4
- 5
- 6
- 7
- 8
- 9
- 10
- 11
- 12
- 13
- 14
- 15
- 16
- 17
- 18
- 19
- 20
- 21
- 22
- 23
- 24
- 25
- 26
- 27
- 28
- 29
- 30
- 31
- 32
- 33
- 34
进行打包:
npm run build
运行index.html代码
如果想省略后缀名还能够正常运行代码的话,需要在webpack.config.js中进行配置
resolve: { extensions: ['.js', '.css', '.vue'] }- 1
- 2
- 3
const path = require('path'); //导入node包中的path module.exports = { entry: './src/main.js', output: { //需要动态获取路径,不然会报错, __dirname保存的是当前文件的路径 path: path.resolve(__dirname, 'dist'), filename: 'bundle.js', publicPath: 'dist/' }, module: { rules: [ { test: /\.css$/, //1.css-loader只负责将css文件加载,是不负责解析的 //2.style-loader负责将样式添加到DOM中 //3.使用多个loader时,是从右向左读的 use: ['style-loader', 'css-loader'] }, { test: /\.less$/, use: [{ loader: "style-loader" // creates style nodes from JS strings }, { loader: "css-loader" // translates CSS into CommonJS }, { loader: "less-loader" // compiles Less to CSS }] }, { test: /\.(png|jpg|gif)$/, use: [ { loader: 'url-loader', options: { //如果图片小于limit时,会将图片编译成base64的字符串形式 //如果图片大于limit时,需要使用file-loader进行加载 limit: 8192, //这个是8k的限制:1024*8=8192 name: 'img/[name].[hash:8].[ext]' //生成的图片文件在img文件夹下,拥有自己的name,hash值8位,扩展名extension } } ] }, { test: /\.js$/, exclude: /(node_modules|bower_components)/, use: { loader: 'babel-loader', options: { presets: ['es2015'] } } }, { test: /\.vue$/, use: ['vue-loader'] } ] }, resolve: { extensions: ['.js', '.css', '.vue'], alias: { 'vue$': 'vue/dist/vue.esm.js' //在执行vue文件时,会使用vue.esm.js执行,这里可进行编译 } } }- 1
- 2
- 3
- 4
- 5
- 6
- 7
- 8
- 9
- 10
- 11
- 12
- 13
- 14
- 15
- 16
- 17
- 18
- 19
- 20
- 21
- 22
- 23
- 24
- 25
- 26
- 27
- 28
- 29
- 30
- 31
- 32
- 33
- 34
- 35
- 36
- 37
- 38
- 39
- 40
- 41
- 42
- 43
- 44
- 45
- 46
- 47
- 48
- 49
- 50
- 51
- 52
- 53
- 54
- 55
- 56
- 57
- 58
- 59
- 60
- 61
- 62
- 63
- 64
- 65
可以将导入文件的.vue文件名省略
进行打包:npm run build
运行index.html,内容正常显示webpack使用Plugin:增加打包文件版权说明信息
plugin:插件的意思,通常是用于对现有的架构进行扩展。
loader 与 plugin的区别
- loader主要用于转换某种类型的模块,它是一个转换器
- plugin是插件,它是对webpack本身的扩展,是一个扩展器
plugin的使用过程:
- 通过 npm 安装需要使用的plugins(某些webpack已经内置的插件不需要安装)
- 在webpack.config.js中的plugins中配置插件
why 需要使用pugin
我们打包完文件之后,可能需要进行一些说明信息,例如:此份代码是否开源,版权信息,一些开发说明信息等等,可以使用plugin进行说明在webpack.config.js中配置plugin:
const webpack = require('webpack') //可直接导入,webpack中有对应的插件 module.exports = { plugins: [ new webpack.BannerPlugin('最终版权归***所有') ] }- 1
- 2
- 3
- 4
- 5
- 6
- 7
const path = require('path'); //导入node包中的path const webpack = require('webpack'); //导入webpack包 module.exports = { entry: './src/main.js', output: { //需要动态获取路径,不然会报错, __dirname保存的是当前文件的路径 path: path.resolve(__dirname, 'dist'), filename: 'bundle.js', publicPath: 'dist/' }, module: { rules: [ { test: /\.css$/, //1.css-loader只负责将css文件加载,是不负责解析的 //2.style-loader负责将样式添加到DOM中 //3.使用多个loader时,是从右向左读的 use: ['style-loader', 'css-loader'] }, { test: /\.less$/, use: [{ loader: "style-loader" // creates style nodes from JS strings }, { loader: "css-loader" // translates CSS into CommonJS }, { loader: "less-loader" // compiles Less to CSS }] }, { test: /\.(png|jpg|gif)$/, use: [ { loader: 'url-loader', options: { //如果图片小于limit时,会将图片编译成base64的字符串形式 //如果图片大于limit时,需要使用file-loader进行加载 limit: 8192, //这个是8k的限制:1024*8=8192 name: 'img/[name].[hash:8].[ext]' //生成的图片文件在img文件夹下,拥有自己的name,hash值8位,扩展名extension } } ] }, { test: /\.js$/, exclude: /(node_modules|bower_components)/, use: { loader: 'babel-loader', options: { presets: ['es2015'] } } }, { test: /\.vue$/, use: ['vue-loader'] } ] }, resolve: { extensions: ['.js', '.css', '.vue'], alias: { 'vue$': 'vue/dist/vue.esm.js' //在执行vue文件时,会使用vue.esm.js执行,这里可进行编译 } }, plugins: [ new webpack.BannerPlugin('最终版权归heng所有') ] }- 1
- 2
- 3
- 4
- 5
- 6
- 7
- 8
- 9
- 10
- 11
- 12
- 13
- 14
- 15
- 16
- 17
- 18
- 19
- 20
- 21
- 22
- 23
- 24
- 25
- 26
- 27
- 28
- 29
- 30
- 31
- 32
- 33
- 34
- 35
- 36
- 37
- 38
- 39
- 40
- 41
- 42
- 43
- 44
- 45
- 46
- 47
- 48
- 49
- 50
- 51
- 52
- 53
- 54
- 55
- 56
- 57
- 58
- 59
- 60
- 61
- 62
- 63
- 64
- 65
- 66
- 67
- 68
- 69
进行打包:
npm run build
查看打包后的bundle.js文件
webpack使用HtmlWebpackPlugin:打包html文件
why需要使用 HtmlWebpackPlugin
当我们在开发项目的过程中,也需要将.html文件打包发送给服务器,此时就需要使用htmlWebpackPlugin插件进行打包。HtmlWebpackPlugin插件的作用
- 自动生成一个index.html文件(可以指定模板来生成)
- 将打包的 js文件,自动通过script标签插入到body中
安装HtmlWebpackPlugin插件
// 1.使用官网的方式安装: 后续会报错,版本太高 npm install html-webpack-plugin --save-dev // 2.安装低版本的html-webpack-plugin npm install html-webpack-plugin@3.2.0 --save-dev- 1
- 2
- 3
- 4
- 5
在webpack.config.js中进行配置
const HtmlWebpackPlugin = require('html-webpack-plugin') plugins: [ new HtmlWebpackPlugin() ]- 1
- 2
- 3
- 4
- 5
const path = require('path'); //导入node包中的path const webpack = require('webpack'); //导入webpack包 const HtmlWebpackPlugin = require('html-webpack-plugin'); //导入安装的包 module.exports = { entry: './src/main.js', output: { //需要动态获取路径,不然会报错, __dirname保存的是当前文件的路径 path: path.resolve(__dirname, 'dist'), filename: 'bundle.js', publicPath: 'dist/' }, module: { rules: [ { test: /\.css$/, //1.css-loader只负责将css文件加载,是不负责解析的 //2.style-loader负责将样式添加到DOM中 //3.使用多个loader时,是从右向左读的 use: ['style-loader', 'css-loader'] }, { test: /\.less$/, use: [{ loader: "style-loader" // creates style nodes from JS strings }, { loader: "css-loader" // translates CSS into CommonJS }, { loader: "less-loader" // compiles Less to CSS }] }, { test: /\.(png|jpg|gif)$/, use: [ { loader: 'url-loader', options: { //如果图片小于limit时,会将图片编译成base64的字符串形式 //如果图片大于limit时,需要使用file-loader进行加载 limit: 8192, //这个是8k的限制:1024*8=8192 name: 'img/[name].[hash:8].[ext]' //生成的图片文件在img文件夹下,拥有自己的name,hash值8位,扩展名extension } } ] }, { test: /\.js$/, exclude: /(node_modules|bower_components)/, use: { loader: 'babel-loader', options: { presets: ['es2015'] } } }, { test: /\.vue$/, use: ['vue-loader'] } ] }, resolve: { extensions: ['.js', '.css', '.vue'], alias: { 'vue$': 'vue/dist/vue.esm.js' //在执行vue文件时,会使用vue.esm.js执行,这里可进行编译 } }, plugins: [ new webpack.BannerPlugin('最终版权归heng所有'), new HtmlWebpackPlugin() ] }- 1
- 2
- 3
- 4
- 5
- 6
- 7
- 8
- 9
- 10
- 11
- 12
- 13
- 14
- 15
- 16
- 17
- 18
- 19
- 20
- 21
- 22
- 23
- 24
- 25
- 26
- 27
- 28
- 29
- 30
- 31
- 32
- 33
- 34
- 35
- 36
- 37
- 38
- 39
- 40
- 41
- 42
- 43
- 44
- 45
- 46
- 47
- 48
- 49
- 50
- 51
- 52
- 53
- 54
- 55
- 56
- 57
- 58
- 59
- 60
- 61
- 62
- 63
- 64
- 65
- 66
- 67
- 68
- 69
- 70
- 71
- 72
进行打包:
npm run build
打包前文件目录结构:
打包后文件目录结构:

包中的 index.html 文件
DOCTYPE html> <html> <head> <meta charset="UTF-8"> <title>Webpack Apptitle> head> <body> <script type="text/javascript" src="dist/bundle.js">script>body> html>- 1
- 2
- 3
- 4
- 5
- 6
- 7
- 8
- 9
src中的 index.html 文件
DOCTYPE html> <html lang="en"> <head> <meta charset="UTF-8"> <title>index.htmltitle> head> <body> <div id="app">div> <script src="dist/bundle.js">script> body> html>- 1
- 2
- 3
- 4
- 5
- 6
- 7
- 8
- 9
- 10
- 11
对比包中的 index.html 文件和 src 文件中的 html 文件,我们发现打包的 index.html还缺少
这些代码,所以,我们可以在生成index.html文件时,通过指定模板来解决这个问题。同时,通过打包后的文件目录结构,我们也可以看出,bundle.js 与 index.html在同一目录结构下,所以并不需要加上***dist/***这个路径了。所以,我们可以将webpack.config.js中的publicPath: 'dist/'的配置给删除。在webpack.config.js中进行配置:
//1.删掉配置的 publicPath: 'dist/' // publicPath: 'dist/' //配置html模板 plugins: [ new webpack.BannerPlugin('最终版权归heng所有'), new HtmlWebpackPlugin({ template: 'index.html' //在当前目录下查找index.html,所以,找的就是src中的index.html }) ]- 1
- 2
- 3
- 4
- 5
- 6
- 7
- 8
- 9
- 10
src中的 index.html 文件中的内容
DOCTYPE html> <html lang="en"> <head> <meta charset="UTF-8"> <title>index.htmltitle> head> <body> <div id="app">div> body> html>- 1
- 2
- 3
- 4
- 5
- 6
- 7
- 8
- 9
- 10
进行打包:
npm run build
包中的 index.html 文件DOCTYPE html> <html lang="en"> <head> <meta charset="UTF-8"> <title>index.htmltitle> head> <body> <div id="app">div> <script type="text/javascript" src="bundle.js">script>body> html>- 1
- 2
- 3
- 4
- 5
- 6
- 7
- 8
- 9
- 10
使用 HtmlWebpackPlugin插件,可以将html文件打包,并且可将打包好的 js 文件插入到 打包的html文件中
webpack使用UglifyjsWebpackPlugin:压缩、丑化js代码
why需要压缩、丑化 js代码
我们在使用 webpack 打包 js 文件时,其实打包后的 js 文件还是很大的,这不是我们想要的效果,我们需要将js代码压缩的小一点,这时可以使用uglifyjs-webpack- plugin插件来丑化代码。安装 uglifyjs-webpack-plugin插件
// 1.安装低版本的插件 npm install uglifyjs-webpack-plugin@1.1.1 --save-dev- 1
- 2
在webpack.config.js文件中进行配置
const UglifyJsPlugin = require('uglifyjs-webpack-plugin') plugins: [ new UglifyJsPlugin() ]- 1
- 2
- 3
- 4
- 5
const path = require('path'); //导入node包中的path const webpack = require('webpack'); //导入webpack包 const HtmlWebpackPlugin = require('html-webpack-plugin'); //导入安装的包 const UglifyJsPlugin = require('uglifyjs-webpack-plugin'); //导入丑化的包 module.exports = { entry: './src/main.js', output: { //需要动态获取路径,不然会报错, __dirname保存的是当前文件的路径 path: path.resolve(__dirname, 'dist'), filename: 'bundle.js', // publicPath: 'dist/' }, module: { rules: [ { test: /\.css$/, //1.css-loader只负责将css文件加载,是不负责解析的 //2.style-loader负责将样式添加到DOM中 //3.使用多个loader时,是从右向左读的 use: ['style-loader', 'css-loader'] }, { test: /\.less$/, use: [{ loader: "style-loader" // creates style nodes from JS strings }, { loader: "css-loader" // translates CSS into CommonJS }, { loader: "less-loader" // compiles Less to CSS }] }, { test: /\.(png|jpg|gif)$/, use: [ { loader: 'url-loader', options: { //如果图片小于limit时,会将图片编译成base64的字符串形式 //如果图片大于limit时,需要使用file-loader进行加载 limit: 8192, //这个是8k的限制:1024*8=8192 name: 'img/[name].[hash:8].[ext]' //生成的图片文件在img文件夹下,拥有自己的name,hash值8位,扩展名extension } } ] }, { test: /\.js$/, exclude: /(node_modules|bower_components)/, use: { loader: 'babel-loader', options: { presets: ['es2015'] } } }, { test: /\.vue$/, use: ['vue-loader'] } ] }, resolve: { extensions: ['.js', '.css', '.vue'], alias: { 'vue$': 'vue/dist/vue.esm.js' //在执行vue文件时,会使用vue.esm.js执行,这里可进行编译 } }, plugins: [ new webpack.BannerPlugin('最终版权归heng所有'), new HtmlWebpackPlugin({ template: 'index.html' //在当前目录下查找index.html,所以,找的就是src中的index.html }), new UglifyJsPlugin() ] }- 1
- 2
- 3
- 4
- 5
- 6
- 7
- 8
- 9
- 10
- 11
- 12
- 13
- 14
- 15
- 16
- 17
- 18
- 19
- 20
- 21
- 22
- 23
- 24
- 25
- 26
- 27
- 28
- 29
- 30
- 31
- 32
- 33
- 34
- 35
- 36
- 37
- 38
- 39
- 40
- 41
- 42
- 43
- 44
- 45
- 46
- 47
- 48
- 49
- 50
- 51
- 52
- 53
- 54
- 55
- 56
- 57
- 58
- 59
- 60
- 61
- 62
- 63
- 64
- 65
- 66
- 67
- 68
- 69
- 70
- 71
- 72
- 73
- 74
- 75
进行打包:
npm run build
查看打包后的bundle.js文件:
webpack使用webpack-dev-server:搭建本地服务器
why需要搭建本地服务器
我们在开发过程中,如果每一次更改一部分代码,都要使用npm run build进行打包,这样做是很麻烦的,也不是我们希望的结果。所以我们可以在本地搭建一个服务器,每次更改代码都能直观的看到结果,如果需要发布项目,再进行最终的一个打包。安装 webpack-dev-server
npm install --save-dev webpack-dev-server@2.9.1- 1
在webpack.config.js文件中进行配置
配置属性介绍:- contentBase:为哪一个文件夹提供本地服务,默认是根文件夹
- port:端口号
- inline:页面实时刷新,为true,页面实时刷新
- historyApiFallback:在SPA页面中,依赖HTML5的 history 模式
devServer: { contentBase: './dist', inline: true }- 1
- 2
- 3
- 4
在 package.json 文件中配置服务器运行的脚本
"dev": "webpack-dev-server"- 1
{ "name": "meetwebpack", "version": "1.0.0", "description": "", "main": "index.js", "scripts": { "test": "echo \"Error: no test specified\" && exit 1", "build": "webpack", "dev": "webpack-dev-server" }, "author": "", "license": "ISC", "devDependencies": { "babel-core": "^6.26.3", "babel-loader": "^7.1.5", "babel-preset-es2015": "^6.24.1", "css-loader": "^1.0.1", "file-loader": "^3.0.1", "html-webpack-plugin": "^3.2.0", "less": "^3.9.0", "less-loader": "^4.1.0", "style-loader": "^1.2.1", "uglifyjs-webpack-plugin": "^1.1.1", "url-loader": "^1.1.2", "vue-loader": "^13.0.5", "vue-template-compiler": "^2.6.14", "webpack": "^3.6.0", "webpack-dev-server": "^2.9.1" }, "dependencies": { "vue": "^2.6.14" } }- 1
- 2
- 3
- 4
- 5
- 6
- 7
- 8
- 9
- 10
- 11
- 12
- 13
- 14
- 15
- 16
- 17
- 18
- 19
- 20
- 21
- 22
- 23
- 24
- 25
- 26
- 27
- 28
- 29
- 30
- 31
- 32
- 33
- 34
启动本地服务器:
npm run dev

按住 ctrl 并点击链接,进入界面:

补充:如果希望使用
npm run dev之后,直接跳转到对应的页面中去的话,可以在package.json中更改配置:"dev": "webpack-dev-server --open"- 1
webpack配置文件的分离
why需要进行配置文件的分离
当我们在webpack.config.js中配置一些文件时,其中有的文件是在开发时需要使用的,有的是在打包时需要的,如果将它们混淆在一起,也是不好的,所以,为了让代码结构更加清晰,我们需要进行配置文件的分离操作。新建一个build文件夹,用来完成配置文件的分离的操作。在build文件夹中新建一个base.config.js,用来编写基础的配置;新建一个prod.config.js,用来编写生产时的配置;新建一个dev.config.js,用来编写开发时配置
文件的结构为:

思路:使用 base.config.js 和 prod.config.js 完成生产时依赖;使用 base.config.js 和 dev.config.js 完成开发时依赖
为了能使两个配置文件合并,需要安装webpack-merge
//1.直接安装,后续运行时会报错,安装的版本太高,不兼容 npm install webpack-merge --save-dev //2.安装低版本的webpack-merge npm install webpack-merge@4.1.5 --save-dev- 1
- 2
- 3
- 4
在 prod.config.js 中将 prod.config.js 与 base.config.js 合并;在 dev.config.js 中将 dev.config.js 与 base.config.js 合并
prod.config.js中的代码:
const UglifyJsPlugin = require('uglifyjs-webpack-plugin'); //导入丑化的包 const webpackMerge = require('webpack-merge'); const baseConfig = require('./base.config'); module.exports = webpackMerge(baseConfig, { plugins: [ new UglifyJsPlugin() ], })- 1
- 2
- 3
- 4
- 5
- 6
- 7
- 8
- 9
dev.config.js中的代码:
const webpackMerge = require('webpack-merge'); const baseConfig = require('./base.config'); module.exports = webpackMerge(baseConfig, { devServer: { contentBase: './dist', inline: true } })- 1
- 2
- 3
- 4
- 5
- 6
- 7
- 8
base.config.js中的代码
const path = require('path'); //导入node包中的path const webpack = require('webpack'); //导入webpack包 const HtmlWebpackPlugin = require('html-webpack-plugin'); //导入安装的包 module.exports = { entry: './src/main.js', output: { //需要动态获取路径,不然会报错, __dirname保存的是当前文件的路径 path: path.resolve(__dirname, 'dist'), filename: 'bundle.js', // publicPath: 'dist/' }, module: { rules: [ { test: /\.css$/, //1.css-loader只负责将css文件加载,是不负责解析的 //2.style-loader负责将样式添加到DOM中 //3.使用多个loader时,是从右向左读的 use: ['style-loader', 'css-loader'] }, { test: /\.less$/, use: [{ loader: "style-loader" // creates style nodes from JS strings }, { loader: "css-loader" // translates CSS into CommonJS }, { loader: "less-loader" // compiles Less to CSS }] }, { test: /\.(png|jpg|gif)$/, use: [ { loader: 'url-loader', options: { //如果图片小于limit时,会将图片编译成base64的字符串形式 //如果图片大于limit时,需要使用file-loader进行加载 limit: 8192, //这个是8k的限制:1024*8=8192 name: 'img/[name].[hash:8].[ext]' //生成的图片文件在img文件夹下,拥有自己的name,hash值8位,扩展名extension } } ] }, { test: /\.js$/, exclude: /(node_modules|bower_components)/, use: { loader: 'babel-loader', options: { presets: ['es2015'] } } }, { test: /\.vue$/, use: ['vue-loader'] } ] }, resolve: { extensions: ['.js', '.css', '.vue'], alias: { 'vue$': 'vue/dist/vue.esm.js' //在执行vue文件时,会使用vue.esm.js执行,这里可进行编译 } }, plugins: [ new webpack.BannerPlugin('最终版权归heng所有'), new HtmlWebpackPlugin({ template: 'index.html' //在当前目录下查找index.html,所以,找的就是src中的index.html }), ], }- 1
- 2
- 3
- 4
- 5
- 6
- 7
- 8
- 9
- 10
- 11
- 12
- 13
- 14
- 15
- 16
- 17
- 18
- 19
- 20
- 21
- 22
- 23
- 24
- 25
- 26
- 27
- 28
- 29
- 30
- 31
- 32
- 33
- 34
- 35
- 36
- 37
- 38
- 39
- 40
- 41
- 42
- 43
- 44
- 45
- 46
- 47
- 48
- 49
- 50
- 51
- 52
- 53
- 54
- 55
- 56
- 57
- 58
- 59
- 60
- 61
- 62
- 63
- 64
- 65
- 66
- 67
- 68
- 69
- 70
- 71
- 72
- 73
- 74
删除 webpack.config.js代码
在 package.json 文件中重新指定webpack的运行路径
"build": "webpack --config ./build/prod.config.js", "dev": "webpack-dev-server --open --config ./build/dev.config.js"- 1
- 2
进行打包:
npm run build文件打包到了build文件夹下

why 会出现这样的情况
由于我们一开始是在webpack.config.js中配置base.config.js,其中路径为’dist’,即以webpack.config.js为标准,同级建立一个dist文件夹。所以,对于base.config.js来说,会在base.config.js同级的build文件夹下进行打包。为了解决这个问题,可以更改文件的路径:path: path.resolve(__dirname, '../dist')在base.config.js中更改文件:
output: { //需要动态获取路径,不然会报错, __dirname保存的是当前文件的路径 path: path.resolve(__dirname, '../dist'), filename: 'bundle.js', // publicPath: 'dist/' },- 1
- 2
- 3
- 4
- 5
- 6
进行打包:
npm run build打包后的文件目录结构为:

启动本地服务器:
npm run dev
-
相关阅读:
FreeRTOS遍历所有任务的TCB并获得栈的最大使用量
Java实现业务异步的几种方案
【云原生之Docker实战】使用Docker部署 mblog个人博客网站
英语演讲常用连接词和句子
git 版本管理
Java 动态加载字节码
灵感宝盒新增「线上云展会」产品,「直播观赏联动」等你共建丨RTE NG-Lab 双周报
常用的Linux命令
三天快速搭建一个属于自己的管理系统,包括前端、后端、部署上线,超级详细的介绍。
公司刚来的00后真卷,上班还没2年,跳到我们公司起薪20k....
- 原文地址:https://blog.csdn.net/Matcha_ice_cream/article/details/126359225
