-
Vue 组件之间的通信,动态组件和插槽
Vue 组件化
组件之间的数据通信
1. 组件之间的关系
组件之间的
最常见的关系分为两种:①父子关系 ②兄弟关系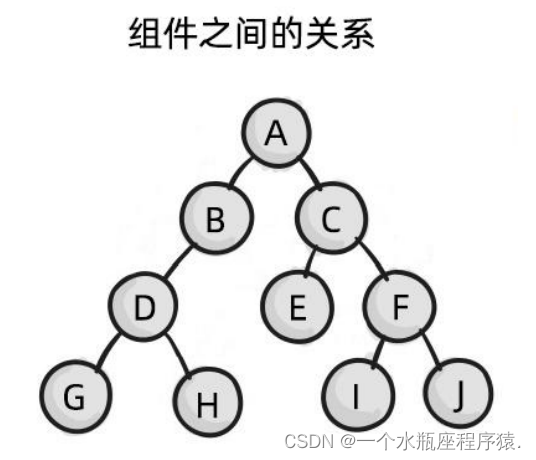
2. 父子组件之间的数据通信
父子组件之间的数据通信又分为: ①
父 -> 子传递数据 ②子 -> 父传递数据2.1 父组件向子组件传递数据
父组件向子组件传递数据需要使用
自定义属性和prop父组件:
<Left :msg="message" :user="userinfo">Left> <script> data(){ return{ message:'hello Vue.js', userinfo:{name:'zs',age:20} } } script>- 1
- 2
- 3
- 4
- 5
- 6
- 7
- 8
- 9
- 10
子组件:
<template> <div> <p>父组件传递过来的 msg 的值是:{{msg}}p> <p>父组件传递过来的 user 的值是:{{user}}p> div> template> props:['msg','user']- 1
- 2
- 3
- 4
- 5
- 6
- 7
- 8
- 9
2.2 子组件向父组件传递数据
子组件向父组件传递数据使用
自定义事件和$emit方法在父组件中,以标签的形式使用子组件的时候,在
子组件上注册一个自定义事件,并设置事件处理函数。在子组件中,使用
$emit 调用这个自定义事件,并把子组件的数据传递出来。父组件:
<Left @countChange="getCount">Left> <script> export default { data(){ return { countFromSon:0 } }, methods:{ getCount(val){ this.countFromSon = val } } } script>- 1
- 2
- 3
- 4
- 5
- 6
- 7
- 8
- 9
- 10
- 11
- 12
- 13
- 14
- 15
- 16
子组件:
<script> export default { data(){ return{ count:0 } }, methods:{ add(){ this.count += 1; this.$emit('countChange',this.count) } } } script>- 1
- 2
- 3
- 4
- 5
- 6
- 7
- 8
- 9
- 10
- 11
- 12
- 13
- 14
- 15
- 16
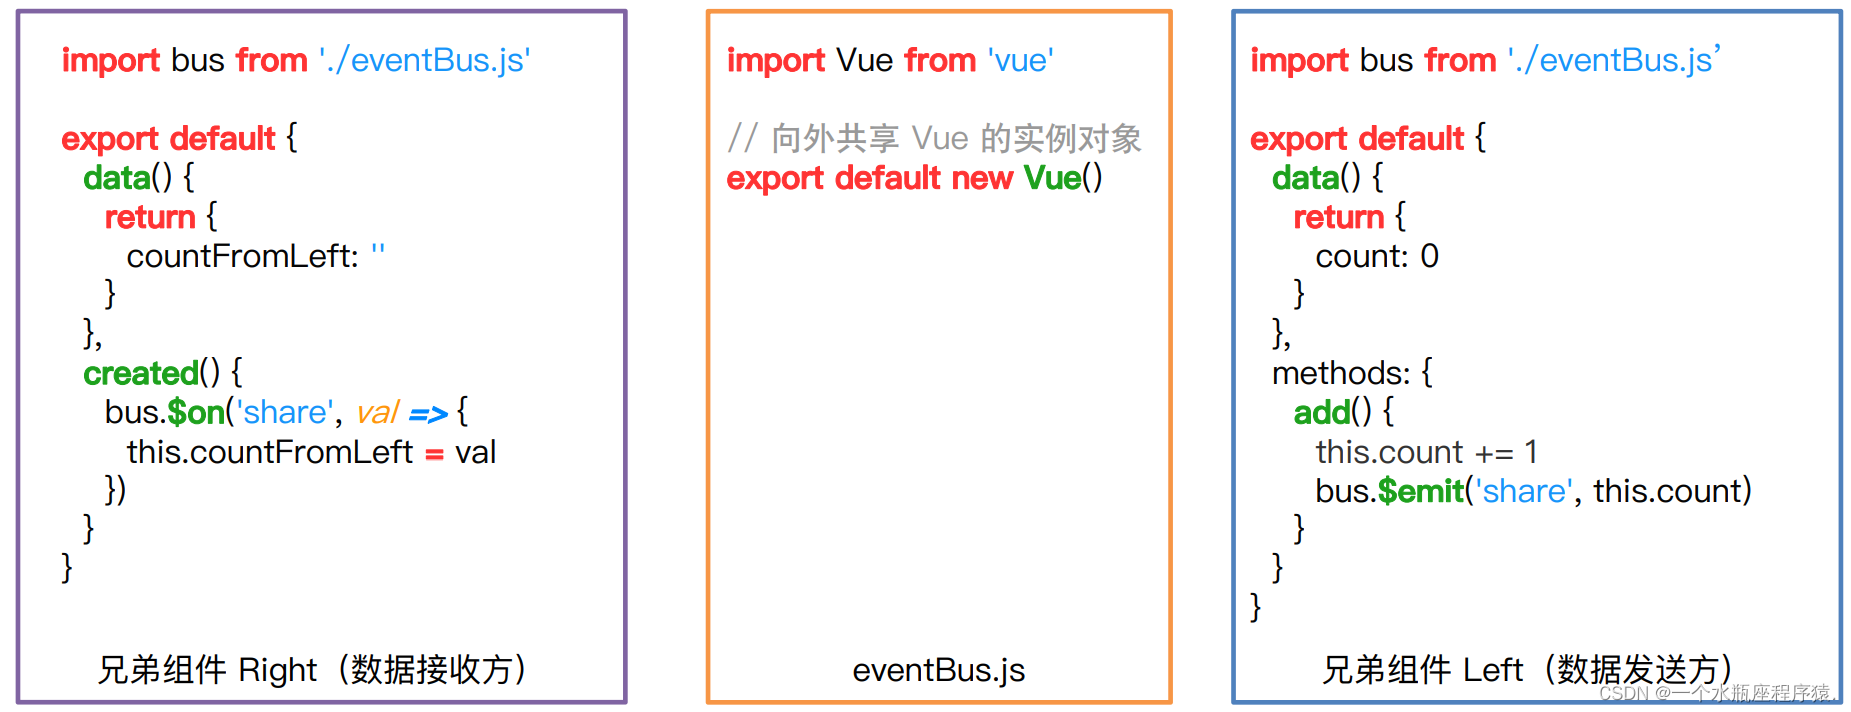
3. 兄弟组件之间的数据通信
兄弟组件:没有一个直接的关联关系,需要借助第三方来作为一个桥梁,才能实现通信
这个桥梁就是
EventBusEventBus:
<script> // 引入 Vue 模块 import Vue from 'vue'; // 导出一个 Vue 实例,只为用它里面的两个方法 export default new Vue(); script>- 1
- 2
- 3
- 4
- 5
- 6
在桥梁
EventBus中:- 有一个
$on的方法,可以注册自定义事件 - 有一个
$emit的方法,可以触发自定义事件
结论:
- 在接收数据的组件中,使用
EventBus.$on来注册一个自定义事件,用于接收数据 - 在发送数据的组件中,使用
EventBus.$emit来触发一个自定义事件,用于将数据触发出去
ref 引用
1. ref 引用 - 获取 DOM 元素
ref 用来辅助开发者,获取
DOM 元素或组件实例的引用2. 使用 ref 获取 DOM 元素
<h1 ref="myh1">App 根组件 --- {{ countFromSon }}h1> <button @click="getDOM">通过 ref 获取 DOMbutton> <script> // 通过 ref 属性,为对应的元素添加引用名称 getDOM(){ // 通过 this.$refs.引用名称,就可以获取到 DOM 元素 console.log(this.$refs.myh1) this.$refs.myh1.style.color='red' } script>- 1
- 2
- 3
- 4
- 5
- 6
- 7
- 8
- 9
- 10
- 11
- 12
3. 使用 ref 获取组件实例
<button @click="getComp">通过 ref 获取组件实例button> <div class="box"> <Left ref="leftRef" :msg="message" :user="userinfo" @countChange="getCount">Left> <Right>Right> div> <script> // 通过 ref 获取组件实例 getComp(){ // 通过 this.$refs.引用名称,就可以获取到组件的实例 console.log(this.$refs.leftRef); // 拿到组件实例后,可以获取组件的数据 console.log(this.$refs.leftRef.count); // 还可以调用组件的方法 this.$refs.leftRef.add() } script>- 1
- 2
- 3
- 4
- 5
- 6
- 7
- 8
- 9
- 10
- 11
- 12
- 13
- 14
- 15
- 16
- 17
- 18
- 19
4. 实现按钮和文本框切换展示
<input type="text" v-if="isShow" @blur="hideInput"> <button v-else @click="showInput">展示输入框button> <script> data(){ return { countFromSon:0, isShow:false } }, methods:{ showInput(){ this.isShow = true }, hideInput(){ this.isShow = false } } script>- 1
- 2
- 3
- 4
- 5
- 6
- 7
- 8
- 9
- 10
- 11
- 12
- 13
- 14
- 15
- 16
- 17
- 18
- 19
5. 让文本框自动获得焦点
this.$nextTick(cb) 方法
$nextTick(cb) 方法中的 cb 回调函数,会在组件的 DOM 更新完成之后,再执行。从而能保证在 cb 回调函数里 面可以拿到最新的 DOM 元素。
<input ref="inputRef" type="text" v-if="isShow" @blur="hideInput"> <script> showInput(){ this.isShow = true // this.$nextTick(cb) // cb 回调函数会在 DOM 更新完成之后调用 // 使用场景:当数据变化,想拿到最新的 DOM,要将获取 DOM 的代码放到 this.$nextTick(cb) 的cb回调函数中去 this.$nextTick(()=>{ // 通过 ref 获取 DOM,然后使用 DOM 上的 focus 方法,让输入框自动获取焦点 this.$refs.inputRef.focus() }) } script>- 1
- 2
- 3
- 4
- 5
- 6
- 7
- 8
- 9
- 10
- 11
- 12
- 13
- 14
- 15
- 16
动态组件
动态组件 - 动态组件的基本用法
什么是动态组件
动态组件指的是,基于 组件,来
动态切换组件的显示与隐藏代码示例:App.vue
<template> <div> <h1 ref="myh1">App 根组件h1> <component :is="compName">component> <button @click="compName = 'Left'">展示 Left 组件button> <button @click="compName = 'Right'">展示 Right 组件button> div> template> <script> export default { data(){ return { conpName:'Left' } } } script>- 1
- 2
- 3
- 4
- 5
- 6
- 7
- 8
- 9
- 10
- 11
- 12
- 13
- 14
- 15
- 16
- 17
- 18
- 19
- 20
动态组件 - 使用 keep-alive 缓存组件
使用 keep - alive 保持状态
切换组件时,会将隐藏的组件销毁掉,显示时,再重新创建。因此
无法保持组件的状态、所以可以使用
缓存,从而保持动态组件的状态<keep-alive> <component :is="compName">component> keep-alive>- 1
- 2
- 3
- 4
include 属性用来指定:只有 include 属性中
包含的组件会被缓存。多个组件名之间使用英文的逗号分隔:<keep-alive include="Left,Right"> <component :is="compName">component> keep-alive>- 1
- 2
- 3
- 4
- 5
动态组件 - 被缓存组件的生命周期
被 keep-alive 缓存的组件的生命周期函数
被 keep-alive 缓存的组件,会有两个生命周期函数
当组件
被缓存时,会自动触发组件的deactivated生命周期函数当组件
被激活时,会自动触发组件的activated生命周期函数<script> export default { // 当组件被缓存时,会自动触发 deactivated 生命周期函数 deactivated(){ console.log('Left 组件被缓存了') }, // 当组件被激活时,会自动触发 activated 生命周期函数 activated(){ console.log('Left 组件被缓存了') } } script>- 1
- 2
- 3
- 4
- 5
- 6
- 7
- 8
- 9
- 10
- 11
- 12
插槽
插槽 - 插槽的基本使用
1. 什么是插槽
插槽(slot)可以提高组件的复用性,使用插槽可以给组件传递一段 html 内容注意:默认情况下,如果在封装组件时
没有设置任何,则使用组件时,在组件的开始和结束标签中间传递的内容将会被插槽 丢弃<Article> <h3>这是外面传进来的 h3 标题h3> Article>- 1
- 2
- 3
2. 体验插槽的基础用法
在封装组件时,可以定义一个插槽(
坑位),用来接收使用组件时传递过来的内容在使用组件时,可以在组件的开始和结束标签中间传递一段 html 内容,这段内容就会被渲染到组件中插槽所在的位置
Left.vue
<Article> <h3>咏鹅h3> Article> <template> <div> <slot>slot> <div> <p>这是文章中的段落1.p> <p>这是文章中的段落2.p> <p>这是文章中的段落3.p> <p>这是文章中的段落4.p> div> <h6>文章的作者:XXXh6> div> template>- 1
- 2
- 3
- 4
- 5
- 6
- 7
- 8
- 9
- 10
- 11
- 12
- 13
- 14
- 15
- 16
- 17
- 18
- 19
3. 为插槽提供默认内容
封装组件时,可以为 插槽设置
默认内容在使用组件时,
没有为插槽提供任何内容,则默认内容会生效<slot> <h3>这是默认内容h3> slot>- 1
- 2
- 3
- 4
4. 具名插槽
当我们从外界传递过来多个内容时,这时就需要设置多个插槽进行接收
为了区分不同的插槽,就需要为插槽指定
具体的 name 名称这种
带有具体名称的插槽叫做 ”具名插槽“给插槽起名字:
<template> <div> <slot name="title">slot> <div> <p>这是文章的段落1.p> <p>这是文章的段落2.p> <p>这是文章的段落3.p> <p>这是文章的段落4.p> div> <slot name="author">slot> div> template>- 1
- 2
- 3
- 4
- 5
- 6
- 7
- 8
- 9
- 10
- 11
- 12
- 13
- 14
使用具名插槽:
① 旧语法:(只能在 vue 2.x 中使用)
<Article> <h1 slot="title">咏鹅h1> <i slot="author">文章的作者:骆宾王i> Article>- 1
- 2
- 3
- 4
② 新语法:(vue 2.x 和 vue 3.x 都能使用)
<Article> <template v-slot:title> <h1>咏鹅h1> template> <template v-slot:author> <i>文章的作者:骆宾王i> template> Article>- 1
- 2
- 3
- 4
- 5
- 6
- 7
- 8
5. 默认插槽
默认插槽:没有指定 name 名称的插槽,叫做默认插槽,它有隐含的名称叫做
"default"将来使用组件的时候,所有没有指定要传给具名插槽的内容,都会被默认插槽所接收
<template> <slot>slot> template>- 1
- 2
- 3
<p>111p> <p>222p> <p>333p> <p>444p>- 1
- 2
- 3
- 4
6. 具名插槽新语法的简写形式
跟 v-on 和 v-bind 一样,v-slot 也有简写形式,即用
v-slot:替换为#例如: v-slot:title 可以被重写为 #title
作用域插槽
使用组件时,在组件的时候和结束标签的内容中,使用的数据如果是来自组件内部,那么这个插槽就是
作用域插槽1. 使用作用域插槽
第一步:使用组件时传递数据
<slot name="author" :age="age">slot>- 1
- 2
第二步:使用组件时,接收组件内部传递出来的数据
<i slot="author" slot-scope="scope"> 文章的作者:骆宾王 --- 年龄:{{ scope.age }} i> <template #author="scope"> <i>文章的作者:骆宾王 --- 年龄:{{ scope.age }}i> template>- 1
- 2
- 3
- 4
- 5
- 6
- 7
- 8
- 9
- 10
- 11
- 12
- 13
2. 解构插槽
作用域插槽对外提供的数据对象,可以使用
解构赋值简化数据的接收过程<i slot="author" slot-scope="{ age }"> 文章的作者:骆宾王 --- 年龄:{{ age }} i> <template #author="{ age }"> <i>文章的作者:骆宾王 --- 年龄:{{ age }}i> template>- 1
- 2
- 3
- 4
- 5
- 6
- 7
- 8
- 9
- 10
- 11
-
相关阅读:
mybatis 如何实现批量更新呢?
Java 全栈体系(二)
Docker Compose映射卷的作用是什么,dockerfile这个文件有什么区别和联系?
CefSharp自定义滚动条样式
OpenCV 中的轮廓-查找轮廓的不同特征,例如面积,周长,重心,边界框等。
Oracle 服务器迁移的一些经验
高级IO—多路转接
次氯酸(HClO)荧光探针 激发波长567 nm
机器学习周记(第三十八周:语义分割)2024.5.6~2024.5.12
Mybatis generator实战:自动生成POJO类完整解决方案
- 原文地址:https://blog.csdn.net/qq_60353088/article/details/126294569
