-
Spring Cloud 学习笔记(3 3)
-
-
-
133_Sentinel服务熔断只配置blockHandler
134_Sentinel服务熔断fallback和blockHandler都配置
135_Sentinel服务熔断exceptionsToIgnore
147_Seata之@GlobalTransactional验证
-
108_Nacos之Linux版本安装
预计需要,1个Nginx+3个nacos注册中心+1个mysql
请确保是在环境中安装使用:
Nacos下载Linux版
-
https://github.com/alibaba/nacos/releases/tag/1.1.4
-
nacos-server-1.1.4.tar.gz 解压后安装
109_Nacos集群配置(上)
集群配置步骤(重点)
1.Linux服务器上mysql数据库配置
SQL脚本在哪里 - 目录nacos/conf/nacos-mysql.sql

自己Linux机器上的Mysql数据库上运行
2.application.properties配置
位置

添加以下内容,设置数据源
spring.datasource.platform=mysql db.num=1 db.url.0=jdbc:mysql://localhost:3306/nacos_devtest?characterEncoding=utf8&connectTimeout=1000&socketTimeout=3000&autoReconnect=true db.user=root db.password=1234- 1
- 2
- 3
- 4
- 5
- 6
3.Linux服务器上nacos的集群配置cluster.conf
梳理出3台nacos集器的不同服务端口号,设置3个端口:
- 3333
- 4444
- 5555
复制出cluster.conf

内容
192.168.111.144:3333 192.168.111.144:4444 192.168.111.144:5555- 1
- 2
- 3
注意,这个IP不能写127.0.0.1,必须是Linux命令
hostname -i能够识别的IP
4.编辑Nacos的启动脚本startup.sh,使它能够接受不同的启动端口
/mynacos/nacos/bin目录下有startup.sh

平时单机版的启动,都是./startup.sh即可
但是,集群启动,我们希望可以类似其它软件的shell命令,传递不同的端口号启动不同的nacos实例。
命令: ./startup.sh -p 3333表示启动端口号为3333的nacos服务器实例,和上一步的cluster.conf配置的一致。修改内容


执行方式 -
startup.sh - p 端口号
110_Nacos集群配置(下)
5.Nginx的配置,由它作为负载均衡器
修改nginx的配置文件 - nginx.conf

修改内容

按照指定启动

6.截止到此处,1个Nginx+3个nacos注册中心+1个mysql
测试
-
启动3个nacos注册中心
-
startup.sh - p 3333 -
startup.sh - p 4444 -
startup.sh - p 5555 -
查看nacos进程启动数
ps -ef | grep nacos | grep -v grep | wc -l
-
-
启动nginx
./nginx -c /usr/local/nginx/conf/nginx.conf- 查看nginx进程
ps - ef| grep nginx
-
测试通过nginx,访问nacos - http://192.168.111.144:1111/nacos/#/login
-
新建一个配置测试

-
新建后,可在linux服务器的mysql新插入一条记录
select * from config;

-
让微服务cloudalibaba-provider-payment9002启动注册进nacos集群 - 修改配置文件
server:
port: 9002spring:
application:
name: nacos-payment-provider
cloud:
nacos:
discovery:
#配置Nacos地址
#server-addr: Localhost:8848
#换成nginx的1111端口,做集群
server-addr: 192.168.111.144:1111management:
endpoints:
web:
exposure:
inc1ude: ‘*’ -
启动微服务cloudalibaba-provider-payment9002
-
访问nacos,查看注册结果

高可用小总结

111_Sentinel是什么
Sentinel 是什么?
随着微服务的流行,服务和服务之间的稳定性变得越来越重要。Sentinel 以流量为切入点,从流量控制、熔断降级、系统负载保护等多个维度保护服务的稳定性。
Sentinel 具有以下特征:
- 丰富的应用场景:Sentinel 承接了阿里巴巴近 10 年的双十一大促流量的核心场景,例如秒杀(即突发流量控制在系统容量可以承受的范围)、消息削峰填谷、集群流量控制、实时熔断下游不可用应用等。
- 完备的实时监控:Sentinel 同时提供实时的监控功能。您可以在控制台中看到接入应用的单台机器秒级数据,甚至 500 台以下规模的集群的汇总运行情况。
- 广泛的开源生态:Sentinel 提供开箱即用的与其它开源框架/库的整合模块,例如与 Spring Cloud、Dubbo、gRPC 的整合。您只需要引入相应的依赖并进行简单的配置即可快速地接入 Sentinel。
- 完善的 SPI 扩展点:Sentinel 提供简单易用、完善的 SPI 扩展接口。您可以通过实现扩展接口来快速地定制逻辑。例如定制规则管理、适配动态数据源等。
Sentinel 的主要特性:

—句话解释,之前我们讲解过的Hystrix。
Hystrix与Sentinel比较:
- Hystrix
- 需要我们程序员自己手工搭建监控平台
- 没有一套web界面可以给我们进行更加细粒度化得配置流控、速率控制、服务熔断、服务降级
- Sentinel
- 单独一个组件,可以独立出来。
- 直接界面化的细粒度统一配置。
约定 > 配置 > 编码
都可以写在代码里面,但是我们本次还是大规模的学习使用配置和注解的方式,尽量少写代码
sentinel
英 [sentnl] 美 [sentnl]
n. 哨兵112_Sentinel下载安装运行
服务使用中的各种问题:
- 服务雪崩
- 服务降级
- 服务熔断
- 服务限流
Sentinel 分为两个部分:
- 核心库(Java 客户端)不依赖任何框架/库,能够运行于所有 Java 运行时环境,同时对 Dubbo / Spring Cloud 等框架也有较好的支持。
- 控制台(Dashboard)基于 Spring Boot 开发,打包后可以直接运行,不需要额外的 Tomcat 等应用容器。
安装步骤:
-
下载
- https://github.com/alibaba/Sentinel/releases
- 下载到本地sentinel-dashboard-1.7.0.jar
-
运行命令
- 前提
- Java 8 环境
- 8080端口不能被占用
- 命令
java -jar sentinel-dashboard-1.7.0.jar
- 前提
-
访问Sentinel管理界面
- localhost:8080
- 登录账号密码均为sentinel
113_Sentinel初始化监控
启动Nacos8848成功
新建工程 - cloudalibaba-sentinel-service8401
POM
cloud2020 com.atguigu.springcloud 1.0-SNAPSHOT 4.0.0 cloudalibaba-sentinel-service8401 com.atguigu.springcloud cloud-api-commons ${project.version} com.alibaba.cloud spring-cloud-starter-alibaba-nacos-discovery com.alibaba.csp sentinel-datasource-nacos com.alibaba.cloud spring-cloud-starter-alibaba-sentinel org.springframework.cloud spring-cloud-starter-openfeign org.springframework.boot spring-boot-starter-web org.springframework.boot spring-boot-starter-actuator org.springframework.boot spring-boot-devtools runtime true cn.hutool hutool-all 4.6.3 org.projectlombok lombok true org.springframework.boot spring-boot-starter-test test - 1
- 2
- 3
- 4
- 5
- 6
- 7
- 8
- 9
- 10
- 11
- 12
- 13
- 14
- 15
- 16
- 17
- 18
- 19
- 20
- 21
- 22
- 23
- 24
- 25
- 26
- 27
- 28
- 29
- 30
- 31
- 32
- 33
- 34
- 35
- 36
- 37
- 38
- 39
- 40
- 41
- 42
- 43
- 44
- 45
- 46
- 47
- 48
- 49
- 50
- 51
- 52
- 53
- 54
- 55
- 56
- 57
- 58
- 59
- 60
- 61
- 62
- 63
- 64
- 65
- 66
- 67
- 68
- 69
- 70
- 71
- 72
- 73
- 74
YML
server: port: 8401 spring: application: name: cloudalibaba-sentinel-service cloud: nacos: discovery: server-addr: localhost:8848 #Nacos服务注册中心地址 sentinel: transport: dashboard: localhost:8080 #配置Sentinel dashboard地址 port: 8719 management: endpoints: web: exposure: include: '*' feign: sentinel: enabled: true # 激活Sentinel对Feign的支持- 1
- 2
- 3
- 4
- 5
- 6
- 7
- 8
- 9
- 10
- 11
- 12
- 13
- 14
- 15
- 16
- 17
- 18
- 19
- 20
- 21
- 22
- 23
- 24
主启动
import org.springframework.boot.SpringApplication; import org.springframework.boot.autoconfigure.SpringBootApplication; import org.springframework.cloud.client.discovery.EnableDiscoveryClient; @EnableDiscoveryClient @SpringBootApplication public class MainApp8401 { public static void main(String[] args) { SpringApplication.run(MainApp8401.class, args); } }- 1
- 2
- 3
- 4
- 5
- 6
- 7
- 8
- 9
- 10
- 11
业务类FlowLimitController
import com.alibaba.csp.sentinel.annotation.SentinelResource; import com.alibaba.csp.sentinel.slots.block.BlockException; import lombok.extern.slf4j.Slf4j; import org.springframework.web.bind.annotation.GetMapping; import org.springframework.web.bind.annotation.RequestParam; import org.springframework.web.bind.annotation.RestController; import java.util.concurrent.TimeUnit; @RestController @Slf4j public class FlowLimitController { @GetMapping("/testA") public String testA() { return "------testA"; } @GetMapping("/testB") public String testB() { log.info(Thread.currentThread().getName()+" "+"...testB"); return "------testB"; } }- 1
- 2
- 3
- 4
- 5
- 6
- 7
- 8
- 9
- 10
- 11
- 12
- 13
- 14
- 15
- 16
- 17
- 18
- 19
- 20
- 21
- 22
- 23
- 24
- 25
启动Sentinel8080 -
java -jar sentinel-dashboard-1.7.0.jar启动微服务8401
启动8401微服务后查看sentienl控制台
- 刚启动,空空如也,啥都没有

- Sentinel采用的懒加载说明
- 执行一次访问即可
- http://localhost:8401/testA
- http://localhost:8401/testB
- 效果 - sentinel8080正在监控微服务8401
- 执行一次访问即可

114_Sentinel流控规则简介
基本介绍
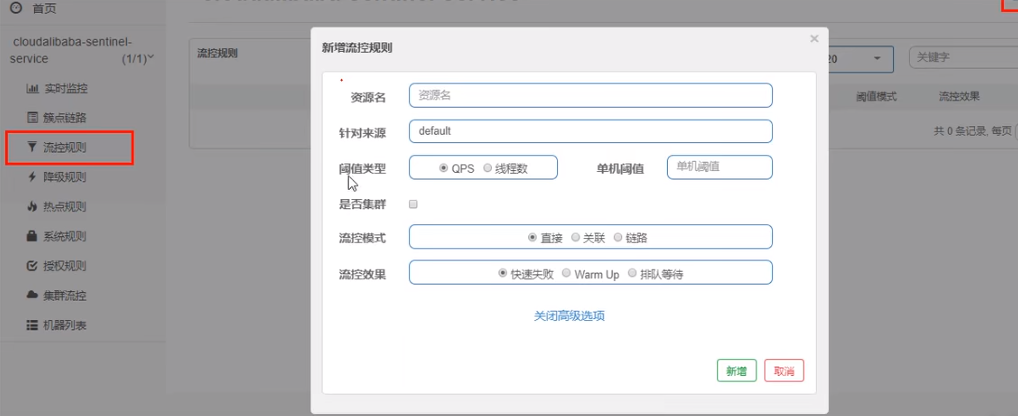
进一步解释说明:
- 资源名:唯一名称,默认请求路径。
- 针对来源:Sentinel可以针对调用者进行限流,填写微服务名,默认default(不区分来源)。
- 阈值类型/单机阈值:
- QPS(每秒钟的请求数量)︰当调用该API的QPS达到阈值的时候,进行限流。
- 线程数:当调用该API的线程数达到阈值的时候,进行限流。
- 是否集群:不需要集群。
- 流控模式:
- 直接:API达到限流条件时,直接限流。
- 关联:当关联的资源达到阈值时,就限流自己。
- 链路:只记录指定链路上的流量(指定资源从入口资源进来的流量,如果达到阈值,就进行限流)【API级别的针对来源】。
- 流控效果:
- 快速失败:直接失败,抛异常。
- Warm up:根据Code Factor(冷加载因子,默认3)的值,从阈值/codeFactor,经过预热时长,才达到设置的QPS阈值。
- 排队等待:匀速排队,让请求以匀速的速度通过,阈值类型必须设置为QPS,否则无效。
115_Sentinel流控-QPS直接失败
直接 -> 快速失败(系统默认)
配置及说明
表示1秒钟内查询1次就是OK,若超过次数1,就直接->快速失败,报默认错误

测试
快速多次点击访问http://localhost:8401/testA
结果
返回页面 Blocked by Sentinel (flow limiting)
源码
com.alibaba.csp.sentinel.slots.block.flow.controller.DefaultController
思考
直接调用默认报错信息,技术方面OK,但是,是否应该有我们自己的后续处理?类似有个fallback的兜底方法
116_Sentinel流控-线程数直接失败
线程数:当调用该API的线程数达到阈值的时候,进行限流。

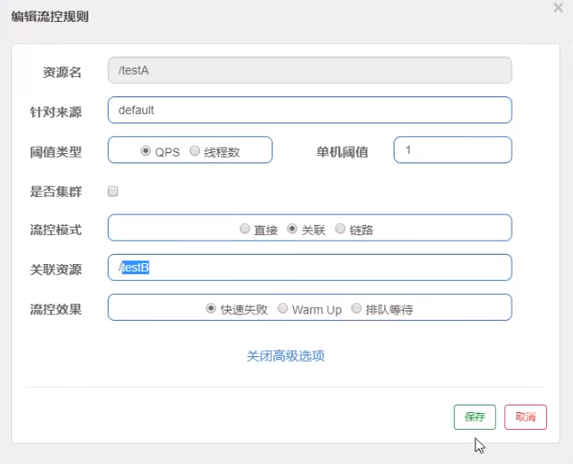
117_Sentinel流控-关联
是什么?
-
当自己关联的资源达到阈值时,就限流自己
-
当与A关联的资源B达到阀值后,就限流A自己(B惹事,A挂了)
设置testA
当关联资源/testB的QPS阀值超过1时,就限流/testA的Rest访问地址,当关联资源到阈值后限制配置好的资源名。
Postman模拟并发密集访问testB
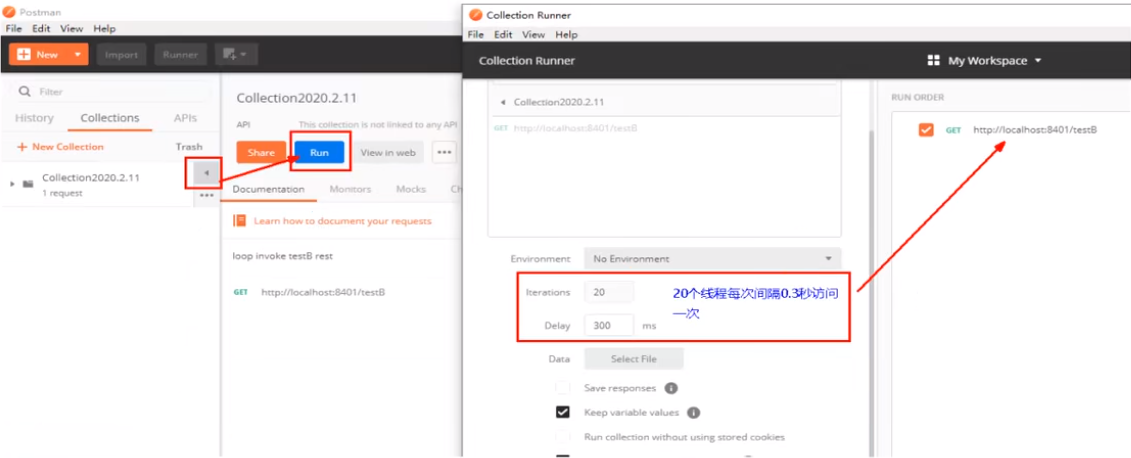
访问testB成功

postman里新建多线程集合组
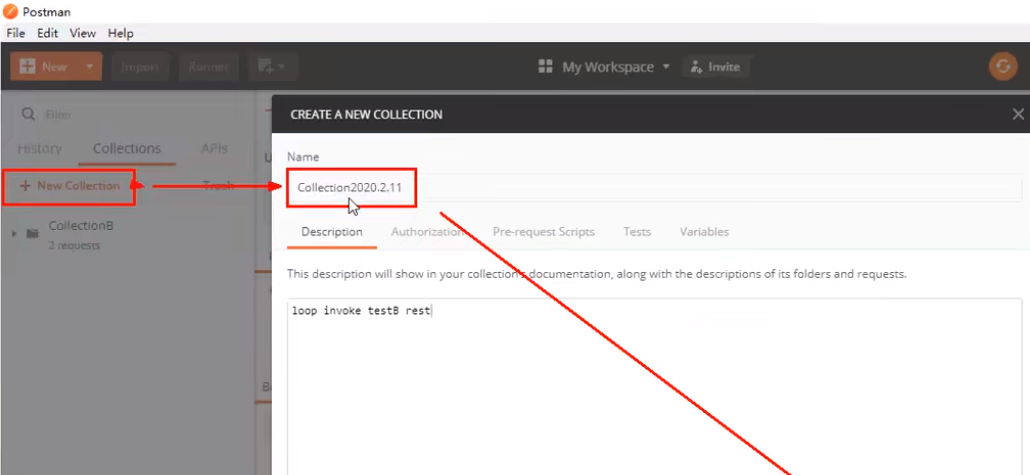
将访问地址添加进新新线程组

Run - 大批量线程高并发访问B
Postman运行后,点击访问http://localhost:8401/testA,发现testA挂了
- 结果Blocked by Sentinel(flow limiting)
HOMEWORK:
自己上机测试
链路:只记录指定链路上的流量(指定资源从入口资源进来的流量,如果达到阈值,就进行限流)【API级别的针对来源】
118_Sentinel流控-预热
Warm Up
Warm Up(
RuleConstant.CONTROL_BEHAVIOR_WARM_UP)方式,即预热/冷启动方式。当系统长期处于低水位的情况下,当流量突然增加时,直接把系统拉升到高水位可能瞬间把系统压垮。通过"冷启动",让通过的流量缓慢增加,在一定时间内逐渐增加到阈值上限,给冷系统一个预热的时间,避免冷系统被压垮。详细文档可以参考 流量控制 - Warm Up 文档,具体的例子可以参见 WarmUpFlowDemo。通常冷启动的过程系统允许通过的 QPS 曲线如下图所示:

默认coldFactor为3,即请求QPS 从 threshold / 3开始,经预热时长逐渐升至设定的QPS阈值。link
源码 - com.alibaba.csp.sentinel.slots.block.flow.controller.WarmUpController
WarmUp配置
案例,阀值为10+预热时长设置5秒。
系统初始化的阀值为10/ 3约等于3,即阀值刚开始为3;然后过了5秒后阀值才慢慢升高恢复到10

测试
多次快速点击http://localhost:8401/testB - 刚开始不行,后续慢慢OK
应用场景
如:秒杀系统在开启的瞬间,会有很多流量上来,很有可能把系统打死,预热方式就是把为了保护系统,可慢慢的把流量放进来,慢慢的把阀值增长到设置的阀值。
119_Sentinel流控-排队等待
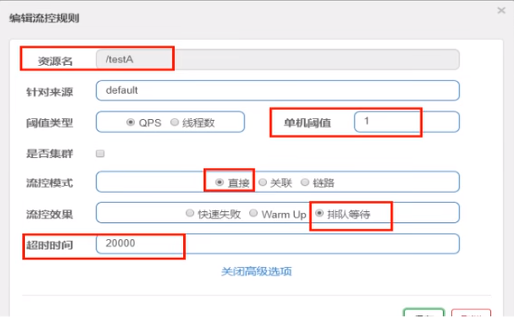
匀速排队,让请求以均匀的速度通过,阀值类型必须设成QPS,否则无效。
设置:/testA每秒1次请求,超过的话就排队等待,等待的超时时间为20000毫秒。
匀速排队
匀速排队(
RuleConstant.CONTROL_BEHAVIOR_RATE_LIMITER)方式会严格控制请求通过的间隔时间,也即是让请求以均匀的速度通过,对应的是漏桶算法。详细文档可以参考 流量控制 - 匀速器模式,具体的例子可以参见 PaceFlowDemo。该方式的作用如下图所示:

这种方式主要用于处理间隔性突发的流量,例如消息队列。想象一下这样的场景,在某一秒有大量的请求到来,而接下来的几秒则处于空闲状态,我们希望系统能够在接下来的空闲期间逐渐处理这些请求,而不是在第一秒直接拒绝多余的请求。
注意:匀速排队模式暂时不支持 QPS > 1000 的场景。
源码 - com.alibaba.csp.sentinel.slots.block.flow.controller.RateLimiterController
测试
-
添加日志记录代码到FlowLimitController的testA方法
@RestController
@Slf4j
public class FlowLimitController {
@GetMapping(“/testA”)
public String testA()
{
log.info(Thread.currentThread().getName()+" “+”…testA");//<----
return “------testA”;
}...- 1
}
-
Postman模拟并发密集访问testA。具体操作参考117_Sentinel流控-关联
-
后台结果

120_Sentinel降级简介
熔断降级概述
除了流量控制以外,对调用链路中不稳定的资源进行熔断降级也是保障高可用的重要措施之一。一个服务常常会调用别的模块,可能是另外的一个远程服务、数据库,或者第三方 API 等。例如,支付的时候,可能需要远程调用银联提供的 API;查询某个商品的价格,可能需要进行数据库查询。然而,这个被依赖服务的稳定性是不能保证的。如果依赖的服务出现了不稳定的情况,请求的响应时间变长,那么调用服务的方法的响应时间也会变长,线程会产生堆积,最终可能耗尽业务自身的线程池,服务本身也变得不可用。
现代微服务架构都是分布式的,由非常多的服务组成。不同服务之间相互调用,组成复杂的调用链路。以上的问题在链路调用中会产生放大的效果。复杂链路上的某一环不稳定,就可能会层层级联,最终导致整个链路都不可用。因此我们需要对不稳定的弱依赖服务调用进行熔断降级,暂时切断不稳定调用,避免局部不稳定因素导致整体的雪崩。熔断降级作为保护自身的手段,通常在客户端(调用端)进行配置。

-
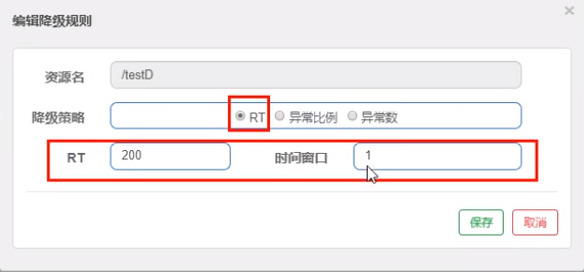
RT(平均响应时间,秒级)
- 平均响应时间 超出阈值 且 在时间窗口内通过的请求>=5,两个条件同时满足后触发降级。
- 窗口期过后关闭断路器。
- RT最大4900(更大的需要通过-Dcsp.sentinel.statistic.max.rt=XXXX才能生效)。
-
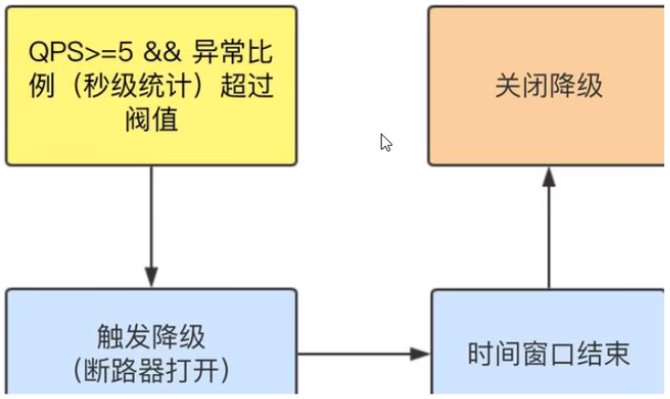
异常比列(秒级)
- QPS >= 5且异常比例(秒级统计)超过阈值时,触发降级;时间窗口结束后,关闭降级 。
-
异常数(分钟级)
- 异常数(分钟统计)超过阈值时,触发降级;时间窗口结束后,关闭降级
Sentinel熔断降级会在调用链路中某个资源出现不稳定状态时(例如调用超时或异常比例升高),对这个资源的调用进行限制,让请求快速失败,避免影响到其它的资源而导致级联错误。
当资源被降级后,在接下来的降级时间窗口之内,对该资源的调用都自动熔断(默认行为是抛出 DegradeException)。
Sentinei的断路器是没有类似Hystrix半开状态的。(Sentinei 1.8.0 已有半开状态)
半开的状态系统自动去检测是否请求有异常,没有异常就关闭断路器恢复使用,有异常则继续打开断路器不可用。
具体可以参考49_Hystrix的服务降级熔断限流概念初讲。
121_Sentinel降级-RT
是什么?
平均响应时间(
DEGRADE_GRADE_RT):当1s内持续进入5个请求,对应时刻的平均响应时间(秒级)均超过阈值(count,以ms为单位),那么在接下的时间窗口(DegradeRule中的timeWindow,以s为单位)之内,对这个方法的调用都会自动地熔断(抛出DegradeException)。注意Sentinel 默认统计的RT上限是4900 ms,超出此阈值的都会算作4900ms,若需要变更此上限可以通过启动配置项-Dcsp.sentinel.statistic.max.rt=xxx来配置。注意:Sentinel 1.7.0才有平均响应时间(
DEGRADE_GRADE_RT),Sentinel 1.8.0的没有这项,取而代之的是慢调用比例 (SLOW_REQUEST_RATIO)。慢调用比例 (
SLOW_REQUEST_RATIO):选择以慢调用比例作为阈值,需要设置允许的慢调用 RT(即最大的响应时间),请求的响应时间大于该值则统计为慢调用。当单位统计时长(statIntervalMs)内请求数目大于设置的最小请求数目,并且慢调用的比例大于阈值,则接下来的熔断时长内请求会自动被熔断。经过熔断时长后熔断器会进入探测恢复状态(HALF-OPEN 状态),若接下来的一个请求响应时间小于设置的慢调用 RT 则结束熔断,若大于设置的慢调用 RT 则会再次被熔断。link接下来讲解Sentinel 1.7.0的。

测试
代码
@RestController @Slf4j public class FlowLimitController { ... @GetMapping("/testD") public String testD() { try { TimeUnit.SECONDS.sleep(1); } catch (InterruptedException e) { e.printStackTrace(); } log.info("testD 测试RT"); } }- 1
- 2
- 3
- 4
- 5
- 6
- 7
- 8
- 9
- 10
- 11
- 12
- 13
- 14
- 15
配置
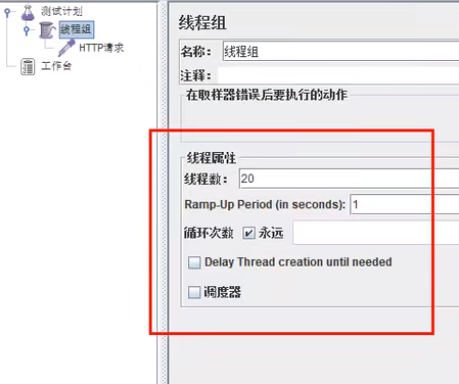
jmeter压测

结论
按照上述配置,永远一秒钟打进来10个线程(大于5个了)调用testD,我们希望200毫秒处理完本次任务,如果超过200毫秒还没处理完,在未来1秒钟的时间窗口内,断路器打开(保险丝跳闸)微服务不可用,保险丝跳闸断电了后续我停止jmeter,没有这么大的访问量了,断路器关闭(保险丝恢复),微服务恢复OK。
122_Sentinel降级-异常比例
是什么?
异常比例(
DEGRADE_GRADE_EXCEPTION_RATIO):当资源的每秒请求量 >= 5,并且每秒异常总数占通过量的比值超过阈值(DegradeRule中的count)之后,资源进入降级状态,即在接下的时间窗口(DegradeRule中的timeWindow,以s为单位)之内,对这个方法的调用都会自动地返回。异常比率的阈值范围是[0.0, 1.0],代表0% -100%。注意,与Sentinel 1.8.0相比,有些不同(Sentinel 1.8.0才有的半开状态),Sentinel 1.8.0的如下:
异常比例 (
ERROR_RATIO):当单位统计时长(statIntervalMs)内请求数目大于设置的最小请求数目,并且异常的比例大于阈值,则接下来的熔断时长内请求会自动被熔断。经过熔断时长后熔断器会进入探测恢复状态(HALF-OPEN 状态),若接下来的一个请求成功完成(没有错误)则结束熔断,否则会再次被熔断。异常比率的阈值范围是[0.0, 1.0],代表 0% - 100%。link接下来讲解Sentinel 1.7.0的。
测试
代码
@RestController @Slf4j public class FlowLimitController { ... @GetMapping("/testD") public String testD() { log.info("testD 异常比例"); int age = 10/0; return "------testD"; } }- 1
- 2
- 3
- 4
- 5
- 6
- 7
- 8
- 9
- 10
- 11
- 12
- 13
配置

jmeter
结论
按照上述配置,单独访问一次,必然来一次报错一次(int age = 10/0),调一次错一次。
开启jmeter后,直接高并发发送请求,多次调用达到我们的配置条件了。断路器开启(保险丝跳闸),微服务不可用了,不再报错error而是服务降级了。
123_Sentinel降级-异常数
是什么?
异常数(
DEGRADE_GRADF_EXCEPTION_COUNT):当资源近1分钟的异常数目超过阈值之后会进行熔断。注意由于统计时间窗口是分钟级别的,若timeWindow小于60s,则结束熔断状态后码可能再进入熔断状态。注意,与Sentinel 1.8.0相比,有些不同(Sentinel 1.8.0才有的半开状态),Sentinel 1.8.0的如下:
异常数 (
ERROR_COUNT):当单位统计时长内的异常数目超过阈值之后会自动进行熔断。经过熔断时长后熔断器会进入探测恢复状态(HALF-OPEN 状态),若接下来的一个请求成功完成(没有错误)则结束熔断,否则会再次被熔断。接下来讲解Sentinel 1.7.0的。
异常数是按照分钟统计的,时间窗口一定要大于等于60秒。

测试
代码
@RestController @Slf4j public class FlowLimitController{ ... @GetMapping("/testE") public String testE() { log.info("testE 测试异常数"); int age = 10/0; return "------testE 测试异常数"; } }- 1
- 2
- 3
- 4
- 5
- 6
- 7
- 8
- 9
- 10
- 11
- 12
- 13
配置

访问http://localhost:8401/testE,第一次访问绝对报错,因为除数不能为零,我们看到error窗口,但是达到5次报错后,进入熔断后降级。
124_Sentinel热点key(上)
基本介绍

官网
何为热点?热点即经常访问的数据。很多时候我们希望统计某个热点数据中访问频次最高的 Top K 数据,并对其访问进行限制。比如:
- 商品 ID 为参数,统计一段时间内最常购买的商品 ID 并进行限制
- 用户 ID 为参数,针对一段时间内频繁访问的用户 ID 进行限制
热点参数限流会统计传入参数中的热点参数,并根据配置的限流阈值与模式,对包含热点参数的资源调用进行限流。热点参数限流可以看做是一种特殊的流量控制,仅对包含热点参数的资源调用生效。

Sentinel 利用 LRU 策略统计最近最常访问的热点参数,结合令牌桶算法来进行参数级别的流控。热点参数限流支持集群模式。
承上启下复习start
兜底方法,分为系统默认和客户自定义,两种
之前的case,限流出问题后,都是用sentinel系统默认的提示: Blocked by Sentinel (flow limiting)
我们能不能自定?类似hystrix,某个方法出问题了,就找对应的兜底降级方法
结论 - 从HystrixCommand到@SentinelResource
代码
com.alibaba.csp.sentinel.slots.block.BlockException
@RestController @Slf4j public class FlowLimitController { ... @GetMapping("/testHotKey") @SentinelResource(value = "testHotKey",blockHandler/*兜底方法*/ = "deal_testHotKey") public String testHotKey(@RequestParam(value = "p1",required = false) String p1, @RequestParam(value = "p2",required = false) String p2) { //int age = 10/0; return "------testHotKey"; } /*兜底方法*/ public String deal_testHotKey (String p1, String p2, BlockException exception) { return "------deal_testHotKey,o(╥﹏╥)o"; //sentinel系统默认的提示:Blocked by Sentinel (flow limiting) } }- 1
- 2
- 3
- 4
- 5
- 6
- 7
- 8
- 9
- 10
- 11
- 12
- 13
- 14
- 15
- 16
- 17
- 18
- 19
- 20
- 21
配置

一
@SentinelResource(value = "testHotKey")- 异常打到了前台用户界面看到,不友好
二
@SentinelResource(value = "testHotKey", blockHandler = "dealHandler_testHotKey")- 方法testHotKey里面第一个参数只要QPS超过每秒1次,马上降级处理
- 异常用了我们自己定义的兜底方法
测试
- error
- http://localhost:8401/testHotKeyp1=abc
- http://localhost:8401/testHotKeyp1=abc&p2=33
- right
- http://localhost:8401/testHotKeyp2=abc
125_Sentinel热点key(下)
上述案例演示了第一个参数p1,当QPS超过1秒1次点击后马上被限流。
参数例外项
- 普通 - 超过1秒钟一个后,达到阈值1后马上被限流
- 我们期望p1参数当它是某个特殊值时,它的限流值和平时不一样
- 特例 - 假如当p1的值等于5时,它的阈值可以达到200
配置
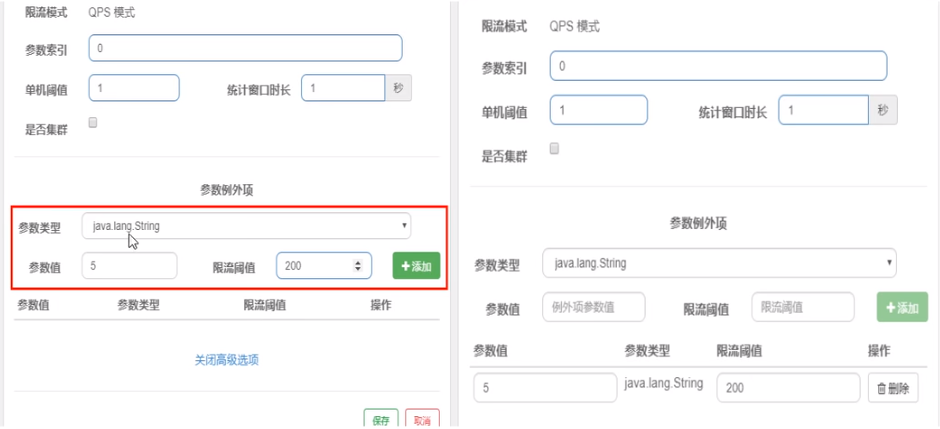
测试
- right - http://localhost:8401/testHotKeyp1=5
- error - http://localhost:8401/testHotKeyp1=3
- 当p1等于5的时候,阈值变为200
- 当p1不等于5的时候,阈值就是平常的1
前提条件 - 热点参数的注意点,参数必须是基本类型或者String
其它
在方法体抛异常
@RestController @Slf4j public class FlowLimitController { ... @GetMapping("/testHotKey") @SentinelResource(value = "testHotKey",blockHandler/*兜底方法*/ = "deal_testHotKey") public String testHotKey(@RequestParam(value = "p1",required = false) String p1, @RequestParam(value = "p2",required = false) String p2) { int age = 10/0;//<----------------------------会抛异常的地方 return "------testHotKey"; } /*兜底方法*/ public String deal_testHotKey (String p1, String p2, BlockException exception) { return "------deal_testHotKey,o(╥﹏╥)o"; //sentinel系统默认的提示:Blocked by Sentinel (flow limiting) } }- 1
- 2
- 3
- 4
- 5
- 6
- 7
- 8
- 9
- 10
- 11
- 12
- 13
- 14
- 15
- 16
- 17
- 18
- 19
- 20
- 21
将会抛出Spring Boot 2的默认异常页面,而不是兜底方法。
-
@SentinelResource - 处理的是sentinel控制台配置的违规情况,有blockHandler方法配置的兜底处理;
-
RuntimeException
int age = 10/0,这个是java运行时报出的运行时异常RunTimeException,@SentinelResource不管
总结 - @SentinelResource主管配置出错,运行出错该走异常走异常
126_Sentinel系统规则
Sentinel 系统自适应限流从整体维度对应用入口流量进行控制,结合应用的 Load、CPU 使用率、总体平均 RT、入口 QPS 和并发线程数等几个维度的监控指标,通过自适应的流控策略,让系统的入口流量和系统的负载达到一个平衡,让系统尽可能跑在最大吞吐量的同时保证系统整体的稳定性。link
系统规则
系统保护规则是从应用级别的入口流量进行控制,从单台机器的 load、CPU 使用率、平均 RT、入口 QPS 和并发线程数等几个维度监控应用指标,让系统尽可能跑在最大吞吐量的同时保证系统整体的稳定性。
系统保护规则是应用整体维度的,而不是资源维度的,并且仅对入口流量生效。入口流量指的是进入应用的流量(
EntryType.IN),比如 Web 服务或 Dubbo 服务端接收的请求,都属于入口流量。系统规则支持以下的模式:
- Load 自适应(仅对 Linux/Unix-like 机器生效):系统的 load1 作为启发指标,进行自适应系统保护。当系统 load1 超过设定的启发值,且系统当前的并发线程数超过估算的系统容量时才会触发系统保护(BBR 阶段)。系统容量由系统的
maxQps * minRt估算得出。设定参考值一般是CPU cores * 2.5。 - CPU usage(1.5.0+ 版本):当系统 CPU 使用率超过阈值即触发系统保护(取值范围 0.0-1.0),比较灵敏。
- 平均 RT:当单台机器上所有入口流量的平均 RT 达到阈值即触发系统保护,单位是毫秒。
- 并发线程数:当单台机器上所有入口流量的并发线程数达到阈值即触发系统保护。
- 入口 QPS:当单台机器上所有入口流量的 QPS 达到阈值即触发系统保护。
127_SentinelResource配置(上)
按资源名称限流 + 后续处理
启动Nacos成功
启动Sentinel成功
Module - cloudalibaba-sentinel-service8401
import com.alibaba.csp.sentinel.annotation.SentinelResource; import com.alibaba.csp.sentinel.slots.block.BlockException; import com.atguigu.springcloud.alibaba.myhandler.CustomerBlockHandler; import com.atguigu.springcloud.entities.CommonResult; import com.atguigu.springcloud.entities.Payment; import org.springframework.web.bind.annotation.GetMapping; import org.springframework.web.bind.annotation.RestController; @RestController public class RateLimitController { @GetMapping("/byResource") @SentinelResource(value = "byResource",blockHandler = "handleException") public CommonResult byResource() { return new CommonResult(200,"按资源名称限流测试OK",new Payment(2020L,"serial001")); } public CommonResult handleException(BlockException exception) { return new CommonResult(444,exception.getClass().getCanonicalName()+" 服务不可用"); } }- 1
- 2
- 3
- 4
- 5
- 6
- 7
- 8
- 9
- 10
- 11
- 12
- 13
- 14
- 15
- 16
- 17
- 18
- 19
- 20
- 21
配置流控规则
配置步骤
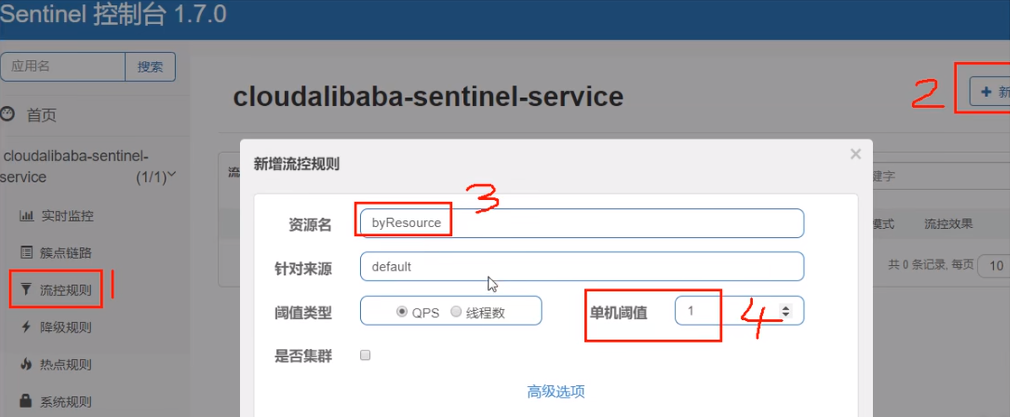
图形配置和代码关系
表示1秒钟内查询次数大于1,就跑到我们自定义的处流,限流
测试
1秒钟点击1下,OK
超过上述,疯狂点击,返回了自己定义的限流处理信息,限流发生
{"code":444, "message":"com.alibaba.csp.sentinel.slots.block.flow.FlowException 服务不可用", "data":null}- 1
额外问题
此时关闭问服务8401 -> Sentinel控制台,流控规则消失了
按照Url地址限流 + 后续处理
通过访问的URL来限流,会返回Sentinel自带默认的限流处理信息
业务类RateLimitController
@RestController public class RateLimitController { ... @GetMapping("/rateLimit/byUrl") @SentinelResource(value = "byUrl") public CommonResult byUrl() { return new CommonResult(200,"按url限流测试OK",new Payment(2020L,"serial002")); } }- 1
- 2
- 3
- 4
- 5
- 6
- 7
- 8
- 9
- 10
- 11
- 12
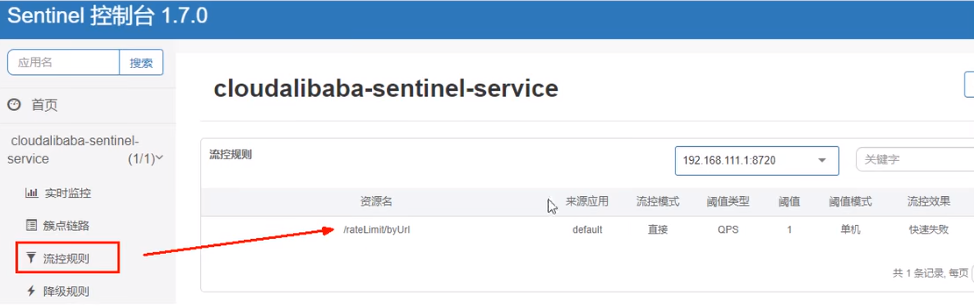
Sentinel控制台配置

测试
- 快速点击http://localhost:8401/rateLimit/byUrl
- 结果 - 会返回Sentinel自带的限流处理结果 Blocked by Sentinel (flow limiting)
上面兜底方案面临的问题
- 系统默认的,没有体现我们自己的业务要求。
- 依照现有条件,我们自定义的处理方法又和业务代码耦合在一块,不直观。
- 每个业务方法都添加—个兜底的,那代码膨胀加剧。
- 全局统—的处理方法没有体现。
128_SentinelResource配置(中)
客户自定义限流处理逻辑
自定义限流处理类 - 创建CustomerBlockHandler类用于自定义限流处理逻辑
import com.alibaba.csp.sentinel.slots.block.BlockException; import com.atguigu.springcloud.entities.CommonResult; import com.atguigu.springcloud.entities.Payment; public class CustomerBlockHandler { public static CommonResult handlerException(BlockException exception) { return new CommonResult(4444,"按客戶自定义,global handlerException----1"); } public static CommonResult handlerException2(BlockException exception) { return new CommonResult(4444,"按客戶自定义,global handlerException----2"); } }- 1
- 2
- 3
- 4
- 5
- 6
- 7
- 8
- 9
- 10
- 11
- 12
- 13
RateLimitController
@RestController public class RateLimitController { ... @GetMapping("/rateLimit/customerBlockHandler") @SentinelResource(value = "customerBlockHandler", blockHandlerClass = CustomerBlockHandler.class,//<-------- 自定义限流处理类 blockHandler = "handlerException2")//<----------- public CommonResult customerBlockHandler() { return new CommonResult(200,"按客戶自定义",new Payment(2020L,"serial003")); } }- 1
- 2
- 3
- 4
- 5
- 6
- 7
- 8
- 9
- 10
- 11
- 12
- 13
Sentinel控制台配置
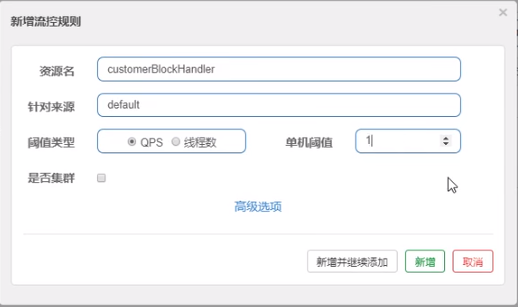
启动微服务后先调用一次 - http://localhost:8401/rateLimit/customerBlockHandler。然后,多次快速刷新http://localhost:8401/rateLimit/customerBlockHandler。刷新后,我们自定义兜底方法的字符串信息就返回到前端。
129_SentinelResource配置(下)
@SentinelResource 注解
注意:注解方式埋点不支持 private 方法。
@SentinelResource用于定义资源,并提供可选的异常处理和 fallback 配置项。@SentinelResource注解包含以下属性:value:资源名称,必需项(不能为空)entryType:entry 类型,可选项(默认为EntryType.OUT)blockHandler/blockHandlerClass:blockHandler对应处理BlockException的函数名称,可选项。blockHandler 函数访问范围需要是public,返回类型需要与原方法相匹配,参数类型需要和原方法相匹配并且最后加一个额外的参数,类型为BlockException。blockHandler 函数默认需要和原方法在同一个类中。若希望使用其他类的函数,则可以指定blockHandlerClass为对应的类的Class对象,注意对应的函数必需为 static 函数,否则无法解析。fallback/fallbackClass:fallback 函数名称,可选项,用于在抛出异常的时候提供 fallback 处理逻辑。fallback 函数可以针对所有类型的异常(除了exceptionsToIgnore里面排除掉的异常类型)进行处理。fallback 函数签名和位置要求:- 返回值类型必须与原函数返回值类型一致;
- 方法参数列表需要和原函数一致,或者可以额外多一个
Throwable类型的参数用于接收对应的异常。 - fallback 函数默认需要和原方法在同一个类中。若希望使用其他类的函数,则可以指定
fallbackClass为对应的类的Class对象,注意对应的函数必需为 static 函数,否则无法解析。
defaultFallback(since 1.6.0):默认的 fallback 函数名称,可选项,通常用于通用的 fallback 逻辑(即可以用于很多服务或方法)。默认 fallback 函数可以针对所有类型的异常(除了exceptionsToIgnore里面排除掉的异常类型)进行处理。若同时配置了 fallback 和 defaultFallback,则只有 fallback 会生效。defaultFallback 函数签名要求:- 返回值类型必须与原函数返回值类型一致;
- 方法参数列表需要为空,或者可以额外多一个
Throwable类型的参数用于接收对应的异常。 - defaultFallback 函数默认需要和原方法在同一个类中。若希望使用其他类的函数,则可以指定
fallbackClass为对应的类的Class对象,注意对应的函数必需为 static 函数,否则无法解析。
exceptionsToIgnore(since 1.6.0):用于指定哪些异常被排除掉,不会计入异常统计中,也不会进入 fallback 逻辑中,而是会原样抛出。
Sentinel主要有三个核心Api:
- SphU定义资源
- Tracer定义统计
- ContextUtil定义了上下文
130_Sentinel服务熔断Ribbon环境预说
sentinel整合ribbon+openFeign+fallback
Ribbon系列
- 启动nacos和sentinel
- 提供者9003/9004
- 消费者84
提供者9003/9004
新建cloudalibaba-provider-payment9003/9004,两个一样的做法
POM
cloud2020 com.atguigu.springcloud 1.0-SNAPSHOT 4.0.0 cloudalibaba-provider-payment9003 com.alibaba.cloud spring-cloud-starter-alibaba-nacos-discovery com.atguigu.springcloud cloud-api-commons ${project.version} org.springframework.boot spring-boot-starter-web org.springframework.boot spring-boot-starter-actuator org.springframework.boot spring-boot-devtools runtime true org.projectlombok lombok true org.springframework.boot spring-boot-starter-test test - 1
- 2
- 3
- 4
- 5
- 6
- 7
- 8
- 9
- 10
- 11
- 12
- 13
- 14
- 15
- 16
- 17
- 18
- 19
- 20
- 21
- 22
- 23
- 24
- 25
- 26
- 27
- 28
- 29
- 30
- 31
- 32
- 33
- 34
- 35
- 36
- 37
- 38
- 39
- 40
- 41
- 42
- 43
- 44
- 45
- 46
- 47
- 48
- 49
- 50
- 51
- 52
YML
server: port: 9003 spring: application: name: nacos-payment-provider cloud: nacos: discovery: server-addr: localhost:8848 #配置Nacos地址 management: endpoints: web: exposure: include: '*'- 1
- 2
- 3
- 4
- 5
- 6
- 7
- 8
- 9
- 10
- 11
- 12
- 13
- 14
- 15
- 16
记得修改不同的端口号
主启动
import org.springframework.boot.SpringApplication; import org.springframework.boot.autoconfigure.SpringBootApplication; import org.springframework.cloud.client.discovery.EnableDiscoveryClient; @SpringBootApplication @EnableDiscoveryClient public class PaymentMain9003 { public static void main(String[] args) { SpringApplication.run(PaymentMain9003.class, args); } }- 1
- 2
- 3
- 4
- 5
- 6
- 7
- 8
- 9
- 10
- 11
业务类
import com.atguigu.springcloud.entities.CommonResult; import com.atguigu.springcloud.entities.Payment; import org.springframework.beans.factory.annotation.Value; import org.springframework.web.bind.annotation.GetMapping; import org.springframework.web.bind.annotation.PathVariable; import org.springframework.web.bind.annotation.RestController; import java.util.HashMap; @RestController public class PaymentController { @Value("${server.port}") private String serverPort; //模拟数据库 public static HashMappaymentSQL(@PathVariable("id") Long id) { Payment payment = hashMap.get(id); CommonResult result = new CommonResult(200,"from mysql,serverPort: "+serverPort,payment); return result; } } - 1
- 2
- 3
- 4
- 5
- 6
- 7
- 8
- 9
- 10
- 11
- 12
- 13
- 14
- 15
- 16
- 17
- 18
- 19
- 20
- 21
- 22
- 23
- 24
- 25
- 26
- 27
- 28
- 29
- 30
- 31
- 32
测试地址 - http://localhost:9003/paymentSQL/1
消费者84
新建cloudalibaba-consumer-nacos-order84
POM
cloud2020 com.atguigu.springcloud 1.0-SNAPSHOT 4.0.0 cloudalibaba-consumer-nacos-order84 com.alibaba.cloud spring-cloud-starter-alibaba-nacos-discovery com.alibaba.cloud spring-cloud-starter-alibaba-sentinel com.atguigu.springcloud cloud-api-commons ${project.version} org.springframework.boot spring-boot-starter-web org.springframework.boot spring-boot-starter-actuator org.springframework.boot spring-boot-devtools runtime true org.projectlombok lombok true org.springframework.boot spring-boot-starter-test test - 1
- 2
- 3
- 4
- 5
- 6
- 7
- 8
- 9
- 10
- 11
- 12
- 13
- 14
- 15
- 16
- 17
- 18
- 19
- 20
- 21
- 22
- 23
- 24
- 25
- 26
- 27
- 28
- 29
- 30
- 31
- 32
- 33
- 34
- 35
- 36
- 37
- 38
- 39
- 40
- 41
- 42
- 43
- 44
- 45
- 46
- 47
- 48
- 49
- 50
- 51
- 52
- 53
- 54
- 55
- 56
- 57
- 58
- 59
- 60
- 61
- 62
- 63
- 64
- 65
YML
server: port: 84 spring: application: name: nacos-order-consumer cloud: nacos: discovery: server-addr: localhost:8848 sentinel: transport: #配置Sentinel dashboard地址 dashboard: localhost:8080 #默认8719端口,假如被占用会自动从8719开始依次+1扫描,直至找到未被占用的端口 port: 8719 #消费者将要去访问的微服务名称(注册成功进nacos的微服务提供者) service-url: nacos-user-service: http://nacos-payment-provider # 激活Sentinel对Feign的支持 feign: sentinel: enabled: false- 1
- 2
- 3
- 4
- 5
- 6
- 7
- 8
- 9
- 10
- 11
- 12
- 13
- 14
- 15
- 16
- 17
- 18
- 19
- 20
- 21
- 22
- 23
- 24
- 25
主启动
import org.springframework.boot.SpringApplication; import org.springframework.boot.autoconfigure.SpringBootApplication; import org.springframework.cloud.client.discovery.EnableDiscoveryClient; import org.springframework.cloud.openfeign.EnableFeignClients; @EnableDiscoveryClient @SpringBootApplication @EnableFeignClients public class OrderNacosMain84 { public static void main(String[] args) { SpringApplication.run(OrderNacosMain84.class, args); } }- 1
- 2
- 3
- 4
- 5
- 6
- 7
- 8
- 9
- 10
- 11
- 12
- 13
业务类
import org.springframework.boot.SpringApplication; import org.springframework.boot.autoconfigure.SpringBootApplication; //import org.springframework.cloud.client.discovery.EnableDiscoveryClient; import org.springframework.cloud.openfeign.EnableFeignClients; @EnableDiscoveryClient @SpringBootApplication //@EnableFeignClients public class OrderNacosMain84 { public static void main(String[] args) { SpringApplication.run(OrderNacosMain84.class, args); } }- 1
- 2
- 3
- 4
- 5
- 6
- 7
- 8
- 9
- 10
- 11
- 12
- 13
ApplicationContextConfig
import org.springframework.cloud.client.loadbalancer.LoadBalanced; import org.springframework.context.annotation.Bean; import org.springframework.context.annotation.Configuration; import org.springframework.web.client.RestTemplate; @Configuration public class ApplicationContextConfig { @Bean @LoadBalanced public RestTemplate getRestTemplate() { return new RestTemplate(); } }- 1
- 2
- 3
- 4
- 5
- 6
- 7
- 8
- 9
- 10
- 11
- 12
- 13
- 14
- 15
CircleBreakerController
import com.alibaba.csp.sentinel.annotation.SentinelResource; import com.alibaba.csp.sentinel.slots.block.BlockException; import com.atguigu.springcloud.alibaba.service.PaymentService; import com.atguigu.springcloud.entities.CommonResult; import com.atguigu.springcloud.entities.Payment; import lombok.extern.slf4j.Slf4j; import org.springframework.web.bind.annotation.GetMapping; import org.springframework.web.bind.annotation.PathVariable; import org.springframework.web.bind.annotation.RequestMapping; import org.springframework.web.bind.annotation.RestController; import org.springframework.web.client.RestTemplate; import javax.annotation.Resource; @RestController @Slf4j public class CircleBreakerController { public static final String SERVICE_URL = "http://nacos-payment-provider"; @Resource private RestTemplate restTemplate; @RequestMapping("/consumer/fallback/{id}") @SentinelResource(value = "fallback")//没有配置 public CommonResultfallback(@PathVariable Long id) { CommonResult result = restTemplate.getForObject(SERVICE_URL + "/paymentSQL/"+id,CommonResult.class,id); if (id == 4) { throw new IllegalArgumentException ("IllegalArgumentException,非法参数异常...."); }else if (result.getData() == null) { throw new NullPointerException ("NullPointerException,该ID没有对应记录,空指针异常"); } return result; } } - 1
- 2
- 3
- 4
- 5
- 6
- 7
- 8
- 9
- 10
- 11
- 12
- 13
- 14
- 15
- 16
- 17
- 18
- 19
- 20
- 21
- 22
- 23
- 24
- 25
- 26
- 27
- 28
- 29
- 30
- 31
- 32
- 33
- 34
- 35
- 36
- 37
- 38
修改后请重启微服务
- 热部署对java代码级生效及时
- 对@SentinelResource注解内属性,有时效果不好
目的
- fallback管运行异常
- blockHandler管配置违规
测试地址 - http://localhost:84/consumer/fallback/1
没有任何配置
只配置fallback
只配置blockHandler
fallback和blockHandler都配置
忽略属性
131_Sentinel服务熔断无配置
没有任何配置 - 给用户error页面,不友好
@RestController @Slf4j public class CircleBreakerController { public static final String SERVICE_URL = "http://nacos-payment-provider"; @Resource private RestTemplate restTemplate; @RequestMapping("/consumer/fallback/{id}") @SentinelResource(value = "fallback")//没有配置 public CommonResultfallback(@PathVariable Long id) { CommonResult result = restTemplate.getForObject(SERVICE_URL + "/paymentSQL/"+id,CommonResult.class,id); if (id == 4) { throw new IllegalArgumentException ("IllegalArgumentException,非法参数异常...."); }else if (result.getData() == null) { throw new NullPointerException ("NullPointerException,该ID没有对应记录,空指针异常"); } return result; } } - 1
- 2
- 3
- 4
- 5
- 6
- 7
- 8
- 9
- 10
- 11
- 12
- 13
- 14
- 15
- 16
- 17
- 18
- 19
- 20
- 21
- 22
- 23
- 24
132_Sentinel服务熔断只配置fallback
fallback只负责业务异常
@RestController @Slf4j public class CircleBreakerController { public static final String SERVICE_URL = "http://nacos-payment-provider"; @Resource private RestTemplate restTemplate; @RequestMapping("/consumer/fallback/{id}") //@SentinelResource(value = "fallback")//没有配置 @SentinelResource(value = "fallback", fallback = "handlerFallback") //fallback只负责业务异常 public CommonResultfallback(@PathVariable Long id) { CommonResult result = restTemplate.getForObject(SERVICE_URL + "/paymentSQL/"+id,CommonResult.class,id); if (id == 4) { throw new IllegalArgumentException ("IllegalArgumentException,非法参数异常...."); }else if (result.getData() == null) { throw new NullPointerException ("NullPointerException,该ID没有对应记录,空指针异常"); } return result; } //本例是fallback public CommonResult handlerFallback(@PathVariable Long id,Throwable e) { Payment payment = new Payment(id,"null"); return new CommonResult<>(444,"兜底异常handlerFallback,exception内容 "+e.getMessage(),payment); } } - 1
- 2
- 3
- 4
- 5
- 6
- 7
- 8
- 9
- 10
- 11
- 12
- 13
- 14
- 15
- 16
- 17
- 18
- 19
- 20
- 21
- 22
- 23
- 24
- 25
- 26
- 27
- 28
- 29
- 30
- 31
测试地址 - http://localhost:84/consumer/fallback/4
页面返回结果:
{"code":444,"message":"兜底异常nandlerFal1back, exception内容illegalkrgumentEBxceptiorn,非法参数异常……","data":{"id":4,"seria:"null"}}- 1
133_Sentinel服务熔断只配置blockHandler
blockHandler只负责sentinel控制台配置违规
@RestController @Slf4j public class CircleBreakerController { public static final String SERVICE_URL = "http://nacos-payment-provider"; @Resource private RestTemplate restTemplate; @RequestMapping("/consumer/fallback/{id}") //@SentinelResource(value = "fallback") //没有配置 //@SentinelResource(value = "fallback",fallback = "handlerFallback") //fallback只负责业务异常 @SentinelResource(value = "fallback",blockHandler = "blockHandler") //blockHandler只负责sentinel控制台配置违规 public CommonResultfallback(@PathVariable Long id) { CommonResult result = restTemplate.getForObject(SERVICE_URL + "/paymentSQL/"+id,CommonResult.class,id); if (id == 4) { throw new IllegalArgumentException ("IllegalArgumentException,非法参数异常...."); }else if (result.getData() == null) { throw new NullPointerException ("NullPointerException,该ID没有对应记录,空指针异常"); } return result; } //本例是fallback /* public CommonResult handlerFallback(@PathVariable Long id,Throwable e) { Payment payment = new Payment(id,"null"); return new CommonResult<>(444,"兜底异常handlerFallback,exception内容 "+e.getMessage(),payment); }*/ //本例是blockHandler public CommonResult blockHandler(@PathVariable Long id,BlockException blockException) { Payment payment = new Payment(id,"null"); return new CommonResult<>(445,"blockHandler-sentinel限流,无此流水: blockException "+blockException.getMessage(),payment); } } - 1
- 2
- 3
- 4
- 5
- 6
- 7
- 8
- 9
- 10
- 11
- 12
- 13
- 14
- 15
- 16
- 17
- 18
- 19
- 20
- 21
- 22
- 23
- 24
- 25
- 26
- 27
- 28
- 29
- 30
- 31
- 32
- 33
- 34
- 35
- 36
- 37
测试地址 - http://localhost:84/consumer/fallback/4
134_Sentinel服务熔断fallback和blockHandler都配置
若blockHandler和fallback 都进行了配置,则被限流降级而抛出BlockException时只会进入blockHandler处理逻辑。
@RestController @Slf4j public class CircleBreakerController { public static final String SERVICE_URL = "http://nacos-payment-provider"; @Resource private RestTemplate restTemplate; @RequestMapping("/consumer/fallback/{id}") //@SentinelResource(value = "fallback") //没有配置 //@SentinelResource(value = "fallback",fallback = "handlerFallback") //fallback只负责业务异常 //@SentinelResource(value = "fallback",blockHandler = "blockHandler") //blockHandler只负责sentinel控制台配置违规 @SentinelResource(value = "fallback",fallback = "handlerFallback",blockHandler = "blockHandler") public CommonResultfallback(@PathVariable Long id) { CommonResult result = restTemplate.getForObject(SERVICE_URL + "/paymentSQL/"+id,CommonResult.class,id); if (id == 4) { throw new IllegalArgumentException ("IllegalArgumentException,非法参数异常...."); }else if (result.getData() == null) { throw new NullPointerException ("NullPointerException,该ID没有对应记录,空指针异常"); } return result; } //本例是fallback public CommonResult handlerFallback(@PathVariable Long id,Throwable e) { Payment payment = new Payment(id,"null"); return new CommonResult<>(444,"兜底异常handlerFallback,exception内容 "+e.getMessage(),payment); } //本例是blockHandler public CommonResult blockHandler(@PathVariable Long id,BlockException blockException) { Payment payment = new Payment(id,"null"); return new CommonResult<>(445,"blockHandler-sentinel限流,无此流水: blockException "+blockException.getMessage(),payment); } } - 1
- 2
- 3
- 4
- 5
- 6
- 7
- 8
- 9
- 10
- 11
- 12
- 13
- 14
- 15
- 16
- 17
- 18
- 19
- 20
- 21
- 22
- 23
- 24
- 25
- 26
- 27
- 28
- 29
- 30
- 31
- 32
- 33
- 34
- 35
- 36
- 37
135_Sentinel服务熔断exceptionsToIgnore
exceptionsToIgnore,忽略指定异常,即这些异常不用兜底方法处理。
@RestController @Slf4j public class CircleBreakerController ... @RequestMapping("/consumer/fallback/{id}") @SentinelResource(value = "fallback",fallback = "handlerFallback",blockHandler = "blockHandler", exceptionsToIgnore = {IllegalArgumentException.class})//<------------- public CommonResultfallback(@PathVariable Long id) { CommonResult result = restTemplate.getForObject(SERVICE_URL + "/paymentSQL/"+id,CommonResult.class,id); if (id == 4) { //exceptionsToIgnore属性有IllegalArgumentException.class, //所以IllegalArgumentException不会跳入指定的兜底程序。 throw new IllegalArgumentException ("IllegalArgumentException,非法参数异常...."); }else if (result.getData() == null) { throw new NullPointerException ("NullPointerException,该ID没有对应记录,空指针异常"); } return result; } ... } - 1
- 2
- 3
- 4
- 5
- 6
- 7
- 8
- 9
- 10
- 11
- 12
- 13
- 14
- 15
- 16
- 17
- 18
- 19
- 20
- 21
- 22
- 23
- 24
- 25
- 26
136_Sentinel服务熔断OpenFeign
修改84模块
-
84消费者调用提供者9003
-
Feign组件一般是消费侧
POM
org.springframework.cloud spring-cloud-starter-openfeign - 1
- 2
- 3
- 4
- 5
- 6
YML
# 激活Sentinel对Feign的支持 feign: sentinel: enabled: true- 1
- 2
- 3
- 4
业务类
带@Feignclient注解的业务接口,fallback = PaymentFallbackService.class
import com.atguigu.springcloud.entities.CommonResult; import com.atguigu.springcloud.entities.Payment; import org.springframework.cloud.openfeign.FeignClient; import org.springframework.web.bind.annotation.GetMapping; import org.springframework.web.bind.annotation.PathVariable; @FeignClient(value = "nacos-payment-provider",fallback = PaymentFallbackService.class) public interface PaymentService { @GetMapping(value = "/paymentSQL/{id}") public CommonResultpaymentSQL(@PathVariable("id") Long id); } import com.atguigu.springcloud.entities.CommonResult; import com.atguigu.springcloud.entities.Payment; import org.springframework.stereotype.Component; @Component public class PaymentFallbackService implements PaymentService { @Override public CommonResult paymentSQL(Long id) { return new CommonResult<>(44444,"服务降级返回,---PaymentFallbackService",new Payment(id,"errorSerial")); } } - 1
- 2
- 3
- 4
- 5
- 6
- 7
- 8
- 9
- 10
- 11
- 12
- 13
- 14
- 15
- 16
- 17
- 18
- 19
- 20
- 21
- 22
- 23
- 24
- 25
- 26
- 27
Controller
@RestController @Slf4j public class CircleBreakerController { ... //==================OpenFeign @Resource private PaymentService paymentService; @GetMapping(value = "/consumer/paymentSQL/{id}") public CommonResultpaymentSQL(@PathVariable("id") Long id) { return paymentService.paymentSQL(id); } } - 1
- 2
- 3
- 4
- 5
- 6
- 7
- 8
- 9
- 10
- 11
- 12
- 13
- 14
- 15
- 16
主启动
import org.springframework.cloud.client.discovery.EnableDiscoveryClient; @EnableDiscoveryClient @SpringBootApplication @EnableFeignClients//<------------------------ public class OrderNacosMain84 { public static void main(String[] args) { SpringApplication.run(OrderNacosMain84.class, args); } }- 1
- 2
- 3
- 4
- 5
- 6
- 7
- 8
- 9
- 10
测试 - http://localhost:84/consumer/paymentSQL/1
测试84调用9003,此时故意关闭9003微服务提供者,84消费侧自动降级,不会被耗死。
熔断框架比较
-
Sentinel
Hystrix
resilience4j
隔离策略
信号量隔离(并发线程数限流)
线程池隔商/信号量隔离
信号量隔离
熔断降级策略
基于响应时间、异常比率、异常数
基于异常比率
基于异常比率、响应时间
实时统计实现
滑动窗口(LeapArray)
滑动窗口(基于RxJava)
Ring Bit Buffer
动态规则配置
支持多种数据源
支持多种数据源
有限支持
扩展性
多个扩展点
插件的形式
接口的形式
基于注解的支持
支持
支持
支持
限流
基于QPS,支持基于调用关系的限流
有限的支持
Rate Limiter
流量整形
支持预热模式匀速器模式、预热排队模式
不支持
简单的Rate Limiter模式
系统自适应保护
支持
不支持
不支持
控制台
提供开箱即用的控制台,可配置规则、查看秒级监控,机器发观等
简单的监控查看
不提供控制台,可对接其它监控系统
137_Sentinel持久化规则
是什么
一旦我们重启应用,sentinel规则将消失,生产环境需要将配置规则进行持久化。
怎么玩
将限流配置规则持久化进Nacos保存,只要刷新8401某个rest地址,sentinel控制台的流控规则就能看到,只要Nacos里面的配置不删除,针对8401上sentinel上的流控规则持续有效。
步骤
修改cloudalibaba-sentinel-service8401
POM
com.alibaba.csp sentinel-datasource-nacos - 1
- 2
- 3
- 4
- 5
YML
server: port: 8401 spring: application: name: cloudalibaba-sentinel-service cloud: nacos: discovery: server-addr: localhost:8848 #Nacos服务注册中心地址 sentinel: transport: dashboard: localhost:8080 #配置Sentinel dashboard地址 port: 8719 datasource: #<---------------------------关注点,添加Nacos数据源配置 ds1: nacos: server-addr: localhost:8848 dataId: cloudalibaba-sentinel-service groupId: DEFAULT_GROUP data-type: json rule-type: flow management: endpoints: web: exposure: include: '*' feign: sentinel: enabled: true # 激活Sentinel对Feign的支持- 1
- 2
- 3
- 4
- 5
- 6
- 7
- 8
- 9
- 10
- 11
- 12
- 13
- 14
- 15
- 16
- 17
- 18
- 19
- 20
- 21
- 22
- 23
- 24
- 25
- 26
- 27
- 28
- 29
- 30
- 31
- 32
添加Nacos业务规则配置

配置内容解析
[{ "resource": "/rateLimit/byUrl", "IimitApp": "default", "grade": 1, "count": 1, "strategy": 0, "controlBehavior": 0, "clusterMode": false }]- 1
- 2
- 3
- 4
- 5
- 6
- 7
- 8
- 9
- resource:资源名称;
- limitApp:来源应用;
- grade:阈值类型,0表示线程数, 1表示QPS;
- count:单机阈值;
- strategy:流控模式,0表示直接,1表示关联,2表示链路;
- controlBehavior:流控效果,0表示快速失败,1表示Warm Up,2表示排队等待;
- clusterMode:是否集群。
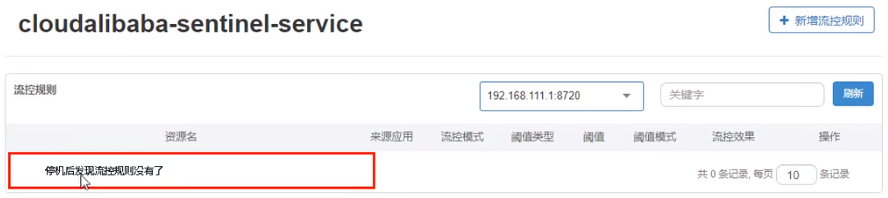
启动8401后刷新sentinel发现业务规则有了
快速访问测试接口 - http://localhost:8401/rateLimit/byUrl - 页面返回
Blocked by Sentinel (flow limiting)停止8401再看sentinel - 停机后发现流控规则没有了
重新启动8401再看sentinel
- 乍一看还是没有,稍等一会儿
- 多次调用 - http://localhost:8401/rateLimit/byUrl
- 重新配置出现了,持久化验证通过
138_分布式事务问题由来
分布式前
- 单机单库没这个问题
- 从1:1 -> 1:N -> N:N
单体应用被拆分成微服务应用,原来的三个模块被拆分成三个独立的应用,分别使用三个独立的数据源,业务操作需要调用三三 个服务来完成。此时每个服务内部的数据一致性由本地事务来保证, 但是全局的数据一致性问题没法保证。

一句话:一次业务操作需要跨多个数据源或需要跨多个系统进行远程调用,就会产生分布式事务问题。
139_Seata术语
是什么
Seata是一款开源的分布式事务解决方案,致力于在微服务架构下提供高性能和简单易用的分布式事务服务。
能干嘛
一个典型的分布式事务过程
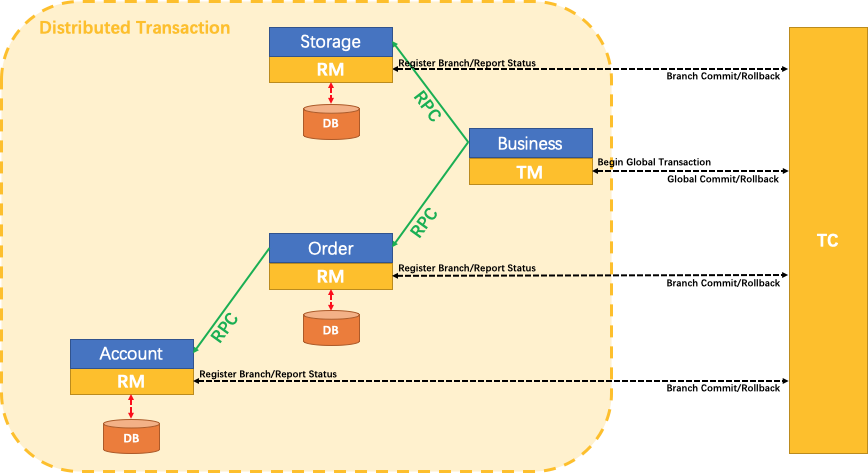
分布式事务处理过程的一ID+三组件模型:
- Transaction ID XID 全局唯一的事务ID
- 三组件概念
- TC (Transaction Coordinator) - 事务协调者:维护全局和分支事务的状态,驱动全局事务提交或回滚。
- TM (Transaction Manager) - 事务管理器:定义全局事务的范围:开始全局事务、提交或回滚全局事务。
- RM (Resource Manager) - 资源管理器:管理分支事务处理的资源,与TC交谈以注册分支事务和报告分支事务的状态,并驱动分支事务提交或回滚。
处理过程:
- TM向TC申请开启一个全局事务,全局事务创建成功并生成一个全局唯一的XID;
- XID在微服务调用链路的上下文中传播;
- RM向TC注册分支事务,将其纳入XID对应全局事务的管辖;
- TM向TC发起针对XID的全局提交或回滚决议;
- TC调度XID下管辖的全部分支事务完成提交或回滚请求。

140_Seata-Server安装
去哪下
发布说明: https://github.com/seata/seata/releases
怎么玩
本地@Transactional
全局@GlobalTransactional
SEATA 的分布式交易解决方案
我们只需要使用一个
@GlobalTransactional注解在业务方法上:Seata-Server安装
官网地址 - http://seata.io/zh-cn/
下载版本 - 0.9.0
seata-server-0.9.0.zip解压到指定目录并修改conf目录下的file.conf配置文件
先备份原始file.conf文件
主要修改:自定义事务组名称+事务日志存储模式为db +数据库连接信息
file.conf
service模块
service { ##fsp_tx_group是自定义的 vgroup_mapping.my.test.tx_group="fsp_tx_group" default.grouplist = "127.0.0.1:8091" enableDegrade = false disable = false max.commitretry.timeout= "-1" max.ollbackretry.timeout= "-1" }- 1
- 2
- 3
- 4
- 5
- 6
- 7
- 8
- 9
store模块
## transaction log store store { ## store mode: file, db ## 改成db mode = "db" ## file store file { dir = "sessionStore" # branch session size, if exceeded first try compress lockkey, still exceeded throws exceptions max-branch-session-size = 16384 # globe session size, if exceeded throws exceptions max-global-session-size = 512 # file buffer size, if exceeded allocate new buffer file-write-buffer-cache-size = 16384 # when recover batch read size session.reload.read_size= 100 # async, sync flush-disk-mode = async } # database store db { ## the implement of javax.sql.DataSource, such as DruidDataSource(druid)/BasicDataSource(dbcp) etc. datasource = "dbcp" ## mysql/oracle/h2/oceanbase etc. ## 配置数据源 db-type = "mysql" driver-class-name = "com.mysql.jdbc.Driver" url = "jdbc:mysql://127.0.0.1:3306/seata" user = "root" password = "你自己密码" min-conn= 1 max-conn = 3 global.table = "global_table" branch.table = "branch_table" lock-table = "lock_table" query-limit = 100 } }- 1
- 2
- 3
- 4
- 5
- 6
- 7
- 8
- 9
- 10
- 11
- 12
- 13
- 14
- 15
- 16
- 17
- 18
- 19
- 20
- 21
- 22
- 23
- 24
- 25
- 26
- 27
- 28
- 29
- 30
- 31
- 32
- 33
- 34
- 35
- 36
- 37
- 38
- 39
- 40
- 41
mysql5.7数据库新建库seata,在seata库里建表
建表db_store.sql在seata-server-0.9.0seataconf目录里面
-- the table to store GlobalSession data drop table if exists `global_table`; create table `global_table` ( `xid` varchar(128) not null, `transaction_id` bigint, `status` tinyint not null, `application_id` varchar(32), `transaction_service_group` varchar(32), `transaction_name` varchar(128), `timeout` int, `begin_time` bigint, `application_data` varchar(2000), `gmt_create` datetime, `gmt_modified` datetime, primary key (`xid`), key `idx_gmt_modified_status` (`gmt_modified`, `status`), key `idx_transaction_id` (`transaction_id`) ); -- the table to store BranchSession data drop table if exists `branch_table`; create table `branch_table` ( `branch_id` bigint not null, `xid` varchar(128) not null, `transaction_id` bigint , `resource_group_id` varchar(32), `resource_id` varchar(256) , `lock_key` varchar(128) , `branch_type` varchar(8) , `status` tinyint, `client_id` varchar(64), `application_data` varchar(2000), `gmt_create` datetime, `gmt_modified` datetime, primary key (`branch_id`), key `idx_xid` (`xid`) ); -- the table to store lock data drop table if exists `lock_table`; create table `lock_table` ( `row_key` varchar(128) not null, `xid` varchar(96), `transaction_id` long , `branch_id` long, `resource_id` varchar(256) , `table_name` varchar(32) , `pk` varchar(36) , `gmt_create` datetime , `gmt_modified` datetime, primary key(`row_key`) );- 1
- 2
- 3
- 4
- 5
- 6
- 7
- 8
- 9
- 10
- 11
- 12
- 13
- 14
- 15
- 16
- 17
- 18
- 19
- 20
- 21
- 22
- 23
- 24
- 25
- 26
- 27
- 28
- 29
- 30
- 31
- 32
- 33
- 34
- 35
- 36
- 37
- 38
- 39
- 40
- 41
- 42
- 43
- 44
- 45
- 46
- 47
- 48
- 49
- 50
- 51
- 52
修改seata-server-0.9.0seataconf目录下的registry.conf配置文件
registry { # file 、nacos 、eureka、redis、zk、consul、etcd3、sofa # 改用为nacos type = "nacos" nacos { ## 加端口号 serverAddr = "localhost:8848" namespace = "" cluster = "default" } ... }- 1
- 2
- 3
- 4
- 5
- 6
- 7
- 8
- 9
- 10
- 11
- 12
- 13
目的是:指明注册中心为nacos,及修改nacos连接信息
先启动Nacos端口号8848 nacosinstartup.cmd
再启动seata-server - seata-server-0.9.0seatainseata-server.bat
141_Seata业务数据库准备
以下演示都需要先启动Nacos后启动Seata,保证两个都OK。
分布式事务业务说明
这里我们会创建三个服务,一个订单服务,一个库存服务,一个账户服务。
当用户下单时,会在订单服务中创建一个订单, 然后通过远程调用库存服务来扣减下单商品的库存,再通过远程调用账户服务来扣减用户账户里面的余额,最后在订单服务中修改订单状态为已完成。
该操作跨越三个数据库,有两次远程调用,很明显会有分布式事务问题。
一言蔽之,下订单—>扣库存—>减账户(余额)。
创建业务数据库
- seata_ order:存储订单的数据库;
- seata_ storage:存储库存的数据库;
- seata_ account:存储账户信息的数据库。
建库SQL
CREATE DATABASE seata_order; CREATE DATABASE seata_storage; CREATE DATABASE seata_account;- 1
- 2
- 3
按照上述3库分别建对应业务表
-
seata_order库下建t_order表
CREATE TABLE t_order (
idBIGINT(11) NOT NULL AUTO_INCREMENT PRIMARY KEY,
user_idBIGINT(11) DEFAULT NULL COMMENT ‘用户id’,
product_idBIGINT(11) DEFAULT NULL COMMENT ‘产品id’,
countINT(11) DEFAULT NULL COMMENT ‘数量’,
moneyDECIMAL(11,0) DEFAULT NULL COMMENT ‘金额’,
statusINT(1) DEFAULT NULL COMMENT ‘订单状态: 0:创建中; 1:已完结’
) ENGINE=INNODB AUTO_INCREMENT=1 DEFAULT CHARSET=utf8;SELECT * FROM t_order;
-
seata_storage库下建t_storage表
CREATE TABLE t_storage (
idBIGINT(11) NOT NULL AUTO_INCREMENT PRIMARY KEY,
product_idBIGINT(11) DEFAULT NULL COMMENT ‘产品id’,
totalINT(11) DEFAULT NULL COMMENT ‘总库存’,
usedINT(11) DEFAULT NULL COMMENT ‘已用库存’,
residueINT(11) DEFAULT NULL COMMENT ‘剩余库存’
) ENGINE=INNODB AUTO_INCREMENT=1 DEFAULT CHARSET=utf8;INSERT INTO seata_storage.t_storage(
id,product_id,total,used,residue)
VALUES (‘1’, ‘1’, ‘100’, ‘0’,‘100’);SELECT * FROM t_storage;
-
seata_account库下建t_account表
CREATE TABLE t_account(
idBIGINT(11) NOT NULL AUTO_INCREMENT PRIMARY KEY COMMENT ‘id’,
user_idBIGINT(11) DEFAULT NULL COMMENT ‘用户id’,
totalDECIMAL(10,0) DEFAULT NULL COMMENT ‘总额度’,
usedDECIMAL(10,0) DEFAULT NULL COMMENT ‘已用余额’,
residueDECIMAL(10,0) DEFAULT ‘0’ COMMENT ‘剩余可用额度’
) ENGINE=INNODB AUTO_INCREMENT=1 DEFAULT CHARSET=utf8;INSERT INTO seata_account.t_account(
id,user_id,total,used,residue)
VALUES (‘1’, ‘1’, ‘1000’, ‘0’, ‘1000’);SELECT * FROM t_account;
按照上述3库分别建对应的回滚日志表
-
订单-库存-账户3个库下都需要建各自的回滚日志表
-
seata-server-0.9.0seataconf目录下的db_ undo_ log.sql
-
建表SQL
– the table to store seata xid data
– 0.7.0+ add context
– you must to init this sql for you business databese. the seata server not need it.
– 此脚本必须初始化在你当前的业务数据库中,用于AT 模式XID记录。与server端无关(注:业务数据库)
– 注意此处0.3.0+ 增加唯一索引 ux_undo_log
drop tableundo_log;
CREATE TABLEundo_log(
idbigint(20) NOT NULL AUTO_INCREMENT,
branch_idbigint(20) NOT NULL,
xidvarchar(100) NOT NULL,
contextvarchar(128) NOT NULL,
rollback_infolongblob NOT NULL,
log_statusint(11) NOT NULL,
log_createddatetime NOT NULL,
log_modifieddatetime NOT NULL,
extvarchar(100) DEFAULT NULL,
PRIMARY KEY (id),
UNIQUE KEYux_undo_log(xid,branch_id)
) ENGINE=InnoDB AUTO_INCREMENT=1 DEFAULT CHARSET=utf8;
142_Seata之Order-Module配置搭建
下订单 -> 减库存 -> 扣余额 -> 改(订单)状态
seata-order-service2001
POM
cloud2020 com.atguigu.springcloud 1.0-SNAPSHOT 4.0.0 seata-order-service2001 com.alibaba.cloud spring-cloud-starter-alibaba-nacos-discovery com.alibaba.cloud spring-cloud-starter-alibaba-seata seata-all io.seata io.seata seata-all 0.9.0 org.springframework.cloud spring-cloud-starter-openfeign org.springframework.boot spring-boot-starter-web org.springframework.boot spring-boot-starter-actuator mysql mysql-connector-java 5.1.37 com.alibaba druid-spring-boot-starter 1.1.10 org.mybatis.spring.boot mybatis-spring-boot-starter 2.0.0 org.springframework.boot spring-boot-starter-test test org.projectlombok lombok true - 1
- 2
- 3
- 4
- 5
- 6
- 7
- 8
- 9
- 10
- 11
- 12
- 13
- 14
- 15
- 16
- 17
- 18
- 19
- 20
- 21
- 22
- 23
- 24
- 25
- 26
- 27
- 28
- 29
- 30
- 31
- 32
- 33
- 34
- 35
- 36
- 37
- 38
- 39
- 40
- 41
- 42
- 43
- 44
- 45
- 46
- 47
- 48
- 49
- 50
- 51
- 52
- 53
- 54
- 55
- 56
- 57
- 58
- 59
- 60
- 61
- 62
- 63
- 64
- 65
- 66
- 67
- 68
- 69
- 70
- 71
- 72
- 73
- 74
- 75
- 76
- 77
- 78
配置文件
YML
server: port: 2001 spring: application: name: seata-order-service cloud: alibaba: seata: #自定义事务组名称需要与seata-server中的对应 tx-service-group: fsp_tx_group nacos: discovery: server-addr: localhost:8848 datasource: driver-class-name: com.mysql.jdbc.Driver url: jdbc:mysql://localhost:3306/seata_order username: root password: 123456 feign: hystrix: enabled: false logging: level: io: seata: info mybatis: mapperLocations: classpath:mapper/*.xml- 1
- 2
- 3
- 4
- 5
- 6
- 7
- 8
- 9
- 10
- 11
- 12
- 13
- 14
- 15
- 16
- 17
- 18
- 19
- 20
- 21
- 22
- 23
- 24
- 25
- 26
- 27
- 28
- 29
- 30
- 31
file.conf
transport { # tcp udt unix-domain-socket type = "TCP" #NIO NATIVE server = "NIO" #enable heartbeat heartbeat = true #thread factory for netty thread-factory { boss-thread-prefix = "NettyBoss" worker-thread-prefix = "NettyServerNIOWorker" server-executor-thread-prefix = "NettyServerBizHandler" share-boss-worker = false client-selector-thread-prefix = "NettyClientSelector" client-selector-thread-size = 1 client-worker-thread-prefix = "NettyClientWorkerThread" # netty boss thread size,will not be used for UDT boss-thread-size = 1 #auto default pin or 8 worker-thread-size = 8 } shutdown { # when destroy server, wait seconds wait = 3 } serialization = "seata" compressor = "none" } service { vgroup_mapping.fsp_tx_group = "default" #修改自定义事务组名称 default.grouplist = "127.0.0.1:8091" enableDegrade = false disable = false max.commit.retry.timeout = "-1" max.rollback.retry.timeout = "-1" disableGlobalTransaction = false } client { async.commit.buffer.limit = 10000 lock { retry.internal = 10 retry.times = 30 } report.retry.count = 5 tm.commit.retry.count = 1 tm.rollback.retry.count = 1 } ## transaction log store store { ## store mode: file、db mode = "db" ## file store file { dir = "sessionStore" # branch session size , if exceeded first try compress lockkey, still exceeded throws exceptions max-branch-session-size = 16384 # globe session size , if exceeded throws exceptions max-global-session-size = 512 # file buffer size , if exceeded allocate new buffer file-write-buffer-cache-size = 16384 # when recover batch read size session.reload.read_size = 100 # async, sync flush-disk-mode = async } ## database store db { ## the implement of javax.sql.DataSource, such as DruidDataSource(druid)/BasicDataSource(dbcp) etc. datasource = "dbcp" ## mysql/oracle/h2/oceanbase etc. db-type = "mysql" driver-class-name = "com.mysql.jdbc.Driver" url = "jdbc:mysql://127.0.0.1:3306/seata" user = "root" password = "123456" min-conn = 1 max-conn = 3 global.table = "global_table" branch.table = "branch_table" lock-table = "lock_table" query-limit = 100 } } lock { ## the lock store mode: local、remote mode = "remote" local { ## store locks in user's database } remote { ## store locks in the seata's server } } recovery { #schedule committing retry period in milliseconds committing-retry-period = 1000 #schedule asyn committing retry period in milliseconds asyn-committing-retry-period = 1000 #schedule rollbacking retry period in milliseconds rollbacking-retry-period = 1000 #schedule timeout retry period in milliseconds timeout-retry-period = 1000 } transaction { undo.data.validation = true undo.log.serialization = "jackson" undo.log.save.days = 7 #schedule delete expired undo_log in milliseconds undo.log.delete.period = 86400000 undo.log.table = "undo_log" } ## metrics settings metrics { enabled = false registry-type = "compact" # multi exporters use comma divided exporter-list = "prometheus" exporter-prometheus-port = 9898 } support { ## spring spring { # auto proxy the DataSource bean datasource.autoproxy = false } }- 1
- 2
- 3
- 4
- 5
- 6
- 7
- 8
- 9
- 10
- 11
- 12
- 13
- 14
- 15
- 16
- 17
- 18
- 19
- 20
- 21
- 22
- 23
- 24
- 25
- 26
- 27
- 28
- 29
- 30
- 31
- 32
- 33
- 34
- 35
- 36
- 37
- 38
- 39
- 40
- 41
- 42
- 43
- 44
- 45
- 46
- 47
- 48
- 49
- 50
- 51
- 52
- 53
- 54
- 55
- 56
- 57
- 58
- 59
- 60
- 61
- 62
- 63
- 64
- 65
- 66
- 67
- 68
- 69
- 70
- 71
- 72
- 73
- 74
- 75
- 76
- 77
- 78
- 79
- 80
- 81
- 82
- 83
- 84
- 85
- 86
- 87
- 88
- 89
- 90
- 91
- 92
- 93
- 94
- 95
- 96
- 97
- 98
- 99
- 100
- 101
- 102
- 103
- 104
- 105
- 106
- 107
- 108
- 109
- 110
- 111
- 112
- 113
- 114
- 115
- 116
- 117
- 118
- 119
- 120
- 121
- 122
- 123
- 124
- 125
- 126
- 127
- 128
- 129
- 130
- 131
- 132
- 133
- 134
- 135
- 136
- 137
- 138
- 139
- 140
registry.conf
registry { # file 、nacos 、eureka、redis、zk、consul、etcd3、sofa type = "nacos" nacos { serverAddr = "localhost:8848" namespace = "" cluster = "default" } eureka { serviceUrl = "http://localhost:8761/eureka" application = "default" weight = "1" } redis { serverAddr = "localhost:6379" db = "0" } zk { cluster = "default" serverAddr = "127.0.0.1:2181" session.timeout = 6000 connect.timeout = 2000 } consul { cluster = "default" serverAddr = "127.0.0.1:8500" } etcd3 { cluster = "default" serverAddr = "http://localhost:2379" } sofa { serverAddr = "127.0.0.1:9603" application = "default" region = "DEFAULT_ZONE" datacenter = "DefaultDataCenter" cluster = "default" group = "SEATA_GROUP" addressWaitTime = "3000" } file { name = "file.conf" } } config { # file、nacos 、apollo、zk、consul、etcd3 type = "file" nacos { serverAddr = "localhost" namespace = "" } consul { serverAddr = "127.0.0.1:8500" } apollo { app.id = "seata-server" apollo.meta = "http://192.168.1.204:8801" } zk { serverAddr = "127.0.0.1:2181" session.timeout = 6000 connect.timeout = 2000 } etcd3 { serverAddr = "http://localhost:2379" } file { name = "file.conf" } }- 1
- 2
- 3
- 4
- 5
- 6
- 7
- 8
- 9
- 10
- 11
- 12
- 13
- 14
- 15
- 16
- 17
- 18
- 19
- 20
- 21
- 22
- 23
- 24
- 25
- 26
- 27
- 28
- 29
- 30
- 31
- 32
- 33
- 34
- 35
- 36
- 37
- 38
- 39
- 40
- 41
- 42
- 43
- 44
- 45
- 46
- 47
- 48
- 49
- 50
- 51
- 52
- 53
- 54
- 55
- 56
- 57
- 58
- 59
- 60
- 61
- 62
- 63
- 64
- 65
- 66
- 67
- 68
- 69
- 70
- 71
- 72
- 73
domain
import lombok.AllArgsConstructor; import lombok.Data; import lombok.NoArgsConstructor; @Data @AllArgsConstructor @NoArgsConstructor public class CommonResult{ private Integer code; private String message; private T data; public CommonResult(Integer code, String message) { this(code,message,null); } } package com.atguigu.springcloud.alibaba.domain; import lombok.AllArgsConstructor; import lombok.Data; import lombok.NoArgsConstructor; import java.math.BigDecimal; @Data @AllArgsConstructor @NoArgsConstructor public class Order { private Long id; private Long userId; private Long productId; private Integer count; private BigDecimal money; private Integer status; //订单状态:0:创建中;1:已完结 } - 1
- 2
- 3
- 4
- 5
- 6
- 7
- 8
- 9
- 10
- 11
- 12
- 13
- 14
- 15
- 16
- 17
- 18
- 19
- 20
- 21
- 22
- 23
- 24
- 25
- 26
- 27
- 28
- 29
- 30
- 31
- 32
- 33
- 34
- 35
- 36
- 37
- 38
- 39
- 40
- 41
- 42
- 43
- 44
- 45
143_Seata之Order-Module撸码(上)
Dao接口及实现
import com.atguigu.springcloud.alibaba.domain.Order; import org.apache.ibatis.annotations.Mapper; import org.apache.ibatis.annotations.Param; @Mapper public interface OrderDao { //1 新建订单 void create(Order order); //2 修改订单状态,从零改为1 void update(@Param("userId") Long userId,@Param("status") Integer status); }insert into t_order (id,user_id,product_id,count,money,status) values (null,#{userId},#{productId},#{count},#{money},0); update t_order set status = 1 where user_id=#{userId} and status = #{status}; - 1
- 2
- 3
- 4
- 5
- 6
- 7
- 8
- 9
- 10
- 11
- 12
- 13
- 14
- 15
- 16
- 17
- 18
- 19
- 20
- 21
- 22
- 23
- 24
- 25
- 26
- 27
- 28
- 29
- 30
- 31
- 32
- 33
- 34
- 35
- 36
- 37
- 38
- 39
- 40
- 41
Service接口及实现
-
OrderService
- OrderServiceImpl
-
StorageService
-
AccountService
import com.atguigu.springcloud.alibaba.domain.Order;
public interface OrderService
{
void create(Order order);
}import com.atguigu.springcloud.alibaba.domain.CommonResult;
import org.springframework.cloud.openfeign.FeignClient;
import org.springframework.web.bind.annotation.PostMapping;
import org.springframework.web.bind.annotation.RequestParam;import java.math.BigDecimal;
@FeignClient(value = “seata-storage-service”)
public interface StorageService
{
@PostMapping(value = “/storage/decrease”)
CommonResult decrease(@RequestParam(“productId”) Long productId, @RequestParam(“count”) Integer count);
}import com.atguigu.springcloud.alibaba.domain.CommonResult;
import org.springframework.cloud.openfeign.FeignClient;
import org.springframework.web.bind.annotation.PostMapping;
import org.springframework.web.bind.annotation.RequestParam;import java.math.BigDecimal;
@FeignClient(value = “seata-account-service”)
public interface AccountService
{
@PostMapping(value = “/account/decrease”)
CommonResult decrease(@RequestParam(“userId”) Long userId, @RequestParam(“money”) BigDecimal money);
}import com.atguigu.springcloud.alibaba.dao.OrderDao;
import com.atguigu.springcloud.alibaba.domain.Order;
import com.atguigu.springcloud.alibaba.service.AccountService;
import com.atguigu.springcloud.alibaba.service.OrderService;
import com.atguigu.springcloud.alibaba.service.StorageService;
import io.seata.spring.annotation.GlobalTransactional;
import lombok.extern.slf4j.Slf4j;
import org.springframework.stereotype.Service;import javax.annotation.Resource;
@Service
@Slf4j
public class OrderServiceImpl implements OrderService
{
@Resource
private OrderDao orderDao;
@Resource
private StorageService storageService;
@Resource
private AccountService accountService;/** * 创建订单->调用库存服务扣减库存->调用账户服务扣减账户余额->修改订单状态 * 简单说:下订单->扣库存->减余额->改状态 */ @Override //@GlobalTransactional(name = "fsp-create-order",rollbackFor = Exception.class) public void create(Order order) { log.info("----->开始新建订单"); //1 新建订单 orderDao.create(order); //2 扣减库存 log.info("----->订单微服务开始调用库存,做扣减Count"); storageService.decrease(order.getProductId(),order.getCount()); log.info("----->订单微服务开始调用库存,做扣减end"); //3 扣减账户 log.info("----->订单微服务开始调用账户,做扣减Money"); accountService.decrease(order.getUserId(),order.getMoney()); log.info("----->订单微服务开始调用账户,做扣减end"); //4 修改订单状态,从零到1,1代表已经完成 log.info("----->修改订单状态开始"); orderDao.update(order.getUserId(),0); log.info("----->修改订单状态结束"); log.info("----->下订单结束了,O(∩_∩)O哈哈~"); }- 1
- 2
- 3
- 4
- 5
- 6
- 7
- 8
- 9
- 10
- 11
- 12
- 13
- 14
- 15
- 16
- 17
- 18
- 19
- 20
- 21
- 22
- 23
- 24
- 25
- 26
- 27
- 28
- 29
- 30
}
144_Seata之Order-Module撸码(下)
Controller
import com.atguigu.springcloud.alibaba.domain.CommonResult; import com.atguigu.springcloud.alibaba.domain.Order; import com.atguigu.springcloud.alibaba.service.OrderService; import org.springframework.web.bind.annotation.GetMapping; import org.springframework.web.bind.annotation.RestController; import javax.annotation.Resource; @RestController public class OrderController { @Resource private OrderService orderService; @GetMapping("/order/create") public CommonResult create(Order order) { orderService.create(order); return new CommonResult(200,"订单创建成功"); } }- 1
- 2
- 3
- 4
- 5
- 6
- 7
- 8
- 9
- 10
- 11
- 12
- 13
- 14
- 15
- 16
- 17
- 18
- 19
- 20
- 21
- 22
Config配置
-
MyBatisConfig
-
DataSourceProxyConfig
import org.mybatis.spring.annotation.MapperScan;
import org.springframework.context.annotation.Configuration;@Configuration
@MapperScan({“com.atguigu.springcloud.alibaba.dao”})
public class MyBatisConfig {
}import com.alibaba.druid.pool.DruidDataSource;
import io.seata.rm.datasource.DataSourceProxy;
import org.apache.ibatis.session.SqlSessionFactory;
import org.mybatis.spring.SqlSessionFactoryBean;
import org.mybatis.spring.transaction.SpringManagedTransactionFactory;
import org.springframework.beans.factory.annotation.Value;
import org.springframework.boot.context.properties.ConfigurationProperties;
import org.springframework.context.annotation.Bean;
import org.springframework.context.annotation.Configuration;
import org.springframework.core.io.support.PathMatchingResourcePatternResolver;
import javax.sql.DataSource;/**
-
使用Seata对数据源进行代理
*/
@Configuration
public class DataSourceProxyConfig {@Value(“${mybatis.mapperLocations}”)
private String mapperLocations;@Bean
@ConfigurationProperties(prefix = “spring.datasource”)
public DataSource druidDataSource(){
return new DruidDataSource();
}@Bean
public DataSourceProxy dataSourceProxy(DataSource dataSource) {
return new DataSourceProxy(dataSource);
}@Bean
public SqlSessionFactory sqlSessionFactoryBean(DataSourceProxy dataSourceProxy) throws Exception {
SqlSessionFactoryBean sqlSessionFactoryBean = new SqlSessionFactoryBean();
sqlSessionFactoryBean.setDataSource(dataSourceProxy);
sqlSessionFactoryBean.setMapperLocations(new PathMatchingResourcePatternResolver().getResources(mapperLocations));
sqlSessionFactoryBean.setTransactionFactory(new SpringManagedTransactionFactory());
return sqlSessionFactoryBean.getObject();
}
}
-
主启动
import org.springframework.boot.SpringApplication; import org.springframework.boot.autoconfigure.SpringBootApplication; import org.springframework.boot.autoconfigure.jdbc.DataSourceAutoConfiguration; import org.springframework.cloud.client.discovery.EnableDiscoveryClient; import org.springframework.cloud.openfeign.EnableFeignClients; @EnableDiscoveryClient @EnableFeignClients //取消数据源的自动创建,而是使用自己定义的 @SpringBootApplication(exclude = DataSourceAutoConfiguration.class) public class SeataOrderMainApp2001 { public static void main(String[] args) { SpringApplication.run(SeataOrderMainApp2001.class, args); } }- 1
- 2
- 3
- 4
- 5
- 6
- 7
- 8
- 9
- 10
- 11
- 12
- 13
- 14
- 15
- 16
- 17
- 18
145_Seata之Storage-Module说明
与seata-order-service2001模块大致相同
seata- storage - service2002
POM(与seata-order-service2001模块大致相同)
YML
server: port: 2002 spring: application: name: seata-storage-service cloud: alibaba: seata: tx-service-group: fsp_tx_group nacos: discovery: server-addr: localhost:8848 datasource: driver-class-name: com.mysql.jdbc.Driver url: jdbc:mysql://localhost:3306/seata_storage username: root password: 123456 logging: level: io: seata: info mybatis: mapperLocations: classpath:mapper/*.xml- 1
- 2
- 3
- 4
- 5
- 6
- 7
- 8
- 9
- 10
- 11
- 12
- 13
- 14
- 15
- 16
- 17
- 18
- 19
- 20
- 21
- 22
- 23
- 24
- 25
- 26
file.conf(与seata-order-service2001模块大致相同)
registry.conf(与seata-order-service2001模块大致相同)
domain
import lombok.Data; @Data public class Storage { private Long id; /** * 产品id */ private Long productId; /** * 总库存 */ private Integer total; /** * 已用库存 */ private Integer used; /** * 剩余库存 */ private Integer residue; }- 1
- 2
- 3
- 4
- 5
- 6
- 7
- 8
- 9
- 10
- 11
- 12
- 13
- 14
- 15
- 16
- 17
- 18
- 19
- 20
- 21
- 22
- 23
- 24
- 25
- 26
- 27
CommonResult(与seata-order-service2001模块大致相同)
Dao接口及实现
import org.apache.ibatis.annotations.Mapper; import org.apache.ibatis.annotations.Param; @Mapper public interface StorageDao { //扣减库存 void decrease(@Param("productId") Long productId, @Param("count") Integer count); }UPDATE t_storage SET used = used + #{count},residue = residue - #{count} WHERE product_id = #{productId} - 1
- 2
- 3
- 4
- 5
- 6
- 7
- 8
- 9
- 10
- 11
- 12
- 13
- 14
- 15
- 16
- 17
- 18
- 19
- 20
- 21
- 22
- 23
- 24
- 25
- 26
- 27
- 28
- 29
- 30
- 31
- 32
- 33
- 34
Service接口及实现
public interface StorageService { /** * 扣减库存 */ void decrease(Long productId, Integer count); } import com.atguigu.springcloud.alibaba.dao.StorageDao; import com.atguigu.springcloud.alibaba.service.StorageService ; import org.slf4j.Logger; import org.slf4j.LoggerFactory; import org.springframework.beans.factory.annotation.Autowired; import org.springframework.stereotype.Service; import javax.annotation.Resource; @Service public class StorageServiceImpl implements StorageService { private static final Logger LOGGER = LoggerFactory.getLogger(StorageServiceImpl.class); @Resource private StorageDao storageDao; /** * 扣减库存 */ @Override public void decrease(Long productId, Integer count) { LOGGER.info("------->storage-service中扣减库存开始"); storageDao.decrease(productId,count); LOGGER.info("------->storage-service中扣减库存结束"); } }- 1
- 2
- 3
- 4
- 5
- 6
- 7
- 8
- 9
- 10
- 11
- 12
- 13
- 14
- 15
- 16
- 17
- 18
- 19
- 20
- 21
- 22
- 23
- 24
- 25
- 26
- 27
- 28
- 29
- 30
- 31
- 32
- 33
- 34
- 35
- 36
Controller
import com.atguigu.springcloud.alibaba.domain.CommonResult ; import com.atguigu.springcloud.alibaba.service.StorageService ; import org.springframework.beans.factory.annotation.Autowired; import org.springframework.web.bind.annotation.RequestMapping; import org.springframework.web.bind.annotation.RestController; @RestController public class StorageController { @Autowired private StorageService storageService; /** * 扣减库存 */ @RequestMapping("/storage/decrease") public CommonResult decrease(Long productId, Integer count) { storageService.decrease(productId, count); return new CommonResult(200,"扣减库存成功!"); } }- 1
- 2
- 3
- 4
- 5
- 6
- 7
- 8
- 9
- 10
- 11
- 12
- 13
- 14
- 15
- 16
- 17
- 18
- 19
- 20
- 21
Config配置(与seata-order-service2001模块大致相同)
主启动(与seata-order-service2001模块大致相同)
146_Seata之Account-Module说明
与seata-order-service2001模块大致相同
seata- account- service2003
POM(与seata-order-service2001模块大致相同)
YML
server: port: 2003 spring: application: name: seata-account-service cloud: alibaba: seata: tx-service-group: fsp_tx_group nacos: discovery: server-addr: localhost:8848 datasource: driver-class-name: com.mysql.jdbc.Driver url: jdbc:mysql://localhost:3306/seata_account username: root password: 123456 feign: hystrix: enabled: false logging: level: io: seata: info mybatis: mapperLocations: classpath:mapper/*.xml- 1
- 2
- 3
- 4
- 5
- 6
- 7
- 8
- 9
- 10
- 11
- 12
- 13
- 14
- 15
- 16
- 17
- 18
- 19
- 20
- 21
- 22
- 23
- 24
- 25
- 26
- 27
- 28
- 29
- 30
file.conf(与seata-order-service2001模块大致相同)
registry.conf(与seata-order-service2001模块大致相同)
domain
import lombok.AllArgsConstructor; import lombok.Data; import lombok.NoArgsConstructor; import java.math.BigDecimal; @Data @AllArgsConstructor @NoArgsConstructor public class Account { private Long id; /** * 用户id */ private Long userId; /** * 总额度 */ private BigDecimal total; /** * 已用额度 */ private BigDecimal used; /** * 剩余额度 */ private BigDecimal residue; }- 1
- 2
- 3
- 4
- 5
- 6
- 7
- 8
- 9
- 10
- 11
- 12
- 13
- 14
- 15
- 16
- 17
- 18
- 19
- 20
- 21
- 22
- 23
- 24
- 25
- 26
- 27
- 28
- 29
- 30
- 31
- 32
- 33
CommonResult(与seata-order-service2001模块大致相同)
Dao接口及实现
import org.apache.ibatis.annotations.Mapper; import org.apache.ibatis.annotations.Param; import org.springframework.stereotype.Component; import org.springframework.stereotype.Repository; import java.math.BigDecimal; @Mapper public interface AccountDao { /** * 扣减账户余额 */ void decrease(@Param("userId") Long userId, @Param("money") BigDecimal money); }UPDATE t_account SET residue = residue - #{money},used = used + #{money} WHERE user_id = #{userId}; - 1
- 2
- 3
- 4
- 5
- 6
- 7
- 8
- 9
- 10
- 11
- 12
- 13
- 14
- 15
- 16
- 17
- 18
- 19
- 20
- 21
- 22
- 23
- 24
- 25
- 26
- 27
- 28
- 29
- 30
- 31
- 32
- 33
- 34
- 35
- 36
- 37
- 38
- 39
- 40
Service接口及实现
import org.springframework.web.bind.annotation.RequestParam; import org.springframework.web.bind.annotation.ResponseBody; import java.math.BigDecimal; public interface AccountService { /** * 扣减账户余额 * @param userId 用户id * @param money 金额 */ void decrease(@RequestParam("userId") Long userId, @RequestParam("money") BigDecimal money); } import com.atguigu.springcloud.alibaba.dao.AccountDao; import com.atguigu.springcloud.alibaba.service.AccountService ; import org.slf4j.Logger; import org.slf4j.LoggerFactory; import org.springframework.beans.factory.annotation.Autowired; import org.springframework.stereotype.Service; import javax.annotation.Resource; import java.math.BigDecimal; import java.util.concurrent.TimeUnit; /** */ @Service public class AccountServiceImpl implements AccountService { private static final Logger LOGGER = LoggerFactory.getLogger(AccountServiceImpl.class); @Resource AccountDao accountDao; /** * 扣减账户余额 */ @Override public void decrease(Long userId, BigDecimal money) { LOGGER.info("------->account-service中扣减账户余额开始"); accountDao.decrease(userId,money); LOGGER.info("------->account-service中扣减账户余额结束"); } }- 1
- 2
- 3
- 4
- 5
- 6
- 7
- 8
- 9
- 10
- 11
- 12
- 13
- 14
- 15
- 16
- 17
- 18
- 19
- 20
- 21
- 22
- 23
- 24
- 25
- 26
- 27
- 28
- 29
- 30
- 31
- 32
- 33
- 34
- 35
- 36
- 37
- 38
- 39
- 40
- 41
- 42
- 43
- 44
- 45
- 46
- 47
- 48
- 49
Controller
import com.atguigu.springcloud.alibaba.domain.CommonResult ; import com.atguigu.springcloud.alibaba.service.AccountService ; import org.springframework.beans.factory.annotation.Autowired; import org.springframework.web.bind.annotation.PostMapping; import org.springframework.web.bind.annotation.RequestMapping; import org.springframework.web.bind.annotation.RequestParam; import org.springframework.web.bind.annotation.RestController; import javax.annotation.Resource; import java.math.BigDecimal; @RestController public class AccountController { @Resource AccountService accountService; /** * 扣减账户余额 */ @RequestMapping("/account/decrease") public CommonResult decrease(@RequestParam("userId") Long userId, @RequestParam("money") BigDecimal money){ accountService.decrease(userId,money); return new CommonResult(200,"扣减账户余额成功!"); } }- 1
- 2
- 3
- 4
- 5
- 6
- 7
- 8
- 9
- 10
- 11
- 12
- 13
- 14
- 15
- 16
- 17
- 18
- 19
- 20
- 21
- 22
- 23
- 24
- 25
- 26
Config配置(与seata-order-service2001模块大致相同)
主启动(与seata-order-service2001模块大致相同)
147_Seata之@GlobalTransactional验证
下订单 -> 减库存 -> 扣余额 -> 改(订单)状态
数据库初始情况:

正常下单 - http://localhost:2001/order/createuserId=1&productId=1&count=10&money=100
数据库正常下单后状况:

超时异常,没加@GlobalTransactional
模拟AccountServiceImpl添加超时
@Service public class AccountServiceImpl implements AccountService { private static final Logger LOGGER = LoggerFactory.getLogger(AccountServiceImpl.class); @Resource AccountDao accountDao; /** * 扣减账户余额 */ @Override public void decrease(Long userId, BigDecimal money) { LOGGER.info("------->account-service中扣减账户余额开始"); //模拟超时异常,全局事务回滚 //暂停几秒钟线程 try { TimeUnit.SECONDS.sleep(20); } catch (InterruptedException e) { e.printStackTrace(); } accountDao.decrease(userId,money); LOGGER.info("------->account-service中扣减账户余额结束"); } }- 1
- 2
- 3
- 4
- 5
- 6
- 7
- 8
- 9
- 10
- 11
- 12
- 13
- 14
- 15
- 16
- 17
- 18
- 19
- 20
- 21
- 22
另外,OpenFeign的调用默认时间是1s以内,所以最后会抛异常。
数据库情况

故障情况
-
当库存和账户金额扣减后,订单状态并没有设置为已经完成,没有从零改为1
-
而且由于feign的重试机制,账户余额还有可能被多次扣减
超时异常,加了@GlobalTransactional
用@GlobalTransactional标注OrderServiceImpl的create()方法。
@Service @Slf4j public class OrderServiceImpl implements OrderService { ... /** * 创建订单->调用库存服务扣减库存->调用账户服务扣减账户余额->修改订单状态 * 简单说:下订单->扣库存->减余额->改状态 */ @Override //rollbackFor = Exception.class表示对任意异常都进行回滚 @GlobalTransactional(name = "fsp-create-order",rollbackFor = Exception.class) public void create(Order order) { ... } }- 1
- 2
- 3
- 4
- 5
- 6
- 7
- 8
- 9
- 10
- 11
- 12
- 13
- 14
- 15
- 16
- 17
- 18
还是模拟AccountServiceImpl添加超时,下单后数据库数据并没有任何改变,记录都添加不进来,达到出异常,数据库回滚的效果。
148_Seata之原理简介
2019年1月份蚂蚁金服和阿里巴巴共同开源的分布式事务解决方案。
Simple Extensible Autonomous Transaction Architecture,简单可扩展自治事务框架。
2020起始,用1.0以后的版本。Alina Gingertail
分布式事务的执行流程
- TM开启分布式事务(TM向TC注册全局事务记录) ;
- 按业务场景,编排数据库、服务等事务内资源(RM向TC汇报资源准备状态) ;
- TM结束分布式事务,事务一阶段结束(TM通知TC提交/回滚分布式事务) ;
- TC汇总事务信息,决定分布式事务是提交还是回滚;
- TC通知所有RM提交/回滚资源,事务二阶段结束。
AT模式如何做到对业务的无侵入
- 是什么
前提
- 基于支持本地 ACID 事务的关系型数据库。
- Java 应用,通过 JDBC 访问数据库。
整体机制
两阶段提交协议的演变:
- 一阶段:业务数据和回滚日志记录在同一个本地事务中提交,释放本地锁和连接资源。
- 二阶段:
- 提交异步化,非常快速地完成。
- 回滚通过一阶段的回滚日志进行反向补偿。
- 一阶段加载
在一阶段,Seata会拦截“业务SQL”
-
解析SQL语义,找到“业务SQL" 要更新的业务数据,在业务数据被更新前,将其保存成"before image”
-
执行“业务SQL" 更新业务数据,在业务数据更新之后,
-
其保存成"after image”,最后生成行锁。
以上操作全部在一个数据库事务内完成, 这样保证了一阶段操作的原子性。

- 二阶段提交
二阶段如果顺利提交的话,因为"业务SQL"在一阶段已经提交至数据库,所以Seata框架只需将一阶段保存的快照数据和行锁删掉,完成数据清理即可。
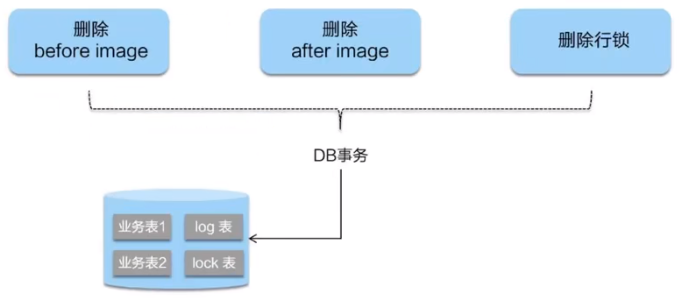
- 二阶段回滚
二阶段如果是回滚的话,Seata 就需要回滚一阶段已经执行的 “业务SQL",还原业务数据。
回滚方式便是用"before image"还原业务数据;但在还原前要首先要校验脏写,对比“数据库当前业务数据”和"after image"。
如果两份数据完全一致就说明没有脏写, 可以还原业务数据,如果不一致就说明有脏写, 出现脏写就需要转人工处理。
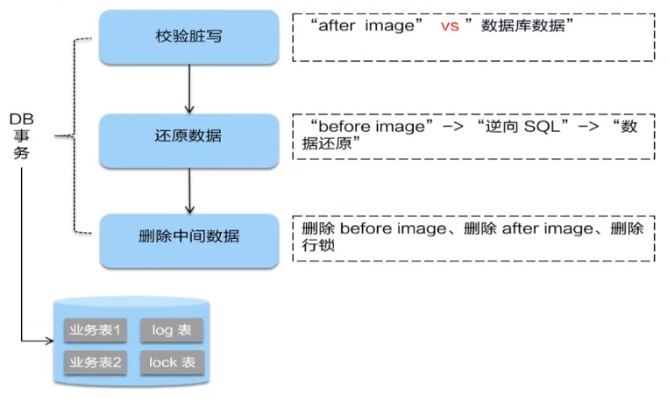
补充

149_大厂面试第三季预告片之雪花算法(上)
为什么需要分布式全局唯一ID以及分布式ID的业务需求?集群高并发情况下如何保证分布式唯一全局Id生成?
在复杂分布式系统中,往往需婴对大量的数据和消息进行唯一标识,如在美团点评的金融、支付、餐饮、酒店,猫眼电影等产品的系统中数据日渐增长,对数据分库分表后需要有一个唯一ID来标识一条数据或消息。特别一点的如订单、骑手、优惠券也都雷要有唯一ID做标识。此时一个能够生成全局唯一ID的系统是非常必要的。
ID生成规则部分硬性要求
-
全局唯一:不能出现重复的ID号,既然是唯一-标识,这是最基本的要求
-
趋势递增:在MySQL的InnoDB引擎中使用的是聚集索引,由于多数RDBMS使用Btree的数据结构来存储索引数据,在主键的选择上面我们应该尽量使用有序的主键保证写入性能。
-
单调递增:保证下一个ID一定大于上一个ID,例如事务版本号、IM增量消息、排序等特殊需求
-
信息安全:如果ID是连续的,恶意用户的扒取工作就非常容易做了,直接按照顺序下载指定URL即可。如果是订单号就更危险了,竞对可以直接知道我们一天的单量。所以在一些应用场景下,需要ID无规则不规则,让竞争对手否好猜。
-
含时间戳:这样就能够在开发中快速了解这个分布式id的生成时间。
ID号生成系统的可用性要求
-
高可用:发一个获取分布式ID的请求,服务器就要保证99.999%的情况下给我创建一个唯一分布式ID。
-
低延迟:发一个获取分布式ID的请求,服务器就要快,极速。
-
高QPS:假如并发一口气10万个创建分布式ID请求同时杀过来,服务器要顶的住且一下子成功创建10万个分布式ID。
一般通用方案
UUID
UUID(Universally Unique ldentifer)的标准型式包含32个16进制数字,以连了号分为五段,形式为8-4-4-4-12的36个字符, 示例:550e8400-e29b-41d4-a716-446655440000
性能非常高:本地生成,没有网络消耗
如果只是考虑唯一性,那就选用它吧
但是,入数据库性能差
为什么无序的UUID会导致入库性能变差呢?
-
无序,无法预测他的生成顺序,不能生成递增有序的数字。首先分布式ID一般都会作为主键, 但是安装MySQL官方推荐主键要尽量越短越好,UUID每一个都很长,所以不是很推荐。
-
主键,ID作为主键时在特定的环境会存在一些问题。比如做DB主键的场景下,UUID就非常不适用MySQL官方有明确的建议主键要尽量越短越好36个字符长度的UUID不符合要求。
-
索引,既然分布式ID是主键,然后主键是包含索引的,然后MySQL的索引是通过B+树来实现的,每一次新的UUID数据的插入,为了查询的优化,都会对索引底层的B+树进行修改,因为UUID数据是无序的,所以每一次UUID数据的插入都会对主键地械的B+树进行很大的修改,这一点很不好。 插入完全无序,不但会导致一-些中间节点产生分裂,也会白白创造出很多不饱和的节点,这样大大降低了数据库插入的性能。
All indexes other than the clustered index are known as secondary indexes. In
InnoDB, each record in a secondary index contains the primary key columns for the row, as well as the columns specified for the secondary index.InnoDBuses this primary key value to search for the row in the clustered index.If the primary key is long, the secondary indexes use more space, so it is advantageous to have a short primary key.
数据库自增主键
单机
在单机里面,数据库的自增ID机制的主要原理是:数据库自增ID和MySQL数据库的replace into实现的。
REPLACE INTO的含义是插入一条记录,如果表中唯一索引的值遇到冲突,则替换老数据。
这里的replace into跟inset功能类似,不同点在于:replace into首先尝试插入数据列表中,如果发现表中已经有此行数据(根据主键或唯一索引判断)则先删除,再插入。否则直接插入新数据。
CREATE TABLE t_test( id BIGINT(20) UNSIGNED NOT NULL AUTO_INCREMENT PRIMARY KEY, stub CHAR(1) NOT NULL DEFAULT '', UNIQUE KEY stub(stub) ) SELECT * FROMt_ test; REPLACE INTO t_test (stub) VALUES('b'); SELECT LAST_INSERT_ID();- 1
- 2
- 3
- 4
- 5
- 6
- 7
- 8
- 9
- 10
- 11
集群分布式
那数据库自增ID机制适合作分布式ID吗?答案是不太适合
1:系统水平扩展比较困难,比如定义好了步长和机器台数之后,如果要添加机器该怎么做?假设现在只有一台机器发号是1,2,3,4,5(步长是1),这
个时候需要扩容机器一台。可以这样做:把第二台机器的初始值设置得比第一台超过很多,貌似还好,现在想象一下如果我们线上有100台机器,这
个时候要扩容该怎么做?简直是噩梦,所以系统水平扩展方案复杂难以实现。2:数据库压力还是很大,每次获取ID都得读写一次数据库, 非常影响性能,不符合分布式ID里面的延迟低和要高QPS的规则(在高并发下,如果都去数据库里面获取id,那是非常影响性能的)
基于Redis生成全局ID策略
因为Redis是单线的天生保证原子性,可以使用原子操作INCR和INCRBY来实现
注意:在Redis集群情况下,同样和MySQL一样需要设置不同的增长步长,同时key一定要设置有效期可以使用Redis集群来获取更高的吞吐量。
假如一个集群中有5台Redis。可以初始化每台Redis的值分别是1,2,3,4,5,然后步长都是5。
各个Redis生成的ID为:
A:1, 6, 11, 16, 21
B:2, 7 , 12, 17, 22
C:3, 8, 13, 18, 23
D:4, 9, 14, 19, 24
E:5, 10, 15, 20, 25150_大厂面试第三季预告片之雪花算法(下)
Twitter的分布式自增ID算法snowflake
概述
Twitter的snowflake解决了这种需求,最初Twitter把存储系统从MySQL迁移到Cassandra(由Facebook开发一套开源分布式NoSQL数据库系统)。因为Cassandra没有顺序ID生成机制,所以开发了这样一套全局唯一生成服务。
Twitter的分布式雪花算法SnowFlake ,经测试snowflake 每秒能够产生26万个自增可排序的ID
- Twitter的SnowFlake生成ID能够按照时间有序生成。
- SnowFlake算法生成ID的结果是一个64bit大小的整数, 为一个Long型(转换成字符串后长度最多19)。
- 分布式系统内不会产生ID碰撞(由datacenter和workerld作区分)并且效率较高。
分布式系统中,有一些需要使用全局唯一ID的场景, 生成ID的基本要求:
- 在分布式的环境下必须全局且唯一 。
- 一般都需要单调递增,因为一般唯一ID都会存到数据库,而Innodb的特性就是将内容存储在主键索引树上的叶子节点而且是从左往右,递增的,所以考
虑到数据库性能,一般生成的ID也最好是单调递增。 为了防止ID冲突可以使用36位的UUID,但是UUID有一些缺点, 首先他相对比较长, 另外UUID一般是无序的。 - 可能还会需要无规则,因为如果使用唯一ID作为订单号这种,为了不然别人知道一天的订单量是多少,就需要这个规则。
结构
雪花算法的几个核心组成部分:

号段解析:
1bit:
不用,因为二进制中最高位是符号位,1表示负数,0表示正数。生成的id一般都是用整数,所以最高位固定为0。
41bit - 时间戳,用来记录时间戳,毫秒级:
- 41位可以表示 2 41 1 2^{41}-1 2411个数字。
- 如果只用来表示正整数(计算机中正数包含0),可以表示的数值范围是:0至 2 41 1 2^{41}-1 2411, 减1是因为可表示的数值范围是从0开始算的,而不是1。
- 也就是说41位可以表示 2 41 1 2^{41}-1 2411个毫秒的值,转化成单位年则是 ( 2 41 1 ) / ( 1000 60 60 24 365 ) = 69 (2^{41}-1)/ (1000 * 60 * 60 * 24 *365) = 69 (2411)/(1000606024365)=69年。
10bit - 工作机器ID,用来记录工作机器ID:
-
可以部署在 2 10 = 1024 2^{10}= 1024 210=1024个节点,包括5位DataCenterId和5位Workerld。
-
5位(bit) 可以表示的最大正整数是 2 5 1 = 31 2^{5}-1=31 251=31,即可以用0、1、2、3、…31这32个数字,来表示不同的DataCenterld或Workerld。
12bit - 序列号,用来记录同毫秒内产生的不同id。
- 12位(bit) 可以表示的最大正整数是 2 12 1 = 4095 2^{12} - 1 = 4095 2121=4095, 即可以用0、1、2、 3、…4094这4095个数字,来表示同一机器同一时间截(毫秒)内产生的4095个ID序号。
SnowFlake可以保证:
- 所有生成的ID按时间趋势递增。
- 整个分布式系统内不会产生重复id(因为有DataCenterId和Workerld来做区分)
源码
以下代码仅供学习:
/** * Twitter_Snowflake * SnowFlake的结构如下(每部分用-分开): * 0 - 0000000000 0000000000 0000000000 0000000000 0 - 00000 - 00000 - 000000000000 * 1位标识,由于long基本类型在Java中是带符号的,最高位是符号位,正数是0,负数是1,所以id一般是正数,最高位是0 * 41位时间戳(毫秒级),注意,41位时间戳不是存储当前时间的时间戳,而是存储时间戳的差值(当前时间戳 - 开始时间戳) * 得到的值),这里的的开始时间戳,一般是我们的id生成器开始使用的时间,由我们程序来指定的(如下面程序SnowflakeIdWorker类的startTime属性)。41位的时间戳,可以使用69年,年T = (1L << 41) / (1000L * 60 * 60 * 24 * 365) = 69 * 10位的数据机器位,可以部署在1024个节点,包括5位datacenterId和5位workerId * 12位序列,毫秒内的计数,12位的计数顺序号支持每个节点每毫秒(同一机器,同一时间戳)产生4096个ID序号 * 加起来刚好64位,为一个Long型。 */ public class SnowflakeIdWorker { /** 开始时间戳 (2015-01-01) */ private final long twepoch = 1420041600000L; /** 机器id所占的位数 */ private final long workerIdBits = 5L; /** 数据标识id所占的位数 */ private final long datacenterIdBits = 5L; /** 支持的最大机器id,结果是31 (这个移位算法可以很快的计算出几位二进制数所能表示的最大十进制数) */ private final long maxWorkerId = -1L ^ (-1L << workerIdBits); /** 支持的最大数据标识id,结果是31 */ private final long maxDatacenterId = -1L ^ (-1L << datacenterIdBits); /** 序列在id中占的位数 */ private final long sequenceBits = 12L; /** 机器ID向左移12位 */ private final long workerIdShift = sequenceBits; /** 数据标识id向左移17位(12+5) */ private final long datacenterIdShift = sequenceBits + workerIdBits; /** 时间戳向左移22位(5+5+12) */ private final long timestampLeftShift = sequenceBits + workerIdBits + datacenterIdBits; /** 生成序列的掩码,这里为4095 (0b111111111111=0xfff=4095) */ private final long sequenceMask = -1L ^ (-1L << sequenceBits); /** 工作机器ID(0~31) */ private long workerId; /** 数据中心ID(0~31) */ private long datacenterId; /** 毫秒内序列(0~4095) */ private long sequence = 0L; /** 上次生成ID的时间戳 */ private long lastTimestamp = -1L; //==============================Constructors===================================== /** * 构造函数 * @param workerId 工作ID (0~31) * @param datacenterId 数据中心ID (0~31) */ public SnowflakeIdWorker(long workerId, long datacenterId) { if (workerId > maxWorkerId || workerId < 0) { throw new IllegalArgumentException(String.format("worker Id can't be greater than %d or less than 0", maxWorkerId)); } if (datacenterId > maxDatacenterId || datacenterId < 0) { throw new IllegalArgumentException(String.format("datacenter Id can't be greater than %d or less than 0", maxDatacenterId)); } this.workerId = workerId; this.datacenterId = datacenterId; } // ==============================Methods========================================== /** * 获得下一个ID (该方法是线程安全的) * @return SnowflakeId */ public synchronized long nextId() { long timestamp = timeGen(); //如果当前时间小于上一次ID生成的时间戳,说明系统时钟回退过这个时候应当抛出异常 if (timestamp < lastTimestamp) { throw new RuntimeException( String.format("Clock moved backwards. Refusing to generate id for %d milliseconds", lastTimestamp - timestamp)); } //如果是同一时间生成的,则进行毫秒内序列 if (lastTimestamp == timestamp) { sequence = (sequence + 1) & sequenceMask; //毫秒内序列溢出 if (sequence == 0) { //阻塞到下一个毫秒,获得新的时间戳 timestamp = tilNextMillis(lastTimestamp); } } //时间戳改变,毫秒内序列重置 else { sequence = 0L; } //上次生成ID的时间戳 lastTimestamp = timestamp; //移位并通过或运算拼到一起组成64位的ID return ((timestamp - twepoch) << timestampLeftShift) // | (datacenterId << datacenterIdShift) // | (workerId << workerIdShift) // | sequence; } /** * 阻塞到下一个毫秒,直到获得新的时间戳 * @param lastTimestamp 上次生成ID的时间戳 * @return 当前时间戳 */ protected long tilNextMillis(long lastTimestamp) { long timestamp = timeGen(); while (timestamp <= lastTimestamp) { timestamp = timeGen(); } return timestamp; } /** * 返回以毫秒为单位的当前时间 * @return 当前时间(毫秒) */ protected long timeGen() { return System.currentTimeMillis(); } /** 测试 */ public static void main(String[] args) { System.out.println("开始:"+System.currentTimeMillis()); SnowflakeIdWorker idWorker = new SnowflakeIdWorker(0, 0); for (int i = 0; i < 50; i++) { long id = idWorker.nextId(); System.out.println(id); // System.out.println(Long.toBinaryString(id)); } System.out.println("结束:"+System.currentTimeMillis()); } }- 1
- 2
- 3
- 4
- 5
- 6
- 7
- 8
- 9
- 10
- 11
- 12
- 13
- 14
- 15
- 16
- 17
- 18
- 19
- 20
- 21
- 22
- 23
- 24
- 25
- 26
- 27
- 28
- 29
- 30
- 31
- 32
- 33
- 34
- 35
- 36
- 37
- 38
- 39
- 40
- 41
- 42
- 43
- 44
- 45
- 46
- 47
- 48
- 49
- 50
- 51
- 52
- 53
- 54
- 55
- 56
- 57
- 58
- 59
- 60
- 61
- 62
- 63
- 64
- 65
- 66
- 67
- 68
- 69
- 70
- 71
- 72
- 73
- 74
- 75
- 76
- 77
- 78
- 79
- 80
- 81
- 82
- 83
- 84
- 85
- 86
- 87
- 88
- 89
- 90
- 91
- 92
- 93
- 94
- 95
- 96
- 97
- 98
- 99
- 100
- 101
- 102
- 103
- 104
- 105
- 106
- 107
- 108
- 109
- 110
- 111
- 112
- 113
- 114
- 115
- 116
- 117
- 118
- 119
- 120
- 121
- 122
- 123
- 124
- 125
- 126
- 127
- 128
- 129
- 130
- 131
- 132
- 133
- 134
- 135
- 136
- 137
- 138
- 139
- 140
- 141
- 142
工程落地经验
添加依赖
cn.hutool hutool-captcha 4.6.8 - 1
- 2
- 3
- 4
- 5
示例程序:
import cn.hutool.core.lang.Snowflake; import cn.hutool.core.net.NetUtil; import cn.hutool.core.util.IdUtil; import lombok.extern.slf4j.Slf4j; import org.springframework.stereotype.Component; import javax.annotation.PostConstruct; @Slf4j @Component public class IdGeneratorSnowflake{ private long workerId = 0; private long datacenterId = 1; private Snowflake snowflake = IdUtil.createSnowflake(workerId, datacenterId); public synchronized long snowflakeId(){ return snowflake.nextId(); } public synchronized long snowflakeId(long workerId, long datacenterId){ Snowflake snowflake = IdUtil.createSnowflake(workerId, datacenterId); return snowflake.nextId(); } public static void main(String[] args){ IdGeneratorSnowflake idGenerator = new IdGeneratorSnowflake(); System.out.println(idGenerator.snowflakeId()); ExecutorService threadPool = Executors.newFixedThreadPool(5); for (int i = 1; i <= 20; i++){ threadPool.submit(() -> { System.out.print1n(idGenerator.snowflakeId()); }); } threadPool.shutdown(); } }- 1
- 2
- 3
- 4
- 5
- 6
- 7
- 8
- 9
- 10
- 11
- 12
- 13
- 14
- 15
- 16
- 17
- 18
- 19
- 20
- 21
- 22
- 23
- 24
- 25
- 26
- 27
- 28
- 29
- 30
- 31
- 32
- 33
- 34
- 35
- 36
- 37
- 38
- 39
优缺点
优点:
毫秒数在高位,自增序列在低位,整个ID都是趋势递增的。
不依赖数据库等第三方系统,以服务的方式部署,稳定性更高,生成ID的性能也是非常高的。
可以根据自身业务特性分配bit位,非常灵活。
缺点:
依赖机器时钟,如果机器时钟回拨,会导致重复ID生成。
在单机上是递增的,但是由于设计到分布式环境,每台机器上的时钟不可能完全同步,有时候会出现不是全局递增的情况。
(此缺点可以认为无所谓,一般分布式ID只要求趋势递增,并不会严格要求递增,90%的需求都只要求趋势递增)
其他补充
百度开源的分布式唯一ID生成器UidGenerator
美团点评分布式ID生成系统Leaf
Spring Cloud组件总结
组件
简介
分类
官网
笔记
备注
Eureka
Eureka is the Netflix Service Discovery Server and Client.
服务注册中心
eureka中文解释:int.(因找到某物,尤指问题的答案而高兴)我发现了,我找到了
Zookeeper
ZooKeeper is a centralized service for maintaining configuration information, naming, providing distributed synchronization, and providing group services.
服务注册中心
zookeeper中文解释:n.动物园管理员
Consul
Consul is a service mesh solution providing a full featured control plane with service discovery, configuration, and segmentation functionality.
服务注册中心
consul中文解释:n.领事
Ribbon
Ribbon is a client-side load balancer that gives you a lot of control over the behavior of HTTP and TCP clients.
服务调用
ribbon中文解释:n.(用于捆绑或装饰的)带子;丝带;带状物;
OpenFeign
Feign is a declarative web service client. It makes writing web service clients easier.
服务调用
feign中文意思:v.假装,装作,佯装(有某种感觉或生病、疲倦等)
Hystrix
Netflix has created a library called Hystrix that implements the circuit breaker pattern.
服务降级
hystrix中文意思:n.豪猪属;猬草属;豪猪;豪猪亚属
GateWay
Spring Cloud Gateway aims to provide a simple, yet effective way to route to APIs and provide cross cutting concerns to them such as: security, monitoring/metrics, and resiliency.
服务网关
gateway中文意思:n.网关;途径;门道;手段
Config
Spring Cloud Config provides server-side and client-side support for externalized configuration in a distributed system.
服务配置
-
Bus
Spring Cloud Bus links nodes of a distributed system with a lightweight message broker.
服务总线
-
Stream
Spring Cloud Stream is a framework for building message-driven microservice applications.
消息队列
-
Sleuth
Spring Cloud Sleuth implements a distributed tracing solution for Spring Cloud.
服务跟踪
sleuth中文意思:n.侦探
Nacos
Nacos致力于帮助您发现、配置和管理微服务。
服务注册中心、服务配置、服务总线
NAme + COnfiguration + Service
Sentinel
Sentinel是面向分布式服务架构的流量控制组件,主要以流量为切入点,从流量控制、熔断降级、系统自适应保护等多个维度来帮助您保障微服务的稳定性。
服务降级
sentinel中文意思:n.哨兵
Seata
Seata 是一款开源的分布式事务解决方案,致力于在微服务架构下提供高性能和简单易用的分布式事务服务。
分布式事务
-
先自我介绍一下,小编13年上师交大毕业,曾经在小公司待过,去过华为OPPO等大厂,18年进入阿里,直到现在。深知大多数初中级java工程师,想要升技能,往往是需要自己摸索成长或是报班学习,但对于培训机构动则近万元的学费,着实压力不小。自己不成体系的自学效率很低又漫长,而且容易碰到天花板技术停止不前。因此我收集了一份《java开发全套学习资料》送给大家,初衷也很简单,就是希望帮助到想自学又不知道该从何学起的朋友,同时减轻大家的负担。添加下方名片,即可获取全套学习资料哦
-
-
相关阅读:
6--OpenCV:基础交互
易周金融分析 | 易观千帆发布7月城商行农商行APP盘点;养老理财产品跨行代销布局提速
ClickHouse安装完整使用 第二章
Redis6.0新特性、剖析线程模型(单线程和多线程)
Windows软件:如何安装Rabbitmq,并开启Web管理端
【Spring Boot系列】快速上手 Spring Boot
安装及管理docker
【go-libp2p学习笔记】使用go-libp2p搭建中转服务器(circuit relay server)
OC5860降压芯片,MPS2459脚位一样,节省肖特基规格书
pem文件类解析
- 原文地址:https://blog.csdn.net/emgexgb_sef/article/details/126114138
