-
OpenCV图像处理基础操作
目录
3.1 高斯模糊 [就好像 近视眼的人没有戴眼镜看事物的情境---轻度近视]
3.2 XY轴模糊 [就好像 近视眼的人没有戴眼镜看事物的情境---重度近视]
一:读取显示图片操作
读取图片的路径选择,这里注意点是window下 \ 但是在ubuntu下是 / 在编写代码的时候需要修正

读取图片代码:
- #include
- #include
- using namespace std;
- using namespace cv;
- int main(int argc, char *argv[])
- {
- Mat img = imread("D:/000imageopencv/333.jpg");//图片路径
- imshow("img",img);//显示图片
- waitKey(0);//等待按键
- return 0;
- }
结果:

对图片可以滚轮放大查看RGB数值,不难看出,越是深色RGB数值越是接近0,越是浅色RGB数值越是接近255


查看分辨率 499 X 355,同时将鼠标移动至图片边缘处(看到 x=498,y=334 博主已经很尽力移到边缘啦,如果不信,你们自己操作一下,哈哈),由此可以知道图片就是由一个又一个的像素点构成的。


二:图像处理 像素点操作
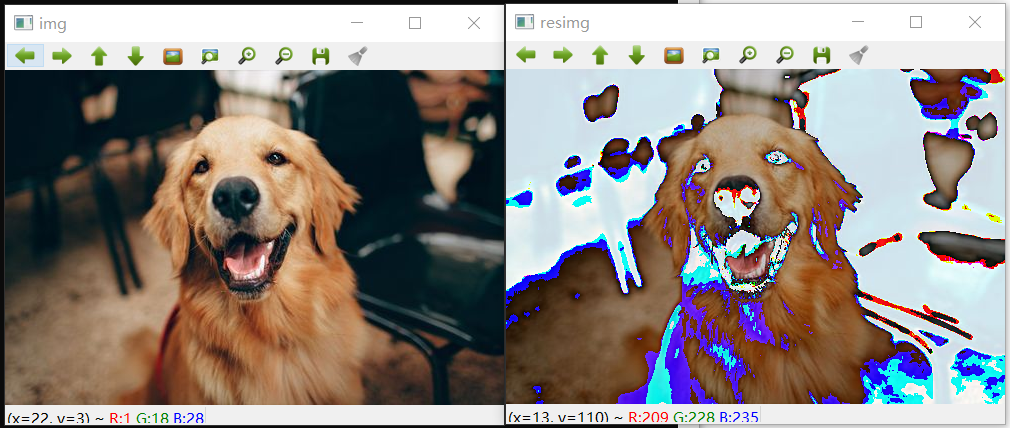
2.1 雪花屏特效

相关代码如下:
- #include
- #include
- using namespace std;
- using namespace cv;
- Mat imageprocess(Mat &img)
- {
- int row = img.rows;
- int col = img.cols * img.channels();
- for(int i=0;i{uchar * data = img.ptr
(i); for(int j=0;j{//雪花屏特效int q = rand()%col;data[q]=155;//某些通道随机改成155}}return img;}int main(int argc, char *argv[]){Mat img = imread("D:/000imageopencv/333.jpg");//图片路径imshow("img",img);//显示图片Mat resimg = imageprocess(img);imshow("resimg",resimg);//显示接收图片waitKey(0);//等待按键return 0;}2.2 色彩反转
相关代码如下:
- Mat imageprocess(Mat &img)
- {
- int row = img.rows;
- int col = img.cols * img.channels();
- for(int i=0;i{uchar * data = img.ptr
(i); for(int j=0;j{//色彩反转data[j] = data[j] - 50;}}return img;}2.3 暗色处理

相关代码如下:
- Mat imageprocess(Mat &img)
- {
- int row = img.rows;
- int col = img.cols * img.channels();
- for(int i=0;i{uchar * data = img.ptr
(i); for(int j=0;j{//暗色处理data[j] = data[j]/2;}}return img;}2.4 毛玻璃特效

相关代码如下:
- #include
- #include
- using namespace std;
- using namespace cv;
- //毛玻璃特效
- Mat imageGalss(Mat &img)
- {
- RNG rng;
- int random = 0;
- int num = 5;
- for(int i=0;i
-5;i++) - {
- for(int j=0;j
-5;j++) - {
- random = rng.uniform(0,num);
- img.at
(i,j)[0] = img.at (i+random,j+random)[0]; - img.at
(i,j)[1] = img.at (i+random,j+random)[1]; - img.at
(i,j)[2] = img.at (i+random,j+random)[2]; - }
- }
- return img;
- }
- int main(int argc, char *argv[])
- {
- Mat img = imread("D:/000imageopencv/333.jpg");//图片路径
- imshow("img",img);//显示图片
- Mat resimg = imageGalss(img);
- imshow("resimg",resimg);//显示接收图片
- waitKey(0);//等待按键
- return 0;
- }
三:图像处理 调用OpenCV库 封装函数
3.1 高斯模糊 [就好像 近视眼的人没有戴眼镜看事物的情境---轻度近视]

相关代码如下:
- #include
- #include
- using namespace std;
- using namespace cv;
- int main(int argc, char *argv[])
- {
- Mat img = imread("D:/000imageopencv/333.jpg");//图片路径
- imshow("img",img);//显示图片
- Mat resimg;
- //高斯模糊
- cv::GaussianBlur(img,resimg,Size(5,5),0);
- imshow("resimg",resimg);//显示接收图片
- waitKey(0);//等待按键
- return 0;
- }
3.2 XY轴模糊 [就好像 近视眼的人没有戴眼镜看事物的情境---重度近视]

相关代码如下:
- #include
- #include
- using namespace std;
- using namespace cv;
- int main(int argc, char *argv[])
- {
- Mat img = imread("D:/000imageopencv/333.jpg");//图片路径
- imshow("img",img);//显示图片
- Mat resimg;
- //XY轴模糊
- cv::blur(img,resimg,Size(10,10));
- imshow("resimg",resimg);//显示接收图片
- waitKey(0);//等待按键
- return 0;
- }
3.3 灰度化处理

相关代码如下:
- #include
- #include
- using namespace std;
- using namespace cv;
- int main(int argc, char *argv[])
- {
- Mat img = imread("D:/000imageopencv/333.jpg");//图片路径
- imshow("img",img);//显示图片
- Mat resimg;
- //灰度处理
- cvtColor(img,resimg,CV_BGR2GRAY);
- imshow("resimg",resimg);//显示接收图片
- waitKey(0);//等待按键
- return 0;
- }
3.4 中值滤波 视觉上就感觉像是油画

相关代码如下:
- #include
- #include
- using namespace std;
- using namespace cv;
- int main(int argc, char *argv[])
- {
- Mat img = imread("D:/000imageopencv/333.jpg");//图片路径
- imshow("img",img);//显示图片
- Mat resimg;
- //中值滤波
- cv::medianBlur(img,resimg,5);
- imshow("resimg",resimg);//显示接收图片
- waitKey(0);//等待按键
- return 0;
- }
四:OpenCV 视频操作
4.1 播放视频:那些年,我们一起追的女孩


- #include
- #include
- using namespace std;
- using namespace cv;
- int main(int argc, char *argv[])
- {
- Mat frame;
- VideoCapture cap("D:/000000000000000ffmpeg/那些年,我们一起追的女孩.mp4");
- while (cap.read(frame))
- {
- imshow("frame",frame);
- waitKey(50);
- }
- return 0;
- }
4.2 使用本机摄像头
这边博主就不露脸了哈!

- #include
- #include
- using namespace std;
- using namespace cv;
- int main(int argc, char *argv[])
- {
- Mat frame;
- VideoCapture cap(0);
- while (cap.read(frame))
- {
- imshow("frame",frame);
- waitKey(50);
- }
- return 0;
- }

-
相关阅读:
【Kotlin 协程】协程底层实现 ② ( 协程调度器 | 协程任务泄漏 | 结构化并发 )
每天5分钟复习OpenStack(八)存储虚拟化
Qt之图片缩放并解决失真问题
Vant UI的Sidebar侧边导航组件单独设置滚动条
Nmap网络扫描
神经网络建模的基本思想,神经网络建模数据分析
第十章《日期与时间》第5节:Period与Duration
10、学习MySQL LIKE 子句
边端融合系统安全风险分析及评估方法
DevOps|研发效能治理:进化史、规模化与治理复杂性
- 原文地址:https://blog.csdn.net/m0_56051805/article/details/126044827
