-
Android studio连接MySQL并完成简单的登录注册功能
近期需要完成一个Android项目,那先从与数据库交互最简单的登陆注册开始吧,现记录过程如下:
此篇文章的小demo主要涉及数据库的连接,以及相应信息的查找与插入。
我已将源码上传至GitHub:
https://github.com/changyan-maker/LoginApp
首先展示一下完成效果。
数据库设计:

数据库内容:

登录结果展示:


此处默认您已经安装好Android studio 与MySQL软件。
首先需要创建一个空项目,关于空的项目如何创建,请参考我本篇文章:
https://blog.csdn.net/changyana/article/details/122948513
接下来需要连接MySQL,首先需要开启网络权限。需要添加一句话,具体位置如图:(将项目切换成Android模式比较好找)

之后是导入Mysql-connection的jar包
关于这个jar包需要我们去官网下载:https://downloads.mysql.com/archives/c-j/

关于版本的选择个人建议选择老一点的,比较稳定。选择ZIP格式进行下载。
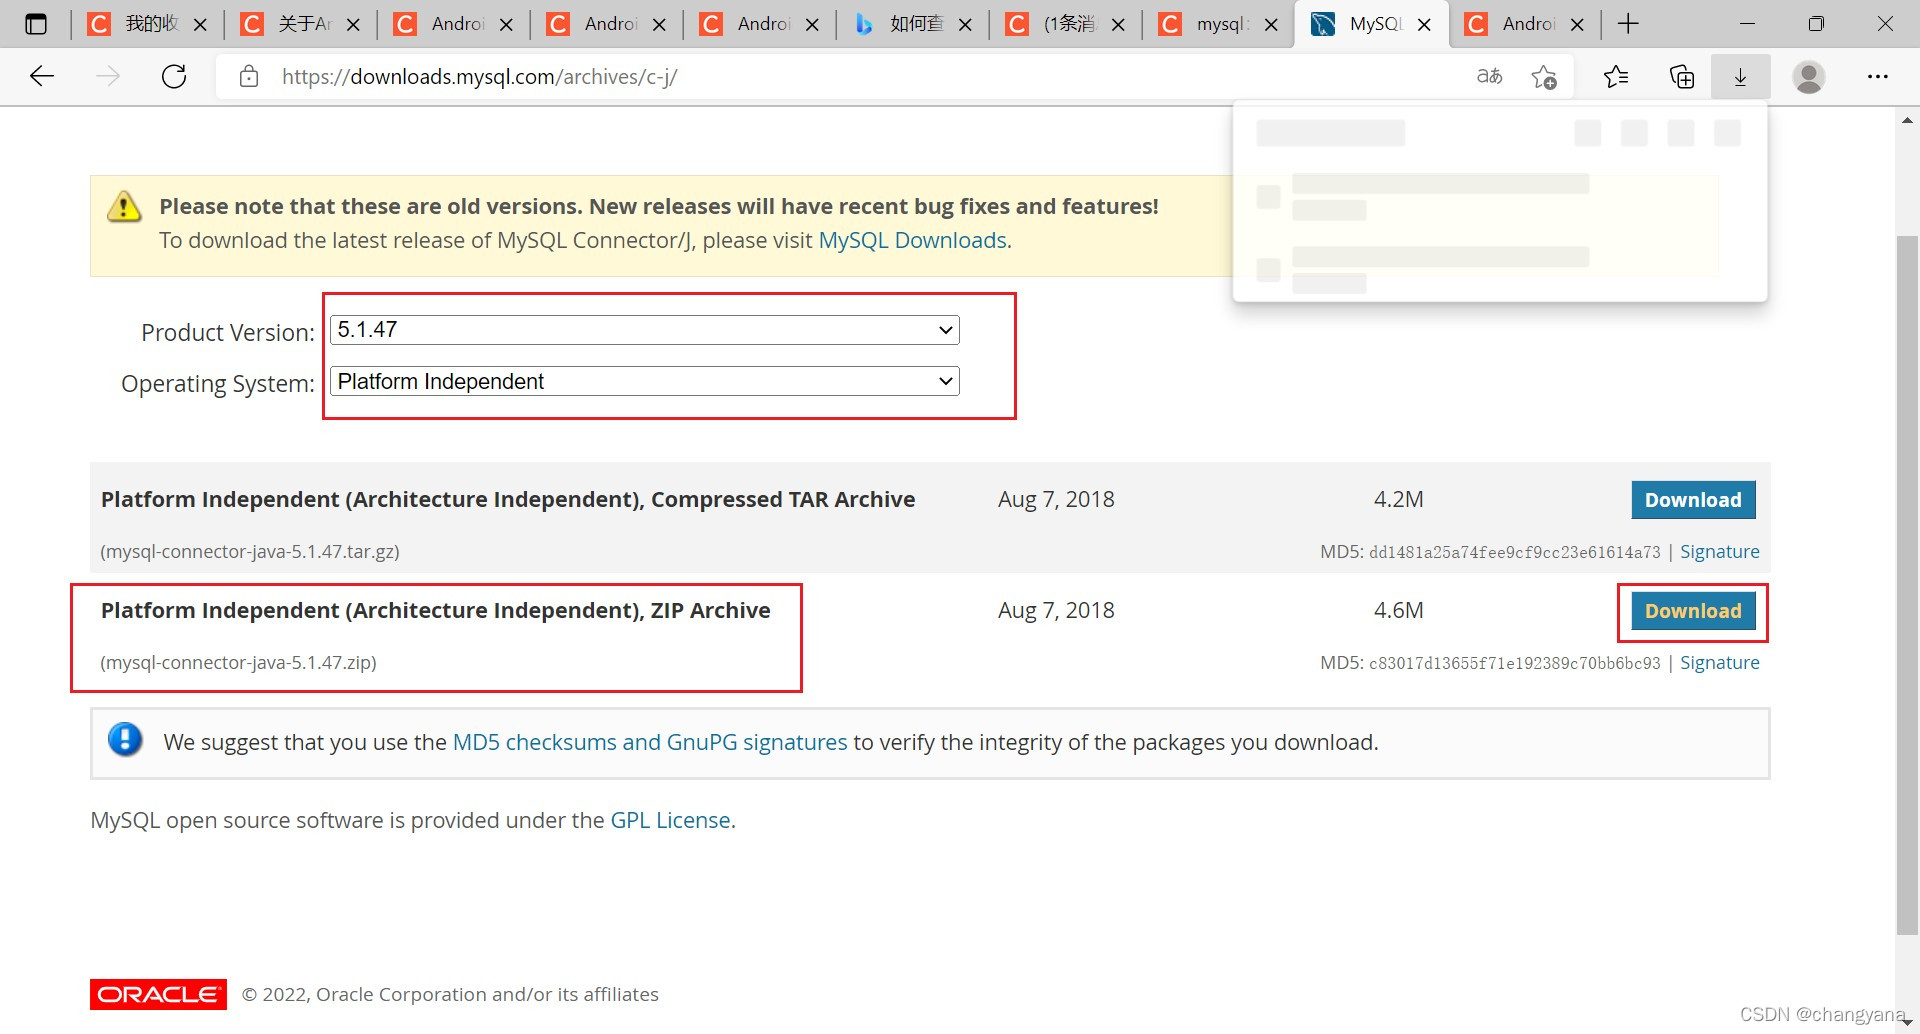
下载完成后在里边找到mysql-connector-java-5.1.47-bin.jar并复制到粘贴板。

然后将Android studio的项目页面切换到Project模式,找到如下文件的位置进行粘贴。

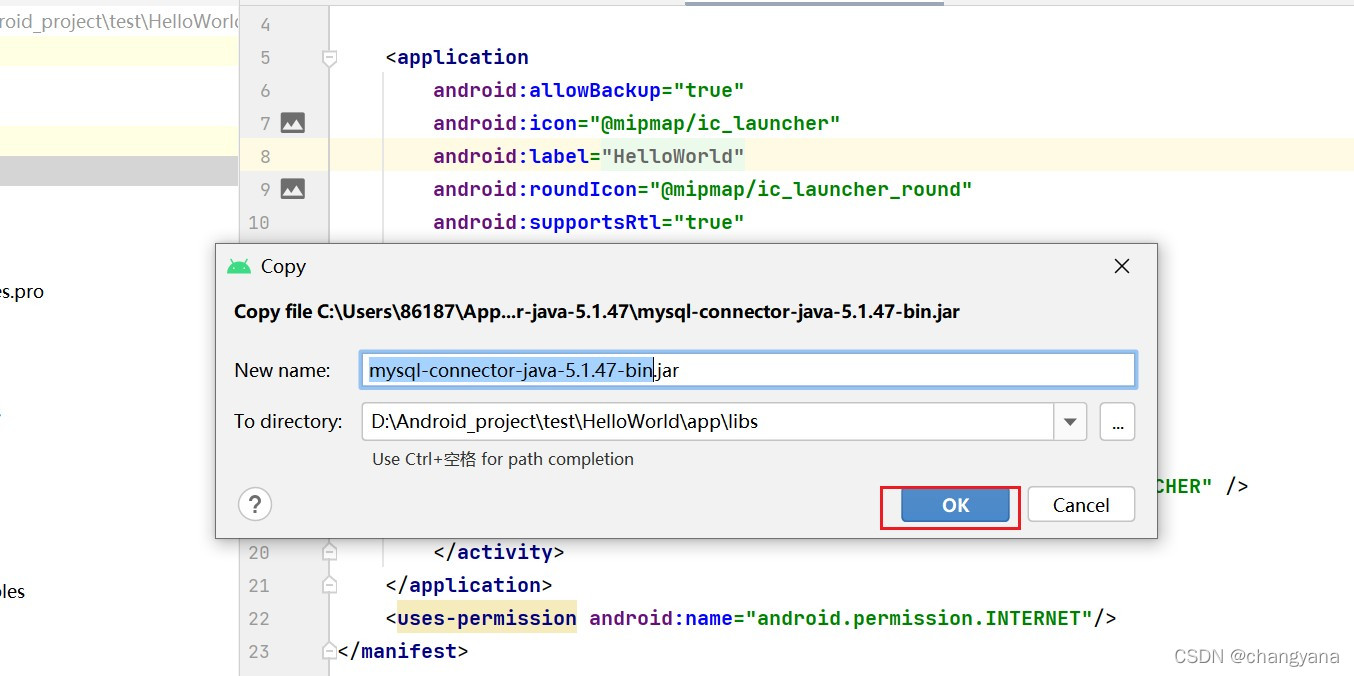
粘贴完成后需要把刚才导入的jar包右击Add as Library


然后切换回Android视图,操作如下,新建一个package


然后粘贴代码如下:

本篇文章从图片可以看到我的项目名称为HelloWorld,这个项目只是我用来做测试的。但是代码是我完善后放在另一个项目为party中的,所有的位置都是一样的,只是项目名称不一样,这个不用担心。你只需要把我的代码里的包名改成你项目的名称就好了。
注意数据库的连接:要连接的数据库,还有用户名和密码都要和自己的Mysql对应。package com.example.party.utils; import java.sql.Connection; import java.sql.DriverManager; /** * function: 数据库工具类,连接数据库用 */ public class JDBCUtils { private static final String TAG = "mysql-party-JDBCUtils"; private static String driver = "com.mysql.jdbc.Driver";// MySql驱动 private static String dbName = "party";// 数据库名称 private static String user = "root";// 用户名 private static String password = "";// 密码 public static Connection getConn(){ Connection connection = null; try{ Class.forName(driver);// 动态加载类 String ip = "10.0.2.2";// 写成本机地址,不能写成localhost,同时手机和电脑连接的网络必须是同一个 // 尝试建立到给定数据库URL的连接 connection = DriverManager.getConnection("jdbc:mysql://" + ip + ":3306/" + dbName, user, password); }catch (Exception e){ e.printStackTrace(); } return connection; } }- 1
- 2
- 3
- 4
- 5
- 6
- 7
- 8
- 9
- 10
- 11
- 12
- 13
- 14
- 15
- 16
- 17
- 18
- 19
- 20
- 21
- 22
- 23
- 24
- 25
- 26
- 27
- 28
- 29
- 30
- 31
- 32
- 33
- 34
- 35
- 36
接着创建entity和User
位置如图,创建方法与上述创建JDBCUtils一样

代码如下:
package com.example.party.entity; public class User { private int id; private String userAccount; private String userPassword; private String userName; private int userType; private int userState; private int userDel; public User() { } public User(int id, String userAccount, String userPassword, String userName, int userType, int userState, int userDel) { this.id = id; this.userAccount = userAccount; this.userPassword = userPassword; this.userName = userName; this.userType = userType; this.userState = userState; this.userDel = userDel; } public int getId() { return id; } public void setId(int id) { this.id = id; } public String getUserAccount() { return userAccount; } public void setUserAccount(String userAccount) { this.userAccount = userAccount; } public String getUserPassword() { return userPassword; } public void setUserPassword(String userPassword) { this.userPassword = userPassword; } public String getUserName() { return userName; } public void setUserName(String userName) { this.userName = userName; } public int getUserType() { return userType; } public void setUserType(int userType) { this.userType = userType; } public int getUserState() { return userState; } public void setUserState(int userState) { this.userState = userState; } public int getUserDel() { return userDel; } public void setUserDel(int userDel) { this.userDel = userDel; } }- 1
- 2
- 3
- 4
- 5
- 6
- 7
- 8
- 9
- 10
- 11
- 12
- 13
- 14
- 15
- 16
- 17
- 18
- 19
- 20
- 21
- 22
- 23
- 24
- 25
- 26
- 27
- 28
- 29
- 30
- 31
- 32
- 33
- 34
- 35
- 36
- 37
- 38
- 39
- 40
- 41
- 42
- 43
- 44
- 45
- 46
- 47
- 48
- 49
- 50
- 51
- 52
- 53
- 54
- 55
- 56
- 57
- 58
- 59
- 60
- 61
- 62
- 63
- 64
- 65
- 66
- 67
- 68
- 69
- 70
- 71
- 72
- 73
- 74
- 75
- 76
- 77
- 78
- 79
- 80
- 81
- 82
之后创建dao和UserDao

package com.example.party.dao; import com.example.party.entity.User; import com.example.party.utils.JDBCUtils; import android.util.Log; import java.sql.Connection; import java.sql.PreparedStatement; import java.sql.ResultSet; import java.util.HashMap; /** * author: yan * date: 2022.02.17 * **/ public class UserDao { private static final String TAG = "mysql-party-UserDao"; /** * function: 登录 * */ public int login(String userAccount, String userPassword){ HashMap- 1
- 2
- 3
- 4
- 5
- 6
- 7
- 8
- 9
- 10
- 11
- 12
- 13
- 14
- 15
- 16
- 17
- 18
- 19
- 20
- 21
- 22
- 23
- 24
- 25
- 26
- 27
- 28
- 29
- 30
- 31
- 32
- 33
- 34
- 35
- 36
- 37
- 38
- 39
- 40
- 41
- 42
- 43
- 44
- 45
- 46
- 47
- 48
- 49
- 50
- 51
- 52
- 53
- 54
- 55
- 56
- 57
- 58
- 59
- 60
- 61
- 62
- 63
- 64
- 65
- 66
- 67
- 68
- 69
- 70
- 71
- 72
- 73
- 74
- 75
- 76
- 77
- 78
- 79
- 80
- 81
- 82
- 83
- 84
- 85
- 86
- 87
- 88
- 89
- 90
- 91
- 92
- 93
- 94
- 95
- 96
- 97
- 98
- 99
- 100
- 101
- 102
- 103
- 104
- 105
- 106
- 107
- 108
- 109
- 110
- 111
- 112
- 113
- 114
- 115
- 116
- 117
- 118
- 119
- 120
- 121
- 122
- 123
- 124
- 125
- 126
- 127
- 128
- 129
- 130
- 131
- 132
- 133
- 134
- 135
- 136
- 137
- 138
- 139
- 140
- 141
- 142
- 143
- 144
- 145
- 146
- 147
- 148
- 149
- 150
- 151
- 152
- 153
- 154
- 155
- 156
- 157
- 158
- 159
- 160
- 161
- 162
- 163
编写登录页面

- 1
- 2
- 3
- 4
- 5
- 6
- 7
- 8
- 9
- 10
- 11
- 12
- 13
- 14
- 15
- 16
- 17
- 18
- 19
- 20
- 21
- 22
- 23
- 24
- 25
- 26
- 27
- 28
- 29
- 30
- 31
- 32
- 33
- 34
- 35
- 36
- 37
- 38
- 39
- 40
- 41
- 42
- 43
- 44
- 45
- 46
- 47
- 48
- 49
- 50
- 51
- 52
- 53
- 54
- 55
- 56
- 57
- 58
- 59
- 60
- 61
- 62
- 63
- 64
- 65
- 66
- 67
- 68
- 69
- 70
- 71
- 72
- 73
- 74
- 75
- 76
- 77
- 78
- 79
- 80
- 81
- 82
- 83
- 84
- 85
- 86
- 87
- 88
- 89
- 90
- 91
- 92
- 93
效果如图:

完善MainActivity

package com.example.party; import androidx.appcompat.app.AppCompatActivity; import android.annotation.SuppressLint; import android.content.Intent; import android.os.Bundle; import android.os.Handler; import android.os.Message; import android.util.Log; import android.view.View; import android.widget.EditText; import android.widget.Toast; import com.example.party.dao.UserDao; /** * function:连接页面加载首页 */ public class MainActivity extends AppCompatActivity { private static final String TAG = "mysql-party-MainActivity"; @Override protected void onCreate(Bundle savedInstanceState) { super.onCreate(savedInstanceState); setContentView(R.layout.activity_main); } public void reg(View view){ startActivity(new Intent(getApplicationContext(),register.class)); } /** * function: 登录 * */ public void login(View view){ EditText EditTextAccount = findViewById(R.id.uesrAccount); EditText EditTextPassword = findViewById(R.id.userPassword); new Thread(){ @Override public void run() { UserDao userDao = new UserDao(); int msg = userDao.login(EditTextAccount.getText().toString(),EditTextPassword.getText().toString()); hand1.sendEmptyMessage(msg); } }.start(); } @SuppressLint("HandlerLeak") final Handler hand1 = new Handler() { @Override public void handleMessage(Message msg) { if (msg.what == 0){ Toast.makeText(getApplicationContext(), "登录失败", Toast.LENGTH_LONG).show(); } else if (msg.what == 1) { Toast.makeText(getApplicationContext(), "登录成功", Toast.LENGTH_LONG).show(); } else if (msg.what == 2){ Toast.makeText(getApplicationContext(), "密码错误", Toast.LENGTH_LONG).show(); } else if (msg.what == 3){ Toast.makeText(getApplicationContext(), "账号不存在", Toast.LENGTH_LONG).show(); } } }; }- 1
- 2
- 3
- 4
- 5
- 6
- 7
- 8
- 9
- 10
- 11
- 12
- 13
- 14
- 15
- 16
- 17
- 18
- 19
- 20
- 21
- 22
- 23
- 24
- 25
- 26
- 27
- 28
- 29
- 30
- 31
- 32
- 33
- 34
- 35
- 36
- 37
- 38
- 39
- 40
- 41
- 42
- 43
- 44
- 45
- 46
- 47
- 48
- 49
- 50
- 51
- 52
- 53
- 54
- 55
- 56
- 57
- 58
- 59
- 60
- 61
- 62
- 63
- 64
- 65
编写注册页面


- 1
- 2
- 3
- 4
- 5
- 6
- 7
- 8
- 9
- 10
- 11
- 12
- 13
- 14
- 15
- 16
- 17
- 18
- 19
- 20
- 21
- 22
- 23
- 24
- 25
- 26
- 27
- 28
- 29
- 30
- 31
- 32
- 33
- 34
- 35
- 36
- 37
- 38
- 39
- 40
- 41
- 42
- 43
- 44
- 45
- 46
- 47
- 48
- 49
- 50
- 51
- 52
- 53
- 54
- 55
- 56
- 57
- 58
- 59
- 60
- 61
- 62
- 63
- 64
- 65
- 66
- 67
- 68
- 69
- 70
- 71
- 72
- 73
- 74
- 75
- 76
- 77
- 78
- 79
- 80
- 81
- 82
- 83
- 84
- 85
- 86
- 87
- 88
- 89
- 90
- 91
- 92
- 93
- 94
- 95
- 96
- 97
- 98
- 99
- 100
- 101
- 102
- 103
- 104
- 105
- 106
页面如图

完善register
上一步创建activity_register.xml的时候会自动生成一个Class,位置如图,如果没有的话自己右键创建一个Class就可以。

package com.example.party; import androidx.appcompat.app.AppCompatActivity; import android.annotation.SuppressLint; import android.content.Intent; import android.os.Bundle; import android.os.Handler; import android.os.Message; import android.util.Log; import android.view.View; import android.widget.EditText; import android.widget.Toast; import com.example.party.dao.UserDao; import com.example.party.entity.User; /** * function:连接注册页面 */ public class register extends AppCompatActivity { private static final String TAG = "mysql-party-register"; EditText userAccount = null; EditText userPassword = null; EditText userName = null; @Override protected void onCreate(Bundle savedInstanceState) { super.onCreate(savedInstanceState); setContentView(R.layout.activity_register); userAccount = findViewById(R.id.userAccount); userPassword = findViewById(R.id.userPassword); userName = findViewById(R.id.userName); } public void register(View view){ String userAccount1 = userAccount.getText().toString(); String userPassword1 = userPassword.getText().toString(); String userName1 = userName.getText().toString(); User user = new User(); user.setUserAccount(userAccount1); user.setUserPassword(userPassword1); user.setUserName(userName1); user.setUserType(1); user.setUserState(0); user.setUserDel(0); new Thread(){ @Override public void run() { int msg = 0; UserDao userDao = new UserDao(); User uu = userDao.findUser(user.getUserAccount()); if(uu != null){ msg = 1; } else{ boolean flag = userDao.register(user); if(flag){ msg = 2; } } hand.sendEmptyMessage(msg); } }.start(); } @SuppressLint("HandlerLeak") final Handler hand = new Handler() { public void handleMessage(Message msg) { if(msg.what == 0) { Toast.makeText(getApplicationContext(),"注册失败",Toast.LENGTH_LONG).show(); } else if(msg.what == 1) { Toast.makeText(getApplicationContext(),"该账号已经存在,请换一个账号",Toast.LENGTH_LONG).show(); } else if(msg.what == 2) { Toast.makeText(getApplicationContext(), "注册成功", Toast.LENGTH_LONG).show(); Intent intent = new Intent(); //将想要传递的数据用putExtra封装在intent中 intent.putExtra("a","注册"); setResult(RESULT_CANCELED,intent); finish(); } } }; }- 1
- 2
- 3
- 4
- 5
- 6
- 7
- 8
- 9
- 10
- 11
- 12
- 13
- 14
- 15
- 16
- 17
- 18
- 19
- 20
- 21
- 22
- 23
- 24
- 25
- 26
- 27
- 28
- 29
- 30
- 31
- 32
- 33
- 34
- 35
- 36
- 37
- 38
- 39
- 40
- 41
- 42
- 43
- 44
- 45
- 46
- 47
- 48
- 49
- 50
- 51
- 52
- 53
- 54
- 55
- 56
- 57
- 58
- 59
- 60
- 61
- 62
- 63
- 64
- 65
- 66
- 67
- 68
- 69
- 70
- 71
- 72
- 73
- 74
- 75
- 76
- 77
- 78
- 79
- 80
- 81
- 82
- 83
- 84
- 85
- 86
- 87
- 88
- 89
- 90
- 91
- 92
- 93
- 94
- 95
- 96
下面汇总一下都需要改变的文件!


然后运行就可以啦!
心得建议
我的大部分时间感觉都是花费在了连接数据库上。刚开始数据库一直连接无法连接,原因是连接的请求要放在一个新的线程里,不能直接在当前线程请求连接数据库。之后解决了连接问题后得到数据进行匹配都是比较简单的事情。
个人建议:如果出问题可以先建一个临时的项目然后按照【连接数据库】–> 【请求数据并在控制台输出】 --> 【建立前端页面交互】这样的过程一步一步进行调试。
祝成功! -
相关阅读:
多线程(如何理解pthread库)
最大子数组问题的分治
图片懒加载
22.在springboot中使用thymeleaf模板(第一个例子)
java中的接口
2021年6月青少年软件编程(Python)等级考试试卷(一级)
Property使用
STM32 HAL库高级定时器输入捕获脉宽测量
神经网络(十六)Pytorch实机运行的一些细节
【Linux】ps -ef 和ps aux 有什么不同呢?
- 原文地址:https://blog.csdn.net/m0_67391870/article/details/126031006
