-
【React】2、面向组件编程——组件实例的三大核心属性state、props和refs超详解
系列文章目录
👏欢迎来到我的React系列文章
🍭本系列文章从React入门开始,涵盖了React的一切基础,属于是从零开始的一个系列
🍭文章会以图文结合-动图-代码实现-解释代码的形式带领大家走进React的世界
🍭持续更新中~希望大家能够喜欢,系列文章👉React–从基础到实战
🌈博客主页👉codeMak1r的博客
👉关注✨点赞👍收藏📂
React面向组件编程
一、使用 React 开发者工具调试
React Developr Tools(chrome插件)

二、基本理解和使用
2.1 函数式组件(适用于简单组件<无状态组件>的定义)
<script type="text/babel"> /* 此处一定要写babel,表示这个脚本是jsx格式的 */ // 1.创建函数式组件 function MyComponent() { console.log(this); // 此处的this是undefined,因为babel编译后开启了严格模式,this无法指向window return <h2>我是用函数定义的组件(适用于【简单组件】的定义)</h2> } // 2.渲染组件到页面 ReactDOM.render(<MyComponent />, document.getElementById('test')) /* 执行了ReactDOM.render(<MyComponent />后,发生了什么呢? 1. React解析组件标签,找到了MyComponent组件。 2. 发现组件是使用函数定义的,随后调用该函数,将返回的虚拟DOM转为真实DOM,随后呈现在页面中。 */ </script>- 1
- 2
- 3
- 4
- 5
- 6
- 7
- 8
- 9
- 10
- 11
- 12
- 13
- 14
- 15
2.2 类式组件(适用于复杂组件<有状态组件>的定义)
<script type="text/babel"> /* 此处一定要写babel,表示这个脚本是jsx格式的 */ // 1.创建类式组件 class MyComponent2 extends React.Component { render() { // render中的this是谁?——MyComponent2的实例对象。(MyComponent2组件实例对象) console.log(this) return <h2>我是用类定义的组件(适用于【复杂组件】的定义)</h2> } } // 2.渲染组件到页面 ReactDOM.render(<MyComponent2 />, document.getElementById('test')) /* 执行了ReactDOM.render(<MyComponent2 />后,发生了什么呢? 1. React解析组件标签,找到了MyComponent2组件。 2. 发现组件是使用类定义的,随后new出该类的实例,并通过该实例调用到原型上的render方法。 3. 将render返回的虚拟DOM转为真实DOM,随后呈现在页面中。 */ </script>- 1
- 2
- 3
- 4
- 5
- 6
- 7
- 8
- 9
- 10
- 11
- 12
- 13
- 14
- 15
- 16
- 17
- 18
- 19
三、组件实例的三大核心属性
1、状态(state)
理解
- state是组件对象最重要的属性,值是对象(可以包含多个 key-value 的组合)
- 组件被称为“状态机”,通过更新组件的state来更新对应的页面显示(重新渲染组件)
- 数据被放在组件的
state里,然后将state交给React去渲染虚拟DOM。
强烈注意
- 组件中render方法中的 this 为组件实例对象
- 组件自定义的方法中 this 为 undefined,如何解决?
- 强制绑定 this:通过函数对象的bind()
- 箭头函数
- 状态数据,不能直接修改或更新
示例效果
需求: 定义一个展示天气信息的组件
1. 默认展示天气炎热 或 凉爽
2. 点击文字切换天气

state 标准写法
<script type="text/babel"> // 1.创建组件 class Weather extends React.Component { // 构造函数调用几次? ——1次 constructor(props) { super(props) console.log(this) this.state = { isHot: true, wind: '微风' } // 解决changeWeather中this指向问题 this.changeWeather = this.changeWeather.bind(this) // 加上这一句后,changeWeather中就可以拿到Weather这个类的实例对象了 // 调用bind()方法,改变了changeWeather中的this,使之指向了类的实例对象 // 然后将bind()方法生成的新函数(函数内容都一样,只是函数中的this指向改变了)赋值给this.changeWeather,也就是this实例对象上的一个名为changeWeather的方法 } // render调用几次? —— 1+n 次,1是初始化那次,n是状态更新次数 render() { const { isHot, wind } = this.state // 解构this.state对象,把isHot赋值给const声明的对象 return <h1 id="title" onClick={this.changeWeather} >今天天气很{isHot ? '炎热' : '凉爽'},{wind}</h1> // 这里的this.changeWeather,是指调用Weather实例上的changeWeather方法,找到了上面bind()函数生成的新函数 // 下面的changeWeather()是类Weather中的方法,实例找到了自己的changeWeather方法就不会再去原型链中找类的changeWeather } // changeWeather调用几次? —— 点几次调用几次 changeWeather() { // changeWeather放在哪里? —— Weather的原型对象上,供实例使用 // 由于 changeWeather 是作为onClick的回调,不是通过实例调用的,是点击h1标签后直接调用 // 类中的方法默认开启了局部的严格模式('use strict'),所以changeWeather中的this为undefined console.log(this) // 获取原来的isHot值 const isHot = this.state.isHot // 严重注意,状态(state)不可直接更改,要借助一个内置的API(setState)去更改 // 更改其实是合并而不是替换,也就是isHot更改了,但是wind不会丢失 this.setState({ isHot: !isHot }) // this.state.isHot = !isHot 这是错误的更改 } } // 2.渲染组件到页面 ReactDOM.render(<Weather />, document.getElementById('test')) /* const title = document.getElementById('title') title.addEventListener('click', () => { console.log('标题被点击了') }) */ /* const title = document.getElementById('title') title.onclick = () => { console.log('标题被点击了') } */ </script>- 1
- 2
- 3
- 4
- 5
- 6
- 7
- 8
- 9
- 10
- 11
- 12
- 13
- 14
- 15
- 16
- 17
- 18
- 19
- 20
- 21
- 22
- 23
- 24
- 25
- 26
- 27
- 28
- 29
- 30
- 31
- 32
- 33
- 34
- 35
- 36
- 37
- 38
- 39
- 40
- 41
- 42
- 43
- 44
- 45
- 46
- 47
- 48
- 49
- 50
- 51
- 52
- 53
state 简写
<script type="text/babel"> class Weather extends React.Component { /* constructor(props) { super(props) this.state = { isHot: true, wind: '微风' } this.changeWeather = this.changeWeather.bind(this) } */ // 不借助构造函数直接对实例对象上的state属性赋值 state = { isHot: true, wind: '微风' } render() { console.log(this) const { isHot, wind } = this.state return <h1 id="title" onClick={this.changeWeather} >今天天气很{isHot ? '炎热' : '凉爽'},{wind}</h1> } // 这里整体是一个赋值语句,就像state={}一样,changeWeather作为实例对象上的一个属性被赋值 // 而箭头函数默认没有this,如果函数体中调用了this,默认会指向包裹箭头函数的上一层(也就是Weather的实例对象) changeWeather = () => { const isHot = this.state.isHot this.setState({ isHot: !isHot }) } } ReactDOM.render(<Weather />, document.getElementById('test')) </script>- 1
- 2
- 3
- 4
- 5
- 6
- 7
- 8
- 9
- 10
- 11
- 12
- 13
- 14
- 15
- 16
- 17
- 18
- 19
- 20
- 21
- 22
- 23
- 24
- 25
⬆️:这才是我们日常开发中会用到的写法
2、props
理解
- 每个组件对象都会有props(properties的简写)属性
- 组件标签的所有属性都保存在 props 中
作用
- 通过标签属性从组件外向组件内传递变化的数据
- 注意: 组件内部不要修改props数据
编码操作
1、内部读取某个属性值
this.props.name- 1
2、对props中的属性值进行类型限制和必要性限制
第一种方式(React v15.5 开始已弃用):
Person.propTypes = { name: React.PropTypes.string.isRequired, age: React.PropTypes.number- 1
- 2
- 3
第二种方式(新):使用prop-types库进限制(需要引入prop-types库):
Person.propTypes = { name: PropTypes.string.isRequired, age: PropTypes.number.- 1
- 2
- 3
3、扩展属性: 将对象的所有属性通过props传递
<Person {...person}/> // ... 展开运算符- 1
4、默认属性值:
Person.defaultProps = { age: 18, sex:'男' }- 1
- 2
- 3
- 4
5、组件类的构造函数
constructor(props){ super(props) console.log(props)//打印所有属性 }- 1
- 2
- 3
- 4
示例效果
需求: 自定义用来显示一个人员信息的组件
1. 姓名必须指定,且为字符串类型;
2. 性别为字符串类型,如果性别没有指定,默认为男
3. 年龄为字符串类型,且为数字类型,默认值为18

在类式组件中使用props
<!-- 引入prop-types,用于对组件标签属性props进行限制 --> <script type="text/javascript" src="../js/prop-types.js"></script> <script type="text/babel"> // 创建组件 class Person extends React.Component { render() { const { name, age, sex } = this.props // props是只读的 // this.props.name = 'jack' 会报错,因为props是只读的不允许修改 return ( <ul> <li>姓名:{name}</li> <li>性别:{sex}</li> <li>年龄:{age + 1}</li> </ul> ) } } // 对标签属性进行类型、必要性的限制 Person.propTypes = { name: PropTypes.string.isRequired, // 限制name必传,且为字符串 age: PropTypes.number, // 限制age为数值 sex: PropTypes.string, // 限制sex为字符串 speak: PropTypes.func // 限制speak为函数 } // 指定默认的标签属性值 Person.defaultProps = { sex: '男', age: 18 } // 渲染组件 ReactDOM.render(<Person name="jerry" speak={speak} />, document.getElementById('test1')) ReactDOM.render(<Person name="tom" age={18} sex="女" />, document.getElementById('test2')) const p = { name: '老刘', age: 18, sex: '女' } // 这种写法能够批量拿到数据,{...p}为展开运算符,是<Person name="tom" age="18" sex="女" />的一种语法糖 ReactDOM.render(<Person {...p} />, document.getElementById('test3')) function speak() { console.log('我说话了') } </script>- 1
- 2
- 3
- 4
- 5
- 6
- 7
- 8
- 9
- 10
- 11
- 12
- 13
- 14
- 15
- 16
- 17
- 18
- 19
- 20
- 21
- 22
- 23
- 24
- 25
- 26
- 27
- 28
- 29
- 30
- 31
- 32
- 33
- 34
- 35
- 36
- 37
- 38
- 39
- 40
- 41
- 42
- 43
在类式组件中使用props-简写
<!-- 引入prop-types,用于对组件标签属性props进行限制 --> <script type="text/javascript" src="../js/prop-types.js"></script> <script type="text/babel"> // 创建组件 class Person extends React.Component { constructor(props) { // 构造函数是否接收props,是否传递给super(),取决于:是否希望在构造函数中通过this访问props super(props) console.log(this.props) } render() { const { name, age, sex } = this.props // props是只读的 // this.props.name = 'jack' 会报错,因为props是只读的不允许修改 return ( <ul> <li>姓名:{name}</li> <li>性别:{sex}</li> <li>年龄:{age + 1}</li> </ul> ) } // 对标签属性进行类型、必要性的限制 static propTypes = { name: PropTypes.string.isRequired, // 限制name必传,且为字符串 age: PropTypes.number, // 限制age为数值 sex: PropTypes.string, // 限制sex为字符串 } // 指定默认的标签属性值 static defaultProps = { sex: '男', age: 18 } } // 渲染组件 ReactDOM.render(<Person name="jerry" />, document.getElementById('test1')) </script>- 1
- 2
- 3
- 4
- 5
- 6
- 7
- 8
- 9
- 10
- 11
- 12
- 13
- 14
- 15
- 16
- 17
- 18
- 19
- 20
- 21
- 22
- 23
- 24
- 25
- 26
- 27
- 28
- 29
- 30
- 31
- 32
- 33
- 34
- 35
- 36
- 37
- 38
- 39
- 40
- 41
- 42
在函数式组件中使用props
<!-- 引入prop-types,用于对组件标签属性props进行限制 --> <script type="text/javascript" src="../js/prop-types.js"></script> <script type="text/babel"> // 创建组件 function Person(props) { const { name, age, sex } = props return ( <ul> <li>姓名:{name}</li> <li>性别:{sex}</li> <li>年龄:{age}</li> </ul> ) } // 对标签属性进行类型、必要性的限制 Person.propTypes = { name: PropTypes.string.isRequired, // 限制name必传,且为字符串 age: PropTypes.number, // 限制age为数值 sex: PropTypes.string, // 限制sex为字符串 } // 指定默认的标签属性值 Person.defaultProps = { sex: '男', age: 18 } // 渲染组件 ReactDOM.render(<Person name="jerry" />, document.getElementById('test1')) </script>- 1
- 2
- 3
- 4
- 5
- 6
- 7
- 8
- 9
- 10
- 11
- 12
- 13
- 14
- 15
- 16
- 17
- 18
- 19
- 20
- 21
- 22
- 23
- 24
- 25
- 26
- 27
- 28
- 29
- 30
- 31
- 32
3、refs
理解
组件内的标签可以定义ref属性来标识自己
示例效果
需求: 自定义组件, 功能说明如下:
1. 点击按钮, 提示第一个输入框中的值
2. 当第2个输入框失去焦点时, 提示这个输入框中的值
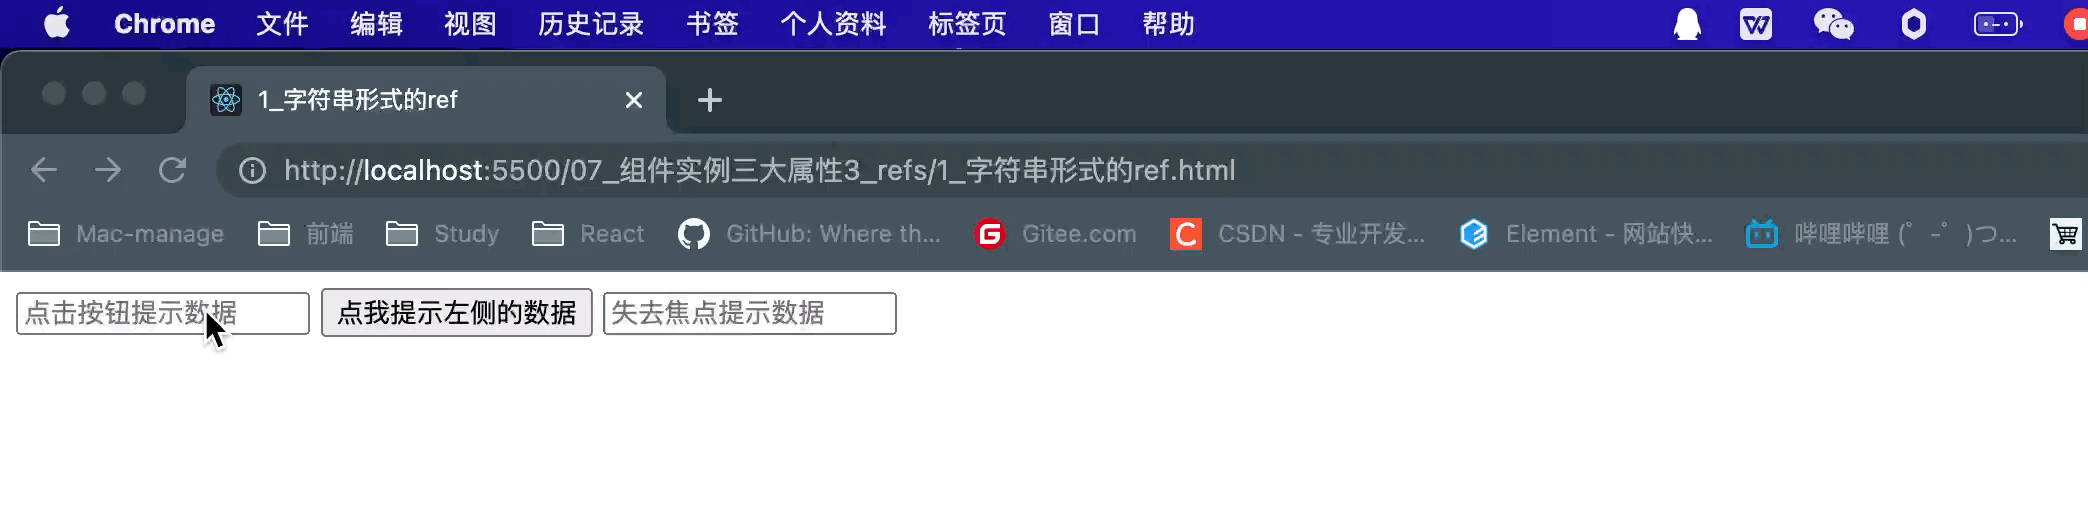
字符串形式的ref
<script type="text/babel"> class Demo extends React.Component { render() { return ( // 字符串类型的ref效率不高,不太推荐使用,可能会在React未来版本中被移除 <div> <input ref="input1" type="<text>" placeholder="点击按钮提示数据" /> <button onClick={this.showData}>点我提示左侧的数据</button> <input ref="input2" onBlur={this.showData2} type="text" placeholder="失去焦点提示数据" /> </div> ) } // 展示左侧输入框的数据 showData = () => { console.log(this.refs.input1) const { input1 } = this.refs alert(input1.value) } // 展示右侧输入框的数据 showData2 = () => { const { input2 } = this.refs alert(input2.value) } } // 渲染组件到页面 ReactDOM.render(<Demo />, document.getElementById('test')) </script>- 1
- 2
- 3
- 4
- 5
- 6
- 7
- 8
- 9
- 10
- 11
- 12
- 13
- 14
- 15
- 16
- 17
- 18
- 19
- 20
- 21
- 22
- 23
- 24
- 25
- 26
- 27
- 28
- 29
在这里需要注意:
React官方文档中,对于字符串形式的组件保持不推荐使用的态度。因此,我们最好使用其他的方式去使用组件中的ref属性,这里,官方推荐使用的是回调函数或createRef API。
回调函数形式的ref
// 在jsx中,可以使用 {/* */} 的方式写注释 <script type="text/babel"> // 创建组件 class Demo extends React.Component { render() { return ( <div> {/* 代码执行步骤: */} {/* React加载Demo组件时,执行render函数内的jsx代码,发现input中有ref属性, 属性内容是一个箭头函数,React就会帮我们调用这个回调函数, 并且把当前的DOM传进这个函数,这样就可以接收到当前的DOM节点了 */} {/* 箭头函数接收到参数(当前的DOM节点)命名为(currentNode), 将currentNode赋值给实例对象下的input1这个属性 */} {/* <input ref={(currentNode) => { this.input1 = currentNode }} type="<text>" placeholder="点击按钮提示数据" /> */} {/* 箭头函数只有一个参数可以省略'()',箭头函数右边只有一条函数体可以省略'{}' */} <input ref={currentNode => this.input1 = currentNode} type="<text>" placeholder="点击按钮提示数据" /> <button onClick={this.showData}>点我提示左侧的数据</button> <input ref={currentNode => this.input2 = currentNode} onBlur={this.showData2} type="text" placeholder="失去焦点提示数据" /> </div> ) } // 展示左侧输入框的数据 showData = () => { const { input1 } = this alert(input1.value) } // 展示右侧输入框的数据 showData2 = () => { const { input2 } = this alert(input2.value) } } // 渲染组件到页面 ReactDOM.render(<Demo />, document.getElementById('test')) </script>- 1
- 2
- 3
- 4
- 5
- 6
- 7
- 8
- 9
- 10
- 11
- 12
- 13
- 14
- 15
- 16
- 17
- 18
- 19
- 20
- 21
- 22
- 23
- 24
- 25
- 26
- 27
- 28
- 29
- 30
- 31
- 32
- 33
- 34
- 35
- 36
- 37
- 38
- 39
- 40
但是仍需注意,这种
内联函数形式的回调ref,仍可能存在一点点的小问题。官网的说明如下:
我们还是以之前的那个天气变换的例子去说明:
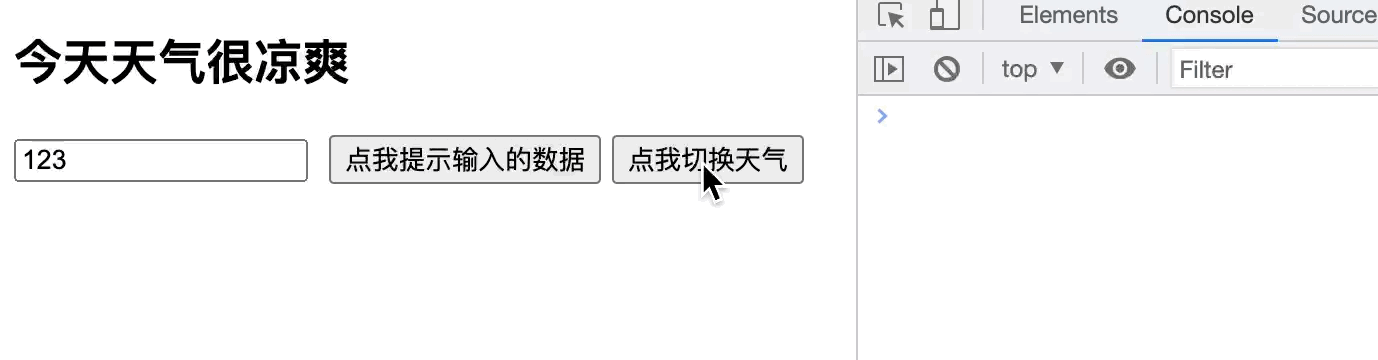
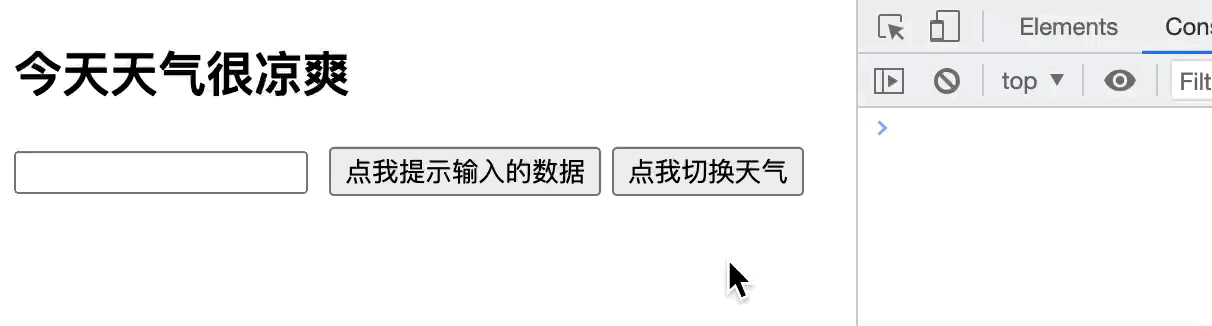
<script type="text/babel"> class Demo extends React.Component { state = { isHot: false } render() { const { isHot } = this.state return ( <div> <h2>今天天气很{isHot ? '炎热' : '凉爽'}</h2> {/* React在state更新的时候,根据新的state去重新渲染组件, 而为了确保上一次ref被清空,所以React在组件更新时调用了两次ref中的回调函数, 第一次传入null以清空上一次的ref缓存, 然后第二次再重新调用回调函数,传入需要的DOM节点 内联函数形式:(用的比较多)*/} <input ref={currentNode => { this.input1 = currentNode; console.log('@', currentNode) }} type="text" /> <button onClick={this.showInfo}>点我提示输入的数据</button> <button onClick={this.changeWeather}>点我切换天气</button> </div> ) } showInfo = () => { const { input1 } = this alert(input1.value) } changeWeather = () => { const { isHot } = this.state this.setState({ isHot: !isHot }) } } ReactDOM.render(<Demo />, document.getElementById('test')) </script>- 1
- 2
- 3
- 4
- 5
- 6
- 7
- 8
- 9
- 10
- 11
- 12
- 13
- 14
- 15
- 16
- 17
- 18
- 19
- 20
- 21
- 22
- 23
- 24
- 25
- 26
- 27
- 28
- 29
- 30
- 31
- 32
简单的说,React在
更新组件时,会先传入null调用一次ref中的回调,以清空之前的ref;然后再传入参数currentNode,以调用第二次。每更新一次组件,ref中的回调函数就会被调用两次,一次传入null,一次传入参数currentNode。为了应对这种情况的出现,官方建议将ref的回调函数定义成 class 的绑定函数的方式去避免上述的问题。回调函数ref——class的绑定函数
<script type="text/babel"> class Demo extends React.Component { state = { isHot: false } render() { const { isHot } = this.state return ( <div> <h2>今天天气很{isHot ? '炎热' : '凉爽'}</h2> <input ref={this.saveInput} type="text" /> <button onClick={this.showInfo}>点我提示输入的数据</button> <button onClick={this.changeWeather}>点我切换天气</button> </div> ) } // class 的绑定函数形式 saveInput = (currentNode) => { this.input1 = currentNode console.log('@', currentNode) } showInfo = () => { const { input1 } = this alert(input1.value) } changeWeather = () => { const { isHot } = this.state this.setState({ isHot: !isHot }) } } ReactDOM.render(<Demo />, document.getElementById('test')) </script>- 1
- 2
- 3
- 4
- 5
- 6
- 7
- 8
- 9
- 10
- 11
- 12
- 13
- 14
- 15
- 16
- 17
- 18
- 19
- 20
- 21
- 22
- 23
- 24
- 25
- 26
- 27
- 28
- 29
- 30
可以看出,换成了
class 的绑定函数形式之后,哪怕在函数内部打印了'@', currentNode,控制台也没有任何反应。这是因为,class 的绑定函数形式只在组件第一次渲染时调用一次,之后更新组件时,React不会再重复调用saveInput这个函数,这样问题就解决了~
createRef API

<script type="text/babel"> // 创建组件 class Demo extends React.Component { /* React.createRef调用后可以返回一个容器,该容器可以存储被ref所标识的节点(该容器是“专人专用”的) 也就是,调用React.createRef()创建了一个容器,通过赋值语句赋值给实例自身名为myRef的属性上 */ myRef = React.createRef() render() { return ( <div> {/* React执行render函数中的jsx代码时, 发现input上有一个ref属性而且是通过createRef方法创建的, React就会把当前ref属性所在的DOM节点放到之前创建的那个容器上, 也就是把当前input这个DOM节点放到了实例自身名为myRef的容器上 */} {/* 可以简写成ref={this.myRef = React.createRef()} */} <input ref={this.myRef} type="<text>" placeholder="点击按钮提示数据" /> <button onClick={this.showData}>点我提示左侧的数据</button> <input onBlur={this.showData2} ref={this.myRef2 = React.createRef()} type="<text>" placeholder="失去焦点提示数据" /> </div> ) } // 展示左侧输入框的数据 showData = () => { console.log(this.myRef) alert(this.myRef.current.value) } showData2 = () => { alert(this.myRef2.current.value) } } // 渲染组件到页面 ReactDOM.render(<Demo />, document.getElementById('test')) </script>- 1
- 2
- 3
- 4
- 5
- 6
- 7
- 8
- 9
- 10
- 11
- 12
- 13
- 14
- 15
- 16
- 17
- 18
- 19
- 20
- 21
- 22
- 23
- 24
- 25
- 26
- 27
- 28
- 29
- 30
- 31
- 32
- 33
- 34
- 35
不要过度使用ref

如图所示,官方文档中建议
勿过度使用Refs。其实,对于上文中的createRef API中的失去焦点提示数据,还有更简便的写法,完全可以不使用ref。{/* 发生事件的元素正好是需要操作的元素本身,可以省略ref */} <input onBlur={this.showData2} type="<text>" placeholder="失去焦点提示数据" /> showData2 = (event) => { // 传入的event是发生onBlur事件的事件源,也就是失去焦点提示数据的input框, // 通过event.target.value拿到input中的值 alert(event.target.value) }- 1
- 2
- 3
- 4
- 5
- 6
- 7
- 8
Refs总结
字符串形式的ref:最为简便,但是代码效率低,不推荐使用,不过用了也没什么大不了。回调函数(内联)ref:虽然存在更新组件时重复调用的问题,但是几乎没有什么影响,引用官方文档的话来说,就是“无关紧要的”,很多开发者更喜欢的是这种ref的使用方式。回调函数(class的绑定函数)ref:解决了更新组件时的重复调用的问题,但是更为繁琐了,其实内联函数形式的回调ref已经够用了。createRef API:最为规范的一种使用方式,也是React在16.3版本引入的新API,更是React最为推荐的一种使用ref的方式。勿过度使用Refs:发生事件的元素正好是需要操作的元素本身时,ref可以省略,转而使用event.target代替。
-
相关阅读:
Mybatis知识点讲解 【笔记】
围绕新市民金融聚焦差异化产品设计、智能技术提效及素养教育
8.jib-maven-plugin构建springboot项目镜像,docker部署配置
直流有刷电机及Matlab/Simulink驱动仿真
倾听:情绪
一款轻量级的NuGet服务器
2022年认证杯SPSSPRO杯数学建模D题(第二阶段)食品风味与风味物质求解全过程文档及程序
colab直接下载kaggle数据集
ASAN入门参考
linux-Too many open files排查及修复
- 原文地址:https://blog.csdn.net/Svik_zy/article/details/124944194