-
学习虚幻C++开发日志——基础案例(持续更新中)
官方文档:虚幻引擎C++编程教程 | 虚幻引擎 5.5 文档 | Epic Developer Community | Epic Developer Community
1.物体上下起伏并旋转
1.1第一种写法
创建一个继承于Actor的类,并为新的Actor命名为FloatingActor,然后点击Create Class
重新加载代码文件
在Games->(用户自定义工程文件名)->Source->FloatingActor.h
在头文件添加代码
- public:
- // 设置构造默认函数
- AFloatingActor();
- UPROPERTY(VisibleAnywhere)
- //使用继承于UObject的指针UStaticMeshComponent*
- UStaticMeshComponent* VisualMesh;
在源文件:
- //设置默认值
- AFloatingActor::AFloatingActor()
- {
- //将设置为每帧调用Tick()。如果你不需要它,你可以关闭它来提高性能。
- PrimaryActorTick.bCanEverTick = true;
- //创建Object,可在蓝图details查看
- VisualMesh = CreateDefaultSubobject
(TEXT("Mesh")); - VisualMesh->SetupAttachment(RootComponent);//根组件
- //根组件另一种写法:RootComponent = VisualMesh;
- //不推荐此写法
- //静态网格体Copy Reference:/Script/Engine.StaticMesh'/Game/StarterContent/Shapes/Shape_Cone.Shape_Cone'
- static ConstructorHelpers::FObjectFinder
CubeVisualAsset(TEXT("/Game/StarterContent/Shapes/Shape_Cone.Shape_Cone")) ; - //判断是否初始化成功
- if (CubeVisualAsset.Succeeded())
- {
- VisualMesh->SetStaticMesh(CubeVisualAsset.Object);
- VisualMesh->SetRelativeLocation(FVector(0.0f, 0.0f, 0.0f));
- }
- }
- void AFloatingActor::BeginPlay()
- {
- Super::BeginPlay();
- //注意BeginPlay一定要调用Super::BeginPlay()
- }
- //调用每一帧
- void AFloatingActor::Tick(float DeltaTime)
- {
- Super::Tick(DeltaTime);
- //初始化
- FVector NewLocation = GetActorLocation();
- FRotator NewRotation = GetActorRotation();
- float RunningTime = GetGameTimeSinceCreation();//得到在世界的时间从创建开始
- float DeltaHeight = (FMath::Sin(RunningTime + DeltaTime) - FMath::Sin(RunningTime)); //设置高度变化呈现正弦曲线变化
- float DeltaRotation = DeltaTime * 20.0f; //Rotate by 20 degrees per second旋转变化
- NewLocation.Z += DeltaHeight * 20.0f; //高度变化,系数放大20倍
- NewRotation.Yaw += DeltaRotation;
- SetActorLocationAndRotation(NewLocation, NewRotation);
- }
思路:在默认构造函数初始化网格体,运用引擎内置函数SetStaticMesh和SetRelativeLocation。在Tick时间函数内先初始化状态信息,并运用数学函数改变状态数值,最后用SetActorLocationAndRotation函数实现Actor位置变化。
1.2第二种写法(初始化网格体)
在上述头文件添加新的代码 :
- public:
- UPROPERTY(BlueprintReadWrite, EditAnywhere, Category = "Name")
- UStaticMesh* NewMesh;
- UPROPERTY(BlueprintReadWrite, EditAnywhere, Category = "FloatingActor")
- float FloatSpeed = 20.0f;
- UPROPERTY(BlueprintReadWrite, EditAnywhere, Category = "FloatingActor")
- float RotationSpeed = 20.0f;
此写法是运用宏从而在蓝图进行快速修改

从而不需要前一种方法默认构造函数的指定网格体的写法:
- //静态网格体Copy Reference:/Script/Engine.StaticMesh'/Game/StarterContent/Shapes/Shape_Cone.Shape_Cone'
- static ConstructorHelpers::FObjectFinder
CubeVisualAsset(TEXT("/Game/StarterContent/Shapes/Shape_Cone.Shape_Cone")) ;
在源文件的BeginPlay()函数处代码:
- void AFloatingActor::BeginPlay()
- {
- Super::BeginPlay();
- //注意BeginPlay一定要调用Super::BeginPlay()
- //将原默认构造函数的判断放在这里
- if (NewMesh)
- {
- VisualMesh->SetStaticMesh(NewMesh);
- VisualMesh->SetRelativeLocation(FVector(0.0f, 0.0f, 0.0f));
- }
- }
2.相机自动切换
2.1第一种自定义相机切换
创建一个继承于Actor的类,并为新的Actor命名为LearnGameCamera,然后点击Create Class
重新加载代码文件
在Games->(用户自定义工程文件名)->Source->LearnGameCamera.h
在头文件添加代码
- protected:
- UPROPERTY(EditAnywhere, Category = "learn")
- AActor* CameraOne;
- UPROPERTY(EditAnywhere, Category = "learn")
- AActor* CameraTwo;
- float TimeToNextCameraChange=0.f;
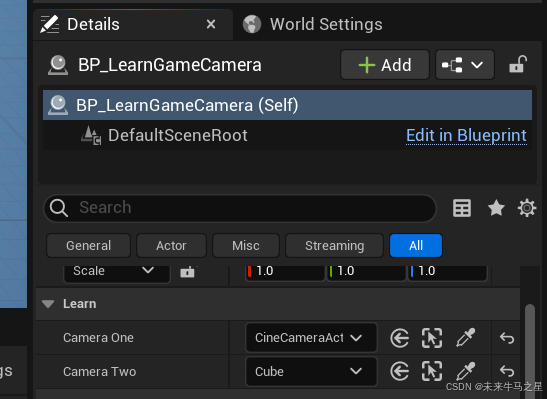
使用宏可以在details进行相机绑定
在源文件的Tick()函数处代码(引用帧参数):
- // Called every frame
- void ALearnGameCamera::Tick(float DeltaTime)
- {
- Super::Tick(DeltaTime);
- const float TimeBetweenCameraChanges = 2.0f;//硬编码写法
- const float SmoothBlendTime = 0.75f;// 视图混合平滑切换时间
- TimeToNextCameraChange -= DeltaTime;
- if (TimeToNextCameraChange <= 0.0f)
- {
- TimeToNextCameraChange += TimeBetweenCameraChanges;
- //查找本地玩家控制的Actor
- APlayerController* OurPlayerController = UGameplayStatics::GetPlayerController(this, 0);
- if (OurPlayerController)
- {
- //视角不是摄像机1的视角且摄像机1不是空指针
- if((OurPlayerController->GetViewTarget()!=CameraOne)&&(CameraOne!=nullptr))
- {
- //立即切换到摄像机1
- OurPlayerController->SetViewTarget(CameraOne);
- }
- else if ((OurPlayerController->GetViewTarget() != CameraTwo) && (CameraTwo != nullptr))
- {
- //平滑切换到摄像机2
- OurPlayerController->SetViewTargetWithBlend(CameraTwo, SmoothBlendTime);
- }
- }
- }
- }
-
相关阅读:
fscan使用方法:一键自动化、全方位漏洞扫描的开源工具
[Spring笔记] Spring-30-AOP快速入门案例
PyTorch 中的【高级索引】 或 【花式索引】
websocket学习笔记【springboot+websocket聊天室demo】
【UI设计】使用ps软件进行一些简单的操作
每天几道Java面试题(第一天)
MongoDB设置密码
Elasticsearch入门(一)基本介绍与安装
酷开科技丨酷开系统9.2:引领大屏智能化新纪元
Android 使用Camera2 API 和 GLSurfaceView实现相机预览
- 原文地址:https://blog.csdn.net/2301_80888963/article/details/143127383