-
Vue笔记(三)
上一篇:Vue二)-CSDN博客
目录
1. router.push(location, onComplete?, onAbort?)
2. router.replace(location, onComplete?, onAbort?)
1.自定义指令


inserted(最常用的配置,但是不止) 说明:会在指令所在的元素,插入到页面中时触发
- App.vue
- <template>
- <div>
- <h1>自定义指令h1>
- <input v-autoFocus type="text">
- div>
- template>
- <script>
- export default {
- // 局部注册指令
- directives: {
- "autoFocus": {
- inserted (el){
- el.focus();
- }
- }
- }
- }
- script>
- <style>
- style>
- main.js
- import Vue from 'vue'
- import App from './App.vue'
- Vue.config.productionTip = false
- // 全局注册指令
- // Vue.directive('autoFocus',{
- // "inserted" (el) {
- // // console.log(el);
- // el.focus();
- // }
- // })
- new Vue({
- render: h => h(App),
- }).$mount('#app')
v-loading的封装

2.插槽
文本插槽


文本插槽(有默认值)

具名插槽


也有简写

作用域插槽
并不是新类型的插槽,而是给插槽传值的一种语法


详细做一个练习
实现如下效果
将表格封装成一个组件,复用两次,但是修改按钮

目录结构

准备数据
- MyTable.vue
待解决:①封装的表格组件数据是写死的,数据来自父组件,所以需要父传子操作

- App.vue

父传子数据
解决表格数据写死的问题
- MyTable.vue

- App.vue


使用文本插槽自定义按钮文本


实现按钮功能--传值(使用了作用域插槽)


- 创建一个对象存储item
对象名随便命名

- 拿值

- 实现功能

3.SPA与路由
SPA:单页面应用程序,所有的功能在一个HTML中实现
类比网易云音乐官网和京东官网

SPA的优势原因

路由的介绍


VueRouter(5+2步操作)

固定的5步操作

具体操作
下载(完成后重启项目)
npm i vue-router@3.6.5引包

注册VueRouter(Vue插件都需要注册)

new空的路由对象

路由对象注入Vue对象中

效果

第6步-创建组件,配置路由规则


第7步-配置路由出口

详细做一个练习
准备一些组件


导入组件和编写路由配置

确定路由出口与结构位置

效果

组件分类(从维护的角度)
为什么使用了路由后,组件从components目录改放到views目录?

本质都是.vue文件,毫无区别,只是程序员需要考虑到维护,所以根据使用场景对其进行分类,分为 页面组件 和 复用组件


路由模块封装(main.js不再写路由)

优化上一节的案例,所有在main.js写的路由相关的配置都转移到单独的js文件,只做最后的引入


router-link声明式导航

- 如下图,vue提供的标签,点击哪个就设置一个类名,并且取消其他同类标签的类名 ,只需要给一个类名设置样式就好了(自己写原生太麻烦)
提供的两个类名分别是(选其一)
- router-link-exact-active
- router-link-active

小案例
- 效果

- 修改上一次案例

- 加一个类样式

两个类名的区别
exact:adj.精确的
模糊匹配是对于开头能匹配成功就行,精准匹配是完全能匹配成功才行
模糊匹配用的多

- 模糊匹配的使用
下图可以看到,只要是开头路径匹配成功,后面再多,依旧高亮

自定义类名

router-link-查询参数传参(更适合多参数)


router-link-动态路由传参(更适合多级路由)
设置了/search/:words后,这是模糊匹配,无论是/search/a 还是/search/a/b都一样能传参


动态路由传参-可选符(通常加上)


路由重定向

匹配到A路径,自动跳转到B路径

404-页面找不到
path中的*表示,除了已经配置的路径,都能匹配成功


编程式导航跳转(两种方法)
不用原生js的方法了
①path路径跳转


②name路由名跳转(适合长路径)
不需要写全部的路由路径了,只需要写某个路由名


- <template>
- <div class="home">
- <div class="logo-box">div>
- <div class="search-box">
- <input v-model="inpValue" type="text">
- <button @click="goSearch">搜索一下button>
- div>
- <div class="hot-link">
- 热门搜索:
- <router-link to="/search/黑马程序员">黑马程序员router-link>
- <router-link to="/search/前端培训">前端培训router-link>
- <router-link to="/search/如何成为前端大牛">如何成为前端大牛router-link>
- div>
- div>
- template>
- <script>
- export default {
- name: 'FindMusic',
- data () {
- return {
- inpValue: ''
- }
- },
- methods: {
- goSearch () {
- // 1. 通过路径的方式跳转
- // (1) this.$router.push('路由路径') [简写]
- // this.$router.push('路由路径?参数名=参数值')
- // this.$router.push('/search')
- // this.$router.push(`/search?key=${this.inpValue}`)
- // this.$router.push(`/search/${this.inpValue}`)
- // (2) this.$router.push({ [完整写法] 更适合传参
- // path: '路由路径'
- // query: {
- // 参数名: 参数值,
- // 参数名: 参数值
- // }
- // })
- // this.$router.push({
- // path: '/search',
- // query: {
- // key: this.inpValue
- // }
- // })
- // this.$router.push({
- // path: `/search/${this.inpValue}`
- // })
- // 2. 通过命名路由的方式跳转 (需要给路由起名字) 适合长路径
- // this.$router.push({
- // name: '路由名'
- // query: { 参数名: 参数值 },
- // params: { 参数名: 参数值 }
- // })
- this.$router.push({
- name: 'search',
- // query: {
- // key: this.inpValue
- // }
- params: {
- words: this.inpValue
- }
- })
- }
- }
- }
- script>
- <style>
- .logo-box {
- height: 150px;
- background: url('@/assets/logo.jpeg') no-repeat center;
- }
- .search-box {
- display: flex;
- justify-content: center;
- }
- .search-box input {
- width: 400px;
- height: 30px;
- line-height: 30px;
- border: 2px solid #c4c7ce;
- border-radius: 4px 0 0 4px;
- outline: none;
- }
- .search-box input:focus {
- border: 2px solid #ad2a26;
- }
- .search-box button {
- width: 100px;
- height: 36px;
- border: none;
- background-color: #ad2a26;
- color: #fff;
- position: relative;
- left: -2px;
- border-radius: 0 4px 4px 0;
- }
- .hot-link {
- width: 508px;
- height: 60px;
- line-height: 60px;
- margin: 0 auto;
- }
- .hot-link a {
- margin: 0 5px;
- }
- style>
编程式导航传参
两种跳转方式都支持两种传参方式,所以一共有四种写法
原理就是创建几个全局对象,点击按钮的时候将数据存入对象,其他组件取用就好

第一种

第二种

配置路由

加个参数

使用

第三种

第四种

声明式 / 编程式导航总结
声明式导航
声明式导航方式在Vue Router中主要通过
组件来实现,它允许你直接在模板中创建导航链接,而无需编写额外的JavaScript代码。以下是一些常见的声明式导航方式及其示 1. 基本的导航链接
使用
组件,并通过to属性指定目标路由的路径。 - <router-link to="/home">Homerouter-link>
- <router-link to="/about">Aboutrouter-link>
2. 带查询参数的导航你可以通过在to属性中传递一个对象来添加查询参数。
<router-link :to="{ path: '/search', query: { q: 'vue' } }">Search Vuerouter-link>
3. 命名路由导航如果你的路由配置中使用了命名路由,你可以通过to属性中的name属性来导航到相应的路由。
<router-link :to="{ name: 'user', params: { id: 123 } }">User 123router-link>
4. a标签跳转可以直接通过a href跳转
<a href="#/Home">首页a>
编程式导航编程式导航是Vue Router提供的一种灵活的方式来进行路由导航。这种方式主要通过Vue组件实例或Vue Router实例的方法来实现,而不是在模板中声明导航链接。
1. router.push(location, onComplete?, onAbort?)
push方法用于导航到新的URL,类似于
的to属性。它可以接收一个路径字符串或是一个描述目标位置的对象。 - this.$router.push('/home'); // 导航到 /home 路径
- // 使用带查询参数的对象
- this.$router.push({ path: '/search', query: { q: 'vue' } }); // 导航到 /search?q=vue
- // 使用命名路由和参数
- this.$router.push({ name: 'user', params: { id: 123 } }); // 导航到命名路由user,并传递id参数
2. router.replace(location, onComplete?, onAbort?)replace方法用于替换当前路由,它不会向浏览器历史记录中添加新的记录。
this.$router.replace('/about'); // 替换当前路由为 /about,但不记录历史
3. router.go(n)go方法用于在浏览器历史记录中前进或后退指定的步数。
- this.$router.go(1); // 前进一步,类似于浏览器的前进按钮
- this.$router.go(-1); // 后退一步,类似于浏览器的后退按钮
4.233、344
Vue2.x 与 Vue3.x版本对应口诀
使用vue2.x时,对应的路由版本和vuex版本是3版本

5.综合案例-面经基础版
视频教程:082-面经基础版-案例效果分析_哔哩哔哩_bilibili
项目分析

准备空组件

路由配置
一级路由配置

- 配置首页的一级路由

- 配置面经详情的一级路由

- 核心代码截图


二级路由配置


首页重定向
进网站首页,自动跳转到文章组件

实现功能
导航链接高亮


首页请求渲染
①异步请求数据


②存储请求的数据

③动态渲染数据

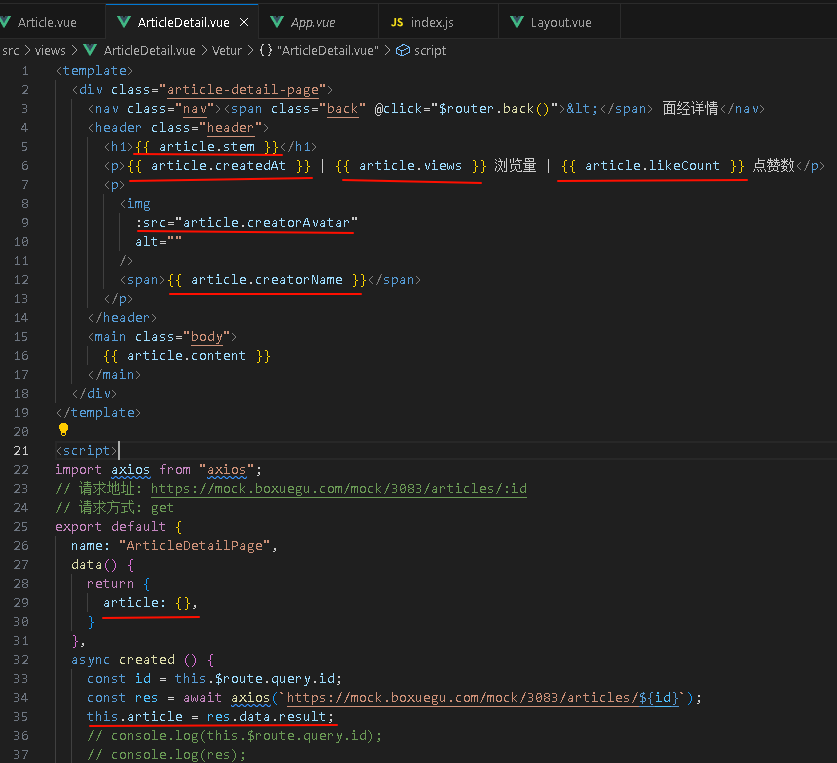
⑤文章详情页-渲染(两种方式传参)
- query查询参数传参
第一步:点击传参

第二步:带上获取的参数请求数据

请求的数据

第四步:新建对象存储,渲染
- 动态路由传参


文章详情-返回上一页


缓存组件-keep-alive


keep-alive的三个属性
注意:include和exclude要写组件名数组,必须是数组,元素较多可以写在data中,而且必须是组件名,如果没有设置组件名name,才会去选择组件文件命名


通常使用include就够了,如果使用exclude,容易影响性能,因为除了指定的组件不缓存,其他都缓存,一定要配合着max使用


下一章:
-
相关阅读:
Web3时代的战争
【Linux】Shell命令行的简易实现(C语言实现)内键命令,普通命令
Linux fork函数详解
Day 46 | 139.单词拆分 & 多重背包理论基础 & 背包问题总结
Spring Boot:自定义注解--annotation
HarmonyOS网络管理开发—HTTP与WebSocket
基于node.js的网页聊天系统设计与实现
Spark计算框架
P1151 子数整数
树回归CART
- 原文地址:https://blog.csdn.net/lklalmq/article/details/139576138