-
界面控件Telerik UI for ASP. NET Core教程 - 如何为网格添加上下文菜单?
Telerik UI for ASP.NET Core是用于跨平台响应式Web和云开发的最完整的UI工具集,拥有超过60个由Kendo UI支持的ASP.NET核心组件。它的响应式和自适应的HTML5网格,提供从过滤、排序数据到分页和分层数据分组等100多项高级功能。
上下文菜单允许开发者为应用程序的最终用户提供额外的功能和选项,本文将带领大家看看如何在 ASP. NET Core 网格中使用它。
Telerik UI for ASP. NET Core Grid组件是一个非常受欢迎的功能,它使您可以自定义用户体验并创建对所呈现的数据有意义的选项。上下文菜单是应用程序很好的功能选择,无论是桌面还是web端,都能直接从屏幕上显示的数据为用户添加额外的功能和选项,从而为您的产品增加价值!
Telerik UI for ASP. NET Core新版下载(Q技术交流:726377843)
您熟悉Telerik UI for ASP. NET Core Grid吗?
Telerik UI for ASP. NET Core是一个健壮的UI组件库,以其卓越的质量和性能而闻名,数据网格是该套件的突出特性之一。
尝试网格上下文菜单
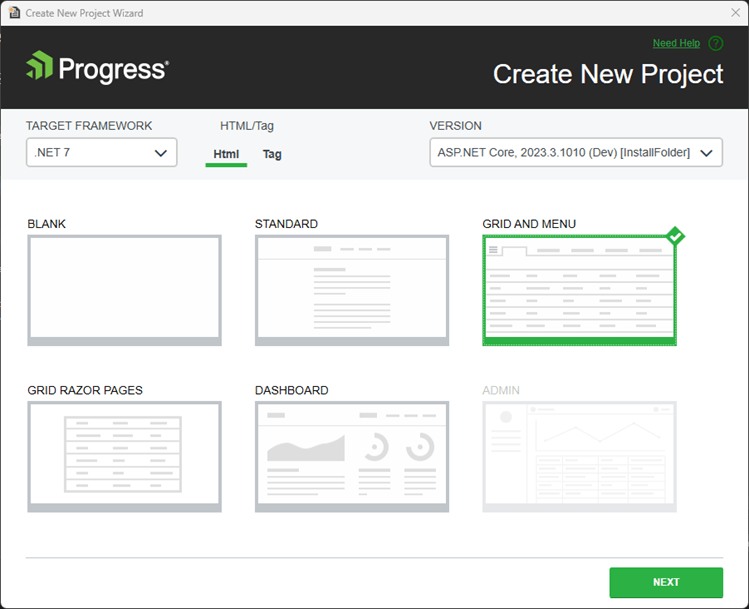
使用进度控制面板应用程序或从VS扩展安装Telerik后,开始创建您的项目类型为Telerik UI for ASP. NET Core:

为项目选择一个路径:

选择更适合您项目的技术:HTML 或 Tag Helpers,对于这个例子,我选择了Grid and Menu模板。
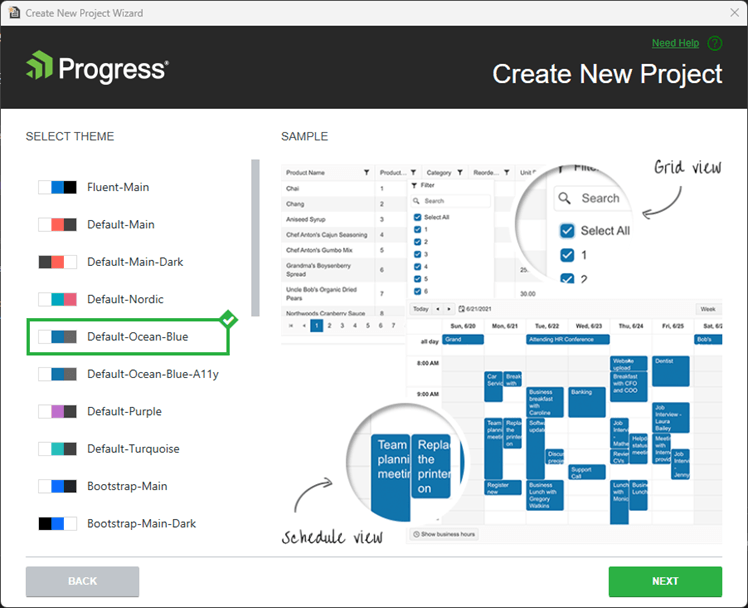
为项目选择一个主题。
确认下一个屏幕,项目看起来像这样:

网格上下文菜单
Grid组件中的ContextMenu选项公开了许多复杂的特性,使开发人员能够更有效、更直观地与网格材料进行交互。
下面是一些网格的ContextMenu特性和功能的描述:
1. Header上下文菜单
排序:在标题上下文菜单中,用户可以直接从上下文菜单中对网格列进行排序,从而改善用户体验。
导出:它支持将网格数据导出为多种格式,如PDF、Excel和其他格式,允许数据共享和报告。
2. Body上下文菜单
选择:此功能允许您在网格中选择单个行或单元格。
编辑:现在可以直接编辑网格内容,简化了数据更新的用户交互。
复制选择:用户可以复制选定的单元格或行,以便在其他地方更容易地使用数据。
不带headers的复制选择:它允许您在不带标头的情况下复制所选数据,从而在数据使用方面提供更大的灵活性。
重新排序行:重新排序工具允许用户根据他们的选择或需要重新排列行。
3. 数据驱动的自定义操作
条件操作:开发人员可以设置上下文菜单,根据网格中的数据显示不同的选项。例如,可以根据行或单元格中的值显示或隐藏特定的菜单选项。
动态菜单选项:上下文菜单的选项可以动态调整,允许对网格数据做出更灵敏和智能的反应。
4. 可扩展性
自定义菜单项:开发人员可以添加触发特定操作的自定义菜单项,根据项目需求扩展网格的功能。
代码是如何工作的?
在GridController上,更改了代码以返回想要的数据:
- 1. using Kendo.Mvc.Extensions;
- 2. using Kendo.Mvc.UI;
- 3. using Microsoft.AspNetCore.Mvc;
- 4. using TelerikAspNetCoreApp1.Models;
- 5.
- 6. namespace TelerikAspNetCoreApp1.Controllers;
- 7. public class GridController : Controller
- 8. {
- 9. public ActionResult Orders_Read([DataSourceRequest] DataSourceRequest request)
- 10. {
- 11. var result = Enumerable.Range(2, 51).Select(i => new OrderViewModel
- 12. {
- 13. OrderID = i,
- 14. Freight = i * 10,
- 15. OrderDate = new DateTime(2023, 9, 15).AddDays(i % 7),
- 16. ShipName = "ShipName " + i,
- 17. ShipCity = "ShipCity " + i
- 18. });
- 19.
- 20. var customRet = result.ToList();
- 21.
- 22. customRet.Insert(0, new OrderViewModel
- 23. {
- 24. OrderID = 1,
- 25. Freight = 1 * 10,
- 26. OrderDate = new DateTime(2023, 9, 15).AddDays(1 % 7),
- 27. ShipName = "Brazil",
- 28. ShipCity = "Porto Alegre"
- 29. });
- 30.
- 31.
- 32. var dsResult = customRet.ToDataSourceResult(request);
- 33. return Json(dsResult);
- 34. }
- 35. }
现在,第一行包含上下文菜单中的选项将监视的特定数据。
在Index.cshtml中,添加了两个通知:
- 1. @(Html.Kendo().Notification()
- 2. .Name("notification")
- 3. .Position(p => p.Pinned(true).Top(60).Left(30))
- 4. .AutoHideAfter(3000)
- 5. )
- 6.
- 7. @(Html.Kendo().Notification()
- 8. .Name("notificationOk")
- 9. .Position(p => p.Pinned(true).Top(30).Left(30))
- 10. .AutoHideAfter(2500)
- 11. )
将ContextMenu方法添加到Grid组件中:
- 1. @(Html.Kendo().Grid
() - 2. .Name("grid")
- 3. .ContextMenu(
添加Head方法和需求的选项:
- 1. @(Html.Kendo().Grid
() - 2. .Name("grid")
- 3. .ContextMenu(menu => menu
- 4. .Head(head =>
- 5. {
- 6. head.Create();
- 7. head.Separator();
- 8. head.SortAsc();
- 9. head.SortDesc();
- 10. head.Separator();
- 11. head.ExportPDF().Text("Generate Pdf File").Icon("file");
- 12. head.ExportExcel();
- 13. })
在这个示例中,向ExportPDF()添加了一个自定义文本。
在Body方法中添加需要的选项:
- 1. @(Html.Kendo().Grid
() - 2. .Name("grid")
- 3. .ContextMenu(menu => menu
- 4. .Head(head =>
- 5. {
- 6. head.Create();
- 7. head.Separator();
- 8. head.SortAsc();
- 9. head.SortDesc();
- 10. head.Separator();
- 11. head.ExportPDF().Text("Generate Pdf File").Icon("file");
- 12. head.ExportExcel();
- 13. })
- 14. .Body(body =>
- 15. {
- 16. body.Edit();
- 17. body.Destroy();
- 18. body.Separator();
- 19. body.Select();
- 20. body.CopySelection();
- 21. body.CopySelectionNoHeaders();
- 22. body.Separator();
- 23. body.ReorderRow();
- 24. body.Custom("myTool").Text("Check status").Icon("gear");
- 25.
- 26. })
- 27. )
在Body方法上添加了一个自定义命令“Check status”,注意自定义名称“myTool”。
在Index.cshtml上添加脚本:
- 1.
通过在网格命令的名称中添加“command”,名称“myTool”成为命令:
- 1. kendo.ui.grid.commands["myToolCommand"] = kendo.ui.grid.GridCommand.extend({
- 2. ...
下图显示了工作演示:

现在当点击“Check status”时,它将执行如下验证:
- 1. var selectedItems = $("#grid").data("kendoGrid").selectedKeyNames();
- 2. var actualItems = [];
- 3.
- 4. if (selectedItems.length > 0) {
- 5. selectedItems.forEach(function (key) {
- 6.
- 7. var item = grid.dataSource.get(key);
- 8. if (item.ShipCity == "Porto Alegre") {
- 9. var popupNotification = $("#notification").data("kendoNotification");
- 10. popupNotification.show(`This city ’${item.ShipCity}’ is temporary blocked!`, "error")
- 11. }
- 12. else {
- 13. actualItems.push(item);
- 14. }
- 15. });
- 16. }
- 17. if (actualItems.length > 0) {
- 18. var popupNotification = $("#notificationOk").data("kendoNotification");
- 19. popupNotification.show(`’${actualItems.length}’ cities available!`, "info")
- 20. }
下面一行接收所有选定的键值:
1. var selectedItems = $("#grid").data("kendoGrid").selectedKeyNames();下面一行通过键获取数据记录:
1. var item = grid.dataSource.get(key);下面这一行分析了模型中的属性/列ShipCity:
1. if (item.ShipCity == "Porto Alegre")通知将显示如下内容:
- 1. if (actualItems.length > 0) {
- 2. var popupNotification = $("#notificationOk").data("kendoNotification");
- 3. popupNotification.show(`’${actualItems.length}’ cities available!`, "info")
- 4. }
你需要做一些额外的配置才能使这个示例正常工作:
添加Model方法并并定义网格的唯一Id,使用.Model(model => model. Id(p => p.**OrderID**)):
- 1. .DataSource(dataSource => dataSource
- 2. .Ajax()
- 3. .Model(model => model.Id(p => p.OrderID))
- 4. .PageSize(20)
- 5. .Read(read => read.Action("Orders_Read", "Grid"))
- 6. )
- 7. )
在OrderViewModel上,为OrderID定义[Key]:
- 1. [Key]
- 2. public int OrderID
- 3. {
- 4. get;
- 5. set;
- 6. }
下面是Grid组件的完整定义:
- 1. @(Html.Kendo().Grid
() - 2. .Name("grid")
- 3. .ContextMenu(menu => menu
- 4. .Head(head =>
- 5. {
- 6. head.Create();
- 7. head.Separator();
- 8. head.SortAsc();
- 9. head.SortDesc();
- 10. head.Separator();
- 11. head.ExportPDF().Text("Generate Pdf File").Icon("file");
- 12. head.ExportExcel();
- 13. })
- 14. .Body(body =>
- 15. {
- 16. body.Edit();
- 17. body.Destroy();
- 18. body.Separator();
- 19. body.Select();
- 20. body.CopySelection();
- 21. body.CopySelectionNoHeaders();
- 22. body.Separator();
- 23. body.ReorderRow();
- 24. body.Custom("myTool").Text("Check status").Icon("gear");
- 25.
- 26. })
- 27. )
- 28. .Columns(columns =>
- 29. {
- 30. columns.Bound(p => p.OrderID).Filterable(false);
- 31. columns.Bound(p => p.Freight);
- 32. columns.Bound(p => p.OrderDate).Format("{0:MM/dd/yyyy}");
- 33. columns.Bound(p => p.ShipName);
- 34. columns.Bound(p => p.ShipCity);
- 35. })
- 36. .Selectable(selectable => selectable
- 37. .Mode(GridSelectionMode.Multiple))
- 38. .Pageable()
- 39. .Sortable()
- 40. .Scrollable()
- 41. .Groupable()
- 42. .Filterable()
- 43. .HtmlAttributes(new { style = "height:550px;" })
- 44. .DataSource(dataSource => dataSource
- 45. .Ajax()
- 46. .Model(model => model.Id(p => p.OrderID))
- 47. .PageSize(20)
- 48. .Read(read => read.Action("Orders_Read", "Grid"))
- 49. )
- 50. )
-
相关阅读:
DI依赖注入-P8,P9,P10,P11
【Java网络编程】二
Centos编译安装python3.9
奖补50万,2022年武汉市推动工业互联网平台化发展专项资金申报条件以及奖励补贴标准
五分钟k8s实战-Istio 网关
paddlespeech 安装和测试教程
相交链表Java
.bashrc中配置环境变量不生效
小程序原生代码转uniapp
Maximum cardinality matching
- 原文地址:https://blog.csdn.net/AABBbaby/article/details/136389215
