-
【Mycat2实战】五、Mycat实现分库分表【实践篇】
Mycat2本系列文章
一、Mycat简介
二、Mycat安装部署
三、Mycat实现读写分离
四、Mycat实现分库分表【概念篇】
五、Mycat实现分库分表【实践篇】1. 前言
上篇文章讲述了Mycat分库分表的概念,本文主要讲如何使用Mycat来实现分库分表。
正式配置之前,先声明一下,配置分表这里采用注释配置的方法,配置即可生效并且动态更新Mycat配置并且把配置持久化,具体可参考通过注释配置文档介绍,这个注释配置挺方便的。后面的Mycat分片算法讲解会介绍直接通过建表语句创建分片。
这里介绍和上文Mycat已执行的内容均无关联,这里先重置Mycat配置。重置后读写分离文章中相关的配置全部清除。
/*+ mycat:resetConfig{} */- 1

注意:这里连接Mycat时建议使用Navicat,部分开源的数据库连接软件 逻辑表 可能展示不出来,例如博主使用的这款(满满的全是泪😭),部分图是在Navicat上截取
2. 单数据源单库分表(水平分表)
2.1 准备数据源
创建一个新的数据库连接。
127.0.0.1:3308,用户名:root, 密码:123456。
2.2 在Mycat上添加数据源
首先使用在Mycat上添加数据源,使用注解就如果读写分离一文中的在
conf/datasources目录下创建xxx.datasource.json文件。/*+ mycat:createDataSource{ "dbType":"mysql", "idleTimeout":60000, "initSqls":[], "initSqlsGetConnection":true, "instanceType":"READ_WRITE", "maxCon":1000, "maxConnectTimeout":3000, "maxRetryCount":5, "minCon":1, "name":"sharding", "password":"123456", "type":"JDBC", "url":"jdbc:mysql://127.0.0.1:3308?useUnicode=true&serverTimezone=UTC&characterEncoding=UTF-8", "user":"root", "weight":0 } */;- 1
- 2
- 3
- 4
- 5
- 6
- 7
- 8
- 9
- 10
- 11
- 12
- 13
- 14
- 15
- 16
- 17
通过命令
/*+ mycat:showDataSources{} */,可以看到新增的数据源sharding。
同时可以看到在
conf/datasources目录下多了sharding.datasource.json文件。
2.3 水平分表实现
在
127.0.0.1:3308创建数据库xxf_sharding。CREATE DATABASE `xxf_sharding`;- 1
在Mycat数据库执行同步生成schema
/*+ mycat:createSchema{ "customTables":{}, "globalTables":{}, "normalTables":{}, "schemaName":"xxf_sharding", "shardingTables":{}, "targetName":"sharding" } */;- 1
- 2
- 3
- 4
- 5
- 6
- 7
- 8
接着创建数据分片规则,在Mycat上执行,采用注释方法配置,先看配置:
/*+ mycat:createTable{ "schemaName":"xxf_sharding", "tableName":"xxf_user", "shardingTable":{ "createTableSQL":"CREATE TABLE `xxf_user` ( `id` BIGINT(20) NOT NULL COMMENT '用户ID', `user_name` VARCHAR(30) NULL DEFAULT NULL COMMENT '用户姓名', `email` VARCHAR(50) NULL DEFAULT NULL COMMENT '用户邮箱', `phone` VARCHAR(11) NULL DEFAULT NULL COMMENT '手机号码', `sex` CHAR(1) NULL DEFAULT NULL COMMENT '用户性别', PRIMARY KEY (`id`) USING BTREE ) COMMENT='笑小枫-用户信息表' COLLATE='utf8_general_ci' ENGINE=InnoDB;", "function":{ "properties":{ "mappingFormat": "sharding/xxf_sharding/xxf_user_${tableIndex}", "dbNum":1, //分库数量 "tableNum":3, //分表数量 "tableMethod":"mod_hash(id)", //分表分片函数 "storeNum":1, //实际存储节点数量 "dbMethod":"mod_hash(id)" //分库分片函数 } }, "partition":{ } } } */;- 1
- 2
- 3
- 4
- 5
- 6
- 7
- 8
- 9
- 10
- 11
- 12
- 13
- 14
- 15
- 16
- 17
- 18
- 19
- 20
- 21
- 22
- 23
- 24
- 25
- 26
- 27
解释一下 mappingFormat属性 targetName/schemaName/tableName 数据库 /物理库名 /物理分表名 targetName:就是配置集群数据源名称,对应prototype.cluster.json 文件中的name属性; schemaName:逻辑库; tableName: 分表的名称; 以上属性都支持表达式,比如user_${tableIndex}会自动根据配置的分表数量(tableNum),从0开始,分为xxf_user_0、xxf_user_1、xxf_user_2三个表,配置集群数据源和逻辑库都是这个原理,这里是单数据源单库就不演示了。 另外,建表语句复杂的话可以先导出表结构,复制粘贴到createTableSQL属性后边即可。 算法请参考:分片算法简介——如果默认的算法都不满足需求,可以下载mycat的源代码,然后修改对应的算法,打包来用即可。- 1
- 2
- 3
- 4
- 5
- 6
- 7
- 8
- 9
- 10
- 11
- 12
- 13
- 14
- 15
- 16
执行完成,可以看见在
127.0.0.1:3308数据库xxf_sharding生成了3张分片表。
查看一下分片规则,在mycat下执行:
/*+ mycat:showTopology{ "schemaName":"xxf_sharding", "tableName":"xxf_user" } */;- 1
- 2
- 3
- 4
结果如下:

在Mycat下执行以下插入语句:
INSERT INTO `xxf_user` VALUES (1, '张三1', 'zhangsan1@xiaoxiaofeng.com', '18300000001', '1'); INSERT INTO `xxf_user` VALUES (2, '张三2', 'zhangsan2@xiaoxiaofeng.com', '18300000002', '1'); INSERT INTO `xxf_user` VALUES (3, '张三3', 'zhangsan3@xiaoxiaofeng.com', '18300000003', '1'); INSERT INTO `xxf_user` VALUES (4, '张三4', 'zhangsan4@xiaoxiaofeng.com', '18300000004', '1'); INSERT INTO `xxf_user` VALUES (5, '张三5', 'zhangsan5@xiaoxiaofeng.com', '18300000005', '1'); INSERT INTO `xxf_user` VALUES (6, '张三6', 'zhangsan6@xiaoxiaofeng.com', '18300000006', '1');- 1
- 2
- 3
- 4
- 5
- 6
在Mycat上可以看到
xxf_sharding库下的xxf_user表里有全部的数据。注意这个xxf_user表是逻辑表,在物理库中是不存在的,主要是综合xxf_user_0~3表的信息

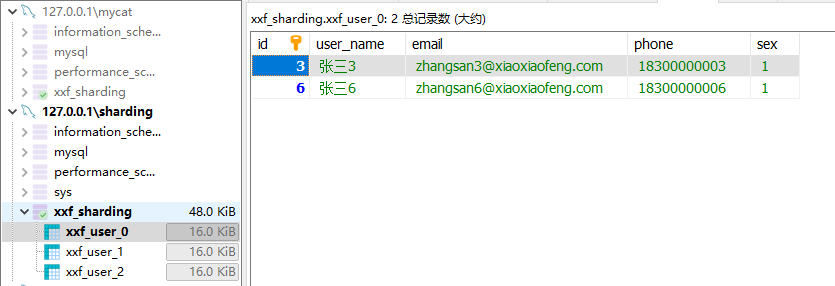
可以看到数据分别插入到了不同的分片上


单数据源的水平拆分表到这里已经实现了,不过这样所有的访问压力仍然都在这一台服务器上,可能并不能满足我们的需求,接下来一起看一下多数据源多库的环境下如何分表吧。
3. 多数据源多库分表(水平分库分表)
先重置一下我们的Mycat。
/*+ mycat:resetConfig{} */- 1
3.1 准备数据源
创建两个新的数据源,分别如下。
`127.0.0.1:3307`,用户名:`root`, 密码:`123456`。 `127.0.0.1:3308`,用户名:`root`, 密码:`123456`。- 1
- 2

3.2 在Mycat上添加数据源
在Mycat连接下分别添加ds0和ds1数据源。如下:
添加数据源ds0
/*+ mycat:createDataSource{ "dbType":"mysql", "idleTimeout":60000, "initSqls":[], "initSqlsGetConnection":true, "instanceType":"READ_WRITE", "maxCon":1000, "maxConnectTimeout":3000, "maxRetryCount":5, "minCon":1, "name":"ds0", "password":"123456", "type":"JDBC", "url":"jdbc:mysql://127.0.0.1:3307?useUnicode=true&serverTimezone=UTC&characterEncoding=UTF-8", "user":"root", "weight":0 } */;- 1
- 2
- 3
- 4
- 5
- 6
- 7
- 8
- 9
- 10
- 11
- 12
- 13
- 14
- 15
- 16
- 17
添加数据源ds1
/*+ mycat:createDataSource{ "dbType":"mysql", "idleTimeout":60000, "initSqls":[], "initSqlsGetConnection":true, "instanceType":"READ_WRITE", "maxCon":1000, "maxConnectTimeout":3000, "maxRetryCount":5, "minCon":1, "name":"ds1", "password":"123456", "type":"JDBC", "url":"jdbc:mysql://127.0.0.1:3308?useUnicode=true&serverTimezone=UTC&characterEncoding=UTF-8", "user":"root", "weight":0 } */;- 1
- 2
- 3
- 4
- 5
- 6
- 7
- 8
- 9
- 10
- 11
- 12
- 13
- 14
- 15
- 16
- 17
通过命令
/*+ mycat:showDataSources{} */,可以看到新增的数据源。
这里我单独创建了两个数据源配置文件,当然也可以利用已经存在的prototypeDs.datasource.json文件作为数据源1,那么你只需要再配置数据源2就可以了。
3.3 创建集群
创建c0、c1集群,用来关联数据源1、2。
自动分片默认要求集群名字以c为前缀,数字为后缀,c0就是分片表第一个节点,c1就是第二个节点,也可以自己更改命名。
创建集群1:c0
/*+ mycat:createCluster{ "clusterType":"MASTER_SLAVE", "heartbeat":{ "heartbeatTimeout":1000, "maxRetry":3, "minSwitchTimeInterval":300, "slaveThreshold":0 }, "masters":[ "ds0" //主节点 ], "maxCon":2000, "name":"c0", "readBalanceType":"BALANCE_ALL", "switchType":"SWITCH" } */;- 1
- 2
- 3
- 4
- 5
- 6
- 7
- 8
- 9
- 10
- 11
- 12
- 13
- 14
- 15
- 16
创建集群2:c1
/*+ mycat:createCluster{ "clusterType":"MASTER_SLAVE", "heartbeat":{ "heartbeatTimeout":1000, "maxRetry":3, "minSwitchTimeInterval":300, "slaveThreshold":0 }, "masters":[ "ds1" //主节点 ], "maxCon":2000, "name":"c1", "readBalanceType":"BALANCE_ALL", "switchType":"SWITCH" } */;- 1
- 2
- 3
- 4
- 5
- 6
- 7
- 8
- 9
- 10
- 11
- 12
- 13
- 14
- 15
- 16
查看添加的集群信息:
/*+ mycat:showClusters{} */
3.4 创建分片规则
在
mycat创建数据库xxf_sharding。在Mycat数据库执行同步生成schema
/*+ mycat:createSchema{ "customTables":{}, "globalTables":{}, "normalTables":{}, "schemaName":"xxf_sharding", "shardingTables":{} } */;- 1
- 2
- 3
- 4
- 5
- 6
- 7
在
127.0.0.1:3307和127.0.0.1:3308上创建数据库xxf_sharding。CREATE DATABASE `xxf_sharding`;- 1

接着创建数据分片规则,在Mycat上执行,采用注释方法配置,先看配置:
/*+ mycat:createTable{ "schemaName":"xxf_sharding", "tableName":"xxf_user", "shardingTable":{ "createTableSQL":"CREATE TABLE `xxf_user` ( `id` BIGINT(20) NOT NULL COMMENT '用户ID', `user_name` VARCHAR(30) NULL DEFAULT NULL COMMENT '用户姓名', `email` VARCHAR(50) NULL DEFAULT NULL COMMENT '用户邮箱', `phone` VARCHAR(11) NULL DEFAULT NULL COMMENT '手机号码', `sex` CHAR(1) NULL DEFAULT NULL COMMENT '用户性别', PRIMARY KEY (`id`) USING BTREE ) COMMENT='笑小枫-用户信息表' COLLATE='utf8_general_ci' ENGINE=InnoDB;", "function":{ "properties":{ "mappingFormat": "c${targetIndex}/xxf_sharding/xxf_user_${tableIndex}", "dbNum":2, //分库数量 "tableNum":3, //分表数量 "tableMethod":"mod_hash(id)", //分表分片函数 "storeNum":2, //实际存储节点数量 "dbMethod":"mod_hash(id)" //分库分片函数 } }, "partition":{ } } } */;- 1
- 2
- 3
- 4
- 5
- 6
- 7
- 8
- 9
- 10
- 11
- 12
- 13
- 14
- 15
- 16
- 17
- 18
- 19
- 20
- 21
- 22
- 23
- 24
- 25
- 26
- 27
可以看到ds0和ds1都已经创建出了对应的3个分片表

查看一下分片规则,在mycat下执行:
/*+ mycat:showTopology{ "schemaName":"xxf_sharding", "tableName":"xxf_user" } */;- 1
- 2
- 3
- 4
结果如下:

在Mycat下执行以下插入语句:
INSERT INTO `xxf_user` VALUES (1, '张三1', 'zhangsan1@xiaoxiaofeng.com', '18300000001', '1'); INSERT INTO `xxf_user` VALUES (2, '张三2', 'zhangsan2@xiaoxiaofeng.com', '18300000002', '1'); INSERT INTO `xxf_user` VALUES (3, '张三3', 'zhangsan3@xiaoxiaofeng.com', '18300000003', '1'); INSERT INTO `xxf_user` VALUES (4, '张三4', 'zhangsan4@xiaoxiaofeng.com', '18300000004', '1'); INSERT INTO `xxf_user` VALUES (5, '张三5', 'zhangsan5@xiaoxiaofeng.com', '18300000005', '1'); INSERT INTO `xxf_user` VALUES (6, '张三6', 'zhangsan6@xiaoxiaofeng.com', '18300000006', '1');- 1
- 2
- 3
- 4
- 5
- 6
可以看出来,插入数据根据mod_hash算法分布到了不同的数据源,数据库表中。在Mycat上可以看到
xxf_sharding库下的xxf_user表里有全部的数据。
-
相关阅读:
Loki | 数据过期自动删除策略设计
PostgreSQL修炼之道笔记之基础篇(五)
docker配置nginx
BERT论文阅读
强大好用的shell:shell的工作原理是什么
css知识学习系列(13)-每天10个知识点
non-trivial designated initializers not supported
查找算法-二分查找法(Binary Search)
《ANCHOR:区分 “湖仓一体” 和 “湖仓分体” 的锚》
Vulnhub系列靶机---HarryPotter-Nagini-哈利波特系列靶机-2
- 原文地址:https://blog.csdn.net/qq_34988304/article/details/134534997