-
Haproxy实现七层负载均衡
目录
Haproxy概述
haproxy---主要是做负载均衡的7层,也可以做4层负载均衡
apache也可以做7层负载均衡,但是很麻烦。实际工作中没有人用。
负载均衡是通过OSI协议对应的
7层负载均衡:用的7层http协议,
4层负载均衡:用的是tcp协议加端口号做的负载均衡haproxy算法:
1.roundrobin
基于权重进行轮询,在服务器的处理时间保持均匀分布时,这是最平衡,最公平的算法.此算法是动态的,这表示其权重可以在运行时进行调整.不过在设计上,每个后端服务器仅能最多接受4128个连接
2.static-rr
基于权重进行轮询,与roundrobin类似,但是为静态方法,在运行时调整其服务器权重不会生效.不过,其在后端服务器连接数上没有限制
3.leastconn
新的连接请求被派发至具有最少连接数目的后端服务器.Haproxy实现七层负载
keepalived+haproxy
192.168.134.165 master
192.168.134.166 slave
192.168.134.163 nginx-server
192.168.134.164 nginx-server
192.168.134.160 VIP(虚拟IP)
①部署nginx-server测试页面
两台nginx都部署方便测试
- [root@server03 ~]# yum -y install nginx
- [root@server03 ~]# systemctl start nginx
- [root@server03 ~]# echo "webserver01..." > /usr/share/nginx/html/index.html
- [root@server04 ~]# yum -y install nginx
- [root@server04 ~]# systemctl start nginx
- [root@server04 ~]# echo "webserver02..." > /usr/share/nginx/html/index.html
②(主/备)部署负载均衡器
- [root@server01 ~]# yum -y install haproxy
- [root@server01 ~]# vim /etc/haproxy/haproxy.cfg
- global
- log 127.0.0.1 local2 info
- pidfile /var/run/haproxy.pid
- maxconn 4000
- user haproxy
- group haproxy
- daemon
- nbproc 1
- defaults
- mode http
- log global
- retries 3
- option redispatch
- maxconn 4000
- contimeout 5000
- clitimeout 50000
- srvtimeout 50000
- listen stats
- bind *:81
- stats enable
- stats uri /haproxy
- stats auth aren:123
- frontend web
- mode http
- bind *:80
- option httplog
- acl html url_reg -i \.html$
- use_backend httpservers if html
- default_backend httpservers
- backend httpservers
- balance roundrobin
- server http1 192.168.134.163:80 maxconn 2000 weight 1 check inter 1s rise 2 fall 2
- server http2 192.168.134.164:80 maxconn 2000 weight 1 check inter 1s rise 2 fall 2
- [root@server01 ~]# systemctl start haproxy
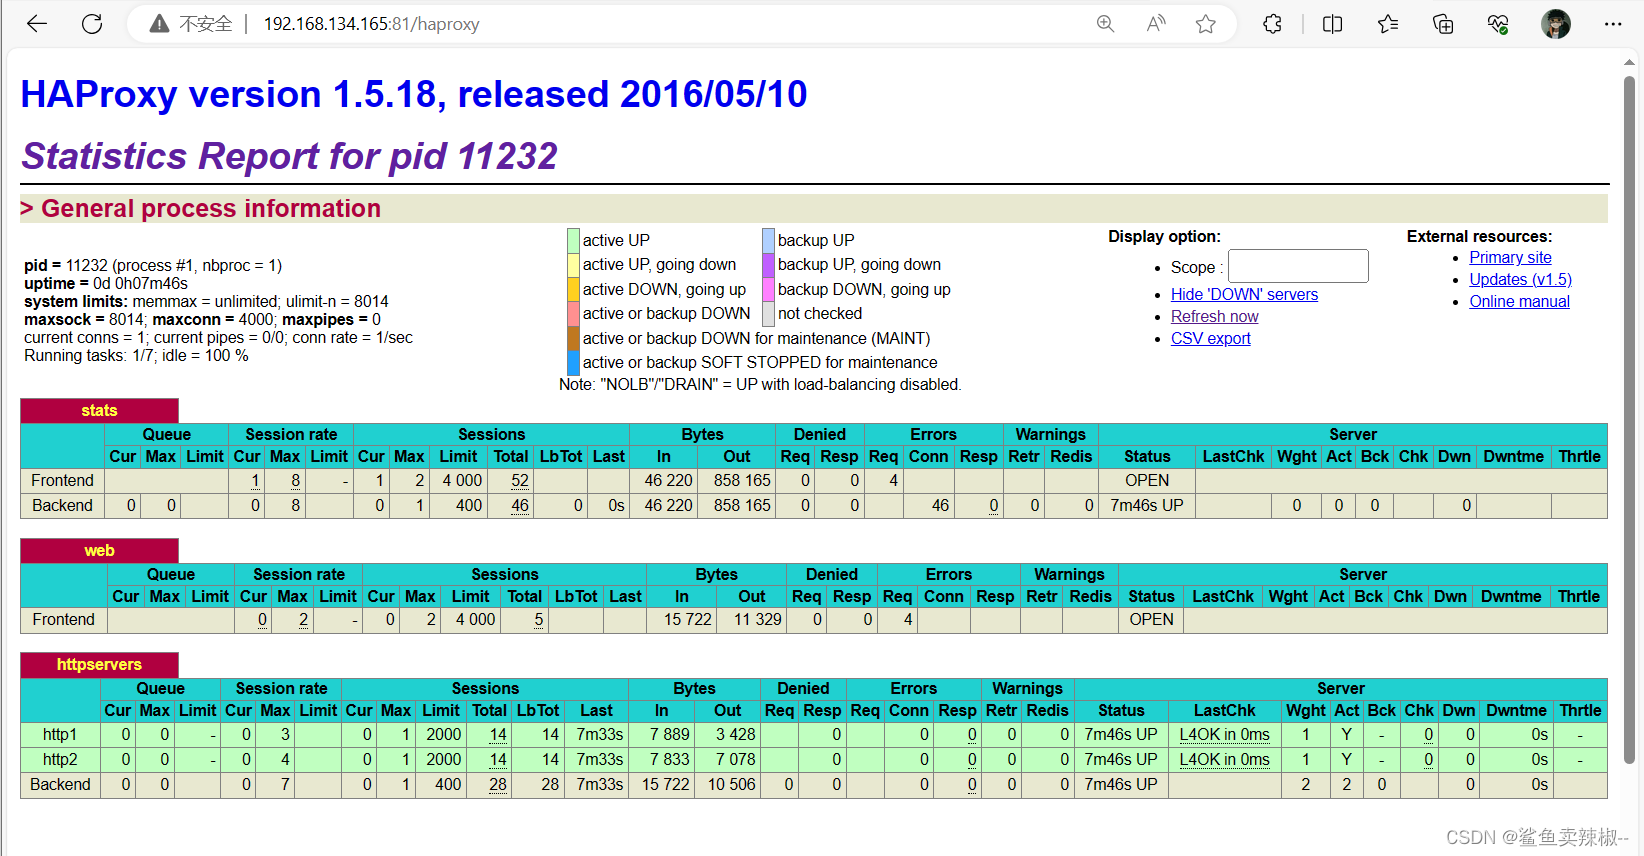
浏览器访问haproxy监控
master:
slave:

页面主要参数解释
Queue
Cur: current queued requests //当前的队列请求数量
Max:max queued requests //最大的队列请求数量
Limit: //队列限制数量Errors
Req:request errors //错误请求
Conn:connection errors //错误的连接Server列表:
Status:状态,包括up(后端机活动)和down(后端机挂掉)两种状态
LastChk: 持续检查后端服务器的时间
Wght: (weight) : 权重③部署keepalived高可用
注意:master和slave的优先级不一样,但虚拟路由id(virtual_router_id)保持一致;并且slave配置 nopreempt(不抢占资源)
master:
- [root@server01 ~]# yum -y install keepalived
- [root@server01 ~]# vim /etc/keepalived/keepalived.conf
- ! Configuration File for keepalived
- global_defs {
- router_id director1
- }
- vrrp_instance VI_1 {
- state MASTER
- interface ens33
- virtual_router_id 80
- priority 100
- advert_int 1
- authentication {
- auth_type PASS
- auth_pass 1111
- }
- virtual_ipaddress {
- 192.168.134.160/24
- }
- }
- [root@server01 ~]# systemctl start keepalived
slaver:
- [root@localhost ~]# yum -y install keepalived
- [root@localhost ~]# vim /etc/keepalived/keepalived.conf
- ! Configuration File for keepalived
- global_defs {
- router_id directory2
- }
- vrrp_instance VI_1 {
- state BACKUP
- interface ens33
- nopreempt
- virtual_router_id 80
- priority 50
- advert_int 1
- authentication {
- auth_type PASS
- auth_pass 1111
- }
- virtual_ipaddress {
- 192.168.134.160/24
- }
- }
- [root@localhost ~]# systemctl start keepalived
查看IP

④增加对haproxy健康检查
两台机器都做,让Keepalived以一定时间间隔执行一个外部脚本,脚本的功能是当Haproxy失败,则关闭本机的Keepalived。
- [root@server01 ~]# vim /etc/keepalived/check.sh
- #!/bin/bash
- /usr/bin/curl -I http://localhost &>/dev/null
- if [ $? -ne 0 ];then
- # /etc/init.d/keepalived stop
- systemctl stop keepalived
- fi
- [root@server01 ~]# chmod a+x /etc/keepalived/check.sh
在keepalived增加健康检查配置vrrp_script check_haproxy并且用 track_script调用。
- ! Configuration File for keepalived
- global_defs {
- router_id director1
- }
- vrrp_script check_haproxy {
- script "/etc/keepalived/check.sh"
- interval 5
- }
- vrrp_instance VI_1 {
- state MASTER
- interface ens33
- virtual_router_id 80
- priority 100
- advert_int 1
- authentication {
- auth_type PASS
- auth_pass 1111
- }
- virtual_ipaddress {
- 192.168.134.160/24
- }
- track_script {
- check_haproxy
- }
- }
重启keepalived
[root@server01 ~]# systemctl restart keepalived⑤测试
关闭master的haproxy服务可以发现master的keepalived服务也关闭,此时master上的VIP转移到slave上
- 关闭master的服务并查看VIP

- 查看slave的IP可以发现VIP跳转至此。

- 在web界面查看服务是否正常
第一次刷新

第二次刷新

-
相关阅读:
label问题排查:打不开标注好的图像
Django自定义manage.py命令实现hexo博客迁移
Vue el-table全表搜索,模糊匹配-前端静态查询
无涯教程-JavaScript - DEGREES函数
函数柯里化详解
rsync远程同步
兼顾省钱与性能的存储资源盘活系统
瑞吉外卖实战项目全攻略——优化篇第一天
解决AU报“MME无法使用“问题
记一次公司被勒索病毒攻击事迹,上上下下咬牙切齿
- 原文地址:https://blog.csdn.net/l1727377/article/details/134345122
