-
Android UI 开发·界面布局开发·案例分析

目录
1. 线性布局(LinearLayout)
LinearLayout线性布局是一种最简单的布局方式,它有垂直和水平两种布局方向,使用“android:orientation="vertical"”属性设置可以指定布局方式为垂直,使用“android:orientation= "horizontal"”属性设置可以指定布局方式为水平。
下面我们将通过一个案例了解LinearLayout这种布局方式。
- "1.0" encoding="utf-8"?>
- <LinearLayout xmlns:android="http://schemas.android.com/apk/res/android"
- xmlns:tools="http://schemas.android.com/tools"
- android:layout_width="match_parent"
- android:layout_height="match_parent"
- android:orientation="vertical" >
- <RelativeLayout
- android:layout_width="match_parent"
- android:layout_height="match_parent"
- android:layout_weight="2"
- android:background="@android:color/white" >
- RelativeLayout>
- <RelativeLayout
- android:layout_width="match_parent"
- android:layout_height="match_parent"
- android:layout_weight="1"
- android:background="@android:color/black" >
- RelativeLayout>
- LinearLayout>

LinearLayout有两个非常相似的属性: android:gravity和android:layout_ gravity。
它们都是用来设置对齐方式的,可选值包括left(左对齐)、right(右对齐)、top(上对齐)、bottom(下对齐)、center(居中)、center_horizontal(水平居中)和center_vertical(垂直居中)等,这些值还可以组合使用,中间用“|”分开。
android:gravity和android:layout_gravity的区别在于:
(1)android:gravity:用于设置该View内部内容的对齐方式。
(2)android:layout_gravity:用于设置该View在其父View中的对齐方式。
2. 相对布局(RelativeLayout)
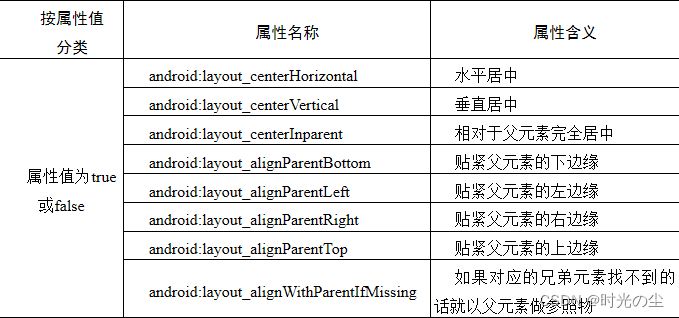
相对布局中的视图组件是按相互之间的相对位置来确定的,并不是线性布局中的必须按行或按列单个显示,在此布局中的子元素里与位置相关的属性将生效。
例如“android:layout_below”、“android:layout_above”等。注意在指定位置关系时,引用的ID必须在引用之前,先被定义,否则将出现异常。RelativeLayout是Android布局结构中最灵活的一种布局结构,比较适合一些复杂界面的布局。

- "1.0" encoding="utf-8"?>
- <RelativeLayout xmlns:android="http://schemas.android.com/apk/res/android"
- xmlns:tools="http://schemas.android.com/tools"
- android:layout_width="match_parent"
- android:layout_height="match_parent" >
- <EditText
- android:id="@+id/et"
- android:layout_width="120dp"
- android:layout_height="wrap_content"
- android:inputType="text" />
- <TextView
- android:id="@+id/tv"
- android:layout_width="wrap_content"
- android:layout_height="wrap_content"
- android:layout_below="@+id/et"/>
- <Button
- android:id="@+id/bt_ok"
- android:layout_width="wrap_content"
- android:layout_height="wrap_content"
- android:layout_below="@+id/tv"
- android:layout_toRightOf="@+id/et"
- android:text="确认" />
- <Button
- android:id="@+id/bt_clear"
- android:layout_width="wrap_content"
- android:layout_height="wrap_content"
- android:layout_alignTop="@+id/bt_ok"
- android:layout_toRightOf="@+id/bt_ok"
- android:layout_marginLeft="25dp"
- android:text="清除" />
- RelativeLayout>
- /* 复写监听器对象的onClick方法,完成点击后的事件处理,参数为被点击的按钮 */
- @Override
- public void onClick(View v) {
- //根据按钮控件的id区分不同按钮的点击
- switch (v.getId()) {
- case R.id.bt_ok:
- //获取界面控件EditText的输入内容
- String _Text = mEditText.getText().toString();
- //给界面控件TextView的文本设置为输入内容
- mTextView.setText(_Text);
- break;
- case R.id.bt_clear:
- //清空界面控件EditText的文本输入内容
- mEditText.setText("");
- break;
- }
- }
- }

3. 表格布局(TableLayout)
TableLayout属于行和列形式的管理控件,适用于多行多列的布局格式,每行为一个TableRow对象,也可以是一个View对象。在TableRow中还可以继续添加其他的控件,每添加一个子控件就成为一列。TableLayout不会生成边框。

表格布局的风格跟HTML中的表格比较接近,只是所采用的标签不同。
是顶级元素,说明采用的是表格布局, 定义一个行,而具体控件则定义一个单元格的内容。 - "1.0" encoding="utf-8"?>
- <TableLayout xmlns:android="http://schemas.android.com/apk/res/android"
- android:layout_width="fill_parent"
- android:layout_height="fill_parent"
- android:stretchColumns="0,1,2,3" >
- <TableRow>
- <TextView
- android:gravity="center"
- android:padding="3dip"
- android:text="姓名" />
- <TextView
- android:gravity="center"
- android:padding="3dip"
- android:text="性别" />
- <TextView
- android:gravity="center"
- android:padding="3dip"
- android:text="年龄" />
- <TextView
- android:gravity="center"
- android:padding="3dip"
- android:text="电话" />
- TableRow>
- <TableRow>
- <TextView
- android:gravity="center"
- android:padding="3dip"
- android:text="小明" />
- ......
- TableRow>
- <TableRow>
- <TextView
- android:gravity="center"
- android:padding="3dip"
- android:text="小王" />
- ......
- TableRow>
- TableLayout>

4. 帧布局(FrameLayout)
帧布局中的每一个组件都代表一个画面,默认以屏幕左上角作为(0, 0)坐标,按组件定义的先后顺序依次逐屏显示,后面出现的会覆盖前面的画面。用该布局可以实现动画效果。
- <?xml version="1.0" encoding="utf-8"?>
- <!-- 最外面的布局文件为帧布局 -->
- <FrameLayout xmlns:android="http://schemas.android.com/apk/res/android"
- android:layout_width="fill_parent"
- android:layout_height=“wrap_content” >
- <TextView
- android:layout_width="wrap_content"
- android:layout_height="wrap_content"
- android:text="A Text" >
- </TextView>
- <Button
- android:layout_width="wrap_content"
- android:layout_height="wrap_content"
- android:text="A Button" >
- </Button>
- </FrameLayout>

5. 网格布局(GridLayout)
GridLayout提供了一种新的布局方式,它可以将子视图放入到一个矩形网格中。GridLayout有以下两个构造函数:
(1)public GridLayout() 建立一个默认的GridLayout布局;
(2)public GridLayout(int numColumns, boolean makeColumnsEqualWidth)
建立一个GridLayout布局,拥有numColumns列。如果makeColumnsEqualWidth为true,则全部组件将拥有相同的宽度。

GridLayout中的元素一般不采用layout_width和layout_height来界定大小,而是采用“layout_gravity=" fill_horizontal"”或”fill_vertical”,并配合GridLayout的“android:orientation”属性来定义它里面的视图元素的大小。默认情况下,它里面的元素大小为“wrap_content”。
GridLayout中的“android:orientation”属性,决定了其中的视图元素的摆放方式,如果为“vertical”,则先摆第一列,然后第二列,以此类推;如果为“horizontal”,则先摆第一行,然后第二行,以此类推。
- <?xml version="1.0" encoding="utf-8"?>
- <GridLayout
- xmlns:android="http://schemas.android.com/apk/res/android"
- android:layout_width="wrap_content"
- android:layout_height="wrap_content"
- android:orientation="horizontal"
- android:rowCount="5"
- android:columnCount="4">
- <Button
- android:id="@+id/one"
- android:text="1" />
- <Button
- android:id="@+id/two"
- android:text="2"/>
- <Button
- android:id="@+id/three"
- android:text="3"/>
- <Button
- android:id="@+id/devide"
- android:text="/"/>
- <Button
- android:id="@+id/four"
- android:text="4"/>
- <Button
- android:id="@+id/five"
- android:text="5"/>
- <Button
- android:id="@+id/six"
- android:text="6"/>
- <Button
- android:id="@+id/multiply"
- android:text="×"/>
- <Button
- android:id="@+id/seven"
- android:text="7"/>
- <Button
- android:id="@+id/eight"
- android:text="8"/>
- <Button
- android:id="@+id/nine"
- android:text="9"/>
- <Button
- android:id="@+id/minus"
- android:text="-"/>
- <Button
- android:id="@+id/zero"
- android:layout_columnSpan="2"
- android:layout_gravity="fill"
- android:text="0"/>
- <Button
- android:id="@+id/point"
- android:text="."/>
- <Button
- android:id="@+id/plus"
- android:layout_rowSpan="2"
- android:layout_gravity="fill"
- android:text="+"/>
- <Button
- android:id="@+id/equal"
- android:layout_columnSpan="3"
- android:layout_gravity="fill"
- android:text="="/>
- </GridLayout>

6. 绝对布局(AbsoluteLayout)
AbsoluteLayout,又可以叫做坐标布局,是直接按照控件的横纵坐标在界面中进行布局。
绝对布局使用“android:layout_x”属性来确定X坐标,以左上角为顶点。使用“android: layout_y”属性确定Y坐标,以左上角为顶点。在绝对定位中,如果子元素不设置layout_x和layout_y,那么它们的默认值是0,也就是说它会像在FrameLayout一样,这个元素会出现在屏幕的左上角。
补充内容:关于selector状态选择器
selector状态选择器一般使用在各种操作状态下,主要体现在字体,背景的切换方面。
以Xml方式写出状态选择器,然后将写好的selector存在放res - drawable 或 res - color 文件夹下,较为常用。
状态设置常用类型:
//设置是否按压状态,一般在true时设置该属性,表示已按压状态,默认为false
android:state_pressed
//设置是否选中状态,true表示已选中,false表示未选中
android:state_selected
//设置是否勾选状态,主要用于CheckBox和RadioButton,true表示已被勾选,false表示未被勾选
android:state_checked
//设置是否获得焦点状态,true表示获得焦点,默认为false,表示未获得焦点
android:state_focused
- <?xml version="1.0" encoding="utf-8"?>
- <selector xmlns:android="http://schemas.android.com/apk/res/android">
- <item android:drawable="@drawable/login_btn2" android:state_pressed="true"/>
- <item android:drawable="@drawable/login_btn1"/>
- </selector>
- <selector xmlns:android="http://schemas.android.com/apk/res/android">
- <item android:state_checked="true" android:drawable="@drawable/tb_on" /> <!-- pressed -->
- <item android:drawable="@drawable/tb_off" /> <!-- default/unchecked -->
- </selector>

-
相关阅读:
ABP应用开发(Step by Step)-上篇
【Linux进行时】磁盘文件结构
onnx文件及其结构、正确导出onnx、onnx解析器
SpringCloud微服务(二)——Eureka服务注册中心
爬虫抓取网站数据
习题 --- 双指针算法、离散化
合约广告平台架构演进实践
Javascript文件上传
新技术应用塑造未来景展望
unity 协程
- 原文地址:https://blog.csdn.net/MANONGDKY/article/details/134271958
