-
Net6集成Nacos实现服务注册
Net6集成Nacos实现服务注册
Nacos安装
nacos-sdk-csharp Nuget包作者博客一、服务注册
1.创建WebAPI项目

2.安装Nuget包
nacos-sdk-csharp nacos-sdk-csharp.AspNetCore nacos-sdk-csharp.Extensions.Configuration nacos-sdk-csharp.IniParser nacos-sdk-csharp.YamlParser Swashbuckle.AspNetCore- 1
- 2
- 3
- 4
- 5
- 6
3.注册Nacos
builder.Services.AddNacosAspNet(builder.Configuration);- 1
Nacos配置文件(放在Appsetting.json或其他文件中)
"nacos": { "EndPoint": "", "ServerAddresses": [ "http://127.0.0.1:8848" ], "DefaultTimeOut": 15000, "Namespace": "ec934a6e-36f5-4f1a-90f4-b74824da42a2", "ListenInterval": 1000, "ServiceName": "BaseApi", "GroupName": "DEFAULT_GROUP", "ClusterName": "DEFAULT", "Ip": "", "PreferredNetworks": "", "Port": 0, "Weight": 100, "RegisterEnabled": true, "InstanceEnabled": true, "Ephemeral": true, "Secure": false, "AccessKey": "", "SecretKey": "", "UserName": "", "Password": "", "ConfigUseRpc": true, "NamingUseRpc": false, "NamingLoadCacheAtStart": "", "LBStrategy": "WeightRandom", "Metadata": { "aa": "bb", "cc": "dd" } }- 1
- 2
- 3
- 4
- 5
- 6
- 7
- 8
- 9
- 10
- 11
- 12
- 13
- 14
- 15
- 16
- 17
- 18
- 19
- 20
- 21
- 22
- 23
- 24
- 25
- 26
- 27
- 28
- 29
- 30
- 31
4.创建Api控制器
using Microsoft.AspNetCore.Http; using Microsoft.AspNetCore.Mvc; namespace NacosService.Controllers { [Route("api/[controller]")] [ApiController] public class ValuesController : ControllerBase { private readonly Nacos.V2.INacosNamingService _svc; public ValuesController(Nacos.V2.INacosNamingService svc) { _svc = svc; } [HttpGet] public string Get() { return "Ok~" + DateTime.Now.ToString("yyyy-MM-dd HH:mm:ss:ffff"); } ////// 从nacos中获取服务并选一个调用 /// /// [HttpGet("test")] public async Task<string> Test() { // 这里需要知道被调用方的服务名 var instance = await _svc.SelectOneHealthyInstance("BaseApi", "DEFAULT_GROUP"); var host = $"{"127.0.0.1"}:{instance.Port}"; var baseUrl = instance.Metadata.TryGetValue("secure", out _) ? $"https://{host}" : $"http://{host}"; if (string.IsNullOrWhiteSpace(baseUrl)) { return "empty"; } var url = $"{baseUrl}/api/values"; using var client = new HttpClient(); var result = await client.GetAsync(url); return await result.Content.ReadAsStringAsync(); } } } - 1
- 2
- 3
- 4
- 5
- 6
- 7
- 8
- 9
- 10
- 11
- 12
- 13
- 14
- 15
- 16
- 17
- 18
- 19
- 20
- 21
- 22
- 23
- 24
- 25
- 26
- 27
- 28
- 29
- 30
- 31
- 32
- 33
- 34
- 35
- 36
- 37
- 38
- 39
- 40
- 41
- 42
- 43
- 44
- 45
- 46
- 47
- 48
- 49
- 50
- 51
5.运行效果


二、注册多个服务
启动Nacos
startup.cmd -m standalone- 1
启动项目,因为要启动多个项目,所以通过CMD在不同端口启动项目
dotnet yourapp.dll --urls=http://localhost:yourport- 1

开启三个项目
dotnet DesignMode.dll --urls=http://127.0.0.1:5001
dotnet DesignMode.dll --urls=http://127.0.0.1:5000
dotnet DesignMode.dll --urls=http://127.0.0.1:5003查看项目注册效果

三、配置中心
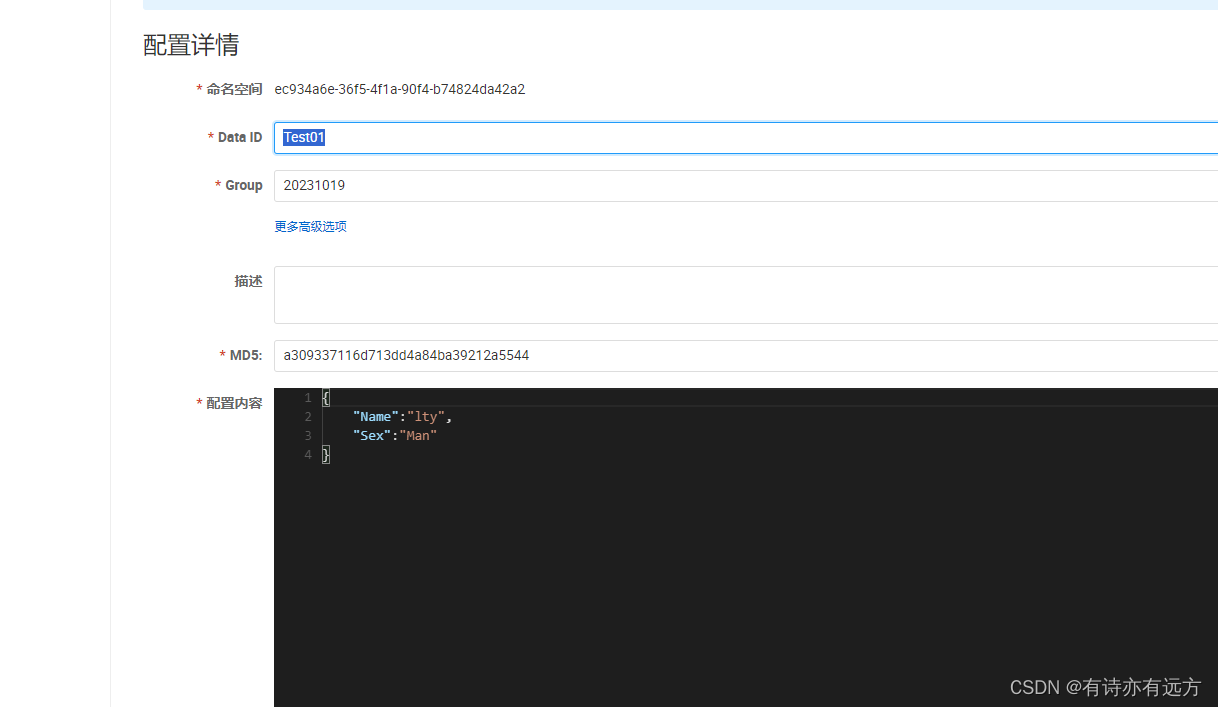
1.设置配置
设置如下配置信息
2.读取配置
注册配置中心
//添加配置中心 builder.Host.ConfigureAppConfiguration((context, builder) => { var config = builder.Build(); builder.AddNacosV2Configuration(config.GetSection("NacosConfig")); });- 1
- 2
- 3
- 4
- 5
- 6
appsetting.json文件下增加如下配置信息
"NacosConfig": { "Listeners": [ { "Optional": false, "DataId": "Test01", "Group": "20231019" } ], "Optional": false, "Namespace": "ec934a6e-36f5-4f1a-90f4-b74824da42a2", "ServerAddresses": [ "http://127.0.0.1:8848/" ] }- 1
- 2
- 3
- 4
- 5
- 6
- 7
- 8
- 9
- 10
- 11
- 12
通过Configuration读取Nacos的配置信息
using Microsoft.AspNetCore.Http; using Microsoft.AspNetCore.Mvc; namespace NacosService.Controllers { [Route("api/[controller]")] [ApiController] public class ValuesController : ControllerBase { private readonly Nacos.V2.INacosNamingService _svc; private readonly IConfiguration _configuration; public ValuesController( Nacos.V2.INacosNamingService svc, IConfiguration configuration) { _svc = svc; _configuration = configuration; } [HttpGet] public string Get() { return "Ok~" + DateTime.Now.ToString("yyyy-MM-dd HH:mm:ss:ffff"); } [HttpGet] [Route("GetConfig")] public string GetConfig() { var appName = _configuration["Name"]; return appName; } } }- 1
- 2
- 3
- 4
- 5
- 6
- 7
- 8
- 9
- 10
- 11
- 12
- 13
- 14
- 15
- 16
- 17
- 18
- 19
- 20
- 21
- 22
- 23
- 24
- 25
- 26
- 27
- 28
- 29
- 30
- 31
- 32
- 33
- 34
- 35
- 36
3.展示效果

4.设置多个配置项
添加三个配置选项

添加如下三个监听
"NacosConfig": { "Listeners": [ { "Optional": false, "DataId": "Test01", "Group": "20231019" }, { "Optional": false, "DataId": "Test02", "Group": "20231019" }, { "Optional": false, "DataId": "Test03", "Group": "20231020" } ], "Optional": false, "Namespace": "ec934a6e-36f5-4f1a-90f4-b74824da42a2", "ServerAddresses": [ "http://127.0.0.1:8848/" ] }- 1
- 2
- 3
- 4
- 5
- 6
- 7
- 8
- 9
- 10
- 11
- 12
- 13
- 14
- 15
- 16
- 17
- 18
- 19
- 20
- 21
- 22
分别获取三个配置项中的配置
[HttpGet] [Route("GetConfig")] public string GetConfig() { var Test01 = _configuration["Name"]; var Test02 = _configuration["Name2"]; var Test03 = _configuration["Address"]; return "Test01: "+Test01 + " "+"Test02:"+Test02 + " "+"Test03:" +Test03; }- 1
- 2
- 3
- 4
- 5
- 6
- 7
- 8
- 9

-
相关阅读:
分布式Netty集群方案 加代码 SpringBoot 版
啊哈C语言 第8章 游戏时间到了(第29讲)
RabbitMQ高频面试题整理
Spring使用(二)
一百二十四、脚本——添加或者删除某行的脚本
Google Earth Engine(GEE)——如何获取指定区域动画影像的指定波段信息
pyplot设置字体格式大小、坐标轴刻度在图内
DDS::core::Entity
[激光原理与应用-18]:《激光原理与技术》-4- 粒子数反转与“光”强放大的基本原理
面试突击74:properties和yml有什么区别?
- 原文地址:https://blog.csdn.net/wsnbbdbbdbbdbb/article/details/133927236
