-
华为eNSP配置专题-VRRP的配置
华为eNSP配置专题-VRRP的配置
0、参考文档
1、前置环境
1.1、宿主机
笔记本电脑,配置如下:Windows10企业版,32GB内存

1.2、eNSP模拟器
eNSP1.3.00

2、基本环境搭建
2.1、基本终端构成和连接
0、总体拓扑如下:

1、1台PC。
2、3台交换机,型号为S5700。其中1台作为接入交换机。另外2台作为核心交换机,配置VRRP。
3、2台路由器,型号为AR2220。其中一台为作为内网的出口路由器,另外一台路由器模拟互联网
4、开启设备。2.VRRP的配置
2.1、PC1的配置
1、PC1配置静态IP和网关如下:
IP:192.168.10.1
掩码:255.255.255.0
网关:192.168.10.2542.2、接入交换机acsw的配置
1、右击接入交换机acsw-》点击“CLI”,进入系统模式,改名为acsw,同时也关闭信息中心的通知消息。
system-view Enter system view, return user view with Ctrl+Z. [Huawei]sysname acsw [acsw]undo info-center enable Info: Information center is disabled. - 1
- 2
- 3
- 4
- 5
2、创建vlan 10:
[acsw]vlan 10 [acsw-vlan10]quit- 1
- 2
3、配置三个接口,1个access口,2个trunk口:
[acsw]interface GigabitEthernet 0/0/3 [acsw-GigabitEthernet0/0/3]port link-type access [acsw-GigabitEthernet0/0/3]port default vlan 10 [acsw-GigabitEthernet0/0/3]quit [acsw]interface GigabitEthernet 0/0/1 [acsw-GigabitEthernet0/0/1]port link-type trunk [acsw-GigabitEthernet0/0/1]port trunk allow-pass vlan all [acsw-GigabitEthernet0/0/1]quit [acsw]interface GigabitEthernet 0/0/2 [acsw-GigabitEthernet0/0/2]port link-type trunk [acsw-GigabitEthernet0/0/2]port trunk allow-pass vlan all- 1
- 2
- 3
- 4
- 5
- 6
- 7
- 8
- 9
- 10
- 11
2.3、核心交换机coresw1的配置
1、右击接入交换机acsw-》点击“CLI”,进入系统模式,改名,同时也关闭信息中心的通知消息。
system-view Enter system view, return user view with Ctrl+Z. [Huawei]sysname coresw1 [coresw1]undo info-center enable Info: Information center is disabled. - 1
- 2
- 3
- 4
- 5
2、生成两个vlan,vlan10用于下联,vlan100用于上联:
[coresw1]vlan 10 [coresw1-vlan10]vlan 100- 1
- 2
3、给三个接口配置,两个trunk口,一个access口用于上联
[coresw1]interface GigabitEthernet 0/0/1 [coresw1-GigabitEthernet0/0/1]port link-type trunk [coresw1-GigabitEthernet0/0/1]port trunk allow-pass vlan all [coresw1-GigabitEthernet0/0/1]quit [coresw1]interface GigabitEthernet 0/0/3 [coresw1-GigabitEthernet0/0/3]port link-type trunk [coresw1-GigabitEthernet0/0/3]port trunk allow-pass vlan all [coresw1-GigabitEthernet0/0/3]quit [coresw1]interface GigabitEthernet 0/0/2 [coresw1-GigabitEthernet0/0/2]port link-type access [coresw1-GigabitEthernet0/0/2]port default vlan 100 [coresw1-GigabitEthernet0/0/2]quit- 1
- 2
- 3
- 4
- 5
- 6
- 7
- 8
- 9
- 10
- 11
- 12
4、配置三层接口。
[coresw1]interface vlanif 10 [coresw1-Vlanif10]ip add 192.168.10.252 24 [coresw1-Vlanif10]quit [coresw1]interface vlanif 100 [coresw1-Vlanif100]ip add 192.168.100.1 30 [coresw1-Vlanif100]quit- 1
- 2
- 3
- 4
- 5
- 6
2.4、核心交换机coresw2的配置
1、右击接入交换机acsw-》点击“CLI”,进入系统模式,改名,同时也关闭信息中心的通知消息。
system-view Enter system view, return user view with Ctrl+Z. [Huawei]undo info-center enable Info: Information center is disabled. [Huawei]sysname coresw2 - 1
- 2
- 3
- 4
- 5
2、生成两个vlan,vlan10用于下联,vlan200用于上联:
[coresw2]vlan 10 [coresw2-vlan10]vlan 200- 1
- 2
3、给三个接口配置,两个trunk口,一个access口用于上联
[coresw2-vlan200]interface GigabitEthernet 0/0/1 [coresw2-GigabitEthernet0/0/1]port link-type trunk [coresw2-GigabitEthernet0/0/1]port trunk allow-pass vlan all [coresw2-GigabitEthernet0/0/1]quit [coresw2]interface GigabitEthernet 0/0/3 [coresw2-GigabitEthernet0/0/3]port link-type trunk [coresw2-GigabitEthernet0/0/3]port trunk allow-pass vlan all [coresw2-GigabitEthernet0/0/3]quit [coresw2]interface GigabitEthernet 0/0/2 [coresw2-GigabitEthernet0/0/2]port link-type access [coresw2-GigabitEthernet0/0/2]port default vlan 200 [coresw2-GigabitEthernet0/0/2]quit- 1
- 2
- 3
- 4
- 5
- 6
- 7
- 8
- 9
- 10
- 11
- 12
4、配置三层接口。
[coresw2]interface vlanif 10 [coresw2-Vlanif10]ip add 192.168.10.253 24 [coresw2-Vlanif10]quit [coresw2]interface vlanif 200 [coresw2-Vlanif200]ip add 192.168.200.1 30 [coresw2-Vlanif200]quit- 1
- 2
- 3
- 4
- 5
- 6
5、到PC1上ping两个核心交换机,发现可以通了:

2.5、配置VRRP
1、在coresw1上作如下配置,设置虚拟IP为192.168.10.254,优先级为120(默认优先级为100,因此本交换机为主节点)。设置为抢占模式,抢占延时为20秒。
[coresw1]interface vlanif10 [coresw1-Vlanif10]vrrp vrid 10 virtual-ip 192.168.10.254 [coresw1-Vlanif10]vrrp vrid 10 priority 120 [coresw1-Vlanif10]vrrp vrid 10 preempt-mode timer delay 20 [coresw1-Vlanif10]display this # interface Vlanif10 ip address 192.168.10.252 255.255.255.0 vrrp vrid 10 virtual-ip 192.168.10.254 vrrp vrid 10 priority 120 vrrp vrid 10 preempt-mode timer delay 20 # return- 1
- 2
- 3
- 4
- 5
- 6
- 7
- 8
- 9
- 10
- 11
- 12
- 13
2、在coresw2上作类似配置,但不设置优先级,默认为100。
[coresw2]interface vlanif 10 [coresw2-Vlanif10]vrrp vrid 10 virtual-ip 192.168.10.254 [coresw2-Vlanif10]quit- 1
- 2
- 3
3、在coresw1上通过
display vrrp查看配置情况,可以看到coresw1的状态为Master:

4、在PC1上ping 192.168.10.254,发现可以通了,也就意味着VRRP配置成功
2.6、配置出口路由器AR1
1、右击AR1-》点击“CLI”,进入系统模式,改名,同时也关闭信息中心的通知消息。
system-view Enter system view, return user view with Ctrl+Z. [Huawei]undo info-center enable Info: Information center is disabled. [Huawei]sysname AR1 - 1
- 2
- 3
- 4
- 5
2、配置三个接口的地址:
[AR1]int g0/0/0 [AR1-GigabitEthernet0/0/0]ip add 100.1.1.2 30 [AR1-GigabitEthernet0/0/0]int g0/0/1 [AR1-GigabitEthernet0/0/1]ip add 192.168.100.2 24 [AR1-GigabitEthernet0/0/1]int g0/0/2 [AR1-GigabitEthernet0/0/2]ip add 192.168.200.2 24- 1
- 2
- 3
- 4
- 5
- 6
2.7、配置模拟互联网路由器AR1
1、右击AR2-》点击“CLI”,进入系统模式,改名,同时也关闭信息中心的通知消息。
system-view Enter system view, return user view with Ctrl+Z. [Huawei]undo info-center enable Info: Information center is disabled. [Huawei]sysname AR2 - 1
- 2
- 3
- 4
- 5
2、配置三个接口的地址:
[AR2]int g0/0/0 [AR2-GigabitEthernet0/0/0]ip add 100.1.1.1 30- 1
- 2
2.8、配置PC1可以访问模拟互联网路由器
1、在PC1上ping AR2,发现ping不通,因为PC1会把包交给默认网关coresw1,但默认网关也就是核心路由器上并没有10网段的路由,如下所示:

2、在核心交换机1上配置默认路由指向出口路由器:
[coresw1]ip route-static 0.0.0.0 0 192.168.100.2- 1
3、在核心交换机2上配置默认路由指向出口路由器:
[coresw2]ip route-static 0.0.0.0 0 192.168.200.2- 1
4、这时发现仍然ping不通,但是在AR2上抓包已经可以看到ICMP包,主要是AR2上没有回程的路由。
5、在AR2上配置静态路由。
[AR2]ip route-static 192.168.10.0 255.255.255.0 100.1.1.2- 1
6、这时发现仍然ping不通,发现ICMP有回包了,主要原因是AR1上也没有回程的路由。做如下配置即可:
[AR1]ip route-static 192.168.10.0 24 192.168.100.1 [AR1]ip route-static 192.168.10.0 24 192.168.200.1- 1
- 2
7、这时发现PC1可以ping通模拟互联网路由器了。
3、其他场景
3.1、VRRP优先级调整
1、在PC1上tracert,可以发现是从左边的coresw1走的。

2、降低coresw1的VRRP的优先级:
[coresw1]interface vlanif 10 [coresw1-Vlanif10]vrrp vrid 10 priority 90- 1
- 2
3、此时再在PC1上tracert,可以发现是从右边的coresw2走的。

4、在coresw1查看VRRP状态,发现已经变成了BACKUP:

3.2、接口跟踪
1、在coresw1恢复已有的优先级为120,再跟踪接口g0/0/2(即接到出口网关的接口)
[coresw1]int Vlanif 10 [coresw1-Vlanif10]vrrp vrid 10 priority 120 [coresw1-Vlanif10]vrrp vrid 10 track interface g0/0/2 reduce 30- 1
- 2
- 3
2、在PC1进行tracert查看,发觉流量走的coresw1:

3、在coresw1关闭它的g/0/0/2接口:
[coresw1]int g0/0/2 [coresw1-GigabitEthernet0/0/2]shutdown- 1
- 2
4、在PC1进行tracert查看,发觉流量已经改走coresw2:

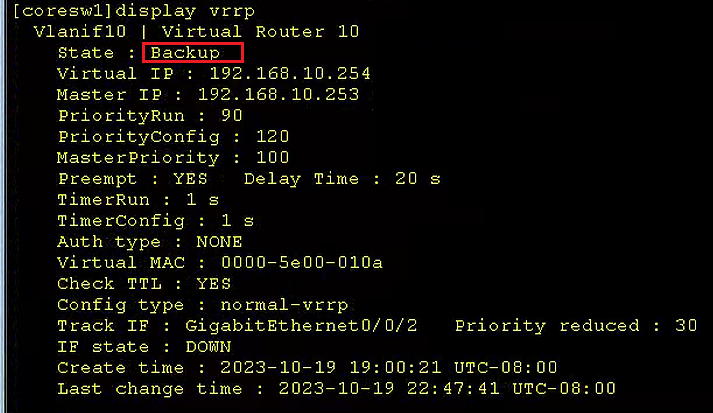
6、在coresw1查看VRRP状态,发现已经变成了BACKUP:
-
相关阅读:
Java--MyBatis传入参数parameterType
ImportError: cannot import name ‘TouchActions‘ from ‘selenium.webdriver‘
四十七、Fluent近壁面处理
如何使用腾讯会议录屏?腾讯会议不允许录屏怎么办?这个方法教你解决
迭代器是一个实现了__iter__()和__next__()方法的对象
实验六 Python数据库编程
AJAX之实现省市联动
【Python&语义分割】Segment Anything(SAM)模型全局语义分割代码+掩膜保存(二)
使用 AutoGen 的 AI 智能体设计模式
【车载开发系列】HexView文件合并
- 原文地址:https://blog.csdn.net/oddrock/article/details/133936592