-
搭建Atlas2.2.0 集成CDH6.3.2 生产环境+kerberos
首先确保环境的干净,如果之前有安装过清理掉相关残留
确保安装atlas的服务器有足够的内存(至少16G),有必要的hadoop角色
- HDFS客户端 — 检索和更新Hadoop使用的用户组信息(UGI)中帐户成员资格的信息。对调试很有用。
- HBase Client - Atlas 存储其 Janus 数据库,用于初始导入 HBase 内容,因此它需要持续访问 HBase 服务中的两个表。
- Hive 客户端 - 用于初始导入 Hive 内容。
备注: kafka我取消了kerberos。没搞定atlas用带kerberos的kafka传消息
准备编译环境
mvn3.8.8 必须3.8以上的版本 3.6无法编译
java 1.8.0_181 跟你的CDH环境保持一致
node node-v16.20.2
下载和解压缩源代码
该项目的网站可以在这里找到 Apache Atlas – Data Governance and Metadata framework for Hadoop
查找并下载 Apache Atlas
更改
pom.xml在主pom(就是文件夹打开第一个)添加一个包含 maven 工件的 clouder 存储库
- <repository>
- <id>cloudera</id>
- <url>https://repository.cloudera.com/artifactory/cloudera-repos</url>
- <releases>
- <enabled>true</enabled>
- </releases>
- <snapshots>
- <enabled>false</enabled>
- </snapshots>
- </repository>
然后修改对应的cdh组件版本
- <hadoop.version>3.0.0-cdh6.3.2</hadoop.version>
- <hbase.version>2.1.0-cdh6.3.2</hbase.version>
- <hive.version>2.1.1-cdh6.3.2</hive.version>
- <kafka.scala.binary.version>2.11</kafka.scala.binary.version>
- <kafka.version>2.2.1-cdh6.3.2</kafka.version>
- <solr-test-framework.version>7.4.0-cdh6.3.2</solr-test-framework.version>
- <lucene-solr.version>7.4.0</lucene-solr.version>
- <solr.version>7.4.0-cdh6.3.2</solr.version>
- <sqoop.version>1.4.7-cdh6.3.2</sqoop.version>
- <zookeeper.version>3.4.5-cdh6.3.2</zookeeper.version>
然后修改一些jar包的版本
- 将“atlas-buildtools”工件的版本从“1.0”更改为“0.8.1”
- <dependency>
- <groupId>org.apache.atlas</groupId>
- <artifactId>atlas-buildtools</artifactId>
- <version>0.8.1</version>
- </dependency>
- 修改jsr.version为2.0.1
- <jsr.version>2.0.1</jsr.version>
修改一些次pom
- 主目录下
- grep -rn jsr311-apii | grep pom.xml
- addons/impala-bridge/pom.xml:332
- addons/falcon-bridge/pom.xml:178
- addons/hive-bridge/pom.xml:312:
- addons/hbase-bridge/pom.xml:345:
- addons/storm-bridge/pom.xml:360:
- addons/sqoop-bridge/pom.xml:250:
- 这几个pom中jsr311-api改成javax.ws.rs-api
修改其他文件
在文件
addons/hive-bridge/src/main/java/org/apache/atlas/hive/bridge/HiveMetaStoreBridge.java
中,转到第618行,
注释”String catalogName = hiveDB.getCatalogName() != null ?hiveDB.getCatalogName().toLowerCase() : null;“
并添加 ”String catalogName = null;“:
- public static String getDatabaseName(Database hiveDB) {
- String dbName = hiveDB.getName().toLowerCase();
- //String catalogName = hiveDB.getCatalogName() != null ? hiveDB.getCatalogName().toLowerCase() : null;
- String catalogName = null;
- if (StringUtils.isNotEmpty(catalogName) && !StringUtils.equals(catalogName, DEFAULT_METASTORE_CATALOG)) {
- dbName = catalogName + SEP + dbName;
- }
- return dbName;
- }
在文件
addons/hive-bridge/src/main/java/org/apache/atlas/hive/hook/AtlasHiveHookContext.java
中
转到第83行”this.metastoreHandler = (listenerEvent != null) ?metastoreEvent.getIHMSHandler() : null;“,
注释它并添加”this.metastoreHandler = null;“:
- public AtlasHiveHookContext(HiveHook hook, HiveOperation hiveOperation, HookContext hiveContext, HiveHookObjectNamesCache knownObjects,
- HiveMetastoreHook metastoreHook, ListenerEvent listenerEvent) throws Exception {
- this.hook = hook;
- this.hiveOperation = hiveOperation;
- this.hiveContext = hiveContext;
- this.hive = hiveContext != null ? Hive.get(hiveContext.getConf()) : null;
- this.knownObjects = knownObjects;
- this.metastoreHook = metastoreHook;
- this.metastoreEvent = listenerEvent;
- //this.metastoreHandler = (listenerEvent != null) ? metastoreEvent.getIHMSHandler() : null;
- this.metastoreHandler = null;
- init();
- }
在文件
addons/hive-bridge/src/main/java/org/apache/atlas/hive/hook/events/CreateHiveProcess.java注释第 293 行提到“MATERIALIZED_VIEW”:
- private boolean isDdlOperation(AtlasEntity entity) {
- return entity != null && !context.isMetastoreHook()
- && (context.getHiveOperation().equals(HiveOperation.CREATETABLE_AS_SELECT)
- || context.getHiveOperation().equals(HiveOperation.CREATEVIEW)
- || context.getHiveOperation().equals(HiveOperation.ALTERVIEW_AS));
- //|| context.getHiveOperation().equals(HiveOperation.CREATE_MATERIALIZED_VIEW));
- }
注意这里要加;号,因为原来的符号被注释了
在文件
addons/hive-bridge/src/main/java/org/apache/atlas/hive/hook/HiveHook.java注释提及“MATERIALIZED_VIEW”的第 212 行和第 217 行
开始构建。基本无坑。有问题多试几次。有时候会因为网络问题下不到包
mvn clean -DskipTests package -Pdist -Drat.skip=true包在
distro/target/apache-atlas-2.2.0-bin.tar.gz不要用官方文档说的server包 那个包没有各种hook文件
解压到安装目录,开始安装
为atlas部署准备 CDH 集群服务
- Atlas使用HBase来存储他的Janus数据库。
- Solr 用于存储和搜索审核日志。
- Kafka被用作从Atlas库(即嵌入Hadoop服务中的钩子)到Atlas本身的消息发送器。
1.1. 在 HBase 中创建必要的表
- 在 Atlas 计算机或安装了“HBase 网关”角色的任何其他计算机上,创建必要的表
- TABLE1="apache_atlas_entity_audit"
- TABLE2="apache_atlas_janus"
- echo "create '${TABLE1}', 'dt'; grant 'atlas', 'RWXCA', '${TABLE1}'" | hbase shell
- echo "create '${TABLE2}', 's'; grant 'atlas', 'RWXCA', '${TABLE2}'" | hbase shell
如果将“atlas”帐户添加到“hbase.superuser”参数中,或添加到“test2_hbase_su”IPA组(在Hadoop直接连接到LDAP的情况下),或将所有HBase权限分配给“atlas”帐户,Atlas将自动创建必要的数据库并将其权限分配给atlas帐户。这有时很方便,例如,出于研究目的。
请注意,在 Atlas 2.2.0 中,在将 'atlas' 添加到 'hbase.superuser' 的情况下,这不起作用。检查已创建的表
-
在 Atlas 计算机或安装了“HBase 网关”角色的任何其他计算机上,执行:
echo "list" | hbase shell复制标准输出:
- Took 0.0028 seconds
- list
- TABLE
- apache_atlas_entity_audit
- apache_atlas_janus
- 2 row(s)
- Took 0.6872 seconds
- ["apache_atlas_entity_audit", "apache_atlas_janus"]
添加
hbase集群配置文件到conf/hbase下ln -s /etc/hbase/conf/ /data/apache-atlas-2.2.0/conf/hbaseApache Kafka
Atlas 使用 Apache Kafka 接收有关 Hadoop 服务中发生的事件的消息。消息是使用嵌入在某些服务中的Atlas的特殊库发送的。目前,Atlas 读取有关 Hbase 和 Hive 中事件的消息,例如创建和删除表、添加列、等等等等......
在 Kafka 中添加必要的topic
-
Apache Atlas 需要 Apache Kafka 中的三个topic。在安装了 Kafka 的计算机上创建它们:
- kafka-topics --zookeeper S0:2181,S1:2181,S2:2181,S3:2181 --create --replication-factor 3 --partitions 3 --topic _HOATLASOK
- kafka-topics --zookeeper S0:2181,S1:2181,S2:2181,S3:2181 --create --replication-factor 3 --partitions 3 --topic ATLAS_ENTITIES
- kafka-topics --zookeeper S0:2181,S1:2181,S2:2181,S3:2181 --create --replication-factor 3 --partitions 3 --topic ATLAS_HOOK
有kerberos的关掉kerberos,我没测试成功使用带kerberos的kafka
配置atlas的sentry role 以访问kafka topic
在具有“Kafka 网关”和“sentry网关”角色的机器上,在sentry中创建“kafka4atlas_role”角色:
- KROLE="kafka4atlas_role"
- kafka-sentry -cr -r ${KROLE}
- 将创建的角色分配给 atlas 组:
- kafka-sentry -arg -r ${KROLE} -g atlas
- 为消费者分配权限:
- TOPIC1="_HOATLASOK"
- TOPIC2="ATLAS_ENTITIES"
- TOPIC3="ATLAS_HOOK"
- kafka-sentry -gpr -r ${KROLE} -p "Host=*->CONSUMERGROUP=*->action=read"
- kafka-sentry -gpr -r ${KROLE} -p "Host=*->CONSUMERGROUP=*->action=describe"
- kafka-sentry -gpr -r ${KROLE} -p "HOST=*->TOPIC=${TOPIC1}->action=read"
- kafka-sentry -gpr -r ${KROLE} -p "HOST=*->TOPIC=${TOPIC2}->action=read"
- kafka-sentry -gpr -r ${KROLE} -p "HOST=*->TOPIC=${TOPIC3}->action=read"
- kafka-sentry -gpr -r ${KROLE} -p "HOST=*->TOPIC=${TOPIC1}->action=describe"
- kafka-sentry -gpr -r ${KROLE} -p "HOST=*->TOPIC=${TOPIC2}->action=describe"
- kafka-sentry -gpr -r ${KROLE} -p "HOST=*->TOPIC=${TOPIC3}->action=describe"
- 为生产者分配权限
- kafka-sentry -gpr -r ${KROLE} -p "HOST=*->TOPIC=${TOPIC1}->action=write"
- kafka-sentry -gpr -r ${KROLE} -p "HOST=*->TOPIC=${TOPIC2}->action=write"
- kafka-sentry -gpr -r ${KROLE} -p "HOST=*->TOPIC=${TOPIC3}->action=write"
- 检查sentry设置
- $ kafka-sentry -lr
- ....
- solradm_role
- kafka4atlas_role
- 显示组及其分配角色的列表:
- $ kafka-sentry -lg
- ...
- atlas = kafka4atlas_role
- test2_solr_admins = solradm_role
- 显示权限列表:
- $ kafka-sentry -lp -r kafka4atlas_role
- ...
- HOST=*->TOPIC=_HOATLASOK->action=read
- HOST=*->TOPIC=_HOATLASOK->action=describe
- HOST=*->TOPIC=ATLAS_HOOK->action=read
- HOST=*->TOPIC=ATLAS_ENTITIES->action=describe
- HOST=*->TOPIC=ATLAS_HOOK->action=describe
- HOST=*->CONSUMERGROUP=*->action=describe
- HOST=*->TOPIC=_HOATLASOK->action=write
- HOST=*->TOPIC=ATLAS_ENTITIES->action=write
- HOST=*->TOPIC=ATLAS_HOOK->action=write
- HOST=*->TOPIC=ATLAS_ENTITIES->action=read
- HOST=*->CONSUMERGROUP=*->action=read
集成CDH的Solr
①将apache-atlas-2.3.0/conf/solr文件拷贝到solr的安装目录下,即/opt/cloudera/parcels/CDh/lib/solr下,然后更名为atlas-solr②创建collection
- vi /etc/passwd
- /sbin/nologin 修改为 /bin/bash
- su - solr
- /opt/cloudera/parcels/CDH/lib/solr/bin/solr create -c vertex_index -d /opt/cloudera/parcels/CDH/lib/solr/atlas-solr -shards 3 -replicationFactor 2
- /opt/cloudera/parcels/CDH/lib/solr/bin/solr create -c edge_index -d /opt/cloudera/parcels/CDH/lib/solr/atlas-solr -shards 3 -replicationFactor 2
- /opt/cloudera/parcels/CDH/lib/solr/bin/solr create -c fulltext_index -d /opt/cloudera/parcels/CDH/lib/solr/atlas-solr -shards 3 -replicationFactor 2
③验证创建collection成功
登录 solr web控制台: http://xxxx:8983 验证是否启动成功创建好相关的kerberos帐号和keytab
修改atlas-application.properties
- ######### Graph Database Configs #########
- # Graph Database
- #Configures the graph database to use. Defaults to JanusGraph
- #atlas.graphdb.backend=org.apache.atlas.repository.graphdb.janus.AtlasJanusGraphDatabase
- # Graph Storage
- # Set atlas.graph.storage.backend to the correct value for your desired storage
- # backend. Possible values:
- #
- # hbase
- # cassandra
- # embeddedcassandra - Should only be set by building Atlas with -Pdist,embedded-cassandra-solr
- # berkeleyje
- #
- # See the configuration documentation for more information about configuring the various storage backends.
- #
- atlas.graph.storage.backend=hbase
- atlas.graph.storage.hbase.table=apache_atlas_janus
- #Hbase
- #For standalone mode , specify localhost
- #for distributed mode, specify zookeeper quorum here
- atlas.graph.storage.hostname=S0:2181,S1:2181,S2:2181
- atlas.graph.storage.hbase.regions-per-server=1
- atlas.graph.stoorage.lock.wait-time=10000
- #In order to use Cassandra as a backend, comment out the hbase specific properties above, and uncomment the
- #the following properties
- #atlas.graph.storage.clustername=
- #atlas.graph.storage.port=
- # Gremlin Query Optimizer
- #
- # Enables rewriting gremlin queries to maximize performance. This flag is provided as
- # a possible way to work around any defects that are found in the optimizer until they
- # are resolved.
- #atlas.query.gremlinOptimizerEnabled=true
- # Delete handler
- #
- # This allows the default behavior of doing "soft" deletes to be changed.
- #
- # Allowed Values:
- # org.apache.atlas.repository.store.graph.v1.SoftDeleteHandlerV1 - all deletes are "soft" deletes
- # org.apache.atlas.repository.store.graph.v1.HardDeleteHandlerV1 - all deletes are "hard" deletes
- #
- #atlas.DeleteHandlerV1.impl=org.apache.atlas.repository.store.graph.v1.SoftDeleteHandlerV1
- # Entity audit repository
- #
- # This allows the default behavior of logging entity changes to hbase to be changed.
- #
- # Allowed Values:
- # org.apache.atlas.repository.audit.HBaseBasedAuditRepository - log entity changes to hbase
- # org.apache.atlas.repository.audit.CassandraBasedAuditRepository - log entity changes to cassandra
- # org.apache.atlas.repository.audit.NoopEntityAuditRepository - disable the audit repository
- #
- atlas.EntityAuditRepository.impl=org.apache.atlas.repository.audit.HBaseBasedAuditRepository
- # if Cassandra is used as a backend for audit from the above property, uncomment and set the following
- # properties appropriately. If using the embedded cassandra profile, these properties can remain
- # commented out.
- # atlas.EntityAuditRepository.keyspace=atlas_audit
- # atlas.EntityAuditRepository.replicationFactor=1
- # Graph Search Index
- atlas.graph.index.search.backend=solr
- #Solr
- #Solr cloud mode properties
- atlas.graph.index.search.solr.mode=cloud
- atlas.graph.index.search.solr.zookeeper-url=S0:2181/solr,S1:2181/solr,S2:2181/solr
- atlas.graph.index.search.solr.zookeeper-connect-timeout=60000
- atlas.graph.index.search.solr.zookeeper-session-timeout=60000
- atlas.graph.index.search.solr.wait-searcher=true
- #Solr http mode properties
- #atlas.graph.index.search.solr.mode=http
- #atlas.graph.index.search.solr.http-urls=http://localhost:8983/solr
- # ElasticSearch support (Tech Preview)
- # Comment out above solr configuration, and uncomment the following two lines. Additionally, make sure the
- # hostname field is set to a comma delimited set of elasticsearch master nodes, or an ELB that fronts the masters.
- #
- # Elasticsearch does not provide authentication out of the box, but does provide an option with the X-Pack product
- # https://www.elastic.co/products/x-pack/security
- #
- # Alternatively, the JanusGraph documentation provides some tips on how to secure Elasticsearch without additional
- # plugins: https://docs.janusgraph.org/latest/elasticsearch.html
- #atlas.graph.index.search.hostname=localhost
- #atlas.graph.index.search.elasticsearch.client-only=true
- # Solr-specific configuration property
- atlas.graph.index.search.max-result-set-size=150
- ######### Import Configs #########
- #atlas.import.temp.directory=/temp/import
- ######### Notification Configs #########
- atlas.notification.embedded=false
- atlas.kafka.data=${sys:atlas.home}/data/kafka
- atlas.kafka.zookeeper.connect=S0:2181,S1:2181,S2:2181
- atlas.kafka.bootstrap.servers=S0:9092,S1:9092,S2:9092
- atlas.kafka.zookeeper.session.timeout.ms=60000
- atlas.kafka.zookeeper.connection.timeout.ms=60000
- atlas.kafka.zookeeper.sync.time.ms=20
- atlas.kafka.auto.commit.interval.ms=1000
- atlas.kafka.hook.group.id=atlas
- atlas.kafka.enable.auto.commit=true
- atlas.kafka.auto.offset.reset=earliest
- atlas.kafka.session.timeout.ms=30000
- atlas.kafka.offsets.topic.replication.factor=3
- atlas.kafka.poll.timeout.ms=1000
- atlas.notification.create.topics=true
- atlas.notification.replicas=1
- atlas.notification.topics=ATLAS_HOOK,ATLAS_ENTITIES
- atlas.notification.log.failed.messages=true
- atlas.notification.consumer.retry.interval=500
- atlas.notification.hook.retry.interval=1000
- # Enable for Kerberized Kafka clusters
- #atlas.notification.kafka.service.principal=kafka/_HOST@EXAMPLE.COM
- #atlas.notification.kafka.keytab.location=/etc/security/keytabs/kafka.service.keytab
- ## Server port configuration
- atlas.server.http.port=21000
- #atlas.server.https.port=21443
- ######### Security Properties #########
- # SSL config
- atlas.enableTLS=false
- #truststore.file=/path/to/truststore.jks
- #cert.stores.credential.provider.path=jceks://file/path/to/credentialstore.jceks
- #following only required for 2-way SSL
- #keystore.file=/path/to/keystore.jks
- # Authentication config
- atlas.authentication.method=kerberos
- atlas.authentication.keytab=/data/hive.keytab
- atlas.authentication.principal=hive@TEST.COM
- atlas.authentication.method.kerberos=true
- atlas.authentication.method.kerberos.principal=hive@TEST.COM
- atlas.authentication.method.kerberos.keytab=/data/hive.keytab
- atlas.authentication.method.kerberos.name.rules=RULE:[2:$1@$0](hive@TEST.COM)s/.*/hive/
- atlas.authentication.method.kerberos.token.validity=3600
- #atlas.authentication.method.file=true
- #### ldap.type= LDAP or AD
- atlas.authentication.method.ldap.type=none
- #### user credentials file
- atlas.authentication.method.file.filename=${sys:atlas.home}/conf/users-credentials.properties
- ### groups from UGI
- #atlas.authentication.method.ldap.ugi-groups=true
- ######## LDAP properties #########
- #atlas.authentication.method.ldap.url=ldap://<ldap server url>:389
- #atlas.authentication.method.ldap.userDNpattern=uid={0},ou=People,dc=example,dc=com
- #atlas.authentication.method.ldap.groupSearchBase=dc=example,dc=com
- #atlas.authentication.method.ldap.groupSearchFilter=(member=uid={0},ou=Users,dc=example,dc=com)
- #atlas.authentication.method.ldap.groupRoleAttribute=cn
- #atlas.authentication.method.ldap.base.dn=dc=example,dc=com
- #atlas.authentication.method.ldap.bind.dn=cn=Manager,dc=example,dc=com
- #atlas.authentication.method.ldap.bind.password=<password>
- #atlas.authentication.method.ldap.referral=ignore
- #atlas.authentication.method.ldap.user.searchfilter=(uid={0})
- #atlas.authentication.method.ldap.default.role=<default role>
- ######### Active directory properties #######
- #atlas.authentication.method.ldap.ad.domain=example.com
- #atlas.authentication.method.ldap.ad.url=ldap://<AD server url>:389
- #atlas.authentication.method.ldap.ad.base.dn=(sAMAccountName={0})
- #atlas.authentication.method.ldap.ad.bind.dn=CN=team,CN=Users,DC=example,DC=com
- #atlas.authentication.method.ldap.ad.bind.password=<password>
- #atlas.authentication.method.ldap.ad.referral=ignore
- #atlas.authentication.method.ldap.ad.user.searchfilter=(sAMAccountName={0})
- #atlas.authentication.method.ldap.ad.default.role=<default role>
- ######### JAAS Configuration ########
- atlas.jaas.KafkaClient.loginModuleName=com.sun.security.auth.module.Krb5LoginModule
- atlas.jaas.KafkaClient.loginModuleControlFlag=required
- atlas.jaas.KafkaClient.option.useKeyTab=true
- atlas.jaas.KafkaClient.option.storeKey=true
- atlas.jaas.KafkaClient.option.serviceName=kafka
- atlas.jaas.KafkaClient.option.keyTab=/data/atlas.service.keytab
- atlas.jaas.KafkaClient.option.principal=atlas/s1.hadoop.com@TEST.COM
- atlas.jaas.Client.loginModuleName=com.sun.security.auth.module.Krb5LoginModule
- atlas.jaas.Client.loginModuleControlFlag=required
- atlas.jaas.Client.option.useKeyTab=true
- atlas.jaas.Client.option.storeKey=true
- atlas.jaas.Client.option.keyTab=/data/atlas.service.keytab
- atlas.jaas.Client.option.principal=atlas/s1.hadoop.com@TEST.COM
- atlas.jaas.producer-1.loginModuleName=com.sun.security.auth.module.Krb5LoginModule
- atlas.jaas.producer-1.loginModuleControlFlag=required
- atlas.jaas.producer-1.option.useKeyTab=true
- atlas.jaas.producer-1.option.storeKey=true
- atlas.jaas.producer-1.option.keyTab=/data/atlas.service.keytab
- atlas.jaas.producer-1.option.principal=atlas/s1.hadoop.com@TEST.COM
- atlas.jaas.producer-1.option.security.protocol=SASL_PLAINTEXT
- atlas.jaas.producer-1.option.sasl.mechanism=GSSAPI
- atlas.jaas.producer-1.option.kerberos.service.name=kafka
- ######### Server Properties #########
- atlas.rest.address=http://localhost:21000
- # If enabled and set to true, this will run setup steps when the server starts
- #atlas.server.run.setup.on.start=false
- ######### Entity Audit Configs #########
- atlas.audit.hbase.tablename=apache_atlas_entity_audit
- atlas.audit.zookeeper.session.timeout.ms=1000
- atlas.audit.hbase.zookeeper.quorum=S0:2181,S1:2181,S2:2181
- ######### High Availability Configuration ########
- atlas.server.ha.enabled=false
- #### Enabled the configs below as per need if HA is enabled #####
- #atlas.server.ids=id1
- #atlas.server.address.id1=localhost:21000
- #atlas.server.ha.zookeeper.connect=localhost:2181
- #atlas.server.ha.zookeeper.retry.sleeptime.ms=1000
- #atlas.server.ha.zookeeper.num.retries=3
- #atlas.server.ha.zookeeper.session.timeout.ms=20000
- ## if ACLs need to be set on the created nodes, uncomment these lines and set the values ##
- #atlas.server.ha.zookeeper.acl=<scheme>:<id>
- #atlas.server.ha.zookeeper.auth=<scheme>:<authinfo>
- ######### Atlas Authorization #########
- atlas.authorizer.impl=simple
- atlas.authorizer.simple.authz.policy.file=atlas-simple-authz-policy.json
- ######### Type Cache Implementation ########
- # A type cache class which implements
- # org.apache.atlas.typesystem.types.cache.TypeCache.
- # The default implementation is org.apache.atlas.typesystem.types.cache.DefaultTypeCache which is a local in-memory type cache.
- #atlas.TypeCache.impl=
- ######### Performance Configs #########
- #atlas.graph.storage.lock.retries=10
- #atlas.graph.storage.cache.db-cache-time=120000
- ######### CSRF Configs #########
- atlas.rest-csrf.enabled=true
- atlas.rest-csrf.browser-useragents-regex=^Mozilla.*,^Opera.*,^Chrome.*
- atlas.rest-csrf.methods-to-ignore=GET,OPTIONS,HEAD,TRACE
- atlas.rest-csrf.custom-header=X-XSRF-HEADER
- ############ KNOX Configs ################
- #atlas.sso.knox.browser.useragent=Mozilla,Chrome,Opera
- #atlas.sso.knox.enabled=true
- #atlas.sso.knox.providerurl=https://<knox gateway ip>:8443/gateway/knoxsso/api/v1/websso
- #atlas.sso.knox.publicKey=
- ############ Atlas Metric/Stats configs ################
- # Format: atlas.metric.query.<key>.<name>
- atlas.metric.query.cache.ttlInSecs=900
- #atlas.metric.query.general.typeCount=
- #atlas.metric.query.general.typeUnusedCount=
- #atlas.metric.query.general.entityCount=
- #atlas.metric.query.general.tagCount=
- #atlas.metric.query.general.entityDeleted=
- #
- #atlas.metric.query.entity.typeEntities=
- #atlas.metric.query.entity.entityTagged=
- #
- #atlas.metric.query.tags.entityTags=
- ######### Compiled Query Cache Configuration #########
- # The size of the compiled query cache. Older queries will be evicted from the cache
- # when we reach the capacity.
- #atlas.CompiledQueryCache.capacity=1000
- # Allows notifications when items are evicted from the compiled query
- # cache because it has become full. A warning will be issued when
- # the specified number of evictions have occurred. If the eviction
- # warning threshold <= 0, no eviction warnings will be issued.
- #atlas.CompiledQueryCache.evictionWarningThrottle=0
- ######### Full Text Search Configuration #########
- #Set to false to disable full text search.
- #atlas.search.fulltext.enable=true
- ######### Gremlin Search Configuration #########
- #Set to false to disable gremlin search.
- atlas.search.gremlin.enable=false
- ########## Add http headers ###########
- #atlas.headers.Access-Control-Allow-Origin=*
- #atlas.headers.Access-Control-Allow-Methods=GET,OPTIONS,HEAD,PUT,POST
- #atlas.headers.<headerName>=<headerValue>
- ######### UI Configuration ########
- atlas.ui.default.version=v1
要改的配置很多。。务必仔细核对。很多默认配置都是有问题的,keytab 新建或者复用都可以,担心可能会涉及到权限问题所以我选择了hive的账户。hbase中应该也需要配置相应的权限。没测试过是否需要配置
kafka配置中的producer-1是默认的group id名称 多出来的三个配置是kafka在kerberos下procedure需要配置的参数
修改atlas-env.sh
- #!/usr/bin/env bash
- # The java implementation to use. If JAVA_HOME is not found we expect java and jar to be in path
- export JAVA_HOME=/usr/java/default
- export HBASE_CONF_DIR=/etc/hbase/conf
- # any additional java opts you want to set. This will apply to both client and server operations
- #export ATLAS_OPTS=
- # any additional java opts that you want to set for client only
- #export ATLAS_CLIENT_OPTS=
- # java heap size we want to set for the client. Default is 1024MB
- #export ATLAS_CLIENT_HEAP=
- # any additional opts you want to set for atlas service.
- #export ATLAS_SERVER_OPTS=
- # indicative values for large number of metadata entities (equal or more than 10,000s)
- export ATLAS_SERVER_OPTS="-server -XX:SoftRefLRUPolicyMSPerMB=0 -XX:+CMSClassUnloadingEnabled -XX:+UseConcMarkSweepGC -XX:+CMSParallelRemarkEnabled -XX:+PrintTenuringDistribution -XX:+HeapDumpOnOutOfMemoryError -XX:HeapDumpPath=dumps/atlas_server.hprof -Xloggc:logs/gc-worker.log -verbose:gc -XX:+UseGCLogFileRotation -XX:NumberOfGCLogFiles=10 -XX:GCLogFileSize=1m -XX:+PrintGCDetails -XX:+PrintHeapAtGC -XX:+PrintGCTimeStamps -Djava.security.krb5.conf=/etc/krb5.conf
- -Djava.security.auth.login.config=/data/atlas2.2/conf/jaas.conf"
- # java heap size we want to set for the atlas server. Default is 1024MB
- #export ATLAS_SERVER_HEAP=
- # indicative values for large number of metadata entities (equal or more than 10,000s) for JDK 8
- export ATLAS_SERVER_HEAP="-Xms15360m -Xmx15360m -XX:MaxNewSize=5120m -XX:MetaspaceSize=100M -XX:MaxMetaspaceSize=512m"
- # What is is considered as atlas home dir. Default is the base locaion of the installed software
- export ATLAS_HOME_DIR=/opt/atlas2.2
- # Where log files are stored. Defatult is logs directory under the base install location
- #export ATLAS_LOG_DIR=
- # Where pid files are stored. Defatult is logs directory under the base install location
- #export ATLAS_PID_DIR=
- # where the atlas titan db data is stored. Defatult is logs/data directory under the base install location
- #export ATLAS_DATA_DIR=
- # Where do you want to expand the war file. By Default it is in /server/webapp dir under the base install dir.
- #export ATLAS_EXPANDED_WEBAPP_DIR=
- # indicates whether or not a local instance of HBase should be started for Atlas
- export MANAGE_LOCAL_HBASE=false
- # indicates whether or not a local instance of Solr should be started for Atlas
- export MANAGE_LOCAL_SOLR=false
- # indicates whether or not cassandra is the embedded backend for Atlas
- export MANAGE_EMBEDDED_CASSANDRA=false
- # indicates whether or not a local instance of Elasticsearch should be started for Atlas
- export MANAGE_LOCAL_ELASTICSEARCH=false
env中的jaas.conf 需要增加一个jaas.conf
- Client {
- com.sun.security.auth.module.Krb5LoginModule required
- useKeyTab=true
- KeyTab="/data/atlas.service.keytab"
- storeKey=true
- principal="atlas/s1.hadoop.com@TEST.COM"
- debug=false;
- };
集成hive
首先去CDH的hive上添加3处配置

HiveServer2 的 Java 配置选项 {{JAVA_GC_ARGS}} -Datlas.conf=/data/apache-atlas-2.2.0/conf/

hive-site.xml的HiveServer2 高级配置代码段 (安全阀)
名称: hive.exec.post.hooks
值: org.apache.atlas.hive.hook.HiveHook
HiveServer2 环境高级配置片段(安全阀)
HIVE_AUX_JARS_PATH=/data/apache-atlas-2.2.0/hook/hive/ 复制一份atlas-application.properties到/etc/hive/conf下 。注意需要修改
- 改为false
- atlas.authentication.method.kerberos=false
- 增加
- atlas.client.readTimeoutMSecs=90000
- atlas.client.connectTimeoutMSecs=90000
- 添加两个性能相关的参数
- #Atlas代码在提交事务时尝试获取锁(以确保一致性)的次数。
- #这应该与服务器预期支持的并发量有关。例如,在重试次数设置为10的情况下,多达100个线程可以在Atlas系统中同时创建类型。
- #如果将其设置为低值(默认值为3),则并发操作可能会失败,并出现PermanentLockingException。
- atlas.graph.storage.lock.reries=10
- #在逐出缓存项之前等待的毫秒数。这应该是atlas.graph.storage.lock.wait-time atlas.gaph.storage.lock.retrys
- #如果将其设置为较低的值(默认值为10000),Atlas应用程序日志中将出现有关耗时过长的事务的警告。
- atlas.graph.storage.cache.db-cache-time=120000
最后两个配置的含义是读取连接时间,,默认的太短
下载这个jar包放到/opt/cloudera/parcels/CDH/lib/hive/lib下。导入hive数据时需要支持正则表达式的字段分隔方式
然后就可以启动了
- bin/atlas-start.py
- bin/atlas-stop.py
启动过程如下图所示

该过程会耗时较久,包含index创建、数据的初始化等操作,可能长达数小时,请耐心等待。
此时可以跟一下atlas的启动日志,直到日志不再刷新,再lsof或netstat查一下21000是否已经监听了,如已存在,则打开浏览器输入ip:21000登录atlas页面千万不要相信他提示的Apache Atlas Server started!!!和jps显示的Atlas进程 ,因为启动脚本超过一定时间后一定会报成功,但此时21000端口还未被监听,服务是不可用的,真正可用还是以21000被成功监听,可以进到Atlas登录页面为准
然后开始正式使用
首先在/etc/profile中配置一下kafka和hive的信息
- export HIVE_HOME=/opt/cloudera/parcels/CDH/lib/hive
- export HIVE_CONF_DIR=/etc/hive/conf
- export PATH=$HIVE_HOME/bin:$PATH
- export KAFKA_HOME=/opt/cloudera/parcels/CDH/lib/kafka
- export KAFKA_CONF_DIR=/etc/kafka/conf
- export PATH=$KAFKA_HOME/bin:$PATH
导入hive数据
- 记得kinit
- bin/import-hive.sh
- 也可以单独导入某个库
- bin/import-hive.sh -d default
- 或者单独导入某个表
- bin/import-hive.sh -d default -t test
- 导入一批库/表
- bin/import-hive.sh -f 文件名

过程中会提示输入atlas用户名和密码,都输入admin即可
成功后会提示
该过程时间视hive现有数据量大小而定
登录后如下图

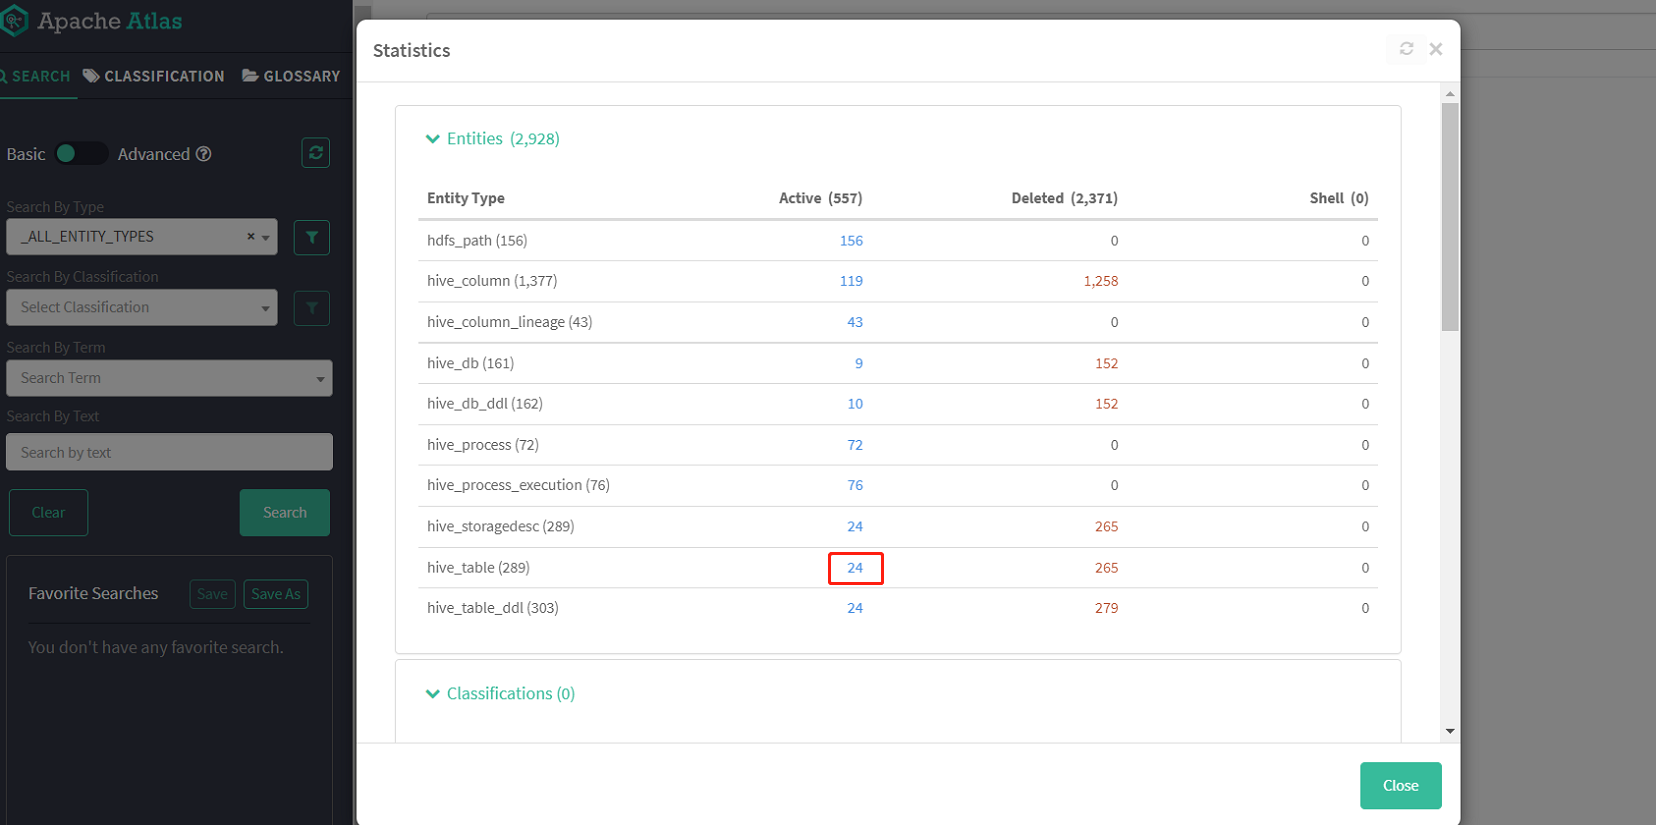
此时可以点击右上角小图标

查看总体数据情况
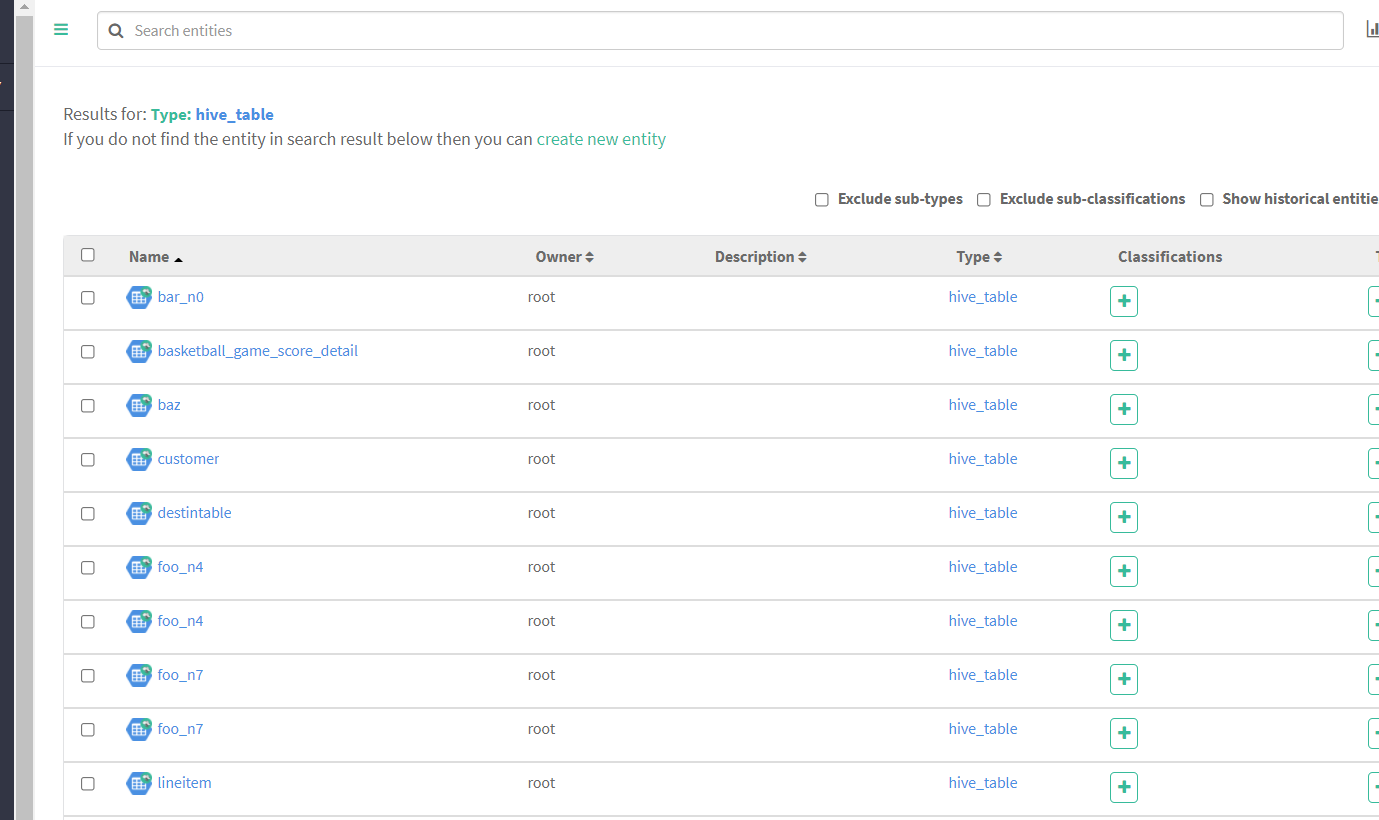
查看所有hive表
随便点击一个表查看详情


可以清楚地看到这个表的各项信息、字段及血缘图等
我们也可以通过左侧搜索栏检索过滤想要查找的项
有几个点需要注意:
1、Atlas 是根据 Hive 所执行的 SQL 语句获取表与表之间以及字段与字段之间的依赖关系的,例如执行 insert into table_a select * from table_b 语句,Atlas 就能获取 table_a 与 table_b 之间的依赖关系。如果并未执行任何 SQL语句,故还不能出现血缘依赖关系。所以初次导入是没有血缘数据的
2、 两个表之间必须要有真实的数据落地,才能解析出来表的血缘关系。例如:查询一条在a表中不存在的数据,然后插入b表。这样就无法解析ab表的血缘关系
3、如果sql中用到的表,使用 with as...当做临时表。这样Atlas也无法解析血缘关系。
4、在atlas中实体是独立的,因此当有业务变更涉及增删字段时,删除某字段实体会在相应表实体columns属性中移除,但表实体的Audits栏中并不会新增一条更新操作记录(可能是使用的版本存在bug);
当新增字段实体时,仅且需要创建该字段实体即可,无需重新建表,我们可以观察到新增该字段实体的同时,表实体的columns的属性中新增了该字段,Audits栏中新增了一条更新操作记录。
当创建atlas中已存在的实体时,如果该实体所有属性均未发生改变,那么在atlas中不会看到任何变化,实体的Audits栏中也不会新增一条创建或更新的操作记录;若有部分属性发生变化,则会对该实体进行更新,可以观察到发生变化的属性,而且Audits栏中新增了一条更新操作记录。
-
相关阅读:
Trie思想及模板
数据通信——应用层(文件传输FTP)
java毕业生设计高校毕业生就业满意度调查统计系统计算机源码+系统+mysql+调试部署+lw
前端周刊第十七期
Sub-1G射频收发器soc芯片 UM2080F32 低功耗 32 位 IoTP
Spring学习(6) Spring中基于注解的方式管理Bean
C语言-控制语句
Anaconda安装配置
Vue3理解(7)
No mapping for GET /swagger-ui.html的解决方法
- 原文地址:https://blog.csdn.net/h952520296/article/details/133774106