前面我们的EventBus已经弄好了,那么接下来通过EventBus来实现我们的消息推送就是自然而然的事情了。
说到消息推送,很多人肯定会想到Websocket,既然我们使用Asp.net core,那么SignalR肯定是我们的首选。
接下来就用SignalR来实现我们的消息实时推送。
NotificationHub#
首选我们需要创建一个Hub,用于连接SignalR。
添加NotificationHub类继承SignalR.Hub
using Microsoft.AspNetCore.SignalR;
using Microsoft.Extensions.Localization;
using Wheel.Notifications;

namespace Wheel.Hubs
{
    public class NotificationHub : Hub
    {
        protected IStringLocalizer L;

        public NotificationHub(IStringLocalizerFactory localizerFactory)
        {
            L = localizerFactory.Create(null);
        }

        public override async Task OnConnectedAsync()
        {
            if (Context.UserIdentifier != null)
            {
                var wellcome = new NotificationData(NotificationType.WellCome)
                    .WithData("name", Context.User!.Identity!.Name!)
                    .WithData("message", L["Hello"].Value);
                await Clients.Caller.SendAsync("Notification", wellcome);
            }
        }
    }
}
这里重写OnConnectedAsync,当用户授权连接之后,立马推送一个Hello的消息。
约定消息通知结构#
为了方便并且统一结构,我们最好约定一组通知格式,方便客户端处理消息。
创建一个NotificationData类:
namespace Wheel.Notifications
{
    public class NotificationData
    {
        public NotificationData(NotificationType type)
        {
            Type = type;
        }

        public NotificationType Type { get; set; }

        public IDictionary<string, object> Data { get; set; } = new Dictionary<string, object>();

        public NotificationData WithData(string name, object value)
        {
            Data.Add(name, value);
            return this;
        }
    }
    public enum NotificationType
    {
        WellCome = 0,
        Info = 1,
        Warn = 2,
        Error = 3
    }
}
NotificationData包含消息通知类型Type,以及消息数据Data。
自定义UserIdProvider#
有时候我们可以能需要自定义用户表示,那么就需要实现一个自定义的IUserIdProvider。
using Microsoft.AspNetCore.SignalR;
using System.Security.Claims;
using Wheel.DependencyInjection;

namespace Wheel.Hubs
{
    public class UserIdProvider : IUserIdProvider, ISingletonDependency
    {
        public string? GetUserId(HubConnectionContext connection)
        {
            return connection.User?.Claims?.FirstOrDefault(a=> a.Type == ClaimTypes.NameIdentifier)?.Value;
        }
    }
}
配置SignalR#
在Program中我们需要注册SignalR以及配置SignalR中间件。
添加代码:
builder.Services.AddAuthentication(IdentityConstants.BearerScheme)
    .AddBearerToken(IdentityConstants.BearerScheme, options =>
    {
        options.Events = new BearerTokenEvents
        {
            OnMessageReceived = context =>
            {
                var accessToken = context.Request.Query["access_token"];
                // If the request is for our hub...
                var path = context.HttpContext.Request.Path;
                if (!string.IsNullOrEmpty(accessToken) &&
                    (path.StartsWithSegments("/hubs")))
                {
                    // Read the token out of the query string
                    context.Token = accessToken;
                }
                return Task.CompletedTask;
            }
        };
    });

builder.Services.AddSignalR()
    .AddJsonProtocol()
    .AddMessagePackProtocol()
    .AddStackExchangeRedis(builder.Configuration["Cache:Redis"]);
在AddBearerToken配置从Query中读取access_token,用于SignalR连接是从Url获取认证的token。
这里注册SignalR并支持JSON和二进制MessagePackProtocol协议。
AddStackExchangeRedis表示用Redis做Redis底板,用于横向扩展。
配置中间件
app.MapHub("/hubs/notification");
配合EventBus进行推送#
有时候我们有些任务可能非实时响应,等待后端处理完成后,再给客户端发出一个消息通知。或者其他各种消息通知的场景,那么配合EventBus就可以非常灵活了。
接下来我们来模拟一个测试场景
创建NotificationEventData
using MediatR;

namespace Wheel.Handlers
{
    public class NotificationEventData : INotification
    {
        public string Message { get; set; }
    }
}
创建NotificationEventHandler
using Microsoft.AspNetCore.SignalR;
using Wheel.EventBus.Local;
using Wheel.Hubs;
using Wheel.Notifications;
namespace Wheel.Handlers
{
public class NotificationEventHandler : ILocalEventHandler<NotificationEventData>
{
private readonly IHubContext _hubContext;
public NotificationEventHandler(IHubContext hubContext )
{
_hubContext = hubContext;
}
public async Task Handle(NotificationEventData eventData, CancellationToken cancellationToken = default)
{
var wellcome = new NotificationData(NotificationType.WellCome)
.WithData(nameof(eventData.Message), eventData.Message);
await _hubContext.Clients.All.SendAsync("Notification", wellcome);
}
}
}
创建NotificationController
using Microsoft.AspNetCore.Authorization;
using Microsoft.AspNetCore.Mvc;
using Wheel.Handlers;

namespace Wheel.Controllers
{
    [Route("api/[controller]")]
    [ApiController]
    [AllowAnonymous]
    public class NotificationController : WheelControllerBase
    {
        [HttpGet]
        public async Task Test()
        {
            await LocalEventBus.PublishAsync(new NotificationEventData { Message = Guid.NewGuid().ToString() });
            return Ok();
        }
    }
}
启动项目
先获取一个token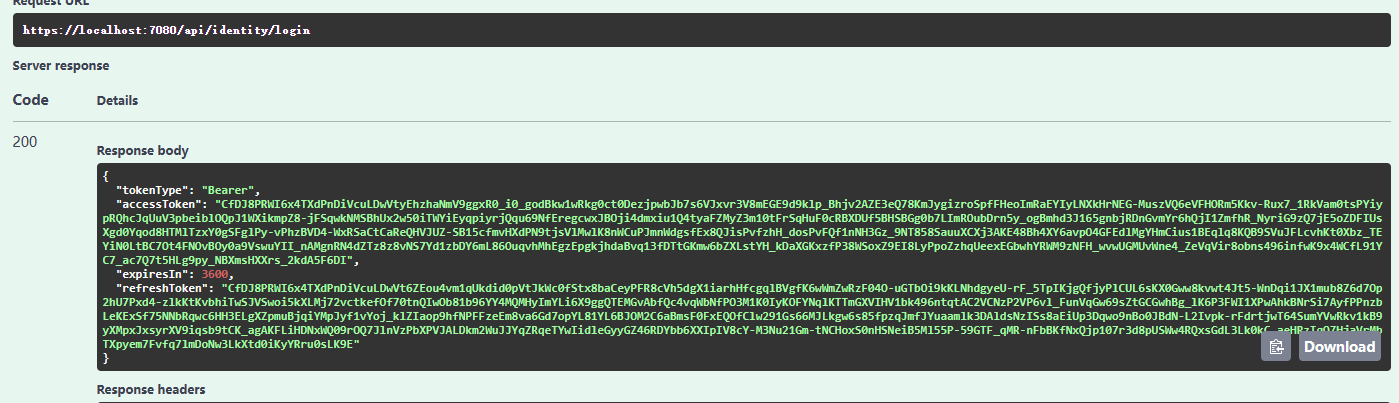
然后用搞一个SignalR客户端连接
using Microsoft.AspNetCore.SignalR.Client;
using System.Text.Json;
using System.Text.Json.Serialization;

var connection = new HubConnectionBuilder()
    .WithUrl("https://localhost:7080/hubs/notification?access_token=CfDJ8PRWI6x4TXdPnDiVcuLDwVtyEhzhaNmV9ggxR0_i0_godBkw1wRkg0ct0DezjpwbJb7s6VJxvr3V8mEGE9d9klp_Bhjv2AZE3eQ78KmJygizroSpfFHeoImRaEYIyLNXkHrNEG-MuszVQ6eVFHORm5Kkv-Rux7_1RkVam0tsPYiypRQhcJqUuV3pbeiblOQpJ1WXikmpZ8-jFSqwkNMSBhUx2w50iTWYiEyqpiyrjQqu69NfEregcwxJBOji4dmxiu1Q4tyaFZMyZ3m10tFrSqHuF0cRBXDUf5BHSBGg0b7LImROubDrn5y_ogBmhd3J165gnbjRDnGvmYr6hQjI1ZmfhR_NyriG9zQ7jE5oZDFIUsXgd0Yqod8HTMlTzxY0gSFglPy-vPhzBVD4-WxRSaCtCaReQHVJUZ-SB15cfmvHXdPN9tjsVlMwlK8nWCuPJmnWdgsfEx8QJisPvfzhH_dosPvFQf1nNH3Gz_9NT858SauuXCXj3AKE48Bh4XY6avpO4GFEdlMgYHmCius1BEqlq8KQB9SVuJFLcvhKt0Xbz_TEYiN0LtBC7Ot4FNOvBOy0a9VswuYII_nAMgnRN4dZTz8z8vNS7Yd1zbDY6mL86OuqvhMhEgzEpgkjhdaBvq13fDTtGKmw6bZXLstYH_kDaXGKxzfP38WSoxZ9EI8LyPpoZzhqUeexEGbwhYRWM9zNFH_wvwUGMUvWne4_ZeVqVir8obns496infwK9x4WCfL91YC7_ac7Q7t5HLg9py_NBXmsHXXrs_2kdA5F6DI")
    .Build();

connection.On("Notification", (data) =>
{
    var newMessage = JsonSerializer.Serialize(data);
    Console.WriteLine($"{DateTime.Now}---{newMessage}");
});
await connection.StartAsync();

Console.ReadKey();
public class NotificationData
{
    public NotificationData(NotificationType type)
    {
        Type = type;
    }

    public NotificationType Type { get; set; }

    public IDictionary<string, object> Data { get; set; } = new Dictionary<string, object>();

    public NotificationData WithData(string name, object value)
    {
        Data.Add(name, value);
        return this;
    }
}
public enum NotificationType
{
    WellCome = 0,
    Info = 1,
    Warn = 2,
    Error = 3
}
启动程序,由于我们带了accessToken连接,所以连上立马就收到Hello的消息推送。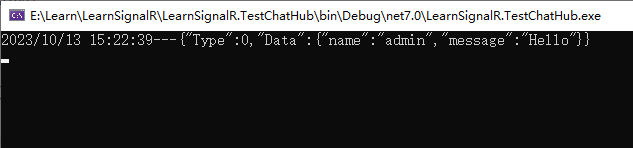
调用API发起推送通知。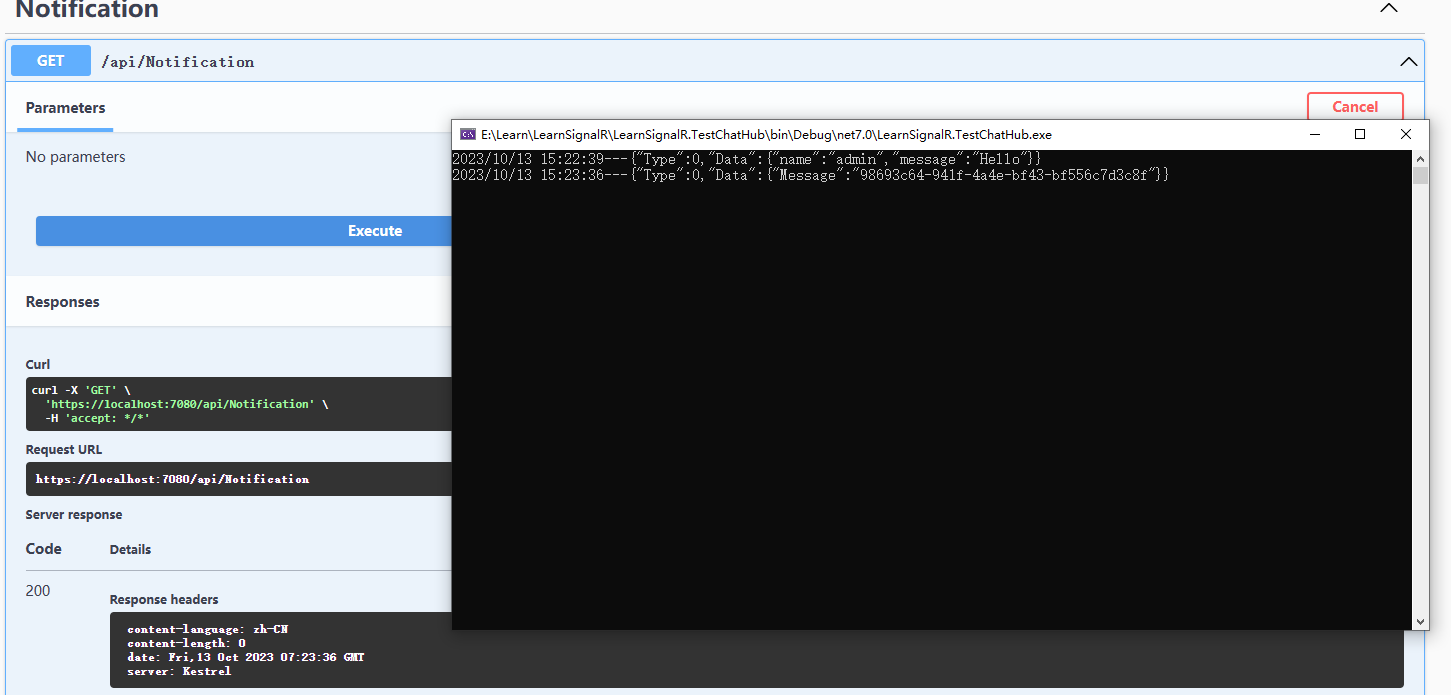
可以看到成功接收到了消息通知。
对接非常容易且灵活。
就这样我们轻轻松松完成了消息实时通知的功能集成。
轮子仓库地址https://github.com/Wheel-Framework/Wheel
欢迎进群催更。
