-
java框架-Springboot3-基础特性+核心原理
java框架-Springboot3-基础特性+核心原理
profiles


外部化配置

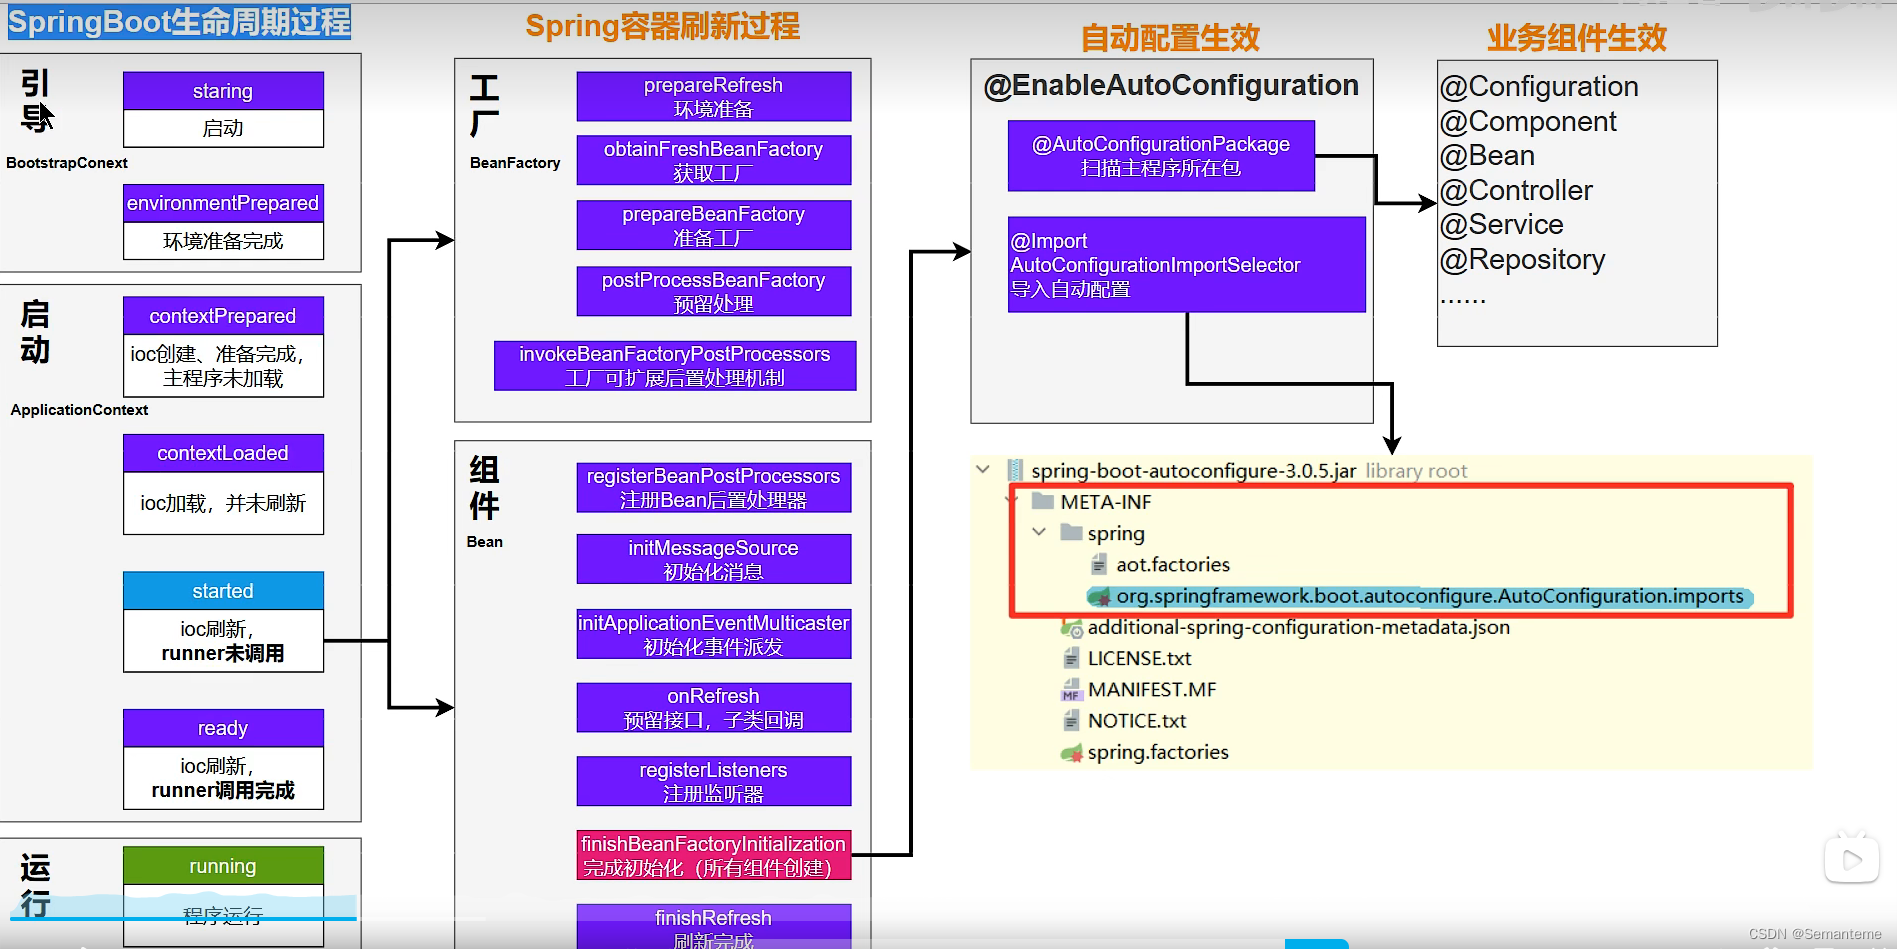
生命周期监听


事件触发时机


事件驱动开发
@Component public class MyApplicationListener2 { @EventListener public void onApplicationEvent2(MyApplicationEvent event){ System.out.println("onApplicationEvent2======================" + event.getSource()); } }- 1
- 2
- 3
- 4
- 5
- 6
- 7
- 8
@Component public class MyApplicationPublish implements ApplicationEventPublisherAware { ApplicationEventPublisher applicationEventPublisher; public String publish(String msg){ MyApplicationEvent myApplicationEvent = new MyApplicationEvent(msg); applicationEventPublisher.publishEvent(myApplicationEvent); return msg + "发布成功!"; } @Override public void setApplicationEventPublisher(ApplicationEventPublisher applicationEventPublisher) { this.applicationEventPublisher = applicationEventPublisher; } }- 1
- 2
- 3
- 4
- 5
- 6
- 7
- 8
- 9
- 10
- 11
- 12
- 13
- 14
- 15
SPI
当您使用Java SPI机制时,首先需要创建接口、实现类和服务提供者配置文件。以下是一个示例:
- 创建服务接口:
// ServiceInterface.java public interface ServiceInterface { void performAction(); }- 1
- 2
- 3
- 4
- 创建服务提供者实现类:
// ServiceProviderImpl1.java public class ServiceProviderImpl1 implements ServiceInterface { @Override public void performAction() { System.out.println("Performing action from ServiceProviderImpl1"); } }- 1
- 2
- 3
- 4
- 5
- 6
- 7
// ServiceProviderImpl2.java public class ServiceProviderImpl2 implements ServiceInterface { @Override public void performAction() { System.out.println("Performing action from ServiceProviderImpl2"); } }- 1
- 2
- 3
- 4
- 5
- 6
- 7
- 创建服务提供者配置文件:
在src/main/resources/META-INF/services/目录下创建一个名为com.example.ServiceInterface的文件,内容如下:
com.example.ServiceProviderImpl1 com.example.ServiceProviderImpl2- 1
- 2
- 使用ServiceLoader加载服务:
// MainClass.java import java.util.ServiceLoader; public class MainClass { public static void main(String[] args) { ServiceLoader<ServiceInterface> serviceLoader = ServiceLoader.load(ServiceInterface.class); for (ServiceInterface service : serviceLoader) { service.performAction(); } } }- 1
- 2
- 3
- 4
- 5
- 6
- 7
- 8
- 9
- 10
- 11
- 12
以上示例中,通过
ServiceLoader.load(ServiceInterface.class)加载实现了ServiceInterface接口的所有服务提供者。通过迭代器遍历,调用performAction()方法执行相应的操作。请记住,上述代码应该根据您的包名和类名进行调整和修改。运行这段代码时,输出将是:
Performing action from ServiceProviderImpl1 Performing action from ServiceProviderImpl2- 1
- 2
这个例子展示了如何使用Java SPI机制来动态地加载和使用服务提供者的实现类。
Springboot容器启动过程
自定义starter


-
相关阅读:
conda环境里安装ffmpeg
Anaconda安装
电商运营管理——广告系统
Nginx Rewrite
IP归属地在金融行业的应用场景
卷积神经网络之卷积层理解(持续更新)
分布式金融的攻击与防护
响应式网页设计(Responsive Web Design)的核心原理
LLC谐振变换器变频移相混合控制MATLAB仿真
【学习笔记之数据结构】时间复杂度与空间复杂度
- 原文地址:https://blog.csdn.net/Semanteme/article/details/133208480
