-
Flume最简单使用
一、简介
1、定义
Flume是Cloudera提供的一个高可用的,高可靠的,分布式的海量日志采集、聚合和传输的系统。
Flume基于流式架构,灵活简单。
- Flume官网地址:http://flume.apache.org
- 文档查看地址:http://flume.apache.org/FlumeUserGuide.html
- 下载地址:http://archive.apache.org/dist/flume

2、基础架构
Flume组成架构如下图所示:

- Agent
Agent:Flume的部署单元,本质是一个JVM进程,Agent内部是以事件的形式将数据从源头送至目的。
组成:Agent主要有3个部分组成,Source、Channel、Sink。
- Source
Source:是负责接收数据到Flume Agent的组件。
特点:Source组件可以处理各种类型、各种格式的日志数据,
Source组件类型:avro:本质是RPC框架,支持跨语言、跨平台的数据传输,avro Source在flume中多用于Agent的连接。netcat:本质是Linux下的端口类工具,netcat Source在Flume中用于采集端口传输的数据。exec:支持执行命令的,并将命令执行后的标准输出作为数据采集,多用于采集一个可追加文件。spooling directory:支持对一个目录进行监听,采集目录中一个或多个新生成的文件数据。taildir:支持对多个目录进行监听,采集一个或多个目录下的一个或多个可追加文件,支持断点续传。- 除此之外还有:thrift、jms、sequence generator、syslog、http、自定义Source。
- Sink
Sink:是负责发送数据到外部系统的Flume Agent的组件。
特点:Sink组件不断地轮询Channel中的事件且批量地移除它们,并将这些事件批量的、事务的写入到存储或索引系统、或者被发送到另一个Flume Agent。
Sink组件类型:logger:logger Sink组件则是将数据写到成Flume框架的运行日志中,配合运行参数-Dflume.root.logger=INFO,console可以将Flume运行日志(其中就包含了采集的数据)输出到控制台,多用于测试环境。hdfs:hdfs Sink组件是负责将数据传输到HDFS分布式文件系统中。avro:avro Sink组件配合avro Source组件可以实现Agent的连接。file:file Sink组件是将采集到的数据直接输出到本地文件系统中,即linux的磁盘上。- 除此之外还有:thrift、ipc、HBase、solr、自定义Sink。
- Channel
**Channel:**是负责暂存数据的,是位于Source和Sink组件之间的缓冲区。
特点:- 由于Channel组件的存在,使得Source和Sink组件可以运作在不同的速率上。
- Channel是线程安全的,可以同时处理几个Source的写入操作和几个Sink的读取操作。
Flume自带两种Channel:
- Memory Channel:基于内存的队列存储事件,适用于对数据安全性要求不高的场景。 快,不安全
- File Channel:基于磁盘存储事件,宕机数据不丢失,适用于对数据安全敏感度高的场景。 慢,安全
- Event
Event: agent中的事件,Flume数据传输的基本单元,以Event的形式将数据从源头送至目的地。
特点: Event由Header和Body两部分组成,- Header:用来存放该event的一些属性,为K-V结构。
- Body:用来存放该条数据,形式为字节数组。
二、快速入门
1、解压Flume
wget https://gitcode.net/weixin_44624117/software/-/raw/master/software/Linux/Flume/apache-flume-1.9.0-bin.tar.gz- 1
解压文件
tar -zxvf apache-flume-1.9.0-bin.tar.gz -C /opt/module/- 1
修改文件目录名称
mv /opt/module/apache-flume-1.9.0-bin /opt/module/flume-1.9.0- 1
将lib文件夹下的
guava-11.0.2.jar删除以兼容Hadoop 3.1.3rm /opt/module/flume-1.9.0/lib/guava-11.0.2.jar- 1
2、案例一:监控端口号
使用Flume监听一个端口,收集该端口数据,并打印到控制台。

安装netcat工具(发送Http请求)
sudo yum install -y nc- 1
判断44444端口是否被占用
sudo netstat -nlp | grep 44444- 1
在Flume目录下,创建job任务
cd /opt/module/flume-1.9.0 mkdir -p job/simpleCase cd /opt/module/flume-1.9.0/job/simpleCase- 1
- 2
- 3
添加配置文件
注:配置文件来源于官方手册http://flume.apache.org/FlumeUserGuide.html
vim flume-1-netcat-logger.con- 1
#Name the components on this agent a1.sources = r1 a1.sinks = k1 a1.channels = c1 # Describe/configure the source a1.sources.r1.type = netcat a1.sources.r1.bind = localhost a1.sources.r1.port = 44444 # Describe the sink a1.sinks.k1.type = logger # Use a channel which buffers events in memory a1.channels.c1.type = memory a1.channels.c1.capacity = 1000 a1.channels.c1.transactionCapacity = 100 # Bind the source and sink to the channel a1.sources.r1.channels = c1 a1.sinks.k1.channel = c1- 1
- 2
- 3
- 4
- 5
- 6
- 7
- 8
- 9
- 10
- 11
- 12
- 13
- 14
- 15
- 16
- 17
- 18
- 19
- 20
- 21
解释:
#Name the components on this agent a1.sources = r1 # 为a1的Source组件命名为r1,多个组件用空格间隔 a1.sinks = k1 # 为a1的Sink组件命名为k1,多个组件用空格间隔 a1.channels = c1 # 为a1的Channel组件命名为c1,多个组件用空格间隔 # Describe/configure the source a1.sources.r1.type = netcat # 配置r1的类型 a1.sources.r1.bind = localhost # 配置r1的绑定地址(注意localhost和hadoop102的区别) a1.sources.r1.port = 44444 # 配置r1的监听端口 # Describe the sink a1.sinks.k1.type = logger # 配置k1的类型为logger,输出到控制台 # Use a channel which buffers events in memory a1.channels.c1.type = memory # 配置c1的类型为memory a1.channels.c1.capacity = 1000 # 配置c1的容量为1000个事件 a1.channels.c1.transactionCapacity = 100 # 配置c1的事务容量为100个事件 # Bind the source and sink to the channel a1.sources.r1.channels = c1 # 配置r1的channel属性,指定r1连接到那个channel a1.sinks.k1.channel = c1 # 配置k1的channel属性,指定k1连接到那个channel- 1
- 2
- 3
- 4
- 5
- 6
- 7
- 8
- 9
- 10
- 11
- 12
- 13
- 14
- 15
- 16
- 17
- 18
- 19
- 20
- 21
运行Flume监听端口
# 方式一: bin/flume-ng agent --conf conf/ --name a1 --conf-file job/simpleCase/flume-1-netcat-logger.conf -Dflume.root.logger=INFO,console # 方式二: bin/flume-ng agent -c conf/ -n a1 -f job/simpleCase/flume-1-netcat-logger.conf -Dflume.root.logger=INFO,console- 1
- 2
- 3
- 4
参数说明:
--conf/-c:表示配置文件存储在conf/目录--name/-n:表示给agent起名为a1--conf-file/-f:指定读取的配置文件是在job/simpleCase文件夹下的flume-1-1netcat-logger.conf文件。-Dflume.root.logger=INFO,console:-D表示flume运行时动态修改flume.root.logger参数属性值,并将控制台日志打印级别设置为INFO级别。日志级别包括:log、info、warn、error。
**测试:**在Hadoop101上启动nc,并发送请求
nc localhost 44444 hello world hello world- 1
- 2
- 3
- 4

3、案例二:将空目录下文件
Source选择:
- Exec source:适用于监控一个实时追加的文件,不能实现断点续传;
- Spooldir Source:适合用于同步新文件,但不适合对实时追加日志的文件进行监听并同步;
- Taildir Source:适合用于监听多个实时追加的文件,并且能够实现断点续传。
案例需求:
- 使用Flume监听整个目录的实时追加文件,并上传至HDFS。

创建配置文件
cd /opt/module/flume-1.9.0/job/simpleCase vim flume-2-taildir-hdfs.conf- 1
- 2
配置文件
# Name the components on this agent a2.sources = r1 a2.sinks = k1 a2.channels = c1 # Describe/configure the source a2.sources.r1.type = TAILDIR a2.sources.r1.positionFile = /opt/module/flume-1.9.0/tail_dir.json a2.sources.r1.filegroups = f1 f2 a2.sources.r1.filegroups.f1 = /opt/module/flume-1.9.0/datas/tailCase/files/.*file.* a2.sources.r1.filegroups.f2 = /opt/module/flume-1.9.0/datas/tailCase/logs/.*log.* # Describe the sink a2.sinks.k1.type = hdfs a2.sinks.k1.hdfs.path = hdfs://hadoop101:8020/flume/tailDir/%Y%m%d/%H # 上传文件的前缀 a2.sinks.k1.hdfs.filePrefix = tail- # 是否按照时间滚动文件夹 a2.sinks.k1.hdfs.round = true # 多少时间单位创建一个新的文件夹 a2.sinks.k1.hdfs.roundValue = 1 # 重新定义时间单位 a2.sinks.k1.hdfs.roundUnit = hour # 是否使用本地时间戳 a2.sinks.k1.hdfs.useLocalTimeStamp = true # 积攒多少个Event才flush到HDFS一次 a2.sinks.k1.hdfs.batchSize = 100 # 设置文件类型,(可选择设置支持压缩的CompressedStream或者不支持压缩的DataStream) a2.sinks.k1.hdfs.fileType = DataStream # 多久生成一个新的文件 a2.sinks.k1.hdfs.rollInterval = 60 # 设置每个文件的滚动大小大概是128M a2.sinks.k1.hdfs.rollSize = 134217700 # 文件的滚动与Event数量无关 a2.sinks.k1.hdfs.rollCount = 0 # Use a channel which buffers events in memory a2.channels.c1.type = memory a2.channels.c1.capacity = 1000 a2.channels.c1.transactionCapacity = 100 # Bind the source and sink to the channel a2.sources.r1.channels = c1 a2.sinks.k1.channel = c1- 1
- 2
- 3
- 4
- 5
- 6
- 7
- 8
- 9
- 10
- 11
- 12
- 13
- 14
- 15
- 16
- 17
- 18
- 19
- 20
- 21
- 22
- 23
- 24
- 25
- 26
- 27
- 28
- 29
- 30
- 31
- 32
- 33
- 34
- 35
- 36
- 37
- 38
- 39
- 40
- 41
- 42
- 43
- 44
启动监控
cd /opt/module/flume-1.9.0 bin/flume-ng agent --conf conf/ --name a2 --conf-file job/simpleCase/flume-2-taildir-hdfs.conf- 1
- 2
测试
新建受监控目录
mkdir -p datas/tailCase/files mkdir -p datas/tailCase/logs- 1
- 2
在
/opt/module/flume/datas/目录下创建tailCase/files文件夹向files文件夹下文件追加内容测试
/opt/module/flume-1.9.0/datas/tailCase/files/.*file.*# 当前目录下会上传file的文件 cd /opt/module/flume-1.9.0/datas/tailCase/files touch file1.txt echo I am file1 >> file1.txt touch log1.txt echo I am log1 >> log1.txt- 1
- 2
- 3
- 4
- 5
- 6
- 7
测试:
/opt/module/flume-1.9.0/datas/tailCase/logs/.*log.*# 当前目录下,会上传 log的文件 cd /opt/module/flume-1.9.0/datas/tailCase/logs touch file2.txt echo I am file2 >> file2.txt touch log2.txt echo I am log2 >> log2.txt- 1
- 2
- 3
- 4
- 5
- 6
文件上传到HDFS上

断点续传监控
关掉flume采集程序,对logs/和files/下文件追加,再开启flume采集程序,验证flume的断点续传。
Taildir Source维护了一个json格式的position File,其会定期的往position File中更新每个文件读取到的最新的位置,因此能够实现断点续传。Position File的格式如下:
{"inode":2496272,"pos":12,"file":"/opt/module/flume/datas/tailCase/files/file1.txt"} {"inode":2496275,"pos":12,"file":"/opt/module/flume/datas/tailCase/logs/log2.txt"}- 1
- 2
注:Linux中储存文件元数据的区域就叫做inode,每个inode都有一个号码,操作系统用inode号码来识别不同的文件,Unix/Linux系统内部不使用文件名,而使用inode号码来识别文件。
三、Flume进阶
1、Flume事务

在Flume中一共有两个事务
- Put事务:在Source组件和Channel组件之间,保证Source组件到Channel组件之间数据传递的可靠性。
- take事务:在Channel组件和Sink组件之间,保证channel组件到Sink组件之间数据传输的可靠性。
Put事务流程
- source组件采集外部数据到agent内部,并且将数据包装为事件。
- source组件开始将事件传输到Channel组件中。
- 首先,会开启事务,在事务内部,通过doPut方法将一批数据放入到putlist中存储。
- 之后,调用doCommit方法,把putList中的所有Event放到Channel中,成功之后就清空putList。
失败重试机制
- putList在像channel中发送数据前会先检查channel中的容量是否放得下,放不下一个都不会放,调用doRollback
- 调用doRollback方法后,doRollback方法会进行两步操作:
- 将putList清空。
- 抛出ChannelException异常。
- source组件会捕捉到doRollback抛出的异常后,source就将刚才的一批数据重新采集,然后就开启一个新的事务。
- 数据批的大小取决于Source组件的配置参数batch size的值。
- putList的大小取决于Channel组件的配置参数transactionCapacity的值(capacity参数是指Channel的容量)。
Take事务流程
- Sink组件不断的轮询Channel,当其中有新的事件到达时,开启take事务。
- take事务开启后,会调用doTake方法将Channel组件中的Event剪切到takeList中。
- 当takeList中存放了batch size数量的Event之后,就会调用doCommit方法。
- doCommit方法中,首先会将数据写出到外部系统,成功后就会清空takeList。
- 当事务失败时,就会调用doRollback方法来进行回滚,就是将takeList中的数据原封不动的还给channel。
2、Flume Agent内部原理

组件名称 概述 组件包含类型 特点 ChannelSelector 选出Event将要发到那个channel Replication Channel Selector 复制,默认选项 Multiplexing Channel Seletctor 多路复用 SinkProcessor 通过配置不同类型的SinkProcess实现不同的功能 DefaultSinkProcessor 单个Sink,默认 LoadBalancingSinkProcessor 负载均衡 FailoverSinkProcessor 故障转移 执行流程
- Source组件采集外部数据到agent内部,并包装为Event
- 然后,将事件发送到ChannelProcessor中,
- 通过拦截器链中每个拦截器的拦截过滤,符合要求的Event会返回到ChannelProcessor中。
- 在通过ChannelSelector,根据不同的选择器来决定Event去往哪个Channel,然后返回到ChannelProcessor。
- 开启Put事务,将批量的Event发送到Channel中
- 更具SinkProcessor组件配置的类型不同,实现相应的功能(负载均衡或故障转移),最终都会且同一时刻只能有一个Sink去拉取数据。
- Sink组件不断的轮询Channel,当有新的Event到达Channel时,向外部系统写出。
3、案例一:监控日志
需求:
- 使用Flume-1监控文件变动。
- Flume-1将变动内容传递给Flume-2,Flume-2负责存储到HDFS。
- 同时Flume-1将变动内容传递给Flume-3,Flume-3负责输出到Local FileSystem。

模拟日志文件:在
/opt/module/flume/datas/目录下创建模拟日志文件realtime.logmkdir -p /opt/module/flume-1.9.0/datas touch /opt/module/flume-1.9.0/datas/realtime.log- 1
- 2
复制的配置文件:在
/opt/module/flume/job目录下创建enterprise/copy文件夹mkdir -p /opt/module/flume-1.9.0/job/enterprise/copy- 1
- Source:
flume-1-exec-avro.conf - Sink:``flume-2-avro-hdfs
和flume-3-avro-file`
配置文件1::
flume-1-exec-avro.confvim /opt/module/flume-1.9.0/job/enterprise/copy/flume-1-exec-avro.conf- 1
# Name the components on this agent a1.sources = r1 a1.sinks = k1 k2 a1.channels = c1 c2 # 将数据流复制给所有channel,其实默认就是replicating a1.sources.r1.selector.type = replicating # Describe/configure the source a1.sources.r1.type = exec a1.sources.r1.command = tail -F /opt/module/flume-1.9.0/datas/realtime.log a1.sources.r1.shell = /bin/bash -c # Describe the sink # sink端的avro是一个数据发送者 a1.sinks.k1.type = avro a1.sinks.k1.hostname = hadoop101 a1.sinks.k1.port = 4141 a1.sinks.k2.type = avro a1.sinks.k2.hostname = hadoop101 a1.sinks.k2.port = 4142 # Describe the channel a1.channels.c1.type = memory a1.channels.c1.capacity = 1000 a1.channels.c1.transactionCapacity = 100 a1.channels.c2.type = memory a1.channels.c2.capacity = 1000 a1.channels.c2.transactionCapacity = 100 # Bind the source and sink to the channel a1.sources.r1.channels = c1 c2 a1.sinks.k1.channel = c1 a1.sinks.k2.channel = c2- 1
- 2
- 3
- 4
- 5
- 6
- 7
- 8
- 9
- 10
- 11
- 12
- 13
- 14
- 15
- 16
- 17
- 18
- 19
- 20
- 21
- 22
- 23
- 24
- 25
- 26
- 27
- 28
- 29
- 30
- 31
- 32
- 33
- 34
- 35
配置文件2:
flume-2-avro-hdfs.confvim /opt/module/flume-1.9.0/job/enterprise/copy/flume-2-avro-hdfs.conf- 1
# Name the components on this agent a2.sources = r1 a2.sinks = k1 a2.channels = c1 # Describe/configure the source # source端的avro是一个数据接收服务 a2.sources.r1.type = avro a2.sources.r1.bind = hadoop101 a2.sources.r1.port = 4141 # Describe the sink a2.sinks.k1.type = hdfs a2.sinks.k1.hdfs.path = hdfs://hadoop101:8020/flume/copy/%Y%m%d/%H # 上传文件的前缀 a2.sinks.k1.hdfs.filePrefix = copy- # 是否按照时间滚动文件夹 a2.sinks.k1.hdfs.round = true # 多少时间单位创建一个新的文件夹 a2.sinks.k1.hdfs.roundValue = 1 # 重新定义时间单位 a2.sinks.k1.hdfs.roundUnit = hour # 是否使用本地时间戳 a2.sinks.k1.hdfs.useLocalTimeStamp = true # 积攒多少个Event才flush到HDFS一次 a2.sinks.k1.hdfs.batchSize = 100 # 设置文件类型,可支持压缩 a2.sinks.k1.hdfs.fileType = DataStream # 多久生成一个新的文件 a2.sinks.k1.hdfs.rollInterval = 60 # 设置每个文件的滚动大小大概是128M a2.sinks.k1.hdfs.rollSize = 134217700 # 文件的滚动与Event数量无关 a2.sinks.k1.hdfs.rollCount = 0 # Describe the channel a2.channels.c1.type = memory a2.channels.c1.capacity = 1000 a2.channels.c1.transactionCapacity = 100 # Bind the source and sink to the channel a2.sources.r1.channels = c1 a2.sinks.k1.channel = c1- 1
- 2
- 3
- 4
- 5
- 6
- 7
- 8
- 9
- 10
- 11
- 12
- 13
- 14
- 15
- 16
- 17
- 18
- 19
- 20
- 21
- 22
- 23
- 24
- 25
- 26
- 27
- 28
- 29
- 30
- 31
- 32
- 33
- 34
- 35
- 36
- 37
- 38
- 39
- 40
- 41
- 42
- 43
配置文件3:
flume-3-avro-file.confvim /opt/module/flume-1.9.0/job/enterprise/copy/flume-3-avro-file.conf- 1
# Name the components on this agent a3.sources = r1 a3.sinks = k1 a3.channels = c2 # Describe/configure the source a3.sources.r1.type = avro a3.sources.r1.bind = hadoop101 a3.sources.r1.port = 4142 # Describe the sink a3.sinks.k1.type = file_roll a3.sinks.k1.sink.directory = /opt/module/flume-1.9.0/datas/copy_result # Describe the channel a3.channels.c2.type = memory a3.channels.c2.capacity = 1000 a3.channels.c2.transactionCapacity = 100 # Bind the source and sink to the channel a3.sources.r1.channels = c2 a3.sinks.k1.channel = c2- 1
- 2
- 3
- 4
- 5
- 6
- 7
- 8
- 9
- 10
- 11
- 12
- 13
- 14
- 15
- 16
- 17
- 18
- 19
- 20
- 21
- 22
mkdir /opt/module/flume-1.9.0/datas/copy_result- 1
cd /opt/module/flume-1.9.0 bin/flume-ng agent -c conf/ -n a3 -f /opt/module/flume-1.9.0/job/enterprise/copy/flume-3-avro-file.conf bin/flume-ng agent -c conf/ -n a2 -f /opt/module/flume-1.9.0/job/enterprise/copy/flume-2-avro-hdfs.conf bin/flume-ng agent -c conf/ -n a1 -f /opt/module/flume-1.9.0/job/enterprise/copy/flume-1-exec-avro.conf- 1
- 2
- 3
- 4
echo 2021-10-41 09-10-32 >> /opt/module/flume-1.9.0/datas/realtime.log- 1
4、案例二:多路复用和拦截器适应
4.1 原理
需求:
使用flume采集服务器端口日志数据,需要按照日志类型的不同,将不同种类的日志发往不同分析系统。
原理
- 背景:在实际的开发中,一台服务器产生的日志类型可能有很多种,不同类型的日志可能需要发送到不同的分析系统。
此时会用到Flume的channel selecter中的Multiplexing结构。 - Multiplexing的原理是:根据event中Header的某个key的值,将不同的event发送到不同的Channel中。
- 自定义Interceptor:实现为不同类型的event的Header中的key赋予不同的值。
- 总结:在该案例中,我们以端口数据模拟日志,以数字和字母模拟不同类型的日志,我们需要自定义interceptor区分数字和字母,将其分别发往不同的分析系统(Channel)。

4.2 代码编写
Maven配置
<project xmlns="http://maven.apache.org/POM/4.0.0" xmlns:xsi="http://www.w3.org/2001/XMLSchema-instance" xsi:schemaLocation="http://maven.apache.org/POM/4.0.0 http://maven.apache.org/xsd/maven-4.0.0.xsd"> <modelVersion>4.0.0modelVersion> <groupId>com.lydmsgroupId> <artifactId>first-flumeartifactId> <version>1.0-SNAPSHOTversion> <packaging>jarpackaging> <name>first-flumename> <properties> <project.build.sourceEncoding>UTF-8project.build.sourceEncoding> properties> <dependencies> <dependency> <groupId>junitgroupId> <artifactId>junitartifactId> <version>3.8.1version> <scope>testscope> dependency> <dependency> <groupId>org.apache.flumegroupId> <artifactId>flume-ng-coreartifactId> <version>1.9.0version> dependency> dependencies> <build> <plugins> <plugin> <groupId>org.apache.maven.pluginsgroupId> <artifactId>maven-compiler-pluginartifactId> <configuration> <source>6source> <target>6target> configuration> plugin> plugins> build> project>- 1
- 2
- 3
- 4
- 5
- 6
- 7
- 8
- 9
- 10
- 11
- 12
- 13
- 14
- 15
- 16
- 17
- 18
- 19
- 20
- 21
- 22
- 23
- 24
- 25
- 26
- 27
- 28
- 29
- 30
- 31
- 32
- 33
- 34
- 35
- 36
- 37
- 38
- 39
- 40
- 41
- 42
- 43
接口:
package com.lydms.flume.interceptor; import org.apache.flume.Context; import org.apache.flume.Event; import org.apache.flume.interceptor.Interceptor; import java.util.List; public class CustomInterceptor implements Interceptor { @Override public void initialize() { } @Override public Event intercept(Event event) { // 1. 从事件中获取数据 byte[] body = event.getBody(); // 2. 判断数据开头的字符是字母还是数据 if (body[0] >= 'a' && body[0] <= 'z') { event.getHeaders().put("type", "letter"); // 是字母就在事件头部设置type类型为letter } else if (body[0] >= '0' && body[0] <= '9') { event.getHeaders().put("type", "number"); // 是数字就在事件头部设置type类型为number } // 3. 返回事件 return event; } // 对批量事件进行拦截 @Override public List<Event> intercept(List<Event> events) { for (Event event : events) { intercept(event); } return events; } @Override public void close() { } // 拦截器对象的构造对象 public static class Builder implements Interceptor.Builder { @Override public Interceptor build() { return new CustomInterceptor(); } @Override public void configure(Context context) { } } }- 1
- 2
- 3
- 4
- 5
- 6
- 7
- 8
- 9
- 10
- 11
- 12
- 13
- 14
- 15
- 16
- 17
- 18
- 19
- 20
- 21
- 22
- 23
- 24
- 25
- 26
- 27
- 28
- 29
- 30
- 31
- 32
- 33
- 34
- 35
- 36
- 37
- 38
- 39
- 40
- 41
- 42
- 43
- 44
- 45
- 46
- 47
- 48
- 49
- 50
- 51
- 52
- 53
- 54
- 55
- 56
- 57
将项目打包,并导入到flume的lib目录下(
/opt/module/flume-1.9.0/lib)。4.3 编写配置文件
Hadoop101:添加配置文件mkdir -p /opt/module/flume-1.9.0/job/custom/multi vim /opt/module/flume-1.9.0/job/custom/multi/flume-1-netcat-avro.conf- 1
- 2
# Name the components on this agent a1.sources = r1 a1.sinks = k1 k2 a1.channels = c1 c2 # Describe/configure the source a1.sources.r1.type = netcat a1.sources.r1.bind = localhost a1.sources.r1.port = 44444 a1.sources.r1.interceptors = i1 # Java文件目录 a1.sources.r1.interceptors.i1.type = com.lydms.flume.interceptor.CustomInterceptor$Builder a1.sources.r1.selector.type = multiplexing a1.sources.r1.selector.header = type a1.sources.r1.selector.mapping.letter = c1 a1.sources.r1.selector.mapping.number = c2 # Describe the sink a1.sinks.k1.type = avro a1.sinks.k1.hostname = hadoop102 a1.sinks.k1.port = 4141 a1.sinks.k2.type=avro a1.sinks.k2.hostname = hadoop103 a1.sinks.k2.port = 4242 # Use a channel which buffers events in memory a1.channels.c1.type = memory a1.channels.c1.capacity = 1000 a1.channels.c1.transactionCapacity = 100 # Use a channel which buffers events in memory a1.channels.c2.type = memory a1.channels.c2.capacity = 1000 a1.channels.c2.transactionCapacity = 100 # Bind the source and sink to the channel a1.sources.r1.channels = c1 c2 a1.sinks.k1.channel = c1 a1.sinks.k2.channel = c2- 1
- 2
- 3
- 4
- 5
- 6
- 7
- 8
- 9
- 10
- 11
- 12
- 13
- 14
- 15
- 16
- 17
- 18
- 19
- 20
- 21
- 22
- 23
- 24
- 25
- 26
- 27
- 28
- 29
- 30
- 31
- 32
- 33
- 34
- 35
- 36
- 37
- 38
- 39
- 40
Hadoop102:添加配置文件mkdir -p /opt/module/flume-1.9.0/job/custom/multi vim /opt/module/flume-1.9.0/job/custom/multi/flume-2-avro-logger.conf- 1
- 2
# agent a2.sources=r1 a2.sinks = k1 a2.channels = c1 # source a2.sources.r1.type = avro a2.sources.r1.bind = hadoop102 a2.sources.r1.port = 4141 # sink a2.sinks.k1.type = logger # Channel a2.channels.c1.type = memory a2.channels.c1.capacity = 1000 a2.channels.c1.transactionCapacity = 100 # bind a2.sinks.k1.channel = c1 a2.sources.r1.channels = c1- 1
- 2
- 3
- 4
- 5
- 6
- 7
- 8
- 9
- 10
- 11
- 12
- 13
- 14
- 15
- 16
- 17
- 18
- 19
- 20
- 21
Hadoop103:添加配置文件mkdir -p /opt/module/flume-1.9.0/job/custom/multi vim /opt/module/flume-1.9.0/job/custom/multi/flume-3-avro-logger.conf- 1
- 2
# agent a3.sources = r1 a3.sinks = k1 a3.channels = c1 # source a3.sources.r1.type = avro a3.sources.r1.bind = hadoop103 a3.sources.r1.port = 4242 # sink a3.sinks.k1.type = logger # Channel a3.channels.c1.type = memory a3.channels.c1.capacity = 1000 a3.channels.c1.transactionCapacity = 100 # bind a3.sinks.k1.channel = c1 a3.sources.r1.channels = c1- 1
- 2
- 3
- 4
- 5
- 6
- 7
- 8
- 9
- 10
- 11
- 12
- 13
- 14
- 15
- 16
- 17
- 18
- 19
- 20
- 21
4.4 测试
启动项目
cd /opt/module/flume-1.9.0 bin/flume-ng agent -c conf/ -n a3 -f /opt/module/flume-1.9.0/job/custom/multi/flume-3-avro-logger.conf -Dflume.root.logger=INFO,console bin/flume-ng agent -c conf/ -n a2 -f /opt/module/flume-1.9.0/job/custom/multi/flume-2-avro-logger.conf -Dflume.root.logger=INFO,console bin/flume-ng agent -c conf/ -n a1 -f /opt/module/flume-1.9.0/job/custom/multi/flume-1-netcat-avro.conf -Dflume.root.logger=INFO,console- 1
- 2
- 3
- 4
测试:
nc localhost 44444 hello world 1231231 41341- 1
- 2
- 3
- 4
- 5

5、案例三:聚合
案例:
hadoop102:flume-1监控文件/opt/module/flume-1.9.0/datas/.*file*.,hadoop103:flume-2监控某一个端口的数据流。hadoop104:flume-3,接收flume-1和flume-2的数据,flume-3将最终数据打印到控制台。

Hadoop101:配置文件flume-1-exec-avro.confmkdir /opt/module/flume-1.9.0/job/enterprise/juhe vim /opt/module/flume-1.9.0/job/enterprise/juhe/flume-1-exec-avro.conf- 1
- 2
# Name the components on this agent a1.sources = r1 a1.sinks = k1 a1.channels = c1 # Describe/configure the source a1.sources.r1.type = exec a1.sources.r1.command = tail -F /opt/module/flume-1.9.0/datas/realtime.log a1.sources.r1.shell = /bin/bash -c # Describe the sink a1.sinks.k1.type = avro a1.sinks.k1.hostname = hadoop103 a1.sinks.k1.port = 4141 # Describe the channel a1.channels.c1.type = memory a1.channels.c1.capacity = 1000 a1.channels.c1.transactionCapacity = 100 # Bind the source and sink to the channel a1.sources.r1.channels = c1 a1.sinks.k1.channel = c1- 1
- 2
- 3
- 4
- 5
- 6
- 7
- 8
- 9
- 10
- 11
- 12
- 13
- 14
- 15
- 16
- 17
- 18
- 19
- 20
- 21
- 22
- 23
Hadoop102:配置文件flume-2-netcat-avro.confmkdir -p /opt/module/flume-1.9.0/job/enterprise/juhe vim /opt/module/flume-1.9.0/job/enterprise/juhe/flume-2-netcat-avro.conf- 1
- 2
# Name the components on this agent a2.sources = r1 a2.sinks = k1 a2.channels = c1 # Describe/configure the source a2.sources.r1.type = netcat a2.sources.r1.bind = hadoop102 a2.sources.r1.port = 44444 # Describe the sink a2.sinks.k1.type = avro a2.sinks.k1.hostname = hadoop103 a2.sinks.k1.port = 4141 # Use a channel which buffers events in memory a2.channels.c1.type = memory a2.channels.c1.capacity = 1000 a2.channels.c1.transactionCapacity = 100 # Bind the source and sink to the channel a2.sources.r1.channels = c1 a2.sinks.k1.channel = c1- 1
- 2
- 3
- 4
- 5
- 6
- 7
- 8
- 9
- 10
- 11
- 12
- 13
- 14
- 15
- 16
- 17
- 18
- 19
- 20
- 21
- 22
- 23
Hadoop103:配置文件flume-1-exec-avro.confmkdir -p /opt/module/flume-1.9.0/job/enterprise/juhe vim /opt/module/flume-1.9.0/job/enterprise/juhe/flume-3-avro-logger.conf- 1
- 2
# Name the components on this agent a3.sources = r1 a3.sinks = k1 a3.channels = c1 # Describe/configure the source a3.sources.r1.type = avro a3.sources.r1.bind = hadoop103 a3.sources.r1.port = 4141 # Describe the sink a3.sinks.k1.type = logger # Describe the channel a3.channels.c1.type = memory a3.channels.c1.capacity = 1000 a3.channels.c1.transactionCapacity = 100 # Bind the source and sink to the channel a3.sources.r1.channels = c1 a3.sinks.k1.channel = c1- 1
- 2
- 3
- 4
- 5
- 6
- 7
- 8
- 9
- 10
- 11
- 12
- 13
- 14
- 15
- 16
- 17
- 18
- 19
- 20
- 21
测试:
# Hadoop103 /opt/module/flume-1.9.0/bin/flume-ng agent –c conf/ -n a3 -f /opt/module/flume-1.9.0/job/enterprise/juhe/flume-3-avro-logger.conf -Dflume.root.logger=INFO,console # Hadoop102 /opt/module/flume-1.9.0/bin/flume-ng agent –c conf/ -n a2 -f /opt/module/flume-1.9.0/job/enterprise/juhe/flume-2-netcat-avro.conf # Hadoop101 /opt/module/flume-1.9.0/bin/flume-ng agent –c conf/ -n a1 -f /opt/module/flume-1.9.0/job/enterprise/juhe/flume-1-exec-avro.conf- 1
- 2
- 3
- 4
- 5
- 6
Hadoop101:向/opt/module/flume/datas/目录下的realtime.log追加内容echo 'Hello Worlld Hadoop101' > /opt/module/flume-1.9.0/datas/realtime.log- 1
Hadoop102:向44444端口发送数据nc hadoop102 44444 hello world- 1
- 2
Hadoop103:查看数据
四、Flume数据流监控
1、Ganglia简介
Ganglia由gmond、gmetad和gweb三部分组成。
- gmond(Ganglia Monitoring Daemon):
是一种轻量级服务,安装在每台需要收集指标数据的节点主机上。
使用gmond,你可以很容易收集很多系统指标数据,如CPU、内存、磁盘、网络和活跃进程的数据等。 - gmetad(Ganglia Meta Daemon):
整合所有信息,并将其以RRD格式存储至磁盘的服务。 - gweb(Ganglia Web)Ganglia可视化工具:
gweb是一种利用浏览器显示gmetad所存储数据的PHP前端。
在Web界面中以图表方式展现集群的运行状态下收集的多种不同指标数据。
2、部署规划
gweb gmetad gmod Hadoop101 ture true true Hadoop102 true Hadoop103 true 安装步骤
# Hadoop101 sudo yum -y install epel-release sudo yum -y install ganglia-gmetad sudo yum -y install ganglia-web sudo yum -y install ganglia-gmond # Hadoop102 sudo yum -y install epel-release sudo yum -y install ganglia-gmond # Hadoop103 sudo yum -y install epel-release sudo yum -y install ganglia-gmond- 1
- 2
- 3
- 4
- 5
- 6
- 7
- 8
- 9
- 10
- 11
- 12
- 13
3、修改配置文件:
hadoop101修改配置:Hadoop101
- 修改配置文件
/etc/httpd/conf.d/ganglia.conf
sudo vim /etc/httpd/conf.d/ganglia.conf # 修改内容(2种配置。二选一) Require ip 192.168.1.1 # Require all granted- 1
- 2
- 3
- 4

修改配置文件
/etc/ganglia/gmetad.confsudo vim /etc/ganglia/gmetad.conf # 修改内容 data_source "my cluster" hadoop101- 1
- 2
- 3

修改配置文件
/etc/selinux/configsudo vim /etc/selinux/config # 修改内容 SELINUX=disabled SELINUXTYPE=targeted- 1
- 2
- 3
- 4
4、修改配置文件
3台修改配置:Hadoop101、Hadoop102、Hadoop103
修改配置文件
/etc/sudganglia/gmond.confsudo vim /etc/ganglia/gmond.conf # 修改内容================== # 数据发送给hadoop101 host = hadoop101 # 接收来自任意连接的数据 bind = 0.0.0.0- 1
- 2
- 3
- 4
- 5
- 6
- 7

5、启动服务
修改文件权限
chown ganglia:ganglia /var/lib/ganglia sudo chmod -R 777 /var/lib/ganglia- 1
- 2
启动脚本(Hadoop101)
sudo systemctl start gmond sudo systemctl start httpd sudo systemctl start gmetad- 1
- 2
- 3
当不能查看到页面时,修改配置文件,再重启。
Require ip 192.168.1.1- 1

3、测试

EventPutAttemptCountsource尝试写入Channel的事件总量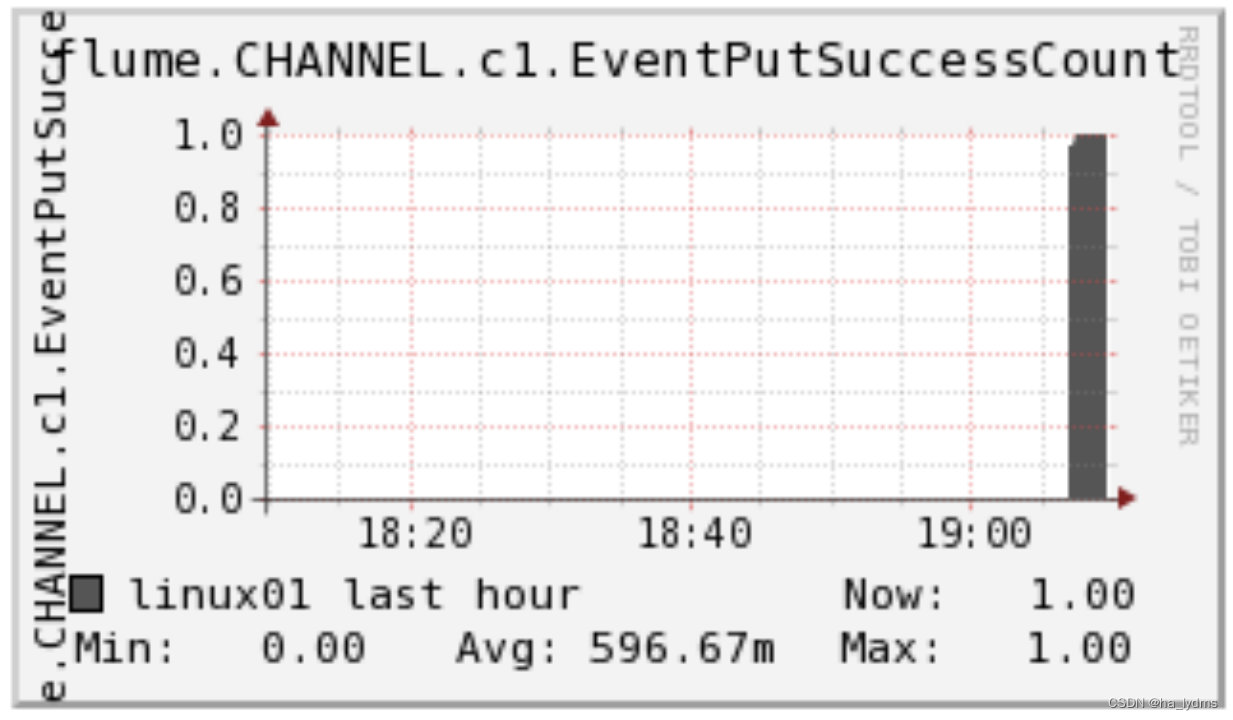 EventPutSuccessCount成功写入channel且提交的事件总量
 StartTimechannel停止时间
 EventTakeAttemptCountsource尝试写入Channel的事件总量
 EventTakeSuccessCount成功写入channel且提交的事件总量
 StopTimechannel停止时间
 ChannelSize目前Channel中事件的总数量
 ChannelFillPercentagechannel占用百分比
 ChannelCapacitychannel的容量
 -
相关阅读:
REVV Racing 指定赛车赛事,发挥最大潜力吧!
【计算机网络】什么是WebSocket?
大数据:Sqoop 简介与安装
vue请求后端数据和跨域问题
C# ORM框架,freesql,mysql数据库
DINO(ICLR 2023)
#笔记# 写给自己用的小爬虫
【Axure视频教程】表格编号函数
Android Framework实战:AMS HOOK实现集中登陆
如何解决消息队列的延时以及过期失效
- 原文地址:https://blog.csdn.net/weixin_44624117/article/details/133219833
