-
【数据结构】二叉树的链式实现及遍历

一、二叉树的遍历
后文所有代码中的二叉树结点:
typedef char BTDataType; //二叉树结点结构体 typedef struct BinaryTreeNode { BTDataType data; struct BinaryTreeNode* left; struct BinaryTreeNode* right; }BTNode;- 1
- 2
- 3
- 4
- 5
- 6
- 7
- 8
1、前序遍历
前,中,后序遍历都可以采用分治递归的思想解决,将根节点和它的孩子结点分别处理。
// 二叉树前序遍历 void BinaryTreePrevOrder(BTNode* root) { if (root == NULL) { printf("NULL "); return; } printf("%c ", root->data); BinaryTreePrevOrder(root->left); BinaryTreePrevOrder(root->right); }- 1
- 2
- 3
- 4
- 5
- 6
- 7
- 8
- 9
- 10
- 11
- 12
- 13
此处仅利用递归展开图分析前序遍历,中序和后序也是相同的思想:


2、中序遍历
// 二叉树中序遍历 void BinaryTreeInOrder(BTNode* root) { if (root == NULL) { printf("NULL "); return; } BinaryTreeInOrder(root->left); printf("%c ", root->data); BinaryTreeInOrder(root->right); }- 1
- 2
- 3
- 4
- 5
- 6
- 7
- 8
- 9
- 10
- 11
- 12
- 13
3、后序遍历
// 二叉树后序遍历 void BinaryTreePostOrder(BTNode* root) { if (root == NULL) { printf("NULL "); return; } BinaryTreePostOrder(root->left); BinaryTreePostOrder(root->right); printf("%c ", root->data); }- 1
- 2
- 3
- 4
- 5
- 6
- 7
- 8
- 9
- 10
- 11
- 12
- 13
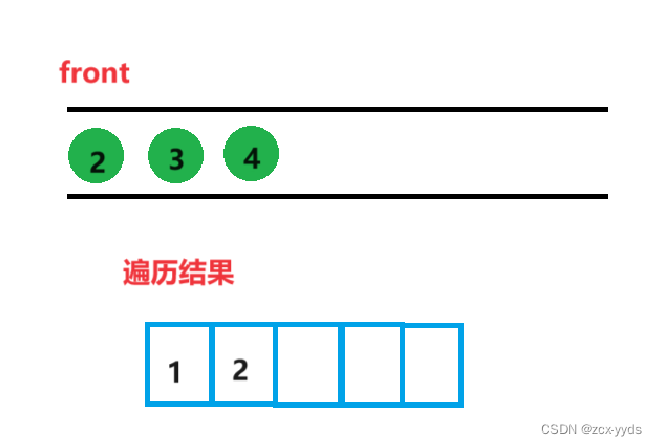
4、层序遍历
层序遍历需要利用队列来进行,如果二叉树跟结点不为空,则让指向它的一个指针入队,然后将队头结点记录下来,先将它的值打印,然后判断它的左右孩子为非空则入队,然后删掉队头换下一个继续记录打印…直到队列为空则遍历完成。
例如对如图这个二叉树:
层序遍历结果为:12345

先将根节点1入队,打印1然后将1的左右孩子2和3入队

删掉队头1,front换为2,打印2

然后将2的左孩子4入队
删掉队头2,front换为3,打印3
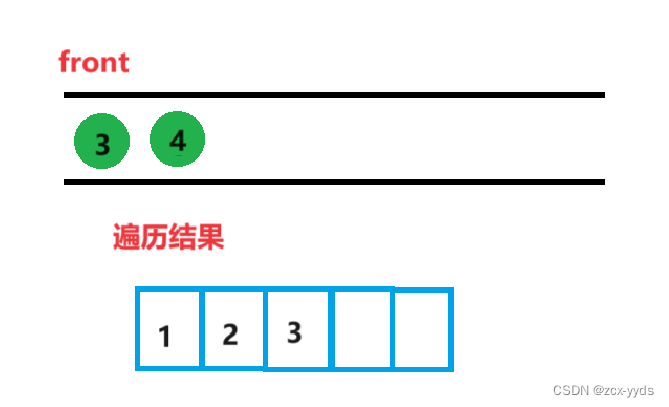
然后将3的右孩子5入队

… …
接着按这样打印4,5便完成了二叉树的层序遍历

程序代码利用了自己创建的队列,代码如下:
//层序遍历 void LevelOrder(BTNode* root) { //创建队列 Que q; QueueInit(&q); //如果根节点不为空,则放进队列 if (root) QueuePush(&q, root); while (!QueueEmpty(&q)) { //将队头打印 BTNode* front = QueueFront(&q); printf("%c ", front->data); //判断front左右节点不为空则入队 if (front->left) QueuePush(&q, front->left); if (front->right) QueuePush(&q, front->right); QueuePop(&q); } printf("\n"); QueueDestroy(&q); }- 1
- 2
- 3
- 4
- 5
- 6
- 7
- 8
- 9
- 10
- 11
- 12
- 13
- 14
- 15
- 16
- 17
- 18
- 19
- 20
- 21
- 22
- 23
- 24
- 25
- 26
- 27
- 28
- 29
二、二叉树结点个数及高度
1、二叉树节点个数
采用分治法递归实现,当根节点为空时返回值为0,不为空则返回左右子树上的节点数加上自身1。
int BinaryTreeSize(BTNode* root) { return root == NULL ? 0 : BinaryTreeSize(root->left) + BinaryTreeSize(root->right) + 1; }- 1
- 2
- 3
- 4
2、二叉树叶子节点个数
采用分治法递归实现,根节点为空时返回0,当根节点没有孩子结点时说明它是叶子节点,返回1,其他情况时只需左右子树上的叶子节点相加即可。
int BinaryTreeLeafSize(BTNode* root) { if (root == NULL) { return 0; } if (root->left == NULL && root->right == NULL) { return 1; } return BinaryTreeLeafSize(root->left) + BinaryTreeLeafSize(root->right); }- 1
- 2
- 3
- 4
- 5
- 6
- 7
- 8
- 9
- 10
- 11
- 12
3、二叉树第k层节点个数
需要保证k大于0才可,当根节点为空,则返回0,当k等于1时只有一层一个节点,返回1,k>1时第k层节点数就相当于它左右孩子的第k-1层节点数相加。
int BinaryTreeLevelKSize(BTNode* root, int k) { assert(k > 0); if (root == NULL) { return 0; } if (k == 1) { return 1; } return BinaryTreeLevelKSize(root->left, k - 1) + BinaryTreeLevelKSize(root->right, k - 1); }- 1
- 2
- 3
- 4
- 5
- 6
- 7
- 8
- 9
- 10
- 11
- 12
- 13
- 14
- 15
4、二叉树查找值为x的节点
跟节点为空则找不到返回NULL,当根节点的值为要找的值时返回该节点,不相等则分别判断它的左右孩子节点,直到找到为止。
BTNode* BinaryTreeFind(BTNode* root, BTDataType x) { if (root == NULL) { return NULL; } if (root->data == x) { return root; } BTNode* ret = BinaryTreeFind(root->left,x); if (ret) { return ret; } return BinaryTreeFind(root->right, x); }- 1
- 2
- 3
- 4
- 5
- 6
- 7
- 8
- 9
- 10
- 11
- 12
- 13
- 14
- 15
- 16
- 17
三、二叉树创建及销毁
1、通过前序遍历数组创建二叉树
读入用户输入的一串先序遍历字符串,根据此字符串建立一个二叉树(以指针方式存储)。 例如如下的先序遍历字符串: ABC##DE#G##F### 其中“#”表示的是空格,空格字符代表空树。建立起此二叉树以后,再对二叉树进行中序遍历,输出遍历结果。
#include#include typedef char BTDataType; typedef struct BinaryTreeNode { BTDataType data; struct BinaryTreeNode* left; struct BinaryTreeNode* right; } BTNode; BTNode* BinaryTreeCreate(BTDataType* a, int* pi) { if (a[*pi] == '#') { ++*pi; return NULL; } BTNode* root = (BTNode*)malloc(sizeof(BTDataType)); root->data = a[*pi]; ++*pi; root->left = BinaryTreeCreate(a, pi); root->right = BinaryTreeCreate(a, pi); return root; } //中序遍历 void InOrder(BTNode* root) { if(root==NULL) { return; } InOrder(root->left); printf("%c ",root->data); InOrder(root->right); } int main() { char a[100]; scanf("%s",a); int pi=0; BTNode* root=BinaryTreeCreate(a, &pi); InOrder(root); return 0; } - 1
- 2
- 3
- 4
- 5
- 6
- 7
- 8
- 9
- 10
- 11
- 12
- 13
- 14
- 15
- 16
- 17
- 18
- 19
- 20
- 21
- 22
- 23
- 24
- 25
- 26
- 27
- 28
- 29
- 30
- 31
- 32
- 33
- 34
- 35
- 36
- 37
- 38
- 39
- 40
- 41
- 42
- 43
2、二叉树的销毁
void BinaryTreeDestory(BTNode* root) { if (root == NULL) { return; } BinaryTreeDestory(root->left); BinaryTreeDestory(root->right); free(root); }- 1
- 2
- 3
- 4
- 5
- 6
- 7
- 8
- 9
- 10
- 11
3、判断是否为完全二叉树
在二叉树层序遍历的基础上修改一下,让空节点也进入队列,遍历时遇到空节点则退出,继续遍历如果结束前还有非空节点则不是完全二叉树。
int BinaryTreeComplete(BTNode* root) { //创建队列 Que q; QueueInit(&q); //如果根节点不为空,则放进队列 if (root) QueuePush(&q, root); while (!QueueEmpty(&q)) { BTNode* front = QueueFront(&q); if (front == NULL) { break; } QueuePush(&q, front->left); QueuePush(&q, front->right); QueuePop(&q); } //此时已经遇到空节点,如果再遇到非空节点则不是完全二叉树 while (!QueueEmpty(&q)) { BTNode* front = QueueFront(&q); if (front) { QueueDestroy(&q); return false; } QueuePop(&q); } QueueDestroy(&q); return true; }- 1
- 2
- 3
- 4
- 5
- 6
- 7
- 8
- 9
- 10
- 11
- 12
- 13
- 14
- 15
- 16
- 17
- 18
- 19
- 20
- 21
- 22
- 23
- 24
- 25
- 26
- 27
- 28
- 29
- 30
- 31
- 32
- 33
- 34
- 35
- 36
四、测试代码
手动构建一个如下图的二叉树,对代码进行测试:

测试结果应该为:前序:123874569
中序:832715469
后序:837259641是否为完全二叉树:0
节点数:9
叶子节点数:4BTNode* BuyNode(BTDataType x) { BTNode* node = (BTNode*)malloc(sizeof(BTNode)); if (node == NULL) { perror("malloc fail"); exit(-1); } node->data = x; node->left = NULL; node->right = NULL; return node; } int main() { // 手动构建 BTNode* node1 = BuyNode('1'); BTNode* node2 = BuyNode('2'); BTNode* node3 = BuyNode('3'); BTNode* node4 = BuyNode('4'); BTNode* node5 = BuyNode('5'); BTNode* node6 = BuyNode('6'); BTNode* node7 = BuyNode('7'); BTNode* node8 = BuyNode('8'); BTNode* node9 = BuyNode('9'); node1->left = node2; node1->right = node4; node2->left = node3; node4->left = node5; node4->right = node6; node2->right = node7; node3->left = node8; node6->right = node9; printf("前序遍历:"); BinaryTreePrevOrder(node1); printf("\n"); printf("中序遍历:"); BinaryTreeInOrder(node1); printf("\n"); printf("后序遍历:"); BinaryTreePostOrder(node1); printf("\n"); printf("层序遍历:"); LevelOrder(node1); printf("\n"); printf("BinaryTreeComplete:%d\n", BinaryTreeComplete(node1)); printf("BinaryTreeSize:%d\n", BinaryTreeSize(node1)); printf("BinaryTreeLeafSize:%d\n", BinaryTreeLeafSize(node1)); BinaryTreeDestory(node1); node1 = NULL; return 0; }- 1
- 2
- 3
- 4
- 5
- 6
- 7
- 8
- 9
- 10
- 11
- 12
- 13
- 14
- 15
- 16
- 17
- 18
- 19
- 20
- 21
- 22
- 23
- 24
- 25
- 26
- 27
- 28
- 29
- 30
- 31
- 32
- 33
- 34
- 35
- 36
- 37
- 38
- 39
- 40
- 41
- 42
- 43
- 44
- 45
- 46
- 47
- 48
- 49
- 50
- 51
- 52
- 53
- 54
- 55
- 56
- 57
- 58
- 59
- 60
- 61
- 62
- 63
- 64
- 65
运行结果:

运行结果与预测结果一致。 -
相关阅读:
离散数学_十章-图 ( 6 ):欧拉通路与哈密顿通路
Idea下载及配置
关于使用docker volume挂载的注意事项
【暑期每日一题】洛谷 P5740【深基7.例9】最厉害的学生
《计算机操作系统-第五章》之线程与多线程模型
vue 弹出消息框
玩转ChatGPT:DALL·E 3生成图像
MMU如何通过虚拟地址找到物理地址-下
Linux 使用 crontab 定时拆分日志、清理过期文件
数组的详细剖析
- 原文地址:https://blog.csdn.net/zcxyywd/article/details/133107365
