-
uniCloud云开发及一键生成代码
uniapp云开发(云数据库)
准备工作
一、新建项目选择云开发


 关联云函数
关联云函数
 在cloudfouctions右键点击创建云函数

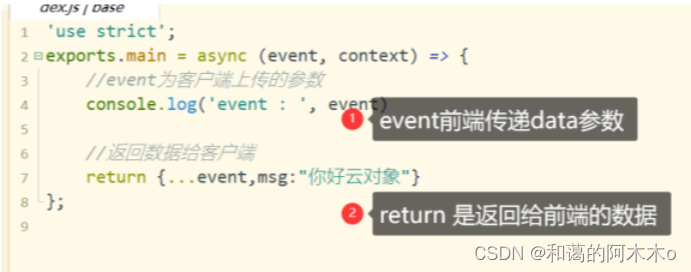
 在base下的index.js中写入
'use strict'; exports.main = async (event, context) => { //event为客户端上传的参数 console.log('event : ', event) //返回数据给客户端 return {...event,msg:"你好云对象"} };- 1
- 2
- 3
- 4
- 5
- 6
- 7
- 8
上传部署
 在page下的index.vue页面调用
<template> <view class="content"> <button @click="call">呼叫服务器</button> </view> </template> <script> export default { data() { return { } }, onLoad() { }, methods: { call() { uniCloud.callFunction({ name: "base", data: { name: "mumu", age: 18 } }) .then(res => { uni.showModal({ content: JSON.stringify(res.result) }) }) .catch(err => { console.log(err); }) } } } </script>- 1
- 2
- 3
- 4
- 5
- 6
- 7
- 8
- 9
- 10
- 11
- 12
- 13
- 14
- 15
- 16
- 17
- 18
- 19
- 20
- 21
- 22
- 23
- 24
- 25
- 26
- 27
- 28
- 29
- 30
- 31
- 32
- 33
- 34
- 35
- 36
新建数据库的文件

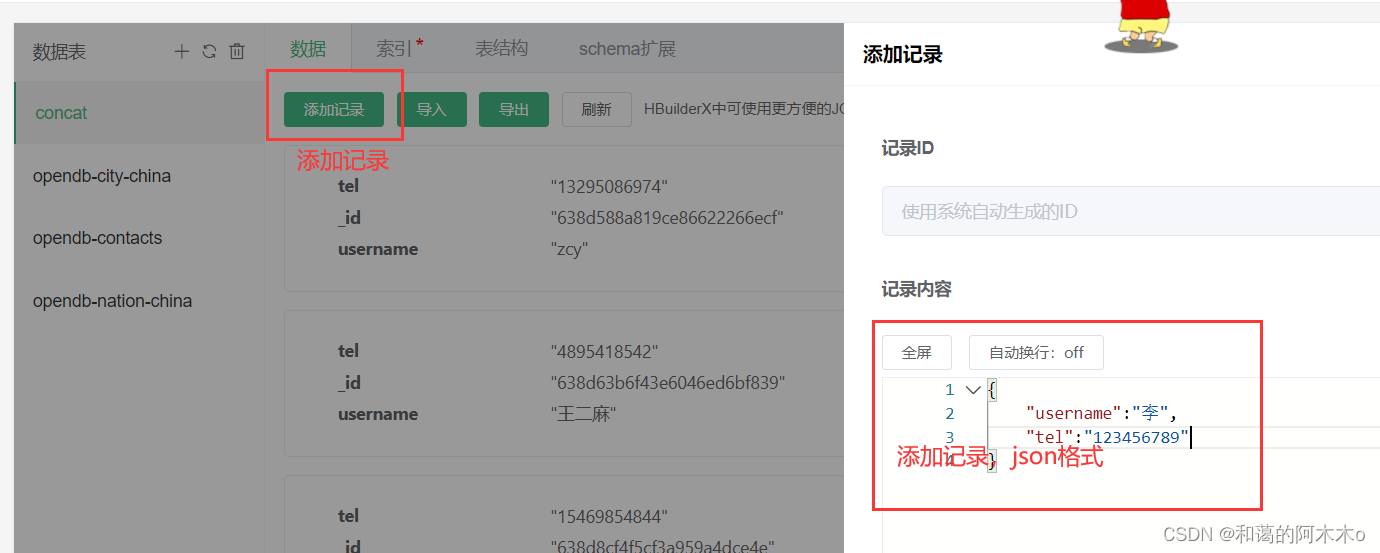
添加数据库记录
 表结构
表结构
 下载表结构(可选)
 运行项目连接云函数

在前端展示数据库文件

 提前引入uni-ui插件
这段代码通过id删除数据库数据
@longpress.native="$refs.udb.remove(item._id)"<template> <view class="content"> <button @click="call">呼叫服务器</button> <navigator url="/pages/add/add">添加</navigator> <!-- udb --> <unicloud-db ref="udb" v-slot:default="{data, loading, error, options}" collection="concat"> <view v-if="error">{{error.message}}</view> <view v-else> <!-- ulist(uni-ui先导入) --> <uni-list> <uni-list-item link :to="'/pages/update/update?item='+JSON.stringify(item)" @longpress.native="$refs.udb.remove(item._id)" v-for="item in data" :key="item._id" :title="item.username" :note="item.tel"></uni-list-item> </uni-list> </view> </unicloud-db> </view> </template> <script> export default { data() { return { title: 'Hello' } }, onLoad() { }, onShow() { if (this.$refs&&this.$refs.udb) { this.$refs.udb.refresh(); } }, methods: { call() { uniCloud.callFunction({ name: "base", data: { name: "mumu", age: 18 } }) .then(res => { uni.showModal({ content: JSON.stringify(res.result) }) }) .catch(err => { console.log(err); }) } } } </script> <style> </style>- 1
- 2
- 3
- 4
- 5
- 6
- 7
- 8
- 9
- 10
- 11
- 12
- 13
- 14
- 15
- 16
- 17
- 18
- 19
- 20
- 21
- 22
- 23
- 24
- 25
- 26
- 27
- 28
- 29
- 30
- 31
- 32
- 33
- 34
- 35
- 36
- 37
- 38
- 39
- 40
- 41
- 42
- 43
- 44
- 45
- 46
- 47
- 48
- 49
- 50
- 51
- 52
- 53
- 54
- 55
在数据库中添加数据
新建add页面
<template> <view> <uni-easyinput v-model="item.username" placeholder="用户名" /> <uni-easyinput v-model="item.tel" placeholder="电话" /> <button @click="addConcat">添加</button> </view> </template> <script> export default { data() { return { item:{ username:"", tel:"", } } }, methods: { addConcat(){ //数据库 var db = uniCloud.database(); //获取表 db.collection("concat") //执行添加 .add(this.item) //成功 .then(res=>{ uni.showToast({ title:"添加成功" }) }) } } } </script>- 1
- 2
- 3
- 4
- 5
- 6
- 7
- 8
- 9
- 10
- 11
- 12
- 13
- 14
- 15
- 16
- 17
- 18
- 19
- 20
- 21
- 22
- 23
- 24
- 25
- 26
- 27
- 28
- 29
- 30
- 31
- 32
- 33
- 34
- 35
在数据库中更新数据
新建update文件
<template> <view> <uni-easyinput v-model="item.username" placeholder="用户名" /> <uni-easyinput v-model="item.tel" placeholder="电话" /> <button @click="updateConcat">更新</button> </view> </template> <script> export default { data() { return { item:{ username:"", tel:"" } } }, onLoad(option) { this.item = JSON.parse(option.item) }, methods: { updateConcat(){ //获取item var item = {...this.item}; //删除id delete item._id; const db = uniCloud.database(); //获取数据库 db.collection("concat") .doc(this.item._id) //查询一条 .update(item) .then(res => { uni.showToast({ title:"更新成功" }) uni.navigateBack() }) .catch(err => { uni.showModal({ title:JSON.stringify(err) }) uni.navigateBack() }) } } } </script>- 1
- 2
- 3
- 4
- 5
- 6
- 7
- 8
- 9
- 10
- 11
- 12
- 13
- 14
- 15
- 16
- 17
- 18
- 19
- 20
- 21
- 22
- 23
- 24
- 25
- 26
- 27
- 28
- 29
- 30
- 31
- 32
- 33
- 34
- 35
- 36
- 37
- 38
- 39
- 40
- 41
- 42
- 43
- 44
- 45
- 46
- 47
- 48
在uniapp中使用一键生成代码
首先跟上面一样创建项目,并关联云服务空间,打开云服务控制台,在云数据库中添加数据库表

添加成功后在database上右键
 创建好后唯一需要修改的数据为pages下的opendb-contacts的

 上面完成后右击database下的opendb-contacts-schema.json


 合并完成后重新运行文件
在代码中添加其他数据库模板
在新建数据库时可以选择
 创建完成后继续上部操作,下载
- 下载所有DB Schema及扩展校验函数
然后在默认的opendb-contacts-schema.json中添加字段
"nation":{ "bsonType": "string", "title": "民族", "order": 2, "enum":{ "collection": "opendb-nation-china", "field": "_id as value,name as text" }, "foreignKey": "opendb-nation-china._id" },- 1
- 2
- 3
- 4
- 5
- 6
- 7
- 8
- 9
- 10
如果添加地区字段,就在下面继续写入以下代码
"address":{ "bsonType": "string", "title": "地区", "order": 2, "enum":{ "collection": "opendb-city-china", "field": "code as value,name as text" }, "foreignKey": "opendb-city-china.code", "enumType": "tree", "componentForEdit":{ "name": "uni-data-picker" } },- 1
- 2
- 3
- 4
- 5
- 6
- 7
- 8
- 9
- 10
- 11
- 12
- 13
- 14
添加成功后再在database下的opendb-contacts-schema.json文件上右键
- 选择schema2code
然后合并就可以了
结束
-
相关阅读:
js中将字符串转换为正则
大厂面试题:有了 G1 还需要其他垃圾回收器吗?
运行python进行指定内容的文件名查找
C语言:从键盘输入一个字符串,将其中的小写字母全部转换成大写字母,然后输出到一个磁盘文件“test“中保存,输入的字符以‘!‘结束
HarmonyOS—端云一体化组件
Linux内核编译-ubuntu22.03-Linux-6.6
面试官: AMS在Android起到什么作用,简单的分析下Android的源码
CVE-2015-5254漏洞复现
使用Jmeter遇到随机取值的需求怎么办?
社区老年人服务系统设计与实现(安卓APP+SSH后台+MYSQL)
- 原文地址:https://blog.csdn.net/m0_59642141/article/details/128191631
