-
狂神说多线程学习笔记
一、线程简介
1、多任务

现实中太多这样同时做多件事情的例子了,看起来是多个任务都在做,其实本质上我们的大脑在同一时间依旧只做了一件事情。2、多线程

原来是一条路,慢慢因为车太多了,道路阻塞,效率极低。为了提高使用的效率,能够充分利用道路,于是加了多个车道。从此,妈妈再也不用担心道路阻塞了。

3、程序、进程、线程

4、Process与Thread
- 说起进程,就不得不说下程序。程序是指令和数据的有序集合,其本身没有任何运行的含义,是一个静态的概念。
- 而进程则是执行程序的过程,它是一个动态的概念。是系统资源分配的单位。
- 通常一个进程中可以包含若干个线程,当然一个进程中至少有一个线程,不然就没有存在的意义。线程是CPU调度和执行的单位。
注意:
很多多线程是模拟出来的,真正的多线程是指有多个CPU,即多核,如服务器。如果是模拟出来的多线程,即在一个CPU的情况下,在同一个时间点,CPU只能执行一段代码,因为切换的很快,所有就有同时进行的错觉。5、核心概念
- 线程就是独立的执行路径
- 在程序运行时,即使自己没有创建线程,后台也会有多个线程,比如主线程、GC线程
- main()称之为主线程,为系统的入口,用于执行整个程序
- 在一个进程中,如果开辟了多个线程,线程的运行是由调度器(CPU)安排调度的,调度器是与操作系统紧密相关的,先后顺序是不能人为干预的
- 在同一份资源被操作时会存在资源抢夺的问题,需要加入并发控制
- 每个线程在自己的工作内存交互,内存控制不当会造成数据不一致
二、线程实现
1、线程创建
1.1、继承Thread类
自定义线程类继承Thread类,重写run() 方法,编写线程执行体;创建线程对象,调用start() 方法开启多线程。
代码实现
public class CreateThread1 extends Thread { @Override public void run() { for (int i = 0; i < 20 ; i++) { System.out.println("自定义线程" + i); } } public static void main(String[] args) { CreateThread1 createThread1 = new CreateThread1(); createThread1.start(); for (int i = 0; i < 20 ; i++) { System.out.println("主线程" + i); } } }- 1
- 2
- 3
- 4
- 5
- 6
- 7
- 8
- 9
- 10
- 11
- 12
- 13
- 14
- 15
- 16
- 17
- 18
总结:
线程不一定立即执行,而是听从CPU的安排调度案例:(下载图片)
/** * 练习Thread,实现多线程同步下载图片 */ public class Demo2_DownloaderImgCase extends Thread { private String url;//网络图片地址 private String name;//报错扥文件名 //有参构造 public Demo2_DownloaderImgCase(String url, String name) { this.url = url; this.name = name; } //下载图片线程的执行体 @Override public void run() { WebDownloader webDownloader = new WebDownloader(); webDownloader.downloader(url, name); System.out.println("下载了文件名为:" + name); } public static void main(String[] args) { Demo2_DownloaderImgCase t = new Demo2_DownloaderImgCase("https://img-home.csdnimg.cn/images/20201124032511.png", "1.png"); Demo2_DownloaderImgCase t1 = new Demo2_DownloaderImgCase("https://img-home.csdnimg.cn/images/20201124032511.png", "2.png"); Demo2_DownloaderImgCase t2 = new Demo2_DownloaderImgCase("https://img-home.csdnimg.cn/images/20201124032511.png", "3.png"); t.start(); t1.start(); t2.start(); } } //下载器 class WebDownloader { //下载方法 public void downloader(String url, String name) { try { FileUtils.copyURLToFile(new URL(url), new File(name)); } catch (IOException e) { e.printStackTrace(); System.out.println("IO异常,downloader方法出现问题"); } } }- 1
- 2
- 3
- 4
- 5
- 6
- 7
- 8
- 9
- 10
- 11
- 12
- 13
- 14
- 15
- 16
- 17
- 18
- 19
- 20
- 21
- 22
- 23
- 24
- 25
- 26
- 27
- 28
- 29
- 30
- 31
- 32
- 33
- 34
- 35
- 36
- 37
- 38
- 39
- 40
- 41
- 42
- 43
1.2、实现Runnable接口
推荐使用Runnable对象,因为Java单继承会有局限性
自定义线程类实现Runnable 接口,实现 run() 方法,编写线程执行体,创建线程对象,调用 start() 开启多线程代码实现
public class CreateThread2 implements Runnable{ @Override public void run() { for (int i = 0; i <20 ; i++) { System.out.println("自定义线程" + i); } } public static void main(String[] args) { CreateThread2 createThread2 = new CreateThread2(); new Thread(createThread2).start(); for (int i = 0; i <20 ; i++) { System.out.println("主线程" + i); } } }- 1
- 2
- 3
- 4
- 5
- 6
- 7
- 8
- 9
- 10
- 11
- 12
- 13
- 14
- 15
- 16
- 17
- 18
案例:(火车票)
public class TrainTicketsCase implements Runnable{ private int ticketNum = 20; @Override public void run() { while(true){ if(ticketNum <= 0){ break; } try{ Thread.sleep(200); }catch (Exception e){ e.printStackTrace(); } System.out.println(Thread.currentThread().getName() + "拿到了第:" + ticketNum-- + "张票"); } } public static void main(String[] args) { TrainTicketsCase trainTicketsCase = new TrainTicketsCase(); new Thread(trainTicketsCase,"小红").start(); new Thread(trainTicketsCase,"小黑").start(); new Thread(trainTicketsCase,"小黄").start(); new Thread(trainTicketsCase,"小蓝").start(); } }- 1
- 2
- 3
- 4
- 5
- 6
- 7
- 8
- 9
- 10
- 11
- 12
- 13
- 14
- 15
- 16
- 17
- 18
- 19
- 20
- 21
- 22
- 23
- 24
- 25
- 26
- 27
- 28

我们发现,三个人同时拿到了同一张票,那我们在这里就初识了多线程产生了问题,这里三个线程同时争夺同一个资源,导致线程不安全,从而造成数据紊乱。案例:(龟兔赛跑)
public class RaceCase implements Runnable { private static String winner = null; @Override public void run() { for (int i = 0; i <= 100; i++) { if (Thread.currentThread().getName().equals("兔子") && i % 10 == 0) { try { Thread.sleep(1); } catch (Exception e) { e.printStackTrace(); } } boolean flag = gameOver(i); if (flag) { break; } System.out.println(Thread.currentThread().getName() + "跑了" + i + "步"); } } public boolean gameOver(int steps) { if (winner != null) { return true; } else { if (steps >= 100) { winner = Thread.currentThread().getName(); System.out.println("获胜者是:" + winner); return true; } else { return false; } } } public static void main(String[] args) { RaceCase raceCase = new RaceCase(); new Thread(raceCase, "兔子").start(); new Thread(raceCase, "乌龟").start(); } }- 1
- 2
- 3
- 4
- 5
- 6
- 7
- 8
- 9
- 10
- 11
- 12
- 13
- 14
- 15
- 16
- 17
- 18
- 19
- 20
- 21
- 22
- 23
- 24
- 25
- 26
- 27
- 28
- 29
- 30
- 31
- 32
- 33
- 34
- 35
- 36
- 37
- 38
- 39
- 40
1.3、实现Callable接口(了解)
实现Callable接口,需要返回值 类型;重写call() 方法,需要抛出异常
1、创建目标对象
2、创建执行服务:ExecutorService ser = Executors.newFixedThreadPool(1);
3、提交执行结果:Future result1 = ser.submit(11);
4、获取结果:boolean r1 = result1.get();
5、关闭服务:ser.shutdownNow();/** * 实现Callable接口 */ public class Demo6_CreateCallable implements Callable<Boolean> { private String url;//网络图片地址 private String name;//报错扥文件名 //有参构造 public Demo6_CreateCallable(String url, String name) { this.url = url; this.name = name; } //下载图片线程的执行体 public Boolean call() throws Exception { WebDownloader webDownloader = new WebDownloader(); webDownloader.downloader(url, name); System.out.println("下载了文件名为:" + name); return true; } public static void main(String[] args) throws ExecutionException, InterruptedException { Demo6_CreateCallable c = new Demo6_CreateCallable("https://img-home.csdnimg.cn/images/20201124032511.png", "1.png"); Demo6_CreateCallable c1 = new Demo6_CreateCallable("https://img-home.csdnimg.cn/images/20201124032511.png", "2.png"); Demo6_CreateCallable c2 = new Demo6_CreateCallable("https://img-home.csdnimg.cn/images/20201124032511.png", "3.png"); //创建执行服务 ExecutorService ser = Executors.newFixedThreadPool(3); //提交执行 Future<Boolean> r = ser.submit(c); Future<Boolean> r1 = ser.submit(c1); Future<Boolean> r2 = ser.submit(c2); //获取结果 boolean res = r.get(); boolean res1 = r1.get(); boolean res2 = r2.get(); //关闭服务 ser.shutdownNow(); } } //class WebDownloader在前面下载图片已经定义了,这里就不用再次写,直接使用就好- 1
- 2
- 3
- 4
- 5
- 6
- 7
- 8
- 9
- 10
- 11
- 12
- 13
- 14
- 15
- 16
- 17
- 18
- 19
- 20
- 21
- 22
- 23
- 24
- 25
- 26
- 27
- 28
- 29
- 30
- 31
- 32
- 33
- 34
- 35
- 36
- 37
- 38
- 39
- 40
- 41
好处
可以定义返回值
可以抛出异常1.4、Thread和Runnable的对比
继承Thread类:
- 子类继承Thread类具备多线程能力
- 启动线程:子类对象.start()
- 不建议使用:避免OOP单继承的局限性
实现Runnable接口
- 实现Runnable接口具备多线程能力
- 启动线程:传入目标对象+Thread对象.start()
- 推荐使用:避免单继承局限性,灵活方便,方便同一个对象被多个线程使用
2、静态代理

案例:(结婚)public class StaticProxy { public static void main(String[] args) { WeddingCompany weddingCompany = new WeddingCompany(new You()); weddingCompany.HappyMarry(); } } interface Marry { void HappyMarry(); } class You implements Marry{ @Override public void HappyMarry() { System.out.println("哥哥要结婚了,我好开心!"); } } class WeddingCompany implements Marry{ private Marry target; public WeddingCompany(Marry target){ this.target = target; } @Override public void HappyMarry() { before(); this.target.HappyMarry(); after(); } public void before(){ System.out.println("布置婚礼现场!"); } public void after(){ System.out.println("打扫,收钱!"); } }- 1
- 2
- 3
- 4
- 5
- 6
- 7
- 8
- 9
- 10
- 11
- 12
- 13
- 14
- 15
- 16
- 17
- 18
- 19
- 20
- 21
- 22
- 23
- 24
- 25
- 26
- 27
- 28
- 29
- 30
- 31
- 32
- 33
- 34
- 35
- 36
- 37
- 38
- 39
- 40
- 41
- 42
- 43
优化:使用线程,Lamda表达式
public static void main(String[] args) { new Thread(()-> System.out.println("我爱你")).start(); new WeddingCompany(new You()).happyMarry(); }- 1
- 2
- 3
- 4
总结:
真实对象和代理对象都要实现一个接口
代理对象要代理真实角色
好处:
代理对象可以做很多真实对象做不了的事情
真实对象专注做自己的事3、Lambda表达式
介绍

- λ 希腊字母表中排序第十一位的字母,英语名称为 Lamda
- 避免匿名内部类定义过多
- 其实质属于函数式编程的概念
- 去掉了一堆没有意义的代码,只留下核心逻辑
(params)-> expression[表达式]
(params) -> statement[语句]
[(params)-> {statements}a->System.out.println("i like lambda-->" + a)- 1
new Thread (()->System.out.println(“多线程学习。。。。”)).start();
理解Functional Interface (函数式接口) 是学习Java8 lamda表达式的关键
函数式接口的定义:
任何接口,如果只包含唯一一个抽象方法,那么它就是一个函数式接口。
public interface Runnable{ public abstract void run(); }- 1
- 2
- 3
对于函数式接口,我们可以通过Lambda表达式来创建该接口的对象。
实现:
案例1:
/** * 推导lamda表达式 */ public class Demo9_Lamda { public static void main(String[] args) { ILike like = new Like(); like.lamda(); } } // 1.定义一个函数式接口 interface ILike { void lamda(); } // 2.实现类 class Like implements ILike { @Override public void lamda() { System.out.println("I like lamda"); } }- 1
- 2
- 3
- 4
- 5
- 6
- 7
- 8
- 9
- 10
- 11
- 12
- 13
- 14
- 15
- 16
- 17
- 18
- 19
- 20
- 21
- 22
优化1:
public class Demo10_Lamda1 { //3. 静态内部类 static class Like1 implements ILike { @Override public void lamda() { System.out.println("I like lamda1"); } } //3.静态内部类 public static void main(String[] args) { ILike like = new Like1(); like.lamda(); } }- 1
- 2
- 3
- 4
- 5
- 6
- 7
- 8
- 9
- 10
- 11
- 12
- 13
- 14
- 15
优化2:
public class Demo11_Lamda2 { public static void main(String[] args) { //4.局部内部类 class Like12 implements ILike { @Override public void lamda() { System.out.println("I like lamda2"); } } ILike like = new Like12(); like.lamda(); } }- 1
- 2
- 3
- 4
- 5
- 6
- 7
- 8
- 9
- 10
- 11
- 12
- 13
优化3:
public class Demo12_Lamda3 { public static void main(String[] args) { //5.匿名内部类,没有类的名称,必须借助接口或者父类 ILike like = new ILike () { @Override public void lamda() { System.out.println("I like lamda3"); } }; like.lamda(); } }- 1
- 2
- 3
- 4
- 5
- 6
- 7
- 8
- 9
- 10
- 11
- 12
最终版:
public class Demo13_Lamda4 { public static void main(String[] args) { //6.lamda简化 ILike like = () ->{ System.out.println("I like lamda4"); }; like.lamda(); } }- 1
- 2
- 3
- 4
- 5
- 6
- 7
- 8
- 9
- 10
案例2:
public class Demo14_LamdaCase2 { public static void main(String[] args) { // 1.lamda ILove love = (int a) -> { System.out.println("I love you -->" + a); }; // 2.lamda简化1.0 love = (a) -> { System.out.println("I love you -->" + a); }; // 3.lamda简化2.0 love = a -> { System.out.println("I love you -->" + a); }; // 3.lamda简化3.0 love = a -> System.out.println("I love you -->" + a); /**总结: * {}简略的条件是只能有一行代码,多行{}就不能简略了 * 前提是接口为函数式接口(只能有一个方法) * 多个参数也可以去掉参数类型,要去掉就都去掉,必须加上() */ love.love(520); } } interface ILove { void love(int a); }- 1
- 2
- 3
- 4
- 5
- 6
- 7
- 8
- 9
- 10
- 11
- 12
- 13
- 14
- 15
- 16
- 17
- 18
- 19
- 20
- 21
- 22
- 23
- 24
- 25
- 26
- 27
- 28
- 29
三、线程状态
1、线程五大状态

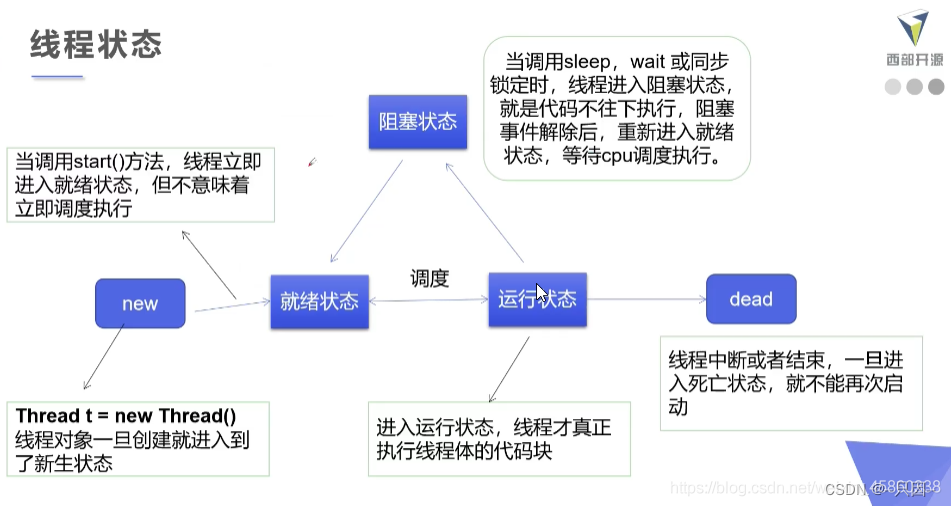
2、线程方法

2.1、停止线程

案例:public class StopThread implements Runnable { private volatile boolean flag = true; @Override public void run() { int i = 0; while (flag) { System.out.println("run...Thread" + i++); } } public void stop() { this.flag = false; } public static void main(String[] args) { StopThread stopThread = new StopThread(); new Thread(stopThread).start(); for (int i = 0; i < 10 ; i++) { System.out.println("main..." + i); if(i == 9){ stopThread.stop(); System.out.println("该线程停止!"); } } } }- 1
- 2
- 3
- 4
- 5
- 6
- 7
- 8
- 9
- 10
- 11
- 12
- 13
- 14
- 15
- 16
- 17
- 18
- 19
- 20
- 21
- 22
- 23
- 24
- 25
- 26
- 27
- 28
2.2、线程休眠

案例:/** * 模拟网络延迟:放大问题的发生性 */ public class Demo16_SleepThread implements Runnable { //票数 private int ticketNums = 10; @Override public void run() { while (true) { if (ticketNums <= 0) { break; } //捕获异常 try { Thread.sleep(200); } catch (InterruptedException e) { e.printStackTrace(); } System.out.println(Thread.currentThread().getName() + "--->拿到了第" + ticketNums-- + "张票"); } } public static void main(String[] args) { Demo4_TrainTicketsCase ticket = new Demo4_TrainTicketsCase(); new Thread(ticket, "小红").start(); new Thread(ticket, "老师").start(); new Thread(ticket, "黄牛1").start(); } }- 1
- 2
- 3
- 4
- 5
- 6
- 7
- 8
- 9
- 10
- 11
- 12
- 13
- 14
- 15
- 16
- 17
- 18
- 19
- 20
- 21
- 22
- 23
- 24
- 25
- 26
- 27
- 28
- 29
- 30
- 31
/** * 模拟倒计时 */ public class Demo17_SleepThread2 { public static void main(String[] args) { try { tenDown(); } catch (InterruptedException e) { e.printStackTrace(); } } //模拟倒计时 public static void tenDown() throws InterruptedException { int num = 10;//10秒 while (true) { Thread.sleep(1000); System.out.println(num--); if (num <= 0) { break; } } } }- 1
- 2
- 3
- 4
- 5
- 6
- 7
- 8
- 9
- 10
- 11
- 12
- 13
- 14
- 15
- 16
- 17
- 18
- 19
- 20
- 21
- 22
- 23
- 24
- 25
- 26
public static void main(String[] args) throws InterruptedException { Date date = new Date(System.currentTimeMillis()); while(true){ Thread.sleep(1000); System.out.println(new SimpleDateFormat("HH:mm:ss").format(date)); date = new Date(System.currentTimeMillis()); } }- 1
- 2
- 3
- 4
- 5
- 6
- 7
- 8
2.3、线程礼让

案例:public static void main(String[] args) { YieldThread yieldThread = new YieldThread(); new Thread(yieldThread,"a").start(); new Thread(yieldThread,"b").start(); } @Override public void run() { System.out.println(Thread.currentThread().getName() + "线程开始执行"); Thread.yield(); System.out.println(Thread.currentThread().getName() + "线程停止"); }- 1
- 2
- 3
- 4
- 5
- 6
- 7
- 8
- 9
- 10
- 11
- 12
2.4、线程插队

案例:public class JoinThread implements Runnable{ @Override public void run() { for (int i = 0; i < 500; i++) { System.out.println("线程vip" + i); } } public static void main(String[] args) throws InterruptedException { JoinThread joinThread = new JoinThread(); Thread thread = new Thread(joinThread); thread.start(); for (int i = 0; i < 500; i++) { if(i == 200){ thread.join(); } System.out.println("线程main" + i); } } }- 1
- 2
- 3
- 4
- 5
- 6
- 7
- 8
- 9
- 10
- 11
- 12
- 13
- 14
- 15
- 16
- 17
- 18
- 19
- 20
- 21
3、线程状态观测

/** * 观察测试线程状态 */ public class Demo21_ThreadState { public static void main(String[] args) throws InterruptedException { Thread thread = new Thread(() -> { for (int i = 0; i < 5; i++) { try { Thread.sleep(1000); } catch (InterruptedException e) { e.printStackTrace(); } } System.out.println("//"); }); //观察状态 Thread.State state = thread.getState(); System.out.println(state); //观察启动后 thread.start(); state = thread.getState(); System.out.println(state);//Run while (state != Thread.State.TERMINATED) {//只要现成不终止,就一直输出状态 Thread.sleep(100); state = thread.getState();//更新线程状态 System.out.println(state); } //死亡后的线程不能再启动了,启动会报异常 //thread.start(); } }- 1
- 2
- 3
- 4
- 5
- 6
- 7
- 8
- 9
- 10
- 11
- 12
- 13
- 14
- 15
- 16
- 17
- 18
- 19
- 20
- 21
- 22
- 23
- 24
- 25
- 26
- 27
- 28
- 29
- 30
- 31
4、线程优先级

/** * 线程优先级 */ public class Demo22_ThreadPriority{ public static void main(String[] args) { //主线程默认优先级 System.out.println(Thread.currentThread().getName()+"-->"+Thread.currentThread().getPriority()); MyPriority myPriority = new MyPriority(); Thread thread1 = new Thread(myPriority); Thread thread2 = new Thread(myPriority); Thread thread3 = new Thread(myPriority); Thread thread4 = new Thread(myPriority); Thread thread5 = new Thread(myPriority); //先设置优先级,再启动 thread1.start(); thread2.setPriority(1); thread2.start(); thread3.setPriority(4); thread3.start(); thread4.setPriority(Thread.MAX_PRIORITY);//MAX_PRIORITY=10 thread4.start(); thread5.setPriority(8); thread5.start(); } } class MyPriority implements Runnable{ @Override public void run() { System.out.println(Thread.currentThread().getName()+"-->"+Thread.currentThread().getPriority()); } }- 1
- 2
- 3
- 4
- 5
- 6
- 7
- 8
- 9
- 10
- 11
- 12
- 13
- 14
- 15
- 16
- 17
- 18
- 19
- 20
- 21
- 22
- 23
- 24
- 25
- 26
- 27
- 28
- 29
- 30
- 31
- 32
- 33
- 34
- 35
- 36
- 37
5、守护(daemon)线程

/** * 测试守护线程 * 上帝守护你 */ public class Demo23_DaemonThread { public static void main(String[] args) { God god = new God(); You you = new You(); Thread thread = new Thread(god); //默认false表示是用户线程,正常的线程都是用户线程... thread.setDaemon(true); //上帝守护线程启动 thread.start(); //你 用户线程启动 new Thread(you).start(); } } //上帝 class God implements Runnable{ @Override public void run() { while (true){ System.out.println("上帝保佑着你"); } } } //你 class You implements Runnable{ @Override public void run() { for (int i = 0; i < 36500; i++) { System.out.println("你一生都开心的活着"); } System.out.println("====goodbye!world===="); } }- 1
- 2
- 3
- 4
- 5
- 6
- 7
- 8
- 9
- 10
- 11
- 12
- 13
- 14
- 15
- 16
- 17
- 18
- 19
- 20
- 21
- 22
- 23
- 24
- 25
- 26
- 27
- 28
- 29
- 30
- 31
- 32
- 33
- 34
- 35
- 36
- 37
- 38
- 39
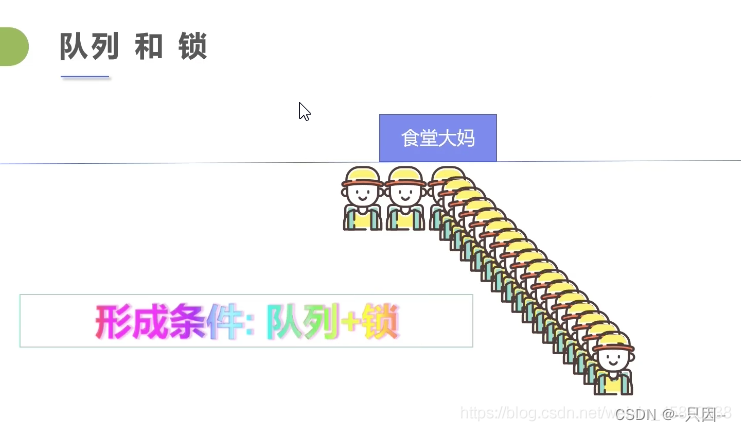
四、线程同步
1、介绍
多个线程操作同一个资源


2、不安全的线程案例
//不安全买票 public class Demo24_UnsafeBuyTicket { public static void main(String[] args) { BuyTicket buyTicket = new BuyTicket(); new Thread(buyTicket, "张三").start(); new Thread(buyTicket, "李四").start(); new Thread(buyTicket, "王五").start(); } } class BuyTicket implements Runnable { //票 private int ticketNums = 10; boolean flag = true; @Override public void run() { //买票 while (flag) { try { buy(); } catch (Exception e) { e.printStackTrace(); } } } //买票 private void buy() { //判断是否有票 if (ticketNums <= 0) { flag = false; return; } //延迟 try { Thread.sleep(1); } catch (InterruptedException e) { e.printStackTrace(); } //买票 System.out.println(Thread.currentThread().getName() + "拿到" + ticketNums--); } }- 1
- 2
- 3
- 4
- 5
- 6
- 7
- 8
- 9
- 10
- 11
- 12
- 13
- 14
- 15
- 16
- 17
- 18
- 19
- 20
- 21
- 22
- 23
- 24
- 25
- 26
- 27
- 28
- 29
- 30
- 31
- 32
- 33
- 34
- 35
- 36
- 37
- 38
- 39
- 40
- 41
- 42
- 43
- 44
- 45
/** * 不安全的取钱 */ public class Demo25_UnsafeBank { public static void main(String[] args) { Account account = new Account(100, "结婚基金"); Drawing you = new Drawing(account, 50, "展堂"); Drawing girlfriend = new Drawing(account, 100, "sad"); you.start(); girlfriend.start(); } } //账户 class Account { int money;//余额 String cardName;//卡名 public Account(int money, String cardName) { this.money = money; this.cardName = cardName; } } //银行:模拟取款 class Drawing extends Thread { Account account;//账户 int drawingMoney;//取金额 int nowMoney;//你手里的钱 public Drawing(Account account, int drawingMoney, String name) { super(name); this.account = account; this.drawingMoney = drawingMoney; } //取钱 @Override public void run() { //判断是否有钱 if (account.money - drawingMoney < 0) { System.out.println(Thread.currentThread().getName() + "余额不足,不能进行取钱"); return; } try { Thread.sleep(1000);//放大问题的发生性 } catch (InterruptedException e) { e.printStackTrace(); } //卡内金额 = 余额-你的钱 account.money = account.money - drawingMoney; //你手里的钱 nowMoney = nowMoney + drawingMoney; System.out.println(account.cardName + "余额为:" + account.money); //this.getName()==Thread.currentThread().getName() System.out.println(this.getName() + "手里的钱:" + nowMoney); } }- 1
- 2
- 3
- 4
- 5
- 6
- 7
- 8
- 9
- 10
- 11
- 12
- 13
- 14
- 15
- 16
- 17
- 18
- 19
- 20
- 21
- 22
- 23
- 24
- 25
- 26
- 27
- 28
- 29
- 30
- 31
- 32
- 33
- 34
- 35
- 36
- 37
- 38
- 39
- 40
- 41
- 42
- 43
- 44
- 45
- 46
- 47
- 48
- 49
- 50
- 51
- 52
- 53
- 54
- 55
- 56
- 57
- 58
//线程不安全的集合 public class Demo26_UnsafeList { public static void main(String[] args) { List<String> list = new ArrayList<String>(); for (int i = 0; i < 1000; i++) { new Thread(()->{ list.add(Thread.currentThread().getName()); }).start(); } System.out.println(list.size()); } }- 1
- 2
- 3
- 4
- 5
- 6
- 7
- 8
- 9
- 10
- 11
- 12
3、同步方法

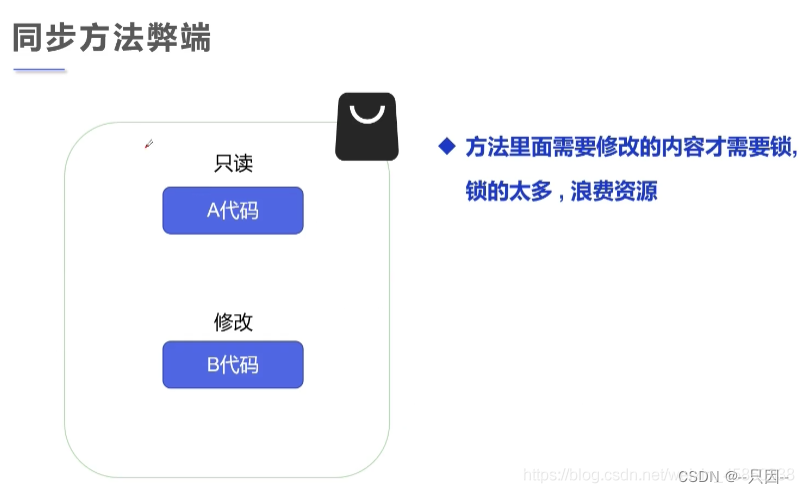
同步方法,锁的是this
实现://安全买票 public class Demo27_SafeBuyTicket { public static void main(String[] args) { BuyTicket1 buyTicket = new BuyTicket1(); new Thread(buyTicket, "张三").start(); new Thread(buyTicket, "李四").start(); new Thread(buyTicket, "王五").start(); } } class BuyTicket1 implements Runnable { //票 private int ticketNums = 10; boolean flag = true; @Override public void run() { //买票 while (flag) { try { buy(); } catch (Exception e) { e.printStackTrace(); } } } //synchronized 同步方法,锁的是this private synchronized void buy() { //判断是否有票 if (ticketNums <= 0) { flag = false; return; } //延迟 try { Thread.sleep(1); } catch (InterruptedException e) { e.printStackTrace(); } //买票 System.out.println(Thread.currentThread().getName() + "拿到" + ticketNums--); } }- 1
- 2
- 3
- 4
- 5
- 6
- 7
- 8
- 9
- 10
- 11
- 12
- 13
- 14
- 15
- 16
- 17
- 18
- 19
- 20
- 21
- 22
- 23
- 24
- 25
- 26
- 27
- 28
- 29
- 30
- 31
- 32
- 33
- 34
- 35
- 36
- 37
- 38
- 39
- 40
- 41
- 42
- 43
- 44
- 45
4、同步块

==锁的对象就是变量的量,需要增删改查的对象 ==
实现:/** * 安全的取钱 同步块 */ public class Demo28_SafeBank { public static void main(String[] args) { Account1 account = new Account1(100, "结婚基金"); Drawing1 you = new Drawing1(account, 50, "展堂"); Drawing1 girlfriend = new Drawing1(account, 100, "sad"); you.start(); girlfriend.start(); } } //账户 class Account1 { int money;//余额 String cardName;//卡名 public Account1(int money, String cardName) { this.money = money; this.cardName = cardName; } } //银行:模拟取款 class Drawing1 extends Thread { Account1 account;//账户 int drawingMoney;//取金额 int nowMoney;//你手里的钱 public Drawing1(Account1 account, int drawingMoney, String name) { super(name); this.account = account; this.drawingMoney = drawingMoney; } //取钱 @Override public void run() { //锁的对象就是变量的量,需要增删改查的对象 synchronized (account) { //判断是否有钱 if (account.money - drawingMoney < 0) { System.out.println(Thread.currentThread().getName() + "余额不足,不能进行取钱"); return; } try { Thread.sleep(1000);//放大问题的发生性 } catch (InterruptedException e) { e.printStackTrace(); } //卡内金额 = 余额-你的钱 account.money = account.money - drawingMoney; //你手里的钱 nowMoney = nowMoney + drawingMoney; System.out.println(account.cardName + "余额为:" + account.money); //this.getName()==Thread.currentThread().getName() System.out.println(this.getName() + "手里的钱:" + nowMoney); } }- 1
- 2
- 3
- 4
- 5
- 6
- 7
- 8
- 9
- 10
- 11
- 12
- 13
- 14
- 15
- 16
- 17
- 18
- 19
- 20
- 21
- 22
- 23
- 24
- 25
- 26
- 27
- 28
- 29
- 30
- 31
- 32
- 33
- 34
- 35
- 36
- 37
- 38
- 39
- 40
- 41
- 42
- 43
- 44
- 45
- 46
- 47
- 48
- 49
- 50
- 51
- 52
- 53
- 54
- 55
- 56
- 57
- 58
- 59
- 60
//线程安全的集合 同步块 public class Demo29_SafeList { public static void main(String[] args) { List<String> list = new ArrayList<String>(); for (int i = 0; i < 1000; i++) { new Thread(() -> { synchronized (list) { list.add(Thread.currentThread().getName()); } }).start(); } try { Thread.sleep(300); } catch (InterruptedException e) { e.printStackTrace(); } System.out.println(list.size()); } }- 1
- 2
- 3
- 4
- 5
- 6
- 7
- 8
- 9
- 10
- 11
- 12
- 13
- 14
- 15
- 16
- 17
- 18
- 19
JUC 安全集合类型扩充
//测试JUC安全类型的集合 public class Demo30_ThreadJuc { public static void main(String[] args) { CopyOnWriteArrayList<String> list = new CopyOnWriteArrayList<String>(); for (int i = 0; i < 10000; i++) { new Thread(() -> { list.add(Thread.currentThread().getName()); }).start(); } try { Thread.sleep(3000); } catch (InterruptedException e) { e.printStackTrace(); } System.out.println(list.size()); } }- 1
- 2
- 3
- 4
- 5
- 6
- 7
- 8
- 9
- 10
- 11
- 12
- 13
- 14
- 15
- 16
- 17
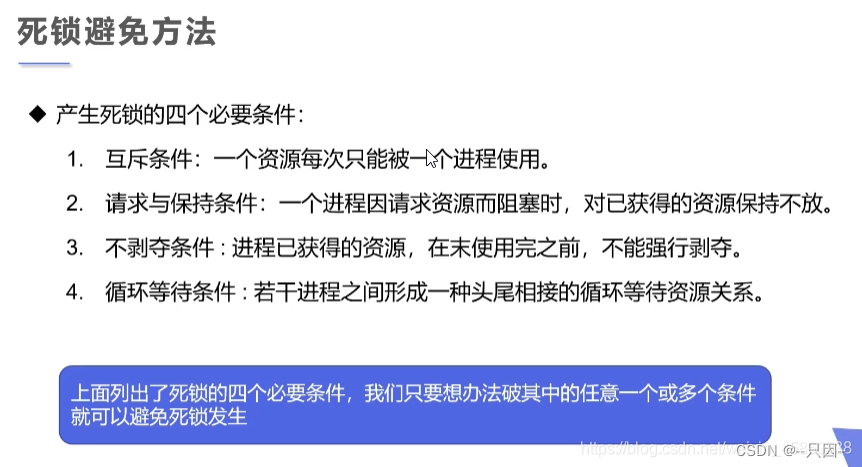
5、死锁

案例:/** * 死锁:多个线程互相抱着对方需要的资源,然后形成僵持 * 解决:一个锁只锁一个对象 */ class Demo31_DeadLock { public static void main(String[] args) { Makeup makeup = new Makeup(0, "灰姑娘"); Makeup makeup1 = new Makeup(1, "白雪公主"); makeup.start(); makeup1.start(); } } //口红 class Lipstick { } //镜子 class Mirror { } class Makeup extends Thread { //需要的资源只有一份,用static保证只有一份 static Lipstick lipstick = new Lipstick(); static Mirror mirror = new Mirror(); int choice;//选择 String girlName;//使用化妆品的人 public Makeup(int choice, String girlName) { this.choice = choice; this.girlName = girlName; } @Override public void run() { //化妆 try { makeup(); } catch (InterruptedException e) { e.printStackTrace(); } } private void makeup() throws InterruptedException { if (choice == 0) { synchronized (lipstick) {//获得口红的锁 System.out.println(this.girlName + "获得口红的锁"); Thread.sleep(1000); synchronized (mirror) {//一秒钟后想获得镜子 System.out.println(this.girlName + "获得镜子的锁"); } } } else { synchronized (mirror) {//获得口红镜子 System.out.println(this.girlName + "获得镜子的锁"); Thread.sleep(2000); synchronized (lipstick) {//二秒钟后想获得的锁 System.out.println(this.girlName + "获得口红的锁"); } } } } }- 1
- 2
- 3
- 4
- 5
- 6
- 7
- 8
- 9
- 10
- 11
- 12
- 13
- 14
- 15
- 16
- 17
- 18
- 19
- 20
- 21
- 22
- 23
- 24
- 25
- 26
- 27
- 28
- 29
- 30
- 31
- 32
- 33
- 34
- 35
- 36
- 37
- 38
- 39
- 40
- 41
- 42
- 43
- 44
- 45
- 46
- 47
- 48
- 49
- 50
- 51
- 52
- 53
- 54
- 55
- 56
- 57
- 58
- 59
- 60
解决:
/** * 死锁:多个线程互相抱着对方需要的资源,然后形成僵持 * 解决:一个锁只锁一个对象 */ class Demo31_DeadLock { public static void main(String[] args) { Makeup makeup = new Makeup(0, "灰姑娘"); Makeup makeup1 = new Makeup(1, "白雪公主"); makeup.start(); makeup1.start(); } } //口红 class Lipstick { } //镜子 class Mirror { } class Makeup extends Thread { //需要的资源只有一份,用static保证只有一份 static Lipstick lipstick = new Lipstick(); static Mirror mirror = new Mirror(); int choice;//选择 String girlName;//使用化妆品的人 public Makeup(int choice, String girlName) { this.choice = choice; this.girlName = girlName; } @Override public void run() { //化妆 try { makeup(); } catch (InterruptedException e) { e.printStackTrace(); } } private void makeup() throws InterruptedException { if (choice == 0) { synchronized (lipstick) {//获得口红的锁 System.out.println(this.girlName + "获得口红的锁"); Thread.sleep(1000); } synchronized (mirror) {//一秒钟后想获得镜子 System.out.println(this.girlName + "获得镜子的锁"); } } else { synchronized (mirror) {//获得口红镜子 System.out.println(this.girlName + "获得镜子的锁"); Thread.sleep(2000); } synchronized (lipstick) {//二秒钟后想获得的锁 System.out.println(this.girlName + "获得口红的锁"); } } } }- 1
- 2
- 3
- 4
- 5
- 6
- 7
- 8
- 9
- 10
- 11
- 12
- 13
- 14
- 15
- 16
- 17
- 18
- 19
- 20
- 21
- 22
- 23
- 24
- 25
- 26
- 27
- 28
- 29
- 30
- 31
- 32
- 33
- 34
- 35
- 36
- 37
- 38
- 39
- 40
- 41
- 42
- 43
- 44
- 45
- 46
- 47
- 48
- 49
- 50
- 51
- 52
- 53
- 54
- 55
- 56
- 57
- 58
- 59
- 60
死锁避免方法
6、Lock(锁)


//测试Lock锁 public class Demo32_ThreadLock { public static void main(String[] args) { TestLock testLock = new TestLock(); new Thread(testLock).start(); new Thread(testLock).start(); new Thread(testLock).start(); } } class TestLock implements Runnable { int tickerNums = 10; //定义Lock锁 private final ReentrantLock lock = new ReentrantLock(); @Override public void run() { while (true) { //加锁 try { lock.lock(); if (tickerNums <= 0) { break; } try { Thread.sleep(1000); } catch (InterruptedException e) { e.printStackTrace(); } System.out.println(tickerNums--); } catch (Exception e) { e.printStackTrace(); } finally { //解锁 lock.unlock(); } } } }- 1
- 2
- 3
- 4
- 5
- 6
- 7
- 8
- 9
- 10
- 11
- 12
- 13
- 14
- 15
- 16
- 17
- 18
- 19
- 20
- 21
- 22
- 23
- 24
- 25
- 26
- 27
- 28
- 29
- 30
- 31
- 32
- 33
- 34
- 35
- 36
- 37
- 38
- 39
- 40
7、synchroized 与 Lock 的对比

五、线程通信问题
生产者消费者模式的问题

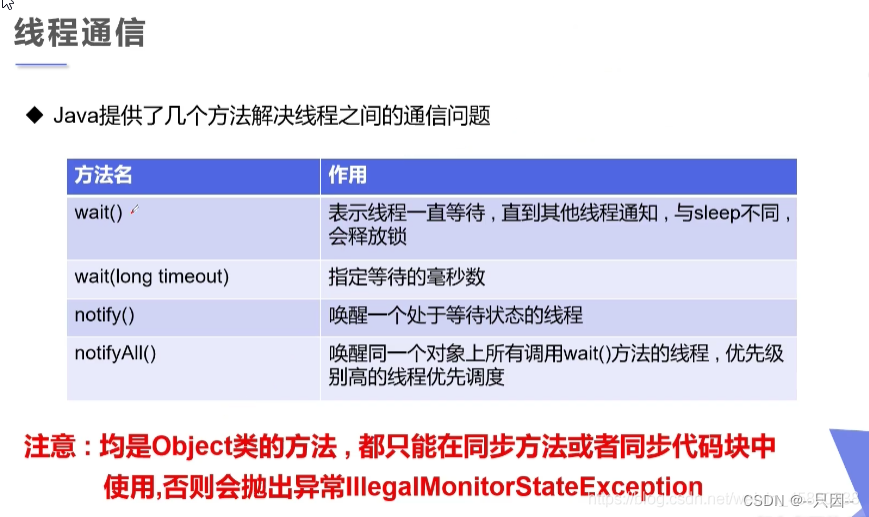
1、线程通信方法

2、线程通信问题解决方式

/** * 测试:生产者消费者模型-->利用缓冲区解决:管程法 */ public class Demo33_ThreadPC { public static void main(String[] args) { SynContainer synContainer = new SynContainer(); new Producer(synContainer).start(); new Consumer(synContainer).start(); } } //生产者 class Producer extends Thread { //容缓冲区 SynContainer container; public Producer(SynContainer container) { this.container = container; } //生产 @Override public void run() { for (int i = 0; i < 100; i++) { container.push(new Product(i)); System.out.println("生产了" + i + "件产品"); } } } //消费者 class Consumer extends Thread { //容缓冲区 SynContainer container; public Consumer(SynContainer container) { this.container = container; } //消费 @Override public void run() { for (int i = 0; i < 100; i++) { System.out.println("消费了-->" + container.pop().id + "件产品"); } } } //产品 class Product { int id;//产品编号 public Product(int id) { this.id = id; } } //缓冲区 class SynContainer { //需要一个容器大小 Product[] products = new Product[10]; //容器计数器 int count = 0; //生产者放入产品 public synchronized void push(Product product) { //如果容器满了,需要等待消费者消费 /*如果是if的话,假如消费者1消费了最后一个,这是index变成0此时释放锁被消费者2拿到而不是生产者拿到,这时消费者的wait是在if里所以它就直接去消费index-1下标越界,如果是while就会再去判断一下index得值是不是变成0了*/ while (count == products.length) { //通知消费者消费,等待生产 try { this.wait(); } catch (InterruptedException e) { e.printStackTrace(); } } //如果没有满,需要丢入产品 products[count] = product; count++; //通知消费者消费 this.notifyAll(); } //消费者消费产品 public synchronized Product pop() { //判断是否能消费 while (count <= 0) { //等待生产者生产 try { this.wait(); } catch (InterruptedException e) { e.printStackTrace(); } } //如果可以消费 count--; Product product = products[count]; //吃完了 通知生产者生产 this.notifyAll(); return product; } }- 1
- 2
- 3
- 4
- 5
- 6
- 7
- 8
- 9
- 10
- 11
- 12
- 13
- 14
- 15
- 16
- 17
- 18
- 19
- 20
- 21
- 22
- 23
- 24
- 25
- 26
- 27
- 28
- 29
- 30
- 31
- 32
- 33
- 34
- 35
- 36
- 37
- 38
- 39
- 40
- 41
- 42
- 43
- 44
- 45
- 46
- 47
- 48
- 49
- 50
- 51
- 52
- 53
- 54
- 55
- 56
- 57
- 58
- 59
- 60
- 61
- 62
- 63
- 64
- 65
- 66
- 67
- 68
- 69
- 70
- 71
- 72
- 73
- 74
- 75
- 76
- 77
- 78
- 79
- 80
- 81
- 82
- 83
- 84
- 85
- 86
- 87
- 88
- 89
- 90
- 91
- 92
- 93
- 94
- 95
- 96
- 97
- 98
- 99
- 100
- 101
- 102
- 103
六、线程池


//测试线程池 public class Demo35_ThreadPool { public static void main(String[] args) { // 1. 创建服务,擦行间线程池 // newFixedThreadPool(线程池大小) ExecutorService service = Executors.newFixedThreadPool(10); //执行 service.execute(new MyThread()); service.execute(new MyThread()); service.execute(new MyThread()); service.execute(new MyThread()); service.execute(new MyThread()); service.execute(new MyThread()); //关闭连接 service.shutdown(); } } class MyThread implements Runnable { @Override public void run() { System.out.println(Thread.currentThread().getName()); } }- 1
- 2
- 3
- 4
- 5
- 6
- 7
- 8
- 9
- 10
- 11
- 12
- 13
- 14
- 15
- 16
- 17
- 18
- 19
- 20
- 21
- 22
- 23
- 24
-
相关阅读:
【矩阵分析】线性空间、λ矩阵、内积空间、Hermite矩阵、矩阵分解、矩阵范数、矩阵函数
计算机毕设 SpringBoot+Vue校园疫情防控系统 校园疫情管理系统 社区疫情防控系统Java Vue MySQL数据库 远程调试 代码讲解
【Python 实战基础】Python 中 PyQt6 颜色讲解
Golang新版本 Go1.19新的fmt方法
JVM之线程资源标记ResourceMark
参考基因组下载 hg19 索引文件 grch38 reference genome infercnv 安装cellranger
图像变形 -- 移动最小二乘法(MLS)
有来团队后台项目-解析5
当数字孪生与智慧园区结合,能够实现什么样的应用?
JVM的内存结构
- 原文地址:https://blog.csdn.net/G823909/article/details/128179089