-
SpringBoot整合RabbitMQ
前言
准备工作:创建springboot项目
pom.xml<project xmlns="http://maven.apache.org/POM/4.0.0" xmlns:xsi="http://www.w3.org/2001/XMLSchema-instance" xsi:schemaLocation="http://maven.apache.org/POM/4.0.0 https://maven.apache.org/xsd/maven-4.0.0.xsd"> <modelVersion>4.0.0modelVersion> <parent> <groupId>org.springframework.bootgroupId> <artifactId>spring-boot-starter-parentartifactId> <version>2.1.13.RELEASEversion> <relativePath/> parent> <groupId>com.examplegroupId> <artifactId>02_rabbitmq_springbootartifactId> <version>0.0.1-SNAPSHOTversion> <name>02_rabbitmq_springbootname> <description>Demo project for Spring Bootdescription> <properties> <java.version>1.8java.version> properties> <dependencies> <dependency> <groupId>org.springframework.bootgroupId> <artifactId>spring-boot-starter-amqpartifactId> dependency> <dependency> <groupId>org.springframework.bootgroupId> <artifactId>spring-boot-starter-webartifactId> dependency> <dependency> <groupId>org.springframework.bootgroupId> <artifactId>spring-boot-starter-testartifactId> <scope>testscope> dependency> <dependency> <groupId>org.springframework.amqpgroupId> <artifactId>spring-rabbit-testartifactId> <scope>testscope> dependency> <dependency> <groupId>junitgroupId> <artifactId>junitartifactId> <version>4.13.2version> <scope>testscope> dependency> dependencies> <build> <plugins> <plugin> <groupId>org.springframework.bootgroupId> <artifactId>spring-boot-maven-pluginartifactId> plugin> plugins> build> project>- 1
- 2
- 3
- 4
- 5
- 6
- 7
- 8
- 9
- 10
- 11
- 12
- 13
- 14
- 15
- 16
- 17
- 18
- 19
- 20
- 21
- 22
- 23
- 24
- 25
- 26
- 27
- 28
- 29
- 30
- 31
- 32
- 33
- 34
- 35
- 36
- 37
- 38
- 39
- 40
- 41
- 42
- 43
- 44
- 45
- 46
- 47
- 48
- 49
- 50
- 51
- 52
- 53
- 54
- 55
- 56
- 57
application.yml# 应用名,此场景没多大用,在微服务中作用比较大 spring: application: name: rabbitmq-spring rabbitmq: host: 192.168.19.129 port: 5672 username: ems password: 123456 virtual-host: /ems- 1
- 2
- 3
- 4
- 5
- 6
- 7
- 8
- 9
- 10
提示:以下是本篇文章正文内容,下面案例可供参考一、helloworld模型

1.生产者
代码如下(示例):
package com.example; import com.example.helloworld.Application; import org.junit.Test; import org.junit.runner.RunWith; import org.springframework.amqp.rabbit.core.RabbitTemplate; import org.springframework.beans.factory.annotation.Autowired; import org.springframework.boot.test.context.SpringBootTest; import org.springframework.test.context.junit4.SpringRunner; @SpringBootTest(classes = Application.class) @RunWith(SpringRunner.class) public class TestRabbitMQ { @Autowired private RabbitTemplate rabbitTemplate; //hello world模型 @Test public void testHelloWorld(){ //执行发现,没有队列,这里需要注意:必须需要有消费者才能出现队列。 //第一个参数:路由key 第二个参数:发送的消息 rabbitTemplate.convertAndSend("hello","hello world"); } }- 1
- 2
- 3
- 4
- 5
- 6
- 7
- 8
- 9
- 10
- 11
- 12
- 13
- 14
- 15
- 16
- 17
- 18
- 19
- 20
- 21
- 22
- 23
- 24
- 25
- 26
2.消费者
代码如下(示例):
package com.example.helloworld; import org.springframework.amqp.rabbit.annotation.Queue; import org.springframework.amqp.rabbit.annotation.RabbitHandler; import org.springframework.amqp.rabbit.annotation.RabbitListener; import org.springframework.stereotype.Component; @Component //持久化 非独占 不是自动删除队列 @RabbitListener(queuesToDeclare = @Queue("hello")) //RabbitMQ消费者监听 public class HelloCustomer { @RabbitHandler //表示该队列处理消息的方法 public void receive(String message){ System.out.println("message = " + message); } }- 1
- 2
- 3
- 4
- 5
- 6
- 7
- 8
- 9
- 10
- 11
- 12
- 13
- 14
- 15
- 16
- 17
- 18
3.测试结果图


二、work模型

1.生产者
代码如下(示例):
package com.example; import com.example.helloworld.Application; import org.junit.Test; import org.junit.runner.RunWith; import org.springframework.amqp.rabbit.annotation.EnableRabbit; import org.springframework.amqp.rabbit.core.RabbitTemplate; import org.springframework.beans.factory.annotation.Autowired; import org.springframework.boot.test.context.SpringBootTest; import org.springframework.context.annotation.ComponentScan; import org.springframework.test.context.junit4.SpringRunner; @SpringBootTest(classes = Application.class) @RunWith(SpringRunner.class) @EnableRabbit @ComponentScan("com.example") public class TestRabbitMQ { @Autowired private RabbitTemplate rabbitTemplate; //work模型 @Test public void testWork(){ for (int i = 0; i < 10; i++) { rabbitTemplate.convertAndSend("work","work模型" + i); } } }- 1
- 2
- 3
- 4
- 5
- 6
- 7
- 8
- 9
- 10
- 11
- 12
- 13
- 14
- 15
- 16
- 17
- 18
- 19
- 20
- 21
- 22
- 23
- 24
- 25
- 26
- 27
- 28
- 29
- 30
- 31
2.消费者
代码如下(示例):
package com.example.work; import org.springframework.amqp.rabbit.annotation.Queue; import org.springframework.amqp.rabbit.annotation.RabbitListener; import org.springframework.stereotype.Component; /** * 说明:默认在Spring AMQP实现中Work这种方式就是公平调度,如果需要实现能者多劳需要额外配置 */ @Component public class WorkCustomer { /** * 消费者1 * @param message */ @RabbitListener(queuesToDeclare = @Queue("work")) //RabbitMQ消费者监听 public void receive1(String message){ System.out.println("消费者1:" + message); } /** * 消费者2 * @param message */ @RabbitListener(queuesToDeclare = @Queue("work")) //表示该方法被监听 public void receive2(String message){ System.out.println("消费者2:" + message); } }- 1
- 2
- 3
- 4
- 5
- 6
- 7
- 8
- 9
- 10
- 11
- 12
- 13
- 14
- 15
- 16
- 17
- 18
- 19
- 20
- 21
- 22
- 23
- 24
- 25
- 26
- 27
- 28
- 29
- 30
- 31
3.测试结果图


注意事项
在work模型中,需要使用到@EnableRabbit和@ComponentScan("com.example")三、Fanout模型

1.生产者
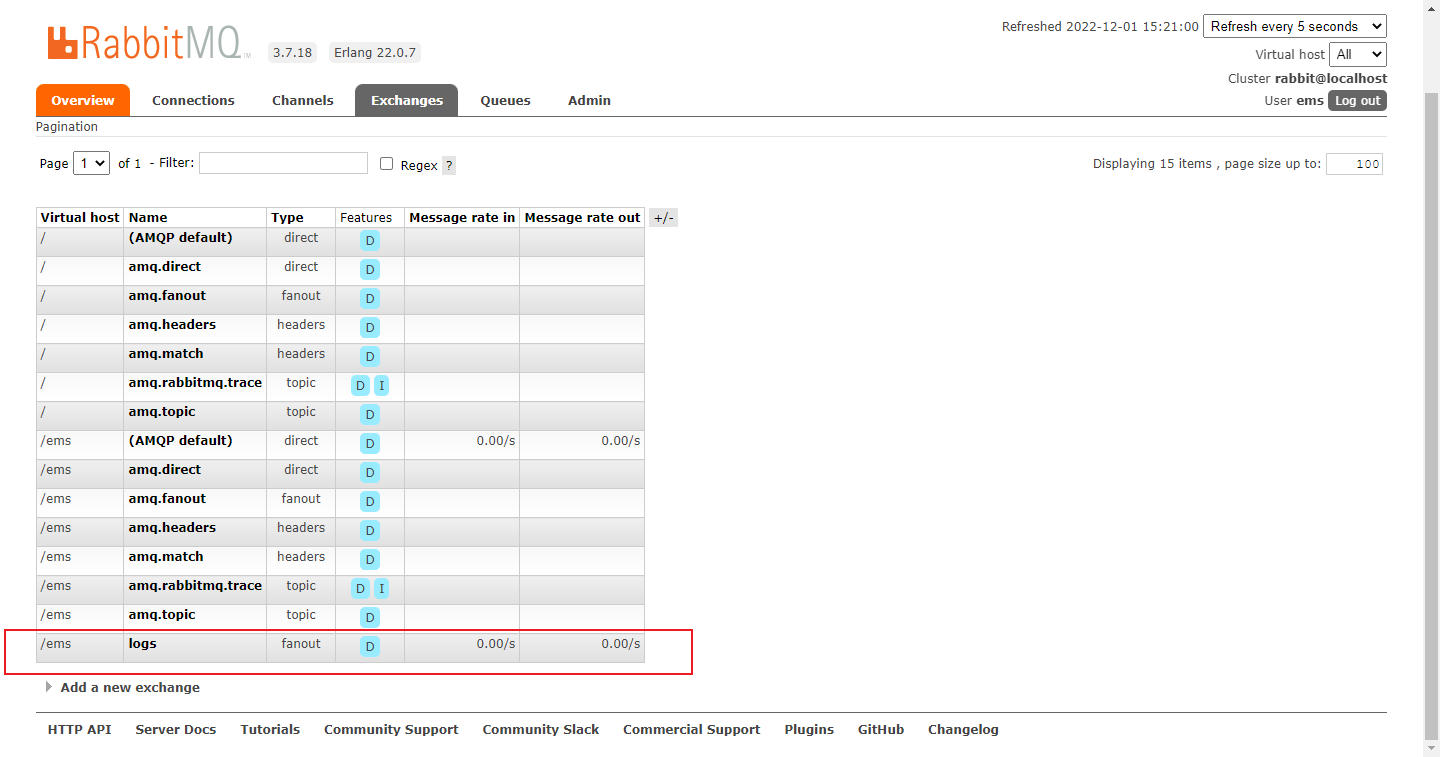
package com.example; import org.junit.Test; import org.junit.runner.RunWith; import org.springframework.amqp.rabbit.annotation.EnableRabbit; import org.springframework.amqp.rabbit.core.RabbitTemplate; import org.springframework.beans.factory.annotation.Autowired; import org.springframework.boot.test.context.SpringBootTest; import org.springframework.context.annotation.ComponentScan; import org.springframework.test.context.junit4.SpringRunner; @SpringBootTest(classes = RabbitmqSpringbootApplication.class) @RunWith(SpringRunner.class) @EnableRabbit @ComponentScan("com.example") public class TestRabbitMQ { @Autowired private RabbitTemplate rabbitTemplate; //fanout 广播 @Test public void testFanout(){ //第一个参数:交换机名称 //第二个参数:路由key //第三个参数:发送的消息 //注意:生产者执行后,在rabbitmq后台管理器中是看不到logs交换机的,得消费者消费才会出现 rabbitTemplate.convertAndSend("logs","","Fanout模型发送的消息"); } }- 1
- 2
- 3
- 4
- 5
- 6
- 7
- 8
- 9
- 10
- 11
- 12
- 13
- 14
- 15
- 16
- 17
- 18
- 19
- 20
- 21
- 22
- 23
- 24
- 25
- 26
- 27
- 28
- 29
- 30
- 31
2.消费者
package com.example.fanout; import org.springframework.amqp.core.ExchangeTypes; import org.springframework.amqp.rabbit.annotation.Exchange; import org.springframework.amqp.rabbit.annotation.Queue; import org.springframework.amqp.rabbit.annotation.QueueBinding; import org.springframework.amqp.rabbit.annotation.RabbitListener; import org.springframework.stereotype.Component; @Component public class FanoutCustomer { @RabbitListener(bindings = { @QueueBinding( value = @Queue, //创建临时队列 exchange = @Exchange(value = "logs",type = ExchangeTypes.FANOUT) //绑定的交换机 ) }) public void receive1(String message){ System.out.println("消费者1:" + message); } @RabbitListener(bindings = { @QueueBinding( value = @Queue, //创建临时队列 exchange = @Exchange(value = "logs",type = ExchangeTypes.FANOUT) //绑定的交换机 ) }) public void receive2(String message){ System.out.println("消费者2:" + message); } @RabbitListener(bindings = { @QueueBinding( value = @Queue, //创建临时队列 exchange = @Exchange(value = "logs",type = ExchangeTypes.FANOUT) //绑定的交换机 ) }) public void receive3(String message){ System.out.println("消费者3:" + message); } }- 1
- 2
- 3
- 4
- 5
- 6
- 7
- 8
- 9
- 10
- 11
- 12
- 13
- 14
- 15
- 16
- 17
- 18
- 19
- 20
- 21
- 22
- 23
- 24
- 25
- 26
- 27
- 28
- 29
- 30
- 31
- 32
- 33
- 34
- 35
- 36
- 37
- 38
- 39
- 40
- 41
- 42
- 43
3.测试结果图
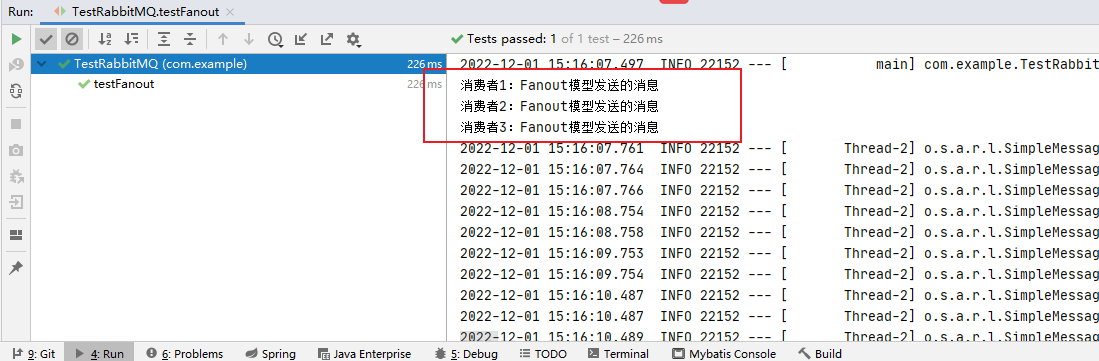
无临时队列,估计是消费完就删除了

第四种:route路由模式

1.生产者
package com.example; import org.junit.Test; import org.junit.runner.RunWith; import org.springframework.amqp.rabbit.annotation.EnableRabbit; import org.springframework.amqp.rabbit.core.RabbitTemplate; import org.springframework.beans.factory.annotation.Autowired; import org.springframework.boot.test.context.SpringBootTest; import org.springframework.context.annotation.ComponentScan; import org.springframework.test.context.junit4.SpringRunner; @SpringBootTest(classes = RabbitmqSpringbootApplication.class) @RunWith(SpringRunner.class) @EnableRabbit @ComponentScan("com.example") public class TestRabbitMQ { @Autowired private RabbitTemplate rabbitTemplate; //route 路由模式 @Test public void testRouteInfo(){ rabbitTemplate.convertAndSend("directs","info","发送info的key的路由信息"); } @Test public void testRouteAll(){ rabbitTemplate.convertAndSend("directs","error","发送error的key的路由信息"); } }- 1
- 2
- 3
- 4
- 5
- 6
- 7
- 8
- 9
- 10
- 11
- 12
- 13
- 14
- 15
- 16
- 17
- 18
- 19
- 20
- 21
- 22
- 23
- 24
- 25
- 26
- 27
- 28
- 29
- 30
- 31
- 32
2.消费者
package com.example.route; import org.springframework.amqp.core.ExchangeTypes; import org.springframework.amqp.rabbit.annotation.Exchange; import org.springframework.amqp.rabbit.annotation.Queue; import org.springframework.amqp.rabbit.annotation.QueueBinding; import org.springframework.amqp.rabbit.annotation.RabbitListener; import org.springframework.stereotype.Component; @Component public class RouteConsumer { @RabbitListener(bindings = { @QueueBinding( value = @Queue, //创建临时队列 exchange = @Exchange(value = "directs",type = ExchangeTypes.DIRECT), //自定义交换机名称和类型 key = {"info","error","warn"} ) }) public void receive1(String message){ System.out.println("都可以拿到的消费者:" + message); } @RabbitListener(bindings = { @QueueBinding( value = @Queue, //创建临时队列 exchange = @Exchange(value = "directs",type = ExchangeTypes.DIRECT), //自定义交换机名称和类型 key = {"error"} ) }) public void receive2(String message){ System.out.println("只能拿到error的消费者:" + message); } }- 1
- 2
- 3
- 4
- 5
- 6
- 7
- 8
- 9
- 10
- 11
- 12
- 13
- 14
- 15
- 16
- 17
- 18
- 19
- 20
- 21
- 22
- 23
- 24
- 25
- 26
- 27
- 28
- 29
- 30
- 31
- 32
- 33
- 34
- 35
- 36
3.测试结果图


五、topics订阅模式

1.生产者
package com.example; import org.junit.Test; import org.junit.runner.RunWith; import org.springframework.amqp.rabbit.annotation.EnableRabbit; import org.springframework.amqp.rabbit.core.RabbitTemplate; import org.springframework.beans.factory.annotation.Autowired; import org.springframework.boot.test.context.SpringBootTest; import org.springframework.context.annotation.ComponentScan; import org.springframework.test.context.junit4.SpringRunner; @SpringBootTest(classes = RabbitmqSpringbootApplication.class) @RunWith(SpringRunner.class) @EnableRabbit @ComponentScan("com.example") public class TestRabbitMQ { @Autowired private RabbitTemplate rabbitTemplate; //topic 动态路由 订阅模式 @Test public void testTopic1(){ rabbitTemplate.convertAndSend("topics","user.save","user.save 路由消息"); } @Test public void testTopic2(){ rabbitTemplate.convertAndSend("topics","order.save.base","order.save.base 路由消息"); } }- 1
- 2
- 3
- 4
- 5
- 6
- 7
- 8
- 9
- 10
- 11
- 12
- 13
- 14
- 15
- 16
- 17
- 18
- 19
- 20
- 21
- 22
- 23
- 24
- 25
- 26
- 27
- 28
- 29
- 30
- 31
- 32
- 33
2.消费者
package com.example.topic; import org.springframework.amqp.core.ExchangeTypes; import org.springframework.amqp.rabbit.annotation.Exchange; import org.springframework.amqp.rabbit.annotation.Queue; import org.springframework.amqp.rabbit.annotation.QueueBinding; import org.springframework.amqp.rabbit.annotation.RabbitListener; import org.springframework.stereotype.Component; @Component public class TopicConsumer { @RabbitListener(bindings = { @QueueBinding( value = @Queue, exchange = @Exchange(name = "topics",type = ExchangeTypes.TOPIC), key = {"user.save","user.*"} ) }) public void receive1(String message){ System.out.println("message1 = " + message); } @RabbitListener(bindings = { @QueueBinding( value = @Queue, exchange = @Exchange(name = "topics",type = ExchangeTypes.TOPIC), key = {"order.#","produce.#","user.*"} ) }) public void receive2(String message){ System.out.println("message2 = " + message); } }- 1
- 2
- 3
- 4
- 5
- 6
- 7
- 8
- 9
- 10
- 11
- 12
- 13
- 14
- 15
- 16
- 17
- 18
- 19
- 20
- 21
- 22
- 23
- 24
- 25
- 26
- 27
- 28
- 29
- 30
- 31
- 32
- 33
- 34
- 35
3.测试结果图


总结
提示:这里对文章进行总结:1、在helloword模式中,生产端,指定的routingKey:helllo。这里指定的是路由规则, 并不是老师说的hello队列。队列是在消费方生成的,生产端没有指定交换机只有routingKey 和Object,也就是说这个消费方产生hello队列,放在默认的交换机(AMQP default)上。 而默认的交换机有一个特点,只要你的routerKey与这个交换机中有同名的队列,他就会自动路由上。 生产端routingKey 叫hello ,消费端生产hello队列。他们就路由上了- 1
- 2
- 3
- 4
- 5

点击默认交换机进去,会看到一条话
The default exchange is implicitly bound to every queue, with a routing key equal to the queue name. It is not possible to explicitly bind to, or unbind from the default exchange. It also cannot be deleted.
默认交换器隐式绑定到每个队列,其路由键等于队列名。 不能显式地绑定到默认交换,也不能从默认交换取消绑定。 也不能删除。
-
相关阅读:
C语言笔记(进行中)!!!
USBCAN在江淮新能源汽车诊断工具的应用案例
《golang设计模式》第三部分·行为型模式-06-备忘录模式(Memento)
提取设备中所有APP的唯一标识符,判断每个APP的测试优先级,而后再进行测试安排
【vue】v-if、v-show、v-for 相关所有面试题总结
十、rem适配方案
Typescript-01
VsCode 配置eslint,支持typescript的语法检查,及时发现低级语法错误,包括函数未定义等行为
[性能测试] locust学习-基础篇
手机检测 打电话识别
- 原文地址:https://blog.csdn.net/weixin_43472934/article/details/128130908
