-
JDBC技术
JDBC
一、jdbc的概述
- JDBC(Java Database Connectivity)是一个独立于特定数据库管理系统、通用的SQL数据库存取和操作的公共接口(一组API),定义了用来访问数据库的标准Java类库,(java.sql,javax.sql)使用这些类库可以以一种标准的方法、方便地访问数据库资源。
- JDBC为访问不同的数据库提供了一种统一的途径,为开发者屏蔽了一些细节问题。
- JDBC的目标是使Java程序员使用JDBC可以连接任何提供了JDBC驱动程序的数据库系统,这样就使得程序员无需对特定的数据库系统的特点有过多的了解,从而大大简化和加快了开发过程。
- 如果没有JDBC,那么Java程序访问数据库时是这样的:

- 有了JDBC,Java程序访问数据库时是这样的:

- 总结如下:

二、jdbc模拟实现
模拟接口
/** * @author wbx * @create 2022-11-16 14:35 */ public interface jdbcInterface { //获得连接 public Object getConnection(); //crud public void crud(); //关闭资源 public void close(); }- 1
- 2
- 3
- 4
- 5
- 6
- 7
- 8
- 9
- 10
- 11
- 12
- 13
- 14
- 15
MySQL数据库实现(驱动)
/** * @author wbx * @create 2022-11-16 14:40 */ public class mysqlJdbcImpl implements jdbcInterface { @Override public Object getConnection() { System.out.println("获得mysql连接"); return null; } @Override public void crud() { System.out.println("MySQL增删改查"); } @Override public void close() { System.out.println("MySQL关闭"); } }- 1
- 2
- 3
- 4
- 5
- 6
- 7
- 8
- 9
- 10
- 11
- 12
- 13
- 14
- 15
- 16
- 17
- 18
- 19
- 20
- 21
- 22
- 23
- 24
- 25
Oracle数据库实现(驱动)
/** * @author wbx * @create 2022-11-16 14:44 */ public class oracleJdbcImpl implements jdbcInterface { @Override public Object getConnection() { System.out.println("获得oracle连接"); return null; } @Override public void crud() { System.out.println("oracle增删改查"); } @Override public void close() { System.out.println("oracle关闭"); } }- 1
- 2
- 3
- 4
- 5
- 6
- 7
- 8
- 9
- 10
- 11
- 12
- 13
- 14
- 15
- 16
- 17
- 18
- 19
- 20
- 21
- 22
- 23
- 24
- 25
- 26
- 27
测试类
/** * @author wbx * @create 2022-11-16 14:42 */ public class testjdbc { public static void main(String[] args) { jdbcInterface j = new mysqlJdbcImpl(); j.getConnection(); j.crud(); j.close(); System.out.println("=========================="); jdbcInterface i = new oracleJdbcImpl(); i.getConnection(); i.crud(); i.close(); } }- 1
- 2
- 3
- 4
- 5
- 6
- 7
- 8
- 9
- 10
- 11
- 12
- 13
- 14
- 15
- 16
- 17
- 18
- 19
- 20
思考:体会jdbc的好处,体会接口是一种规范
三、jdbc入门
JDBC API是一系列的接口,他统一和规范了应用程序与数据库的连接、执行SQL语句,并得到返回结果等各类操作,相关的类和借口在java.sql与javax.sql包中,可查看API文档
1、JDBC程序编写步骤
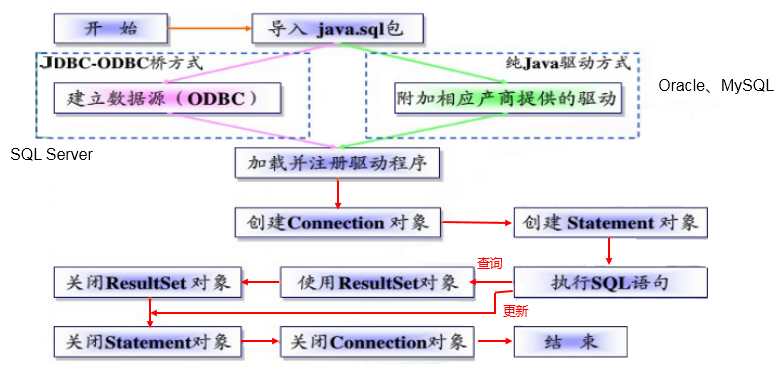
补充:ODBC(Open Database Connectivity,开放式数据库连接),是微软在Windows平台下推出的。使用者在程序中只需要调用ODBC API,由 ODBC 驱动程序将调用转换成为对特定的数据库的调用请求。
2、五种连接方式
package com.ynny.rj212.jdbcCon; import org.junit.jupiter.api.Test; import java.io.FileInputStream; import java.io.InputStream; import java.sql.Connection; import java.sql.Driver; import java.sql.DriverManager; import java.sql.SQLException; import java.util.Properties; /** * @author wbx * @create 2022-11-16 15:40 * jdbc的五种连接方式 */ public class jdbcCon01 { @Test //代码中显式出现了第三方数据库的API public void test1() throws SQLException { //1.提供java.sql.Driver接口实现类的对象 Driver driver = new com.mysql.jdbc.Driver(); //2.提供url,指明具体操作的数据 String url = "jdbc:mysql://localhost:3306/test"; //3.提供Properties的对象,指明用户名和密码 Properties info = new Properties(); info.setProperty("user", "root"); info.setProperty("password", "root"); //4.调用driver的connect(),获取连接 Connection conn = driver.connect(url, info); System.out.println(conn); } @Test //相较于方式一,这里使用反射实例化Driver,不在代码中体现第三方数据库的API。体现了面向接口编程思想。 public void test2() throws SQLException, ClassNotFoundException, InstantiationException, IllegalAccessException { //1.实例化Driver String className = "com.mysql.jdbc.Driver"; Class clazz = Class.forName(className); Driver driver = (Driver) clazz.newInstance(); //2.提供url,指明具体操作的数据 String url = "jdbc:mysql://localhost:3306/test"; //3.提供Properties的对象,指明用户名和密码 Properties info = new Properties(); info.setProperty("user", "root"); info.setProperty("password", "root"); //4.调用driver的connect(),获取连接 Connection conn = driver.connect(url, info); System.out.println(conn); } @Test //使用DriverManager实现数据库的连接。体会获取连接必要的4个基本要素。 public void test3() throws Exception { //1.数据库连接的4个基本要素: String url = "jdbc:mysql://localhost:3306/test"; String user = "root"; String password = "root"; String driverName = "com.mysql.jdbc.Driver"; //2.实例化Driver Class clazz = Class.forName(driverName); Driver driver = (Driver) clazz.newInstance(); //3.注册驱动 DriverManager.registerDriver(driver); //4.获取连接 Connection conn = DriverManager.getConnection(url, user, password); System.out.println(conn); } @Test // 不必显式的注册驱动了。因为在DriverManager的源码中已经存在静态代码块,实现了驱动的注册。 public void test4() throws Exception { //1.数据库连接的4个基本要素: String url = "jdbc:mysql://localhost:3306/test"; String user = "root"; String password = "abc123"; String driverName = "com.mysql.jdbc.Driver"; //2.加载驱动 (①实例化Driver ②注册驱动) Class.forName(driverName); //Driver driver = (Driver) clazz.newInstance(); //3.注册驱动 //DriverManager.registerDriver(driver); /* 可以注释掉上述代码的原因,是因为在mysql的Driver类中声明有: static { try { DriverManager.registerDriver(new Driver()); } catch (SQLException var1) { throw new RuntimeException("Can't register driver!"); } } */ //3.获取连接 Connection conn = DriverManager.getConnection(url, user, password); System.out.println(conn); } @Test /** * 说明:使用配置文件的方式保存配置信息,在代码中加载配置文件 * * **使用配置文件的好处:** * * ①实现了代码和数据的分离,如果需要修改配置信息,直接在配置文件中修改,不需要深入代码 * ②如果修改了配置信息,省去重新编译的过程。 */ public void test5() throws Exception { //1.加载配置文件 Properties pros = new Properties(); pros.load(new FileInputStream("src\\jdbc.properties")); //2.读取配置信息 String user = pros.getProperty("user"); String password = pros.getProperty("password"); String url = pros.getProperty("url"); String driverClass = pros.getProperty("driverClass"); //3.加载驱动 Class.forName(driverClass); //4.获取连接 Connection conn = DriverManager.getConnection(url, user, password); System.out.println(conn); } }- 1
- 2
- 3
- 4
- 5
- 6
- 7
- 8
- 9
- 10
- 11
- 12
- 13
- 14
- 15
- 16
- 17
- 18
- 19
- 20
- 21
- 22
- 23
- 24
- 25
- 26
- 27
- 28
- 29
- 30
- 31
- 32
- 33
- 34
- 35
- 36
- 37
- 38
- 39
- 40
- 41
- 42
- 43
- 44
- 45
- 46
- 47
- 48
- 49
- 50
- 51
- 52
- 53
- 54
- 55
- 56
- 57
- 58
- 59
- 60
- 61
- 62
- 63
- 64
- 65
- 66
- 67
- 68
- 69
- 70
- 71
- 72
- 73
- 74
- 75
- 76
- 77
- 78
- 79
- 80
- 81
- 82
- 83
- 84
- 85
- 86
- 87
- 88
- 89
- 90
- 91
- 92
- 93
- 94
- 95
- 96
- 97
- 98
- 99
- 100
- 101
- 102
- 103
- 104
- 105
- 106
- 107
- 108
- 109
- 110
- 111
- 112
- 113
- 114
- 115
- 116
- 117
- 118
- 119
- 120
- 121
- 122
- 123
- 124
- 125
- 126
- 127
- 128
- 129
- 130
- 131
- 132
- 133
- 134
- 135
- 136
- 137
- 138
- 139
- 140
- 141
- 142
- 143
- 144
- 145
- 146
- 147
- 148
- 149
- 150
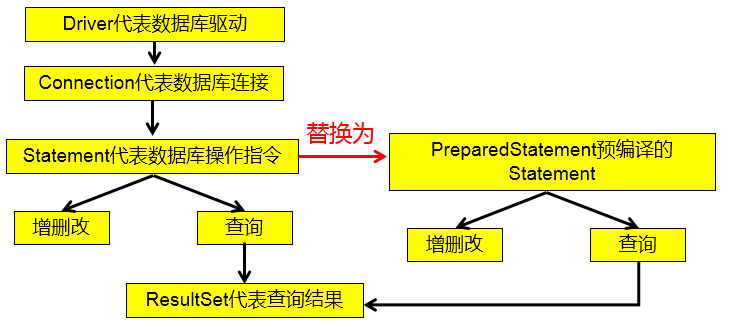
3、使用PreparedStatement实现CRUD操作
3.1 操作和访问数据库
-
数据库连接被用于向数据库服务器发送命令和 SQL 语句,并接受数据库服务器返回的结果。其实一个数据库连接就是一个Socket连接。
-
在 java.sql 包中有 3 个接口分别定义了对数据库的调用的不同方式:
- Statement:用于执行静态 SQL 语句并返回它所生成结果的对象。
- PrepatedStatement:SQL 语句被预编译并存储在此对象中,可以使用此对象多次高效地执行该语句。
- CallableStatement:用于执行 SQL 存储过程

3.2 使用Statement操作数据表的弊端
- 通过调用 Connection 对象的 createStatement() 方法创建该对象。该对象用于执行静态的 SQL 语句,并且返回执行结果。
- 但是使用Statement操作数据表存在弊端:
- 问题一:存在拼串操作,繁琐
- 问题二:存在SQL注入问题
- SQL 注入是利用某些系统没有对用户输入的数据进行充分的检查,而在用户输入数据中注入非法的 SQL 语句段或命令(如:SELECT user, password FROM user_table WHERE user=‘a’ OR 1 = ’ AND password = ’ OR ‘1’ = ‘1’) ,从而利用系统的 SQL 引擎完成恶意行为的做法。
CREATE TABLE admin( id INT, admin_name VARCHAR(16), admin_pwd VARCHAR(16)); -- 添加数据 INSERT INTO admin VALUES(1,"wbx","abc123"); -- 查询数据 SELECT * FROM admin WHERE admin_name = 'wbx' AND admin_pwd = 'abc123'; -- SQL注入 SELECT * FROM admin WHERE admin_name = '1' OR' AND admin_pwd = 'OR '1'='1';- 1
- 2
- 3
- 4
- 5
- 6
- 7
- 8
- 9
- 10
- 11
- 12
- 13
- 14
- 15
- 16
-
对于 Java 而言,要防范 SQL 注入,只要用 PreparedStatement(从Statement扩展而来) 取代 Statement 就可以了。
-
代码演示:
package com.ynny.rj212.crud; import org.junit.jupiter.api.Test; import java.io.FileInputStream; import java.sql.Connection; import java.sql.DriverManager; import java.sql.ResultSet; import java.sql.Statement; import java.util.Properties; import java.util.Scanner; /** * @author wbx * @create 2022-11-16 17:05 */ public class StatementTest2 { public static void main(String[] args) throws Exception { //让用户输入信息 Scanner scanner = new Scanner(System.in); //希望看到SQL注入的效果,用nextLine(),而不用next() System.out.println("请输入姓名"); String admin_name = scanner.nextLine(); System.out.println("请输入密码"); String admin_pwd = scanner.nextLine(); //1.加载配置文件 Properties pros = new Properties(); pros.load(new FileInputStream("src\\jdbc.properties")); //2.读取配置信息 String user = pros.getProperty("user"); String password = pros.getProperty("password"); String url = pros.getProperty("url"); String driverClass = pros.getProperty("driverClass"); //3.加载驱动 Class.forName(driverClass); //4.获取连接 Connection conn = DriverManager.getConnection(url, user, password); // System.out.println(conn); //得到Statement Statement statement = conn.createStatement(); //执行SQL String sql = "SELECT * FROM admin WHERE admin_name = '"+admin_name+"' AND admin_pwd = '"+admin_pwd+"'"; ResultSet resultSet = statement.executeQuery(sql); //如果查到一条数据,则证明该管理存在 if(resultSet.next()){ System.out.println("登录成功"); }else{ System.out.println("登录失败"); } //关闭连接 resultSet.close(); statement.close(); conn.close(); } }- 1
- 2
- 3
- 4
- 5
- 6
- 7
- 8
- 9
- 10
- 11
- 12
- 13
- 14
- 15
- 16
- 17
- 18
- 19
- 20
- 21
- 22
- 23
- 24
- 25
- 26
- 27
- 28
- 29
- 30
- 31
- 32
- 33
- 34
- 35
- 36
- 37
- 38
- 39
- 40
- 41
- 42
- 43
- 44
- 45
- 46
- 47
- 48
- 49
- 50
- 51
- 52
- 53
- 54
- 55
- 56
- 57
- 58
- 59
- 60
- 61
- 62
- 63
- 64
- 65
- 66
- 67
- 68
综上:
3.3 PreparedStatement的使用
3.3.1 PreparedStatement介绍
- 可以通过调用 Connection 对象的 preparedStatement(String sql) 方法获取 PreparedStatement 对象
- PreparedStatement 接口是 Statement 的子接口,它表示一条预编译过的 SQL 语句
- PreparedStatement 对象所代表的 SQL 语句中的参数用问号(?)来表示,调用 PreparedStatement 对象的 setXxx() 方法来设置这些参数. setXxx() 方法有两个参数,第一个参数是要设置的 SQL 语句中的参数的索引(从 1 开始),第二个是设置的 SQL 语句中的参数的值
3.3.2 PreparedStatement vs Statement
-
代码的可读性和可维护性。
-
PreparedStatement 能最大可能提高性能:
- DBServer会对预编译语句提供性能优化。因为预编译语句有可能被重复调用,所以语句在被DBServer的编译器编译后的执行代码被缓存下来,那么下次调用时只要是相同的预编译语句就不需要编译,只要将参数直接传入编译过的语句执行代码中就会得到执行。
- 在statement语句中,即使是相同操作但因为数据内容不一样,所以整个语句本身不能匹配,没有缓存语句的意义.事实是没有数据库会对普通语句编译后的执行代码缓存。这样每执行一次都要对传入的语句编译一次。
- (语法检查,语义检查,翻译成二进制命令,缓存)
-
代码示例
package com.ynny.rj212.crud; import java.io.FileInputStream; import java.io.FileNotFoundException; import java.sql.*; import java.util.Properties; import java.util.Scanner; public class PreparedStatement_ { public static void main(String[] args) throws Exception { //让用户输入信息 Scanner scanner = new Scanner(System.in); //希望看到SQL注入的效果,用nextLine(),而不用next() System.out.println("请输入姓名"); String admin_name = scanner.nextLine(); System.out.println("请输入密码"); String admin_pwd = scanner.nextLine(); //1.加载配置文件 Properties pros = new Properties(); pros.load(new FileInputStream("src\\jdbc.properties")); //2.读取配置信息 String user = pros.getProperty("user"); String password = pros.getProperty("password"); String url = pros.getProperty("url"); String driverClass = pros.getProperty("driverClass"); //3.加载驱动 Class.forName(driverClass); //4.获取连接 Connection conn = DriverManager.getConnection(url, user, password); // System.out.println(conn); //5. 得到PreparedStatement //5.1 组织SqL , Sql 语句的 ? 就相当于占位符 String sql = "select admin_name , admin_pwd from admin where admin_name =? and admin_pwd = ?"; //5.2 preparedStatement 对象实现了 PreparedStatement 接口的实现类的对象 PreparedStatement preparedStatement = conn.prepareStatement(sql); //5.3 给 ? 赋值 preparedStatement.setString(1, admin_name); preparedStatement.setString(2, admin_pwd); //6. 执行 select 语句使用 executeQuery // 如果执行的是 dml(update, insert ,delete) executeUpdate() // 这里执行 executeQuery ,不要在写 sql ResultSet resultSet = preparedStatement.executeQuery(); if (resultSet.next()) { //如果查询到一条记录,则说明该管理存在 System.out.println("恭喜, 登录成功"); } else { System.out.println("对不起,登录失败"); } //7.关闭连接 resultSet.close(); preparedStatement.close(); conn.close(); } }- 1
- 2
- 3
- 4
- 5
- 6
- 7
- 8
- 9
- 10
- 11
- 12
- 13
- 14
- 15
- 16
- 17
- 18
- 19
- 20
- 21
- 22
- 23
- 24
- 25
- 26
- 27
- 28
- 29
- 30
- 31
- 32
- 33
- 34
- 35
- 36
- 37
- 38
- 39
- 40
- 41
- 42
- 43
- 44
- 45
- 46
- 47
- 48
- 49
- 50
- 51
- 52
- 53
- 54
- 55
- 56
- 57
- 58
- 59
- 60
- 61
- 62
- 63
- 64
- 65
3.3.3 preparedStatement实现增删改
代码示例
package com.ynny.rj212.crud; import java.io.FileInputStream; import java.sql.Connection; import java.sql.DriverManager; import java.sql.PreparedStatement; import java.sql.ResultSet; import java.util.Properties; import java.util.Scanner; /** * @author wbx * @create 2022-11-17 8:08 */ public class PreparedStatementDML{ public static void main(String[] args) throws Exception { //看 PreparedStatement类图 Scanner scanner = new Scanner(System.in); System.out.print("请输管理员的id: "); //next(): 当接收到 空格或者 '就是表示结束 int id = scanner.nextInt(); //让用户输入管理员名和密码 System.out.print("请输管理员的名字: "); //next(): 当接收到 空格或者 '就是表示结束 String admin_name = scanner.nextLine(); // 老师说明,如果希望看到SQL注入,这里需要用nextLine System.out.print("请输入管理员的密码: "); String admin_pwd = scanner.nextLine(); //通过Properties对象获取配置文件的信息 Properties properties = new Properties(); properties.load(new FileInputStream("src\\jdbc.properties")); //获取相关的值 String user = properties.getProperty("user"); String password = properties.getProperty("password"); String driver = properties.getProperty("driverClass"); String url = properties.getProperty("url"); //1. 注册驱动 Class.forName(driver);//建议写上 //2. 得到连接 Connection connection = DriverManager.getConnection(url, user, password); //3. 得到PreparedStatement //3.1 组织SqL , Sql 语句的 ? 就相当于占位符 //添加记录 String sql = "insert into admin values(?, ?, ?)"; //String sql = "update admin set admin_pwd = ? where admin_name = ?"; //String sql = "delete from admin where admin_name = ?"; //3.2 preparedStatement 对象实现了 PreparedStatement 接口的实现类的对象 PreparedStatement preparedStatement = connection.prepareStatement(sql); //3.3 给 ? 赋值 preparedStatement.setInt(1, id); preparedStatement.setString(2, admin_name); preparedStatement.setString(3, admin_pwd); //4. 执行 dml 语句使用 executeUpdate int rows = preparedStatement.executeUpdate(); System.out.println(rows > 0 ? "执行成功" : "执行失败"); //关闭连接 preparedStatement.close(); connection.close(); } }- 1
- 2
- 3
- 4
- 5
- 6
- 7
- 8
- 9
- 10
- 11
- 12
- 13
- 14
- 15
- 16
- 17
- 18
- 19
- 20
- 21
- 22
- 23
- 24
- 25
- 26
- 27
- 28
- 29
- 30
- 31
- 32
- 33
- 34
- 35
- 36
- 37
- 38
- 39
- 40
- 41
- 42
- 43
- 44
- 45
- 46
- 47
- 48
- 49
- 50
- 51
- 52
- 53
- 54
- 55
- 56
- 57
- 58
- 59
- 60
- 61
- 62
- 63
- 64
- 65
- 66
- 67
3.4 ResultSet
-
查询需要调用PreparedStatement 的 executeQuery() 方法,查询结果是一个ResultSet 对象
-
ResultSet 对象以逻辑表格的形式封装了执行数据库操作的结果集,ResultSet 接口由数据库厂商提供实现
-
ResultSet 返回的实际上就是一张数据表。有一个指针指向数据表的第一条记录的前面。
-
ResultSet 对象维护了一个指向当前数据行的游标,初始的时候,游标在第一行之前,可以通过 ResultSet 对象的 next() 方法移动到下一行。调用 next()方法检测下一行是否有效。若有效,该方法返回 true,且指针下移。相当于Iterator对象的 hasNext() 和 next() 方法的结合体。
-
当指针指向一行时, 可以通过调用 getXxx(int index) 或 getXxx(int columnName) 获取每一列的值。
- 例如: getInt(1), getString(“name”)
- 注意:Java与数据库交互涉及到的相关Java API中的索引都从1开始。
-
ResultSet 接口的常用方法:
- boolean next()
- getString()
- …

-
可用于获取关于 ResultSet 对象中列的类型和属性信息的对象
-
ResultSetMetaData meta = rs.getMetaData();
- getColumnName(int column):获取指定列的名称
- getColumnLabel(int column):获取指定列的别名
- getColumnCount():返回当前 ResultSet 对象中的列数。
- getColumnTypeName(int column):检索指定列的数据库特定的类型名称。
- getColumnDisplaySize(int column):指示指定列的最大标准宽度,以字符为单位。
- isNullable(int column):指示指定列中的值是否可以为 null。
- isAutoIncrement(int column):指示是否自动为指定列进行编号,这样这些列仍然是只读的。
[外链图片转存失败,源站可能有防盗链机制,建议将图片保存下来直接上传(img-47iUH67M-1668777631528)(F:/%E8%83%BD%E6%BA%90%E5%AD%A6%E4%B9%A0/web/%E5%B0%9A%E7%A1%85%E8%B0%B7_%E5%AE%8B%E7%BA%A2%E5%BA%B7_JDBC%E6%A0%B8%E5%BF%83%E6%8A%80%E6%9C%AF(2019%E6%96%B0%E7%89%88)]/1-%E8%AF%BE%E4%BB%B6/%E8%AF%BE%E4%BB%B6-md/%E5%B0%9A%E7%A1%85%E8%B0%B7_%E5%AE%8B%E7%BA%A2%E5%BA%B7_JDBC.assets/1555579494691.png)
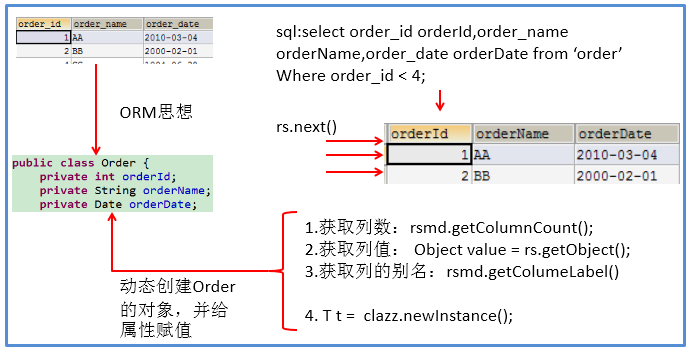
问题1:得到结果集后, 如何知道该结果集中有哪些列 ? 列名是什么?
需要使用一个描述 ResultSet 的对象, 即 ResultSetMetaData
问题2:关于ResultSetMetaData
- 如何获取 ResultSetMetaData: 调用 ResultSet 的 getMetaData() 方法即可
- 获取 ResultSet 中有多少列:调用 ResultSetMetaData 的 getColumnCount() 方法
- 获取 ResultSet 每一列的列的别名是什么:调用 ResultSetMetaData 的getColumnLabel() 方法
代码示例
package com.ynny.rj212.crud; import java.io.FileInputStream; import java.sql.*; import java.util.Properties; /** * @author wbx * @create 2022-11-17 8:34 */ public class ResultSetTest { public static void main(String[] args) throws Exception { //1.加载配置文件 Properties pros = new Properties(); pros.load(new FileInputStream("src\\jdbc.properties")); //2.读取配置信息 String user = pros.getProperty("user"); String password = pros.getProperty("password"); String url = pros.getProperty("url"); String driverClass = pros.getProperty("driverClass"); //3.加载驱动 Class.forName(driverClass); //4.获取连接 Connection conn = DriverManager.getConnection(url, user, password); // System.out.println(conn); //5. 得到PreparedStatement //执行给定的SQL语句,该语句返回单个 ResultSet对象 /* +----+-----------+-----+---------------------+ | id | name | sex | borndate | +----+-----------+-----+---------------------+-------+ | 4 | 刘德华 | 男 | 1970-12-12 00:00:00 | | 5 | jack | 男 | 1990-11-11 00:00:00 | +----+-----------+-----+---------------------+-------+ */ //5.1 组织SqL , Sql 语句的 ? 就相当于占位符 String sql = "select id , admin_name , admin_pwd from admin where admin_name =? and admin_pwd = ?"; //5.2 preparedStatement 对象实现了 PreparedStatement 接口的实现类的对象 PreparedStatement preparedStatement = conn.prepareStatement(sql); //5.3 给 ? 赋值 preparedStatement.setString(1, "wbx"); preparedStatement.setString(2, "abc123"); //6.执行SQL ResultSet resultSet = preparedStatement.executeQuery(); //5. 使用while取出数据 while (resultSet.next()) { // 让光标向后移动,如果没有更多行,则返回false int id = resultSet.getInt(1); //获取该行的第1列 //int id1 = resultSet.getInt("id"); 通过列名来获取值, 推荐 String admin_name = resultSet.getString(2);//获取该行的第2列 String admin_sex = resultSet.getString(3); System.out.println(id + "\t" + admin_name + "\t" + admin_sex + "\t" ); } //6. 关闭连接 resultSet.close(); preparedStatement.close(); conn.close(); } }- 1
- 2
- 3
- 4
- 5
- 6
- 7
- 8
- 9
- 10
- 11
- 12
- 13
- 14
- 15
- 16
- 17
- 18
- 19
- 20
- 21
- 22
- 23
- 24
- 25
- 26
- 27
- 28
- 29
- 30
- 31
- 32
- 33
- 34
- 35
- 36
- 37
- 38
- 39
- 40
- 41
- 42
- 43
- 44
- 45
- 46
- 47
- 48
- 49
- 50
- 51
- 52
- 53
- 54
- 55
- 56
- 57
- 58
- 59
- 60
- 61
- 62
- 63
- 64
- 65
- 66
- 67
- 68
- 69
- 70
- 71
- 72
- 73
- 74
3.5课后练习
- 实现增删改查
- 实现工具类(将连接和关闭资源操作封装)
示例代码
工具类
package com.ynny.rj212.utils; import java.io.FileInputStream; import java.io.IOException; import java.sql.*; import java.util.Properties; /** * @author wbx * @version 1.0 * 这是一个工具类,完成 mysql的连接和关闭资源 */ public class JDBCUtils { //定义相关的属性(4个), 因为只需要一份,因此,我们做出static private static String user; //用户名 private static String password; //密码 private static String url; //url private static String driver; //驱动名 //在static代码块去初始化 static { try { Properties properties = new Properties(); properties.load(new FileInputStream("src\\jdbc.properties")); //读取相关的属性值 user = properties.getProperty("user"); password = properties.getProperty("password"); url = properties.getProperty("url"); driver = properties.getProperty("driverClass"); } catch (IOException e) { //在实际开发中,我们可以这样处理 //1. 将编译异常转成 运行异常 //2. 调用者,可以选择捕获该异常,也可以选择默认处理该异常,比较方便. throw new RuntimeException(e); } } //连接数据库, 返回Connection public static Connection getConnection() { try { return DriverManager.getConnection(url, user, password); } catch (SQLException e) { //1. 将编译异常转成 运行异常 //2. 调用者,可以选择捕获该异常,也可以选择默认处理该异常,比较方便. throw new RuntimeException(e); } } //关闭相关资源 /* 1. ResultSet 结果集 2. Statement 或者 PreparedStatement 3. Connection 4. 如果需要关闭资源,就传入对象,否则传入 null */ public static void close(ResultSet set, Statement statement, Connection connection) { //判断是否为null try { if (set != null) { set.close(); } if (statement != null) { statement.close(); } if (connection != null) { connection.close(); } } catch (SQLException e) { //将编译异常转成运行异常抛出 throw new RuntimeException(e); } } }- 1
- 2
- 3
- 4
- 5
- 6
- 7
- 8
- 9
- 10
- 11
- 12
- 13
- 14
- 15
- 16
- 17
- 18
- 19
- 20
- 21
- 22
- 23
- 24
- 25
- 26
- 27
- 28
- 29
- 30
- 31
- 32
- 33
- 34
- 35
- 36
- 37
- 38
- 39
- 40
- 41
- 42
- 43
- 44
- 45
- 46
- 47
- 48
- 49
- 50
- 51
- 52
- 53
- 54
- 55
- 56
- 57
- 58
- 59
- 60
- 61
- 62
- 63
- 64
- 65
- 66
- 67
- 68
- 69
- 70
- 71
- 72
- 73
- 74
- 75
- 76
- 77
- 78
- 79
- 80
测试类
public class JDBCUtils_Use { @Test public void testSelect() { //1. 得到连接 Connection connection = null; //2. 组织一个sql String sql = "select * from admin where id = ?"; PreparedStatement preparedStatement = null; ResultSet set = null; //3. 创建PreparedStatement 对象 try { connection = JDBCUtils.getConnection(); System.out.println(connection.getClass()); //com.mysql.jdbc.JDBC4Connection preparedStatement = connection.prepareStatement(sql); preparedStatement.setInt(1, 1);//给?号赋值 //执行, 得到结果集 set = preparedStatement.executeQuery(); //遍历该结果集 while (set.next()) { int id = set.getInt("id"); String name = set.getString("admin_name"); String pwd = set.getString("admin_pwd"); System.out.println(id + "\t" + name + "\t" + pwd ); } } catch (SQLException e) { e.printStackTrace(); } finally { //关闭资源 JDBCUtils.close(set, preparedStatement, connection); } }- 1
- 2
- 3
- 4
- 5
- 6
- 7
- 8
- 9
- 10
- 11
- 12
- 13
- 14
- 15
- 16
- 17
- 18
- 19
- 20
- 21
- 22
- 23
- 24
- 25
- 26
- 27
- 28
- 29
- 30
- 31
- 32
- 33
- 34
- 35
四、事务处理

代码示例
- 创建表并添加数据
CREATE TABLE account( id INT PRIMARY KEY AUTO_INCREMENT, account_name VARCHAR(32) NOT NULL DEFAULT '', balance DOUBLE NOT NULL DEFAULT 0) CHARACTER SET utf8; INSERT INTO account VALUES (NULL,'刘德华',3000); INSERT INTO account VALUES (NULL,'周星驰',10000); SELECT * FROM account;- 1
- 2
- 3
- 4
- 5
- 6
- 7
- 8
- 9
- 10
- 错误展示
//没有使用事务. @Test public void noTransaction() { //操作转账的业务 //1. 得到连接 Connection connection = null; //2. 组织一个sql String sql = "update account set balance = balance - 100 where id = 1"; String sql2 = "update account set balance = balance + 100 where id = 2"; PreparedStatement preparedStatement = null; //3. 创建PreparedStatement 对象 try { connection = JDBCUtils.getConnection(); // 在默认情况下,connection是默认自动提交 preparedStatement = connection.prepareStatement(sql); preparedStatement.executeUpdate(); // 执行第1条sql int i = 1 / 0; //抛出异常 preparedStatement = connection.prepareStatement(sql2); preparedStatement.executeUpdate(); // 执行第3条sql } catch (SQLException e) { e.printStackTrace(); } finally { //关闭资源 JDBCUtils.close(null, preparedStatement, connection); } }- 1
- 2
- 3
- 4
- 5
- 6
- 7
- 8
- 9
- 10
- 11
- 12
- 13
- 14
- 15
- 16
- 17
- 18
- 19
- 20
- 21
- 22
- 23
- 24
- 25
- 26
- 27
- 28
- 29

正确做法
//事务来解决 @Test public void useTransaction() { //操作转账的业务 //1. 得到连接 Connection connection = null; //2. 组织一个sql String sql = "update account set balance = balance - 100 where id = 1"; String sql2 = "update account set balance = balance + 100 where id = 2"; PreparedStatement preparedStatement = null; //3. 创建PreparedStatement 对象 try { connection = JDBCUtils.getConnection(); // 在默认情况下,connection是默认自动提交 //将 connection 设置为不自动提交 connection.setAutoCommit(false); //开启了事务 preparedStatement = connection.prepareStatement(sql); preparedStatement.executeUpdate(); // 执行第1条sql //int i = 1 / 0; //抛出异常 preparedStatement = connection.prepareStatement(sql2); preparedStatement.executeUpdate(); // 执行第3条sql //这里提交事务 connection.commit(); } catch (SQLException e) { //这里我们可以进行回滚,即撤销执行的SQL //默认回滚到事务开始的状态. System.out.println("执行发生了异常,撤销执行的sql"); try { connection.rollback(); } catch (SQLException throwables) { throwables.printStackTrace(); } e.printStackTrace(); } finally { //关闭资源 JDBCUtils.close(null, preparedStatement, connection); } }- 1
- 2
- 3
- 4
- 5
- 6
- 7
- 8
- 9
- 10
- 11
- 12
- 13
- 14
- 15
- 16
- 17
- 18
- 19
- 20
- 21
- 22
- 23
- 24
- 25
- 26
- 27
- 28
- 29
- 30
- 31
- 32
- 33
- 34
- 35
- 36
- 37
- 38
- 39
- 40
- 41

五、批处理(扩展,自我提升)

代码示例
注:一定要在url后边加上?…=true
import org.junit.jupiter.api.Test; import java.sql.Connection; import java.sql.PreparedStatement; import java.sql.SQLException; /** * @author wbx * @version 1.0 * 演示java的批处理 */ public class Batch_ { //传统方法,添加5000条数据到admin2 @Test public void noBatch() throws Exception { Connection connection = JDBCUtils.getConnection(); String sql = "insert into admin2 values(null, ?, ?)"; PreparedStatement preparedStatement = connection.prepareStatement(sql); System.out.println("开始执行"); long start = System.currentTimeMillis();//开始时间 for (int i = 0; i < 5000; i++) {//5000执行 preparedStatement.setString(1, "jack" + i); preparedStatement.setString(2, "666"); preparedStatement.executeUpdate(); } long end = System.currentTimeMillis(); System.out.println("传统的方式 耗时=" + (end - start));//传统的方式 耗时=10702 //关闭连接 JDBCUtils.close(null, preparedStatement, connection); } //使用批量方式添加数据 @Test public void batch() throws Exception { Connection connection = JDBCUtils.getConnection(); String sql = "insert into admin2 values(null, ?, ?)"; PreparedStatement preparedStatement = connection.prepareStatement(sql); System.out.println("开始执行"); long start = System.currentTimeMillis();//开始时间 for (int i = 0; i < 5000; i++) {//5000执行 preparedStatement.setString(1, "jack" + i); preparedStatement.setString(2, "666"); //将sql 语句加入到批处理包中 -> 看源码 /* //1. //第一就创建 ArrayList - elementData => Object[] //2. elementData => Object[] 就会存放我们预处理的sql语句 //3. 当elementData满后,就按照1.5扩容 //4. 当添加到指定的值后,就executeBatch //5. 批量处理会减少我们发送sql语句的网络开销,而且减少编译次数,因此效率提高 public void addBatch() throws SQLException { synchronized(this.checkClosed().getConnectionMutex()) { if (this.batchedArgs == null) { this.batchedArgs = new ArrayList(); } for(int i = 0; i < this.parameterValues.length; ++i) { this.checkAllParametersSet(this.parameterValues[i], this.parameterStreams[i], i); } this.batchedArgs.add(new PreparedStatement.BatchParams(this.parameterValues, this.parameterStreams, this.isStream, this.streamLengths, this.isNull)); } } */ preparedStatement.addBatch(); //当有1000条记录时,在批量执行 if((i + 1) % 1000 == 0) {//满1000条sql preparedStatement.executeBatch(); //清空一把 preparedStatement.clearBatch(); } } long end = System.currentTimeMillis(); System.out.println("批量方式 耗时=" + (end - start));//批量方式 耗时=108 //关闭连接 JDBCUtils.close(null, preparedStatement, connection); } }- 1
- 2
- 3
- 4
- 5
- 6
- 7
- 8
- 9
- 10
- 11
- 12
- 13
- 14
- 15
- 16
- 17
- 18
- 19
- 20
- 21
- 22
- 23
- 24
- 25
- 26
- 27
- 28
- 29
- 30
- 31
- 32
- 33
- 34
- 35
- 36
- 37
- 38
- 39
- 40
- 41
- 42
- 43
- 44
- 45
- 46
- 47
- 48
- 49
- 50
- 51
- 52
- 53
- 54
- 55
- 56
- 57
- 58
- 59
- 60
- 61
- 62
- 63
- 64
- 65
- 66
- 67
- 68
- 69
- 70
- 71
- 72
- 73
- 74
- 75
- 76
- 77
- 78
- 79
- 80
- 81
- 82
- 83
- 84
- 85
六、数据库连接池
6.1、传统连接存在的问题(引入)

代码示例
package com.ynny.rj212.datasource; import com.ynny.rj212.utils.JDBCUtils; import org.junit.jupiter.api.Test; import java.sql.Connection; /** * @author 韩顺平 * @version 1.0 */ public class ConQuestion { //代码 连接mysql 5000次 @Test public void testCon() { //看看连接-关闭 connection 会耗用多久 long start = System.currentTimeMillis(); System.out.println("开始连接....."); for (int i = 0; i < 500; i++) { //使用传统的jdbc方式,得到连接 Connection connection = JDBCUtils.getConnection(); //做一些工作,比如得到PreparedStatement ,发送sql //.......... //关闭 JDBCUtils.close(null, null, connection); } long end = System.currentTimeMillis(); System.out.println("传统方式500次 耗时=" + (end - start));//传统方式5000次 耗时=7099 } }- 1
- 2
- 3
- 4
- 5
- 6
- 7
- 8
- 9
- 10
- 11
- 12
- 13
- 14
- 15
- 16
- 17
- 18
- 19
- 20
- 21
- 22
- 23
- 24
- 25
- 26
- 27
- 28
- 29
- 30
- 31
- 32
- 33
- 34
- 35

 
6.2、连接池原理

6.3、连接池的种类

6.4、c3p0(提供jar包)
代码示例
package com.ynny.rj212.datasource; import com.mchange.v2.c3p0.ComboPooledDataSource; import org.junit.jupiter.api.Test; import java.io.FileInputStream; import java.sql.Connection; import java.sql.SQLException; import java.util.Properties; /** * @author wbx * @version 1.0 * 演示c3p0的使用 */ public class C3P0_ { //方式1: 相关参数,在程序中指定user, url , password等 @Test public void testC3P0_01() throws Exception { //1. 创建一个数据源对象 ComboPooledDataSource comboPooledDataSource = new ComboPooledDataSource(); //2. 通过配置文件mysql.properties 获取相关连接的信息 Properties properties = new Properties(); properties.load(new FileInputStream("src\\jdbc.properties")); //读取相关的属性值 String user = properties.getProperty("user"); String password = properties.getProperty("password"); String url = properties.getProperty("url"); String driver = properties.getProperty("driverClass"); //给数据源 comboPooledDataSource 设置相关的参数 //注意:连接管理是由 comboPooledDataSource 来管理 comboPooledDataSource.setDriverClass(driver); comboPooledDataSource.setJdbcUrl(url); comboPooledDataSource.setUser(user); comboPooledDataSource.setPassword(password); //设置初始化连接数 comboPooledDataSource.setInitialPoolSize(10); //最大连接数 comboPooledDataSource.setMaxPoolSize(50); //测试连接池的效率, 测试对mysql 5000次操作 long start = System.currentTimeMillis(); for (int i = 0; i < 500; i++) { Connection connection = comboPooledDataSource.getConnection(); //这个方法就是从 DataSource 接口实现的 //System.out.println("连接OK"); connection.close(); } long end = System.currentTimeMillis(); //c3p0 5000连接mysql 耗时=391 System.out.println("c3p0 500连接mysql 耗时=" + (end - start)); } //第二种方式 使用配置文件模板来完成 //1. 将c3p0 提供的 c3p0.config.xml 拷贝到 src目录下 //2. 该文件指定了连接数据库和连接池的相关参数 @Test public void testC3P0_02() throws SQLException { ComboPooledDataSource comboPooledDataSource = new ComboPooledDataSource("rj212"); //测试5000次连接mysql long start = System.currentTimeMillis(); System.out.println("开始执行...."); for (int i = 0; i < 500; i++) { Connection connection = comboPooledDataSource.getConnection(); //System.out.println("连接OK~"); connection.close(); } long end = System.currentTimeMillis(); //c3p0的第二种方式 耗时=413 System.out.println("c3p0的第二种方式(500) 耗时=" + (end - start));//1917 } }- 1
- 2
- 3
- 4
- 5
- 6
- 7
- 8
- 9
- 10
- 11
- 12
- 13
- 14
- 15
- 16
- 17
- 18
- 19
- 20
- 21
- 22
- 23
- 24
- 25
- 26
- 27
- 28
- 29
- 30
- 31
- 32
- 33
- 34
- 35
- 36
- 37
- 38
- 39
- 40
- 41
- 42
- 43
- 44
- 45
- 46
- 47
- 48
- 49
- 50
- 51
- 52
- 53
- 54
- 55
- 56
- 57
- 58
- 59
- 60
- 61
- 62
- 63
- 64
- 65
- 66
- 67
- 68
- 69
- 70
- 71
- 72
- 73
- 74
- 75
- 76
- 77
- 78
- 79
- 80
- 81
xml文件
<c3p0-config> <named-config name="rj212"> <property name="driverClass">com.mysql.jdbc.Driverproperty> <property name="jdbcUrl">jdbc:mysql://127.0.0.1:3306/testproperty> <property name="user">rootproperty> <property name="password">rootproperty> <property name="acquireIncrement">5property> <property name="initialPoolSize">10property> <property name="minPoolSize">5property> <property name="maxPoolSize">50property> <property name="maxStatements">5property> <property name="maxStatementsPerConnection">2property> named-config> c3p0-config>- 1
- 2
- 3
- 4
- 5
- 6
- 7
- 8
- 9
- 10
- 11
- 12
- 13
- 14
- 15
- 16
- 17
- 18
- 19
- 20
- 21
- 22
- 23
- 24
- 25
- 26
- 27
6.5、德鲁伊(jar包)
配置文件
#key=value driverClassName=com.mysql.jdbc.Driver url=jdbc:mysql://localhost:3306/test?rewriteBatchedStatements=true username=root password=root #initial connection Size initialSize=10 #min idle connecton size minIdle=5 #max active connection size maxActive=50 #max wait time (5000 mil seconds) maxWait=5000- 1
- 2
- 3
- 4
- 5
- 6
- 7
- 8
- 9
- 10
- 11
- 12
- 13
代码示例
package com.ynny.rj212.datasource; import com.alibaba.druid.pool.DruidDataSourceFactory; import org.junit.jupiter.api.Test; import javax.sql.DataSource; import java.io.FileInputStream; import java.io.FileNotFoundException; import java.io.IOException; import java.sql.Connection; import java.util.Properties; /** * @author wbx * @version 1.0 * 测试druid的使用 */ public class Druid_ { @Test public void testDruid() throws Exception { //1. 加入 Druid jar包 //2. 加入 配置文件 druid.properties , 将该文件拷贝项目的src目录 //3. 创建Properties对象, 读取配置文件 Properties properties = new Properties(); properties.load(new FileInputStream("src\\druid.properties")); //4. 创建一个指定参数的数据库连接池, Druid连接池 DataSource dataSource = DruidDataSourceFactory.createDataSource(properties); long start = System.currentTimeMillis(); for (int i = 0; i < 50000; i++) { Connection connection = dataSource.getConnection(); System.out.println(connection.getClass()); //System.out.println("连接成功!"); connection.close(); } long end = System.currentTimeMillis(); //druid连接池 操作5000 耗时=412 System.out.println("druid连接池 操作50000 耗时=" + (end - start));//539 } }- 1
- 2
- 3
- 4
- 5
- 6
- 7
- 8
- 9
- 10
- 11
- 12
- 13
- 14
- 15
- 16
- 17
- 18
- 19
- 20
- 21
- 22
- 23
- 24
- 25
- 26
- 27
- 28
- 29
- 30
- 31
- 32
- 33
- 34
- 35
- 36
- 37
- 38
- 39
- 40
- 41
- 42
- 43
- 44
- 45
- 46
6.6、思考
上述数据库连接池查询的结果集存在哪些问题?
准备工作
CREATE TABLE actor( id INT PRIMARY KEY AUTO_INCREMENT, NAME VARCHAR(32) NOT NULL DEFAULT '', sex VARCHAR(12) NOT NULL DEFAULT '女', borndate DATETIME, phone VARCHAR(12)); INSERT INTO actor VALUES(NULL,'wbx','男',NOW(),'12345678'); INSERT INTO actor VALUES(NULL,'刘德华','男',NOW(),'12345678');- 1
- 2
- 3
- 4
- 5
- 6
- 7
- 8
- 9
- 10
- 11
- 12
代码示例
public class JDBCUtilsByDruid_USE { @Test public void testSelect() { System.out.println("使用 druid方式完成"); //1. 得到连接 Connection connection = null; //2. 组织一个sql String sql = "select * from actor where id >= ?"; PreparedStatement preparedStatement = null; ResultSet set = null; //3. 创建PreparedStatement 对象 try { connection = JDBCUtilsByDruid.getConnection(); System.out.println(connection.getClass());//运行类型 com.alibaba.druid.pool.DruidPooledConnection preparedStatement = connection.prepareStatement(sql); preparedStatement.setInt(1, 1);//给?号赋值 //执行, 得到结果集 set = preparedStatement.executeQuery(); //问题演示,提前关闭连接会报错 // connection.close(); //遍历该结果集 while (set.next()) { int id = set.getInt("id"); String name = set.getString("name");//getName() String sex = set.getString("sex");//getSex() Date borndate = set.getDate("borndate"); String phone = set.getString("phone"); System.out.println(id + "\t" + name + "\t" + sex + "\t" + borndate + "\t" + phone); } } catch (SQLException e) { e.printStackTrace(); } finally { //关闭资源 JDBCUtilsByDruid.close(set, preparedStatement, connection); } }- 1
- 2
- 3
- 4
- 5
- 6
- 7
- 8
- 9
- 10
- 11
- 12
- 13
- 14
- 15
- 16
- 17
- 18
- 19
- 20
- 21
- 22
- 23
- 24
- 25
- 26
- 27
- 28
- 29
- 30
- 31
- 32
- 33
- 34
- 35
- 36
- 37
- 38
- 39
- 40
- 41
- 42
[外链图片转存失败,源站可能有防盗链机制,建议将图片保存下来直接上传(img-pisH4hpH-1668777631536)(C:\Users\PC\AppData\Roaming\Typora\typora-user-images\1668668064145.png)]
6.7、映射

创建对应的实体类
package com.ynny.rj212.datasource; import java.util.Date; /** * @author wbx * * @version 1.0 * Actor 对象和 actor表的记录对应 * */ public class Actor { //Javabean, POJO, Domain对象 private Integer id; private String name; private String sex; private Date borndate; private String phone; public Actor() { //一定要给一个无参构造器[反射需要] } public Actor(Integer id, String name, String sex, Date borndate, String phone) { this.id = id; this.name = name; this.sex = sex; this.borndate = borndate; this.phone = phone; } public Integer getId() { return id; } public void setId(Integer id) { this.id = id; } public String getName() { return name; } public void setName(String name) { this.name = name; } public String getSex() { return sex; } public void setSex(String sex) { this.sex = sex; } public Date getBorndate() { return borndate; } public void setBorndate(Date borndate) { this.borndate = borndate; } public String getPhone() { return phone; } public void setPhone(String phone) { this.phone = phone; } @Override public String toString() { return "\nActor{" + "id=" + id + ", name='" + name + '\'' + ", sex='" + sex + '\'' + ", borndate=" + borndate + ", phone='" + phone + '\'' + '}'; } }- 1
- 2
- 3
- 4
- 5
- 6
- 7
- 8
- 9
- 10
- 11
- 12
- 13
- 14
- 15
- 16
- 17
- 18
- 19
- 20
- 21
- 22
- 23
- 24
- 25
- 26
- 27
- 28
- 29
- 30
- 31
- 32
- 33
- 34
- 35
- 36
- 37
- 38
- 39
- 40
- 41
- 42
- 43
- 44
- 45
- 46
- 47
- 48
- 49
- 50
- 51
- 52
- 53
- 54
- 55
- 56
- 57
- 58
- 59
- 60
- 61
- 62
- 63
- 64
- 65
- 66
- 67
- 68
- 69
- 70
- 71
- 72
- 73
- 74
- 75
- 76
- 77
- 78
- 79
- 80
- 81
- 82
土方法封装(因为APDBUtils(AP是阿帕奇的缩写)对我们的需求进行了封装,打成了jar包,稍后再讲)
//使用土方法来解决ResultSet =封装=> Arraylist @Test // public ArrayListtestSelectToArrayList() { public void testSelectToArrayList() { System.out.println("使用 druid方式完成"); //1. 得到连接 Connection connection = null; //2. 组织一个sql String sql = "select * from actor where id >= ?"; PreparedStatement preparedStatement = null; ResultSet set = null; ArrayList<Actor> list = new ArrayList<>();//创建ArrayList对象,存放actor对象 //3. 创建PreparedStatement 对象 try { connection = JDBCUtilsByDruid.getConnection(); System.out.println(connection.getClass());//运行类型 com.alibaba.druid.pool.DruidPooledConnection preparedStatement = connection.prepareStatement(sql); preparedStatement.setInt(1, 1);//给?号赋值 //执行, 得到结果集 set = preparedStatement.executeQuery(); //遍历该结果集 while (set.next()) { int id = set.getInt("id"); String name = set.getString("name");//getName() String sex = set.getString("sex");//getSex() Date borndate = set.getDate("borndate"); String phone = set.getString("phone"); //把得到的resultset 的记录,封装到 Actor对象,放入到list集合 list.add(new Actor(id, name, sex, borndate, phone)); } System.out.println("list集合数据=" + list); for(Actor actor : list) { System.out.println("id=" + actor.getId() + "\t" + actor.getName()); } } catch (SQLException e) { e.printStackTrace(); } finally { //关闭资源 JDBCUtilsByDruid.close(set, preparedStatement, connection); } //因为ArrayList 和 connection 没有任何关联,所以该集合可以复用. // return list; }- 1
- 2
- 3
- 4
- 5
- 6
- 7
- 8
- 9
- 10
- 11
- 12
- 13
- 14
- 15
- 16
- 17
- 18
- 19
- 20
- 21
- 22
- 23
- 24
- 25
- 26
- 27
- 28
- 29
- 30
- 31
- 32
- 33
- 34
- 35
- 36
- 37
- 38
- 39
- 40
- 41
- 42
- 43
- 44
- 45
- 46
- 47
[外链图片转存失败,源站可能有防盗链机制,建议将图片保存下来直接上传(img-nbkNOoIE-1668777631537)(C:\Users\PC\AppData\Roaming\Typora\typora-user-images\1668668548140.png)]
6.8、Apache-DBUtils

代码示例
package com.ynny.rj212.datasource; import org.apache.commons.dbutils.QueryRunner; import org.apache.commons.dbutils.handlers.BeanHandler; import org.apache.commons.dbutils.handlers.BeanListHandler; import org.apache.commons.dbutils.handlers.ScalarHandler; import org.junit.jupiter.api.Test; import java.sql.*; import java.util.ArrayList; import java.util.List; /** * @author wbx * @version 1.0 */ @SuppressWarnings({"all"}) public class DBUtils_USE { //使用apache-DBUtils 工具类 + druid 完成对表的crud操作 @Test public void testQueryMany() throws SQLException { //返回结果是多行的情况 //1. 得到 连接 (druid) Connection connection = JDBCUtilsByDruid.getConnection(); //2. 使用 DBUtils 类和接口 , 先引入DBUtils 相关的jar , 加入到本Project //3. 创建 QueryRunner QueryRunner queryRunner = new QueryRunner(); //4. 就可以执行相关的方法,返回ArrayList 结果集 //String sql = "select * from actor where id >= ?"; // 注意: sql 语句也可以查询部分列 String sql = "select id, name from actor where id >= ?"; // 方法解读 //(1) query 方法就是执行sql 语句,得到resultset ---封装到 --> ArrayList 集合中 //(2) 返回集合 //(3) connection: 连接 //(4) sql : 执行的sql语句 //(5) new BeanListHandler<>(Actor.class): 在将resultset -> Actor 对象 -> 封装到 ArrayList // 底层使用反射机制 去获取Actor 类的属性,然后进行封装 //(6) 1 就是给 sql 语句中的? 赋值,可以有多个值,因为是可变参数Object... params //(7) 底层得到的resultset ,会在query 关闭, 关闭PreparedStatment /** * 分析 queryRunner.query方法: * publicT query(Connection conn, String sql, ResultSetHandler List<Actor> list = queryRunner.query(connection, sql, new BeanListHandler<>(Actor.class), 1); System.out.println("输出集合的信息"); for (Actor actor : list) { System.out.print(actor); } //释放资源 JDBCUtilsByDruid.close(null, null, connection); } //演示 apache-dbutils + druid 完成 返回的结果是单行记录(单个对象) @Test public void testQuerySingle() throws SQLException { //1. 得到 连接 (druid) Connection connection = JDBCUtilsByDruid.getConnection(); //2. 使用 DBUtils 类和接口 , 先引入DBUtils 相关的jar , 加入到本Project //3. 创建 QueryRunner QueryRunner queryRunner = new QueryRunner(); //4. 就可以执行相关的方法,返回单个对象 String sql = "select * from actor where id = ?"; // 因为我们返回的单行记录<--->单个对象 , 使用的Hander 是 BeanHandler Actor actor = queryRunner.query(connection, sql, new BeanHandler<>(Actor.class), 10); System.out.println(actor); // 释放资源 JDBCUtilsByDruid.close(null, null, connection); } //演示apache-dbutils + druid 完成查询结果是单行单列-返回的就是object @Test public void testScalar() throws SQLException { //1. 得到 连接 (druid) Connection connection = JDBCUtilsByDruid.getConnection(); //2. 使用 DBUtils 类和接口 , 先引入DBUtils 相关的jar , 加入到本Project //3. 创建 QueryRunner QueryRunner queryRunner = new QueryRunner(); //4. 就可以执行相关的方法,返回单行单列 , 返回的就是Object String sql = "select name from actor where id = ?"; //解读: 因为返回的是一个对象, 使用的handler 就是 ScalarHandler Object obj = queryRunner.query(connection, sql, new ScalarHandler(), 4); System.out.println(obj); // 释放资源 JDBCUtilsByDruid.close(null, null, connection); } //演示apache-dbutils + druid 完成 dml (update, insert ,delete) @Test public void testDML() throws SQLException { //1. 得到 连接 (druid) Connection connection = JDBCUtilsByDruid.getConnection(); //2. 使用 DBUtils 类和接口 , 先引入DBUtils 相关的jar , 加入到本Project //3. 创建 QueryRunner QueryRunner queryRunner = new QueryRunner(); //4. 这里组织sql 完成 update, insert delete //String sql = "update actor set name = ? where id = ?"; String sql = "insert into actor values(null, ?, ?, ?, ?)"; // String sql = "delete from actor where id = ?"; //(1) 执行dml 操作是 queryRunner.update() //(2) 返回的值是受影响的行数 (affected: 受影响) int affectedRow = queryRunner.update(connection, sql, "林青霞", "女", "1966-10-10", "116"); // int affectedRow = queryRunner.update(connection, sql, 1000 ); System.out.println(affectedRow > 0 ? "执行成功" : "执行没有影响到表"); // 释放资源 JDBCUtilsByDruid.close(null, null, connection); } }rsh, Object... params) throws SQLException { * PreparedStatement stmt = null;//定义PreparedStatement * ResultSet rs = null;//接收返回的 ResultSet * Object result = null;//返回ArrayList * * try { * stmt = this.prepareStatement(conn, sql);//创建PreparedStatement * this.fillStatement(stmt, params);//对sql 进行 ? 赋值 * rs = this.wrap(stmt.executeQuery());//执行sql,返回resultset * result = rsh.handle(rs);//返回的resultset --> arrayList[result] [使用到反射,对传入class对象处理] * } catch (SQLException var33) { * this.rethrow(var33, sql, params); * } finally { * try { * this.close(rs);//关闭resultset * } finally { * this.close((Statement)stmt);//关闭preparedstatement对象 * } * } * * return result; * } */ - 1
- 2
- 3
- 4
- 5
- 6
- 7
- 8
- 9
- 10
- 11
- 12
- 13
- 14
- 15
- 16
- 17
- 18
- 19
- 20
- 21
- 22
- 23
- 24
- 25
- 26
- 27
- 28
- 29
- 30
- 31
- 32
- 33
- 34
- 35
- 36
- 37
- 38
- 39
- 40
- 41
- 42
- 43
- 44
- 45
- 46
- 47
- 48
- 49
- 50
- 51
- 52
- 53
- 54
- 55
- 56
- 57
- 58
- 59
- 60
- 61
- 62
- 63
- 64
- 65
- 66
- 67
- 68
- 69
- 70
- 71
- 72
- 73
- 74
- 75
- 76
- 77
- 78
- 79
- 80
- 81
- 82
- 83
- 84
- 85
- 86
- 87
- 88
- 89
- 90
- 91
- 92
- 93
- 94
- 95
- 96
- 97
- 98
- 99
- 100
- 101
- 102
- 103
- 104
- 105
- 106
- 107
- 108
- 109
- 110
- 111
- 112
- 113
- 114
- 115
- 116
- 117
- 118
- 119
- 120
- 121
- 122
- 123
- 124
- 125
- 126
- 127
- 128
- 129
- 130
- 131
- 132
- 133
- 134
- 135
- 136
- 137
- 138
- 139
- 140
- 141
- 142
- 143
- 144
- 145
- 146
- 147
- 148
- 149


表和实体类(JavaBean) 的类型映射关系

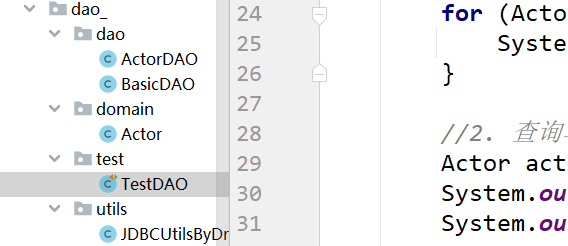
6.9、DAO 和增删改查通用方法-BasicDao(扩展提升部分,有时间就讲)
问题分析


示例代码
Actor
package com.ynny.rj212.dao_.domain; import java.util.Date; /** * @author wbx * @version 1.0 * Actor 对象和 actor表的记录对应 * */ public class Actor { //Javabean, POJO, Domain对象 private Integer id; private String name; private String sex; private Date borndate; private String phone; public Actor() { //一定要给一个无参构造器[反射需要] } public Actor(Integer id, String name, String sex, Date borndate, String phone) { this.id = id; this.name = name; this.sex = sex; this.borndate = borndate; this.phone = phone; } public Integer getId() { return id; } public void setId(Integer id) { this.id = id; } public String getName() { return name; } public void setName(String name) { this.name = name; } public String getSex() { return sex; } public void setSex(String sex) { this.sex = sex; } public Date getBorndate() { return borndate; } public void setBorndate(Date borndate) { this.borndate = borndate; } public String getPhone() { return phone; } public void setPhone(String phone) { this.phone = phone; } @Override public String toString() { return "\nActor{" + "id=" + id + ", name='" + name + '\'' + ", sex='" + sex + '\'' + ", borndate=" + borndate + ", phone='" + phone + '\'' + '}'; } }- 1
- 2
- 3
- 4
- 5
- 6
- 7
- 8
- 9
- 10
- 11
- 12
- 13
- 14
- 15
- 16
- 17
- 18
- 19
- 20
- 21
- 22
- 23
- 24
- 25
- 26
- 27
- 28
- 29
- 30
- 31
- 32
- 33
- 34
- 35
- 36
- 37
- 38
- 39
- 40
- 41
- 42
- 43
- 44
- 45
- 46
- 47
- 48
- 49
- 50
- 51
- 52
- 53
- 54
- 55
- 56
- 57
- 58
- 59
- 60
- 61
- 62
- 63
- 64
- 65
- 66
- 67
- 68
- 69
- 70
- 71
- 72
- 73
- 74
- 75
- 76
- 77
- 78
- 79
- 80
- 81
BasicDAO
package com.ynny.rj212.dao_.dao; import com.ynny.rj212.dao_.utils.JDBCUtilsByDruid; import org.apache.commons.dbutils.QueryRunner; import org.apache.commons.dbutils.handlers.BeanHandler; import org.apache.commons.dbutils.handlers.BeanListHandler; import org.apache.commons.dbutils.handlers.ScalarHandler; import java.sql.Connection; import java.sql.SQLException; import java.util.List; /** * @author wbx * @version 1.0 * 开发BasicDAO , 是其他DAO的父类 */ public class BasicDAO<T> { //泛型指定具体类型 private QueryRunner qr = new QueryRunner(); //开发通用的dml方法, 针对任意的表 public int update(String sql, Object... parameters) { Connection connection = null; try { connection = JDBCUtilsByDruid.getConnection(); int update = qr.update(connection, sql, parameters); return update; } catch (SQLException e) { throw new RuntimeException(e); //将编译异常->运行异常 ,抛出 } finally { JDBCUtilsByDruid.close(null, null, connection); } } //返回多个对象(即查询的结果是多行), 针对任意表 /** * * @param sql sql 语句,可以有 ? * @param clazz 传入一个类的Class对象 比如 Actor.class * @param parameters 传入 ? 的具体的值,可以是多个 * @return 根据Actor.class 返回对应的 ArrayList 集合 */ public List<T> queryMulti(String sql, Class<T> clazz, Object... parameters) { Connection connection = null; try { connection = JDBCUtilsByDruid.getConnection(); return qr.query(connection, sql, new BeanListHandler<T>(clazz), parameters); } catch (SQLException e) { throw new RuntimeException(e); //将编译异常->运行异常 ,抛出 } finally { JDBCUtilsByDruid.close(null, null, connection); } } //查询单行结果 的通用方法 public T querySingle(String sql, Class<T> clazz, Object... parameters) { Connection connection = null; try { connection = JDBCUtilsByDruid.getConnection(); return qr.query(connection, sql, new BeanHandler<T>(clazz), parameters); } catch (SQLException e) { throw new RuntimeException(e); //将编译异常->运行异常 ,抛出 } finally { JDBCUtilsByDruid.close(null, null, connection); } } //查询单行单列的方法,即返回单值的方法 public Object queryScalar(String sql, Object... parameters) { Connection connection = null; try { connection = JDBCUtilsByDruid.getConnection(); return qr.query(connection, sql, new ScalarHandler(), parameters); } catch (SQLException e) { throw new RuntimeException(e); //将编译异常->运行异常 ,抛出 } finally { JDBCUtilsByDruid.close(null, null, connection); } } }- 1
- 2
- 3
- 4
- 5
- 6
- 7
- 8
- 9
- 10
- 11
- 12
- 13
- 14
- 15
- 16
- 17
- 18
- 19
- 20
- 21
- 22
- 23
- 24
- 25
- 26
- 27
- 28
- 29
- 30
- 31
- 32
- 33
- 34
- 35
- 36
- 37
- 38
- 39
- 40
- 41
- 42
- 43
- 44
- 45
- 46
- 47
- 48
- 49
- 50
- 51
- 52
- 53
- 54
- 55
- 56
- 57
- 58
- 59
- 60
- 61
- 62
- 63
- 64
- 65
- 66
- 67
- 68
- 69
- 70
- 71
- 72
- 73
- 74
- 75
- 76
- 77
- 78
- 79
- 80
- 81
- 82
- 83
- 84
- 85
- 86
- 87
- 88
- 89
- 90
- 91
- 92
- 93
- 94
- 95
- 96
- 97
ActorDAO
package com.ynny.rj212.dao_.dao; import com.ynny.rj212.dao_.domain.Actor; /** * @author wbx * @version 1.0 */ public class ActorDAO extends BasicDAO<Actor> { //1. 就有 BasicDAO 的方法 //2. 根据业务需求,可以编写特有的方法. }- 1
- 2
- 3
- 4
- 5
- 6
- 7
- 8
- 9
- 10
- 11
- 12
- 13
- 14
JDBCUtilsByDruid
package com.ynny.rj212.dao_.utils; import com.alibaba.druid.pool.DruidDataSourceFactory; import javax.sql.DataSource; import java.io.FileInputStream; import java.sql.Connection; import java.sql.ResultSet; import java.sql.SQLException; import java.sql.Statement; import java.util.Properties; /** * @author wbx * @version 1.0 * 基于druid数据库连接池的工具类 */ public class JDBCUtilsByDruid { private static DataSource ds; //在静态代码块完成 ds初始化 static { Properties properties = new Properties(); try { properties.load(new FileInputStream("src\\druid.properties")); ds = DruidDataSourceFactory.createDataSource(properties); } catch (Exception e) { e.printStackTrace(); } } //编写getConnection方法 public static Connection getConnection() throws SQLException { return ds.getConnection(); } //关闭连接, 再次强调: 在数据库连接池技术中,close 不是真的断掉连接 //而是把使用的Connection对象放回连接池 public static void close(ResultSet resultSet, Statement statement, Connection connection) { try { if (resultSet != null) { resultSet.close(); } if (statement != null) { statement.close(); } if (connection != null) { connection.close(); } } catch (SQLException e) { throw new RuntimeException(e); } } }- 1
- 2
- 3
- 4
- 5
- 6
- 7
- 8
- 9
- 10
- 11
- 12
- 13
- 14
- 15
- 16
- 17
- 18
- 19
- 20
- 21
- 22
- 23
- 24
- 25
- 26
- 27
- 28
- 29
- 30
- 31
- 32
- 33
- 34
- 35
- 36
- 37
- 38
- 39
- 40
- 41
- 42
- 43
- 44
- 45
- 46
- 47
- 48
- 49
- 50
- 51
- 52
- 53
- 54
- 55
- 56
- 57
- 58
- 59
TestDAO
package com.ynny.rj212.dao_.test; import com.ynny.rj212.dao_.dao.ActorDAO; import com.ynny.rj212.dao_.domain.Actor; import org.junit.jupiter.api.Test; import java.util.List; /** * @author wbx * @version 1.0 */ public class TestDAO { //测试ActorDAO 对actor表crud操作 @Test public void testActorDAO() { ActorDAO actorDAO = new ActorDAO(); //1. 查询 List<Actor> actors = actorDAO.queryMulti("select * from actor where id >= ?", Actor.class, 1); System.out.println("===查询结果==="); for (Actor actor : actors) { System.out.println(actor); } //2. 查询单行记录 Actor actor = actorDAO.querySingle("select * from actor where id = ?", Actor.class, 2); System.out.println("====查询单行结果===="); System.out.println(actor); //3. 查询单行单列 Object o = actorDAO.queryScalar("select name from actor where id = ?", 2); System.out.println("====查询单行单列值==="); System.out.println(o); //4. dml操作 insert ,update, delete int update = actorDAO.update("insert into actor values(null, ?, ?, ?, ?)", "张无忌", "男", "2000-11-11", "999"); System.out.println(update > 0 ? "执行成功" : "执行没有影响表"); } }- 1
- 2
- 3
- 4
- 5
- 6
- 7
- 8
- 9
- 10
- 11
- 12
- 13
- 14
- 15
- 16
- 17
- 18
- 19
- 20
- 21
- 22
- 23
- 24
- 25
- 26
- 27
- 28
- 29
- 30
- 31
- 32
- 33
- 34
- 35
- 36
- 37
- 38
- 39
- 40
- 41
- 42
- 43
- 44
- 45
- 46
- 47
- 48

public static Connection getConnection() throws SQLException { return ds.getConnection(); } //关闭连接, 再次强调: 在数据库连接池技术中,close 不是真的断掉连接 //而是把使用的Connection对象放回连接池 public static void close(ResultSet resultSet, Statement statement, Connection connection) { try { if (resultSet != null) { resultSet.close(); } if (statement != null) { statement.close(); } if (connection != null) { connection.close(); } } catch (SQLException e) { throw new RuntimeException(e); } }- 1
- 2
- 3
- 4
- 5
- 6
- 7
- 8
- 9
- 10
- 11
- 12
- 13
- 14
- 15
- 16
- 17
- 18
- 19
- 20
- 21
- 22
}
TestDAO ~~~java package com.ynny.rj212.dao_.test; import com.ynny.rj212.dao_.dao.ActorDAO; import com.ynny.rj212.dao_.domain.Actor; import org.junit.jupiter.api.Test; import java.util.List; /** * @author wbx * @version 1.0 */ public class TestDAO { //测试ActorDAO 对actor表crud操作 @Test public void testActorDAO() { ActorDAO actorDAO = new ActorDAO(); //1. 查询 Listactors = actorDAO.queryMulti("select * from actor where id >= ?", Actor.class, 1); System.out.println("===查询结果==="); for (Actor actor : actors) { System.out.println(actor); } //2. 查询单行记录 Actor actor = actorDAO.querySingle("select * from actor where id = ?", Actor.class, 2); System.out.println("====查询单行结果===="); System.out.println(actor); //3. 查询单行单列 Object o = actorDAO.queryScalar("select name from actor where id = ?", 2); System.out.println("====查询单行单列值==="); System.out.println(o); //4. dml操作 insert ,update, delete int update = actorDAO.update("insert into actor values(null, ?, ?, ?, ?)", "张无忌", "男", "2000-11-11", "999"); System.out.println(update > 0 ? "执行成功" : "执行没有影响表"); } } - 1
- 2
- 3
- 4
- 5
- 6
- 7
- 8
- 9
- 10
- 11
- 12
- 13
- 14
- 15
- 16
- 17
- 18
- 19
- 20
- 21
- 22
- 23
- 24
- 25
- 26
- 27
- 28
- 29
- 30
- 31
- 32
- 33
- 34
- 35
- 36
- 37
- 38
- 39
- 40
- 41
- 42
- 43
- 44
- 45
- 46
- 47
- 48
- 49
- 50
- 51
- 52
[外链图片转存中…(img-y2odIGRm-1668777631544)]
-
相关阅读:
参加Oracle OCP和MySQL OCP考试的学员怎样在VUE预约考试
大数据应用开发流程
Java core——深入理解接口和抽象类
java计算机毕业设计酒店预订管理系统源码+mysql数据库+系统+lw文档+部署
学习和巩固mysql的经典练习题目
【ESD专题】案例:都是集成TVS管,为什么第一眼就发现不能导入?
【MySQL知识点】自动增长
从Docker容器内部访问宿主的IP地址
了解华为交换机路由器的基本命令
【kafka】mac环境安装kafka
- 原文地址:https://blog.csdn.net/pillow233/article/details/127929917
