-
云原生系统学习[Kubernetes]——02 Pod、Deployment、Service
云原生系统学习[Kubernetes]——02 Pod、Deployment、Service
[外链图片转存失败,源站可能有防盗链机制,建议将图片保存下来直接上传(img-t9RomXCf-1668486830453)(./assets/image-20221103113345300.png)]
参考资料
学多少,写多少,仅作自我学习笔记
一、YAML文件
1.1 简介
YAML 是一种数据序列化语言,通常用于编写配置文件。业界对 YAML 有不同的看法,有人会说 YAML 不过代表了另一种标记语言,另外一些人认为"YAML ain’t markup language"(“YAML 不是标记语言”),“YAML” 正是这句话的递归缩写,强调了 YAML 是用于数据而不是文档。
YAML 是一种流行的编程语言,因为它是人类可读的语言,易于理解。它还可以与其他编程语言结合使用。
1.2 基础知识
基本语法规则如下:
- 大小写敏感
- 使用缩进表示层级关系
- 缩进时不允许使用Tab键,只允许使用空格。
- 缩进的空格数目不重要,只要相同层级的元素左侧对齐即可
#表示注释,从这个字符一直到行尾,都会被解析器忽略。
在k8s中,了解Lists和Maps两种结构类型即可。
Maps
Map 是字典,就是一个
key:value的键值对,如下例:--- apiVersion: v1 kind: Pod- 1
- 2
- 3
第一行的
---是分隔符,是可选的,在单一文件中,可用连续三个连字号---区分多个文件。这里我们可以看到,我们有两个键:kind和apiVersion,他们对应的值分别是:v1 和Pod。用JSON格式表示如下:{ "apiVersion": "v1", "kind": "pod" }- 1
- 2
- 3
- 4
创建一个相对复杂一点的 YAML 文件,创建一个 KEY 对应的值不是字符串而是一个 Maps:
--- apiVersion: v1 kind: Pod metadata: name: yjq-site labels: app: web- 1
- 2
- 3
- 4
- 5
- 6
- 7
YAML 处理器是根据行缩进来知道内容之间的关联性的。缩进空格的数量并不重要,但是得保持一致,并且至少要求一个空格。
🔥 :在YAML文件中千万不用使用tab键
上述YAML文件同样可以转换为JSON格式:
{ "apiVersion": "v1", "kind": "Pod", "metadata": { "name": "yjq-site", "labels": { "app": "web" } } }- 1
- 2
- 3
- 4
- 5
- 6
- 7
- 8
- 9
- 10
Lists
Lists 就是列表,在 YAML 文件中定义如下:
args - Cat - Dog - Fish- 1
- 2
- 3
- 4
每个项的定义以破折号(-)开头的,与父元素直接可以缩进一个空格。对应的 JSON 格式如下:
{ "args": ["Cat", "Dog", "Fish"] }- 1
- 2
- 3
list 的子项也可以是 Maps,Maps 的子项也可以是list,如下所示:
--- apiVersion: v1 kind: Pod metadata: name: yjq-site labels: app: web spec: containers: - name: front-end image: nginx ports: - containerPort: 80 - name: flaskapp-demo image: jcdemo/flaskapp ports: - containerPort: 5000- 1
- 2
- 3
- 4
- 5
- 6
- 7
- 8
- 9
- 10
- 11
- 12
- 13
- 14
- 15
- 16
- 17
在这个 YAML 文件,我们定义了一个叫 containers 的 List 对象,每个子项都由 name、image、ports 组成,每个 ports 都有一个 key 为 containerPort 的 Map 组成,同样的,我们可以转成如下 JSON 格式文件:
{ "apiVersion": "v1", "kind": "Pod", "metadata": { "name": "kube100-site", "labels": { "app": "web" } }, "spec": { "containers": [{ "name": "front-end", "image": "nginx", "ports": [{ "containerPort": 80 }] }, { "name": "flaskapp-demo", "image": "jcdemo/flaskapp", "ports": [{ "containerPort": 5000 }] }] } }- 1
- 2
- 3
- 4
- 5
- 6
- 7
- 8
- 9
- 10
- 11
- 12
- 13
- 14
- 15
- 16
- 17
- 18
- 19
- 20
- 21
- 22
- 23
- 24
- 25
YAML显然更为简洁。
二、Pod
Pod 是可以在 Kubernetes 中创建和管理的、最小的可部署的计算单元。
Pod(就像在鲸鱼荚或者豌豆荚中)是一组(一个或多个) 容器; 这些容器共享存储、网络、以及怎样运行这些容器的声明。 Pod 中的内容总是并置(colocated)的并且一同调度,在共享的上下文中运行。 Pod 所建模的是特定于应用的 “逻辑主机”,其中包含一个或多个应用容器, 这些容器相对紧密地耦合在一起。 在非云环境中,在相同的物理机或虚拟机上运行的应用类似于在同一逻辑主机上运行的云应用。
除了应用容器,Pod 还可以包含在 Pod 启动期间运行的 Init 容器。 你也可以在集群支持临时性容器的情况下, 为调试的目的注入临时性容器。
2.1 什么是Pod
Pod 共享的上下文包括一组 Linux 命名空间、控制组(cgroup)和可能一些其他的隔离面, 即用来隔离容器的技术。 在 Pod 的上下文中,单个应用程序可能会有更多的子隔离应用。
一个Pod类似于一组具有共享命名空间(namespace)和共享文件系统卷(volume)的容器。
2.2 使用案例
创建一个镜像
新建一个
main.go文件,作为测试:package main import ( "github.com/gin-gonic/gin" "net/http" ) func main() { router := gin.Default() router.GET("/ping", func(c *gin.Context) { c.String(http.StatusOK, "[v1]hello k8s") }) router.Run(":8080") }- 1
- 2
- 3
- 4
- 5
- 6
- 7
- 8
- 9
- 10
- 11
- 12
编写Dockerfile(关于Docker的学习可参考我的前两篇文章:Docker学习1——Docker入门,Docker学习2——Docker高级)
# 基础镜像,基于golang的alpine镜像构建--编译阶段 FROM golang:alpine AS builder # 全局工作目录 WORKDIR /go/server # 把运行Dockerfile文件的当前目录所有文件复制到目标目录 COPY . /go/server # 环境变量 # 用于代理下载go项目依赖的包 ENV GOPROXY https://goproxy.cn,direct # 编译,关闭CGO,防止编译后的文件有动态链接,而alpine镜像里有些c库没有,直接没有文件的错误 RUN GOOS=linux GOARCH=amd64 CGO_ENABLED=0 go build main.go # 使用alpine这个轻量级镜像为基础镜像--运行阶段 FROM alpine AS runner # 全局工作目录 WORKDIR /go/server # 复制编译阶段编译出来的运行文件到目标目录 COPY --from=builder /go/server/main . # 需暴露的端口 EXPOSE 8888 # docker run命令触发的真实命令(相当于直接运行编译后的可运行文件) ENTRYPOINT ["./main"]- 1
- 2
- 3
- 4
- 5
- 6
- 7
- 8
- 9
- 10
- 11
- 12
- 13
- 14
- 15
- 16
- 17
- 18
- 19
- 20
- 21
- 22
- 23
需要注意将命令中
yijunquan替换成自己的DockerHub注册的账号名称。$ docker build -t yijunquan/hello_k8s:v1.0.0 . Sending build context to Docker daemon 3.584kB $ docker images REPOSITORY TAG IMAGE ID CREATED SIZE yijunquan/hello_k8s v1.0.0 c3cc1c96228f 13 seconds ago 12MB- 1
- 2
- 3
- 4
- 5
docker build命令完成后我们可以通过docker images命令查看镜像是否 build 成功,最后我们执行docker run命令将容器启动,-p指定8888作为端口,-d指定刚打包成功的镜像名称。$ docker run -p 8888:8888 --name hello_k8s -d yijunquan/hello_k8s:v1.0.0 f7c86030629a94c30581774b90328b7bde329928bf79c8ece5aef9ef62b9bef5 $ curl http://localhost:8888 [v1]Hello k8s! 2022-11-08 06:43:01.441742036 +0000 UTC m=+3.421179660⏎- 1
- 2
- 3
- 4
用
docker push将镜像上传到远程的DockerHub仓库当中$ docker push yijunquan/hello_k8s:v1.0.0 The push refers to repository [docker.io/yijunquan/hello_k8s] 6b39fb25ec8e: Pushed 12ae0aa08096: Pushed 994393dc58e7: Mounted from library/alpine v1.0.0: digest: sha256:236c2fa46575c542dc692311f305155478c32e642f3235a109da72c037339a19 size: 946- 1
- 2
- 3
- 4
- 5
- 6

创建Pod
创建
nginx.yaml文件,编写一个可以创建nginx的Pod# nginx.yaml apiVersion: v1 # 版本号 kind: Pod # 创建的资源类型:Deployment、Job、Ingress、Service 等 metadata: # 包含了我们定义的 Pod 的一些 meta 信息,比如名称、namespace、标签等等信息。 name: nginx-pod #Pod的名字,唯一 spec: # spec:包括一些 containers,storage,volumes,或者其他 Kubernetes 需要知道的参数,以及诸如是否在容器失败时重新启动容器的属性。 containers: - name: nginx-container #容器名称 image: nginx #镜像名称,默认来源为DockerHub- 1
- 2
- 3
- 4
- 5
- 6
- 7
- 8
- 9
运行
kubectl apply -f nginx.yaml命令来创建nginxPod。通过
kubectl port-forward nginx-pod 8888:80命令将nginx默认的80端口映射到本机的8888端口,8curl来访问http://127.0.0.1:8888, 查看是否成功访问 。╭─yjq@yi-junquan /home/yjq/mynote/cloud-learning/k8s-learning/code/firstdemo ‹system› <master*> ╰─$ kubectl apply -f nginx.yaml pod/nginx-pod created ╭─yjq@yi-junquan /home/yjq/mynote/cloud-learning/k8s-learning/code/firstdemo ‹system› <master*> ╰─$ kubectl get pods NAME READY STATUS RESTARTS AGE nginx-pod 1/1 Running 0 8s ╭─yjq@yi-junquan /home/yjq/mynote/cloud-learning/k8s-learning/code/firstdemo ‹system› <master*> ╰─$ kubectl port-forward nginx-pod 8888:80 Forwarding from 127.0.0.1:8888 -> 80 Forwarding from [::1]:8888 -> 80 ╭─yjq@yi-junquan /home/yjq/mynote/cloud-learning/k8s-learning/code/firstdemo ‹system› <master*> ╰─$ curl http://localhost:8888 <!DOCTYPE html> <html> <head> <title>Welcome to nginx!</title>- 1
- 2
- 3
- 4
- 5
- 6
- 7
- 8
- 9
- 10
- 11
- 12
- 13
- 14
- 15
- 16
- 17
2.3 Pod vs Container
刚刚创建出来的资源如下图所示,最内层服务
nginx,运行在container容器当中,container(容器) 的本质是进程,而pod是管理这一组进程的资源。
pod可以管理多个container,在某些场景例如服务之间需要文件交换(日志收集),本地网络通信需求(使用 localhost 或者 Socket 文件进行本地通信),在这些场景中使用pod管理多个container就非常的推荐。而这,也是 k8s 如何处理服务之间复杂关系的第一个例子,如下图所示
2.4 Pod命令
我们可以通过
logs或者logs -f命令查看 pod 日志,可以通过exec -it进入 pod 或者调用容器命令,通过delete pod或者delete -f nginx.yaml的方式删除 pod 资源。这里可以看到 kubectl 所有命令。kubectl logs --follow nginx-pod kubectl exec nginx-pod -- ls kubectl delete pod nginx-pod # pod "nginx-pod" deleted kubectl delete -f nginx.yaml # pod "nginx-pod" deleted- 1
- 2
- 3
- 4
- 5
- 6
- 7
- 8
- 9
三、Deployment
Deployment是k8s的另一个资源,可以帮助管理Pod,实现自动扩容与自动升级版本。
3.1 扩容
可以创建一个
deployment.yaml的文件。来管理hello_k8spod。apiVersion: apps/v1 kind: Deployment # 资源类型 metadata: name: hellok8s-deployment # 名字需要唯一 spec: replicas: 1 # 部署的Pod副本数量 selector: # 表示deployment资源与pod资源的关联方式 matchLabels: # 表示会管理所有label=hellok8s的Pod app: hellok8s template: # 定义Pod资源 metadata: labels: app: hellok8s # 与上面的label对应起来 # 不用name是因为 deployment 会自动为我们创建 pod 的唯一name。 spec: containers: - image: yijunquan/hello_k8s:v1.0.0 name: hellok8s-container- 1
- 2
- 3
- 4
- 5
- 6
- 7
- 8
- 9
- 10
- 11
- 12
- 13
- 14
- 15
- 16
- 17
- 18
接下来输入下面的命令,可以创建
deployment资源。通过get和delete pod命令,我们会初步感受 deployment 的魅力。每次创建的 pod 名称都会变化。╭─yjq@yi-junquan /home/yjq/mynote/cloud-learning/k8s-learning/code/deploymentdemo ‹system› <master*> ╰─$ kubectl apply -f deployment.yaml deployment.apps/hellok8s-deployment created ╭─yjq@yi-junquan /home/yjq/mynote/cloud-learning/k8s-learning/code/deploymentdemo ‹system› <master*> ╰─$ kubectl get pods NAME READY STATUS RESTARTS AGE hellok8s-deployment-6b6c464957-z48bj 1/1 Running 0 14s nginx-pod 1/1 Running 0 6h40m ╭─yjq@yi-junquan /home/yjq/mynote/cloud-learning/k8s-learning/code/deploymentdemo ‹system› <master*> ╰─$ kubectl delete pod hellok8s-deployment-6b6c464957-z48bj pod "hellok8s-deployment-6b6c464957-z48bj" deleted ╭─yjq@yi-junquan /home/yjq/mynote/cloud-learning/k8s-learning/code/deploymentdemo ‹system› <master*> ╰─$ kubectl get pods NAME READY STATUS RESTARTS AGE hellok8s-deployment-6b6c464957-j6279 1/1 Running 0 6s nginx-pod 1/1 Running 0 6h41m- 1
- 2
- 3
- 4
- 5
- 6
- 7
- 8
- 9
- 10
- 11
- 12
- 13
- 14
- 15
- 16
手动删除一个
pod资源后,deployment 会自动创建一个新的pod,这和我们之前手动创建 pod 资源有本质的区别!这代表着当生产环境管理着成千上万个 pod 时,我们不需要关心具体的情况,只需要维护好这份deployment.yaml文件的资源定义即可。当我们想要将
hellok8s:v1的资源扩容到 3 个副本时,只需要将replicas的值设置成 3,接着重新输入kubectl apply -f deployment.yaml即可。如下所示:╭─yjq@yi-junquan /home/yjq/mynote/cloud-learning/k8s-learning/code/deploymentdemo ‹system› <master*> ╰─$ kubectl apply -f deployment.yaml deployment.apps/hellok8s-deployment configured ╭─yjq@yi-junquan /home/yjq/mynote/cloud-learning/k8s-learning/code/deploymentdemo ‹system› <master*> ╰─$ kubectl get pods NAME READY STATUS RESTARTS AGE hellok8s-deployment-6b6c464957-9wlpf 1/1 Running 0 11s hellok8s-deployment-6b6c464957-9x8dx 1/1 Running 0 11s hellok8s-deployment-6b6c464957-j6279 1/1 Running 0 2m12s nginx-pod 1/1 Running 0 6h43m- 1
- 2
- 3
- 4
- 5
- 6
- 7
- 8
- 9
- 10
可以在
kubectl apply之前通过新建窗口执行kubectl get pods --watch命令来观察 pod 启动和删除的记录,想要减少副本数时也很简单,你可以尝试将副本数随意增大或者缩小,再通过watch来观察它的状态。
3.2 升级版本
将所有
v1版本的pod升级到v2版本。首先我们需要构建一份hellok8s:v2的版本镜像。唯一的区别就是字符串替换成了[v2]Hello k8s。package main import ( "fmt" "net/http" "time" ) func greet(w http.ResponseWriter, r *http.Request) { fmt.Fprintf(w, "[v2]Hello k8s! %s", time.Now()) } func main() { http.HandleFunc("/", greet) http.ListenAndServe(":8888", nil) }- 1
- 2
- 3
- 4
- 5
- 6
- 7
- 8
- 9
- 10
- 11
- 12
- 13
- 14
- 15
- 16
- 17
将
hello_k8s:v2推到 DockerHub 仓库中。$ docker build -t yijunquan/hello_k8s:v2.0.0 . $ docker push yijunquan/hello_k8s:v2.0.0- 1
- 2
接着编写
v2版本的 deployment 资源文件。apiVersion: apps/v1 kind: Deployment metadata: name: hellok8s-deployment spec: replicas: 3 selector: matchLabels: app: hellok8s template: metadata: labels: app: hellok8s spec: containers: - image: yijunquan/hello_k8s:v2.0.0 name: hellok8s-container- 1
- 2
- 3
- 4
- 5
- 6
- 7
- 8
- 9
- 10
- 11
- 12
- 13
- 14
- 15
- 16
- 17
$ kubectl apply -f deployment.yaml deployment.apps/hellok8s-deployment configured $ kubectl get pods NAME READY STATUS RESTARTS AGE hellok8s-deployment-6f4bf76c4d-8pnjp 1/1 Running 0 2s hellok8s-deployment-6f4bf76c4d-c9vcs 1/1 Running 0 34s hellok8s-deployment-6f4bf76c4d-njzhr 1/1 Running 0 2s $ curl http://localhost:8888 [v1]Hello k8s! 2022-11-08 07:06:39.95882862 +0000 UTC m=+1421.938266243⏎- 1
- 2
- 3
- 4
- 5
- 6
- 7
- 8
- 9
3.3 滚动更新
滚动更新 (rolling update),在保证新版本
v2的 pod 还没有ready之前,先不删除v1版本的 pod。在 deployment 的资源定义中,
spec.strategy.type有两种选择:- RollingUpdate: 逐渐增加新版本的 pod,逐渐减少旧版本的 pod。
- Recreate: 在新版本的 pod 增加前,先将所有旧版本 pod 删除。
大多数情况下我们会采用滚动更新 (RollingUpdate) 的方式,滚动更新又可以通过
maxSurge和maxUnavailable字段来控制升级 pod 的速率,具体可以详细看官网定义。:- maxSurge: 最大峰值,用来指定可以创建的超出期望 Pod 个数的 Pod 数量。
- maxUnavailable: 最大不可用,用来指定更新过程中不可用的 Pod 的个数上限。
先输入命令回滚 deployment,输入
kubectl describe pod会发现 deployment 已经把v2版本的 pod 回滚到v1的版本。$ kubectl rollout undo deployment hellok8s-deployment deployment.apps/hellok8s-deployment rolled back $ kubectl get pods NAME READY STATUS RESTARTS AGE hellok8s-deployment-669fbd47b5-4fxqr 1/1 Running 0 2s hellok8s-deployment-669fbd47b5-jcb9f 1/1 Running 0 3s hellok8s-deployment-669fbd47b5-vvxpx 1/1 Running 0 4s hellok8s-deployment-6f4bf76c4d-njzhr 1/1 Terminating 0 3m50s $ kubectl describe pod hellok8s-deployment-669fbd47b5-4fxqr Image: yijunquan/hello_k8s:v1.0.0- 1
- 2
- 3
- 4
- 5
- 6
- 7
- 8
- 9
- 10
除了上面的命令,还可以用
history来查看历史版本,--to-revision=2来回滚到指定版本。kubectl rollout history deployment hellok8s-deployment kubectl rollout undo deployment/hellok8s-deployment --to-revision=2- 1
- 2
接着设置
strategy=rollingUpdate,maxSurge=1,maxUnavailable=1和replicas=3到 deployment.yaml 文件中。这个参数配置意味着最大可能会创建 4 个 hellok8s pod (replicas + maxSurge),最小会有 2 个 hellok8s pod 存活 (replicas - maxUnavailable)。apiVersion: apps/v1 kind: Deployment metadata: name: hellok8s-deployment spec: strategy: rollingUpdate: maxSurge: 1 maxUnavailable: 1 replicas: 3 selector: matchLabels: app: hellok8s template: metadata: labels: app: hellok8s spec: containers: - image: yijunquan/hello_k8s:v2.0.0 name: hellok8s-container- 1
- 2
- 3
- 4
- 5
- 6
- 7
- 8
- 9
- 10
- 11
- 12
- 13
- 14
- 15
- 16
- 17
- 18
- 19
- 20
- 21
使用
kubectl apply -f deployment.yaml来重新创建v2的资源,可以通过kubectl get pods --watch来观察 pod 的创建销毁情况,是否如下图所示。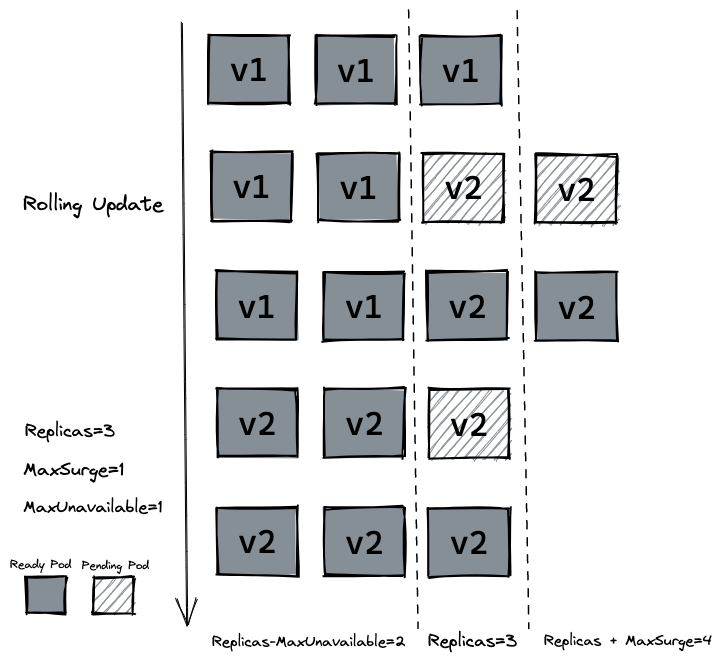
3.4 存活探针 (livenessProb)
在生产中,有时候因为某些 bug 导致应用死锁或者线程耗尽了,最终会导致应用无法继续提供服务,这个时候如果没有手段来自动监控和处理这一问题的话,可能会导致很长一段时间无人发现。kubelet 使用存活探测器 (livenessProb) 来确定什么时候要重启容器。
接下来我们写一个
/healthz接口来说明livenessProb如何使用。/healthz接口会在启动成功的 15s 内正常返回 200 状态码,在 15s 后,会一直返回 500 的状态码。package main import ( "fmt" "net/http" "time" ) func greet(w http.ResponseWriter, r *http.Request) { fmt.Fprintf(w, "[v2]Hello k8s! %s", time.Now()) } func main() { started := time.Now() http.HandleFunc("/healthz", func(w http.ResponseWriter, r *http.Request) { duration := time.Since(started) if duration.Seconds() > 15 { w.WriteHeader(500) w.Write([]byte(fmt.Sprintf("error: %v", duration.Seconds()))) } else { w.WriteHeader(200) w.Write([]byte("ok")) } }) http.HandleFunc("/", greet) http.ListenAndServe(":8888", nil) }- 1
- 2
- 3
- 4
- 5
- 6
- 7
- 8
- 9
- 10
- 11
- 12
- 13
- 14
- 15
- 16
- 17
- 18
- 19
- 20
- 21
- 22
- 23
- 24
- 25
- 26
- 27
- 28
Dockerfile文件保持不变,修改tag为liveness,然后推送到远程仓库。
docker build -t yijunquan/hello_k8s:liveness . docker push yijunquan/hello_k8s:liveness- 1
- 2
编写 deployment 的定义,这里使用存活探测方式是使用 HTTP GET 请求,请求的是刚才定义的
/healthz接口,periodSeconds字段指定了 kubelet 每隔 3 秒执行一次存活探测。initialDelaySeconds字段告诉 kubelet 在执行第一次探测前应该等待 3 秒。如果服务器上/healthz路径下的处理程序返回成功代码,则 kubelet 认为容器是健康存活的。 如果处理程序返回失败代码,则 kubelet 会杀死这个容器并将其重启。apiVersion: apps/v1 kind: Deployment metadata: name: hellok8s-deployment spec: strategy: rollingUpdate: maxSurge: 1 maxUnavailable: 1 replicas: 3 selector: matchLabels: app: hellok8s template: metadata: labels: app: hellok8s spec: containers: - image: yijunquan/hello_k8s:liveness name: hellok8s-container livenessProbe: httpGet: path: /healthz # 路径 port: 8888 initialDelaySeconds: 3 #第一次探测前等待3秒 periodSeconds: 3 # 每3秒探测一次- 1
- 2
- 3
- 4
- 5
- 6
- 7
- 8
- 9
- 10
- 11
- 12
- 13
- 14
- 15
- 16
- 17
- 18
- 19
- 20
- 21
- 22
- 23
- 24
- 25
- 26
- 27
- 28
通过
get或者describe命令可以发现 pod 一直处于重启当中。$ kubectl apply -f deployment.yaml $ kubectl get pods NAME READY STATUS RESTARTS AGE hellok8s-deployment-76c5459db4-5spbr 1/1 Running 1 (22s ago) 59s hellok8s-deployment-76c5459db4-8t26r 1/1 Running 1 (19s ago) 59s hellok8s-deployment-76c5459db4-cj5g4 1/1 Running 2 (1s ago) 59s $ kubectl describe pod hellok8s-deployment-76c5459db4-5spbr Events: Type Reason Age From Message ---- ------ ---- ---- ------- Normal Scheduled 2m21s default-scheduler Successfully assigned default/hellok8s-deployment-76c5459db4-5spbr to minikube Normal Pulling 2m21s kubelet Pulling image "yijunquan/hello_k8s:liveness" Normal Pulled 2m8s kubelet Successfully pulled image "yijunquan/hello_k8s:liveness" in 12.955888948s Normal Created 57s (x4 over 2m8s) kubelet Created container hellok8s-container Normal Started 57s (x4 over 2m7s) kubelet Started container hellok8s-container Warning Unhealthy 57s (x9 over 111s) kubelet Liveness probe failed: HTTP probe failed with statuscode: 500 Normal Killing 57s (x3 over 105s) kubelet Container hellok8s-container failed liveness probe, will be restarted Normal Pulled 57s (x3 over 105s) kubelet Container image "yijunquan/hello_k8s:liveness- 1
- 2
- 3
- 4
- 5
- 6
- 7
- 8
- 9
- 10
- 11
- 12
- 13
- 14
- 15
- 16
- 17
- 18
3.5 就绪探针(readiness)
在生产环境中,升级服务的版本是日常的需求,这时我们需要考虑一种场景,即当发布的版本存在问题,就不应该让它升级成功。kubelet 使用就绪探测器可以知道容器何时准备好接受请求流量,当一个 pod 升级后不能就绪,即不应该让流量进入该 pod,在配合
rollingUpate的功能下,也不能允许升级版本继续下去,否则服务会出现全部升级完成,导致所有服务均不可用的情况。这里我们将应用的
/healthz接口直接设置成返回 500 状态码,代表该版本是一个有问题的版本。package main import ( "fmt" "net/http" "time" ) func greet(w http.ResponseWriter, r *http.Request) { fmt.Fprintf(w, "[v2]Hello k8s! %s", time.Now()) } func main() { http.HandleFunc("/healthz", func(w http.ResponseWriter, r *http.Request) { w.WriteHeader(500) }) http.HandleFunc("/", greet) http.ListenAndServe(":8888", nil) }- 1
- 2
- 3
- 4
- 5
- 6
- 7
- 8
- 9
- 10
- 11
- 12
- 13
- 14
- 15
- 16
- 17
- 18
- 19
在
build阶段我们将tag设置为bad,打包后 push 到远程仓库。$ docker build -t yijunquan/hello_k8s:bad . $ docker push yijunquan/hello_k8s:bad- 1
- 2
编写 deployment 资源文件,Probe 有很多配置字段,可以使用这些字段精确地控制就绪检测的行为:
initialDelaySeconds:容器启动后要等待多少秒后才启动存活和就绪探测器, 默认是 0 秒,最小值是 0。periodSeconds:执行探测的时间间隔(单位是秒)。默认是 10 秒。最小值是 1。timeoutSeconds:探测的超时后等待多少秒。默认值是 1 秒。最小值是 1。successThreshold:探测器在失败后,被视为成功的最小连续成功数。默认值是 1。 存活和启动探测的这个值必须是 1。最小值是 1。failureThreshold:当探测失败时,Kubernetes 的重试次数。 对存活探测而言,放弃就意味着重新启动容器。 对就绪探测而言,放弃意味着 Pod 会被打上未就绪的标签。默认值是 3。最小值是 1。
apiVersion: apps/v1 kind: Deployment metadata: name: hellok8s-deployment spec: strategy: rollingUpdate: maxSurge: 1 maxUnavailable: 1 replicas: 3 selector: matchLabels: app: hellok8s template: metadata: labels: app: hellok8s spec: containers: - image: yijunquan/hello_k8s:bad name: hellok8s-container readinessProbe: httpGet: path: /healthz # 路径 port: 8888 # 容器启动后要等待多少秒后才启动存活和就绪探测器, 默认是 0 秒,最小值是 0 initialDelaySeconds: 1 # 探测器在失败后,被视为成功的最小连续成功数。默认值是 1。 存活和启动探测的这个值必须是 1。最小值是 1。 successThreshold: 5- 1
- 2
- 3
- 4
- 5
- 6
- 7
- 8
- 9
- 10
- 11
- 12
- 13
- 14
- 15
- 16
- 17
- 18
- 19
- 20
- 21
- 22
- 23
- 24
- 25
- 26
- 27
- 28
- 29
$ kubectl apply -f deployment.yaml $ kubectl get pods NAME READY STATUS RESTARTS AGE hellok8s-deployment-76c5459db4-92z9h 1/1 Running 6 (108s ago) 4m54s hellok8s-deployment-76c5459db4-j9zqt 1/1 Running 6 (99s ago) 4m52s hellok8s-deployment-7bb6745ff6-j74vw 0/1 Running 0 2m22s hellok8s-deployment-7bb6745ff6-l786h 0/1 Running 0 2m22s $ kubectl describe pod hellok8s-deployment-76c5459db4-92z9h Events: Type Reason Age From Message ---- ------ ---- ---- ------- Normal Scheduled 5m48s default-scheduler Successfully assigned default/hellok8s-deployment-76c5459db4-92z9h to minikube Normal Pulled 4m36s (x4 over 5m47s) kubelet Container image "yijunquan/hello_k8s:liveness" already present on machine Normal Created 4m36s (x4 over 5m47s) kubelet Created container hellok8s-container Normal Started 4m36s (x4 over 5m47s) kubelet Started container hellok8s-container Normal Killing 4m36s (x3 over 5m24s) kubelet Container hellok8s-container failed liveness probe, will be restarted Warning Unhealthy 4m18s (x10 over 5m30s) kubelet Liveness probe failed: HTTP probe failed with statuscode: 500 Warning BackOff 40s (x15 over 3m48s) kubelet Back-off restarting failed container- 1
- 2
- 3
- 4
- 5
- 6
- 7
- 8
- 9
- 10
- 11
- 12
- 13
- 14
- 15
- 16
- 17
- 18
通过
get命令可以发现两个 pod 一直处于还没有 Ready 的状态当中,通过describe命令可以看到是因为Readiness probe failed: HTTP probe failed with statuscode: 500的原因。又因为设置了最小不可用的服务数量为maxUnavailable=1,这样能保证剩下两个v2版本的hellok8s能继续提供服务。四、Service
kubernetes提供了一种名叫Service的资源帮助解决这些问题,它为 pod 提供一个稳定的 Endpoint。Servie 位于 pod 的前面,负责接收请求并将它们传递给它后面的所有pod。一旦服务中的 Pod 集合发生更改,Endpoints 就会被更新,请求的重定向自然也会导向最新的 pod。4.1 ClusterIP
Service默认使用ClusterIP类型,先将之前的hello_k8s:v2加上返回当前服务所在的hostname功能,升级到v3版本。package main import ( "fmt" "io" "net/http" "os" ) func hello(w http.ResponseWriter, r *http.Request) { host, _ := os.Hostname() io.WriteString(w, fmt.Sprintf("[v3] Hello, Kubernetes!, From host: %s", host)) } func main() { http.HandleFunc("/", hello) http.ListenAndServe(":3000", nil) }- 1
- 2
- 3
- 4
- 5
- 6
- 7
- 8
- 9
- 10
- 11
- 12
- 13
- 14
- 15
- 16
- 17
- 18
$ docker build -t yijunquan/hello_k8s:v3.0.0 . $ docker push yijunquan/hello_k8s:v3.0.0- 1
- 2
修改 deployment 的
hellok8s为v3版本。执行kubectl apply -f deployment.yaml更新 deployment。apiVersion: apps/v1 kind: Deployment metadata: name: hellok8s-deployment spec: replicas: 3 selector: matchLabels: app: hellok8s template: metadata: labels: app: hellok8s spec: containers: - image: yijunquan/hello_k8s:v3.0.0 name: hellok8s-container- 1
- 2
- 3
- 4
- 5
- 6
- 7
- 8
- 9
- 10
- 11
- 12
- 13
- 14
- 15
- 16
- 17
接下来是
Service资源的定义,我们使用ClusterIP的方式定义 Service,通过kubernetes集群的内部 IP 暴露服务,当我们只需要让集群中运行的其他应用程序访问我们的 pod 时,就可以使用这种类型的Service。首先创建一个service-hellok8s-clusterip.yaml文件。apiVersion: v1 kind: Service metadata: name: service-hellok8s-clusterip spec: type: ClusterIP selector: app: hellok8s ports: - port: 3000 targetPort: 3000- 1
- 2
- 3
- 4
- 5
- 6
- 7
- 8
- 9
- 10
- 11
首先通过
kubectl get endpoints来看看 Endpoint。被 selector 选中的 Pod,就称为 Service 的 Endpoints。它维护着 Pod 的 IP 地址,只要服务中的 Pod 集合发生更改,Endpoints 就会被更新。通过kubectl get pod -o wide命令获取 Pod 更多的信息,可以看到 3 个 Pod 的 IP 地址和 Endpoints 中是保持一致的,你可以试试增大或减少 Deployment 中 Pod 的 replicas,观察 Endpoints 会不会发生变化。$ kubectl apply -f deployment.yaml deployment.apps/hellok8s-deployment configured $ kubectl apply -f service-hellok8s-clusterip.yaml service/service-hellok8s-clusterip created $ kubectl get endpoints NAME ENDPOINTS AGE kubernetes 192.168.58.2:8443 10d service-hellok8s-clusterip 172.17.0.5:3000,172.17.0.6:3000,172.17.0.8:3000 12s $ kubectl get pod -o wide NAME READY STATUS RESTARTS AGE IP NODE NOMINATED NODE READINESS GATES hellok8s-deployment-5dbfd6fd99-4nr9t 1/1 Running 0 2m3s 172.17.0.6 minikube <none> <none> hellok8s-deployment-5dbfd6fd99-95m7b 1/1 Running 0 113s 172.17.0.8 minikube <none> <none> hellok8s-deployment-5dbfd6fd99-bm4z2 1/1 Running 0 112s 172.17.0.5 minikube <none> <none> $ kubectl get service NAME TYPE CLUSTER-IP EXTERNAL-IP PORT(S) AGE kubernetes ClusterIP 10.96.0.1 <none> 443/TCP 10d service-hellok8s-clusterip ClusterIP 10.105.31.71 <none> 3000/TCP 4m23s- 1
- 2
- 3
- 4
- 5
- 6
- 7
- 8
- 9
- 10
- 11
- 12
- 13
- 14
- 15
- 16
- 17
# replicas增加到4个 $ kubectl get endpoints NAME ENDPOINTS AGE kubernetes 192.168.58.2:8443 10d service-hellok8s-clusterip 172.17.0.3:3000,172.17.0.5:3000,172.17.0.6:3000 + 1 more... 37m- 1
- 2
- 3
- 4
- 5
接着我们可以通过在集群其它应用中访问
service-hellok8s-clusterip的 IP 地址10.105.31.71来访问hello_k8s:v3.0.0服务。这里通过在集群内创建一个
nginx来访问hellok8s服务。创建后进入nginx容器来用curl命令访问service-hellok8s-clusterip。$ kubectl get pods NAME READY STATUS RESTARTS AGE hellok8s-deployment-5dbfd6fd99-4nr9t 1/1 Running 0 43m hellok8s-deployment-5dbfd6fd99-95m7b 1/1 Running 0 43m hellok8s-deployment-5dbfd6fd99-bm4z2 1/1 Running 0 43m hellok8s-deployment-5dbfd6fd99-n5tfb 1/1 Running 0 6m10s nginx 1/1 Running 0 25s $ kubectl exec -it nginx /bin/bash root@nginx:/# curl 10.105.31.71:3000 [v3] Hello, k8s!, From host: hellok8s-deployment-5dbfd6fd99-bm4z2 root@nginx:/# curl 10.105.31.71:3000 [v3] Hello, k8s!, From host: hellok8s-deployment-5dbfd6fd99-95m7b- 1
- 2
- 3
- 4
- 5
- 6
- 7
- 8
- 9
- 10
- 11
- 12
可以看到,我们多次
curl 10.104.96.153:3000访问hellok8sService IP 地址,返回的hellok8s:v3hostname不一样,说明 Service 可以接收请求并将它们传递给它后面的所有 pod,还可以自动负载均衡。调用过程如下图所示:
 除了上述的
除了上述的 ClusterIp的方式外,KubernetesServiceTypes允许指定你所需要的 Service 类型,默认是ClusterIP。Type的值包括如下:ClusterIP:通过集群的内部 IP 暴露服务,选择该值时服务只能够在集群内部访问。 这也是默认的ServiceType。NodePort:通过每个节点上的 IP 和静态端口(NodePort)暴露服务。NodePort服务会路由到自动创建的ClusterIP服务。 通过请求<节点 IP>:<节点端口>,你可以从集群的外部访问一个NodePort服务。LoadBalancer:使用云提供商的负载均衡器向外部暴露服务。 外部负载均衡器可以将流量路由到自动创建的NodePort服务和ClusterIP服务上。ExternalName:通过返回CNAME和对应值,可以将服务映射到externalName字段的内容(例如,foo.bar.example.com)。 无需创建任何类型代理。
4.2 NodePort
kubernetes集群并不是单机运行,它管理着多台节点即 Node,可以通过每个节点上的 IP 和静态端口(NodePort)暴露服务。如下图所示,如果集群内有两台 Node 运行着hellok8s:v3,我们创建一个NodePort类型的 Service,将hellok8s:v3的3000端口映射到 Node 机器的30000端口 (在 30000-32767 范围内),就可以通过访问http://node1-ip:30000或者http://node2-ip:30000访问到服务。
这里以
minikube为例,我们可以通过minikube ip命令拿到 k8s cluster node IP地址。下面的教程都以我本机的192.168.58.2为例,需要替换成你的 IP 地址。$ minikube ip 192.168.58.2- 1
- 2
接着以 NodePort 的 ServiceType 创建一个 Service 来接管 pod 流量。通过
minikube节点上的 IP192.168.58.2暴露服务。NodePort服务会路由到自动创建的ClusterIP服务。 通过请求<节点 IP>:<节点端口>–192.168.58.2:30000,你可以从集群的外部访问一个NodePort服务,最终重定向到hellok8s:v3的3000端口。apiVersion: v1 kind: Service metadata: name: service-hellok8s-nodeport spec: type: NodePort selector: app: hellok8s ports: - port: 3000 nodePort: 30000- 1
- 2
- 3
- 4
- 5
- 6
- 7
- 8
- 9
- 10
- 11
$ kubectl apply -f service-hellok8s-nodeport.yaml service/service-hellok8s-nodeport created $ kubectl get service NAME TYPE CLUSTER-IP EXTERNAL-IP PORT(S) AGE kubernetes ClusterIP 10.96.0.1 <none> 443/TCP 10d service-hellok8s-clusterip ClusterIP 10.105.31.71 <none> 3000/TCP 52m service-hellok8s-nodeport NodePort 10.98.80.232 <none> 3000:30000/TCP 6s $ kubectl get pods NAME READY STATUS RESTARTS AGE hellok8s-deployment-5dbfd6fd99-4nr9t 1/1 Running 0 53m hellok8s-deployment-5dbfd6fd99-95m7b 1/1 Running 0 53m hellok8s-deployment-5dbfd6fd99-bm4z2 1/1 Running 0 53m hellok8s-deployment-5dbfd6fd99-n5tfb 1/1 Running 0 15m nginx 1/1 Running 0 9m59s $ curl http://192.168.58.2:30000 [v3] Hello, k8s!, From host: hellok8s-deployment-5dbfd6fd99-4nr9t⏎ $ curl http://192.168.58.2:30000 [v3] Hello, k8s!, From host: hellok8s-deployment-5dbfd6fd99-n5tfb⏎- 1
- 2
- 3
- 4
- 5
- 6
- 7
- 8
- 9
- 10
- 11
- 12
- 13
- 14
- 15
- 16
- 17
-
相关阅读:
发挥数字化平台优势,电子元器件采购商城系统助力企业改变固有低效流程
持续集成和持续部署(CI/CD)
无线WIFI工业路由器可用于楼宇自动化
力扣题解22-25
Unity中Shader的Pass的复用
CRC校验简单记录
YOLO系列目标检测算法-YOLOv6
【AGC】云数据库API9开发问题汇总
C++精简实现2048游戏逻辑
GitHub上传本地文件
- 原文地址:https://blog.csdn.net/weixin_47692652/article/details/127863667
