-
springcloud-01-注册中心
前言
springcloud作为微服务的主流技术早已开始流行开来,我们要明白的一点是:springcloud并不是像我们之前学过的一些比如Hibernate、springMVC、Mybatis框架那样是个单独的框架。反之,springcloud是一系列技术的整合,它把好用的微服务组件进行了整合,相当于是一个筐,里面放入各种各样和微服务相关的服务框架组件。它本身有版本之分,它所管理的微服务组件也有各种各样的版本。每个springcloud版本里面对应的各个微服务组件的版本也是有区别的。因此,我这里首先创建了一个父模块专门管理springcloud的版本,然后每个微服务都继承这个父模块,保证了每个微服务使用的springcloud版本的一致,避免由于各个微服务使用了不一致的springcloud版本而出现各种各样奇怪的问题。
使用Idea创建一个空项目,然后在空项目下新建一个模块,这个模块就是各个微服务以后要继承的父模块,父模块没有任何业务和逻辑,只负责springcloud版本和公共依赖的管理。
在父模块pom.xml中添加以下内容:<project xmlns="http://maven.apache.org/POM/4.0.0" xmlns:xsi="http://www.w3.org/2001/XMLSchema-instance" xsi:schemaLocation="http://maven.apache.org/POM/4.0.0 http://maven.apache.org/xsd/maven-4.0.0.xsd"> <modelVersion>4.0.0modelVersion> <groupId>jitazheng.comgroupId> <artifactId>spring_parentartifactId> <packaging>pompackaging> <version>1.0-SNAPSHOTversion> <description>it's a parent module, just integrate common dependencies for children module to usedescription> <modules> <module>springcloud_01eureka_servermodule> <module>springcloud_02eureka_clientmodule> modules> <properties> <maven.compiler.source>8maven.compiler.source> <maven.compiler.target>8maven.compiler.target> <spring-cloud.version>Hoxton.SR6spring-cloud.version> properties> <parent> <groupId>org.springframework.bootgroupId> <artifactId>spring-boot-starter-parentartifactId> <version>2.2.5.RELEASEversion> parent> <dependencyManagement> <dependencies> <dependency> <groupId>org.springframework.cloudgroupId> <artifactId>spring-cloud-dependenciesartifactId> <version>${spring-cloud.version}version> <type>pomtype> <scope>importscope> dependency> dependencies> dependencyManagement> project>- 1
- 2
- 3
- 4
- 5
- 6
- 7
- 8
- 9
- 10
- 11
- 12
- 13
- 14
- 15
- 16
- 17
- 18
- 19
- 20
- 21
- 22
- 23
- 24
- 25
- 26
- 27
- 28
- 29
- 30
- 31
- 32
- 33
- 34
- 35
- 36
- 37
- 38
- 39
- 40
- 41
- 42
- 43
注意:整个pom.xml文件的内容不止上面这么多,还有一些比如项目信息、子模块信息等等,由于每个人编写的项目名等信息不同,没必要把所有信息都展示出来,这里只给出关键信息!!!
接下来的代码也都只是片段,请大家注意!!!请大家注意!!!请大家注意!!!
我文章中的内容是按照springcloud系列技术学习和总结的,所以大家最好按照我的创建项目,以免出现一些不必要的错误。第一章 注册中心(服务发现)
1.Eureka注册中心组件
Eureka作为netflix公司开源的注册中心组件,经历了长时间的实践检验,证明了其良好的性能。因此spring团队对其进行了整合。
Eureka组件分为Eureka server和Eureka client。1.1 Eureka server
Eureka server作为服务注册中心,在所有的微服务启动之前,首先就要先启动Eureka server。
1.1.1 引入Eureka依赖
在
pom.xml中添加依赖:<project xmlns="http://maven.apache.org/POM/4.0.0" xmlns:xsi="http://www.w3.org/2001/XMLSchema-instance" xsi:schemaLocation="http://maven.apache.org/POM/4.0.0 http://maven.apache.org/xsd/maven-4.0.0.xsd"> <parent> <artifactId>spring_parentartifactId> <groupId>jitazheng.comgroupId> <version>1.0-SNAPSHOTversion> parent> <modelVersion>4.0.0modelVersion> <groupId>com.jitazhenggroupId> <artifactId>springcloud_01eureka_serverartifactId> <properties> <maven.compiler.source>8maven.compiler.source> <maven.compiler.target>8maven.compiler.target> properties> <dependencies> <dependency> <groupId>org.springframework.cloudgroupId> <artifactId>spring-cloud-starter-netflix-eureka-serverartifactId> dependency> <dependency> <groupId>org.springframework.bootgroupId> <artifactId>spring-boot-starter-webartifactId> dependency> dependencies> project>- 1
- 2
- 3
- 4
- 5
- 6
- 7
- 8
- 9
- 10
- 11
- 12
- 13
- 14
- 15
- 16
- 17
- 18
- 19
- 20
- 21
- 22
- 23
- 24
- 25
- 26
- 27
- 28
- 29
- 30
- 31
- 32
- 33
- 34
- 35
- 36
- 37
- 38
注意:不要引入下面这个依赖,否则启动后控制台会报错:
org.springframework.cloud spring-cloud-netflix-eureka-server - 1
- 2
- 3
- 4

上面的依赖我也不知道是啥,我当时没注意,按照idea提示粗心的引入了上面这个依赖,结果出现启动错误,一顿百度才发现原来依赖引错了,编码还是要小心谨慎才行啊!!!1.1.2 编写配置文件
application.properties配置文件:# 端口 server.port=8761 # 应用名称 spring.application.name=eurekaserver # 指定注册中心地址 eureka.client.service-url.defaultZone=http://localhost:8761/eureka- 1
- 2
- 3
- 4
- 5
- 6
1.1.3 编写入口类并添加注解
代码如下:
package com.jitazheng; import org.springframework.boot.SpringApplication; import org.springframework.boot.autoconfigure.SpringBootApplication; import org.springframework.cloud.netflix.eureka.server.EnableEurekaServer; /** * @title: 注册中心eureka的server端 * @EnableEurekaServer 指定该应用为eureka的server端 * @author: devinChen * @date: 2022/10/29 * @version: v1.0.0 */ @SpringBootApplication @EnableEurekaServer public class EurekaServerApplication { public static void main(String[] args) { SpringApplication.run(EurekaServerApplication.class, args); } }- 1
- 2
- 3
- 4
- 5
- 6
- 7
- 8
- 9
- 10
- 11
- 12
- 13
- 14
- 15
- 16
- 17
- 18
- 19
- 20
- 21
- 22
注解
@EnableEurekaServer:表明这个微服务作为注册中心的Eureka server,用于接收Eureka client的注册信息。
然后启动服务器端,控制台会出现以下错误:


这些错误出现的原因就是:Eureka组件包含Eureka server和Eureka client。server是一个服务注册中心,用来接受客户端的注册。client的特性会让当前启动的服务把自己作为eureka的客户端进行服务中心的注册,当项目启动时服务注册中心还没有创建好,所以找不到服务的客户端组件就直接报错了,当启动成功服务注册中心创建好了,日后client也能进行注册,就不再报错啦!
因此,要添加以下2个配置解决控制台报错问题:# 关闭服务注册中心将自己也作为客户端进行注册 eureka.client.register-with-eureka=false # 关闭作为客户端时从Eureka server获取服务信息 eureka.client.fetch-registry=false- 1
- 2
- 3
- 4
再次启动就不会错误了:

启动成功后,在浏览器输入以下内容:http://localhost:8761/就会出现以下页面:

1.2 Eureka client
1.2.1 引入依赖
<project xmlns="http://maven.apache.org/POM/4.0.0" xmlns:xsi="http://www.w3.org/2001/XMLSchema-instance" xsi:schemaLocation="http://maven.apache.org/POM/4.0.0 http://maven.apache.org/xsd/maven-4.0.0.xsd"> <parent> <artifactId>spring_parentartifactId> <groupId>jitazheng.comgroupId> <version>1.0-SNAPSHOTversion> parent> <modelVersion>4.0.0modelVersion> <groupId>com.jitazhenggroupId> <artifactId>springcloud_02eureka_clientartifactId> <properties> <maven.compiler.source>8maven.compiler.source> <maven.compiler.target>8maven.compiler.target> properties> <dependencies> <dependency> <groupId>org.springframework.cloudgroupId> <artifactId>spring-cloud-starter-netflix-eureka-clientartifactId> dependency> <dependency> <groupId>org.springframework.bootgroupId> <artifactId>spring-boot-starter-webartifactId> dependency> dependencies> project>- 1
- 2
- 3
- 4
- 5
- 6
- 7
- 8
- 9
- 10
- 11
- 12
- 13
- 14
- 15
- 16
- 17
- 18
- 19
- 20
- 21
- 22
- 23
- 24
- 25
- 26
- 27
- 28
- 29
- 30
- 31
- 32
- 33
1.2.2 编写配置文件
编写
application.properties配置文件:server.port=8888 # Eureka client应用名:每个微服务都要有一个唯一的应用名 spring.application.name=eruekaclient # 客户端要注册的服务中心的地址 eureka.client.service-url.defaultZone=http://localhost:8761/eureka- 1
- 2
- 3
- 4
- 5
1.2.3 编写入口类并添加注释
package com.jitazheng; import org.springframework.boot.SpringApplication; import org.springframework.boot.autoconfigure.SpringBootApplication; import org.springframework.cloud.netflix.eureka.EnableEurekaClient; /** * @title: 注册中心eureka的client端 * @EnableEurekaClient 指定该应用为eureka的client端 * @author: devinChen * @date: 2022/10/29 * @version: v1.0.0 */ @SpringBootApplication @EnableEurekaClient public class EurekaClientApplication { public static void main(String[] args) { SpringApplication.run(EurekaClientApplication.class, args); } }- 1
- 2
- 3
- 4
- 5
- 6
- 7
- 8
- 9
- 10
- 11
- 12
- 13
- 14
- 15
- 16
- 17
- 18
- 19
- 20
- 21
- 22
- 23
启动之后,会发现客户端已经在注册中心注册了。

若此时我们将客户端停掉,大概过90秒之后,再次刷新注册中心页面,会出现上面这段红色文字不要慌:这是由于Eureka的自我保护机制导致的。

- 官网地址: https://github.com/Netflix/eureka/wiki/Server-Self-Preservation-Mode
- 默认情况下,如果Eureka Server在一定时间内(默认90秒)没有接收到某个微服务实例的心跳,Eureka Server将会移除该实例。但是当网络分区故障发生时,微服务与Eureka Server之间无法正常通信,而微服务本身是正常运行的,此时不应该移除这个微服务,所以引入了自我保护机制。Eureka Server在运行期间会去统计心跳失败比例在 15 分钟之内是否低于 85%,如果低于 85%,Eureka Server 会将这些实例保护起来,让这些实例不会过期。这种设计的哲学原理就是"宁可信其有不可信其无!"。自我保护模式正是一种针对网络异常波动的安全保护措施,使用自我保护模式能使Eureka集群更加的健壮、稳定的运行。
在eureka server的appliaction.properties引入以下配置即可消除红色文字:
# 关闭eureka的自我保护 eureka.server.enable-self-preservation=false # 超过设定时间后server没有检测到client的心跳,自动移除该实例(单位:毫秒) eureka.server.eviction-interval-timer-in-ms=3000- 1
- 2
- 3
- 4
虽然我们消除了上面的红色文字,但是又出现一句红色文字警示:
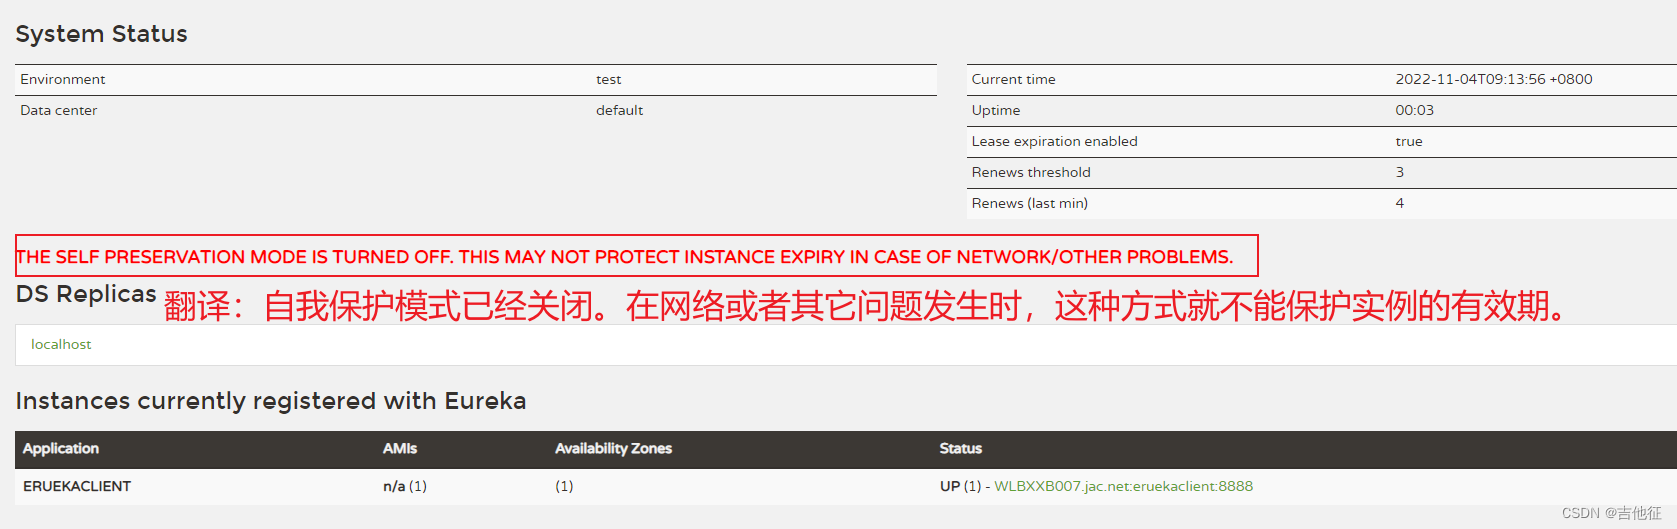
上面红色问题通俗一点来说就是当我们把eureka的自我保护机制关闭掉之后,可能由于网络或者其它原因导致eureka server 在规定时间内没有接收到eureka client的心跳,eureka server就认为client已经挂了,会立即将其从注册中心移除掉,实际上client是可用的,这会导致eureka集群的健壮性、稳定想受损。
值得注意的是:官方并不建议我们在生产环境下关闭Eureka的自我保护机制。1.3 关于Eureka停止更新
Eureka由于是Netflix公司的产品,他们已经停止了对Eureka的更新。
可参考以下网址获得详细内容:- https://github.com/Netflix/eureka/wiki
- 在
1.x版本项目还是活跃的,但是在2.x版本中停止维护,出现问题后果自负!!!
2. Consul注册中心组件
Consul简介
- 官网地址:https://www.consul.io
- consul是一个可以提供服务发现,健康检查,多数据中心,Key/Value存储等功能的分布式服务框架,用于实现分布式系统的服务发现与配置。对比其他分布式服务注册与发现的方案,Consul 简化了分布式环境中的服务的注册和发现流程,通过 HTTP 或者 DNS 接口发现。支持外部 SaaS 提供者等。Consul用Golang实现,因此具有天然可移植性(支持Linux、Windows和Mac OS X);安装包仅包含一个可执行文件,方便部署。
2.1 安装
从官网下载后,解压到指定的文件夹,然后添加环境变量。这里以我自己配置的为例:

变量名:CONSUL_HOME
变量值:consul解压之后存放的目录。 例如:D:\software-install\consule

然后编辑path变量,添加进去:

最终,在cmd窗口输入
consul -v,可以看到如下内容:

成功完成了consul的配置。2.2 启动
cmd窗口输入命令
consul agent -dev

consul默认服务端口是8500,我们使用的就是默认端口,在浏览器输入地址:http://localhost:8500

至此,consul启动成功!2.3 consul 客户端服务
按照2.1和2.2所描述,我们已经使用consul开启了微服务的注册中心,那么接下来,我们自己开发的微服务作为客户端怎么向注册中心去注册呢?
2.3.1 创建项目并引入consul客户端依赖
此时会发现,consul客户端并没有注册成功,这是因为consul默认是要开启健康检查的,但是必须有maven依赖,我们当前之引入了consul客户端依赖,而没有引入consul的健康检查依赖。consul又默认要进行健康检查,客户端虽然启动成功,但没有通过健康检查导致注册失败,此时,我们可以手动关闭健康检查(不推荐)或者引入健康检查依赖。


3. nacos注册中心组件
作者正在奋笔疾书,敬请期待!作者正在奋笔疾书,敬请期待!作者正在奋笔疾书,敬请期待!4. 注册中心问题总结
nacos服务注册IP选择问题
场景:
微服务部署后,需要相互调用,其中服务A调用服务B时发现无法调用。其中服务注册和发现以及配置中心使用Nacos分析:
检查了多遍代码后,没有发现调用方式有问题,所以只能是网络问题。通过postman直接调用服务B,发现可以调通,但是使用服务A不行,于是检查服务A在注册中心注册的IP,发现和并不是服务B启动机器的IP。这就是问题所在了。
为什么注册的IP和真实IP不符合呢?
原因是Nacos客户端在注册服务时会从机器网卡中选择一个IP来注册,当机器存在多个网卡(例如存在虚拟网卡)时,所选则的IP可能不是真是的物理机的IP,所以,当注册了的是非真实IP后,另一台机器调用时是不可能调通的。
图中的ip192.168.25.1就是本人电脑的一个虚拟网卡的ip:

解决:
知道问题后,就要解决,查了一下SpringCloud的官方文档,发现有一项配置如下:- Sometimes, it is useful to ignore certain named network interfaces so that they can be excluded from Service Discovery registration (for example, when running in a Docker container). A list of regular expressions can be set to cause the desired network interfaces to be ignored.
You can also force the use of only specified network addresses by using a list of regular expressions.
spring: cloud: inetutils: preferredNetworks: - 192.168 - 10.0- 1
- 2
- 3
- 4
- 5
- 6
该项配置用于指定首选IP,当有多个网卡时,指定该IP地址后(支持正则),客户端在选择IP时就会选择符合preferredNetworks配置的IP地址进行注册。
同样的,Nacos也可以配置自己的首选IP以及网卡选择:
spring.cloud.nacos.discovery.ip: spring.cloud.nacos.discovery.networkInterface- 1
- 2
- 3
我们选择其中一个配置就可以,都能达到相同的效果。
这里我选择第一个:

再次启动微服务发现ip正常了:

当然如果服务器或者测试电脑上只有一个网卡,是不会出现上述问题的。
-
相关阅读:
求告知!该如何解决这个问题
Python语言:经典例题分析讲解
selenium 元素定位方法
git的使用(从配置到常用命令)
QT+OSG/osgEarth编译之三十六:Protobuf+Qt编译(一套代码、一套框架,跨平台编译,版本:Protobuf-21.2)
opencv 双目立体视觉
突破编程_C++_设计模式(观察者模式)
如何在邮箱客户端上设置配置使用多个邮箱
qt 判断文件是否存在
java计算机毕业设计驾考服务系统MyBatis+系统+LW文档+源码+调试部署
- 原文地址:https://blog.csdn.net/weixin_40056279/article/details/127648569
