-
谷粒学院——Day02【环境搭建和讲师管理接口开发】
前后端分离概念
- 传统单体结构

- 前后端分离结构
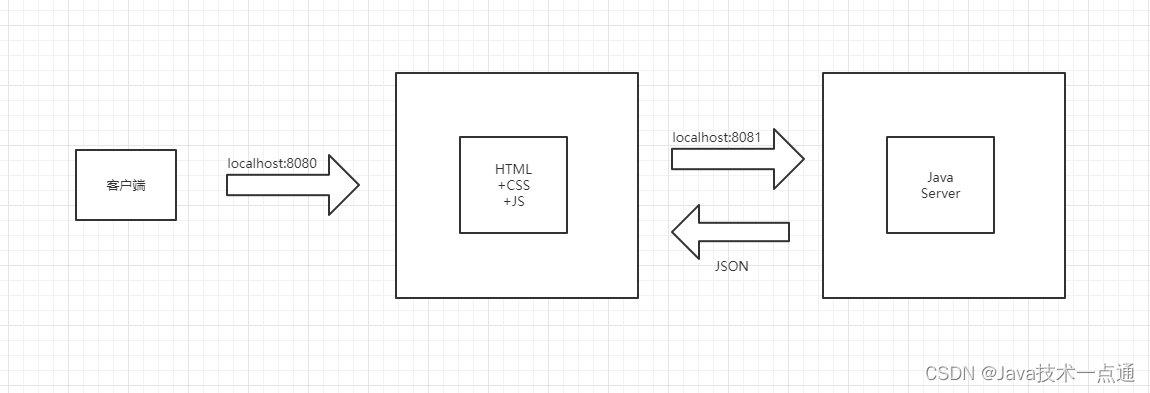
前后端分离就是将一个单体应用拆分成两个独立的应用:前端应用和后端应用,以JSON格式进行数据交互。
后台讲师管理模块环境搭建
一、数据库设计
-
数据库
guli_edu -
数据库
guli_edu.sql
# # Structure for table "edu_teacher" # CREATE TABLE `edu_teacher` ( `id` CHAR(19) NOT NULL COMMENT '讲师ID', `name` VARCHAR(20) NOT NULL COMMENT '讲师姓名', `intro` VARCHAR(500) NOT NULL DEFAULT '' COMMENT '讲师简介', `career` VARCHAR(500) DEFAULT NULL COMMENT '讲师资历,一句话说明讲师', `level` INT(10) UNSIGNED NOT NULL COMMENT '头衔 1高级讲师 2首席讲师', `avatar` VARCHAR(255) DEFAULT NULL COMMENT '讲师头像', `sort` INT(10) UNSIGNED NOT NULL DEFAULT '0' COMMENT '排序', `is_deleted` TINYINT(1) UNSIGNED NOT NULL DEFAULT '0' COMMENT '逻辑删除 1(true)已删除, 0(false)未删除', `gmt_create` DATETIME NOT NULL COMMENT '创建时间', `gmt_modified` DATETIME NOT NULL COMMENT '更新时间', PRIMARY KEY (`id`), UNIQUE KEY `uk_name` (`name`) ) ENGINE=INNODB DEFAULT CHARSET=utf8mb4 COMMENT='讲师'; # # Data for table "edu_teacher" # INSERT INTO `edu_teacher` VALUES ('1','张三','近年主持国家自然科学基金(6项)、江苏省重大科技成果转化项目(5项)、江苏省产学研前瞻性联合研究项目(3项)、省工业科技支撑、省高技术、省自然科学基金等省部级及其企业的主要科研项目40多个,多个项目在企业成功转化,产生了较好的经济、社会和环境效益。积极开展产学研科技合作,并与省内16家企业建立了江苏省研究生工作站,其中6家为江苏省优秀研究生工作站','高级',1,'https://guli-file-190513.oss-cn-beijing.aliyuncs.com/avatar/default.jpg',0,0,'2019-10-30 14:18:46','2019-11-12 13:36:36'),('1189389726308478977','晴天','高级讲师简介','高级讲师资历',2,'https://online-teach-file.oss-cn-beijing.aliyuncs.com/teacher/2019/10/30/de47ee9b-7fec-43c5-8173-13c5f7f689b2.png',1,0,'2019-10-30 11:53:03','2019-10-30 11:53:03'),('1189390295668469762','李刚','高级讲师简介','高级讲师',2,'https://online-teach-file.oss-cn-beijing.aliyuncs.com/teacher/2019/10/30/b8aa36a2-db50-4eca-a6e3-cc6e608355e0.png',2,0,'2019-10-30 11:55:19','2019-11-12 13:37:52'),('1189426437876985857','王二','高级讲师简介','高级讲师',1,'https://online-teach-file.oss-cn-beijing.aliyuncs.com/teacher/2019/11/08/e44a2e92-2421-4ea3-bb49-46f2ec96ef88.png',0,0,'2019-10-30 14:18:56','2019-11-12 13:37:35'),('1189426464967995393','王五','高级讲师简介','高级讲师',1,'https://online-teach-file.oss-cn-beijing.aliyuncs.com/teacher/2019/10/30/65423f14-49a9-4092-baf5-6d0ef9686a85.png',0,0,'2019-10-30 14:19:02','2019-11-12 13:37:18'),('1192249914833055746','李四','高级讲师简介','高级讲师',1,'https://online-teach-file.oss-cn-beijing.aliyuncs.com/teacher/2019/11/07/91871e25-fd83-4af6-845f-ea8d471d825d.png',0,0,'2019-11-07 09:18:25','2019-11-12 13:37:01'),('1192327476087115778','1222-12-12','1111','11',1,'https://online-teach-file.oss-cn-beijing.aliyuncs.com/teacher/2019/11/08/5805c6cd-c8ad-4a77-aafd-d2e083bfd8a4.png',0,1,'2019-11-07 14:26:37','2019-11-11 16:26:26'),('1195337453429129218','test','sdfsdf','sdfdf',1,'https://guli-file-190513.oss-cn-beijing.aliyuncs.com/avatar/default.jpg',0,1,'2019-11-15 21:47:12','2019-11-15 21:47:27');- 1
- 2
- 3
- 4
- 5
- 6
- 7
- 8
- 9
- 10
- 11
- 12
- 13
- 14
- 15
- 16
- 17
- 18
- 19
- 20
- 21
- 22
- 23
- 24
- 25
二、数据库设计规范
以下规约只针对本模块,更全面的文档参考《阿里巴巴Java开发手册》:五、MySQL数据库
-
库名与应用名称尽量一致
-
表名、字段名必须使用小写字母或数字,禁止出现数字开头,
-
表名不使用复数名词
-
表的命名最好是加上“业务名称_表的作用”。如,edu_teacher
-
表必备三字段:id, gmt_create, gmt_modified
说明:
其中 id 必为主键,类型为 bigint unsigned、单表时自增、步长为 1。
(如果使用分库分表集群部署,则id类型为verchar,非自增,业务中使用分布式id生成器)
gmt_create, gmt_modified 的类型均为 datetime 类型,前者现在时表示主动创建,后者过去分词表示被 动更新。
-
单表行数超过 500 万行或者单表容量超过 2GB,才推荐进行分库分表。 说明:如果预计三年后的数据量根本达不到这个级别,请不要在创建表时就分库分表。
-
表达是与否概念的字段,必须使用 is_xxx 的方式命名,数据类型是 unsigned tinyint (1 表示是,0 表示否)。
说明:任何字段如果为非负数,必须是 unsigned。
注意:POJO 类中的任何布尔类型的变量,都不要加 is 前缀。数据库表示是与否的值,使用 tinyint 类型,坚持 is_xxx 的 命名方式是为了明确其取值含义与取值范围。
正例:表达逻辑删除的字段名 is_deleted,1 表示删除,0 表示未删除。
-
小数类型为 decimal,禁止使用 float 和 double。 说明:float 和 double 在存储的时候,存在精度损失的问题,很可能在值的比较时,得到不 正确的结果。如果存储的数据范围超过 decimal 的范围,建议将数据拆成整数和小数分开存储。
-
如果存储的字符串长度几乎相等,使用 char 定长字符串类型。
-
varchar 是可变长字符串,不预先分配存储空间,长度不要超过 5000,如果存储长度大于此值,定义字段类型为 text,独立出来一张表,用主键来对应,避免影响其它字段索 引效率。
-
唯一索引名为 uk_字段名;普通索引名则为 idx_字段名。
说明:uk_ 即 unique key;idx_ 即 index 的简称
-
不得使用外键与级联,一切外键概念必须在应用层解决。外键与级联更新适用于单机低并发,不适合分布式、高并发集群;级联更新是强阻塞,存在数据库更新风暴的风险;外键影响数据库的插入速度。
三、搭建项目工程
一、项目结构介绍
-
工程结构

-
模块说明
guli-parent:在线教学根目录(父工程),管理四个子模块:-
canal-client:canal数据库表同步模块(统计同步数据) -
common:公共模块父节点-
common-util:工具类模块,所有模块都可以依赖于它 -
service-base:service服务的base包,包含service服务的公共配置类,所有service模块依赖于它 -
spring-security:认证与授权模块,需要认证授权的service服务依赖于它
-
-
infrastructure:基础服务模块父节点api-gateway:api网关服务
-
service:api接口服务父节点-
service-acl:用户权限管理api接口服务(用户管理、角色管理和权限管理等) -
service-cms:cms api接口服务 -
service-edu:教学相关api接口服务 -
service-msm:短信api接口服务 -
service-order:订单相关api接口服务 -
service-oss:阿里云oss api接口服务 -
service-statistics:统计报表api接口服务 -
service-ucenter:会员api接口服务 -
service-vod:视频点播api接口服务
-
-
二、创建父工程
-
创建 springboot 工程 guli_parent


-
删除 src 目录

-
配置 pom.xml
guli-parent pom - 1
- 2
- 3
- 在pom.xml中添加依赖的版本
删除pom.xml中原先的内容:
org.springframework.boot spring-boot-starter org.springframework.boot spring-boot-starter-test test - 1
- 2
- 3
- 4
- 5
- 6
- 7
- 8
- 9
- 10
- 11
添加 确定依赖的版本:
1.8 0.0.1-SNAPSHOT 3.0.5 2.0 2.7.0 2.8.3 2.10.1 3.17 1.3.1 2.6 4.5.1 0.7.0 4.3.3 3.1.0 2.15.2 1.4.11 1.4.11 1.2.28 2.8.2 20170516 1.7 1.1.0 zx 0.2.2.RELEASE - 1
- 2
- 3
- 4
- 5
- 6
- 7
- 8
- 9
- 10
- 11
- 12
- 13
- 14
- 15
- 16
- 17
- 18
- 19
- 20
- 21
- 22
- 23
- 24
- 25
- 26
配置
org.springframework.cloud spring-cloud-dependencies Hoxton.RELEASE pom import org.springframework.cloud spring-cloud-alibaba-dependencies ${cloud-alibaba.version} pom import com.baomidou mybatis-plus-boot-starter ${mybatis-plus.version} org.apache.velocity velocity-engine-core ${velocity.version} io.springfox springfox-swagger2 ${swagger.version} io.springfox springfox-swagger-ui ${swagger.version} com.aliyun.oss aliyun-sdk-oss ${aliyun.oss.version} joda-time joda-time ${jodatime.version} org.apache.poi poi ${poi.version} org.apache.poi poi-ooxml ${poi.version} commons-fileupload commons-fileupload ${commons-fileupload.version} commons-io commons-io ${commons-io.version} org.apache.httpcomponents httpclient ${httpclient.version} com.google.code.gson gson ${gson.version} io.jsonwebtoken jjwt ${jwt.version} com.aliyun aliyun-java-sdk-core ${aliyun-java-sdk-core.version} com.aliyun.oss aliyun-sdk-oss ${aliyun-sdk-oss.version} com.aliyun aliyun-java-sdk-vod ${aliyun-java-sdk-vod.version} com.aliyun aliyun-java-vod-upload ${aliyun-java-vod-upload.version} com.aliyun aliyun-sdk-vod-upload ${aliyun-sdk-vod-upload.version} com.alibaba fastjson ${fastjson.version} org.json json ${json.version} commons-dbutils commons-dbutils ${commons-dbutils.version} com.alibaba.otter canal.client ${canal.client.version} - 1
- 2
- 3
- 4
- 5
- 6
- 7
- 8
- 9
- 10
- 11
- 12
- 13
- 14
- 15
- 16
- 17
- 18
- 19
- 20
- 21
- 22
- 23
- 24
- 25
- 26
- 27
- 28
- 29
- 30
- 31
- 32
- 33
- 34
- 35
- 36
- 37
- 38
- 39
- 40
- 41
- 42
- 43
- 44
- 45
- 46
- 47
- 48
- 49
- 50
- 51
- 52
- 53
- 54
- 55
- 56
- 57
- 58
- 59
- 60
- 61
- 62
- 63
- 64
- 65
- 66
- 67
- 68
- 69
- 70
- 71
- 72
- 73
- 74
- 75
- 76
- 77
- 78
- 79
- 80
- 81
- 82
- 83
- 84
- 85
- 86
- 87
- 88
- 89
- 90
- 91
- 92
- 93
- 94
- 95
- 96
- 97
- 98
- 99
- 100
- 101
- 102
- 103
- 104
- 105
- 106
- 107
- 108
- 109
- 110
- 111
- 112
- 113
- 114
- 115
- 116
- 117
- 118
- 119
- 120
- 121
- 122
- 123
- 124
- 125
- 126
- 127
- 128
- 129
- 130
- 131
- 132
- 133
- 134
- 135
- 136
- 137
- 138
- 139
- 140
- 141
- 142
- 143
- 144
四、搭建service模块
一、搭建service模块
- 在父工程guli-parent下面创建模块service

- 删除service模块的src目录
- 添加模块类型是pom
service pom - 1
- 2
- 添加项目需要的依赖
org.springframework.cloud spring-cloud-starter-netflix-ribbon org.springframework.cloud spring-cloud-starter-netflix-hystrix org.springframework.cloud spring-cloud-starter-alibaba-nacos-discovery org.springframework.cloud spring-cloud-starter-openfeign org.springframework.boot spring-boot-starter-web com.baomidou mybatis-plus-boot-starter mysql mysql-connector-java org.apache.velocity velocity-engine-core io.springfox springfox-swagger2 io.springfox springfox-swagger-ui org.projectlombok lombok org.apache.poi poi org.apache.poi poi-ooxml commons-fileupload commons-fileupload org.apache.httpcomponents httpclient commons-io commons-io com.google.code.gson gson junit junit 4.12 - 1
- 2
- 3
- 4
- 5
- 6
- 7
- 8
- 9
- 10
- 11
- 12
- 13
- 14
- 15
- 16
- 17
- 18
- 19
- 20
- 21
- 22
- 23
- 24
- 25
- 26
- 27
- 28
- 29
- 30
- 31
- 32
- 33
- 34
- 35
- 36
- 37
- 38
- 39
- 40
- 41
- 42
- 43
- 44
- 45
- 46
- 47
- 48
- 49
- 50
- 51
- 52
- 53
- 54
- 55
- 56
- 57
- 58
- 59
- 60
- 61
- 62
- 63
- 64
- 65
- 66
- 67
- 68
- 69
- 70
- 71
- 72
- 73
- 74
- 75
- 76
- 77
- 78
- 79
- 80
- 81
- 82
- 83
- 84
- 85
二、搭建service-edu模块
- 在父工程service模块下面创建子模块service-edu

输入模块名称 service-edu,下一步完成创建:

后台讲师管理模块开发
一、讲师管理模块配置和生成代码
一、讲师管理模块配置
1. 在service下面service-edu模块中创建配置文件

resources目录下创建文件 application.properties:# 服务端口 server.port=8001 # 服务名 spring.application.name=service-edu # 环境设置:dev、test、prod spring.profiles.active=dev # mysql数据库连接 spring.datasource.url=jdbc:mysql://localhost:3306/guli?useUnicode=true&characterEncoding=UTF-8&serverTimeZone=UTC spring.datasource.username=root spring.datasource.password=123456 spring.datasource.driver-class-name=com.mysql.cj.jdbc.Driver # mybatis日志 mybatis-plus.configuration.log-impl=org.apache.ibatis.logging.stdout.StdOutImpl- 1
- 2
- 3
- 4
- 5
- 6
- 7
- 8
- 9
- 10
- 11
- 12
- 13
- 14
- 15
- 16
- 17
2. 创建MP代码生成器
在
test/java目录下创建包com.atguigu.eduservice,创建代码生成器:CodeGenerator.java:public class CodeGenerator { @Test public void run() { // 1、创建代码生成器 AutoGenerator mpg = new AutoGenerator(); // 2、全局配置 GlobalConfig gc = new GlobalConfig(); String projectPath = System.getProperty("user.dir"); gc.setOutputDir("D:\\IDEA\\guli_parent\\service\\service_edu" + "/src/main/java"); //输出目录 gc.setAuthor("jyu_zwy"); //作者名 gc.setOpen(false); //生成后是否打开资源管理器 gc.setFileOverride(false); //重新生成时文件是否覆盖 gc.setServiceName("%sService"); //去掉Service接口的首字母I gc.setIdType(IdType.ID_WORKER_STR); //主键策略 gc.setDateType(DateType.ONLY_DATE);//定义生成的实体类中日期类型 gc.setSwagger2(true);//开启Swagger2模式 mpg.setGlobalConfig(gc); // 3、数据源配置 DataSourceConfig dsc = new DataSourceConfig(); dsc.setUrl("jdbc:mysql://localhost:3306/guli?useUnicode=true&characterEncoding=UTF-8&serverTimeZone=UTC"); dsc.setDriverName("com.mysql.cj.jdbc.Driver"); dsc.setUsername("root"); dsc.setPassword("123456"); dsc.setDbType(DbType.MYSQL); mpg.setDataSource(dsc); // 4、包配置 PackageConfig pc = new PackageConfig(); //生成包:com.atguigu.eduservice pc.setModuleName("eduservice"); //模块名 pc.setParent("com.atguigu"); //生成包:com.atguigu.controller pc.setController("controller"); pc.setEntity("entity"); pc.setService("service"); pc.setMapper("mapper"); mpg.setPackageInfo(pc); // 5、策略配置 StrategyConfig strategy = new StrategyConfig(); strategy.setInclude("edu_teacher");//根据数据库哪张表生成,有多张表就加逗号继续填写 strategy.setNaming(NamingStrategy.underline_to_camel);//数据库表映射到实体的命名策略 strategy.setTablePrefix(pc.getModuleName() + "_"); //生成实体时去掉表前缀 strategy.setColumnNaming(NamingStrategy.underline_to_camel);//数据库表字段映射到实体的命名策略 strategy.setEntityLombokModel(true); // lombok 模型 @Accessors(chain = true) setter链式操作 strategy.setRestControllerStyle(true); //restful api风格控制器 strategy.setControllerMappingHyphenStyle(true); //url中驼峰转连字符 mpg.setStrategy(strategy); // 6、执行 mpg.execute(); } }- 1
- 2
- 3
- 4
- 5
- 6
- 7
- 8
- 9
- 10
- 11
- 12
- 13
- 14
- 15
- 16
- 17
- 18
- 19
- 20
- 21
- 22
- 23
- 24
- 25
- 26
- 27
- 28
- 29
- 30
- 31
- 32
- 33
- 34
- 35
- 36
- 37
- 38
- 39
- 40
- 41
- 42
- 43
- 44
- 45
- 46
- 47
- 48
- 49
- 50
- 51
- 52
- 53
- 54
- 55
- 56
- 57
- 58
- 59
- 60
- 61
- 62
- 63
- 64
- 65
- 66
- 67
- 68
执行
CodeGenerator方法,将会在java包下自动创建代码:

二、编写后台管理api接口
1. 编写controller代码
@RestController @RequestMapping("/eduservice/edu-teacher") public class EduTeacherController { @Autowired private EduTeacherService eduTeacherService; // 查询讲师表所有数据 // 访问地址: http://localhost:8001/eduservice/edu-teacher/findAll @GetMapping("/findAll") public Listlist() { return eduTeacherService.list(null); } } - 1
- 2
- 3
- 4
- 5
- 6
- 7
- 8
- 9
- 10
- 11
- 12
- 13
- 14
- 15
- 16
2. 创建SpringBoot配置类
在
eduservice包下创建config包,创建MyBatisPlusConfig.java@Configuration @EnableTransactionManagement @MapperScan("com.atguigu.eduservice.mapper") public class MyBatisPlusConfig { }- 1
- 2
- 3
- 4
- 5
- 6
3. 配置SQL执行性能分析插件
在
MyBatisPlusConfig.java中添加以下配置,代码如下:/** * SQL 执行性能分析插件 * 开发环境使用,线上不推荐。 maxTime 指的是 sql 最大执行时长 */ @Bean @Profile({"dev","test"})// 设置 dev test 环境开启 public PerformanceInterceptor performanceInterceptor() { PerformanceInterceptor performanceInterceptor = new PerformanceInterceptor(); performanceInterceptor.setMaxTime(1000);//ms,超过此处设置的ms则sql不执行 performanceInterceptor.setFormat(true); return performanceInterceptor; }- 1
- 2
- 3
- 4
- 5
- 6
- 7
- 8
- 9
- 10
- 11
- 12
4. 创建SpringBoot启动类
创建启动类
EduApplication.java,注意启动类的创建位置。@SpringBootApplication public class EduApplication { public static void main(String[] args) { SpringApplication.run(EduApplication.class, args); } }- 1
- 2
- 3
- 4
- 5
- 6
5. 运行启动类
运行启动类后,在浏览器地址栏中访问
http://localhost:8001/eduservice/edu-teacher/findAll, 将会返回JSON数据:

6. 统一返回的json时间格式
默认情况下
json时间格式带有时区,并且是世界标准时间,和我们的时间差了八个小时。
在application.properties中添加以下配置:#返回json的全局时间格式 spring.jackson.date-format=yyyy-MM-dd HH:mm:ss spring.jackson.time-zone=GMT+8- 1
- 2
- 3
三、讲师逻辑删除功能
1. EduTeacherController添加删除方法
@RestController @RequestMapping("/eduservice/edu-teacher") public class EduTeacherController { @Autowired private EduTeacherService eduTeacherService; // 查询讲师表所有数据 // 访问地址: http://localhost:8001/eduservice/edu-teacher/findAll @GetMapping("/findAll") public Listlist() { return eduTeacherService.list(null); } // 逻辑删除讲师 // 访问地址:http://localhost:8001/eduservice/edu-teacher/deleteTeacherById/id @DeleteMapping("deleteTeacherById/{id}") public boolean deleteTeacherById(@PathVariable String id) { return eduTeacherService.removeById(id); } } - 1
- 2
- 3
- 4
- 5
- 6
- 7
- 8
- 9
- 10
- 11
- 12
- 13
- 14
- 15
- 16
- 17
- 18
- 19
- 20
- 21
- 22
- 23
2. 配置逻辑删除插件
在
MyBatisPlusConfig中添加配置:@Configuration @EnableTransactionManagement @MapperScan("com.atguigu.eduservice.mapper") public class MyBatisPlusConfig { /** * SQL 执行性能分析插件 * 开发环境使用,线上不推荐。 maxTime 指的是 sql 最大执行时长 */ @Bean @Profile({"dev","test"})// 设置 dev test 环境开启 public PerformanceInterceptor performanceInterceptor() { PerformanceInterceptor performanceInterceptor = new PerformanceInterceptor(); performanceInterceptor.setMaxTime(1000);//ms,超过此处设置的ms则sql不执行 performanceInterceptor.setFormat(true); return performanceInterceptor; } /** * 逻辑删除插件 * @return */ @Bean public ISqlInjector sqlInjector() { return new LogicSqlInjector(); } }- 1
- 2
- 3
- 4
- 5
- 6
- 7
- 8
- 9
- 10
- 11
- 12
- 13
- 14
- 15
- 16
- 17
- 18
- 19
- 20
- 21
- 22
- 23
- 24
- 25
- 26
- 27
- 28
3. 在实体类上对应字段标注注解
@TableLogic private Boolean isDeleted;- 1
- 2
4. 使用postman测试删除

测试结果: 数据库中的is_deleted字段被修改为1。
四、跨域配置
1. 什么是跨域
浏览器从一个域名的网页去请求另一个域名的资源时,域名、端口、协议任一不同,都是跨域 。前后端分离开发中,需要考虑
ajax跨域的问题。
这里我们可以从服务端解决这个问题。2. 配置
在
controller类上添加注解:@RestController @CrossOrigin //解决跨域问题 @RequestMapping("/eduservice/edu-teacher") public class EduTeacherController { }- 1
- 2
- 3
- 4
- 5
二、配置Swagger2生成API接口文档
一、Swagger2介绍
前后端分离开发模式中,api文档是最好的沟通方式。
Swagger是一个规范和完整的框架,用于生成、描述、调用和可视化RESTful风格的Web服务。简单来说,Swagger是一个功能强大的接口管理工具,并且提供了多种编程语言的前后端分离解决方案。- 及时性 (接口变更后,能够及时准确地通知相关前后端开发人员)
- 规范性 (并且保证接口的规范性,如接口的地址,请求方式,参数及响应格式和错误信息)
- 一致性 (接口信息一致,不会出现因开发人员拿到的文档版本不一致,而出现分歧)
- 可测性 (直接在接口文档上进行测试,以方便理解业务)
二、配置Swagger2
1. 创建 common 模块
在
guli-parent下创建模块common:

2. 在common中引入相关依赖
org.springframework.boot spring-boot-starter-web provided com.baomidou mybatis-plus-boot-starter provided org.projectlombok lombok provided io.springfox springfox-swagger2 provided io.springfox springfox-swagger-ui provided org.springframework.boot spring-boot-starter-data-redis - 1
- 2
- 3
- 4
- 5
- 6
- 7
- 8
- 9
- 10
- 11
- 12
- 13
- 14
- 15
- 16
- 17
- 18
- 19
- 20
- 21
- 22
- 23
- 24
- 25
- 26
- 27
- 28
- 29
- 30
- 31
- 32
- 33
- 34
- 35
- 36
- 37
- 38
- 39
- 40
- 41
- 42
- 43
- 44
- 45
3. 在common下面创建子模块service-base

4. 在模块service-base中,创建swagger的配置类
创建
com.atguigu.servicebase.config包,在此包下创建SwaggerConfig类:@Configuration @EnableSwagger2 public class SwaggerConfig { @Bean public Docket webApiConfig(){ return new Docket(DocumentationType.SWAGGER_2) .groupName("webApi") .apiInfo(webApiInfo()) .select() .paths(Predicates.not(PathSelectors.regex("/admin/.*"))) .paths(Predicates.not(PathSelectors.regex("/error.*"))) .build(); } private ApiInfo webApiInfo(){ return new ApiInfoBuilder() .title("网站-课程中心API文档") .description("本文档描述了课程中心微服务接口定义") .version("1.0") .contact(new Contact("guli_edu", "http://guli_edu.com", "995931576@qq.com")) .build(); } }- 1
- 2
- 3
- 4
- 5
- 6
- 7
- 8
- 9
- 10
- 11
- 12
- 13
- 14
- 15
- 16
- 17
- 18
- 19
- 20
- 21
- 22
- 23
- 24
- 25
- 26
- 27
5. 在模块service模块中引入service-base
service_base com.atguigu 0.0.1-SNAPSHOT - 1
- 2
- 3
- 4
- 5
6. 在service-edu启动类上添加注解
在启动类上添加
@ComponentScan(basePackages = {"com.atguigu"})来扫描SwaggerConfig这个类。@SpringBootApplication @ComponentScan(basePackages = {"com.atguigu"}) public class EduApplication { public static void main(String[] args) { SpringApplication.run(EduApplication.class, args); } }- 1
- 2
- 3
- 4
- 5
- 6
- 7
7. 测试
运行启动类,访问
http://localhost:8001/swagger-ui.html:

8. API模型
可以添加一些自定义设置,例如:
定义样例数据@ApiModelProperty(value = "创建时间") @TableField(fill = FieldFill.INSERT) private Date gmtCreate; @ApiModelProperty(value = "更新时间") @TableField(fill = FieldFill.INSERT_UPDATE) private Date gmtModified;- 1
- 2
- 3
- 4
- 5
- 6
- 7

9. 定义接口说明和参数说明
定义在类上:
@Api
定义在方法上:@ApiOperation
定义在参数上:@ApiParam@Api(description = "讲师管理") @RestController @CrossOrigin //解决跨域问题 @RequestMapping("/eduservice/edu-teacher") public class EduTeacherController { @Autowired private EduTeacherService eduTeacherService; // 查询讲师表所有数据 // 访问地址: http://localhost:8001/eduservice/edu-teacher/findAll @ApiOperation(value = "所有讲师列表") @GetMapping("/findAll") public Listlist() { return eduTeacherService.list(null); } // 逻辑删除讲师 // 访问地址:http://localhost:8001/eduservice/edu-teacher/deleteTeacherById/id @ApiOperation(value = "根据ID删除讲师") @DeleteMapping("deleteTeacherById/{id}") public boolean deleteTeacherById(@ApiParam(name = "id", value = "讲师ID", required = true)@PathVariable String id) { return eduTeacherService.removeById(id); } } - 1
- 2
- 3
- 4
- 5
- 6
- 7
- 8
- 9
- 10
- 11
- 12
- 13
- 14
- 15
- 16
- 17
- 18
- 19
- 20
- 21
- 22
- 23
- 24
- 25
- 26
- 27

三、统一返回结果对象
一、统一返回数据格式
项目中我们会将响应封装成
json返回,一般我们会将所有接口的数据格式统一, 使前端(iOS Android, Web)对数据的操作更一致、轻松。
一般情况下,统一返回数据格式没有固定的格式,只要能描述清楚返回的数据状态以及要返回的具体数据就可以。但是一般会包含状态码、返回消息、数据这几部分内容。
例如,我们的系统要求返回的基本数据格式如下:列表:
{ "success": true, "code": 20000, "message": "成功", "data": { "items": [ { "id": "1", "name": "刘德华", "intro": "毕业于师范大学数学系,热爱教育事业,执教数学思维6年有余" } ] } }- 1
- 2
- 3
- 4
- 5
- 6
- 7
- 8
- 9
- 10
- 11
- 12
- 13
- 14
分页:
{ "success": true, "code": 20000, "message": "成功", "data": { "total": 17, "rows": [ { "id": "1", "name": "刘德华", "intro": "毕业于师范大学数学系,热爱教育事业,执教数学思维6年有余" } ] } }- 1
- 2
- 3
- 4
- 5
- 6
- 7
- 8
- 9
- 10
- 11
- 12
- 13
- 14
- 15
没有返回数据:
{ "success": true, "code": 20000, "message": "成功", "data": {} }- 1
- 2
- 3
- 4
- 5
- 6
失败:
{ "success": false, "code": 20001, "message": "失败", "data": {} }- 1
- 2
- 3
- 4
- 5
- 6
因此,我们定义统一结果:
{ "success": 布尔, //响应是否成功 "code": 数字, //响应码 "message": 字符串, //返回消息 "data": HashMap //返回数据,放在键值对中 }- 1
- 2
- 3
- 4
- 5
- 6
二、创建统一结果返回类
- 在common模块下创建子模块common-utils

- 创建接口定义返回码
创建包com.atguigu.commonutils,创建接口ResultCode.java:
public interface ResultCode { //状态码:成功 public static Integer SUCCESS = 20000; //状态码:失败 public static Integer ERROR = 20001; }- 1
- 2
- 3
- 4
- 5
- 6
- 7
- 创建结果类
创建类R.java
@Data public class R { @ApiModelProperty("是否成功") private boolean success; @ApiModelProperty("响应码") private Integer code; @ApiModelProperty("返回信息") private String message; @ApiModelProperty("返回数据") private Map- 1
- 2
- 3
- 4
- 5
- 6
- 7
- 8
- 9
- 10
- 11
- 12
- 13
- 14
- 15
- 16
- 17
- 18
- 19
- 20
- 21
- 22
- 23
- 24
- 25
- 26
- 27
- 28
- 29
- 30
- 31
- 32
- 33
- 34
- 35
- 36
- 37
- 38
- 39
- 40
- 41
- 42
- 43
- 44
- 45
- 46
- 47
- 48
- 49
- 50
- 51
- 52
- 53
- 54
- 55
- 56
- 57
- 58
- 59
- 60
- 61
- 62
三、统一返回结果使用
- 在service模块中添加依赖
common_utils com.atguigu 0.0.1-SNAPSHOT - 1
- 2
- 3
- 4
- 5
- 修改Controller中的返回结果
@Api(description = "讲师管理") @RestController @CrossOrigin //解决跨域问题 @RequestMapping("/eduservice/edu-teacher") public class EduTeacherController { @Autowired private EduTeacherService eduTeacherService; // 查询讲师表所有数据 // 访问地址: http://localhost:8001/eduservice/edu-teacher/findAll @ApiOperation(value = "所有讲师列表") @GetMapping("/findAll") public R findAllTeacher() { Listlist = eduTeacherService.list(null); return R.ok().data("items", list); } // 逻辑删除讲师 // 访问地址:http://localhost:8001/eduservice/edu-teacher/deleteTeacherById/id @ApiOperation(value = "根据ID删除讲师") @DeleteMapping("deleteTeacherById/{id}") public R removeTeacher(@ApiParam(name = "id", value = "讲师ID", required = true)@PathVariable String id) { boolean flag = eduTeacherService.removeById(id); if (flag) { return R.ok(); } else { return R.error(); } } } - 1
- 2
- 3
- 4
- 5
- 6
- 7
- 8
- 9
- 10
- 11
- 12
- 13
- 14
- 15
- 16
- 17
- 18
- 19
- 20
- 21
- 22
- 23
- 24
- 25
- 26
- 27
- 28
- 29
- 30
- 31
- 32
- 33
- 34
- 35

四、分页和条件查询接口开发
一、分页
- MyBatisPlusConfig中配置分页插件
/** * 分页插件 */ @Bean public PaginationInterceptor paginationInterceptor() { return new PaginationInterceptor(); }- 1
- 2
- 3
- 4
- 5
- 6
- 7
- 分页Controller方法
在EduTeacherController类中添加分页的方法:
// 分页查询讲师的方法 @ApiOperation(value = "分页讲师列表") @GetMapping("/pageList/{page}/{limit}") public R pageList(@ApiParam(name = "page", value = "当前页码", required = true)@PathVariable Long page, @ApiParam(name = "limit", value = "每页记录数", required = true)@PathVariable Long limit) { // 创建page对象 PagepagePram = new Page<>(page, limit); // 调用方法实现分页 // 调用方法时,底层封装,把分页所有数据封装到pageParam对象里面 eduTeacherService.page(pagePram, null); // 获取查询到的数据 List records = pagePram.getRecords(); // 获取总记录数 long total = pagePram.getTotal(); return R.ok().data("total", total).data("rows", records); } - 1
- 2
- 3
- 4
- 5
- 6
- 7
- 8
- 9
- 10
- 11
- 12
- 13
- 14
- 15
- 16
- 17
- Swagger 中测试


二、多条件组合查询带分页
根据讲师名称
name、讲师头衔level、讲师入驻时间gmt_create(时间段)查询。- 创建查询对象
在entity包下创建vo包,并且创建TeacherQuery查询对象:
@ApiModel(value = "Teacher查询对象", description = "讲师查询对象封装") @Data public class TeacherQuery implements Serializable { private static final long serialVersionUID = 1L; @ApiModelProperty(value = "教师名称,模糊查询") private String name; @ApiModelProperty(value = "头衔 1高级讲师 2首席讲师") private Integer level; @ApiModelProperty(value = "查询开始时间", example = "2019-01-01 10:10:10") private String begin;//注意,这里使用的是String类型,前端传过来的数据无需进行类型转换 @ApiModelProperty(value = "查询结束时间", example = "2019-12-01 10:10:10") private String end; }- 1
- 2
- 3
- 4
- 5
- 6
- 7
- 8
- 9
- 10
- 11
- 12
- 13
- 14
- 15
- 16
- 17
- 18
- 19
- service
接口:
public interface EduTeacherService extends IService{ // 多条件查询讲师带分页 void pageQuery(Page pageParam, TeacherQuery teacherQuery); } - 1
- 2
- 3
- 4
实现:
@Service public class EduTeacherServiceImpl extends ServiceImplpageParam, TeacherQuery teacherQuery) { //构建条件 QueryWrapper wrapper = new QueryWrapper<>(); //取出值,判断他们是否有值 String name = teacherQuery.getName(); Integer level = teacherQuery.getLevel(); String begin = teacherQuery.getBegin(); String end = teacherQuery.getEnd(); //判断条件值是否为空,如果不为空,拼接条件 //判断是否有传入教师名 if (!StringUtils.isEmpty(name)){ //构建条件 wrapper.like("name",name); //参数1:数据库字段名; 参数2:模糊查询的值 } //判断是否传入教师头衔 if (!StringUtils.isEmpty(level)){ //构造条件 wrapper.eq("level",level); } if (!StringUtils.isEmpty(begin)){ //构造条件 wrapper.ge("gmt_create",begin); //ge:大于等于 } if (!StringUtils.isEmpty(begin)){ //构造条件 wrapper.le("gmt_modified",end); //le: 小于等于 } baseMapper.selectPage(pageParam, wrapper); } } - 1
- 2
- 3
- 4
- 5
- 6
- 7
- 8
- 9
- 10
- 11
- 12
- 13
- 14
- 15
- 16
- 17
- 18
- 19
- 20
- 21
- 22
- 23
- 24
- 25
- 26
- 27
- 28
- 29
- 30
- 31
- 32
- 33
- 34
- 35
- 36
- 37
- 38
- 39
- 40
- 41
- 42
- 43
- 44
- controller
在EduTeacherController类中添加pageTeacherCondition方法,代码如下:
// 多条件查询讲师带分页 @ApiOperation(value = "多条件查询讲师带分页") @PostMapping("pageTeacherCondition/{page}/{limit}") public R pageTeacherCondition(@ApiParam(name = "page", value = "当前页码", required = true)@PathVariable Long page, @ApiParam(name = "limit", value = "每页记录数", required = true)@PathVariable Long limit, @RequestBody(required = false) TeacherQuery teacherQuery) { // 创建分页page对象 PagepageParam = new Page<>(page, limit); // 调用方法实现多条件分页查询 eduTeacherService.pageQuery(pageParam, teacherQuery); // 获取查询到的数据 List records = pageParam.getRecords(); // 获取总记录数 long total = pageParam.getTotal(); return R.ok().data("total", total).data("rows", records); } - 1
- 2
- 3
- 4
- 5
- 6
- 7
- 8
- 9
- 10
- 11
- 12
- 13
- 14
- 15
- 16
- 17
- 18
- 19
- 20
- Swagger 中测试

五、新增和修改讲师接口开发
一、自动填充封装
- 在service-base模块中添加
创建包handler, 在此包下创建MyMetaObjectHandler自动填充类:
@Component public class MyMetaObjectHandler implements MetaObjectHandler { @Override public void insertFill(MetaObject metaObject) { //参数1:对应类中的属性名称 this.setFieldValByName("gmtCreate", new Date(), metaObject); this.setFieldValByName("gmtModified", new Date(), metaObject); } @Override public void updateFill(MetaObject metaObject) { this.setFieldValByName("gmtModified", new Date(), metaObject); } }- 1
- 2
- 3
- 4
- 5
- 6
- 7
- 8
- 9
- 10
- 11
- 12
- 13
- 14
- 15
- 在实体类添加自动填充注解
@ApiModelProperty(value = "创建时间") @TableField(fill = FieldFill.INSERT) private Date gmtCreate; @ApiModelProperty(value = "更新时间") @TableField(fill = FieldFill.INSERT_UPDATE) private Date gmtModified;- 1
- 2
- 3
- 4
- 5
- 6
- 7
二、controller方法定义
- 添加讲师
// 添加讲师 @ApiOperation(value = "添加讲师") @PostMapping("addTeacher") public R addTeacher(@RequestBody EduTeacher eduTeacher) { boolean save = eduTeacherService.save(eduTeacher); if (save) { return R.ok(); } else { return R.error(); } }- 1
- 2
- 3
- 4
- 5
- 6
- 7
- 8
- 9
- 10
- 11
- 根据id查询
// 根据讲师id进行查询 @ApiOperation(value = "根据id查询") @GetMapping("/getTeacher/{if}") public R getTeacher(@PathVariable String id) { EduTeacher eduTeacher = eduTeacherService.getById(id); return R.ok().data("teacher", eduTeacher); }- 1
- 2
- 3
- 4
- 5
- 6
- 7
- 根据id修改
// 修改讲师 @ApiOperation(value = "修改讲师") @PostMapping("updateTeacher") public R updateTeacher(@RequestBody EduTeacher eduTeacher) { boolean flag = eduTeacherService.updateById(eduTeacher); if (flag) { return R.ok(); } else { return R.error(); } }- 1
- 2
- 3
- 4
- 5
- 6
- 7
- 8
- 9
- 10
- 11
六、统一异常处理
一、什么是统一异常处理
- 制造异常
int a = 10 / 0

- 什么是统一异常处理
我们想让异常结果也显示为统一的返回结果对象,并且统一处理系统的异常信息,那么需要统一异常处理。
二、统一异常处理
- 创建统一异常处理器
在模块service-base中创建GlobalExceptionHandler统一异常处理类:
// 统一异常处理 @ExceptionHandler(Exception.class) @ResponseBody //因为不在Controller中。没有@RestController,所以数据不会返回,需要加@ResponeseBody返回数据 public R error(Exception e){ e.printStackTrace(); return R.error().message("执行了全局异常处理"); }- 1
- 2
- 3
- 4
- 5
- 6
- 7
- 测试

三、处理特定异常
- 添加处理异常方法
// 特定异常 @ExceptionHandler(ArithmeticException.class) @ResponseBody public R error(ArithmeticException e){ e.printStackTrace(); return R.error().message("执行了特定异常"); }- 1
- 2
- 3
- 4
- 5
- 6
- 7
- 测试

四、自定义异常
- 创建自定义异常类
@Data @AllArgsConstructor @NoArgsConstructor public class GuliException extends RuntimeException { private Integer code; // 状态码 private String msg; // 异常信息 }- 1
- 2
- 3
- 4
- 5
- 6
- 7
- 8
- 9
- 业务中需要的位置抛出GuliException
try { int a = 10/0; }catch(Exception e) { throw new GuliException(20001,"出现自定义异常"); }- 1
- 2
- 3
- 4
- 5
- 添加异常处理方法
// 自定义异常 @ExceptionHandler(GuliException.class) @ResponseBody public R error(GuliException e){ e.printStackTrace(); return R.error().message(e.getMsg()).code(e.getCode()); }- 1
- 2
- 3
- 4
- 5
- 6
- 7
- 测试

七、统一日志处理
一、日志
- 配置日志级别
日志记录器(Logger)的行为是分等级的。分为:OFF、FATAL、ERROR、WARN、INFO、DEBUG、ALL
默认情况下,spring boot从控制台打印出来的日志级别只有INFO及以上级别,可以配置日志级别
# 设置日志级别 logging.level.root=WARN- 1
- 2
这种方式只能将日志打印在控制台上.
二、Logback日志
spring boot内部使用Logback作为日志实现的框架。
Logback和log4j非常相似,如果你对log4j很熟悉,那对logback很快就会得心应手。- 配置logback日志
删除application.properties中的日志配置:
# mybatis日志 #mybatis-plus.configuration.log-impl=org.apache.ibatis.logging.stdout.StdOutImpl # 设置日志级别 #logging.level.root=WARN- 1
- 2
- 3
- 4
在安装
idea彩色日志插件:grep-console
在resources中创建logback-spring.xml:logback INFO ${CONSOLE_LOG_PATTERN} UTF-8 ${log.path}/log_info.log %d{yyyy-MM-dd HH:mm:ss.SSS} [%thread] %-5level %logger{50} - %msg%n UTF-8 ${log.path}/info/log-info-%d{yyyy-MM- dd}.%i.log 100MB 15 INFO ACCEPT DENY ${log.path}/log_warn.log %d{yyyy-MM-dd HH:mm:ss.SSS} [%thread] %-5level %logger{50} - %msg%n UTF-8 ${log.path}/warn/log-warn-%d{yyyy-MM- dd}.%i.log 100MB 15 warn ACCEPT DENY ${log.path}/log_error.log %d{yyyy-MM-dd HH:mm:ss.SSS} [%thread] %-5level %logger{50} - %msg%n UTF-8 ${log.path}/error/log-error-%d{yyyy-MM- dd}.%i.log 100MB 15 ERROR ACCEPT DENY - 1
- 2
- 3
- 4
- 5
- 6
- 7
- 8
- 9
- 10
- 11
- 12
- 13
- 14
- 15
- 16
- 17
- 18
- 19
- 20
- 21
- 22
- 23
- 24
- 25
- 26
- 27
- 28
- 29
- 30
- 31
- 32
- 33
- 34
- 35
- 36
- 37
- 38
- 39
- 40
- 41
- 42
- 43
- 44
- 45
- 46
- 47
- 48
- 49
- 50
- 51
- 52
- 53
- 54
- 55
- 56
- 57
- 58
- 59
- 60
- 61
- 62
- 63
- 64
- 65
- 66
- 67
- 68
- 69
- 70
- 71
- 72
- 73
- 74
- 75
- 76
- 77
- 78
- 79
- 80
- 81
- 82
- 83
- 84
- 85
- 86
- 87
- 88
- 89
- 90
- 91
- 92
- 93
- 94
- 95
- 96
- 97
- 98
- 99
- 100
- 101
- 102
- 103
- 104
- 105
- 106
- 107
- 108
- 109
- 110
- 111
- 112
- 113
- 114
- 115
- 116
- 117
- 118
- 119
- 120
- 121
- 122
- 123
- 124
- 125
- 126
- 127
- 128
- 129
- 130
- 131
- 132
- 133
- 134
- 135
- 136
- 137
- 138
- 139
- 140
- 141
- 142
- 143
- 144
- 145
- 146
- 147
- 148
- 149
- 150
- 151
- 152
- 153
- 154
- 155
- 156
- 157
- 158
- 159
- 160
- 161
- 162
- 163
- 164
- 165
- 166
- 167
- 168
- 169
- 170
- 171
- 172
- 173
- 174
- 175
- 176
- 177
- 178
- 179
- 180
- 181
- 182
- 183
- 184
- 185
- 186
- 187
- 188
- 189
- 将错误日志输出到文件
在GlobalExceptionHandler类中添加@Slf4j注解。
异常语句输出:log.error(e.getMessage());
创作不易,如果有帮助到你,请给文章点个赞和收藏,让更多的人看到!!!
关注博主不迷路,内容持续更新中。 - 传统单体结构
-
相关阅读:
深度神经网络的应用
一个帮各位填秋招表格省一点事的浏览器插件
CSS-06:多类名的使用场景
Android 音量调节流程分析
mac系统占用内存太大怎么办?
Hadoop 3.x 笔记(配置、命令、脚本、重要图示、代码实现)
npm相关资料
【Swift 60秒】44 - Writing throwing functions
Day52 前端开发 JS 函数 BOM DOM
弘辽科技:淘宝14天降权会恢复吗?多久能恢复正常?
- 原文地址:https://blog.csdn.net/m0_52691962/article/details/127655494
