-
Spring Boot项目学习之通用权限管理项目03
继续接着上一篇,完成用户管理页面的增删改相关功能。
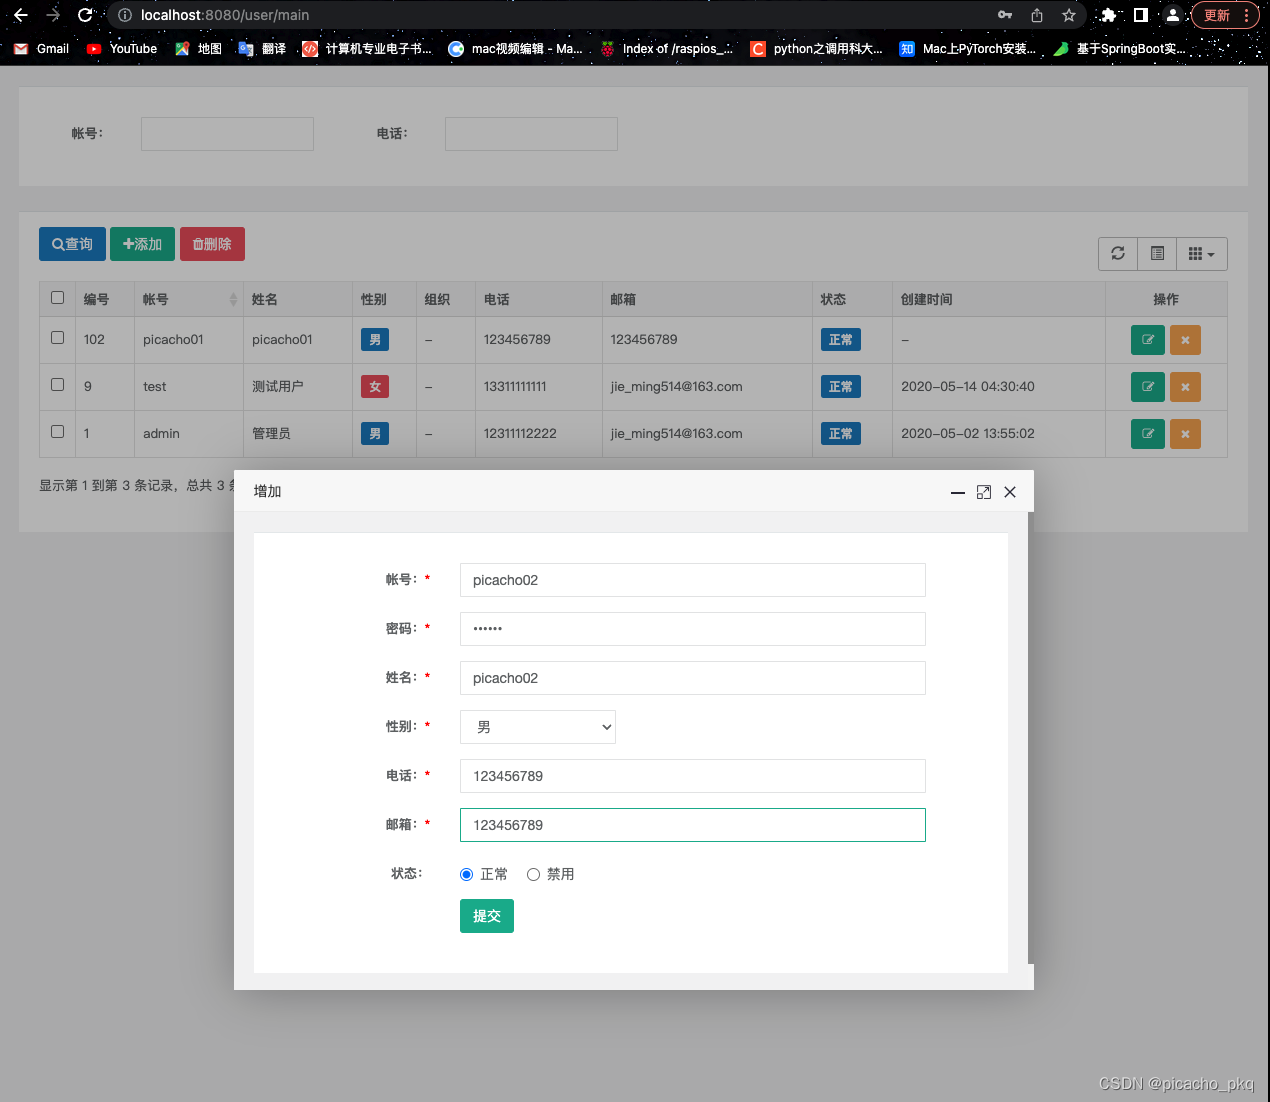
1.添加用户
在user文件夹添加add.html文件,用于填写新增用户信息。
DOCTYPE html> <html xmlns:th="http://www.thymeleaf.org"> <meta charset="utf-8"> <head th:include="include :: header">head> <body class="gray-bg"> <div class="wrapper wrapper-content "> <div class="row"> <div class="col-sm-12"> <div class="ibox float-e-margins"> <div class="ibox-content"> <form class="form-horizontal m-t" id="signupForm"> <div class="form-group"> <label class="col-sm-3 control-label">帐号:<strong style="color:red">*strong>label> <div class="col-sm-8"> <input id="username" name="username" class="form-control" type="text" autocomplete="off"> div> div> <div class="form-group"> <label class="col-sm-3 control-label">密码:<strong style="color:red">*strong>label> <div class="col-sm-8"> <input id="password" name="password" class="form-control" type="password" autocomplete="off"> div> div> <div class="form-group"> <label class="col-sm-3 control-label">姓名:<strong style="color:red">*strong>label> <div class="col-sm-8"> <input id="realname" name="realname" class="form-control" type="text" autocomplete="off"> div> div> <div class="form-group"> <label class="col-sm-3 control-label">性别:<strong style="color:red">*strong>label> <div class="col-sm-3"> <select class="form-control" id="sex" name="sex"> <option value="1" selected>男option> <option value="0">女option> select> div> div> <div class="form-group" hidden> <label class="col-sm-3 control-label">头像:label> <div class="col-sm-8"> <input id="avatar" name="avatar" class="form-control" type="text" value="/img/profile_small03.jpg"> div> div> <div class="form-group"> <label class="col-sm-3 control-label">电话:<strong style="color:red">*strong>label> <div class="col-sm-8"> <input id="phone" name="phone" class="form-control" type="text" autocomplete="off"> div> div> <div class="form-group"> <label class="col-sm-3 control-label">邮箱:<strong style="color:red">*strong>label> <div class="col-sm-8"> <input id="email" name="email" class="form-control" type="text" autocomplete="off"> div> div> <div class="form-group"> <label class="col-sm-3 control-label">状态:label> <div class="col-sm-8"> <label class="radio-inline"> <input type="radio" name="locked" value="0" checked/> 正常 label> <label class="radio-inline"> <input type="radio" name="locked" value="1" /> 禁用 label> div> div> <div class="form-group"> <div class="col-sm-8 col-sm-offset-3"> <button type="button" class="btn btn-primary" onclick="save()">提交button> div> div> form> div> div> div> div> div> <div th:include="include::footer">div> <script src="/js/plugins/validate/jquery.validate.extend.js" th:src="@{/js/plugins/validate/jquery.validate.extend.js}">script> <script type="text/javascript" src="/js/appjs/system/urmsUser/add.js" th:src="@{/js/appjs/system/urmsUser/add.js}"> script> body> html>- 1
- 2
- 3
- 4
- 5
- 6
- 7
- 8
- 9
- 10
- 11
- 12
- 13
- 14
- 15
- 16
- 17
- 18
- 19
- 20
- 21
- 22
- 23
- 24
- 25
- 26
- 27
- 28
- 29
- 30
- 31
- 32
- 33
- 34
- 35
- 36
- 37
- 38
- 39
- 40
- 41
- 42
- 43
- 44
- 45
- 46
- 47
- 48
- 49
- 50
- 51
- 52
- 53
- 54
- 55
- 56
- 57
- 58
- 59
- 60
- 61
- 62
- 63
- 64
- 65
- 66
- 67
- 68
- 69
- 70
- 71
- 72
- 73
- 74
- 75
- 76
- 77
- 78
- 79
- 80
- 81
- 82
- 83
- 84
- 85
- 86
- 87
- 88
接着需要添加add.js文件,主要功能包括获取填写信息,校验信息以及发起请求。
var prefix = ctx + "/user"; $().ready(function() { validateRule(); }); $.validator.setDefaults({ submitHandler : function() { save(); } }); function save() { if($("#signupForm").valid()) { debugger; $.ajax({ cache : true, type : "POST", url : prefix + "/save", data : $('#signupForm').serialize(), async : false, error : function(request) { parent.layer.alert("Connection error"); }, success : function(data) { if (data.code == 0) { parent.layer.msg("操作成功"); parent.reLoad(); var index = parent.layer.getFrameIndex(window.name); // 获取窗口索引 parent.layer.close(index); } else { parent.layer.alert(data.msg) } } }); } } // 验证规则 function validateRule() { var icon = " "; $("#signupForm").validate({ onsubmit: true, onkeyup: false, rules : { username : { required : true }, password : { required : true }, realname : { required : true }, organizationName : { required : true }, phone : { required : true }, email : { required : true } }, messages : { username : { required : icon + "请输入姓名" }, password : { required : icon + "请输入密码" }, realname : { required : icon + "请输入名称" }, phone : { required : icon + "请输入电话" }, email : { required : icon + "请输入邮箱" } }, focusCleanup: true }) }- 1
- 2
- 3
- 4
- 5
- 6
- 7
- 8
- 9
- 10
- 11
- 12
- 13
- 14
- 15
- 16
- 17
- 18
- 19
- 20
- 21
- 22
- 23
- 24
- 25
- 26
- 27
- 28
- 29
- 30
- 31
- 32
- 33
- 34
- 35
- 36
- 37
- 38
- 39
- 40
- 41
- 42
- 43
- 44
- 45
- 46
- 47
- 48
- 49
- 50
- 51
- 52
- 53
- 54
- 55
- 56
- 57
- 58
- 59
- 60
- 61
- 62
- 63
- 64
- 65
- 66
- 67
- 68
- 69
- 70
- 71
- 72
- 73
- 74
- 75
- 76
- 77
- 78
- 79
- 80
- 81
- 82
- 83
- 84
- 85
- 86
- 87
- 88
- onsubmit:true 表示当提交时校验表单信息。
- onkeyup: false 表示当按钮松开的时候校验表单信息。
- rules 表示设置验证规则。
- required : true 表示要验证的对象是否必填是。
通过 jQuery Validator 框架来对表单信息进行验证,可以尽量减少错误的表单提交,再加上准确的提示,这样就会有更好的用户体验感。
接着需要在主页面中为新增按钮添加点击事件,通过点击新增按钮跳转至添加用户页面,在main.js中添加add()方法。
function add() { layer.open({ type : 2, title : '增加', maxmin : true, shadeClose : false, // 点击遮罩关闭层 area : [ '800px', '520px' ], content : prefix + '/add' // iframe的url }); }- 1
- 2
- 3
- 4
- 5
- 6
- 7
- 8
- 9
- 10
接着完成控制层跳转页面的功能。
/** * 跳转至新增用户页面 * @return */ @GetMapping("/add") public String add(){ return "user/add"; }- 1
- 2
- 3
- 4
- 5
- 6
- 7
- 8
新增用户一般需要对用户的部分信息进行加密,比如密码;所以这里添加加密工具类,先添加Shiro框架依赖。
<dependency> <groupId>org.apache.shirogroupId> <artifactId>shiro-coreartifactId> <version>1.5.3version> dependency> <dependency> <groupId>org.apache.commonsgroupId> <artifactId>commons-lang3artifactId> <version>3.11version> dependency>- 1
- 2
- 3
- 4
- 5
- 6
- 7
- 8
- 9
- 10
- 11
- 12
- 13
接着在创建工具类MD5Utils.java。
public class MD5Utils { // 加盐 private static final String SALT = "picacho"; // 算法名称 private static final String ALGORITH_NAME = "md5"; private static final int HASH_ITERATIONS = 2; public static String encrypt(String pwd){ String newPwd = new SimpleHash(ALGORITH_NAME, pwd, ByteSource.Util.bytes(SALT), HASH_ITERATIONS).toHex(); return newPwd; } public static String encrypt(String username, String pwd){ String newPwd = new SimpleHash(ALGORITH_NAME, pwd, ByteSource.Util.bytes(username + SALT), HASH_ITERATIONS).toHex(); return newPwd; } }- 1
- 2
- 3
- 4
- 5
- 6
- 7
- 8
- 9
- 10
- 11
- 12
- 13
- 14
- 15
- 16
- 17
- 18
- 19
最后新增添加用户的接口。
/** * 新增用户 * @param urmsUser * @return */ @PostMapping("/save") @ResponseBody public R save(UrmsUser urmsUser){ String salt = RandomStringUtils.randomAlphanumeric(30); urmsUser.setSalt(salt); String pwd = urmsUser.getPassword() + salt; urmsUser.setPassword(MD5Utils.encrypt(urmsUser.getUsername(), pwd)); if(urmsUserService.insert(urmsUser) > 0){ return R.ok(); } return R.error(); }- 1
- 2
- 3
- 4
- 5
- 6
- 7
- 8
- 9
- 10
- 11
- 12
- 13
- 14
- 15
- 16
- 17
- 18
最后测试一下效果,查看添加用户功能。

2.修改用户
在user文件夹下添加edit.html,用于修改用户页面。
DOCTYPE html> <html lang="zh-CN" xmlns:th="http://www.thymeleaf.org"> <meta charset="utf-8"> <head th:include="include :: header">head> <body class="gray-bg"> <div class="wrapper wrapper-content"> <div class="row"> <div class="col-sm-12"> <div class="ibox float-e-margins"> <div class="ibox-content"> <form class="form-horizontal m-t" id="signupForm"> <input id="userId" name="userId" th:value="${urmsUser.userId}" type="hidden"> <div class="form-group"> <label class="col-sm-3 control-label">帐号:<strong style="color:red">*strong>label> <div class="col-sm-8"> <input id="username" name="username" th:value="${urmsUser.username}" class="form-control" type="text" disabled> div> div> <div class="form-group"> <label class="col-sm-3 control-label">姓名:<strong style="color:red">*strong>label> <div class="col-sm-8"> <input id="realname" name="realname" th:value="${urmsUser.realname}" class="form-control" type="text"> div> div> <div class="form-group"> <label class="col-sm-3 control-label">性别:<strong style="color:red">*strong>label> <div class="col-sm-3"> <select class="form-control" id="sex" name="sex"> <option value="1" th:field="*{urmsUser.sex}">男option> <option value="0" th:field="*{urmsUser.sex}">女option> select> div> div> <div class="form-group"> <label class="col-sm-3 control-label">电话:label> <div class="col-sm-8"> <input id="phone" name="phone" th:value="${urmsUser.phone}" class="form-control" type="text"> div> div> <div class="form-group"> <label class="col-sm-3 control-label">邮箱:label> <div class="col-sm-8"> <input id="email" name="email" th:value="${urmsUser.email}" class="form-control" type="text"> div> div> <div class="form-group"> <label class="col-sm-3 control-label">状态:label> <div class="col-sm-8"> <label class="radio-inline"> <input th:field="*{urmsUser.locked}" type="radio" name="locked" value="0" /> 正常 label> <label class="radio-inline"> <input th:field="*{urmsUser.locked}" type="radio" name="locked" value="1" /> 禁用 label> div> div> <div class="form-group"> <div class="col-sm-8 col-sm-offset-3"> <button type="submit" class="btn btn-primary">提交button> div> div> form> div> div> div> div> div> <div th:include="include::footer">div> <script type="text/javascript" src="/js/appjs/system/urmsUser/edit.js" th:src="@{/js/appjs/system/urmsUser/edit.js}"> script> body> html>- 1
- 2
- 3
- 4
- 5
- 6
- 7
- 8
- 9
- 10
- 11
- 12
- 13
- 14
- 15
- 16
- 17
- 18
- 19
- 20
- 21
- 22
- 23
- 24
- 25
- 26
- 27
- 28
- 29
- 30
- 31
- 32
- 33
- 34
- 35
- 36
- 37
- 38
- 39
- 40
- 41
- 42
- 43
- 44
- 45
- 46
- 47
- 48
- 49
- 50
- 51
- 52
- 53
- 54
- 55
- 56
- 57
- 58
- 59
- 60
- 61
- 62
- 63
- 64
- 65
- 66
- 67
- 68
- 69
- 70
- 71
- 72
- 73
- 74
添加edit.js文件,用于校验信息和发送更新请求。
var prefix = ctx + "/user"; $().ready(function() { validateRule(); }); $.validator.setDefaults({ submitHandler : function() { update(); } }); function update() { $.ajax({ cache : true, type : "POST", url : prefix + "/update", data : $('#signupForm').serialize(), async : false, error : function(request) { parent.layer.alert("Connection error"); }, success : function(data) { if (data.code == 0) { parent.layer.msg("操作成功"); parent.reLoad(); var index = parent.layer.getFrameIndex(window.name); // 获取窗口索引 parent.layer.close(index); } else { parent.layer.alert(data.msg) } } }); } function validateRule() { var icon = " "; $("#signupForm").validate({ rules : { name : { required : true } }, messages : { name : { required : icon + "请输入名字" } } }) }- 1
- 2
- 3
- 4
- 5
- 6
- 7
- 8
- 9
- 10
- 11
- 12
- 13
- 14
- 15
- 16
- 17
- 18
- 19
- 20
- 21
- 22
- 23
- 24
- 25
- 26
- 27
- 28
- 29
- 30
- 31
- 32
- 33
- 34
- 35
- 36
- 37
- 38
- 39
- 40
- 41
- 42
- 43
- 44
- 45
- 46
- 47
- 48
- 49
- 50
- 51
接着需要在主页面中为更新按钮添加点击事件,通过点击更新按钮跳转至更新用户页面,在main.js中添加edit()方法。
function edit(id) { layer.open({ type : 2, title : '编辑', maxmin : true, shadeClose : false, // 点击遮罩关闭层 area : [ '800px', '520px' ], content : prefix + '/edit/' + id // iframe的url }); }- 1
- 2
- 3
- 4
- 5
- 6
- 7
- 8
- 9
- 10
接着完成控制层跳转页面的功能。
/** * 跳转之更新用户界面 * @param userId * @param model * @return */ @GetMapping("/edit/{userId}") String edit(@PathVariable("userId") Integer userId,Model model){ UrmsUser urmsUser = urmsUserService.get(userId); model.addAttribute("urmsUser", urmsUser); return "user/edit"; }- 1
- 2
- 3
- 4
- 5
- 6
- 7
- 8
- 9
- 10
- 11
- 12
最后新增更新用户的接口。
/** * 更新用户 * @param urmsUser * @return */ @RequestMapping("/update") @ResponseBody public R update( UrmsUser urmsUser){ urmsUserService.updateByPrimaryKeySelective(urmsUser); return R.ok(); }- 1
- 2
- 3
- 4
- 5
- 6
- 7
- 8
- 9
- 10
- 11
最后测试一下效果,查看更新用户功能。


3.删除单个用户
删除单个用户,主要通过用户ID删除指定的用户,在main.js文件中添加删除方法。
function remove(id) { layer.confirm('确定要删除选中的记录?', { btn : [ '确定', '取消' ] }, function() { $.ajax({ url : prefix+"/remove", type : "post", data : { 'userId' : id }, success : function(r) { if (r.code==0) { layer.msg(r.msg); reLoad(); }else{ layer.msg(r.msg); } } }); }) }- 1
- 2
- 3
- 4
- 5
- 6
- 7
- 8
- 9
- 10
- 11
- 12
- 13
- 14
- 15
- 16
- 17
- 18
- 19
- 20
- 21
在控制层添加删除单个用户接口。
/** * 根据用户ID删除用户 * @param userId * @return */ @PostMapping("/remove") @ResponseBody public R remove(Integer userId){ if(urmsUserService.deleteByPrimaryKey(userId) > 0){ return R.ok(); } return R.error(); }- 1
- 2
- 3
- 4
- 5
- 6
- 7
- 8
- 9
- 10
- 11
- 12
- 13
最后测试一下效果,查看删除单个用户功能。


4.批量删除用户
在mapper层添加批量删除用户的方法,并在XML文件中添加sql实现。
// 批量删除用户 int batchRemove(Integer[] userIds);- 1
- 2
<delete id ="batchRemove"> delete from urms_user where user_id in <foreach item="userId" collection="array" open="(" separator="," close=")"> #{userId} foreach> delete>- 1
- 2
- 3
- 4
- 5
- 6
接着在service层添加批量删除方法。
/** * 批量删除用户 * @param userIds * @return */ int batchRemove(Integer[] userIds);- 1
- 2
- 3
- 4
- 5
- 6
@Override public int batchRemove(Integer[] userIds){ return urmsUserMapper.batchRemove(userIds); }- 1
- 2
- 3
- 4
最后在controller层添加批量删除用户的接口。
@PostMapping("/batchRemove") @ResponseBody public R remove(@RequestParam("ids[]") Integer[] userIds){ urmsUserService.batchRemove(userIds); return R.ok(); }- 1
- 2
- 3
- 4
- 5
- 6
在main.js中添加批量删除的方法。
function batchRemove() { var rows = $('#exampleTable').bootstrapTable('getSelections'); // 返回所有选择的行,当没有选择的记录时,返回一个空数组 if (rows.length == 0) { layer.msg("请选择要删除的数据"); return; } layer.confirm("确认要删除选中的'" + rows.length + "'条数据吗?", { btn : [ '确定', '取消' ] // 按钮 }, function() { var ids = new Array(); // 遍历所有选择的行数据,取每条数据对应的ID $.each(rows, function(i, row) { ids[i] = row['userId']; }); $.ajax({ type : 'POST', data : { "ids" : ids }, url : prefix + '/batchRemove', success : function(r) { if (r.code == 0) { layer.msg(r.msg); reLoad(); } else { layer.msg(r.msg); } } }); }, function() { }); }- 1
- 2
- 3
- 4
- 5
- 6
- 7
- 8
- 9
- 10
- 11
- 12
- 13
- 14
- 15
- 16
- 17
- 18
- 19
- 20
- 21
- 22
- 23
- 24
- 25
- 26
- 27
- 28
- 29
- 30
- 31
- 32
- 33
- 34
最后测试一下效果,查看批量删除用户功能。


源码下载地址:源码下载 -
相关阅读:
java.lang.Float类下floatValue()方法具有什么功能呢?
70-Java的日期时间:Date、SimpleDateFormat、Calendar、JDK8后新增日期API
某大厂面试题:说一说Java、Spring、Dubbo三者SPI机制的原理和区别
C++ TCP通信
使用ffmpeg进行音频处理
【译】All-In-One Search 在 Visual Studio 17.6 中可用
第三章——MySQL数据管理
Java多并发(七)| Executor框架(四种线程池详解)
类与对象(七)----递归
pywinauto:Windows桌面应用自动化测试(三)
- 原文地址:https://blog.csdn.net/pikcacho_pkq/article/details/127599913
