-
CSS入门学习笔记例题详解(下)
接上一篇:CSS入门学习笔记例题详解(一)
接下一篇:CSS入门学习笔记例题详解(三)1. 盒子模型
1.1 边框(border)


1.2 复合写法(没有顺序)

1.3 边框分开写法

1.4 表格边框粗细写法

1.5 内边距,内边距复合写法

注意事项:

例题:

1.6 padding应用

DOCTYPE html> <html lang="en"> <head> <meta charset="UTF-8"> <meta http-equiv="X-UA-Compatible" content="IE=edge"> <meta name="viewport" content="width=device-width, initial-scale=1.0"> <title>Documenttitle> <style> .nav{ height: 41px; width: 530px; border-top: 3px solid #ff8500; border-bottom: 1px solid #edeef0; background-color: #fcfcfc; } .nav a { display: inline-block; color: #4c4c4c; height: 41px; font-size: 12px; padding:10px 20px; text-decoration: none; } .nav a:hover { background-color: #fff; color: #ff8500; } style> head> <body> <div class="nav"> <a href="">设为首页a> <a href="">手机新浪网a> <a href="">移动客户端a> <a href="">博客a> <a href="">微博a> <a href="">关注我a> div> body> html>- 1
- 2
- 3
- 4
- 5
- 6
- 7
- 8
- 9
- 10
- 11
- 12
- 13
- 14
- 15
- 16
- 17
- 18
- 19
- 20
- 21
- 22
- 23
- 24
- 25
- 26
- 27
- 28
- 29
- 30
- 31
- 32
- 33
- 34
- 35
- 36
- 37
- 38
- 39
- 40
- 41
- 42
- 43
- 44
- 45
1.7 margin外边距
原理和padding一样


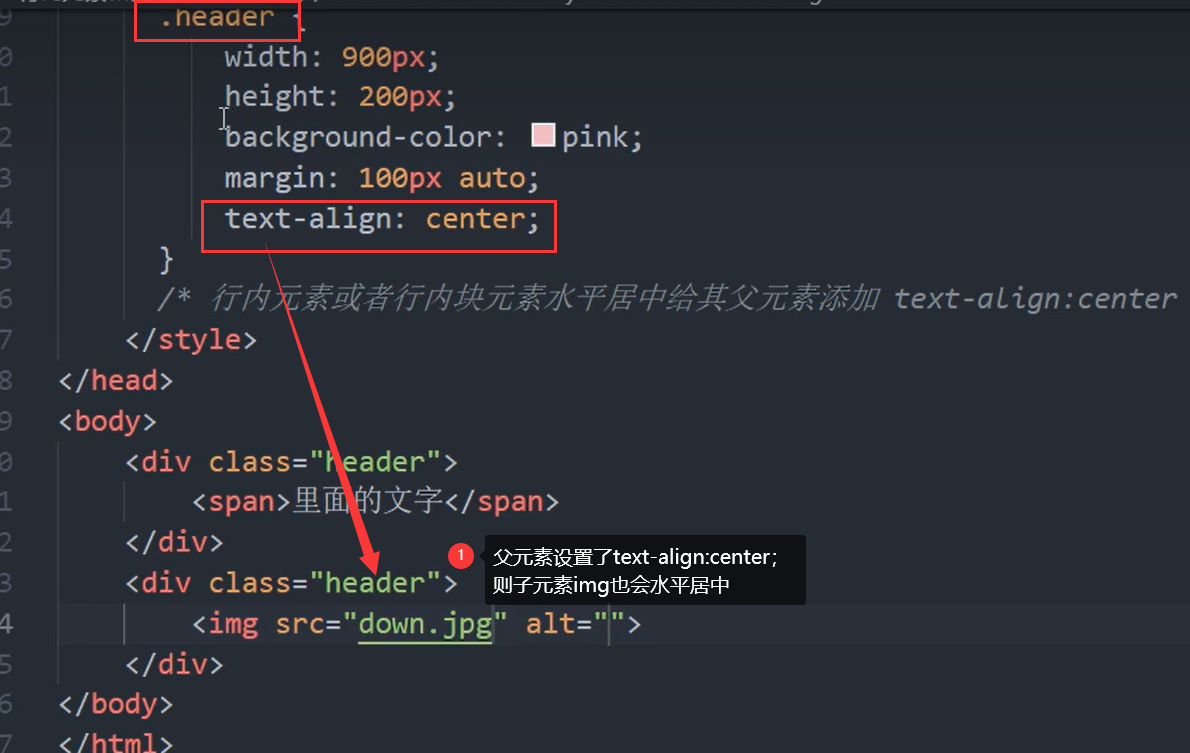
注意:行内元素和行内块元素水平居中:

1.7 父元素和子元素同时设置margin-top,显示结果会合并,解决办法如图

例题:

transparent是透明1.7.1 通配符选择器清除内外边距

1.8 PS基本操作

综合案例1

DOCTYPE html> <html lang="en"> <head> <meta charset="UTF-8"> <meta http-equiv="X-UA-Compatible" content="IE=edge"> <meta name="viewport" content="width=device-width, initial-scale=1.0"> <title>Documenttitle> <style> * { text-align: center; font-size: 14px "Helvetica Neue", Helvetica, Arial; } li { width: 234px; height: 340px; border: 2px solid white; } .brick { text-decoration: none; width: 234px; height: 300px; padding: 20px 30px; } img { width: 160px; height: 160px; padding: 0px 0px; } h3 { width: 214px; height: 21px; color: #333333; margin: 0px 10px 2px; padding: 0px 0px; } .desc { width: 214px; height: 21px; color: #b0b0b0; margin: 0px 10px 10px; font-size: 14px; } .price { width: 214px; height: 21px; color: #FF6700; margin: 0px 10px 14px; } style> head> <body> <ul> <li type="none"> <a href="#" class="brick"> <div class="figure"> <img src="小米手机.jpg" alt=""> div> <h3> Xiaomi 125 h3> <p class="desc">小尺寸性能旗舰 | 徕卡影像p> <p class="price">3999元起p> a> li> ul> body> html>- 1
- 2
- 3
- 4
- 5
- 6
- 7
- 8
- 9
- 10
- 11
- 12
- 13
- 14
- 15
- 16
- 17
- 18
- 19
- 20
- 21
- 22
- 23
- 24
- 25
- 26
- 27
- 28
- 29
- 30
- 31
- 32
- 33
- 34
- 35
- 36
- 37
- 38
- 39
- 40
- 41
- 42
- 43
- 44
- 45
- 46
- 47
- 48
- 49
- 50
- 51
- 52
- 53
- 54
- 55
- 56
- 57
- 58
- 59
- 60
- 61
- 62
- 63
- 64
- 65
- 66
- 67
- 68
- 69
- 70
- 71
- 72
- 73
- 74
- 75
- 76
- 77
综合案例2

DOCTYPE html> <html lang="en"> <head> <meta charset="UTF-8"> <meta http-equiv="X-UA-Compatible" content="IE=edge"> <meta name="viewport" content="width=device-width, initial-scale=1.0"> <title>Documenttitle> <style> * { padding: 0px; margin: 0px; } .all { border: 2px solid rgb(182, 179, 179); width: 300px; height: 210px; } .head { width: 300px; height: 50px; border-bottom: 2px solid rgb(182, 179, 179); line-height: 50px; } h3 { font-weight: normal; color: rgb(97, 91, 91); padding: 0px 20px; } li { color: rgb(97, 91, 91); padding: 5px 10px 5px 30px; } style> head> <body> <div class="all"> <div class="head"> <h3>品优购快报h3> div> <div class="body"> <ul type="none"> <li>【特惠】 爆款耳机5折秒li> <li>【特惠】 爆款耳机5折秒li> <li>【特惠】 爆款耳机5折秒li> <li>【特惠】 爆款耳机5折秒li> <li>【特惠】 爆款耳机5折秒li> ul> div> div> body> html>- 1
- 2
- 3
- 4
- 5
- 6
- 7
- 8
- 9
- 10
- 11
- 12
- 13
- 14
- 15
- 16
- 17
- 18
- 19
- 20
- 21
- 22
- 23
- 24
- 25
- 26
- 27
- 28
- 29
- 30
- 31
- 32
- 33
- 34
- 35
- 36
- 37
- 38
- 39
- 40
- 41
- 42
- 43
- 44
- 45
- 46
- 47
- 48
- 49
- 50
- 51
- 52
- 53
- 54
- 55
- 56
- 57
- 58
- 59
- 60
1.9 圆角边框
- 代码
div{ width:200px; height:200px; border-radius:10px; background-color:aqua; }- 1
- 2
- 3
- 4
- 5
- 6

-
例题:div显示一个圆


圆角矩形,把border-radius设置为高度的一半即可。 -
属性值可以写1个,也可以写4个

4. border-top-left-radius:10px;//只设置左上角为圆角边框,其他不变1.10 盒子阴影box-shadow

例题:

1.10.2 文字阴影

-
相关阅读:
springboot 基于微信小程序的高校学生疫情在校封闭管理系统的设计与实现 毕业设计源码240904
三大缓存技术--localStorage、sessionStorage、Cookie
虹科教您 | 如何选择超声波储罐液位传感器(一)
【reverse】buu-CrackRTF——提取PE中的resource、rtf的固定文件头
shopee选品软件:解决你店铺选品难题的神器-shopee选品软件知虾
数据库访问中间件--springdata-jpa的基本使用
.NET CORE医学检验信息系统源码,B/S架构 saas模式
【C++】运算符重载
Mybatis框架--优化过程
【分类-SVDD】基于支持向量数据描述 (SVDD) 的多类分类算法附matlab代码
- 原文地址:https://blog.csdn.net/m0_47010003/article/details/126907365