-
使用openssl生成SAN证书 多个注意点
转自原文:https://blog.csdn.net/a145127/article/details/126311442 补充了几个注意点
前言
由于Golang 1.17以上强制使用SAN证书,故,需要在此进行生成。
如果,系统中安装了git、mingw64工具的话,就无需再安装openssl了,否则需要单独安装openssl。
win10安装与下载
其他系统请参考官方***
注意点***:- windows下面一直报错,请不要折腾环境,换Linux系统你会舒心很多
- 生成证书命令 会有多处 需要输入密码,注意看提示 不要忽略密码输入
- 最后生成的pem文件 如果报错,请不要纠结,再来一遍!
- pem文件的验收,cat xxx.pem 文件 有内容 表示成功,否则就再来一遍吧
1.创建一个“cert”目录用于,保存证书和配置文件。
2.创建配置文件(openssl.cnf),并保存到“cert”目录下,内容如下:
[ CA_default ] copy_extensions = copy [req] distinguished_name = req_distinguished_name x509_extensions = v3_req prompt = no [req_distinguished_name] # 国家 C = CN # 省份 ST = Shenzhen # 城市 L = Shenzhen # 组织 O = Arvin # 部门 OU = Arvin # 域名 CN = test.example.com [v3_req] basicConstraints = CA:FALSE keyUsage = nonRepudiation, digitalSignature, keyEncipherment subjectAltName = @alt_names [alt_names] # 解析域名 DNS.1 = *.test.example.com # 可配置多个域名,如下 DNS.2 = *.example.com- 1
- 2
- 3
- 4
- 5
- 6
- 7
- 8
- 9
- 10
- 11
- 12
- 13
- 14
- 15
- 16
- 17
- 18
- 19
- 20
- 21
- 22
- 23
- 24
- 25
- 26
- 27
- 28
- 29
- 30
- 31
- 32
3.生成根证书(rootCa)
使用命令行工具,进入到“cert”目录下,并执行如下命令:
# 生成私钥,密码可以输入123456 $ openssl genrsa -des3 -out ca.key 2048 # 使用私钥来签名证书 $ openssl req -new -key ca.key -out ca.csr # 使用私钥+证书来生成公钥 $ openssl x509 -req -days 365 -in ca.csr -signkey ca.key -out ca.crt- 1
- 2
- 3
- 4
- 5
- 6
- 7
- 8
4.在“cert”目录下,分别创建“server”、“client”目录,它们用来保存服务器密钥与客户端密钥。
5.生成服务器密钥
使用命令行工具,进入到“cert”目录下,并执行如下命令:
# 生成服务器私钥,密码输入123456 $ openssl genpkey -algorithm RSA -out server/server.key # 使用私钥来签名证书 $ openssl req -new -nodes -key server/server.key -out server/server.csr -config openssl.cnf -extensions 'v3_req' # 生成SAN证书 $ openssl x509 -req -in server/server.csr -out server/server.pem -CA ca.crt -CAkey ca.key -CAcreateserial -extfile ./openssl.cnf -extensions 'v3_req'- 1
- 2
- 3
- 4
- 5
- 6
- 7
- 8
6.生成客户端密钥
使用命令行工具,进入到“cert”目录下,并执行如下命令:
# 生成客户端私钥,密码输入123456 $ openssl genpkey -algorithm RSA -out client/client.key # 使用私钥来签名证书 $ openssl req -new -nodes -key client/client.key -out client/client.csr -config openssl.cnf -extensions 'v3_req' # 生成SAN证书 $ openssl x509 -req -in client/client.csr -out client/client.pem -CA ca.crt -CAkey ca.key -CAcreateserial -extfile ./openssl.cnf -extensions 'v3_req'- 1
- 2
- 3
- 4
- 5
- 6
- 7
- 8
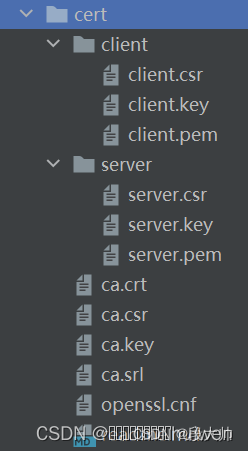
最后给出一个效果图:
-
相关阅读:
12--Django-批量插入数据、分页原理、分页器的使用
angular2+ 集成系统利用服务作为模块通信中间件
《性能之巅第2版》阅读笔记(二)--CPU监测
推谷子转化动物饲料建议 国稻种芯:解读制定饲草产业规划
《web课程设计》用HTML CSS做一个简洁、漂亮的个人博客网站
[Codeforces] combinatorics (R1200) Part.1
wav to image 的数据集制作代码
Activiti兼容达梦数据库
LeetCode_3_无重复字符的最长子串
用Rust手把手编写一个Proxy(代理), TLS加密通讯
- 原文地址:https://blog.csdn.net/qq_35306993/article/details/126907049
