-
PyQt5中的layout布局
本文所述的内容完全在QtDesigner中自动完成,而这里写的内容只是加深对其底层的认识,并不是必要学习的。绝对指定位置
- widget.move(x, y): 设置控件widget的位置。
- widget.resize(width, heigth): 设置控件widget的尺寸。
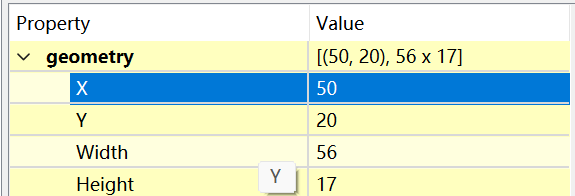
- widget.setGeometry(x, y, width, heigth): 设置控件widget的位置与尺寸。
- 对位置并不灵活,比如控件拖拽时不会自动调整,且很多对其需要自己手动的计算。
- 在QtDesigner可以通过geometry的x,y设置控件在容器中的相对位置。如果移出容器,则x,y的值为相对于窗口的值。
使用layout布局
Horizontal Layout: 横向布局(沿水平方向)
- QHBoxLayout
Horizontal Layout常用方法
-
addLayout(…)
QBoxLayout.addLayout(QLayout, int stretch=0) -
addWidget(…)
QBoxLayout.addWidget(QWidget, int stretch=0, Qt.Alignment alignment=0)
为布局中添加控件,stretch(拉伸因子)只适用与QBoxLayout,widget和box会随着stretch的变大而增大;alignment指定对齐的方式 -
addSpacing(…)
QBoxLayout.addSpacing(int)
通过该方法增加额外的space。
from PyQt5.QtWidgets import * import sys class Window(QWidget): def __init__(self): super().__init__() self.init_ui() def init_ui(self): bt1 = QPushButton("Button 1", self) bt2 = QPushButton("Button 2", self) bt3 = QPushButton("Button 3", self) h_box = QHBoxLayout() h_box.addWidget(bt1) h_box.addWidget(bt2) h_box.addWidget(bt3) self.setLayout(h_box) if __name__ == "__main__": app = QApplication(sys.argv) window = Window() window.show() sys.exit(app.exec_())- 1
- 2
- 3
- 4
- 5
- 6
- 7
- 8
- 9
- 10
- 11
- 12
- 13
- 14
- 15
- 16
- 17
- 18
- 19
- 20
- 21
- 22
- 23
- 24
- 25
QVBoxLayout: 竖向布局(沿垂直方向)
- QVBoxLayout
QVBoxLayout常用方法
- 同Horizontal Layout
from PyQt5.QtWidgets import * import sys class Window(QWidget): def __init__(self): super().__init__() self.init_ui() def init_ui(self): bt11 = QPushButton("Button 11", self) bt22 = QPushButton("Button 22", self) bt33 = QPushButton("Button 33", self) v_box = QVBoxLayout() v_box.addWidget(bt11) v_box.addWidget(bt22) v_box.addWidget(bt33) self.setLayout(v_box) if __name__ == "__main__": app = QApplication(sys.argv) window = Window() window.show() sys.exit(app.exec_())- 1
- 2
- 3
- 4
- 5
- 6
- 7
- 8
- 9
- 10
- 11
- 12
- 13
- 14
- 15
- 16
- 17
- 18
- 19
- 20
- 21
- 22
- 23
- 24
- 25
Grid Layout: 网格布局
- QGridLayout
Grid Layout常用方法
-
QGridLayout.addWidget(QWidget)
-
QGridLayout.addWidget(QWidget * widget, int row, int column, Qt.Alignment alignment = 0 )
- QWidget:为所添加的组件
- row, column:为组件要添加的行和列数,默认从0开始
- alignment:对齐的方式
-
QGridLayout.addWidget(QWidget * widget, int fromRow, int fromColumn, int rowSpan, int columnSpan, Qt.Alignment alignment = 0)
当添加的组件跨越很多行或者列的时候,使用该方法。- fromRow:为组件起始的行数
- fromColumn:为组件起始的列数
- rowSpan:为组件跨越的行数
- columnSpan:为组件跨越的列数
- alignment:对齐的方式
-
addLayout(…) 参数说明同addWidget
-
QGridLayout.addLayout(QLayout, int, int, Qt.Alignment alignment=0)
-
QGridLayout.addLayout(QLayout, int, int, int, int, Qt.Alignment alignment=0)
其中参数说明同addWidget.
from PyQt5.QtWidgets import * import sys class Window(QWidget): def __init__(self): super(Window, self).__init__() self.init_ui() def init_ui(self): buttons = [QPushButton(str(i), self) for i in range(7)] grid = QGridLayout() grid.addWidget(buttons[0], 0, 0) grid.addWidget(buttons[1], 0, 1) grid.addWidget(buttons[2], 0, 2) grid.addWidget(buttons[3], 0, 3) grid.addWidget(buttons[4], 1, 0) grid.addWidget(buttons[5], 1, 1) grid.addWidget(buttons[6], 1, 2, 1, 2) self.setLayout(grid) if __name__ == "__main__": app = QApplication(sys.argv) win = Window() win.show() sys.exit(app.exec_())- 1
- 2
- 3
- 4
- 5
- 6
- 7
- 8
- 9
- 10
- 11
- 12
- 13
- 14
- 15
- 16
- 17
- 18
- 19
- 20
- 21
- 22
- 23
- 24
- 25
- 26
- 27
Form Layout: 表单布局
- QFormLayout
- 使用addRow方法进行表单布局的放置。
Form Layout常用方法
| addRow(…)
| QFormLayout.addRow(QWidget, QWidget)
| QFormLayout.addRow(QWidget, QLayout)
| QFormLayout.addRow(str, QWidget)
| QFormLayout.addRow(str, QLayout)
| QFormLayout.addRow(QWidget)
| QFormLayout.addRow(QLayout)from PyQt5.QtWidgets import * import sys class Window(QWidget): def __init__(self): super(Window, self).__init__() self.init_ui() def init_ui(self): form_layout = QFormLayout() label1 = QLabel("账号", self) label2 = QLabel("密码", self) label3 = QLabel("校验码", self) line_edit1 = QLineEdit() line_edit2 = QLineEdit() line_edit2.setEchoMode(QLineEdit.Password) line_edit3 = QLineEdit() form_layout.addRow(label1, line_edit1) form_layout.addRow(label2, line_edit2) form_layout.addRow(label3, line_edit3) self.setLayout(form_layout) if __name__ == "__main__": app = QApplication(sys.argv) win = Window() win.show() sys.exit(app.exec_())- 1
- 2
- 3
- 4
- 5
- 6
- 7
- 8
- 9
- 10
- 11
- 12
- 13
- 14
- 15
- 16
- 17
- 18
- 19
- 20
- 21
- 22
- 23
- 24
- 25
- 26
- 27
- 28
- 29
Layout 嵌套布局
- 布局添加子布局使用addLayout方法。
- 使用QVBoxLayout和QHBoxLayout实现网格效果。
- 先分别做好某一种布局,然后再使用另外一种布局的addLayout方法将其加入。
from PyQt5.QtWidgets import * import sys class Window(QWidget): def __init__(self): super(Window, self).__init__() self.init_ui() def init_ui(self): # 先分别做好两个水平布局,然后再进行垂直布局 v_box = QVBoxLayout() label = QLabel("The Title", self) h_box1 = QHBoxLayout() for i in range(3): button = QPushButton(str(i), self) h_box1.addWidget(button) h_box2 = QHBoxLayout() for i in range(4): button = QPushButton(str(i), self) h_box2.addWidget(button) v_box.addWidget(label) v_box.addLayout(h_box1) v_box.addLayout(h_box2) self.setLayout(v_box) if __name__ == "__main__": app = QApplication(sys.argv) win = Window() win.show() sys.exit(app.exec_())- 1
- 2
- 3
- 4
- 5
- 6
- 7
- 8
- 9
- 10
- 11
- 12
- 13
- 14
- 15
- 16
- 17
- 18
- 19
- 20
- 21
- 22
- 23
- 24
- 25
- 26
- 27
- 28
- 29
- 30
- 31
- 32
容器布局
- 可以直接建立一个容器,如Frame,把控件放置在里面,然后Frame布局为4种中的一种。
- 普通布局方式和Frame布局可以互相转化。

QtDesigner中操作
- 将控件选中右击选择需要布局的类型。
- 先从widget中选中布局方式,将控件拖进去。
- 对于GroupBox中的东西,将小的个体布局完之后,可以选中GroupBox进行整体布局。
- 当所有的GroupBox都布局完,对整个界面进行布局,选中界面空白处,右击选择布局方式,否则拉动边框时,里面的控件不会整体移动。

-
相关阅读:
C#调用管理员身份运行程序
水稻生物育种突破 国稻种芯-何登骥:功能性农业外源植物导入
Tomcat:Java Web
从React源码来学hooks是不是更香呢
MySQL——基础知识
51单片机电子钟六位数码管显示整点提醒仿真设计( proteus仿真+程序+原理图+报告+讲解视频)
配置网络接口的“IP“命令
【算法&消费者行为】算法性能预期如何增强冲动性购买?—推文分享—2024-07-16
js 高精度计算 - decimal.js 库
关于Cannot resolve xxx的解决办法
- 原文地址:https://blog.csdn.net/weixin_48668114/article/details/126797982
