-
【C++】侯捷:C++面向对象-笔记-01
C++面向对象高级编程(上)
文章目录
- C++面向对象高级编程(上)
- 一、学习目标
- 二、 C++类的分类
- 三、不带指针的类:Complex类设计规范
- 四、带有指针的类-String类设计规范
一、学习目标
目标:培养正规的,大器的编程习惯
Object Based(基于对象):
以良好的方式编写C++ class
- 没有指针成员变量的类(以Complex为例)
- 有指针成员变量的类(以String为例)
Object Oriented(面向对象):
学习class之间的关系
- 继承(inheritance)
- 复合(composition)
- 委托(delegation)
你将获得的代码:
complex.h complex-test.cpp string.h string-test.cpp- 1
- 2
- 3
- 4
- 5
1.1 关于C++
1.1.1 C++的历史
- B语言(1969)
- C语言(1972)
- C++语言(1983)(名称变化:new C -> C with Class -> C++)
- Java语言
- C#语言
1.1.2 C++演化
C++98(1.0)
C++03
C++11(2.0)
C++14
(1.0 到 2.0之间的都是小版本)
C++包括C++语言与C++标准库,一个真正的C++程序员要会使用标准库.

1.1.3 C vs C++

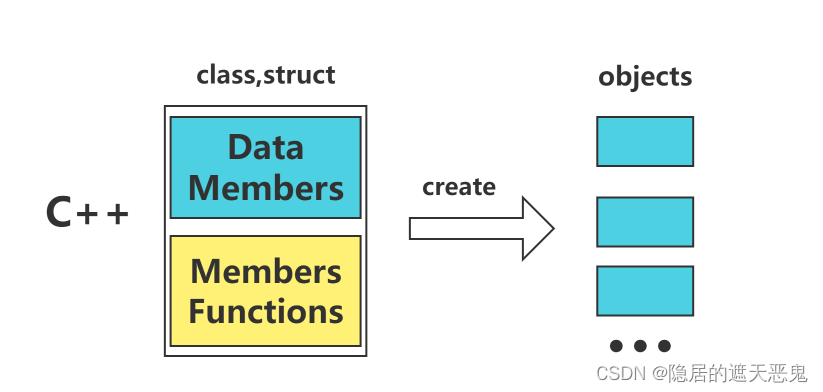
可以看出:C中数据和函数是分开的,C++中则是封装好的。
- Object Based : 面对的是单一class的设计
- Object Oriented:面对的是多重classes的设计。classes 和 classes之间的关系
二、 C++类的分类
classes的两种经典分类:带指针的与不带指针的
- Class without pointer member(s) 。(这里以complex程序为例)
- Class with pointer member(s) 。(这里以 string程序为例)


接下来,分别以complex类与带有指针的类string的规范设计过程去论述,带你了解正规情况下的类的设计过程。
三、不带指针的类:Complex类设计规范
3.1 C++ 代码的基本内容
3.1.1 基本组成
一个完整的C++程序一般包括声明部分(.h文件)+程序部分(.cpp文件)以及标准库部分。
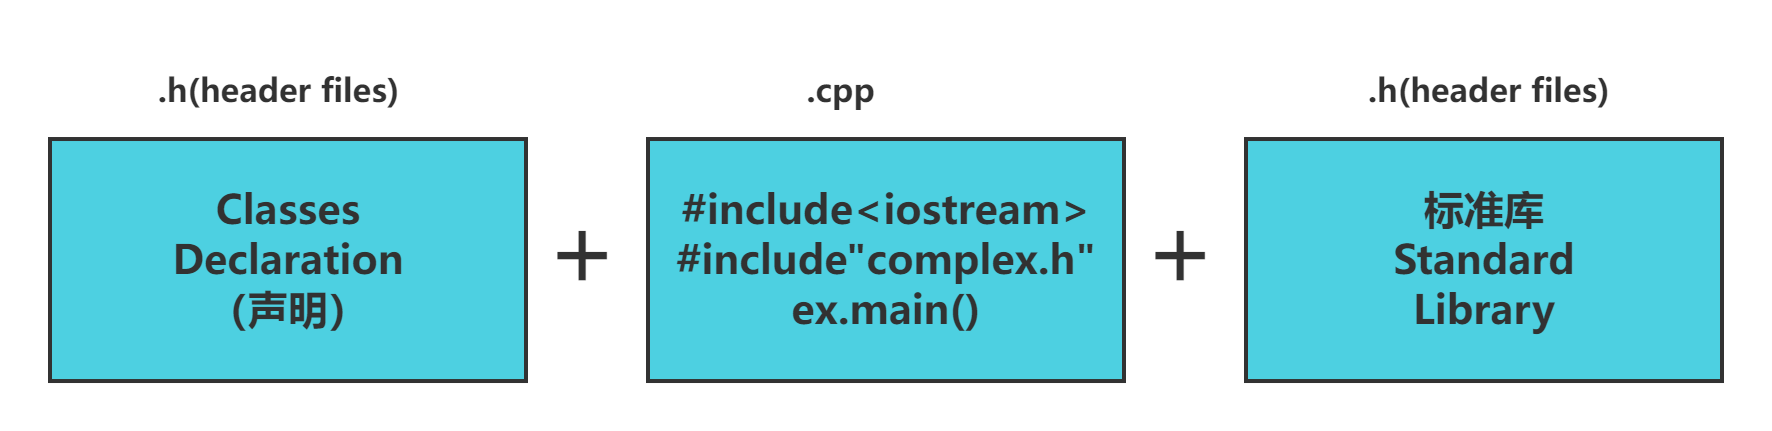
自己写的头文件用双引号;系统自带的头文件用<>;
扩展名不一定是.h或.cpp,也可能是.hpp或其他扩展名。3.1.2 防卫式声明
在C/C++头文件中,必须进行防卫式声明,防止头文件重复包含问题。如果是第一次包含该头文件,则定义宏 __XXXXX__H,并包含代码,如果是第二次包含,条件编译指令不通过,不再重复包含。
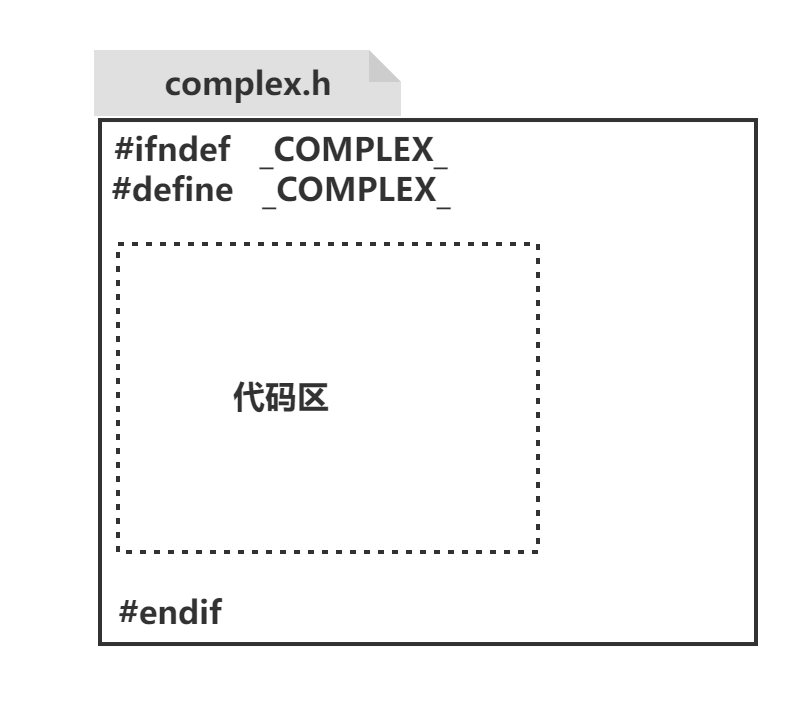
大家知道,我们写.h文件时,通常会加上防卫式声明,有以下两种方式:1.宏定义
#ifndef _FILENAME_ #define _FILENAME_ //... #endif- 1
- 2
- 3
- 4
2.编译器指令
#pragma once- 1
但是,为什么头文件中需要添加这种防卫式声明呢?如果没有这样的声明,会出现怎样的问题。这里,先看一个例子。
代码如下(并没有添加防卫式声明):// Car.h class Car { // ... };- 1
- 2
- 3
- 4
- 5
– “Person.h”包含了Car.h文件):
// Person.h #include "Car.h" class Person { public: Car car; };- 1
- 2
- 3
- 4
- 5
- 6
- 7
– 在"main.cpp"中,我们同时include两个头文件:
// main.cpp #include "Car.h" #include "Person.h" int main(int argc, const char * argv[]){ Person p; }- 1
- 2
- 3
- 4
- 5
- 6
此时,我们会发现编译出错:
Redefinition of ‘Car’.可是为什么会出现这样的情况呢?
我们需要知道,在预编译阶段,编译器会把.h文件展开,即main.cpp中的代码可以看做是:
class Car { // ... }; class Car { // ... }; class Person { public: Car car; }; int main(int argc, const char * argv[]) { Person p; }- 1
- 2
- 3
- 4
- 5
- 6
- 7
- 8
- 9
- 10
- 11
- 12
- 13
- 14
- 15
- 16
- 17
- 18
- 19
所以,我们可以知道防卫式声明的作用是:防止由于同一个头文件被包含多次,而导致了重复定义。
在这两种声明方式中:
#ifndef 依赖于宏定义名,当宏已经定义时,#endif之前的代码就会被忽略,但是这里需要注意宏命名重名的问题;
#pragma once 只能保证同一个文件不会被编译多次,但是当两个不同的文件内容相同时,仍然会出错。而且这是微软提供的编译器命令,当代码需要跨平台时,需要使用宏定义方式。3.1.3 头文件的布局
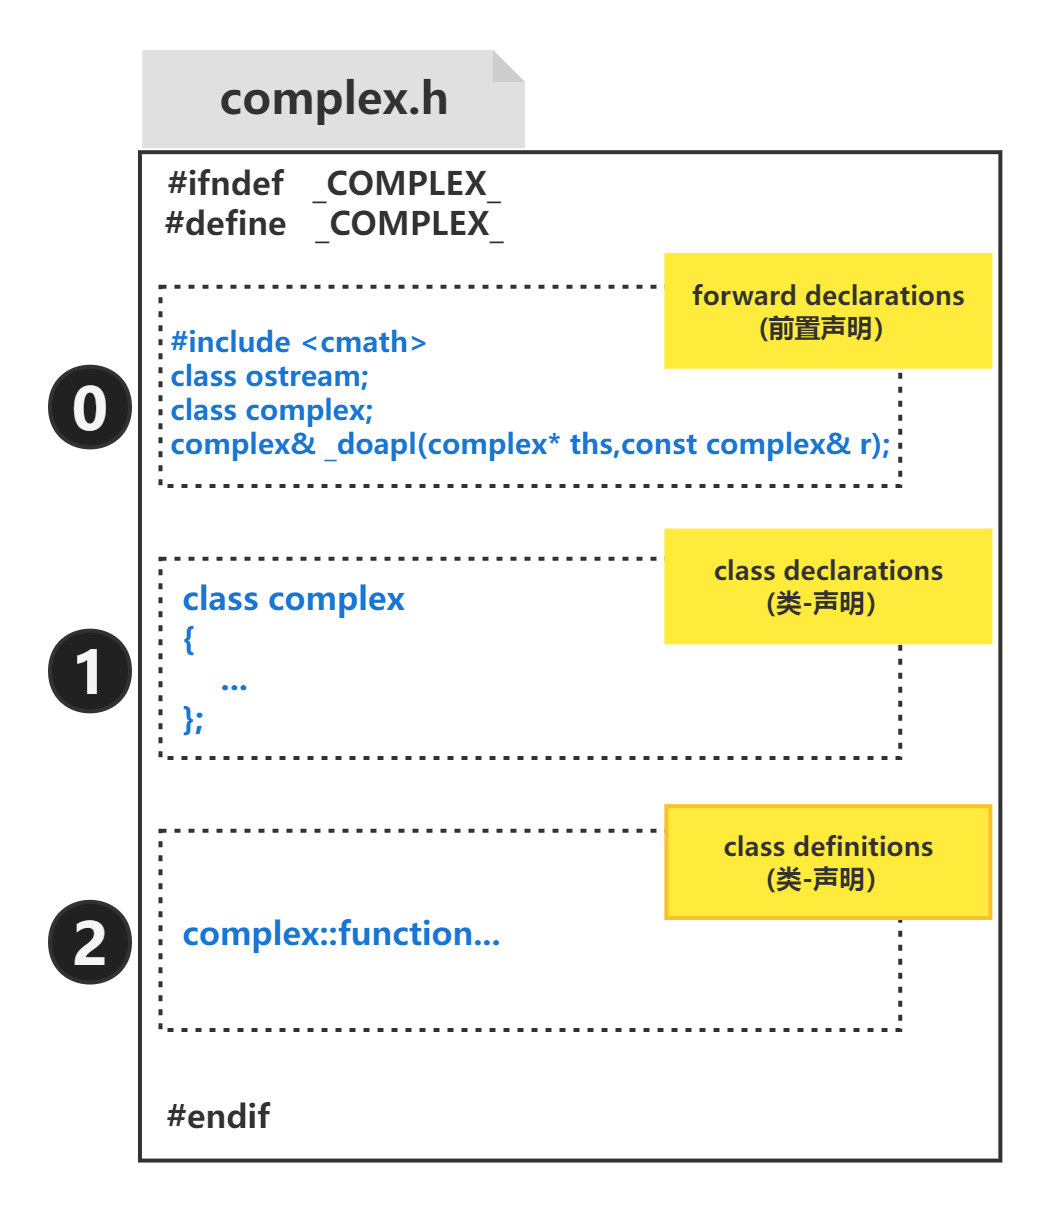
3.1.4 前置声明
尽可能地避免使用前置声明。使用
#include包含需要的头文件即可。前置声明(forward declaration)是类、函数和模板的纯粹声明,没伴随着其定义。
前置声明是为了降低编译依赖,防止修改一个头文件引发多米诺效应。
优点:
- 节省编译时间:多余的 #include 会迫使编译器展开更多的文件,处理更多的输入。
- 节省不必要的重新编译的时间: #include 使代码因为头文件中无关的改动而被重新编译多次。
缺点:
-
前置声明隐藏了依赖关系,头文件改动时,用户的代码会跳过必要的重新编译过程。
-
前置声明可能会被库的后续更改所破坏。前置声明函数或模板有时会妨碍头文件开发者变动其 API. 例如扩大形参类型,加个自带默认参数的模板形参等等。
-
极端情况下,用前置声明代替 #include 甚至都会暗暗地改变代码的含义:
// b.h: struct B {}; struct D : B {}; // good_user.cc: #include "b.h" void f(B*); void f(void*); void test(D* x) { f(x); } // calls f(B*)- 1
- 2
- 3
- 4
- 5
- 6
- 7
- 8
- 9
如果
#include被B和D的前置声明替代,test()就会调用f(void*)结论:
- 尽量避免前置声明那些定义在其他项目中的实体.
- 函数:总是使用 #include.
- 类模板:优先使用 #include.
3.1.5 #include 的路径及顺序
使用标准的头文件包含顺序可增强可读性, 避免隐藏依赖: 相关头文件, C 库, C++ 库, 其他库的 .h, 本项目内的 .h.
项目内头文件应按照项目源代码目录树结构排列, 避免使用 UNIX 特殊的快捷目录 . (当前目录) 或 … (上级目录).(即使用绝对路径而非相对路径)
#include 的顺序:
- dir2/foo2.h (这个cpp文件对应的.h文件,放置于优先位置)
- C 系统文件
- C++ 系统文件
- 其他库的 .h 文件
- 本项目内 .h 文件
这种优先的顺序排序保证 dir2/foo2.h(.h文件) 遗漏某些必要的库时, 其实现/测试(.cpp文件)的构建会立刻中止。这一条规则保证维护这些文件的人们首先看到构建中止的消息而不是别人。
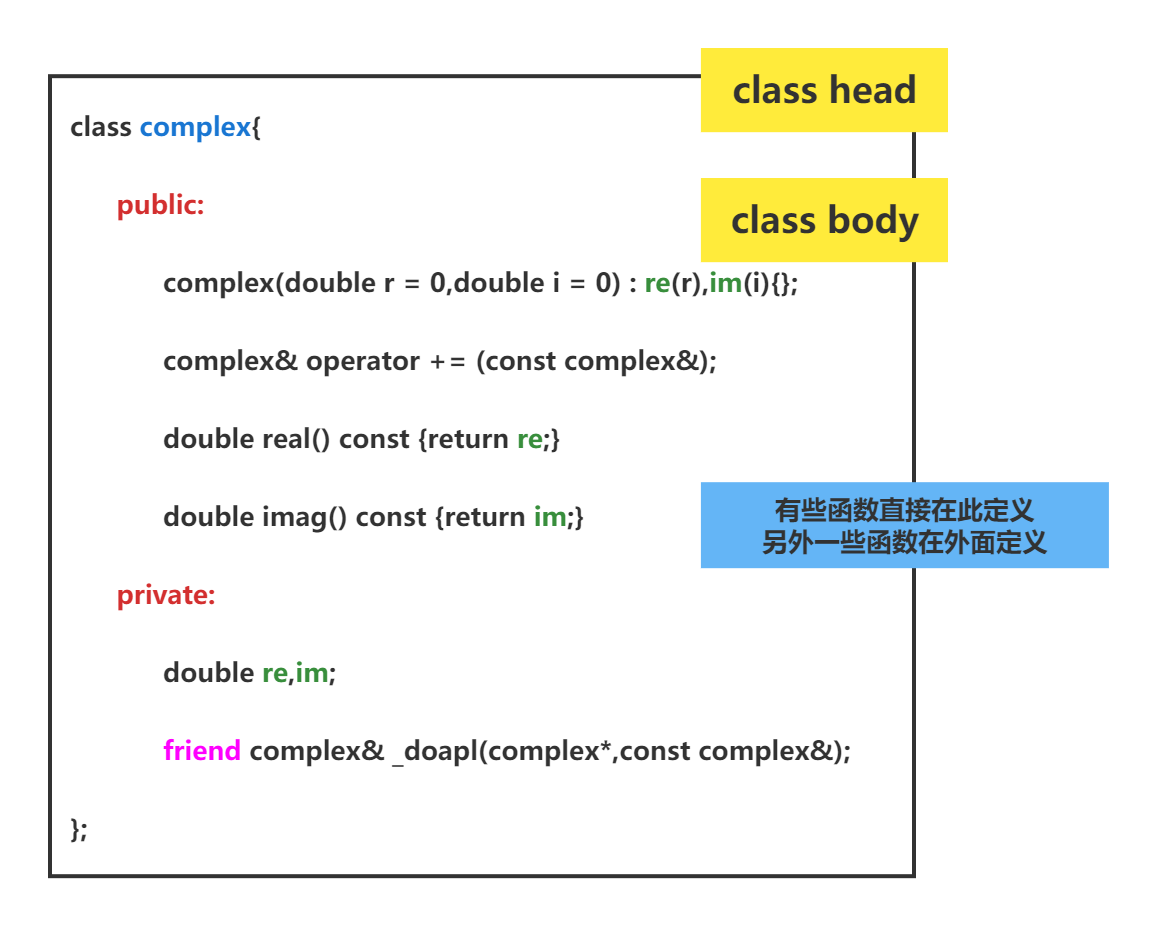
3.1.6 class的声明
3.2 模板类简介
3.2.1 模板函数的定义
C++提供了模板(template)编程的概念。
所谓模板,实际上是建立一个通用函数或类,其类内部的类型和函数的形参类型不具体指定,用一个虚拟的类型来代表。这种通用的方式称为模板。模板是泛型编程的基础,泛型编程即以一种独立于任何特定类型的方式编写代码。
简单来说,就是我们提供一个抽象的函数,并不具体指定其中数据的类型,而是某个虚拟类型代替。只提供基本的功能。其具体的数据类型,只在其被调用时视具体情况实例化。
这么说可能还是很抽象,举个例子就好理解了。
#include#include using namespace std; template //模板函数声明与定义 T2 test(T1 tmp, T2 tmp1) { T2 tmp2 = tmp + tmp1; return tmp2; } int main(void) { cout << "test(10, 5)=" << test(10, 5) << endl; //调用模板函数,模板函数通过传入的参数自动推导未实例化的类型 cout << "test(5,'A')=" << test(5,'A') << endl; cout << "test(10.5, 5.5) =" << test(10.5, 5.5) << endl; system("pause"); return 0; } - 1
- 2
- 3
- 4
- 5
- 6
- 7
- 8
- 9
- 10
- 11
- 12
- 13
- 14
- 15
- 16
- 17
- 18
- 19
- 20
- 21
- 22
- 23
函数模板的声明通过关键字template与typename 实现。其中,template告知编译器这是函数模板的声明,typename用来声明虚拟类型。比如你要声明一个模板函数,里面需要两个不同的变量,那么你就需要通过typename声明两个不同的虚拟类型T1,T2。
声明好后,你就可以在函数定义中使用虚拟类型来定义变量,但是要注意,用同一个虚拟类型定义的变量就只能是同种类型,比如用T1定义的变量只能是同种变量,可以是int,也可以是char。这取决于其实例化时被实例化为哪种类型。
3.2.2 模板函数的调用
3.2.2.1 显示的调用
可以显式的调用模板函数,即在调用时人为地指明虚拟类型的具体类型。
#include#include using namespace std; template //模板函数声明与定义 T2 test(T1 tmp, T2 tmp1) { T2 tmp2 = tmp + tmp1; return tmp2; } int main(void) { cout << "test(5,'A')=" << test - 1
- 2
- 3
- 4
- 5
- 6
- 7
- 8
- 9
- 10
- 11
- 12
- 13
- 14
- 15
- 16
- 17
- 18
- 19
- 20
- 21
3.2.2.2 隐式的调用
即不指明具体的数据类型,而让编译器根据传入的数据自动推导出数据类型。
#include#include using namespace std; template //模板函数声明与定义 T2 test(T1 tmp, T2 tmp1) { T2 tmp2 = tmp + tmp1; return tmp2; } int main(void) { cout << "test(5,'A')=" << test(5, 'A') << endl; //自动推导数据类型 system("pause"); return 0; } - 1
- 2
- 3
- 4
- 5
- 6
- 7
- 8
- 9
- 10
- 11
- 12
- 13
- 14
- 15
- 16
- 17
- 18
- 19
- 20
- 21
3.2.3 模板函数的底层实现
模板函数在被实例化后,那么它就会被具体的函数所取代。举个例子,某一版代码有一个模板函数,其被调用后虚拟类型被自动推导为int型。那么在编译后就会生成实例化为int型的函数(即所有虚拟类型被int取代的普通函数),而不会调用模板函数,也就是在调用时,模板函数会被实例化为普通函数的函数所取代。
由此我们或许可以知道,无论是自动推导,还是显式的指定类型。都不允许出现不能被编译器知道的虚拟类型。更清楚的说,就是使用自动推导方式推导模板函数类型时必须要让编译器能推导出具体的类型。
看个不能被编译器推导出的例子。
错误代码:#include#include using namespace std; template //模板函数声明与定义 T1 test(T1 tmp, T1 tmp1) { T2 tmp2; //T2无法被推导出具体的类型 return (tmp + tmp1); } int main(void) { cout << "test(5, 6)=" << test(5, 6) << endl; system("pause"); return 0; } - 1
- 2
- 3
- 4
- 5
- 6
- 7
- 8
- 9
- 10
- 11
- 12
- 13
- 14
- 15
- 16
- 17
- 18
- 19
- 20
- 21
3.2.4 模板函数与函数重载
熟悉函数重载的人应该会好奇,如果既有模板函数又有同名的普通函数,而且参数列表的参数个数是一样的,那么在主函数中调用同名函数,编译器具体会调用哪一个呢?
下面看一个例子:
#include#include using namespace std; template //模板函数声明与定义 T1 test(T1 tmp, T2 tmp1) { cout << "调用模板函数!" << endl; return (tmp + tmp1); } int test(int tmp, int tmp1) { //重载的普通函数 cout << "调用普通函数!" << endl; return 0; } int main(void) { char tmp = 'c'; int tmp1 = 0; int a = 5; cout << "test(5,'c')=" << test(a, tmp) << endl; cout << "test(5,0)=" << test(a, tmp1) << endl; system("pause"); return 0; } - 1
- 2
- 3
- 4
- 5
- 6
- 7
- 8
- 9
- 10
- 11
- 12
- 13
- 14
- 15
- 16
- 17
- 18
- 19
- 20
- 21
- 22
- 23
- 24
- 25
- 26
- 27
- 28
- 29
- 30
- 31
- 32
- 33
运行结果:
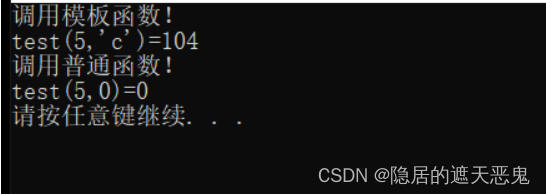
普通函数的两个参数都是int型,在第一次调用test时第二个参数使用的是char型,调用的是模板函数,第二次使用的是int型,调用的是普通函数。
这是为什么呢?理论上来说,模板函数两个都能匹配,使用。而普通函数也能匹配这两次调用的参数(在C语言中,char型变量是可以作为int型参数使用的)。
这是因为模板函数可以自动推导类型,在第一次调用中,两个类型分别被推导为int型与char型。而普通函数是两个int型,虽然也能使用传入的参数,但模板函数明显能更好的匹配参数列表。
也就是说,如果模板函数实例化后的类型能更好的匹配参数列表的话就使用模板函数。
那么当这两个函数都能完全匹配参数列表的时候呢?通过第二次test的调用结果不难发现,这时候,编译器会调用普通函数。
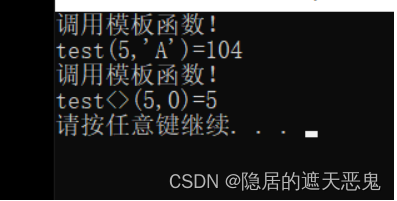
如果一定要使用模板函数,可以使用<>显式的指定使用模板函数。看下面的例子。
#include#include using namespace std; template //模板函数声明与定义 T1 test(T1 tmp, T2 tmp1) { cout << "调用模板函数!" << endl; return (tmp + tmp1); } int test(int tmp, int tmp1) { //重载的普通函数 cout << "调用普通函数!" << endl; return 0; } int main(void) { char tmp = 'c'; int tmp1 = 0; int a = 5; cout << "test(5,'A')=" << test(a, tmp) << endl; cout << "test<>(5,0)=" << test<>(a, tmp1) << endl; //使用<>显式的调用模板函数 system("pause"); return 0; } - 1
- 2
- 3
- 4
- 5
- 6
- 7
- 8
- 9
- 10
- 11
- 12
- 13
- 14
- 15
- 16
- 17
- 18
- 19
- 20
- 21
- 22
- 23
- 24
- 25
- 26
- 27
- 28
- 29
- 30
- 31
- 32
- 33
运行结果:
3.3 inline(内联)函数
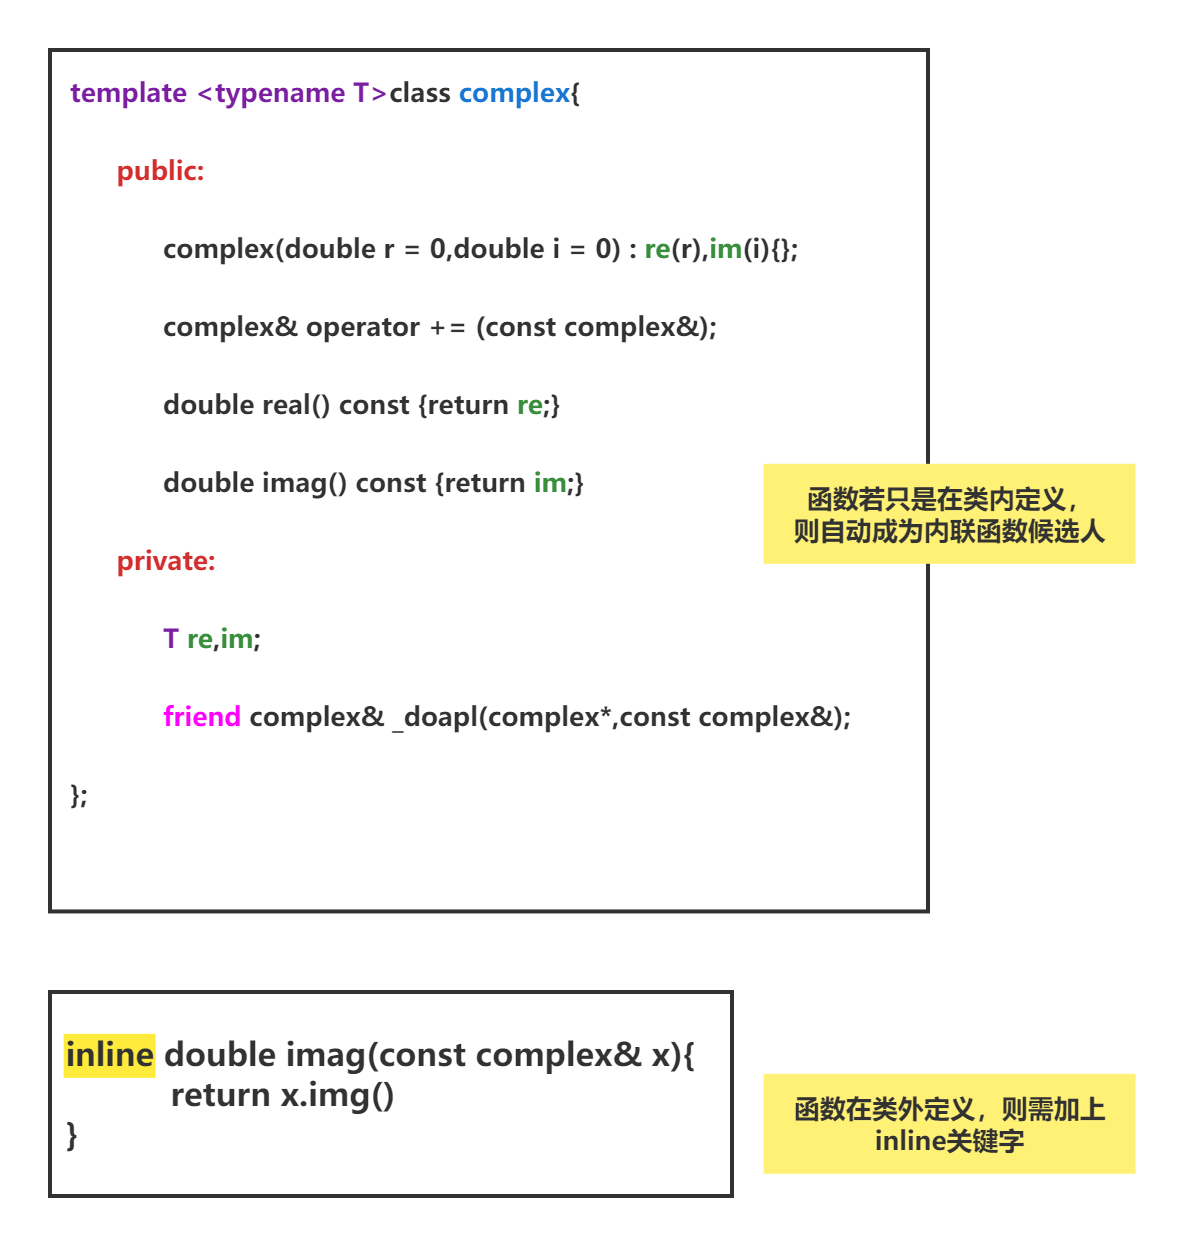
内联函数仅仅是一个建议性操作,具体能不能成为内联函数,还是要看编译器的能力,跟是否加关键字无关。当函数被声明为内联函数之后, 编译器会将其内联展开, 而不是按通常的函数调用机制进行调用。
在类的声明中定义的函数将被编译器尝试翻译为内联函数。
优点:
只要内联的函数体较小, 内联该函数可以令目标代码更加高效. 对于存取函数以及其它函数体比较短, 性能关键的函数, 鼓励使用内联.
缺点:
滥用内联将导致程序变得更慢. 内联可能使目标代码量或增或减, 这取决于内联函数的大小. 内联非常短小的存取函数通常会减少代码大小, 但内联一个相当大的函数将戏剧性的增加代码大小. 现代处理器由于更好的利用了指令缓存, 小巧的代码往往执行更快。
经验:
- 不要内联超过 10 行的函数
- 谨慎对待析构函数
- 内联包含循环或 switch 语句的函数往往得不偿失
一般不会被内联的函数:虚函数和递归函数不会被正常内联
3.4 access level(访问级别)
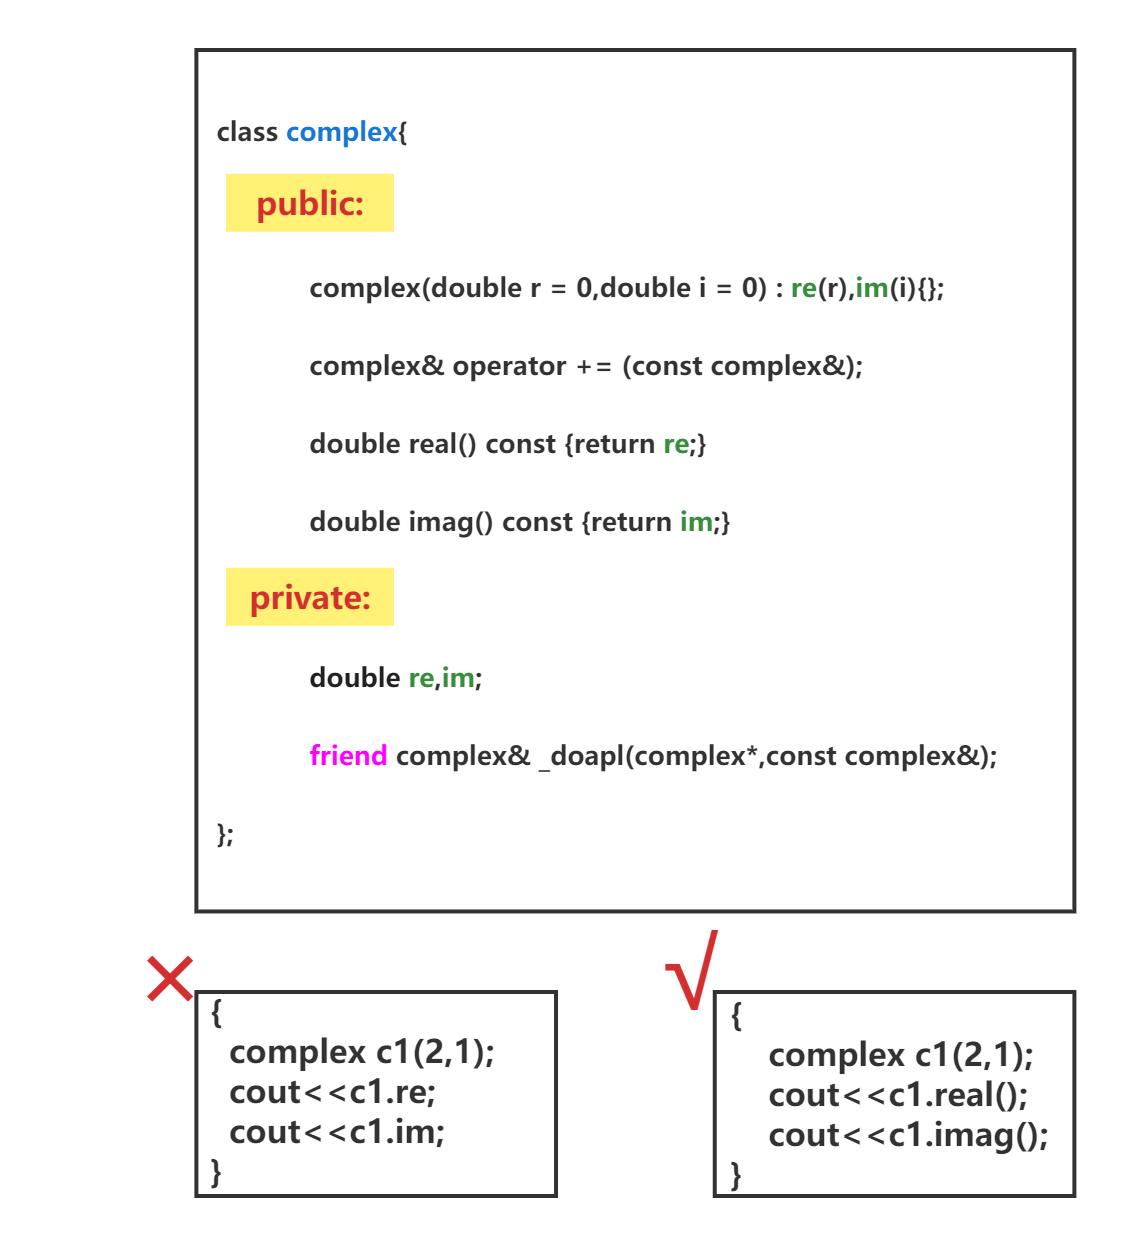
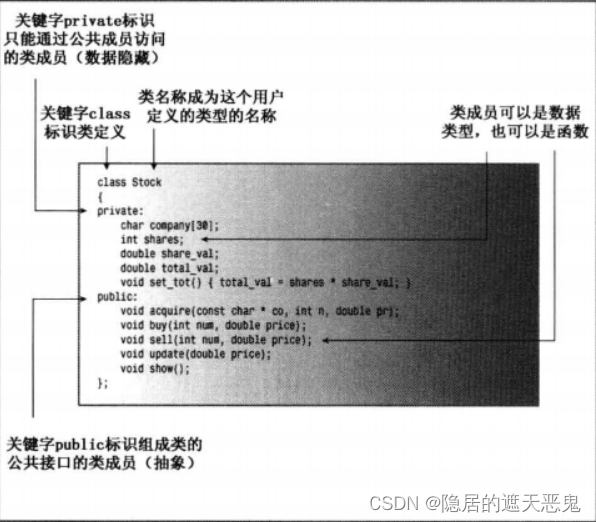
private 和 public 也是 C++ 新增的关键字,它们描述了对类的访问控制。使用类对象的程序可以直接访问 public 部分,对于私有部分是不能直接访问的,需要通过公有接口(或者友元函数)来间接访问。
例如,Stock 类的 shares 成员是 private,想要修改 shares 只能通过 Stock 的成员函数。因此,公有成员函数是程序和对象的私有成员之间的桥梁,提供了对象和程序之间的接口。这种防止程序直接访问数据的方式被称为数据隐藏。
Q:哪些应该放在 public 中,哪些应该放在 private 中?
A:无论是类的数据成员还是成员函数,都可以在类的公有部分或私有部分中声明它。但是由于隐藏数据是面向对象编程的主要目标之一,因此一般会进行如下处理:- 数据项通常放在私有部分。
- 用于作为类接口的成员函数需要放在公有部分,否则无法在程序中调用这些作为接口的函数。
- 不作为类接口的成员函数则可以放在私有部分,这些函数无法在程序中调用,但是可以在公有方法中调用。通常使用私有函数来处理不属于公有接口的实现细节。
在类声明中,可以不使用 private 关键字,因为 private 是类对象的默认访问控制权限:
class Work { float mass; // private public: void tellall(void); // public }- 1
- 2
- 3
- 4
- 5
不过,为了强调数据隐藏的概念,所有的代码都以显式使用 private 为主。
PS:类描述看上去很像是包含成员函数以及 public、private 可见性标签的结构声明。实际上,C++ 对结构进行了扩展,使之具有与类相同的特性。它们之间唯一的区别是,结构默认访问类型是 public,而类为 private。C++ 程序员通常使用类来实现类描述,而把结构限制为只表示纯粹的数据对象。
3.5 两种构造函数
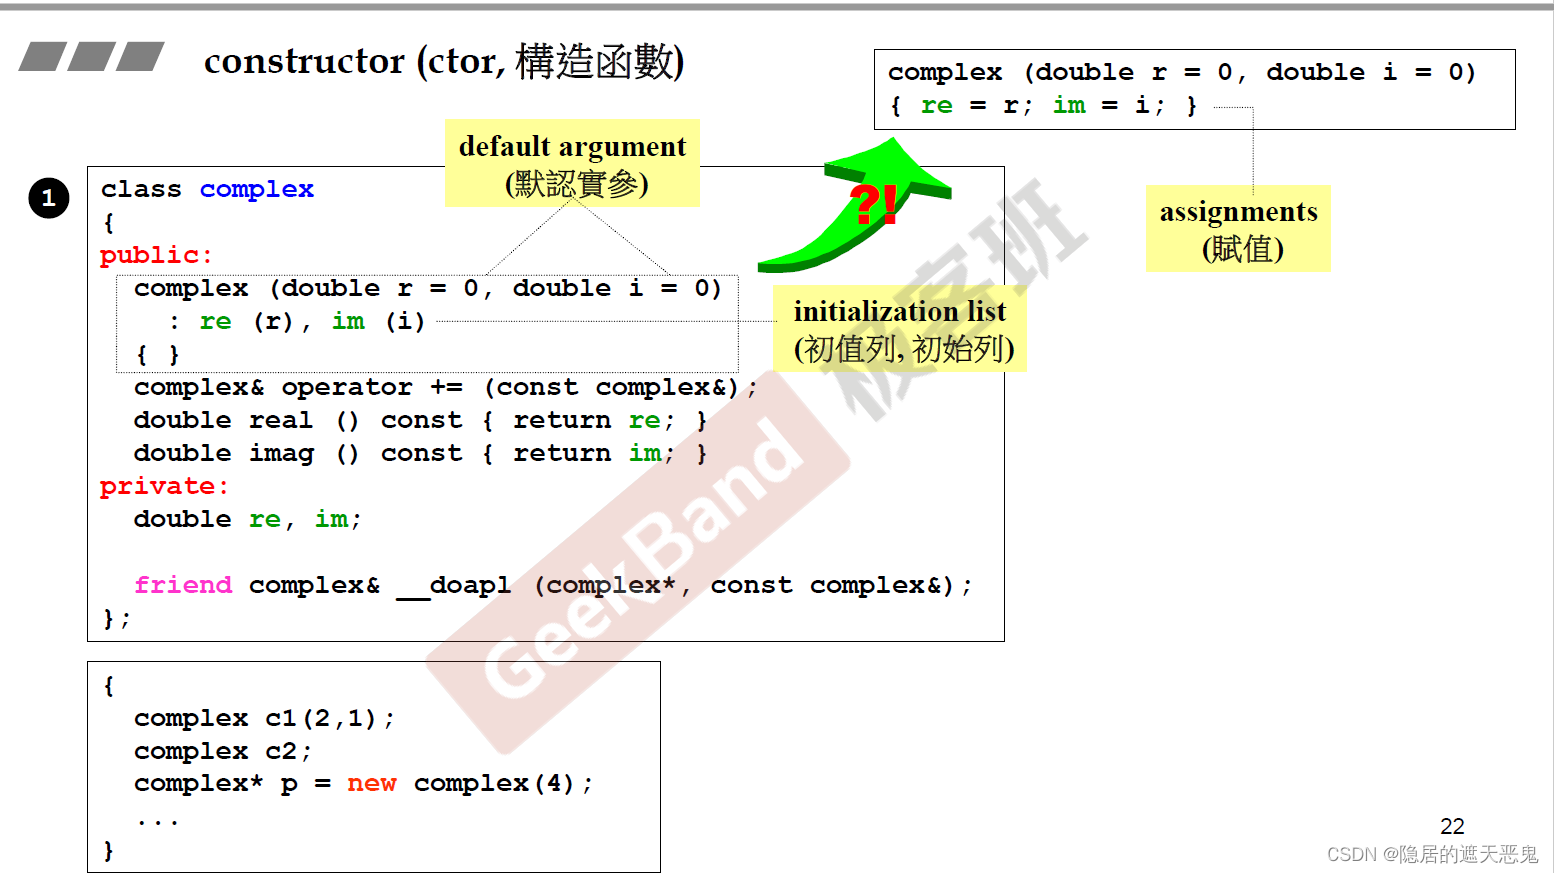
3.5.1 为什么初始化列表效率高?
C中类的构造函数写法有两种,一种是使用初始化列表,一种是在代码块中赋值。很多书中(包括C Primer、C++ Primer Plus等等)都会提到应该尽量使用初始化列表而不是在代码块中赋值,因为使用初始化列表通常比在代码块中赋值效率要高。
但是这个结论是怎么来的?如何验证呢?今天我们来设计一个小例子对比一下两者之间的区别。
首先,我们定义一个Man类,数据成员包括姓名和年龄。设计很简单,直接放代码:
class Man{ public: Man(){ cout << "call Man::Man()" << endl; } Man(string n, int a):name(n),age(a) { cout << "call Man::Man(string, int)" << endl; } Man(const Man& a) { cout << "call Man::Man(const Man&)" << endl; } Man& operator=(const Man& a) { name = a.name; age = a.age; cout << "call Man::operator=(const Man& a)" << endl; return *this; } private: string name; int age; };- 1
- 2
- 3
- 4
- 5
- 6
- 7
- 8
- 9
- 10
- 11
- 12
- 13
- 14
- 15
- 16
- 17
- 18
- 19
- 20
- 21
在这个类里面,我们写了三个构造函数:默认构造函数,带参的构造函数、拷贝构造函数,并且重载了赋值运算符。同时在每个函数当中添加了打印语句,指示当前执行的函数名称。
3.5.2 代码块构造
我们再来定义一个ChineseMan类。类中包含一个Man对象和一个名为ID的string对象,用来保存身份证号码。
class ChineseMan { public: ChineseMan(Man a, string i) { man = a; id = i; } private: string id; Man man; };- 1
- 2
- 3
- 4
- 5
- 6
- 7
- 8
- 9
- 10
在类中我们我们写了一个带参数的构造函数,用代码块赋值的方式来初始化。然后我们再来写一个测试程序:
int main() { Man vincent("vincent", 26); cout << "-----------" << endl; ChineseMan vincent_CN(vincent, "001"); return 0; }- 1
- 2
- 3
- 4
- 5
- 6
- 7
测试程序中创建了一个Man对象和一个ChineseMan对象,ChineseMan对象用Man对象来初始化。看一下程序执行的结果。
call Man::Man(string, int) ----------- call Man::Man(const Man&) call Man::Man() call Man::operator=(const Man& a)- 1
- 2
- 3
- 4
- 5
从执行结果来看:
在main函数中首先调用了Man的带参构造函数,创建了对象vincent,这个很好理解。下面来看看创建vincent_CN的过程中,稍微有点绕。创建vincent_CN的过程可以分为三步:
- 首先调用了Man的拷贝构造函数,因为需要把实参vincent拷贝赋值给形参a;
- 然后又调用了Man的默认构造函数,这是因为需要创建vincent_CN对象的man成员。
- 第三步调用赋值运算符函数,把对象a赋值给对象man。至此完成vincent_CN的构造过程。
可以看出,用代码块初始化一个参数含对象的对象,经历了三步。如果传入的参数是引用或者指针的话,第一步可以省掉。我们再看一下用初始化列表构造对象是什么样子。
3.5.3 初始化列表构造
下面我们把ChineseMan类的构造函数修改一下,改为初始化列表:
class ChineseMan { public: ChineseMan(Man a, string i):man(a), id(i) {} private: string id; Man man; };- 1
- 2
- 3
- 4
- 5
- 6
- 7
测试程序不变,再来看一下运行结果:
call Man::Man(string, int) ----------- call Man::Man(const Man&) call Man::Man(const Man&)- 1
- 2
- 3
- 4
程序执行结果的第一行是创建vincent对象,创建vincent_CN的过程可以分为两步:
- 第一步调用拷贝构造函数,是因为传递参数需要把实参vincent传递给形参a。
- 第二步再次调用拷贝构造函数,是用形参a来构造数据成员man。
- 因此用初始化列表构造对象,调用了两次拷贝构造函数。
3.5.4 总结
对比两种方法的执行结果,可以看出来:用初始化列表构造对象,在实参传给形参之后,直接就调用拷贝构造函数用形参来构造数据成员了,不需要经历先构造再
赋值的操作。因此效率上确实要比代码块初始化高一些。在这样一个短短的程序上看不出来什么明显的效果,但是如果一个类的数据成员里面包含了大量的其他类
对象,那么累积起来的效果是非常客观的,因此在平常的开发过程中我们应该养成尽量使用列表初始化来构造对象的习惯。
3.6 构造函数可以有很多重载
complex(double r = 0,double i = 0) : re(r),im(i) {} complex() : re(0),im(0) {}- 1
- 2
同时重载上面的函数行不行呢?
不行,因为第一个有默认参数。假如遇到
complex c1; complex c2(); ...- 1
- 2
- 3
Singleton:
构造函数放在private区里
class A{ public: static A& getInstance(); setup(){...} private: A(); A(const A& rhs); ... }; A& A::getInsTance(){ static A a; return a; } A::getInstance().setup();- 1
- 2
- 3
- 4
- 5
- 6
- 7
- 8
- 9
- 10
- 11
- 12
- 13
- 14
- 15
对于class里面的数据分为两种:
- 会改变数据的
- 不会改变数据的
不会改变数据内容的一定要记得加上const。
double real() const {return re;}- 1
如果没有加const,再去声明一个对象的时候:
const complex c1(2,1);- 1
行吗?不行。定义的时候加上了const,说明不希望改变它的值,而对应的函数不加const,说明并不确定是否去改变它的值。
3.7 pass by value VS pass by reference(to const)
参数的传递尽可能的去传引用,因为一个地址固定4个字节,而如果不是pass by reference,就不能确定其占多少个字节,很大概率上比4个字节多,因此效率就低。同理,返回值的传递也尽量用引用,前提是可以用引用。
reference主要用来做参数传递以及返回值的传递。
友元
我们身上的钱,别人可以来拿吗?不可以!朋友可以来拿吗?可以。
友元函数可以自由取得friend的private成员。
相同class的各个object互为友元。
设计一个类需要考虑的情况:
第一,数据尽可能的放在private里面。
第二,参数尽可能的是以reference来传。要不要加const?看状况。
第三,返回值尽可能的是以reference来传。要不要加const?看状况。
第四,构造函数尽量用初始化列表的形式。
3.8 操作符重载-1(成员函数)
操作符本身可以看成一种函数,且自动作用于左值。
所有的成员函数一定带着一个隐藏的参数,就是他自己,this,谁调用这个函数,谁就相当于this。
complex::operator += (const complex& r){ return _doapl(this,r)}; inline complex& _doapl(complex* ths,const complex& r){ ths->re += r.re; ths->im += r.im; return *ths; } inline complex& complex::operator +=(const complex& r){ return _doapl(this,r); } c2 += c1;- 1
- 2
- 3
- 4
- 5
- 6
- 7
- 8
- 9
- 10
- 11
- 12
- 13
在这个例子中,很显然,操作符重载函数通过传递引用参数的形式,完成了把第二个操作数加到第一个操作数上的任务,那既然都已经加上了,似乎也就没有必要再去返回了,也就是说,返回值似乎也可以为空,如下:
void _doapl(complex* ths,const complex& r){ ths->re += r.re; ths->im += r.im; }- 1
- 2
- 3
- 4
这样做行不行呢?
行。当然行。
但是从C上来的那一批程序员都知道,在C里是可以做这样一种操作的:
c3 += c2 += c1;- 1
如果使用者这样做的话,那么对于刚刚说的将返回值设置为void就显得不那么合理了。
事实上,也确实如此。
这里我们引入一个理念“传递者无需知道接受者是以何种形式接收的。”
也就是说,无论返回值是空或者是引用,都是可以的。这并不会引发什么错误,但却实实在在的会影响使用者调用这个函数时的使用。
3.9 操作符重载-2(非成员函数)
我们前面通过操作符重载的方式,成功的实现了+=。由于操作符都是作用于左值的,刚好成员函数里的this指针能解决这个问题。但是这种情况并不能满足所有的使用场景,因此,将操作符重载写成非成员函数的形式成为了解决方案:
inline complex operator + (const complex& x, const complex& y) { return complex (real (x) + real (y), imag (x) + imag (y)); } inline complex operator + (const complex& x, double y) { return complex (real (x) + y, imag (x)); } inline complex operator + (double x, const complex& y) { return complex (x + real (y), imag (y)); { complex c1(2,1); complex c2; c2 = c1 + c2; c2 = c1 + 5; c2 = 7 + c1; }- 1
- 2
- 3
- 4
- 5
- 6
- 7
- 8
- 9
- 10
- 11
- 12
- 13
- 14
- 15
- 16
- 17
- 18
- 19
- 20
- 21
- 22
- 23
- 24
- 25
临时对象: typename()
inline complex operator + (const complex& x, const complex& y){ return complex (real (x) + real (y),imag (x) + imag (y)); } inline complex operator + (const complex& x, double y){ return complex (real (x) + y, imag (x)); } inline complex operator + (double x, const complex& y){ return complex (x + real (y), imag (y)); }- 1
- 2
- 3
- 4
- 5
- 6
- 7
- 8
- 9
这些函数绝对不能用return by reference,因为在函数里使用了临时对象,临时对象的有效区域仅限于建立临时对象的这一行,还有一种情况是仅在这个函数里建立的对象,我们称之为local object,临时对象一旦出了这个函数就消亡了,因此也不能使用return by reference。
对于操作符重载还有一种使用场景:
inline complex conj (const complex& x) { return complex (real (x), -imag (x)); } #includeostream& operator << (ostream& os, const complex& x) { return os << '(' << real (x) << ',' << imag (x) << ')'; } { complex c1(2,1); cout << conj(c1); cout << c1 << conj(c1); } - 1
- 2
- 3
- 4
- 5
- 6
- 7
- 8
- 9
- 10
- 11
- 12
- 13
- 14
- 15
- 16
- 17
- 18
对于这种,cout 是一个对象,这个对象在设计之初,肯定只“认识”当时的一些对象(基本数据类型),对于当时不存在的一些对象,自然也“不认识”。因此,只能重载运算符。
这种场景下,如果还是写成成员函数,不是说不行,而是不太符合常理。因为运算符是作用于左值的,而重载运算符写进成员函数中,比如这样:“
ostream& operator << (ostream& os) { return os << '(' << real (this->x) << ',' << imag (this->x) << ')'; }- 1
- 2
- 3
- 4
- 5
正确吗?正确
但是用的时候只能这样用:
c1<- 1
正好相反。
因此对于这种场景下的运算符,只能写成非成员函数。
而同样写成这样行不行呢?
void operator << (ostream& os, const complex& x) { return os << '(' << real (x) << ',' << imag (x) << ')'; }- 1
- 2
- 3
- 4
- 5
- 6
- 7
可以。但是这种只能这样输出:
cout<- 1
不能连续输出:
cout<
- 1
所以返回值应该是ostream&。
至此,不带指针的类:complex类设计规范论述完毕。
3.10 complex详细设计
该类的详细设计代码如下:
complex.h
//防卫式定义
#ifndef __MYCOMPLEX__
#define __MYCOMPLEX__
//前置声明
class complex;//类声明
complex& __doapl (complex* ths, const complex& r);//函数声明
complex& __doami (complex* ths, const complex& r);
complex& __doaml (complex* ths, const complex& r);
class complex{//函数定义
public:
complex (double r = 0, double i = 0): re (r), im (i) { }//构造函数
complex& operator += (const complex&);//操作符重载+=
complex& operator -= (const complex&);//操作符重载-=
complex& operator *= (const complex&);//操作符重载*=
complex& operator / = (const complex&);//操作符重载/=
double real () const { return re; }//获取实部
double imag () const { return im; }//获取虚部
private:
double re, im;//成员变量一般写在私有保护区
friend complex& __doapl (complex *, const complex&);//友元函数
friend complex& __doami (complex *, const complex&);
friend complex& __doaml (complex *, const complex&);
};
inline complex& __doapl (complex* ths, const complex& r){//全局函数
ths->re += r.re;
ths->im += r.im;
return *ths;
}
inline complex& complex::operator += (const complex& r){//成员函数
return __doapl (this, r);
}
inline complex& __doami (complex* ths, const complex& r){//全局函数
ths->re -= r.re;
ths->im -= r.im;
return *ths;
}
inline complex& complex::operator -= (const complex& r){//成员函数
return __doami (this, r);
}
inline complex& __doaml (complex* ths, const complex& r){
double f = ths->re * r.re - ths->im * r.im;
ths->im = ths->re * r.im + ths->im * r.re;
ths->re = f;
return *ths;
}
inline complex& complex::operator *= (const complex& r)
{
return __doaml (this, r);
}
inline double imag (const complex& x)//获取虚部
{
return x.imag ();
}
inline double real (const complex& x){//获取实部
return x.real ();
}
inline complex operator + (const complex& x, const complex& y){//加
return complex (real (x) + real (y), imag (x) + imag (y));
}
inline complex operator + (const complex& x, double y){
return complex (real (x) + y, imag (x));
}
inline complex operator + (double x, const complex& y){
return complex (x + real (y), imag (y));
}
inline complex
operator - (const complex& x, const complex& y)
{
return complex (real (x) - real (y), imag (x) - imag (y));
}
inline complex
operator - (const complex& x, double y)
{
return complex (real (x) - y, imag (x));
}
inline complex
operator - (double x, const complex& y)
{
return complex (x - real (y), - imag (y));
}
inline complex
operator * (const complex& x, const complex& y)
{
return complex (real (x) * real (y) - imag (x) * imag (y),
real (x) * imag (y) + imag (x) * real (y));
}
inline complex
operator * (const complex& x, double y)
{
return complex (real (x) * y, imag (x) * y);
}
inline complex
operator * (double x, const complex& y)
{
return complex (x * real (y), x * imag (y));
}
complex
operator / (const complex& x, double y)
{
return complex (real (x) / y, imag (x) / y);
}
inline complex
operator + (const complex& x)
{
return x;
}
inline complex
operator - (const complex& x)
{
return complex (-real (x), -imag (x));
}
inline bool
operator == (const complex& x, const complex& y)
{
return real (x) == real (y) && imag (x) == imag (y);
}
inline bool
operator == (const complex& x, double y)
{
return real (x) == y && imag (x) == 0;
}
inline bool
operator == (double x, const complex& y)
{
return x == real (y) && imag (y) == 0;
}
inline bool
operator != (const complex& x, const complex& y)
{
return real (x) != real (y) || imag (x) != imag (y);
}
inline bool
operator != (const complex& x, double y)
{
return real (x) != y || imag (x) != 0;
}
inline bool
operator != (double x, const complex& y)
{
return x != real (y) || imag (y) != 0;
}
#include - 1
- 2
- 3
- 4
- 5
- 6
- 7
- 8
- 9
- 10
- 11
- 12
- 13
- 14
- 15
- 16
- 17
- 18
- 19
- 20
- 21
- 22
- 23
- 24
- 25
- 26
- 27
- 28
- 29
- 30
- 31
- 32
- 33
- 34
- 35
- 36
- 37
- 38
- 39
- 40
- 41
- 42
- 43
- 44
- 45
- 46
- 47
- 48
- 49
- 50
- 51
- 52
- 53
- 54
- 55
- 56
- 57
- 58
- 59
- 60
- 61
- 62
- 63
- 64
- 65
- 66
- 67
- 68
- 69
- 70
- 71
- 72
- 73
- 74
- 75
- 76
- 77
- 78
- 79
- 80
- 81
- 82
- 83
- 84
- 85
- 86
- 87
- 88
- 89
- 90
- 91
- 92
- 93
- 94
- 95
- 96
- 97
- 98
- 99
- 100
- 101
- 102
- 103
- 104
- 105
- 106
- 107
- 108
- 109
- 110
- 111
- 112
- 113
- 114
- 115
- 116
- 117
- 118
- 119
- 120
- 121
- 122
- 123
- 124
- 125
- 126
- 127
- 128
- 129
- 130
- 131
- 132
- 133
- 134
- 135
- 136
- 137
- 138
- 139
- 140
- 141
- 142
- 143
- 144
- 145
- 146
- 147
- 148
- 149
- 150
- 151
- 152
- 153
- 154
- 155
- 156
- 157
- 158
- 159
- 160
- 161
- 162
- 163
- 164
- 165
- 166
- 167
- 168
- 169
- 170
- 171
- 172
- 173
- 174
- 175
- 176
- 177
- 178
- 179
- 180
- 181
- 182
- 183
- 184
- 185
- 186
- 187
- 188
- 189
- 190
- 191
- 192
- 193
- 194
complex_test.cpp
#include - 1
- 2
- 3
- 4
- 5
- 6
- 7
- 8
- 9
- 10
- 11
- 12
- 13
- 14
- 15
- 16
- 17
- 18
- 19
- 20
- 21
- 22
- 23
- 24
- 25
- 26
- 27
- 28
- 29
- 30
- 31
- 32
- 33
- 34
- 35
- 36
- 37
- 38
- 39
- 40
四、带有指针的类-String类设计规范
防卫式定义
#ifndef _MYSTRING_
#define _MYSTRING_

# endif
- 1
- 2
- 3
- 4
测试程序:
int main(){
    String s1();
    String s2("hello");
    String s3(s1);
cout<- 1
- 2
- 3
- 4
- 5
- 6
- 7
- 8
4.1 浅拷贝与深拷贝
编译器给的那一套拷贝赋值与拷贝构造函数,仅仅是一个bit一个bit的拷贝,即浅拷贝。
而对于带有指针的类而言,很显然,这样的构造是不满足使用场景的。
4.1.1 class with pointer members必须有copy ctor和copy op=

4.2 Big Three,三个特殊函数
class String{
    public:
    	String(const char* cstr = 0);
    	String(const String& str);#拷贝构造函数
    	String& operator=(const String& str);#拷贝赋值函数
    	~String();#析构函数
    	char* get_c_str() const {return m_data;}
    private:
    	char* m_data;
};
- 1
- 2
- 3
- 4
- 5
- 6
- 7
- 8
- 9
- 10
4.2.1 析构函数
inline String::String(const char *cstr = 0){
    if (cstr)
    {
        m_data = new char[strlen(cstr) + 1];
        strcpy(m_data, cstr);
    }
    else
    {
        // 未指 定 初 值 m_data = new char[1];
        *m_data = '\0';
    }
}
inline String::~String(){
    delete[] m_data;
}
- 1
- 2
- 3
- 4
- 5
- 6
- 7
- 8
- 9
- 10
- 11
- 12
- 13
- 14
- 15
如果让编译器自己写的拷贝构造和拷贝赋值函数,就会发生以上情况,最终造成内存泄露。
4.2.2 拷贝构造函数(copy ctor)
inline #直接取另一个object的private数据(兄弟之间互为友元)
String::String(const String& str)
{
m_data = new char[ strlen(str.m_data) + 1 ];
strcpy(m_data, str.m_data);
}

{
String s1("hello ");
String s2(s1);
// String s2 = s1;
}
- 1
- 2
- 3
- 4
- 5
- 6
- 7
- 8
- 9
- 10
- 11
- 12
4.2.3 拷贝赋值函数(copy assignment operator)
先把原来的数据清空,分配一块相同大小的内存,赋值。
inline
String& String::operator=(const String& str)
{
if (this == &str)
return *this;#注意这里的操作

delete[] m_data;
m_data = new char[ strlen(str.m_data) + 1 ];
strcpy(m_data, str.m_data);
return *this;
}
- 1
- 2
- 3
- 4
- 5
- 6
- 7
- 8
- 9
- 10
- 11
一定要在operator=中检查是否有self assignment(自我赋值)
output函数
#include
ostream& operator<<(ostream& os, const String& str)
{
os << str.get_c_str();
return os;
}
2-4
{
String s1("hello ");
cout << s1;
}
- 1
- 2
- 3
- 4
- 5
- 6
- 7
- 8
- 9
- 10
- 11
4.3 stack 和 heap
stack:是存在于某作用于(scope)的一块内存空间。两个{}里面就形成一个stack,假如你调用函数,函数本身即会形成一个stack用来防止它所接受的参数,以及返回地址。
在函数本体内声明的任何变量,其所使用的内存块都取自上述stack。
heap:是指由操作系统提供的一块global内存空间,程序可动态分配从其中获得的若干区块。
动态取得指的是new一块内存。
动态获得的内存(堆里获得的),自己就有责任去释放掉这一块内存。
栈里获得的内存,可以由系统自动的去处理。
4.3.1 stack objects 的生命期
...
{
Complex c1(1,2);
}
- 1
- 2
- 3
- 4
c1便是所谓的stack object,其生命在作用域结束之后结束。这种作用域内的对象,又被称为auto object,因为它会被自动清理。
4.3.2 static local objects 的生命期
class Complex { … };
...
{
static Complex c2(1,2);
}
- 1
- 2
- 3
- 4
- 5
c2便是所谓的static object,其生命在作用域结束之后仍然存在,直到整个程序结束。
4.3.3 global objects 的生命期
class Complex { … };
...
Complex c3(1,2);
int main()
{
...
}
- 1
- 2
- 3
- 4
- 5
- 6
- 7
c3 便是所谓的global object,其生命在整个程序后才結束。你也可以把它视为一种static object,其作用域是「整个程序」。
内存泄漏:自己动态申请获取的内存,由于某种原因失去了对该块内存的控制,最终无法将该块内存交还给操作系统,就造成了内存泄漏(借了东西忘了还)。
4.4 new:先分配内存,再调用ctor.

第一步获取内存,底层调用malloc,第二步进行转存,第三步调用对应对象的构造函数进行赋值。
4.5 delete:先调用dtor再释放memory。

4.6 关键字Static
静态函数与普通函数的区别:静态函数没有this指针。
静态函数应该单独去处理静态数据。
调用static函数的两种方式:通过类去调用 通过class name去调用。
通过一行代码使得某个变量获得内存,叫定义,而没有获得定义叫声明。
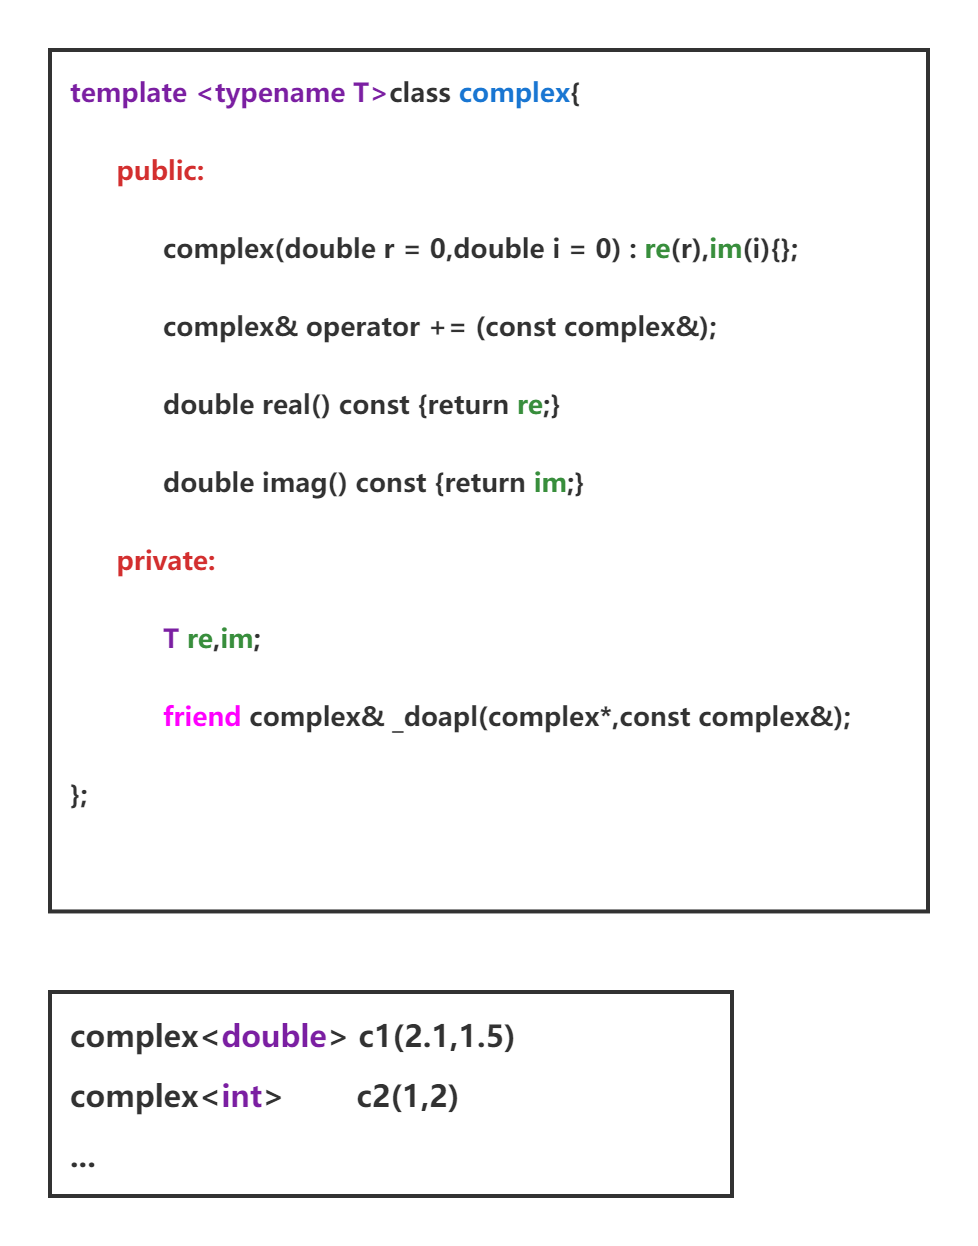
类模板:
template
class complex{
	public:
		complex(T r = 0, T i = 0):re(r),im(i){
		}
	complex& operator += (const complex&);
	T real () const {return re;}
	T imag () const {return im;}
	private:
		T re,im;
};
- 1
- 2
- 3
- 4
- 5
- 6
- 7
- 8
- 9
- 10
- 11
用的时候:
{
	complex c1(2.5,1.2);
	complex c2(2,6);
}
- 1
- 2
- 3
- 4
函数模板:
template
inline const T& min(const T& a,const T& b){
	return b