-
frp记录
frp入门使用记录
简介: frp 是一个专注于内网穿透的高性能的反向代理应用,支持 TCP、UDP、HTTP、HTTPS 等多种协议。可以将内网服务以安全、便捷的方式通过具有公网 IP 节点的中转暴露到公网
目前是因为没有公网ip 所以使用服务器的公网去映射
1. 安装
- 下载
wget https://github.com/fatedier/frp/releases/download/v0.38.0/frp_0.38.0_linux_amd64.tar.gz- 1
- 解压
tar -xvf frp_0.38.0_linux_amd64.tar.gz- 1
- 移动至 /usr/local
mkdir /usr/local/frp mv frp_0.38.0_linux_amd64/* /usr/local/frp/- 1
- 2
- 文件说明
frps.ini: 服务端配置文件 frps: 服务端软件 frpc.ini: 客户端配置文件 frpc: 客户端软件- 1
- 2
- 3
- 4
2. 配置systemctl来控制,服务端运行
- vim新建文件并写入配置内容
vim /usr/lib/systemd/system/frp.service- 1
- 写入以下内容,注意上文移动放置的路径和此处有关。这里是启动的服务端。
[Unit] Description=The nginx HTTP and reverse proxy server After=network.target remote-fs.target nss-lookup.target [Service] Type=simple ExecStart=/usr/local/frp/frps -c /usr/local/frp/frps.ini KillSignal=SIGQUIT TimeoutStopSec=5 KillMode=process PrivateTmp=true StandardOutput=syslog StandardError=inherit [Install] WantedBy=multi-user.target- 1
- 2
- 3
- 4
- 5
- 6
- 7
- 8
- 9
- 10
- 11
- 12
- 13
- 14
- 15
- 16
- 重新加载服务的配置文件
systemctl daemon-reload- 1
- 现在就可以用 systemctl 套装来控制 frp 了。
- 启动/停止/重启,查看状态,设置开机自启/关闭开机自启
systemctl start frp systemctl stop frp systemctl restart frp systemctl status frp systemctl enable frp systemctl disable frp- 1
- 2
- 3
- 4
- 5
- 6
3. 配置和使用
3.1 服务端
frps.ini
[common] #必须设置 bind_port = 7000 #是自己设定的frp服务端端口 vhost_http_port = 80 #是自己设定的http访问端口 token = 123 #核实身份用,加了更安全 [ssh] #ssh反向代理(不是必须设置) listen_port = 6000 是自己设定的ssh访问端口 [web] #http反向代理[]里的内容可以自己设定,但是客户端和服务端必须要对应(如[aaa],[bbb]); type = http #为服务类型,可以设为http,https custom_domains = test1.a.com #为要映射的域名,记得域名的A记录要解析到外网主机的IP。 [web2] #同上(可设置多个)- 1
- 2
- 3
- 4
- 5
- 6
- 7
- 8
- 9
- 10
- 11
- 12
- 13
示例
[common] bind_port = 700 vhost_http_port = 9080 [ssh] listen_port = 6000 [web] type = http custom_domains = onlylmf.cn- 1
- 2
- 3
- 4
- 5
- 6
- 7
- 8
- 9
- 10
- 启动
./frps -c ./frps.ini # 后台启动 nohup ./frps -c ./frps.ini & # 因为我设置的端口是700 如果想关闭服务 netstat -auntp|grep 700 # 然后结束掉该进程 xxx是该pid kill -9 xxxx- 1
- 2
- 3
- 4
- 5
- 6
- 7
- 8
- 9

至此服务端就已经启动成功了!
3.2 客户端
因为我使用的是win10
所以直接下载 cmd运行了
- 下载
https://github.com/fatedier/frp/releases- 1
选择自己操作系统对应的版本进行下载

解压后 得到该目录

frpc.ini
[common] server_addr = 远程frp服务器ip server_port = 远程frp服务器端口 token = 远程frp服务器token [http] type = http local_ip = 127.0.0.1 local_port = 本地端口号 remote_port = 远程frp服务器的http服务端口号 custom_domains = 自定义配置的域名 subdomain = 匹配服务端配置的subdomain_host- 1
- 2
- 3
- 4
- 5
- 6
- 7
- 8
- 9
- 10
- 11
- 12
示例
[common] server_addr = 服务器公网ip #绑定端口要和服务端配置的一样 server_port = 700 [web] type = http local_ip = 192.168.3.46 local_port = 80 custom_domains = xxx.xxx.onlylmf.cn #subdomain = zxy [web2] type = http local_ip = 192.168.0.166 local_port = 11180 custom_domains = xxx.xxx.onlylmf.cn [lapis] type = http local_ip = 127.0.0.1 local_port = 11180 custom_domains = xxx.xxx.onlylmf.cn- 1
- 2
- 3
- 4
- 5
- 6
- 7
- 8
- 9
- 10
- 11
- 12
- 13
- 14
- 15
- 16
- 17
- 18
- 19
- 20
- 21
- 22
- 23
- 24
- 25
- 26
启动
./frpc -c ./frpc.ini # 后台启动 nohup ./frpc -c ./frpc.ini &- 1
- 2
- 3
- 4
- 5

4. Nginx 配置
-
在域名网站 解析自定义域名后申请免费是ssl证书 下载crt和key放在服务器中
-
配置nginx配置
# 将访问80端口的网址 跳转到443 server{ listen 80; server_name 需要跳转的网址; add_header cettt $http_host; # 这里是自定义头 rewrite ^(.*)$ https://$http_host$1 permanent; } server { listen 443 ssl; server_name 需要转发的域名; ssl_certificate 对应的ssl证书的crt.crt; ssl_certificate_key 对应的ssl证书的key.key; ssl_session_timeout 30m; ssl_ciphers ECDHE-RSA-AES128-GCM-SHA256:ECDHE:ECDH:AES:HIGH:!NULL:!aNULL:!MD5:!ADH:!RC4; ssl_protocols TLSv1 TLSv1.1 TLSv1.2; ssl_prefer_server_ciphers on; add_header ffff $http_host; # 这里是自定义头 location / { proxy_redirect off; proxy_set_header Host $http_host; proxy_set_header X-Real-IP $remote_addr; proxy_set_header X-Forwarded-For $proxy_add_x_forwarded_for; proxy_pass http://127.0.0.1:8090/; } }- 1
- 2
- 3
- 4
- 5
- 6
- 7
- 8
- 9
- 10
- 11
- 12
- 13
- 14
- 15
- 16
- 17
- 18
- 19
- 20
- 21
- 22
- 23
- 24
- 25
- 26
- 27
- 28
- 29
5. 配置连接家里的路由器
纯属是我自己的需要而已
因为我租的房子网络没有公网ip 用不了DDNS 所以使用frp进行内网穿透
因为买的一个阿里云的服务器没怎么用 就把服务端放在服务器上 使用服务器的公网ip
- 先在服务器上安装frps
步骤如前面的步骤
下载安装后 配置
frps.ini
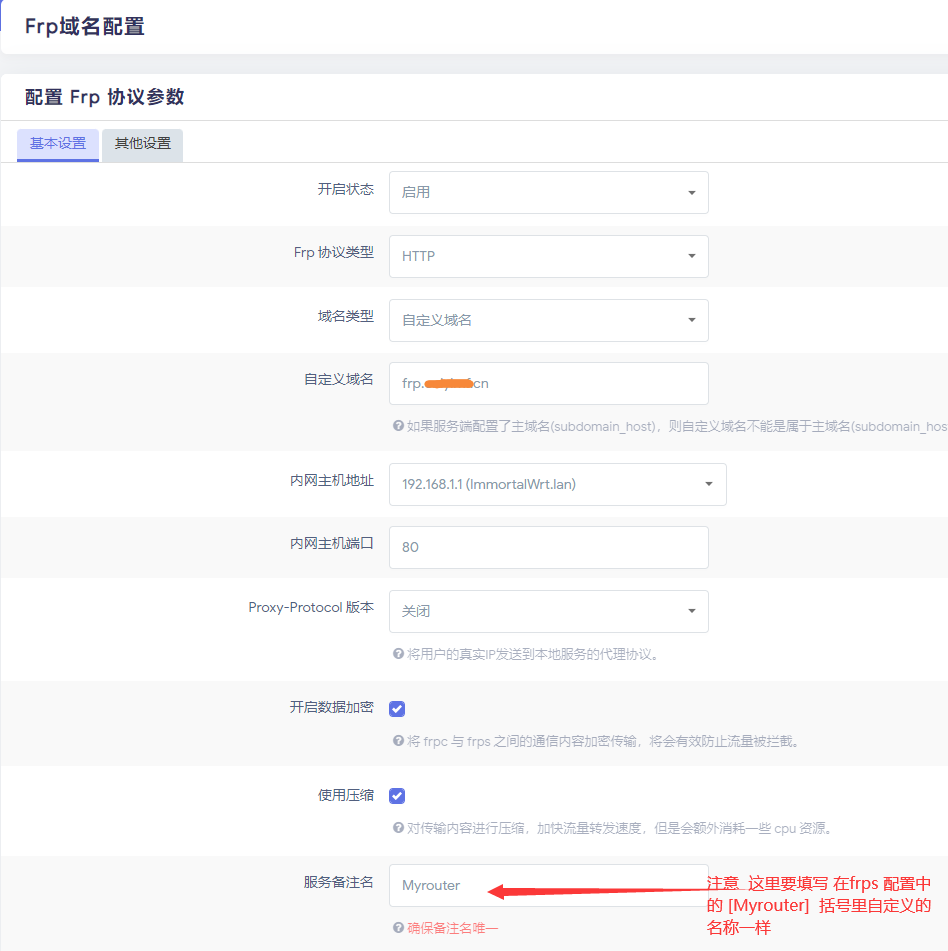
我这边定义的 [web] 是我另外的穿透 现在使用的是 [Myrouter]
然后后台启动 服务端
- 在家里路由器上安装客户端
注: 因为我刷了openwrt的固件 所以下载frpc客户端 以及luci可视化的管理页面
可以在 软件包里搜索下载 frpc 、luci-app-frpc 、 语言包 luci-i18n0-frpc-zh-cn
如果搜索不到 就先下载到本地 然后在通过文件传输到 路由上

-
装好后 如果服务里没有显示 Frp内网穿透 那么可能是缓存引起的
登录路由器的ssh 把luci的缓存清空后 重启
rm /tmp/luci-indexcache reboot- 1
- 2
- 3
-

在如果 都安装完成了 但一直frp显示未启动 那么可能是被禁止了 去系统的启动项去 找到frp 启动

然后不出意外的话应该就好了
- 进行全局和服务列表的配置

保存后 配置服务列表
点击添加后
至此就配置完成了
- 验证 在本地访问服务端的可视化界面查看
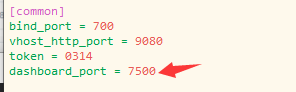
当时在frps.ini中配置了
dashboard_port就是访问端口 还要记得在服务器的防火墙将设置的端口开放
- 设置 ssl 配置nginx 转发
-
前提是申请 对应的自定义域名的证书 下载crt和key 放入服务器中
-
配置nginx
server { listen 443 ssl; server_name 需要跳转的域名; ssl_certificate 申请的ssl的crt路径.crt; ssl_certificate_key 申请的ssl的key路径.key; ssl_session_timeout 30m; ssl_ciphers ECDHE-RSA-AES128-GCM-SHA256:ECDHE:ECDH:AES:HIGH:!NULL:!aNULL:!MD5:!ADH:!RC4; ssl_protocols TLSv1 TLSv1.1 TLSv1.2; ssl_prefer_server_ciphers on; add_header ffff $http_host; # 这里是自定义头 location / { proxy_redirect off; proxy_set_header Host $http_host; proxy_set_header X-Real-IP $remote_addr; proxy_set_header X-Forwarded-For $proxy_add_x_forwarded_for; proxy_pass http://127.0.0.1:9080/; } }- 1
- 2
- 3
- 4
- 5
- 6
- 7
- 8
- 9
- 10
- 11
- 12
- 13
- 14
- 15
- 16
- 17
- 18
- 19
- 20
- 21
然后 访问自定义域名 则成功访问到转发网址
-
相关阅读:
【JavaEE进阶】Spring事务和事务传播机制
Pandas中常用的魔法命令与Linux命令
【HMS core】【IAP Kit】【FAQ】华为支付典型问题集
CDH 集群离线部署、大数据组件安装与扩容详细步骤(cdh-6.3.1)
scipy库统计模块stats
【linux】Valgrind工具集详解(十六):交叉编译、移植到arm(失败)
RK3568平台开发系列讲解(Linux系统篇)kernel config 配置解析
Leetcode2-两数相加代码详解
Java中的volatile为什么不能保证原子性
堆料,新能源汽车走上智能手机老路
- 原文地址:https://blog.csdn.net/qq_42411307/article/details/126665590
