-
Proxyless Mesh 在 Dubbo 中的实战指南
在上一篇《Proxyless Mesh 在 Dubbo 中的实战》中我们了解了Dubbo Proxyless的基本原理、本文将带领大家实战操作,代码来自官网。
环境准备
安装docker
安装minikube
墙裂推荐:https://kubernetes.io/zh-cn/docs/tutorials/hello-minikube/
安装istio
https://istio.io/latest/docs/setup/getting-started/
❗❗❗ 安装 Istio 的时候需要开启 first-party-jwt 支持(使用 istioctl 工具安装的时候加上 --set values.global.jwtPolicy=first-party-jwt 参数),否则将导致客户端认证失败的问题。
参考命令如下:curl -L https://istio.io/downloadIstio | sh - cd istio-1.xx.x export PATH=$PWD/bin:$PATH istioctl install --set profile=demo --set values.global.jwtPolicy=first-party-jwt -y- 1
- 2
- 3
- 4
代码准备
xds-provider
定义一个接口
public interface GreetingService { String sayHello(String name); }- 1
- 2
- 3
- 4
实现对应的接口
@DubboService(version = "1.0.0") public class AnnotatedGreetingService implements GreetingService { @Override public String sayHello(String name) { System.out.println("greeting service received: " + name); return "hello, " + name + "! from host: " + NetUtils.getLocalHost(); } }- 1
- 2
- 3
- 4
- 5
- 6
- 7
- 8
- 9
编写启动类
public class ProviderBootstrap { public static void main(String[] args) throws Exception { AnnotationConfigApplicationContext context = new AnnotationConfigApplicationContext(ProviderConfiguration.class); context.start(); System.out.println("dubbo service started"); new CountDownLatch(1).await(); } @Configuration @EnableDubbo(scanBasePackages = "org.apache.dubbo.samples.impl") @PropertySource("classpath:/spring/dubbo-provider.properties") static class ProviderConfiguration { } }- 1
- 2
- 3
- 4
- 5
- 6
- 7
- 8
- 9
- 10
- 11
- 12
- 13
- 14
- 15
编写配置信息
dubbo.application.name=dubbo-samples-xds-provider # 由于 Dubbo 3 应用级服务发现的元数据无法从 istio 中获取,需要走服务自省模式。 # 这要求了 Dubbo MetadataService 的端口在全集群的是统一的。 dubbo.application.metadataServicePort=20885 # 走xds协议 dubbo.registry.address=xds://istiod.istio-system.svc:15012 dubbo.protocol.name=tri dubbo.protocol.port=50051 # 对齐k8s pod生命周期,由于 Kubernetes probe 探活机制的工作原理限制, # 探活请求的发起方不是 localhost,所以需要配置 qosAcceptForeignIp 参数开启允许全局访问 dubbo.application.qosEnable=true dubbo.application.qosAcceptForeignIp=true- 1
- 2
- 3
- 4
- 5
- 6
- 7
- 8
- 9
- 10
- 11
- 12
编写Deployment.yml和Service.yml
apiVersion: apps/v1 kind: Deployment metadata: name: dubbo-samples-xds-provider namespace: dubbo-demo spec: replicas: 3 selector: matchLabels: app: dubbo-samples-xds-provider template: metadata: labels: app: dubbo-samples-xds-provider spec: containers: - name: server image: apache/dubbo-demo:dubbo-samples-xds-provider_0.0.1 livenessProbe: httpGet: path: /live port: 22222 initialDelaySeconds: 5 periodSeconds: 5 readinessProbe: httpGet: path: /ready port: 22222 initialDelaySeconds: 5 periodSeconds: 5 startupProbe: httpGet: path: /startup port: 22222 failureThreshold: 30 periodSeconds: 10- 1
- 2
- 3
- 4
- 5
- 6
- 7
- 8
- 9
- 10
- 11
- 12
- 13
- 14
- 15
- 16
- 17
- 18
- 19
- 20
- 21
- 22
- 23
- 24
- 25
- 26
- 27
- 28
- 29
- 30
- 31
- 32
- 33
- 34
- 35
- 36
apiVersion: v1 kind: Service metadata: name: dubbo-samples-xds-provider namespace: dubbo-demo spec: clusterIP: None selector: app: dubbo-samples-xds-provider ports: - name: grpc protocol: TCP port: 50051 targetPort: 50051- 1
- 2
- 3
- 4
- 5
- 6
- 7
- 8
- 9
- 10
- 11
- 12
- 13
- 14
编写Dockerfile
FROM openjdk:8-jdk ADD ./target/dubbo-samples-xds-provider-1.0-SNAPSHOT.jar dubbo-samples-xds-provider-1.0-SNAPSHOT.jar CMD java -jar -agentlib:jdwp=transport=dt_socket,server=y,suspend=n,address=31000 /dubbo-samples-xds-provider-1.0-SNAPSHOT.jar- 1
- 2
- 3
xds-consumer
定义一个接口
public interface GreetingService { String sayHello(String name); }- 1
- 2
- 3
- 4
实现对应的接口
@Component("annotatedConsumer") public class GreetingServiceConsumer { // 这里特别注意的是、由于当前 Dubbo 版本受限于 istio 的通信模型无法获取接口所对应的应用名, // 因此需要配置 providedBy 参数来标记此服务来自哪个应用。 @DubboReference(version = "1.0.0", providedBy = "dubbo-samples-xds-provider") private GreetingService greetingService; public String doSayHello(String name) { return greetingService.sayHello(name); } }- 1
- 2
- 3
- 4
- 5
- 6
- 7
- 8
- 9
- 10
- 11
编写启动类
public class ConsumerBootstrap { public static void main(String[] args) { AnnotationConfigApplicationContext context = new AnnotationConfigApplicationContext(ConsumerConfiguration.class); context.start(); GreetingServiceConsumer greetingServiceConsumer = context.getBean(GreetingServiceConsumer.class); while (true) { try { String hello = greetingServiceConsumer.doSayHello("xDS Consumer"); System.out.println("result: " + hello); Thread.sleep(100); } catch (Throwable t) { t.printStackTrace(); } } } @Configuration @EnableDubbo(scanBasePackages = "org.apache.dubbo.samples.action") @PropertySource("classpath:/spring/dubbo-consumer.properties") @ComponentScan(value = {"org.apache.dubbo.samples.action"}) static class ConsumerConfiguration { } }- 1
- 2
- 3
- 4
- 5
- 6
- 7
- 8
- 9
- 10
- 11
- 12
- 13
- 14
- 15
- 16
- 17
- 18
- 19
- 20
- 21
- 22
- 23
- 24
- 25
编写配置信息
dubbo.application.name=dubbo-samples-xds-consumer dubbo.application.metadataServicePort=20885 dubbo.registry.address=xds://istiod.istio-system.svc:15012 dubbo.consumer.timeout=3000 dubbo.consumer.check=false dubbo.application.qosEnable=true dubbo.application.qosAcceptForeignIp=true- 1
- 2
- 3
- 4
- 5
- 6
- 7
编写Deployment.yml和Service.yml
apiVersion: apps/v1 kind: Deployment metadata: name: dubbo-samples-xds-consumer namespace: dubbo-demo spec: replicas: 2 selector: matchLabels: app: dubbo-samples-xds-consumer template: metadata: labels: app: dubbo-samples-xds-consumer spec: containers: - name: server image: apache/dubbo-demo:dubbo-samples-xds-consumer_0.0.1 livenessProbe: httpGet: path: /live port: 22222 initialDelaySeconds: 5 periodSeconds: 5 readinessProbe: httpGet: path: /ready port: 22222 initialDelaySeconds: 5 periodSeconds: 5 startupProbe: httpGet: path: /startup port: 22222 failureThreshold: 30 periodSeconds: 10- 1
- 2
- 3
- 4
- 5
- 6
- 7
- 8
- 9
- 10
- 11
- 12
- 13
- 14
- 15
- 16
- 17
- 18
- 19
- 20
- 21
- 22
- 23
- 24
- 25
- 26
- 27
- 28
- 29
- 30
- 31
- 32
- 33
- 34
- 35
- 36
apiVersion: v1 kind: Service metadata: name: dubbo-samples-xds-consumer namespace: dubbo-demo spec: clusterIP: None selector: app: dubbo-samples-xds-consumer ports: - name: grpc protocol: TCP port: 50051 targetPort: 50051- 1
- 2
- 3
- 4
- 5
- 6
- 7
- 8
- 9
- 10
- 11
- 12
- 13
- 14
编写Dockerfile
FROM openjdk:8-jdk ADD ./target/dubbo-samples-xds-consumer-1.0-SNAPSHOT.jar dubbo-samples-xds-consumer-1.0-SNAPSHOT.jar CMD java -jar -agentlib:jdwp=transport=dt_socket,server=y,suspend=n,address=31000 /dubbo-samples-xds-consumer-1.0-SNAPSHOT.jar- 1
- 2
- 3
✅ 到目前为止我们的环境和代码就全都准备完毕了!
构建镜像
1、启动docker

2、启动minikube
因为minikube是一个本地的k8s,他启动需要一个虚拟引擎,这里我们用docker来管理。我们通过如下命令启动
minikube start- 1
 我们可以在docker里看到minikube
3、检查istio的状态

4、构建镜像
在本地找到代码所在位置、依次执行以下命令
# 找到provider所在路径 cd ./dubbo-samples-xds-provider/ # 构建provider的镜像 docker build -t apache/dubbo-demo:dubbo-samples-xds-provider_0.0.1 .- 1
- 2
- 3
- 4

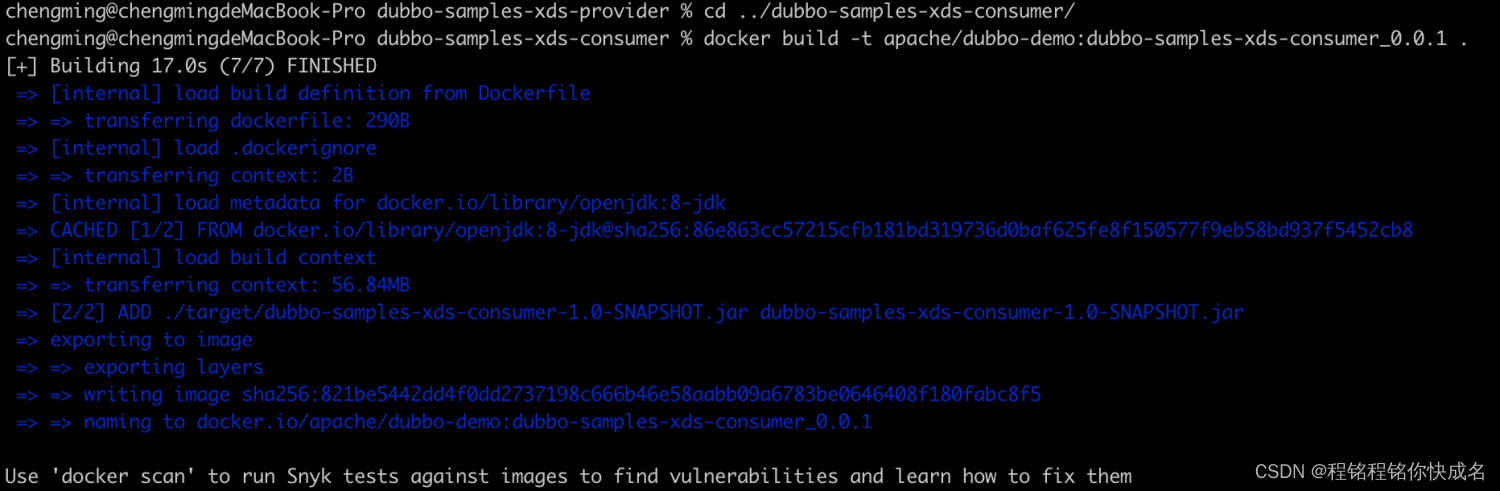
# 找到consumer所在路径 cd ../dubbo-samples-xds-consumer/ # 构建consumer的镜像 docker build -t apache/dubbo-demo:dubbo-samples-xds-consumer_0.0.1 .- 1
- 2
- 3
- 4
5、检查本地镜像

6、创建namespace
# 初始化命名空间 kubectl apply -f https://raw.githubusercontent.com/apache/dubbo-samples/master/dubbo-samples-xds/deploy/Namespace.yml # 切换命名空间 kubens dubbo-demo- 1
- 2
- 3
- 4
- 5
如果不创建namespace,那么会看到如下错误

部署容器
# 找到provider所在路径 cd ./dubbo-samples-xds-provider/src/main/resources/k8s # dubbo-samples-xds/dubbo-samples-xds-provider/src/main/resources/k8s/Deployment.yml # dubbo-samples-xds/dubbo-samples-xds-provider/src/main/resources/k8s/Service.yml # 部署provider的Deployment和Service kubectl apply -f Deployment.yml kubectl apply -f Service.yml- 1
- 2
- 3
- 4
- 5
- 6
- 7
- 8

# 找到consumer所在路径 cd ../../../../../dubbo-samples-xds-consumer/src/main/resources/k8s # dubbo-samples-xds/dubbo-samples-xds-consumer/src/main/resources/k8s/Deployment.yml # 部署consumer的Deployment kubectl apply -f Deployment.yml- 1
- 2
- 3
- 4
- 5
- 6

在minikube dashboard看到我们已经部署的pod
观察consumer效果
kubectl logs xxx- 1
result: hello, xDS Consumer! from host: 172.17.0.5 result: hello, xDS Consumer! from host: 172.17.0.5 result: hello, xDS Consumer! from host: 172.17.0.6 result: hello, xDS Consumer! from host: 172.17.0.6- 1
- 2
- 3
- 4
-
相关阅读:
最终稿第5部分理论知识考卷模拟
基于nodejs+vue学生论坛设计与实现
【工程光学】像差
自动化机器学习pycaret: PyCaret Basic Auto Classification LightGBM
Vue-router
数据库的进阶增删查改操作(一)
透过销售过程看清销售本质
R语言lavaan结构方程模型(SEM)实践技术应用
C动态内存分配和管理函数malloc,calloc,free与realloc
Openharmony3.2 源码编译(ubuntu 22.04) 过程记录
- 原文地址:https://blog.csdn.net/wangchengming1/article/details/126666190
