-
【SpringMVC】注解开发
学习SpringMVC注解开发之前建议先学习SpringMVC的底层工作流程:
【SpringMVC】深入理解DispatcherServlet
使用注解简化SpringMVC
1.导入相关依赖,添加web框架支持
这一步,在 [【SpringMVC】深入理解DispatcherServlet]提到过。
2.在web.xml下注册DispatcherServlet
虽然我们使用注解开发,但其本质还是用DispatcherServlet控制三大组件。
<servlet> <servlet-name>springmvcservlet-name> <servlet-class>org.springframework.web.servlet.DispatcherServletservlet-class> <init-param> <param-name>contextConfigLocationparam-name> <param-value>classpath:springmvc-servlet.xmlparam-value> init-param> <load-on-startup>1load-on-startup> servlet> <servlet-mapping> <servlet-name>springmvcservlet-name> <url-pattern>/url-pattern> servlet-mapping>- 1
- 2
- 3
- 4
- 5
- 6
- 7
- 8
- 9
- 10
- 11
- 12
- 13
- 14
- 15
- 16
- 17
- 18
3.编写spring管理的配置文件
<beans xmlns="http://www.springframework.org/schema/beans" xmlns:xsi="http://www.w3.org/2001/XMLSchema-instance" xmlns:cotext="http://www.springframework.org/schema/context" xmlns:mvc="http://www.springframework.org/schema/mvc" xsi:schemaLocation="http://www.springframework.org/schema/beans http://www.springframework.org/schema/beans/spring-beans.xsd http://www.springframework.org/schema/context https://www.springframework.org/schema/context/spring-context.xsd http://www.springframework.org/schema/mvc https://www.springframework.org/schema/mvc/spring-mvc.xsd"> <cotext:component-scan base-package="com.kxy.controller"/> <mvc:default-servlet-handler/> <mvc:annotation-driven/> <bean class="org.springframework.web.servlet.view.InternalResourceViewResolver" id="internalResourceViewResolver"> <property name="prefix" value="/WEB-INF/jsp/"/> <property name="suffix" value=".jsp"/> bean> beans>- 1
- 2
- 3
- 4
- 5
- 6
- 7
- 8
- 9
- 10
- 11
- 12
- 13
- 14
- 15
- 16
- 17
- 18
- 19
- 20
- 21
4.编写HelloController处理器
@Controller public class HelloController { @RequestMapping("/hello") public String hello(Model model) { model.addAttribute("msg","HelloSpringMVCAnnotation!"); return "hello"; } }- 1
- 2
- 3
- 4
- 5
- 6
- 7
- 8
- 9
5.启动tomcat服务器并运行url

总结
流程:
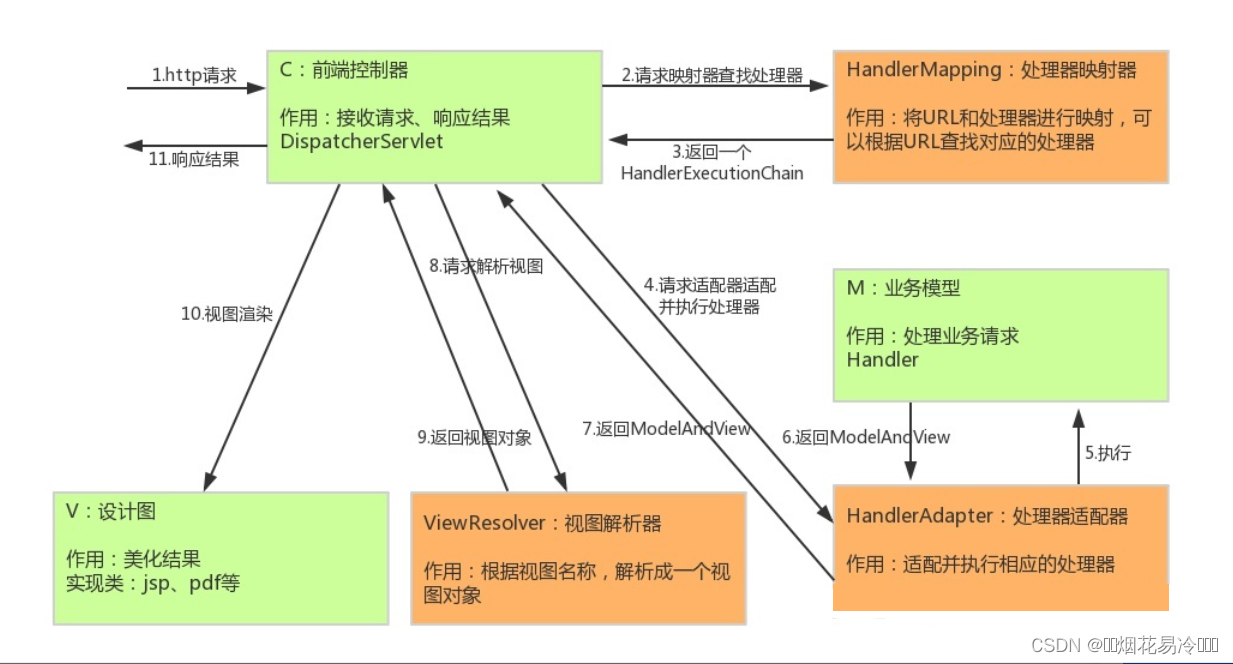
1.首先当客户端的url请求发出的时候,DispatcherServlet接受请求,DispatcherServlet告诉处理器映射器,通过注解@RequestMapping的url来查找对应的处理器,返回执行链给DispatcherServlet。
2.然后DispatcherServlet告诉适配器,适配并且执行处理器HelloController,执行完返回模型和视图对象。
3.DispatcherServlet告诉视图解析器,视图解析器解析modelAndView对象,返回view视图给DispatcherServlet。在这里通过@RequestMapping(“/hello”)下的方法的返回值,根据视图名来跳转到相应的视图。
4.最后,视图交给DispatcherServlet,渲染后响应给客户端。
其实它的底层的思想是永远不变的。advantages:
在经过了注解实现SpringMVC后,三大组件里的处理器适配器和处理器映射器不需要我们自己主动注册到spring容器中,只需要一个 < mvc:annotation-driven/>
包含了他们的注解支持,为了让注解生效,我们需要(开启扫描包的注解支持)。仅仅只需要我们配置视图解析器的前后缀。假如你创建的处理器很多的情况下,不再需要像从前那样,建很多处理器的类,还要把他们一个一个装配到容器里。只需要用@RequestMapping就可以完成url和处理器的映射,用@Controller完成到容器的装配。大大简化了开发~ -
相关阅读:
渗透测试突破口——未授权访问
不让写系列之软件篇-留档
[附源码]java毕业设计亿上汽车在线销售管理系统
JavaWeb之JSON、AJAX
MFC 解决Enter回车键和Esc取消键默认关闭窗口的三种方法
php定时任务
3、Android 活动Activity(4)(为活动补充附加信息)
简单的一个两层的一维卷积网络
〖Python 数据库开发实战 - MySQL篇㉕〗- 数据更新操作 - UPDATE 语句
Java_线程的概念和线程的创建的方法
- 原文地址:https://blog.csdn.net/qq_53635765/article/details/126601751
