-
【SwiftUI模块】0007、SwiftUI新手指引-新手指示-聚光灯介绍说明
SwiftUI小功能模块系列
0001、SwiftUI自定义Tabbar动画效果
0002、SwiftUI自定义3D动画导航抽屉效果
0003、SwiftUI搭建瀑布流-交错网格-效果
0004、SwiftUI-<探探App>喜欢手势卡片
0005、SwiftUI-粘性动画指示器引导页
0006、SwiftUI自定义引导页动画
0007、SwiftUI新手指引技术:SwiftUI3.0、新手指引、聚光灯、新手指示、聚光灯介绍说明
运行环境:
SwiftUI3.0 + Xcode13.4.1 + MacOS12.5 + iPhone Simulator iPhone 13 Pro Max⚠️基于上一个 SwiftUI自定义引导页动画 案例 进行扩展添加一个新手引导效果
SwiftUI新手指引-新手指示-聚光灯介绍说明
- 概述
- 详细
- 一、运行效果
- 二、项目结构图
- ⭐️ 额外给引导页的背景添加一个颜色值
- 三、程序实现 - 过程
- 1.创建一个项目命名为 `OnBoardingAnimation`
- 1.1.引入资源文件和颜色
- 2. 创建一个虚拟文件`New Group` 命名为 `View`
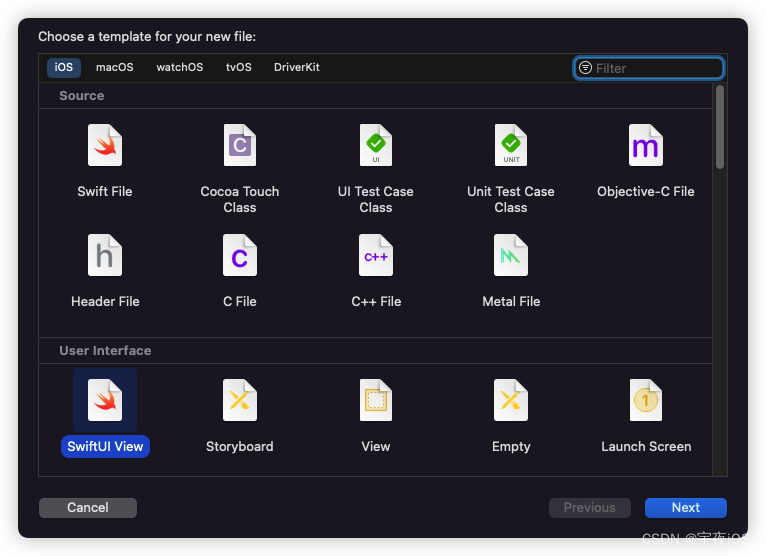
- 2. 创建一个文件`New File` 选择`SwiftUI View`类型 命名为`OnBoarding`
- 2. 创建一个文件`New File` 选择`SwiftUI View`类型 命名为`OffsetPageTabView`
- 3. 创建一个虚拟文件`New Group` 命名为 `Model`
- 3. 创建一个文件`New File` 选择`SwiftUI View`类型 命名为`BoardingScreen` 、并且删除预览视图、改造成模型 继承`Identifiable`
- ⭐️4. 创建一个虚拟文件`New Group` 命名为 `Helpers`
- ⭐️5. 创建一个文件`New File` 选择`SwiftUI View`类型 命名为`Extensions` 、并且删除预览视图、改造成一个扩展文件`extension`
- Code
- demo源码
概述
使用SwiftUI做一个
SwiftUI新手指引的效果
如果你有跟着我操作上篇 SwiftUI自定义引导页动画 案例
这次只需要注重 ⭐️的部分即可 。 代码会出现部分的改变详细
一、运行效果

二、项目结构图

⭐️ 额外给引导页的背景添加一个颜色值
默认颜色
#000000
暗黑模式#212121
三、程序实现 - 过程
思路:
1.创建主页OnBoarding
2.搭建主页进行偏移的逻辑处理OffsetTabView
3.添加主页介绍信息的模型BoardingScreen
4.处理滚动的时候 通过 主页进行绑定OffsetPageTabView的偏移量offset进行监听 是否要改变当前页面
5.并且通过一个圆形矩形背景做一个自身360的旋转动画
⭐️新手指示效果:- 获取根控制器
- 从根控制器获取view
- 从根控制器的view 里面添加一个view 用来当做聚光灯的背景
- 从聚光灯背景中反向提取指定区域 设置成白色 也就是高光效果
1.创建一个项目命名为
OnBoardingAnimation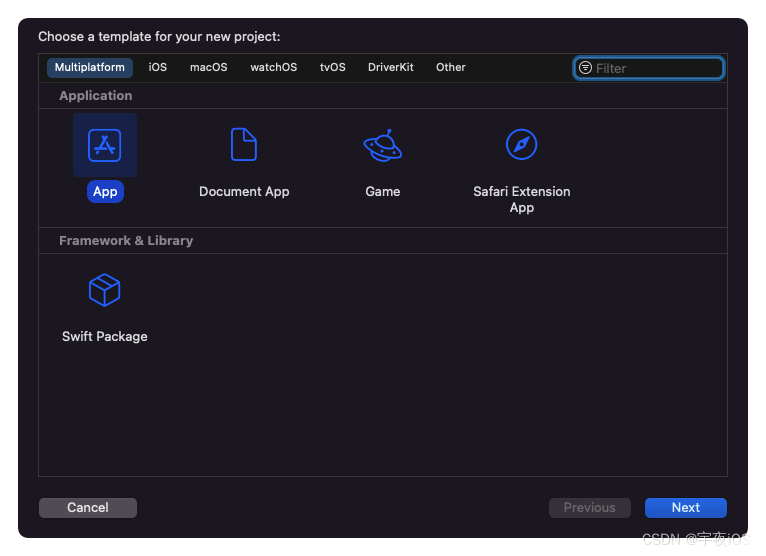

1.1.引入资源文件和颜色
颜色
screen1#D2BA64
screen2#5050CF
screen3#7EBA64
screen4#504F5F
引导页介绍图片4张
图片名称 和 颜色名称一样 。方便统一根据名字设置对应的页面
2. 创建一个虚拟文件
New Group命名为View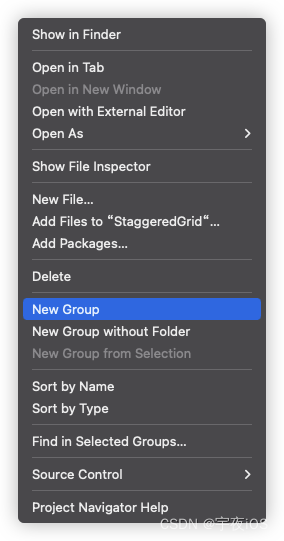

2. 创建一个文件
New File选择SwiftUI View类型 命名为OnBoarding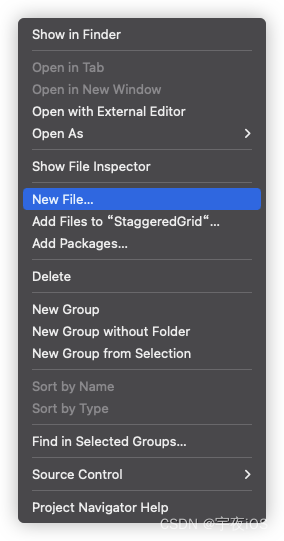

2. 创建一个文件
New File选择SwiftUI View类型 命名为OffsetPageTabView具体实现和 0005、SwiftUI-粘性动画指示器引导页 案例一样
如果上一个案例 你有跟我实现 - 那么可以直接拖拽过来即可


3. 创建一个虚拟文件
New Group命名为Model

3. 创建一个文件
New File选择SwiftUI View类型 命名为BoardingScreen、并且删除预览视图、改造成模型 继承Identifiable


⭐️4. 创建一个虚拟文件
New Group命名为Helpers

⭐️5. 创建一个文件
New File选择SwiftUI View类型 命名为Extensions、并且删除预览视图、改造成一个扩展文件extension


Code
ContentView - 主窗口
主要是展示主窗口
OnBoarding// // ContentView.swift // Shared // // Created by 李宇鸿 on 2022/8/17. // import SwiftUI struct ContentView: View { var body: some View { OnBoarding() } } struct ContentView_Previews: PreviewProvider { static var previews: some View { ContentView() } }- 1
- 2
- 3
- 4
- 5
- 6
- 7
- 8
- 9
- 10
- 11
- 12
- 13
- 14
- 15
- 16
- 17
- 18
- 19
- 20
- 21
OnBoarding - 引导页
思路
- 主要部分核心模块 - 滚动页面 - UI创建
包含图片、两个文本 - 叠加层 - 最顶层 做了指示器 和 跳过、下一页的按钮
指示器使用Circle创建和 做了登录和注册按钮 - 创建引导页面数据、和滚动核心UI
OffsetPageTabView - 添加滚动的时候 做一个
圆形矩形背景进行360度自身旋转 - ⭐️给需要新手指示的 添加聚光灯效果 - 通过View的扩展 - 使得每个控件都可以拥有聚光效果 - 然后设置当前的聚光位置
// // OnBoarding.swift // OnBoardingAnimation (iOS) // // Created by 李宇鸿 on 2022/8/17. // import SwiftUI struct OnBoarding: View { @State var offset : CGFloat = 0 @State var showLight : Bool = true // @State var currentHighlight : Int = 0 @State var currentHighlight : Int = 1 // 聚光灯从1开始 var body: some View { // 自定义页面视图… OffsetPageTabView(offset:$offset){ HStack(spacing:0){ ForEach(boardingScreens) { screen in VStack(spacing:15){ Image(screen.image) .resizable() .aspectRatio(contentMode: .fit) .frame(width:getScrrenBounds().width - 100,height: getScrrenBounds().width - 100) // 小屏幕采用…… .scaleEffect(getScrrenBounds().height < 750 ? 0.9 : 1) .offset(y:getScrrenBounds().height < 750 ? -100 : -120) VStack(alignment:.leading,spacing: 12){ Text(screen.title) .font(.largeTitle.bold()) .foregroundColor(.white) .padding(.top,20) Text(screen.description) .fontWeight(.semibold) .foregroundColor(.white) } .frame(maxWidth:.infinity,alignment:.leading) .offset(y:-70) } .padding() .frame(width:getScrrenBounds().width) .frame(maxHeight: .infinity) // .background(Color(screen.image)) } } } // 动画 // 使用一个圆形矩形做一个背景动画 基于自身白色圆形矩形进行一个360动画效果 .background( RoundedRectangle(cornerRadius: 50) .fill(.white) // 大小为图像大小… .frame(width:getScrrenBounds().width - 100,height: getScrrenBounds().width - 100) .scaleEffect(2) .rotationEffect(.init(degrees: 25)) .rotationEffect(.init(degrees: getRotation())) .offset(y: -getScrrenBounds().width + 20) ,alignment: .leading ) .background(Color("screen\(getIndex() + 1)")) .animation(.easeInOut,value: getIndex()) // 适配刘海屏 .ignoresSafeArea(.container,edges: .all) // 叠加层 放在最前面 .overlay( VStack{ HStack(spacing:25){ Button { } label: { Text("Login") .fontWeight(.semibold) .foregroundColor(.black) .padding(.vertical,20) .frame(maxWidth: .infinity) .background(Color.white,in:RoundedRectangle(cornerRadius: 12)) } // 增加聚光灯视野 .spotlight(enabled: currentHighlight == 1, title: "Login into Account") Button { } label: { Text("SignUp") .fontWeight(.semibold) .foregroundColor(.black) .offset(x:-5) .padding(.vertical,20) .frame(maxWidth: .infinity) .background(Color.white,in:RoundedRectangle(cornerRadius: 12)) } .spotlight(enabled: currentHighlight == 2, title: "SignUp New Account") } HStack{ Button{ } label: { Text("Skip") .fontWeight(.semibold) .foregroundColor(.white) } .spotlight(enabled: currentHighlight == 3, title: "Skip Intro's") // 指示器 HStack(spacing:8){ ForEach(boardingScreens.indices,id:\.self){ index in Circle() .fill(.white) .opacity(index == getIndex() ? 1 : 0.4) .frame(width: 8, height: 8) .scaleEffect(index == (getIndex()) ? 1.3 : 0.85) .animation(.easeInOut,value:getIndex()) } } .frame(maxWidth:.infinity) .spotlight(enabled: currentHighlight == 4, title: "Indicator's") // 用于测试圆形形状 // Circle() // .fill(.red) // .frame(width: 45, height: 45) // .spotlight(enabled: currentHighlight == 0, title: "") Button{ //设置Mac Offset… // Max 4个屏幕,所以Max将是3*宽 offset = min(offset + getScrrenBounds().width,getScrrenBounds().width * 3) } label: { Text("Next") .fontWeight(.semibold) .foregroundColor(.white) } .spotlight(enabled: currentHighlight == 5, title: "Indicator's") } .padding(.top,30) .padding(.horizontal,8) } .padding() ,alignment: .bottom ) .onTapGesture{ currentHighlight += 1 } } // 得到旋转 func getRotation()-> Double{ let progress = offset / (getScrrenBounds().width * 4 ) // 做一个完整的旋转… let rotation = Double(progress) * 360 return rotation } // 基于偏移改变背景颜色… func getIndex() -> Int { let progress = (offset / getScrrenBounds().width).rounded() return Int(progress) } } struct OnBoarding_Previews: PreviewProvider { static var previews: some View { OnBoarding() } } // 扩展视图获得屏幕边界… extension View { func getScrrenBounds()-> CGRect{ return UIScreen.main.bounds } }- 1
- 2
- 3
- 4
- 5
- 6
- 7
- 8
- 9
- 10
- 11
- 12
- 13
- 14
- 15
- 16
- 17
- 18
- 19
- 20
- 21
- 22
- 23
- 24
- 25
- 26
- 27
- 28
- 29
- 30
- 31
- 32
- 33
- 34
- 35
- 36
- 37
- 38
- 39
- 40
- 41
- 42
- 43
- 44
- 45
- 46
- 47
- 48
- 49
- 50
- 51
- 52
- 53
- 54
- 55
- 56
- 57
- 58
- 59
- 60
- 61
- 62
- 63
- 64
- 65
- 66
- 67
- 68
- 69
- 70
- 71
- 72
- 73
- 74
- 75
- 76
- 77
- 78
- 79
- 80
- 81
- 82
- 83
- 84
- 85
- 86
- 87
- 88
- 89
- 90
- 91
- 92
- 93
- 94
- 95
- 96
- 97
- 98
- 99
- 100
- 101
- 102
- 103
- 104
- 105
- 106
- 107
- 108
- 109
- 110
- 111
- 112
- 113
- 114
- 115
- 116
- 117
- 118
- 119
- 120
- 121
- 122
- 123
- 124
- 125
- 126
- 127
- 128
- 129
- 130
- 131
- 132
- 133
- 134
- 135
- 136
- 137
- 138
- 139
- 140
- 141
- 142
- 143
- 144
- 145
- 146
- 147
- 148
- 149
- 150
- 151
- 152
- 153
- 154
- 155
- 156
- 157
- 158
- 159
- 160
- 161
- 162
- 163
- 164
- 165
- 166
- 167
- 168
- 169
- 170
- 171
- 172
- 173
- 174
- 175
- 176
- 177
- 178
- 179
- 180
- 181
- 182
- 183
- 184
- 185
- 186
- 187
- 188
- 189
- 190
- 191
- 192
- 193
- 194
- 195
- 196
- 197
- 198
- 199
- 200
- 201
- 202
- 203
- 204
- 205
- 206
- 207
- 208
- 209
- 210
OffsetPageTabView.swift -偏移Tab视图逻辑处理
主要是做 滚动页面的逻辑处理
思路- 基于ScrollView进行处理
- 提供初始化构造器 - 方便上层通过偏移量进行 调用初始化
init(offset: Binding, @ViewBuilder content: @escaping()->Content) - 监听ScrollView滚动的代理、更新当前的偏移量
class Coordinator - 提供滚动的代理 滚动到下一个页面 进行是否更新当前的偏移量
updateUIView
比 0005、SwiftUI-粘性动画指示器引导页多做了一个清除背景操作
import SwiftUI // 自定义视图泰式将返回填充控件的偏移量… struct OffsetPageTabView<Content: View>: UIViewRepresentable { var content: Content @Binding var offset : CGFloat func makeCoordinator() -> Coordinator { return OffsetPageTabView.Coordinator(parent: self) } init(offset: Binding<CGFloat> , @ViewBuilder content: @escaping()->Content){ self.content = content() self._offset = offset } func makeUIView(context: Context) -> UIScrollView { let scrollview = UIScrollView() // 提取SwiftUI View并嵌入到UIKit ScrollView… let hostview = UIHostingController(rootView: content) hostview.view.translatesAutoresizingMaskIntoConstraints = false // 清除背景 hostview.view.backgroundColor = .clear let constraints = [ hostview.view.topAnchor.constraint(equalTo: scrollview.topAnchor), hostview.view.leadingAnchor.constraint(equalTo: scrollview.leadingAnchor), hostview.view.trailingAnchor.constraint(equalTo: scrollview.trailingAnchor), hostview.view.bottomAnchor.constraint(equalTo: scrollview.bottomAnchor), //如果你使用的是垂直填充… //然后不要声明高度限制… hostview.view.heightAnchor.constraint(equalTo: scrollview.heightAnchor) ] scrollview.addSubview(hostview.view) scrollview.addConstraints(constraints) // 启用分页 scrollview.isPagingEnabled = true scrollview.showsVerticalScrollIndicator = false scrollview.showsHorizontalScrollIndicator = false // 设置代理 scrollview.delegate = context.coordinator return scrollview } func updateUIView(_ uiView: UIScrollView, context: Context) { //只有当offset被手动更改时才需要更新… //检查当前和滚动视图的偏移量… let currentOffset = uiView.contentOffset.x if currentOffset != offset { print("updating"); uiView.setContentOffset(CGPoint(x: offset, y: 0),animated:true) } } // 页面抵消…… class Coordinator : NSObject,UIScrollViewDelegate { var parent : OffsetPageTabView init(parent: OffsetPageTabView){ self.parent = parent } func scrollViewDidScroll(_ scrollView: UIScrollView) { let offset = scrollView.contentOffset.x parent.offset = offset } } } struct OffsetPageTabView_Previews: PreviewProvider { static var previews: some View { ContentView() } }- 1
- 2
- 3
- 4
- 5
- 6
- 7
- 8
- 9
- 10
- 11
- 12
- 13
- 14
- 15
- 16
- 17
- 18
- 19
- 20
- 21
- 22
- 23
- 24
- 25
- 26
- 27
- 28
- 29
- 30
- 31
- 32
- 33
- 34
- 35
- 36
- 37
- 38
- 39
- 40
- 41
- 42
- 43
- 44
- 45
- 46
- 47
- 48
- 49
- 50
- 51
- 52
- 53
- 54
- 55
- 56
- 57
- 58
- 59
- 60
- 61
- 62
- 63
- 64
- 65
- 66
- 67
- 68
- 69
- 70
- 71
- 72
- 73
- 74
- 75
- 76
- 77
- 78
- 79
- 80
- 81
- 82
- 83
- 84
- 85
- 86
- 87
BoardingScreen - 模型
介绍模型
import SwiftUI struct BoardingScreen: Identifiable { var id = UUID().uuidString var image : String var title : String var description : String } // 相同的标题和描述… let title = "Easy Payments with \n Walletoy" let description = "Samll business can receive device \npayment super fast and super easy" // 因为图片名称和BG颜色名称相同… // 样本模型屏幕… var boardingScreens : [BoardingScreen] = [ BoardingScreen(image: "screen1", title: title, description: description), BoardingScreen(image: "screen2", title: title, description: description), BoardingScreen(image: "screen3", title: title, description: description), BoardingScreen(image: "screen4", title: title, description: description) ]- 1
- 2
- 3
- 4
- 5
- 6
- 7
- 8
- 9
- 10
- 11
- 12
- 13
- 14
- 15
- 16
- 17
- 18
- 19
- 20
- 21
- 22
- 23
- 24
- 25
- 26
⭐️Extensions - 扩展
用来处理 新手指引思路
- 获取根控制器
- 从根控制器获取view
- 从根控制器的view 里面添加一个view 用来当做聚光灯的背景
- 从聚光灯背景中反向提取指定区域 设置成白色 也就是高光效果
// // Extensions.swift // OnBoardingAnimation (iOS) // // Created by 李宇鸿 on 2022/8/18. // import SwiftUI extension View{ // MARK:自定义Spolitght编辑 func spotlight(enabled: Bool,title: String = "")->some View{ return self .overlay{ if enabled{ //获取当前内容大小 GeometryReader{proxy in let rect = proxy.frame(in:.global) SpotlightView(rect:rect, title: title) { self } } } } } //屏幕边界 func screenBounds()-> CGRect{ return UIScreen.main.bounds } // 获取根控制器 func rootController()-> UIViewController { guard let screen = UIApplication.shared.connectedScenes.first as? UIWindowScene else { return .init() } guard let root = screen.windows.first?.rootViewController else { return .init() } return root } } // 给当前类文件做一个预览窗口 struct OnBoarding_Spotlight_Previews: PreviewProvider { static var previews: some View { OnBoarding() } } //聚光灯视野 struct SpotlightView<Content: View> : View{ var content : Content var rect : CGRect var title : String init(rect:CGRect, title: String,@ViewBuilder content: @escaping ()-> Content){ self.content = content() self.title = title self.rect = rect } @State var tag: Int = 1009 var body : some View{ Rectangle() // 如果你想避免用户互动 就不要使用clear .fill(.clear) // .fill(.white.opacity(0.02)) .onAppear{ addOverlayView() } .onDisappear{ removeOverlay() } } // 当视图消失时移除覆盖层 func removeOverlay(){ rootController().view.subviews.forEach { view in if view.tag == self.tag{ view.removeFromSuperview() } } } //在当前视图上添加一个额外视图 //从根控制器中提取UIView func addOverlayView(){ // 转换SwiftUI View到UIKit let hostingView = UIHostingController(rootView: OverlaySwiftUIView()) hostingView.view.frame = screenBounds() hostingView.view.backgroundColor = .clear //有时候SiwftUI On Appear会被调用两次 //添加到当前视图 // 要标识添加的是哪个视图,可以向视图添加一个标记 if self.tag == 1009 { self.tag = generateRandom() } hostingView.view.tag = self.tag rootController().view.subviews.forEach { view in if view.tag == self.tag{return} } // 添加到当前视图 rootController().view.addSubview(hostingView.view) } @ViewBuilder // 叠加的view func OverlaySwiftUIView()-> some View { ZStack{ Rectangle() .fill(Color("Spotlight").opacity(0.8)) // 反向屏蔽当前高光点 .mask({ // 如果高度和宽度几乎相同,那么使它圆形esle,圆形 let radius = (rect.height / rect.width) > 0.7 ? rect.width : 6 Rectangle() .overlay( content .frame(width:rect.width,height:rect.height) // 特别亮的小区域 .padding(10) .background(.white,in: RoundedRectangle(cornerRadius: radius)) // 放置在正确的位置 .position() //位置将把内容放在左上角 //在MidXY的帮助下,我们将它设置在正确的位置 .offset(x:rect.midX,y:rect.midY) // The Exact coent Size // 确切的股份大小 .blendMode(.destinationOut) ) }) // 显示文本 if title != "" { Text(title) .font(.title.bold()) .foregroundColor(.white) .position() // 如果是底部,则在上面或下面显示文本 .offset(x:screenBounds().midX,y:rect.maxY > (screenBounds().height - 150) ? (rect.minY - 150) : (rect.maxY + 150) ) } } .frame(width: screenBounds().width, height: screenBounds().height) .ignoresSafeArea() } // 标签的随机数 func generateRandom()-> Int{ let random = Int(UUID().uuid.0) // 检查是否有一个视图已经拥有这个标签 let subViews = rootController().view.subviews for index in subViews.indices { // 相同的话 就一直递归 直到找到不同View if subViews[index].tag == random { return generateRandom() } } return random } }- 1
- 2
- 3
- 4
- 5
- 6
- 7
- 8
- 9
- 10
- 11
- 12
- 13
- 14
- 15
- 16
- 17
- 18
- 19
- 20
- 21
- 22
- 23
- 24
- 25
- 26
- 27
- 28
- 29
- 30
- 31
- 32
- 33
- 34
- 35
- 36
- 37
- 38
- 39
- 40
- 41
- 42
- 43
- 44
- 45
- 46
- 47
- 48
- 49
- 50
- 51
- 52
- 53
- 54
- 55
- 56
- 57
- 58
- 59
- 60
- 61
- 62
- 63
- 64
- 65
- 66
- 67
- 68
- 69
- 70
- 71
- 72
- 73
- 74
- 75
- 76
- 77
- 78
- 79
- 80
- 81
- 82
- 83
- 84
- 85
- 86
- 87
- 88
- 89
- 90
- 91
- 92
- 93
- 94
- 95
- 96
- 97
- 98
- 99
- 100
- 101
- 102
- 103
- 104
- 105
- 106
- 107
- 108
- 109
- 110
- 111
- 112
- 113
- 114
- 115
- 116
- 117
- 118
- 119
- 120
- 121
- 122
- 123
- 124
- 125
- 126
- 127
- 128
- 129
- 130
- 131
- 132
- 133
- 134
- 135
- 136
- 137
- 138
- 139
- 140
- 141
- 142
- 143
- 144
- 145
- 146
- 147
- 148
- 149
- 150
- 151
- 152
- 153
- 154
- 155
- 156
- 157
- 158
- 159
- 160
- 161
- 162
- 163
- 164
- 165
- 166
- 167
- 168
- 169
- 170
- 171
- 172
- 173
- 174
- 175
- 176
- 177
- 178
- 179
- 180
- 181
- 182
- 183
- 184
- 185
- 186
- 187
- 188
- 189
demo源码
如需看源码,请点击下载!
-
相关阅读:
L63.linux命令每日一练 -- 第九章 Linux进程管理命令 -- runlevel、init和service
【Python】实现excel文档中指定工作表数据的更新操作
库存三层模型概述
推荐十个优秀的ASP.NET Core第三方中间件,你用过几个?
8章:scrapy框架
常见git提交规范
数组:2.近序数组
一分钟搞定基于Saltstack集群批量安装部署Docker
基于KT6368A的车载OBD蓝牙芯片模块解决方案低成本国产替代
TMS320F283743之GPIO配置
- 原文地址:https://blog.csdn.net/qq_42816425/article/details/126412257