-
HIVE源码阅读(五)
1、HQL 是如何转换为MR任务
1.1、Hive 的核心组成介绍

- 用户接口:Client
CLI(command-line interface)、JDBC/ODBC(jdbc 访问 hive)、WEBUI(浏览器访问 hive) - 元数据:Metastore
元数据包括:表名、表所属的数据库(默认是 default)、表的拥有者、列/分区字段、表的类型(是否是外部表)、表的数据所在目录等;
默认存储在自带的 derby 数据库中,推荐使用 MySQL 存储 Metastore - Hadoop
使用 HDFS 进行存储,使用 MapReduce 进行计算。 - 驱动器:Driver
- 解析器(SQL Parser) 将 SQL 字符串转换成抽象语法树 AST,这一步一般都用第三方工具库完成,比如 antlr; 对 AST 进行语法分析,比如表是否存在、字段是否存在、SQL 语义是否有误。
- 编译器(Physical Plan) 将 AST 编译生成逻辑执行计划。
- 优化器(Query Optimizer)
对逻辑执行计划进行优化。 - 执行器(Execution)
把逻辑执行计划转换成可以运行的物理计划。对于 Hive 来说,就是 MR/Spark。
1.2、HQL 转换为 MR 任务流程说明
- 进入程序,利用Antlr框架定义HQL的语法规则,对HQL完成词法语法解析,将HQL转换为为AST(抽象语法树);
- 遍历AST,抽象出查询的基本组成单元QueryBlock(查询块),可以理解为最小的查询执行单元;
- 遍历QueryBlock,将其转换为OperatorTree(操作树,也就是逻辑执行计划),可以理解为不可拆分的一个逻辑执行单元;
- 使用逻辑优化器对OperatorTree(操作树)进行逻辑优化。例如合并不必要的ReduceSinkOperator,减少Shuffle数据量;
- 遍历OperatorTree,转换为TaskTree。也就是翻译为MR任务的流程,将逻辑执行计划转换为物理执行计划;
- 使用物理优化器对TaskTree进行物理优化;
- 生成最终的执行计划,提交任务到Hadoop集群运行。
2、HQL 转换为 MR 源码详细解读
2.1、HQL 转换为 MR 源码整体流程介绍

2.2、程序入口 — CliDriver
我们执行一个 HQL 语句通常有以下几种方式:
$HIVE_HOME/bin/hive进入客户端,然后执行 HQL;$HIVE_HOME/bin/hive -e “hql”;$HIVE_HOME/bin/hive -f hive.sql;- 先开启 hivesever2 服务端,然后通过 JDBC 方式连接远程提交 HQL。可以知道我们执行HQL主要依赖于
$HIVE_HOME/bin/hive和$HIVE_HOME/bin/,hivesever2 两种脚本来实现提交 HQL,而在这两个脚本中,最终启动的 JAVA 程序的主类为
“org.apache.hadoop.hive.cli.CliDriver”,所以其实 Hive 程序的入口就是“CliDriver”这个类。
2.3、HQL 的读取与参数解析
2.3.1、找到“CliDriver”这个类的“main”方法
public static void main(String[] args) throws Exception { int ret = new CliDriver().run(args); System.exit(ret); }- 1
- 2
- 3
- 4
2.3.2、主类的 run 方法
public int run(String[] args) throws Exception { OptionsProcessor oproc = new OptionsProcessor(); //解析系统参数 if (!oproc.process_stage1(args)) { return 1; } ... ... CliSessionState ss = new CliSessionState(new HiveConf(SessionState.class)); //标准输入输出以及错误输出流的定义,后续需要输入 HQL 以及打印控制台信息 ss.in = System.in; try { ss.out = new PrintStream(System.out, true, "UTF-8"); ss.info = new PrintStream(System.err, true, "UTF-8"); ss.err = new CachingPrintStream(System.err, true, "UTF-8"); } catch (UnsupportedEncodingException e) { return 3; } //解析用户参数,包含"-e -f -v -database"等等 if (!oproc.process_stage2(ss)) { return 2; } ... ... // execute cli driver work try { return executeDriver(ss, conf, oproc); } finally { ss.resetThreadName(); ss.close(); } }- 1
- 2
- 3
- 4
- 5
- 6
- 7
- 8
- 9
- 10
- 11
- 12
- 13
- 14
- 15
- 16
- 17
- 18
- 19
- 20
- 21
- 22
- 23
- 24
- 25
- 26
- 27
- 28
- 29
- 30
2.3.3、executeDriver 方法
private int executeDriver(CliSessionState ss, HiveConf conf, OptionsProcessor oproc) throws Exception { CliDriver cli = new CliDriver(); cli.setHiveVariables(oproc.getHiveVariables()); // use the specified database if specified cli.processSelectDatabase(ss); // Execute -i init files (always in silent mode) cli.processInitFiles(ss); if (ss.execString != null) { int cmdProcessStatus = cli.processLine(ss.execString); return cmdProcessStatus; } ... ... setupConsoleReader(); String line; int ret = 0; String prefix = ""; String curDB = getFormattedDb(conf, ss); String curPrompt = prompt + curDB; String dbSpaces = spacesForString(curDB); //读取客户端的输入 HQL while ((line = reader.readLine(curPrompt + "> ")) != null) { if (!prefix.equals("")) { prefix += '\n'; } if (line.trim().startsWith("--")) { continue; } //以按照“;”分割的方式解析 if (line.trim().endsWith(";") && !line.trim().endsWith("\\;")) { line = prefix + line; ret = cli.processLine(line, true); prefix = ""; curDB = getFormattedDb(conf, ss); curPrompt = prompt + curDB; dbSpaces = dbSpaces.length() == curDB.length() ? dbSpaces : spacesForString(curDB); } else { prefix = prefix + line; curPrompt = prompt2 + dbSpaces; continue; } } return ret; }- 1
- 2
- 3
- 4
- 5
- 6
- 7
- 8
- 9
- 10
- 11
- 12
- 13
- 14
- 15
- 16
- 17
- 18
- 19
- 20
- 21
- 22
- 23
- 24
- 25
- 26
- 27
- 28
- 29
- 30
- 31
- 32
- 33
- 34
- 35
- 36
- 37
- 38
- 39
- 40
- 41
- 42
- 43
2.3.4、processLine 方法
public int processLine(String line, boolean allowInterrupting) { SignalHandler oldSignal = null; Signal interruptSignal = null; ... ... try { int lastRet = 0, ret = 0; // we can not use "split" function directly as ";" may be quoted List<String> commands = splitSemiColon(line); String command = ""; for (String oneCmd : commands) { if (StringUtils.endsWith(oneCmd, "\\")) { command += StringUtils.chop(oneCmd) + ";"; continue; } else { command += oneCmd; } if (StringUtils.isBlank(command)) { continue; } //解析单行 HQL ret = processCmd(command); command = ""; lastRet = ret; boolean ignoreErrors = HiveConf.getBoolVar(conf, HiveConf.ConfVars.CLIIGNOREERRORS); if (ret != 0 && !ignoreErrors) { return ret; } } return lastRet; } finally { // Once we are done processing the line, restore the old handler if (oldSignal != null && interruptSignal != null) { Signal.handle(interruptSignal, oldSignal); } } }- 1
- 2
- 3
- 4
- 5
- 6
- 7
- 8
- 9
- 10
- 11
- 12
- 13
- 14
- 15
- 16
- 17
- 18
- 19
- 20
- 21
- 22
- 23
- 24
- 25
- 26
- 27
- 28
- 29
- 30
- 31
- 32
- 33
- 34
- 35
- 36
2.3.5、processCmd 方法
public int processCmd(String cmd) { CliSessionState ss = (CliSessionState) SessionState.get(); ... ... //1.如果命令为"quit"或者"exit",则退出 if (cmd_trimmed.toLowerCase().equals("quit") || cmd_trimmed.toLowerCase().equals("exit")) { // if we have come this far - either the previous commands // are all successful or this is command line. in either case // this counts as a successful run ss.close(); System.exit(0); //2.如果命令为"source"开头,则表示执行 HQL 文件,继续读取文件并解析 } else if (tokens[0].equalsIgnoreCase("source")) { String cmd_1 = getFirstCmd(cmd_trimmed, tokens[0].length()); cmd_1 = new VariableSubstitution(new HiveVariableSource() { @Override public Map<String, String> getHiveVariable() { return SessionState.get().getHiveVariables(); } }).substitute(ss.getConf(), cmd_1); File sourceFile = new File(cmd_1); if (! sourceFile.isFile()){ console.printError("File: "+ cmd_1 + " is not a file."); ret = 1; } else { try { ret = processFile(cmd_1); } catch (IOException e) { console.printError("Failed processing file "+ cmd_1 +" "+ e.getLocalizedMessage(), stringifyException(e)); ret = 1; } } //3.如果命令以"!"开头,则表示用户需要执行 Linux 命令 } else if (cmd_trimmed.startsWith("!")) { // for shell commands, use unstripped command String shell_cmd = cmd.trim().substring(1); shell_cmd = new VariableSubstitution(new HiveVariableSource() { @Override public Map<String, String> getHiveVariable() { return SessionState.get().getHiveVariables(); } }).substitute(ss.getConf(), shell_cmd); // shell_cmd = "/bin/bash -c \'" + shell_cmd + "\'"; try { ShellCmdExecutor executor = new ShellCmdExecutor(shell_cmd, ss.out, ss.err); ret = executor.execute(); if (ret != 0) { console.printError("Command failed with exit code = " + ret); } } catch (Exception e) { console.printError("Exception raised from Shell command " + e.getLocalizedMessage(), stringifyException(e)); ret = 1; } //4.以上三者都不是,则认为用户输入的为"select ..."正常的增删改查 HQL 语句,则进行 HQL 解析 } else { try { try (CommandProcessor proc = CommandProcessorFactory.get(tokens, (HiveConf) conf)) { if (proc instanceof IDriver) { // Let Driver strip comments using sql parser ret = processLocalCmd(cmd, proc, ss); } else { ret = processLocalCmd(cmd_trimmed, proc, ss); } } } catch (SQLException e) { console.printError("Failed processing command " + tokens[0] + " " + e.getLocalizedMessage(), org.apache.hadoop.util.StringUtils.stringifyException(e)); ret = 1; } catch (Exception e) { throw new RuntimeException(e); } } ss.resetThreadName(); return ret; }- 1
- 2
- 3
- 4
- 5
- 6
- 7
- 8
- 9
- 10
- 11
- 12
- 13
- 14
- 15
- 16
- 17
- 18
- 19
- 20
- 21
- 22
- 23
- 24
- 25
- 26
- 27
- 28
- 29
- 30
- 31
- 32
- 33
- 34
- 35
- 36
- 37
- 38
- 39
- 40
- 41
- 42
- 43
- 44
- 45
- 46
- 47
- 48
- 49
- 50
- 51
- 52
- 53
- 54
- 55
- 56
- 57
- 58
- 59
- 60
- 61
- 62
- 63
- 64
- 65
- 66
- 67
- 68
- 69
- 70
- 71
- 72
- 73
- 74
- 75
- 76
2.3.6、processLocalCmd 方法
int processLocalCmd(String cmd, CommandProcessor proc, CliSessionState ss) { boolean escapeCRLF = HiveConf.getBoolVar(conf, HiveConf.ConfVars.HIVE_CLI_PRINT_ESCAPE_CRLF); int ret = 0; if (proc != null) { if (proc instanceof IDriver) { IDriver qp = (IDriver) proc; PrintStream out = ss.out; //获取系统时间作为开始时间,以便后续计算 HQL 执行时长 long start = System.currentTimeMillis(); if (ss.getIsVerbose()) { out.println(cmd); } //HQL 执行的核心方法 ret = qp.run(cmd).getResponseCode(); if (ret != 0) { qp.close(); return ret; } // query has run capture the time //获取系统时间作为结束时间,以便后续计算 HQL 执行时长 long end = System.currentTimeMillis(); double timeTaken = (end - start) / 1000.0; ArrayList<String> res = new ArrayList<String>(); //打印头信息 printHeader(qp, out); // print the results,包含结果集并获取抓取到数据的条数 int counter = 0; try { if (out instanceof FetchConverter) { ((FetchConverter) out).fetchStarted(); } while (qp.getResults(res)) { for (String r : res) { if (escapeCRLF) { r = EscapeCRLFHelper.escapeCRLF(r); } out.println(r); } counter += res.size(); res.clear(); if (out.checkError()) { break; } } } catch (IOException e) { console.printError("Failed with exception " + e.getClass().getName() + ":" + e.getMessage(), "\n" + org.apache.hadoop.util.StringUtils.stringifyException(e)); ret = 1; } qp.close(); if (out instanceof FetchConverter) { ((FetchConverter) out).fetchFinished(); } //打印 HQL 执行时间以及抓取数据的条数(经常使用 Hive 的同学是否觉得这句很熟悉呢,其实就是执行完一个 HQL 最后打印的那句话) console.printInfo("Time taken: " + timeTaken + " seconds" + (counter == 0 ? "" : ", Fetched: " + counter + " row(s)")); } else { String firstToken = tokenizeCmd(cmd.trim())[0]; String cmd_1 = getFirstCmd(cmd.trim(), firstToken.length()); if (ss.getIsVerbose()) { ss.out.println(firstToken + " " + cmd_1); } CommandProcessorResponse res = proc.run(cmd_1); if (res.getResponseCode() != 0) { ss.out.println("Query returned non-zero code: " + res.getResponseCode() + ", cause: " + res.getErrorMessage()); } if (res.getConsoleMessages() != null) { for (String consoleMsg : res.getConsoleMessages()) { console.printInfo(consoleMsg); } } ret = res.getResponseCode(); } } return ret; }- 1
- 2
- 3
- 4
- 5
- 6
- 7
- 8
- 9
- 10
- 11
- 12
- 13
- 14
- 15
- 16
- 17
- 18
- 19
- 20
- 21
- 22
- 23
- 24
- 25
- 26
- 27
- 28
- 29
- 30
- 31
- 32
- 33
- 34
- 35
- 36
- 37
- 38
- 39
- 40
- 41
- 42
- 43
- 44
- 45
- 46
- 47
- 48
- 49
- 50
- 51
- 52
- 53
- 54
- 55
- 56
- 57
- 58
- 59
- 60
- 61
- 62
- 63
- 64
- 65
- 66
- 67
- 68
- 69
- 70
- 71
- 72
- 73
- 74
- 75
2.3.7、qp.run(cmd)方法
点击进入“run”方法,该方法为 IDriver 接口的抽象方法,此处实际调用的是“org.apache.hadoop.hive.ql.Driver”类中的“run”方法,找到“Driver”类中的“run”方法。
public CommandProcessorResponse run(String command) { return run(command, false); } public CommandProcessorResponse run(String command, boolean alreadyCompiled) { try { runInternal(command, alreadyCompiled); return createProcessorResponse(0); } catch (CommandProcessorResponse cpr) { ... ... } }- 1
- 2
- 3
- 4
- 5
- 6
- 7
- 8
- 9
- 10
- 11
2.3.8、runInternal 方法
private void runInternal(String command, boolean alreadyCompiled) throws CommandProcessorResponse { errorMessage = null; SQLState = null; downstreamError = null; LockedDriverState.setLockedDriverState(lDrvState); lDrvState.stateLock.lock(); ... ... PerfLogger perfLogger = null; if (!alreadyCompiled) { // compile internal will automatically reset the perf logger //1.编译 HQL 语句 compileInternal(command, true); // then we continue to use this perf logger perfLogger = SessionState.getPerfLogger(); } ... ... try { //2.执行 execute(); } catch (CommandProcessorResponse cpr) { rollback(cpr); throw cpr; } isFinishedWithError = false; } }- 1
- 2
- 3
- 4
- 5
- 6
- 7
- 8
- 9
- 10
- 11
- 12
- 13
- 14
- 15
- 16
- 17
- 18
- 19
- 20
- 21
- 22
- 23
- 24
- 25
- 26
- 27
2.4、HQL 生成 AST(抽象语法树)
2.4.1、compileInternal 方法
private void compileInternal(String command, boolean deferClose) throws CommandProcessorResponse { Metrics metrics = MetricsFactory.getInstance(); if (metrics != null) { metrics.incrementCounter(MetricsConstant.WAITING_COMPILE_OPS, 1); } ... ... if (compileLock == null) { throw createProcessorResponse(ErrorMsg.COMPILE_LOCK_TIMED_OUT.getErrorCode()); } try { compile(command, true, deferClose); } catch (CommandProcessorResponse cpr) { try { releaseLocksAndCommitOrRollback(false); } catch (LockException e) { LOG.warn("Exception in releasing locks. " + org.apache.hadoop.util.StringUtils.stringifyException(e)); } throw cpr; } }- 1
- 2
- 3
- 4
- 5
- 6
- 7
- 8
- 9
- 10
- 11
- 12
- 13
- 14
- 15
- 16
- 17
- 18
- 19
- 20
2.4.2、compile 方法
private void compile(String command, boolean resetTaskIds, boolean deferClose) throws CommandProcessorResponse { PerfLogger perfLogger = SessionState.getPerfLogger(true); perfLogger.PerfLogBegin(CLASS_NAME, PerfLogger.DRIVER_RUN); perfLogger.PerfLogBegin(CLASS_NAME, PerfLogger.COMPILE); lDrvState.stateLock.lock(); ... ... //HQL 生成 AST ASTNode tree; try { tree = ParseUtils.parse(command, ctx); } catch (ParseException e) { parseError = true; throw e; } finally { hookRunner.runAfterParseHook(command, parseError); } }- 1
- 2
- 3
- 4
- 5
- 6
- 7
- 8
- 9
- 10
- 11
- 12
- 13
- 14
- 15
- 16
- 17
2.4.3、parse 方法
/** Parses the Hive query. */ public static ASTNode parse(String command, Context ctx) throws ParseException { return parse(command, ctx, null); } public static ASTNode parse( String command, Context ctx, String viewFullyQualifiedName) throws ParseException { ParseDriver pd = new ParseDriver(); ASTNode tree = pd.parse(command, ctx, viewFullyQualifiedName); tree = findRootNonNullToken(tree); handleSetColRefs(tree); return tree; } public ASTNode parse(String command, Context ctx, String viewFullyQualifiedName) throws ParseException { if (LOG.isDebugEnabled()) { LOG.debug("Parsing command: " + command); } //1.构建词法解析器 HiveLexerX lexer = new HiveLexerX(new ANTLRNoCaseStringStream(command)); //2.将 HQL 中的关键词替换为 Token TokenRewriteStream tokens = new TokenRewriteStream(lexer); if (ctx != null) { if (viewFullyQualifiedName == null) { // Top level query ctx.setTokenRewriteStream(tokens); } else { // It is a view ctx.addViewTokenRewriteStream(viewFullyQualifiedName, tokens); } lexer.setHiveConf(ctx.getConf()); }- 1
- 2
- 3
- 4
- 5
- 6
- 7
- 8
- 9
- 10
- 11
- 12
- 13
- 14
- 15
- 16
- 17
- 18
- 19
- 20
- 21
- 22
- 23
- 24
- 25
- 26
- 27
- 28
- 29
- 30
- 31
- 32
说明:Antlr 框架。Hive 使用 Antlr 实现 SQL 的词法和语法解析。Antlr 是一种语言识别的工具,可以用来构造领域语言。使用 Antlr 构造特定的语言只需要编写一个语法文件,定义词法和语法替换规则即可,Antlr 完成了词法分析、语法分析、语义分析、中间代码生成的过程。
Hive 中语法规则的定义文件在 0.10 版本以前是 Hive.g 一个文件,随着语法规则越来越复杂,由语法规则生成的 Java 解析类可能超过 Java 类文件的最大上限,0.11 版本将 Hive.g拆成了 5 个文件,词法规则 HiveLexer.g 和语法规则的 4 个文件
SelectClauseParser.g,FromClauseParser.g,IdentifiersParser.g,HiveParser.g。HiveParser parser = new HiveParser(tokens); if (ctx != null) { parser.setHiveConf(ctx.getConf()); } parser.setTreeAdaptor(adaptor); HiveParser.statement_return r = null; try { //3.进行语法解析,生成最终的 AST r = parser.statement(); } catch (RecognitionException e) { e.printStackTrace(); throw new ParseException(parser.errors); } if (lexer.getErrors().size() == 0 && parser.errors.size() == 0) { LOG.debug("Parse Completed"); } else if (lexer.getErrors().size() != 0) { throw new ParseException(lexer.getErrors()); } else { throw new ParseException(parser.errors); } ASTNode tree = (ASTNode) r.getTree(); tree.setUnknownTokenBoundaries(); return tree; }- 1
- 2
- 3
- 4
- 5
- 6
- 7
- 8
- 9
- 10
- 11
- 12
- 13
- 14
- 15
- 16
- 17
- 18
- 19
- 20
- 21
- 22
- 23
- 24
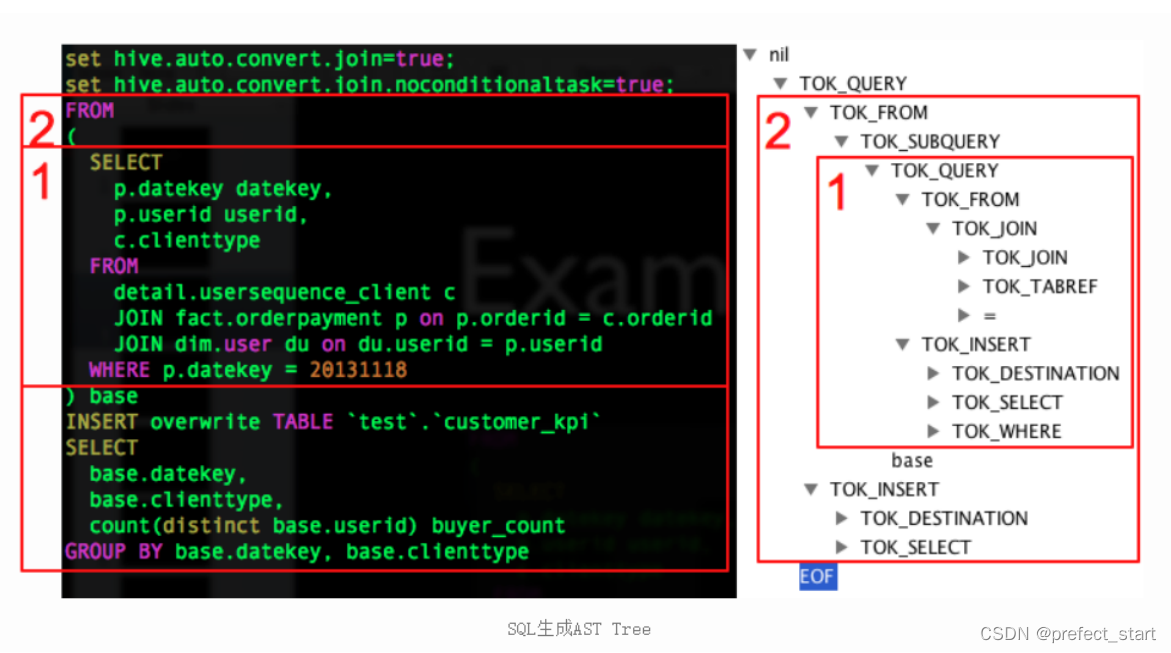
说明:例如 HQL 语句为:
FROM ( SELECT p.datekey datekey, p.userid userid, c.clienttype FROM detail.usersequence_client c JOIN fact.orderpayment p ON p.orderid = c.orderid JOIN default.user du ON du.userid = p.userid WHERE p.datekey = 20131118 ) base INSERT OVERWRITE TABLE `test`.`customer_kpi` SELECT base.datekey, base.clienttype, count(distinct base.userid) buyer_count GROUP BY base.datekey, base.clienttype- 1
- 2
- 3
- 4
- 5
- 6
- 7
- 8
- 9
- 10
- 11
- 12
- 13
- 14
- 15
- 16
- 17
- 18
生成对应的 AST(抽象语法树)为:
2.5、对 AST 进一步解析
接下来的步骤包括:
- 将 AST 转换为 QueryBlock 进一步转换为 OperatorTree;
- 对 OperatorTree 进行逻辑优化(LogicalOptimizer);
- 将 OperatorTree 转换为 TaskTree(任务树);
- 对 TaskTree 进行物理优化(PhysicalOptimizer)。
之所以将这 4 个步骤写在一起,是因为这几个步骤在源码中存在于一个方法中。
2.5.1、compile 方法(接 2.4.2 节 compile 方法继续往下)
private void compile(String command, boolean resetTaskIds, boolean deferClose) throws CommandProcessorResponse { PerfLogger perfLogger = SessionState.getPerfLogger(true); perfLogger.PerfLogBegin(CLASS_NAME, PerfLogger.DRIVER_RUN); perfLogger.PerfLogBegin(CLASS_NAME, PerfLogger.COMPILE); lDrvState.stateLock.lock(); ... ... //HQL 生成 AST ASTNode tree; try { tree = ParseUtils.parse(command, ctx); } catch (ParseException e) { parseError = true; throw e; } finally { hookRunner.runAfterParseHook(command, parseError); } // Do semantic analysis and plan generation BaseSemanticAnalyzer sem = SemanticAnalyzerFactory.get(queryState, tree); if (!retrial) { openTransaction(); generateValidTxnList(); } //进一步解析抽象语法树 sem.analyze(tree, ctx); }- 1
- 2
- 3
- 4
- 5
- 6
- 7
- 8
- 9
- 10
- 11
- 12
- 13
- 14
- 15
- 16
- 17
- 18
- 19
- 20
- 21
- 22
- 23
- 24
- 25
2.5.2、analyze 方法
public void analyze(ASTNode ast, Context ctx) throws SemanticException { initCtx(ctx); init(true); analyzeInternal(ast); }- 1
- 2
- 3
- 4
- 5
- 6
2.5.3、analyzeInternal 方法
public abstract void analyzeInternal(ASTNode ast) throws SemanticException;- 1
此方法为
“org.apache.hadoop.hive.ql.parse.BaseSemanticAnalyzer”抽象类的抽象方法,我们进入实现类“org.apache.hadoop.hive.ql.parse.SemanticAnalyzer”的 analyzeInternal 方法。public void analyzeInternal(ASTNode ast) throws SemanticException { analyzeInternal(ast, new PlannerContextFactory() { @Override public PlannerContext create() { return new PlannerContext(); } }); }- 1
- 2
- 3
- 4
- 5
- 6
- 7
- 8
2.5.4、继续调用重载的 analyzeInternal 方法
注意:该段源码中出现的“1,2,3,4…11”均为源码所定义步骤
void analyzeInternal(ASTNode ast, PlannerContextFactory pcf) throws SemanticException { LOG.info("Starting Semantic Analysis"); // 1. Generate Resolved Parse tree from syntax tree boolean needsTransform = needsTransform(); //change the location of position alias process here processPositionAlias(ast); PlannerContext plannerCtx = pcf.create(); //处理 AST,转换为 QueryBlock if (!genResolvedParseTree(ast, plannerCtx)) { return; } ... ... // 2. Gen OP Tree from resolved Parse Tree Operator sinkOp = genOPTree(ast, plannerCtx); // 3. Deduce Resultset Schema:定义输出数据的 Schema ... ... // 4. Generate Parse Context for Optimizer & Physical compiler copyInfoToQueryProperties(queryProperties); ParseContext pCtx = new ParseContext(queryState, opToPartPruner, opToPartList, topOps, new HashSet<JoinOperator>(joinContext.keySet()), new HashSet<SMBMapJoinOperator>(smbMapJoinContext.keySet()), loadTableWork, loadFileWork, columnStatsAutoGatherContexts, ctx, idToTableNameMap, destTableId, uCtx, listMapJoinOpsNoReducer, prunedPartitions, tabNameToTabObject, opToSamplePruner, globalLimitCtx, nameToSplitSample, inputs, rootTasks, opToPartToSkewedPruner, viewAliasToInput, reduceSinkOperatorsAddedByEnforceBucketingSorting, analyzeRewrite, tableDesc, createVwDesc, materializedViewUpdateDesc, queryProperties, viewProjectToTableSchema,acidFileSinks); ... ... // 5. Take care of view creation:处理视图相关 ... ... // 6. Generate table access stats if required if (HiveConf.getBoolVar(this.conf, HiveConf.ConfVars.HIVE_STATS_COLLECT_TABLEKEYS)) { TableAccessAnalyzer tableAccessAnalyzer = new TableAccessAnalyzer(pCtx); setTableAccessInfo(tableAccessAnalyzer.analyzeTableAccess()); } // 7. Perform Logical optimization:对操作树执行逻辑优化 if (LOG.isDebugEnabled()) { LOG.debug("Before logical optimization\n" + Operator.toString(pCtx.getTopOps().values())); } //创建优化器 Optimizer optm = new Optimizer(); optm.setPctx(pCtx); optm.initialize(conf); //执行优化 pCtx = optm.optimize(); if (pCtx.getColumnAccessInfo() != null) { // set ColumnAccessInfo for view column authorization setColumnAccessInfo(pCtx.getColumnAccessInfo()); } if (LOG.isDebugEnabled()) { LOG.debug("After logical optimization\n" + Operator.toString(pCtx.getTopOps().values())); } // 8. Generate column access stats if required - wait until column pruning // takes place during optimization boolean isColumnInfoNeedForAuth = SessionState.get().isAuthorizationModeV2() && HiveConf.getBoolVar(conf, HiveConf.ConfVars.HIVE_AUTHORIZATION_ENABLED); if (isColumnInfoNeedForAuth || HiveConf.getBoolVar(this.conf, HiveConf.ConfVars.HIVE_STATS_COLLECT_SCANCOLS)) { ColumnAccessAnalyzer columnAccessAnalyzer = new ColumnAccessAnalyzer(pCtx); // view column access info is carried by this.getColumnAccessInfo(). setColumnAccessInfo(columnAccessAnalyzer.analyzeColumnAccess(this.getColumnAccessInfo())); } // 9. Optimize Physical op tree & Translate to target execution engine (MR, TEZ..):执行物理优化 if (!ctx.getExplainLogical()) { TaskCompiler compiler = TaskCompilerFactory.getCompiler(conf, pCtx); compiler.init(queryState, console, db); //compile 为抽象方法,对应的实现类分别为 MapReduceCompiler、TezCompiler 和 SparkCompiler compiler.compile(pCtx, rootTasks, inputs, outputs); fetchTask = pCtx.getFetchTask(); } //find all Acid FileSinkOperatorS QueryPlanPostProcessor qp = new QueryPlanPostProcessor(rootTasks, acidFileSinks, ctx.getExecutionId()); // 10. Attach CTAS/Insert-Commit-hooks for Storage Handlers ... ... LOG.info("Completed plan generation"); // 11. put accessed columns to readEntity if (HiveConf.getBoolVar(this.conf, HiveConf.ConfVars.HIVE_STATS_COLLECT_SCANCOLS)) { putAccessedColumnsToReadEntity(inputs, columnAccessInfo); } if (isCacheEnabled && lookupInfo != null) { if (queryCanBeCached()) { QueryResultsCache.QueryInfo queryInfo = createCacheQueryInfoForQuery(lookupInfo); // Specify that the results of this query can be cached. setCacheUsage(new CacheUsage( CacheUsage.CacheStatus.CAN_CACHE_QUERY_RESULTS, queryInfo)); } } }- 1
- 2
- 3
- 4
- 5
- 6
- 7
- 8
- 9
- 10
- 11
- 12
- 13
- 14
- 15
- 16
- 17
- 18
- 19
- 20
- 21
- 22
- 23
- 24
- 25
- 26
- 27
- 28
- 29
- 30
- 31
- 32
- 33
- 34
- 35
- 36
- 37
- 38
- 39
- 40
- 41
- 42
- 43
- 44
- 45
- 46
- 47
- 48
- 49
- 50
- 51
- 52
- 53
- 54
- 55
- 56
- 57
- 58
- 59
- 60
- 61
- 62
- 63
- 64
- 65
- 66
- 67
- 68
- 69
- 70
- 71
- 72
- 73
- 74
- 75
- 76
- 77
- 78
- 79
- 80
- 81
- 82
- 83
- 84
- 85
- 86
2.5.5、提交任务并执行(接 2.3.8 节 runInternal 方法继续往下)
此处接 2.3.8 节中的第二步
//2.执行 execute();- 1
- 2
2.5.6、execute 方法
private void execute() throws CommandProcessorResponse { PerfLogger perfLogger = SessionState.getPerfLogger(); perfLogger.PerfLogBegin(CLASS_NAME, PerfLogger.DRIVER_EXECUTE); ... ... //1.构建任务:根据任务树构建 MrJob setQueryDisplays(plan.getRootTasks()); int mrJobs = Utilities.getMRTasks(plan.getRootTasks()).size(); int jobs = mrJobs + Utilities.getTezTasks(plan.getRootTasks()).size() + Utilities.getSparkTasks(plan.getRootTasks()).size(); if (jobs > 0) { logMrWarning(mrJobs); console.printInfo("Query ID = " + queryId); console.printInfo("Total jobs = " + jobs); } perfLogger.PerfLogBegin(CLASS_NAME, PerfLogger.RUN_TASKS); // Loop while you either have tasks running, or tasks queued up while (driverCxt.isRunning()) { // Launch upto maxthreads tasks Task<? extends Serializable> task; while ((task = driverCxt.getRunnable(maxthreads)) != null) { //2.启动任务 TaskRunner runner = launchTask(task, queryId, noName, jobname, jobs, driverCxt); if (!runner.isRunning()) { break; } } ... ... //打印结果中最后的 OK if (console != null) { console.printInfo("OK"); } }- 1
- 2
- 3
- 4
- 5
- 6
- 7
- 8
- 9
- 10
- 11
- 12
- 13
- 14
- 15
- 16
- 17
- 18
- 19
- 20
- 21
- 22
- 23
- 24
- 25
- 26
- 27
- 28
- 29
- 30
- 31
2.5.7、launchTask 方法
private TaskRunner launchTask(Task<? extends Serializable> tsk, String queryId, boolean noName, String jobname, int jobs, DriverContext cxt) throws HiveException { if (SessionState.get() != null) { SessionState.get().getHiveHistory().startTask(queryId, tsk, tsk.getClass().getName()); } if (tsk.isMapRedTask() && !(tsk instanceof ConditionalTask)) { if (noName) { conf.set(MRJobConfig.JOB_NAME, jobname + " (" + tsk.getId() + ")"); } conf.set(DagUtils.MAPREDUCE_WORKFLOW_NODE_NAME, tsk.getId()); Utilities.setWorkflowAdjacencies(conf, plan); cxt.incCurJobNo(1); console.printInfo("Launching Job " + cxt.getCurJobNo() + " out of " + jobs); } tsk.initialize(queryState, plan, cxt, ctx.getOpContext()); TaskRunner tskRun = new TaskRunner(tsk); //添加启动任务 cxt.launching(tskRun); // Launch Task:根据是否可以并行来决定是否并行启动 Task if (HiveConf.getBoolVar(conf, HiveConf.ConfVars.EXECPARALLEL) && tsk.canExecuteInParallel()) { // Launch it in the parallel mode, as a separate thread only for MR tasks if (LOG.isInfoEnabled()){ LOG.info("Starting task [" + tsk + "] in parallel"); } //可并行任务启动,实际上还是执行 tskRun.runSequential(); tskRun.start(); } else { if (LOG.isInfoEnabled()){ LOG.info("Starting task [" + tsk + "] in serial mode"); } //不可并行任务,则按照序列顺序执行任务 tskRun.runSequential(); } return tskRun; }- 1
- 2
- 3
- 4
- 5
- 6
- 7
- 8
- 9
- 10
- 11
- 12
- 13
- 14
- 15
- 16
- 17
- 18
- 19
- 20
- 21
- 22
- 23
- 24
- 25
- 26
- 27
- 28
- 29
- 30
- 31
- 32
- 33
- 34
2.5.8、runSequential 方法
public void runSequential() { int exitVal = -101; try { exitVal = tsk.executeTask(ss == null ? null : ss.getHiveHistory()); } catch (Throwable t) { if (tsk.getException() == null) { tsk.setException(t); } LOG.error("Error in executeTask", t); } result.setExitVal(exitVal); if (tsk.getException() != null) { result.setTaskError(tsk.getException()); } }- 1
- 2
- 3
- 4
- 5
- 6
- 7
- 8
- 9
- 10
- 11
- 12
- 13
- 14
- 15
2.5.9、executeTask 方法
public int executeTask(HiveHistory hiveHistory) { try { this.setStarted(); if (hiveHistory != null) { hiveHistory.logPlanProgress(queryPlan); } int retval = execute(driverContext); this.setDone(); if (hiveHistory != null) { hiveHistory.logPlanProgress(queryPlan); } return retval; } catch (IOException e) { throw new RuntimeException("Unexpected error: " + e.getMessage(), e); } }- 1
- 2
- 3
- 4
- 5
- 6
- 7
- 8
- 9
- 10
- 11
- 12
- 13
- 14
- 15
- 16
2.5.10、execute 方法
protected abstract int execute(DriverContext driverContext);- 1
此时我们进入了一个抽象
“org.apache.hadoop.hive.ql.exec.Task”的“execute”方法,我们则需要找到一个实现类的 “ execute ” 方法, 此处我选 择
“org.apache.hadoop.hive.ql.exec.mr.MapRedTask”这个类。public int execute(DriverContext driverContext) { Context ctx = driverContext.getCtx(); boolean ctxCreated = false; try { ... ... if (!runningViaChild) { // since we are running the mapred task in the same jvm, we should update the job conf // in ExecDriver as well to have proper local properties. if (this.isLocalMode()) { // save the original job tracker ctx.setOriginalTracker(ShimLoader.getHadoopShims().getJobLauncherRpcAddre ss(job)); // change it to local ShimLoader.getHadoopShims().setJobLauncherRpcAddress(job, "local"); } // we are not running this mapred task via child jvm // so directly invoke ExecDriver //设置 MR 任务的 InputFormat、OutputFormat 等等这些 MRJob 的执行类 int ret = super.execute(driverContext); // restore the previous properties for framework name, RM address etc. if (this.isLocalMode()) { // restore the local job tracker back to original ctx.restoreOriginalTracker(); } return ret; } ... ... //构建执行 MR 任务的命令 String isSilent = "true".equalsIgnoreCase(System.getProperty("test.silent")) ? "-nolog" : ""; String jarCmd = hiveJar + " " + ExecDriver.class.getName() + libJarsOption; String cmdLine = hadoopExec + " jar " + jarCmd + " -plan " + planPath.toString() + " " + isSilent + " " + hiveConfArgs; ... ... // Run ExecDriver in another JVM executor = Runtime.getRuntime().exec(cmdLine, env, new File(workDir)); }- 1
- 2
- 3
- 4
- 5
- 6
- 7
- 8
- 9
- 10
- 11
- 12
- 13
- 14
- 15
- 16
- 17
- 18
- 19
- 20
- 21
- 22
- 23
- 24
- 25
- 26
- 27
- 28
- 29
- 30
- 31
- 32
- 33
- 34
- 35
3、Hive 源码 Debug 介绍
3.1、Debug 环境准备
3.1.1、下载源码包
下载 Hive 源码包,自行编译一下,建议在 Linux 环境下编译,然后将整个编译好的包全部拷贝到 IDEA 工作目录中并使用 IDEA 打开。该文档是以 Hive3.1.2 版本作为讲解的。在资料包中提供了已经编译好的 Hive 源码包。
3.1.2、打开项目配置项

3.1.3、添加远程连接配置组

3.1.4、添加配置信息

3.2、测试
3.2.1、在 CliDriver 类的 run 方法中随意打上断点

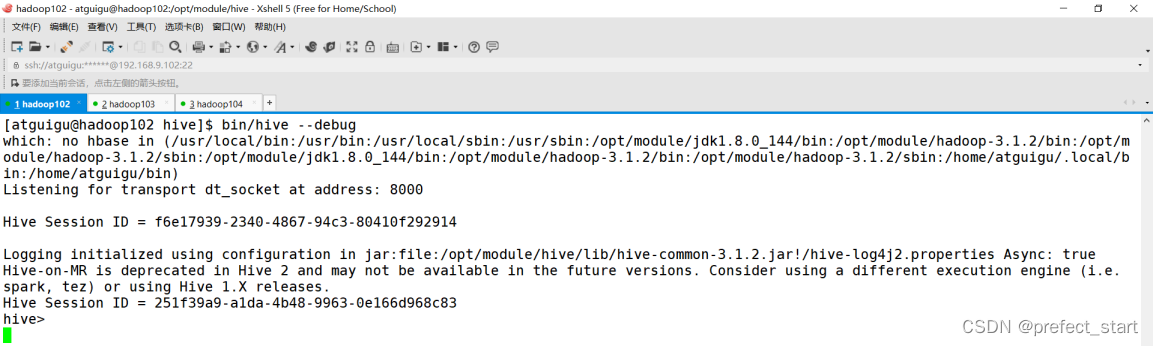
3.2.2、开启 Hive 客户端 Debug 模式
$HIVE_HOME/bin/hive –debug- 1
3.2.3、使用 debug 模式启动本地项目

3.2.4、在 Hive 客户端中执行 HQL,切换到 IDEA 中查看
- 在 IDEA 中查看断点

- 在 Hive Debug 模式客户端查看
- 用户接口:Client
-
相关阅读:
数据结构和算法:数组和链表
基于Anacoda搭建虚拟环境cudnn6.0+cuda8.0+python3.6+tensorflow-gpu1.4.0
(四)Ansible-其他模块
pwn入门(1)二进制基础
redis、rocketmq 高级面试考点
如何成功安装Node.js并在VS Code终端使用npm
运筹说 第66期|贝尔曼也有“演讲恐惧症”?
并发工具类库使用的常见问题
匈牙利算法解决二分图匹配问题
电池充电放电试验标准介绍
- 原文地址:https://blog.csdn.net/prefect_start/article/details/126091687