-
如何实现MQTT的Java代码
MQTT(消息队列遥测传输)是ISO 标准(ISO/IEC PRF 20922)下基于发布/订阅]范式的消息协议。它工作在 TCP/IP协议族上,是为硬件性能低下的远程设备以及网络状况糟糕的情况下而设计的发布/订阅型消息协议,为此,它需要一个消息中间件 。
为rabbit开启mqtt
1.在yml文件中添加一个mqtt的端口映射1883:1883
"prettyprint hljs less" style="padding: 0.5em; font-family: Menlo, Monaco, Consolas, "Courier New", monospace; color: rgb(68, 68, 68); border-radius: 4px; display: block; margin: 0px 0px 1.5em; font-size: 14px; line-height: 1.5em; word-break: break-all; overflow-wrap: break-word; white-space: pre; background-color: rgb(246, 246, 246); border: none; overflow-x: auto; font-style: normal; font-variant-ligatures: normal; font-variant-caps: normal; font-weight: 400; letter-spacing: normal; orphans: 2; text-align: start; text-indent: 0px; text-transform: none; widows: 2; word-spacing: 0px; -webkit-text-stroke-width: 0px; text-decoration-style: initial; text-decoration-color: initial;">restart: always- container_name: rabbitmq
- ports:
- - 5672:5672
- - 15672:15672
- - 1883:1883 #mqtt
- volumes:
- - ./data:/var/lib/rabbitmq
2.进入rabbit的docker容器内部
<pre class="hljs nginx" style="padding: 0.5em; font-family: Menlo, Monaco, Consolas, "Courier New", monospace; color: rgb(68, 68, 68); border-radius: 4px; display: block; margin: 0px 0px 0.75em; font-size: 14px; line-height: 1.5em; word-break: break-all; overflow-wrap: break-word; white-space: pre; background-color: rgb(246, 246, 246); border: none; overflow-x: auto; font-style: normal; font-variant-ligatures: normal; font-variant-caps: normal; font-weight: 400; letter-spacing: normal; orphans: 2; text-align: start; text-indent: 0px; text-transform: none; widows: 2; word-spacing: 0px; -webkit-text-stroke-width: 0px; text-decoration-style: initial; text-decoration-color: initial;">docker exec -it rabbitmq bashpre>3.rabbit内运行
<pre class="hljs bash" style="padding: 0.5em; font-family: Menlo, Monaco, Consolas, "Courier New", monospace; color: rgb(68, 68, 68); border-radius: 4px; display: block; margin: 0px 0px 0.75em; font-size: 14px; line-height: 1.5em; word-break: break-all; overflow-wrap: break-word; white-space: pre; background-color: rgb(246, 246, 246); border: none; overflow-x: auto; font-style: normal; font-variant-ligatures: normal; font-variant-caps: normal; font-weight: 400; letter-spacing: normal; orphans: 2; text-align: start; text-indent: 0px; text-transform: none; widows: 2; word-spacing: 0px; -webkit-text-stroke-width: 0px; text-decoration-style: initial; text-decoration-color: initial;">rabbitmq-plugins enable rabbitmq_mqttpre>4.在网页视图中查看mqtt

使用MQTT软件测试mqtt
1.连接mqtt

2.在MQTT软中添加订阅

在RabbitMQ的队列中查看

3.测试
方法一、在Rabbitmq网页发送消息

方法二、自己给自己发
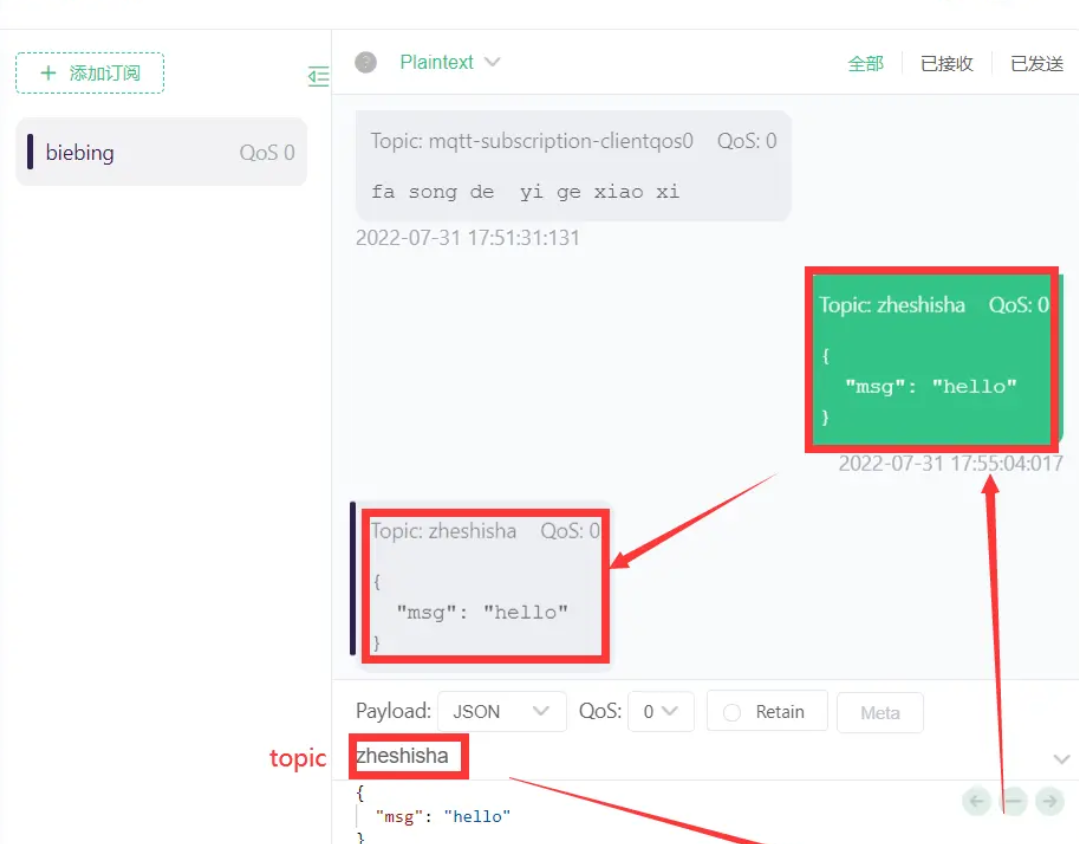
一、发送消息
- 创建springBoot项目,在xml中导入springBoot项目所需要配置以及相关依赖包
- <pre class="prettyprint hljs xml" style="padding: 0.5em; font-family: Menlo, Monaco, Consolas, "Courier New", monospace; color: rgb(68, 68, 68); border-radius: 4px; display: block; margin: 0px 0px 1.5em; font-size: 14px; line-height: 1.5em; word-break: break-all; overflow-wrap: break-word; white-space: pre; background-color: rgb(246, 246, 246); border: none; overflow-x: auto; font-style: normal; font-variant-ligatures: normal; font-variant-caps: normal; font-weight: 400; letter-spacing: normal; orphans: 2; text-align: start; text-indent: 0px; text-transform: none; widows: 2; word-spacing: 0px; -webkit-text-stroke-width: 0px; text-decoration-style: initial; text-decoration-color: initial;"><parent>
- <groupId>org.springframework.bootgroupId>
- <artifactId>spring-boot-starter-parentartifactId>
- <version>2.6.8version>
- parent>
- <dependencies>
- <dependency>
- <groupId>org.springframework.bootgroupId>
- <artifactId>spring-boot-starter-webartifactId>
- dependency>
- <dependency>
- <groupId>org.springframework.bootgroupId>
- <artifactId>spring-boot-starter-integrationartifactId>
- dependency>
- <dependency>
- <groupId>org.springframework.integrationgroupId>
- <artifactId>spring-integration-mqttartifactId>
- dependency>
- <dependency>
- <groupId>org.springframework.integrationgroupId>
- <artifactId>spring-integration-streamartifactId>
- dependency>
- <dependency>
- <groupId>org.projectlombokgroupId>
- <artifactId>lombokartifactId>
- dependency>
- dependencies>pre>
注意寻找依赖包:spring.io->projects->LEARN(右边)->2.6.10 GA Refence Doc.-> Documentation Overview ->7.Messaging-> Spring Integration: Auto-configuration for Spring Integration
- 创建配置类(2步骤可忽略,此地只为推导使用,配置类的正确使用方式见步骤6)
class="prettyprint hljs java" style="padding: 0.5em; font-family: Menlo, Monaco, Consolas, "Courier New", monospace; color: rgb(68, 68, 68); border-radius: 4px; display: block; margin: 0px 0px 1.5em; font-size: 14px; line-height: 1.5em; word-break: break-all; overflow-wrap: break-word; white-space: pre; background-color: rgb(246, 246, 246); border: none; overflow-x: auto; font-style: normal; font-variant-ligatures: normal; font-variant-caps: normal; font-weight: 400; letter-spacing: normal; orphans: 2; text-align: start; text-indent: 0px; text-transform: none; widows: 2; word-spacing: 0px; -webkit-text-stroke-width: 0px; text-decoration-style: initial; text-decoration-color: initial;">//修正官网后的(这个配置文件还不可以使用,正确的使用方式见在后面--此地是视频课程讲的讲解中推导步骤,可以省略不看)
- @Configuration
- public class MqttConfig {
- @Bean
- public MessageChannel mqttInputChannel() {
- return new DirectChannel();
- }
- /**
- * 连接mqtt服务器的工厂
- * @return
- */
- @Bean
- public MqttPahoClientFactory mqttClientFactory() {
- DefaultMqttPahoClientFactory factory = new DefaultMqttPahoClientFactory();
- MqttConnectOptions options = new MqttConnectOptions();
- options.setServerURIs(new String[] {
- "tcp://10.9.48.165:1883" });
- options.setUserName("guest");
- options.setPassword("guest".toCharArray());
- factory.setConnectionOptions(options);
- return factory;
- }
- @Bean
- public MessageProducer inbound(MessageChannel mqttInputChannel,MqttPahoClientFactory mqttClientFactory) {
- MqttPahoMessageDrivenChannelAdapter adapter =
- new MqttPahoMessageDrivenChannelAdapter("springclient",mqttClientFactory,
- "zheshisha");
- adapter.setCompletionTimeout(5000);
- adapter.setConverter(new DefaultPahoMessageConverter());
- //设置一次需要应答
- adapter.setQos(1);
- //设置对外的通道
- adapter.setOutputChannel(mqttInputChannel);
- return adapter;
- }
- }
class="prettyprint hljs java" style="padding: 0.5em; font-family: Menlo, Monaco, Consolas, "Courier New", monospace; color: rgb(68, 68, 68); border-radius: 4px; display: block; margin: 0px 0px 1.5em; font-size: 14px; line-height: 1.5em; word-break: break-all; overflow-wrap: break-word; white-space: pre; background-color: rgb(246, 246, 246); border: none; overflow-x: auto; font-style: normal; font-variant-ligatures: normal; font-variant-caps: normal; font-weight: 400; letter-spacing: normal; orphans: 2; text-align: start; text-indent: 0px; text-transform: none; widows: 2; word-spacing: 0px; -webkit-text-stroke-width: 0px; text-decoration-style: initial; text-decoration-color: initial;">//官方文档
- @Bean
- public MessageChannel mqttInputChannel() {
- return new DirectChannel();
- }
- @Bean
- public MessageProducer inbound() {
- MqttPahoMessageDrivenChannelAdapter adapter =
- new MqttPahoMessageDrivenChannelAdapter("tcp://localhost:1883", "testClient",
- "topic1", "topic2");
- adapter.setCompletionTimeout(5000);
- adapter.setConverter(new DefaultPahoMessageConverter());
- adapter.setQos(1);
- //问题所在:mqttInputChannel()这个是调用方法,而在这个方法上面加一一个注解@Bean相当于白加~~~
- adapter.setOutputChannel(mqttInputChannel());
- return adapter;
- }
- 创建接口
class="prettyprint hljs kotlin" style="padding: 0.5em; font-family: Menlo, Monaco, Consolas, "Courier New", monospace; color: rgb(68, 68, 68); border-radius: 4px; display: block; margin: 0px 0px 1.5em; font-size: 14px; line-height: 1.5em; word-break: break-all; overflow-wrap: break-word; white-space: pre; background-color: rgb(246, 246, 246); border: none; overflow-x: auto; font-style: normal; font-variant-ligatures: normal; font-variant-caps: normal; font-weight: 400; letter-spacing: normal; orphans: 2; text-align: start; text-indent: 0px; text-transform: none; widows: 2; word-spacing: 0px; -webkit-text-stroke-width: 0px; text-decoration-style: initial; text-decoration-color: initial;">@MessagingGateway(defaultRequestChannel = "mqttOutboundChannel")
- public interface MyGateway {
- void sendToMqtt(String data);
- }
- 启动类
class="prettyprint hljs less" style="padding: 0.5em; font-family: Menlo, Monaco, Consolas, "Courier New", monospace; color: rgb(68, 68, 68); border-radius: 4px; display: block; margin: 0px 0px 1.5em; font-size: 14px; line-height: 1.5em; word-break: break-all; overflow-wrap: break-word; white-space: pre; background-color: rgb(246, 246, 246); border: none; overflow-x: auto; font-style: normal; font-variant-ligatures: normal; font-variant-caps: normal; font-weight: 400; letter-spacing: normal; orphans: 2; text-align: start; text-indent: 0px; text-transform: none; widows: 2; word-spacing: 0px; -webkit-text-stroke-width: 0px; text-decoration-style: initial; text-decoration-color: initial;">@SpringBootApplication
- //扫描整合的注解
- @IntegrationComponentScan
- public class MqttStartApp {
- public static void main(String[] args) {
- SpringApplication.run(MqttStartApp.class, args);
- }
- }
- 编写controller类测试
class="prettyprint hljs kotlin" style="padding: 0.5em; font-family: Menlo, Monaco, Consolas, "Courier New", monospace; color: rgb(68, 68, 68); border-radius: 4px; display: block; margin: 0px 0px 1.5em; font-size: 14px; line-height: 1.5em; word-break: break-all; overflow-wrap: break-word; white-space: pre; background-color: rgb(246, 246, 246); border: none; overflow-x: auto; font-style: normal; font-variant-ligatures: normal; font-variant-caps: normal; font-weight: 400; letter-spacing: normal; orphans: 2; text-align: start; text-indent: 0px; text-transform: none; widows: 2; word-spacing: 0px; -webkit-text-stroke-width: 0px; text-decoration-style: initial; text-decoration-color: initial;">@RestController
- public class MqttController {
- private MyGateway myGateway;
- @Autowired
- public void setMyGateway(MyGateway myGateway) {
- this.myGateway = myGateway;
- }
- @PostMapping("/msg")
- public String sendMsg(String msg){
- myGateway.sendToMqtt(msg);
- return "success";
- }
- }
- 修改后的配置类
class="prettyprint hljs java" style="padding: 0.5em; font-family: Menlo, Monaco, Consolas, "Courier New", monospace; color: rgb(68, 68, 68); border-radius: 4px; display: block; margin: 0px 0px 1.5em; font-size: 14px; line-height: 1.5em; word-break: break-all; overflow-wrap: break-word; white-space: pre; background-color: rgb(246, 246, 246); border: none; overflow-x: auto; font-style: normal; font-variant-ligatures: normal; font-variant-caps: normal; font-weight: 400; letter-spacing: normal; orphans: 2; text-align: start; text-indent: 0px; text-transform: none; widows: 2; word-spacing: 0px; -webkit-text-stroke-width: 0px; text-decoration-style: initial; text-decoration-color: initial;">@Configuration
- public class MqttConfig {
- /**
- * 连接mqtt服务器的工厂
- * @return
- */
- @Bean
- public MqttPahoClientFactory mqttClientFactory() {
- DefaultMqttPahoClientFactory factory = new DefaultMqttPahoClientFactory();
- MqttConnectOptions options = new MqttConnectOptions();
- options.setServerURIs(new String[] {
- "tcp://10.9.48.165:1883" });
- options.setUserName("guest");
- options.setPassword("guest".toCharArray());
- factory.setConnectionOptions(options);
- return factory;
- }
- @Bean
- public MessageChannel mqttOutboundChannel() {
- return new DirectChannel();
- }
- @Bean
- @ServiceActivator(inputChannel = "mqttOutboundChannel") //inputChannel的名字必须和上面的MessageChannel的方法名保持一致
- public MessageHandler mqttOutbound() {
- MqttPahoMessageHandler messageHandler =
- new MqttPahoMessageHandler("testClient", mqttClientFactory());
- messageHandler.setAsync(true);
- messageHandler.setDefaultTopic("zheshisha");
- return messageHandler;
- }
- }
二、收消息
在配配置文件中加入
class="prettyprint hljs java" style="padding: 0.5em; font-family: Menlo, Monaco, Consolas, "Courier New", monospace; color: rgb(68, 68, 68); border-radius: 4px; display: block; margin: 0px 0px 1.5em; font-size: 14px; line-height: 1.5em; word-break: break-all; overflow-wrap: break-word; white-space: pre; background-color: rgb(246, 246, 246); border: none; overflow-x: auto; font-style: normal; font-variant-ligatures: normal; font-variant-caps: normal; font-weight: 400; letter-spacing: normal; orphans: 2; text-align: start; text-indent: 0px; text-transform: none; widows: 2; word-spacing: 0px; -webkit-text-stroke-width: 0px; text-decoration-style: initial; text-decoration-color: initial;">/**
- * 收消息的通道,注意实际开发中和发的可能不在一起
- * @return
- */
- @Bean
- public MessageChannel mqttInputChannel() {
- return new DirectChannel();
- }
- @Bean
- public MessageProducer inbound() {
- MqttPahoMessageDrivenChannelAdapter adapter =
- new MqttPahoMessageDrivenChannelAdapter("tcp://10.9.48.165:1883", "testClient",
- "chixihua");
- adapter.setCompletionTimeout(5000);
- adapter.setConverter(new DefaultPahoMessageConverter());
- adapter.setQos(1);
- adapter.setOutputChannel(mqttInputChannel());
- return adapter;
- }
- /**
- * 收消息的处理器,用于如何处理消息
- * mqttInputChannel 代表的是收消息的通道对象的id
- * @return
- */
- @Bean
- @ServiceActivator(inputChannel = "mqttInputChannel")
- public MessageHandler handler() {
- return new MessageHandler() {
- @Override
- public void handleMessage(Message message) throws MessagingException {
- System.out.println(message.getPayload());
- }
- };
- }
三、SpringBoot整合MQTT
- 导入依赖包
- <pre class="prettyprint hljs xml" style="padding: 0.5em; font-family: Menlo, Monaco, Consolas, "Courier New", monospace; color: rgb(68, 68, 68); border-radius: 4px; display: block; margin: 0px 0px 1.5em; font-size: 14px; line-height: 1.5em; word-break: break-all; overflow-wrap: break-word; white-space: pre; background-color: rgb(246, 246, 246); border: none; overflow-x: auto; font-style: normal; font-variant-ligatures: normal; font-variant-caps: normal; font-weight: 400; letter-spacing: normal; orphans: 2; text-align: start; text-indent: 0px; text-transform: none; widows: 2; word-spacing: 0px; -webkit-text-stroke-width: 0px; text-decoration-style: initial; text-decoration-color: initial;">
- <dependency>
- <groupId>org.springframework.bootgroupId>
- <artifactId>spring-boot-starter-integrationartifactId>
- dependency>
- <dependency>
- <groupId>org.springframework.integrationgroupId>
- <artifactId>spring-integration-mqttartifactId>
- dependency>
- <dependency>
- <groupId>org.springframework.integrationgroupId>
- <artifactId>spring-integration-streamartifactId>
- dependency>pre>
- 创建配置类
class="prettyprint hljs java" style="padding: 0.5em; font-family: Menlo, Monaco, Consolas, "Courier New", monospace; color: rgb(68, 68, 68); border-radius: 4px; display: block; margin: 0px 0px 1.5em; font-size: 14px; line-height: 1.5em; word-break: break-all; overflow-wrap: break-word; white-space: pre; background-color: rgb(246, 246, 246); border: none; overflow-x: auto; font-style: normal; font-variant-ligatures: normal; font-variant-caps: normal; font-weight: 400; letter-spacing: normal; orphans: 2; text-align: start; text-indent: 0px; text-transform: none; widows: 2; word-spacing: 0px; -webkit-text-stroke-width: 0px; text-decoration-style: initial; text-decoration-color: initial;">@Configuration
- public class MqttConfig {
- @Bean
- public MqttConnectOptions options(){
- MqttConnectOptions mqttConnectOptions=new MqttConnectOptions();
- mqttConnectOptions.setServerURIs(new String[] {
- "tcp://10.9.48.190:1883" });
- mqttConnectOptions.setUserName("dc3");
- mqttConnectOptions.setPassword("dc3".toCharArray());
- return mqttConnectOptions;
- }
- /**
- * 创建连接工厂
- * @param options
- * @return
- */
- @Bean
- public MqttPahoClientFactory mqttPahoClientFactory(MqttConnectOptions options){
- DefaultMqttPahoClientFactory defaultMqttPahoClientFactory=new DefaultMqttPahoClientFactory();
- defaultMqttPahoClientFactory.setConnectionOptions(options);
- return defaultMqttPahoClientFactory;
- }
- @Bean
- public MessageChannel messageInputChannel(){
- return new DirectChannel();
- }
- @Bean
- public MessageProducer mqttInbound(MessageChannel messageInputChannel, MqttPahoClientFactory mqttPahoClientFactory){
- MqttPahoMessageDrivenChannelAdapter adapter =
- new MqttPahoMessageDrivenChannelAdapter("testClient",mqttPahoClientFactory, "chixihua");
- adapter.setCompletionTimeout(5000);
- adapter.setConverter(new DefaultPahoMessageConverter());
- adapter.setQos(1);
- adapter.setOutputChannel(messageInputChannel);
- return adapter;
- }
- }
- 配置消息处理的类
class="prettyprint hljs kotlin" style="padding: 0.5em; font-family: Menlo, Monaco, Consolas, "Courier New", monospace; color: rgb(68, 68, 68); border-radius: 4px; display: block; margin: 0px 0px 1.5em; font-size: 14px; line-height: 1.5em; word-break: break-all; overflow-wrap: break-word; white-space: pre; background-color: rgb(246, 246, 246); border: none; overflow-x: auto; font-style: normal; font-variant-ligatures: normal; font-variant-caps: normal; font-weight: 400; letter-spacing: normal; orphans: 2; text-align: start; text-indent: 0px; text-transform: none; widows: 2; word-spacing: 0px; -webkit-text-stroke-width: 0px; text-decoration-style: initial; text-decoration-color: initial;">@Configuration
- public class MessageReceiverHandler {
- /**
- * 收到设备发送来的上行数据的时候执行,具体怎么做取决于业务,比如这里面可能是设备发来的一些传感器数据,我们需要保存并发送到统计平台
- * @return
- */
- @Bean
- @ServiceActivator(inputChannel = "messageInputChannel")
- public MessageHandler messageHandler(){
- return message -> {
- //获取到消息正文
- Object payload = message.getPayload();
- System.err.println(payload);
- //处理消息
- System.err.println("等下就处理消息");
- };
- }
- }
- 在启动类添加注解
class="prettyprint hljs less" style="padding: 0.5em; font-family: Menlo, Monaco, Consolas, "Courier New", monospace; color: rgb(68, 68, 68); border-radius: 4px; display: block; margin: 0px 0px 1.5em; font-size: 14px; line-height: 1.5em; word-break: break-all; overflow-wrap: break-word; white-space: pre; background-color: rgb(246, 246, 246); border: none; overflow-x: auto; font-style: normal; font-variant-ligatures: normal; font-variant-caps: normal; font-weight: 400; letter-spacing: normal; orphans: 2; text-align: start; text-indent: 0px; text-transform: none; widows: 2; word-spacing: 0px; -webkit-text-stroke-width: 0px; text-decoration-style: initial; text-decoration-color: initial;">@SpringBootApplication
- @IntegrationComponentScan
- public class MqttStartApp {
- public static void main(String[] args) {
- SpringApplication.run(MqttStartApp.class, args);
- }
- }
-
相关阅读:
Android案例手册 - 实现一个华容道拼图游戏
lowbit()运算及原码、反码、补码
Polygon zkEVM R1CS与Plonk电路转换
如何发高质量的外链?
ELK体系部署文档(elk+filebeat+redis)
宣泰医药通过注册:拟募资6亿 联和投资是大股东
快速生成力扣链表题的链表,实现快速调试
js 中的错误类型及处理方式
DPDK vhost库
虚拟机安装openEuler系统
- 原文地址:https://blog.csdn.net/Java_ttcd/article/details/126133907
