-
第2章 Spring Boot实践,开发社区登录模块(上)
1.发送邮件

分三步:
- 邮箱设置
- Spring Email
- 模板引擎
1. 邮件设置
- 邮箱的设置
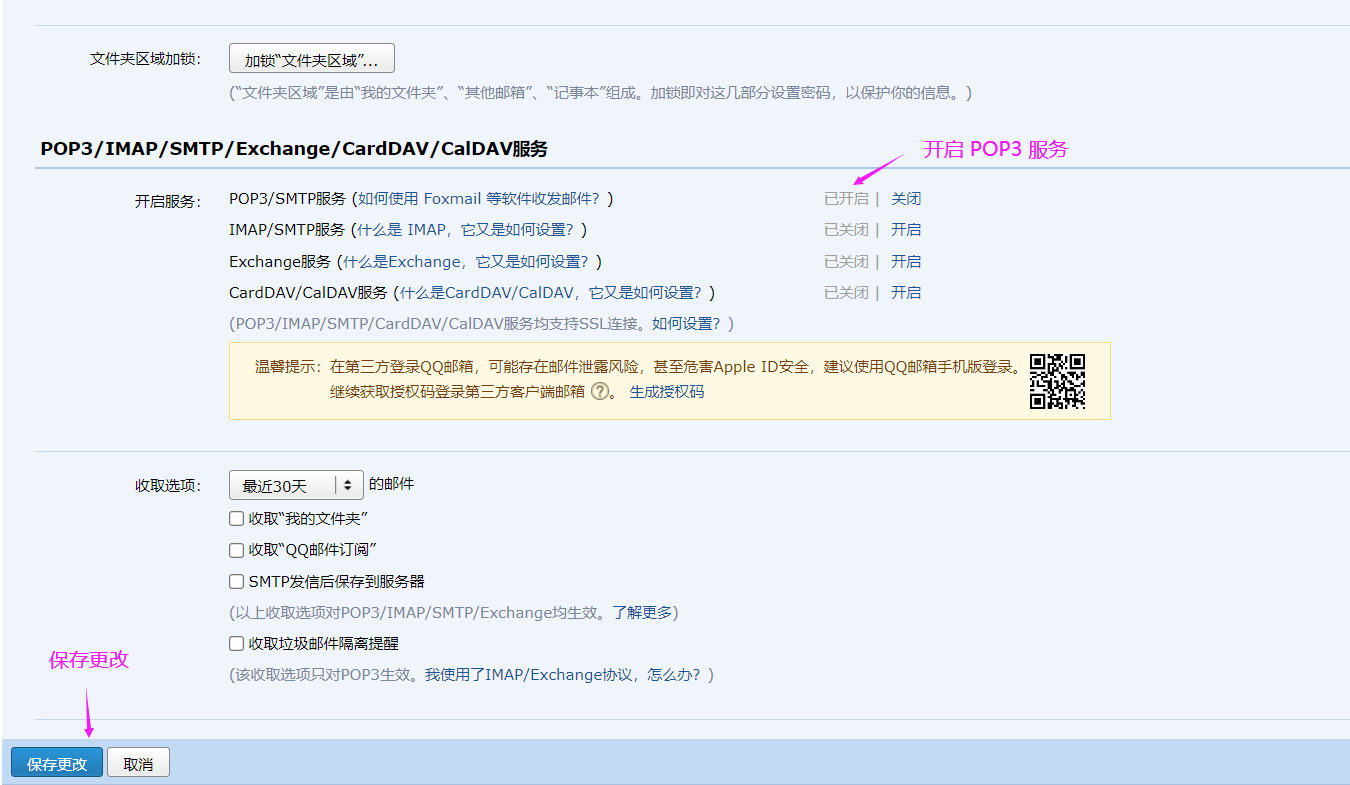
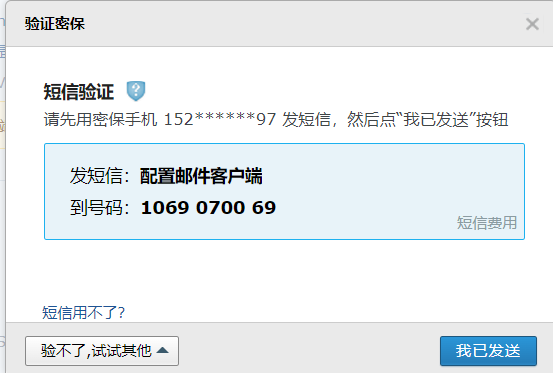
首先我们进入第一个环节:邮箱的设置
这里我们使用qq邮箱(其他的邮箱也是一样的)

开启 POP3/SMTP 服务去发送邮件
2. Spring Email如何使用
- 怎么去使用 Spring Email
接下来是第二步,怎么去使用 Spring Email
- 引入 spring mail 依赖
首先需要引入 spring mail 依赖,可以去maven中心仓库搜索

之后将依赖粘贴到项目的 pom.xml 配置文件中
<dependency> <groupId>org.springframework.bootgroupId> <artifactId>spring-boot-starter-mailartifactId> <version>2.7.1version> dependency>- 1
- 2
- 3
- 4
- 5
- 邮箱参数配置
要用这个邮箱,肯定得把邮箱的账号、密码、链接、协议等都配好。如果将来想换一个邮箱,只要改配置文件就好了,不要把邮箱的参数写死在 java 程序里。
进行邮箱的配置是在 application.properties 配置文件中配置的。
# MailProperties # 声明访问邮箱的域名是什么(下一行中后面的是 qq 浏览器的smtp服务器的域名) spring.mail.host=smtp.qq.com # 配置端口(几乎所有的邮箱默认的端口都是465) spring.mail.port=465 # 配置用户名和授权码 spring.mail.username=958691367@qq.com spring.mail.password=lpfejerqpiqxbeda # 配置协议(启用安全加密的的smtp协议) spring.mail.protocol=smtps # 发送邮件的时候采用 ssl 安全连接方式 spring.mail.properties.mail.smtp.ssl.enable=true- 1
- 2
- 3
- 4
- 5
- 6
- 7
- 8
- 9
- 10
- 11
- 12

- 使用 JavaMailSender 接口 发送邮件
为了是发送邮件这个功能可以复用,我们写一个工具把整个的流程封装一下。
这个类它要把发邮件的事委托给 qq 去做,它相当于代替了 qq 邮箱的客户端,或者说它就是一个客户端。
MailClient类(工具类):
@Component public class MailClient { // 记录一些日志 private Logger logger = LoggerFactory.getLogger(MailClient.class); // 发送邮件的核心组件,交给 Sping 容器去管理 @Autowired private JavaMailSender mailSender; // 发邮箱的时候需要几个条件:1. 发件人 2. 收件人 3. 邮件的标题和内容 // 我们在配置文件里配置了邮箱,所以发件人是固定的,就是配置文件里配置的发件人 //我们把配置文件的spring.mail.username注入到这里,省的在方法里再传了 @Value("${spring.mail.username}") private String from; // 发送邮件方法(记住:是public 修饰) // 参数1:收件人 参数2:邮件标题 参数3:邮件内容 public void sendMail(String to, String subject, String content){ try { // 创建邮件主体,但是这个message是空的,只是一个模板,我们还需要往里面填入内容。 MimeMessage message = mailSender.createMimeMessage(); // 使用帮助类构建 message 里面的内容,设置发件人、收件人、邮件标题、邮件内容 MimeMessageHelper helper = new MimeMessageHelper(message); helper.setFrom(from); // 设置邮件发件人 helper.setTo(to); // 设置邮件收件人 helper.setSubject(subject); // 设置邮件主题 helper.setText(content, true); // 设置邮件内容(加true表示也支持html文本,不加这个参数表示支持普通的文本) // 发送 mailSender.send(helper.getMimeMessage()); } catch (MessagingException e) { // 失败的话打印日志 logger.error("发送邮件失败" + e.getMessage()); } } }- 1
- 2
- 3
- 4
- 5
- 6
- 7
- 8
- 9
- 10
- 11
- 12
- 13
- 14
- 15
- 16
- 17
- 18
- 19
- 20
- 21
- 22
- 23
- 24
- 25
- 26
- 27
- 28
- 29
- 30
- 31
- 32
- 33
- 34
- 35
- 36
- 37
- 38
- 39
- 40
- 41
- 42
- 43
- 44

3. 测试
1. 发送普通文本
在发送的时候要在邮箱中要生成授权码复制授权码

然后将 application.properties 配置文件中的 mail 邮箱密码设置为 刚刚复制的授权码,之后就可以测试发送邮件了。

@SpringBootTest @RunWith(SpringRunner.class) @ContextConfiguration(classes = CommunityApplication.class) public class MailTests { @Autowired private MailClient mailClient; @Test public void testTextMail(){ String to = "958691367@qq.com"; String subject = "Test2"; String content = "Welcome."; mailClient.sendMail(to, subject, content); } }- 1
- 2
- 3
- 4
- 5
- 6
- 7
- 8
- 9
- 10
- 11
- 12
- 13
- 14
- 15
- 16
- 17
- 18
- 19
上面程序一执行程序就通过协议访问了 qq 的邮件服务器,把这些信息提交给了服务器,让服务器帮我们把这些东西发送给对方。

2. 利用 thymeleaf 引擎 去发送 HTML 格式的邮件
上面发送的只是普通的文本,接下来我们看怎么利用 thymeleaf 引擎 去发送 HTML 格式的邮件
先创建一个 HTML 文件,然后将第二行修改使其成为 themeleaf 模板
DOCTYPE html> <html lang="en" xmlns:th="http://www.themeleaf.org"> <head> <meta charset="UTF-8"> <title>邮件示例title> head> <body> <p>欢迎你,<span style="color: red;" th:text="${username}">span>!p> body> html>- 1
- 2
- 3
- 4
- 5
- 6
- 7
- 8
- 9
- 10

测试类
测试第二个方法 “发送HTML”
@SpringBootTest @RunWith(SpringRunner.class) @ContextConfiguration(classes = CommunityApplication.class) public class MailTests { @Autowired private MailClient mailClient; @Autowired private TemplateEngine templateEngine; // 只发送普通的文本 @Test public void testTextMail(){ String to = "958691367@qq.com"; String subject = "Test4"; String content = "Welcome."; mailClient.sendMail(to, subject, content); } // 测试这个方法 // 发送 HTML @Test public void testHtmlMail(){ // 给 themeleaf 模板传参 Context context = new Context(); context.setVariable("username", "sunday"); // 调模板引擎生成动态网页 参数1:模板引擎的路径 参数2:数据 // 会生成一个动态网页,其实就是一个字符串,模板引擎主要的作用就是生成动态网页 String content = templateEngine.process("/mail/demo", context); System.out.println(content); // 发邮件 参数1:收件人 参数2:邮件标题 参数3:邮件内容 mailClient.sendMail("958691367@qq.com", "HTML", content); } }- 1
- 2
- 3
- 4
- 5
- 6
- 7
- 8
- 9
- 10
- 11
- 12
- 13
- 14
- 15
- 16
- 17
- 18
- 19
- 20
- 21
- 22
- 23
- 24
- 25
- 26
- 27
- 28
- 29
- 30
- 31
- 32
- 33
- 34
- 35
- 36
- 37
- 38
- 39
- 40
themeleaf模板引擎 有一个核心的类,这个类也是被 Spring 管理起来的,需要的话直接注入进来就可以用。


测试结果

2. 开发注册功能

这种相对复杂的功能我们要学会拆解,使得每一部分都相对简单一点就好开发了。对于一个 web 功能我们可以按照请求去拆解,因为每一个功能都是由若干个浏览器和服务器之间的请求交互所构成的。
分析得知,开发注册功能由三个请求构成
- 访问注册页面
- 提交注册页面,服务器发送激活邮件
- 点击邮件中的链接激活服务
我们一次请求一次请求去写,相对来说会比较容易。
每次请求按照 数据访问层 --> 业务层 --> 视图层的顺序开发
但是注意有些功能可能会没有数据访问层,有些功能没有业务层。
1. 访问注册页面
首先写controller
@Controller public class LoginController { @RequestMapping(path = "/register", method = RequestMethod.GET) public String getRegisterPage(){ return "/site/register"; } }- 1
- 2
- 3
- 4
- 5
- 6
- 7
- 8
- 9
然后修改 themeleaf 资源 register.html
首先将第二行修改为下面这句使其声明为 themeleaf 模板
<html lang="en" xmlns:th="http://www.thymeleaf.org">- 1
然后是修改开头的css文件和末尾的js文件或者图片的路径,绝对路径不用管,主要是相对路径要进行一个处理,将其交给 themeleaf 去管理。(注意:themeleaf 模板资源都是以 templates 目录为根路径的)


然后我们访问注册页面是通过点击首页的 “注册” 超链接点过来的,接下来我们来将首页 index.html 的 “注册” 超链接写一下。

每一个页面头部的header区域都是一样的,如果每个页面都复制处理一下会非常的麻烦, 所以最好的方式就是让header这段代码在多个页面复用。header的复用 themeleaf 也是支持的。
# 什么是header header标签定义文档的页眉。语法格式为“内容 ”。header元素是一种具有引导和导航作用的结 构元素,通常用来放置整个页面或页面内的一个内容区块的标题等。 # themeleaf如何复用header 模板中,经常希望从其他模板中包含⼀些部分,如⻚眉,⻚脚,公共菜单等部分,为了做到这⼀点,Thymeleaf 可以使 ⽤th:fragment 属性来定义被包含的模版⽚段,以供其他模版包含,其他页面可以通过 th:replace 来使用。- 1
- 2
- 3
- 4
- 5
- 6
- 7
给 index.html 的header起个名字
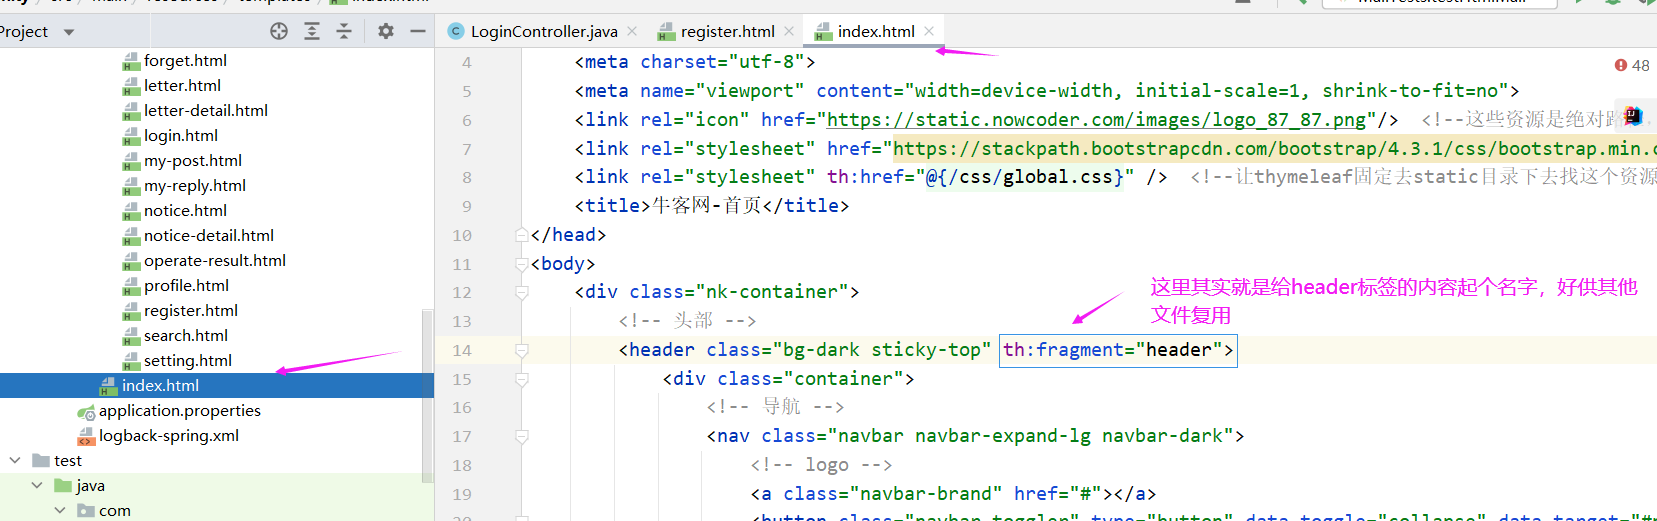
register.html 复用 index.html 的header

接下来启动项目看一下是否开发成功
经测试,访问注册页面成功!


2. 提交注册数据
前置操作
在开发之初再导入一个包,这个包主要提供一些判断字符串、集合等常用的一些数据空值的情况。
<dependency> <groupId>org.apache.commonsgroupId> <artifactId>commons-lang3artifactId> <version>3.9version> dependency>- 1
- 2
- 3
- 4
- 5
然后我们需要在 application.properties 里将网站的域名配置好,当然现在没有域名,配的是本机的IP地址,因为在注册的过程中要发邮件,邮件里面得带激活链接,这个链接得链到我们的网站,所以我们需要有一个链接。因为这个链接在开发阶段在测试阶段在上线的时候它是不一样的,所以我们需要把它做成可配的。
# community 下面的key即“community”也是我们自己取的,声明本机域名,当然现在我们也没有域名,我们写本机的ip地址 community.path.domain=http://localhost:8080- 1
- 2

然后我们还需要写一个工具类,在工具类里面提供两个方法,后面注册的时候好用,不然注册的时候现写有点麻烦。这个工具类里面的是静态方法,这个工具类就不交给容器管理了。
public class CommunityUtil { // 生成随机字符串(激活码、上传文件的随机名字) public static String generateUUID(){ return UUID.randomUUID().toString().replaceAll("-", ""); // 后面的 replace 方法是去掉随机字符串中的 “-” } // MD5加密(存的时候对密码进行加密,防止泄露) // MD5加密特点:1. 只能加密,不能解密 2. 每次加密结果都一样 // 为了避免由于用户设的密码过于简单导致很容易被破解, // 我们在处理密码的时候会在密码后面加上一个随机的字符串然后用MD5加密 public static String md5(String key){ if(StringUtils.isBlank(key)){ // 空串(nulll 或者 空格 或者 空串)直接返回 null return null; } // 不为空串则进行加密(方法参数是byte) return DigestUtils.md5DigestAsHex(key.getBytes()); } }- 1
- 2
- 3
- 4
- 5
- 6
- 7
- 8
- 9
- 10
- 11
- 12
- 13
- 14
- 15
- 16
- 17
- 18
- 19
- 20
- 21
- 22
- 23
- 24
- 25
- 26


接下来就正式开发提交注册数据了
因为注册是针对用户的,所以我们可以把逻辑写到我们之前创建的 UserService 之中。
# 分析 注册时要发邮件,所以我们要把 邮件客户端(MailClient) 、模板引擎注入进来。 发邮件的时候要生成激活码,激活码当中要包含域名、项目名,所以我们也要把配置文件中的域名和项目名 都注入进来。- 1
- 2
- 3
- 4
- 5
- 6
开发 service
@Service public class UserService { @Autowired private UserMapper userMapper; @Autowired private MailClient mailClient; @Autowired private TemplateEngine templateEngine; @Value("${community.path.domain}") // @Value 注解会将 application.properties 配置文件中的指定值注入给它 private String domain; // 域名 @Value("${server.servlet.context-path}") private String contextPath; // 项目名 public User findUserById(int id){ return userMapper.selectById(id); } // 注册方法:注册需要 username、password、email,所以传入一个 user // 返回的应该是相关信息,比如“账号已存在、邮箱不能为空”等等,所以为了封装多个内容,返回Map public Map<String, Object> register(User user){ Map<String, Object> map = new HashMap<>(); // 先进行空值处理 user 为 null // (username为null、password为null、email为null 或者 全部为 null) // 空值处理 if(user == null){ throw new IllegalArgumentException("参数不能为空"); } // 账号/密码/邮箱 为空是业务上的漏洞,但是不是程序的错误,因此我们把信息封装到map里面返回给客户端 if(StringUtils.isBlank(user.getUsername())){ map.put("usernameMsg", "账号不能为空!"); return map; } if(StringUtils.isBlank(user.getPassword())){ map.put("passwordMsg", "密码不能为空!"); return map; } if(StringUtils.isBlank(user.getEmail())){ map.put("emailMsg", "邮箱不能为空!"); return map; } // 验证账号是否已存在 User u = userMapper.selectByName(user.getUsername()); if(u != null){ map.put("usernameMsg", "该账号已存在!"); return map; } // 验证邮箱是否已被注册 u = userMapper.selectByEmail(user.getEmail()); if(u != null){ map.put("emailMsg", "该邮箱已被注册!"); return map; } // 如果可以执行到这里说明账号/密码/邮箱都不为空,且账号/邮箱都未注册 // 这里我们要对用户输入的密码后面加一个salt(随机字符串)(password+salt 之后md5加密之后才真正存到数据库的) // salt 一般 5 位就够了 user.setSalt(CommunityUtil.generateUUID().substring(0, 5)); user.setPassword(CommunityUtil.md5(user.getPassword() + user.getSalt())); user.setType(0); // 0 表示普通用户 user.setStatus(0); // 0 表示没有激活 user.setActivationCode(CommunityUtil.generateUUID()); // 设置激活码 // 图片url:https://images.nowcoder.com/head/0t.png 注:从 0 - 1000 都是图片 user.setHeaderUrl(String.format("https://images.nowcoder.com/head/%dt.png", new Random().nextInt(1000))); //设置图片的路径 user.setCreateTime(new Date()); // 设置注册时间 userMapper.insertUser(user); // 存入数据库,本来user的id是null,直行这句之后mysql生成id赋值给了它 // 给用户发送 html 激活邮件,好带有链接 // 给用户发送发送邮件 // 给 themeleaf 模板传参 Context context = new Context(); // themeleaf 包下的 Context context.setVariable("email", user.getEmail()); // 项目路径下某个功能哪个用户在激活激活码是什么 // http://localhost:8080/community/activation/101/code String url = domain + contextPath + "/activation/" + user.getId() + "/" + user.getActivationCode(); // 由于拼接url可能会造成空格问题,空格在浏览器地址栏中会解析成 %20 ,造成错误,所以我们要将url中的空格去掉 url = url.replaceAll(" ", ""); context.setVariable("url", url); // 调模板引擎生成动态网页 参数1:模板引擎的路径 参数2:数据 // 会生成一个动态网页,其实就是一个字符串,模板引擎主要的作用就是生成动态网页 String content = templateEngine.process("/mail/activation", context); // 发邮件 参数1:收件人 参数2:邮件标题 参数3:邮件内容 System.out.println(user.getEmail()); try { mailClient.sendMail(user.getEmail(), "激活账号", content); } catch (Exception e) { e.printStackTrace(); } // 最后没有问题的话也返回map,且这里map是空的 return map; } }- 1
- 2
- 3
- 4
- 5
- 6
- 7
- 8
- 9
- 10
- 11
- 12
- 13
- 14
- 15
- 16
- 17
- 18
- 19
- 20
- 21
- 22
- 23
- 24
- 25
- 26
- 27
- 28
- 29
- 30
- 31
- 32
- 33
- 34
- 35
- 36
- 37
- 38
- 39
- 40
- 41
- 42
- 43
- 44
- 45
- 46
- 47
- 48
- 49
- 50
- 51
- 52
- 53
- 54
- 55
- 56
- 57
- 58
- 59
- 60
- 61
- 62
- 63
- 64
- 65
- 66
- 67
- 68
- 69
- 70
- 71
- 72
- 73
- 74
- 75
- 76
- 77
- 78
- 79
- 80
- 81
- 82
- 83
- 84
- 85
- 86
- 87
- 88
- 89
- 90
- 91
- 92
- 93
- 94
- 95
- 96
- 97
- 98
- 99
- 100
- 101
- 102
- 103
- 104
- 105
- 106
- 107
- 108
- 109
- 110
- 111
- 112
- 113
- 114
- 115
- 116

发送给用户的 themeleaf 模板 activation.html
<!doctype html> <html lang="en" xmlns:th="http://www.thymeleaf.org"> <head> <meta charset="utf-8"> <link rel="icon" href="https://static.nowcoder.com/images/logo_87_87.png"/> <title>牛客网-激活账号</title> </head> <body> <div> <p> <b th:text="${email}">xxx@xxx.com</b>, 您好! </p> <p> 您正在注册牛客网, 这是一封激活邮件, 请点击 <a th:href="${url}">此链接</a>, 激活您的牛客账号! </p> </div> </body> </html>- 1
- 2
- 3
- 4
- 5
- 6
- 7
- 8
- 9
- 10
- 11
- 12
- 13
- 14
- 15
- 16
- 17
- 18
- 19
- 20

接下来开发 controller,controller的话在之前的 LoginController 中写可以
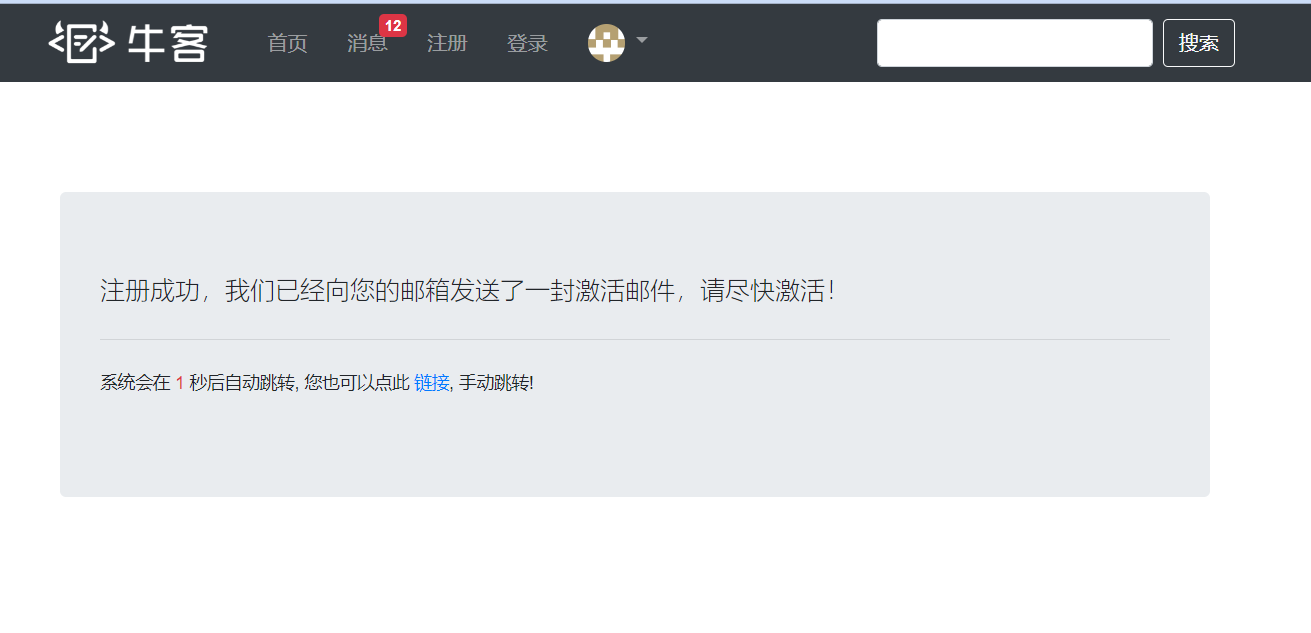
@Controller public class LoginController { @Autowired private UserService userService; @RequestMapping(path = "/register", method = RequestMethod.GET) public String getRegisterPage(){ return "/site/register"; } // 处理请求,因为是浏览器向我们提交数据,所以请求是POST方式 @RequestMapping(path = "/register", method = RequestMethod.POST) public String register(Model model, User user){ // 注意:因为User声明在了方法的参数里,SpringMVC会自动把user存到model里 Map<String, Object> map = userService.register(user); // map为空说明注册成功,我们应该提示浏览器注册成功,然后跳转到首页页面,之后激活之后才跳转到登录页面 if(map == null || map.isEmpty()){ model.addAttribute("msg", "注册成功,我们已经向您的邮箱发送了一封激活邮件,请尽快激活!"); model.addAttribute("target", "/index"); return "/site/operate-result"; } else { // 有错误,传给页面信息并返回登录页面 model.addAttribute("usernameMsg", map.get("usernameMsg")); model.addAttribute("passwordMsg", map.get("passwordMsg")); model.addAttribute("emailMsg", map.get("emailMsg")); return "/site/register"; } } }- 1
- 2
- 3
- 4
- 5
- 6
- 7
- 8
- 9
- 10
- 11
- 12
- 13
- 14
- 15
- 16
- 17
- 18
- 19
- 20
- 21
- 22
- 23
- 24
- 25
- 26
- 27
- 28
- 29
- 30
- 31
- 32
- 33
- 34
operate-result.html 操作成功之后的页面
注意:在 themeleaf 模板中
路径用 @
controller 传过来的参数接收用 $

还需要对 register.html 模板做一个处理
因为 register.html 之前路径、header 已经做过了一次处理,所以这次主要是对内容做一个处理,内容部分其实主要就是对表单的处理。
表单提交到哪去
什么样的提交方式


另外,如果注册失败会返回一些错误信息,在 register.html 页面显示,所以我们还要对错误信息进行一些处理。
注意:这里确认密码和密码不一致是在前端处理的,所以我们后台无需处理。

注:上面表单的提交方式和调教路径写错位置了,应该写在 标签中,而不是 < div> 标签中


注:上面的 th:text="${emailMsg}" 少加了右边的双引号然后这里我们可以测试一下


3. 激活注册账号
最后我们来开发 “激活注册账号” 的功能
开发顺序 数据访问层(dao) --> 业务层(service) --> 视图层(controller 和 themeleaf 模板)
因为之前已经写过了 dao 中的方法,所以我们接下来应该写的是 业务层(service)
激活有三种结果:
成功
重复激活
激活失败(激活码错误)
我们把这三种结果封装到常量接口里,好能够复用,得到状态。
public interface CommunityConstant { /** * 激活成功 */ int ACTIVATION_SUCCESS = 0; /** * 重复激活 */ int ACTIVATION_REPEAT = 1; /** * 激活失败 */ int ACTIVATION_FAILURE = 2; }- 1
- 2
- 3
- 4
- 5
- 6
- 7
- 8
- 9
- 10
- 11
- 12
- 13
- 14
- 15
- 16
- 17
- 18
在UserService里面去处理激活逻辑的时候,需要用到上面的接口中的常量。
所以我们让UserService去实现上面的接口CommunityConstant
然后我们在UserService写激活的方法,这个返回激活的状态,成功还是失败,int
在激活的时候,服务器会传给后台 用户id 和 激活码,所以激活方法要求参数为 userId 和 激活码
注:为了UserService的完整性,所以也把与激活账号无关的代码粘了进来,与激活账号有关的部分没就两点:1. 实现 CommunityConstant 接口 2. activation方法
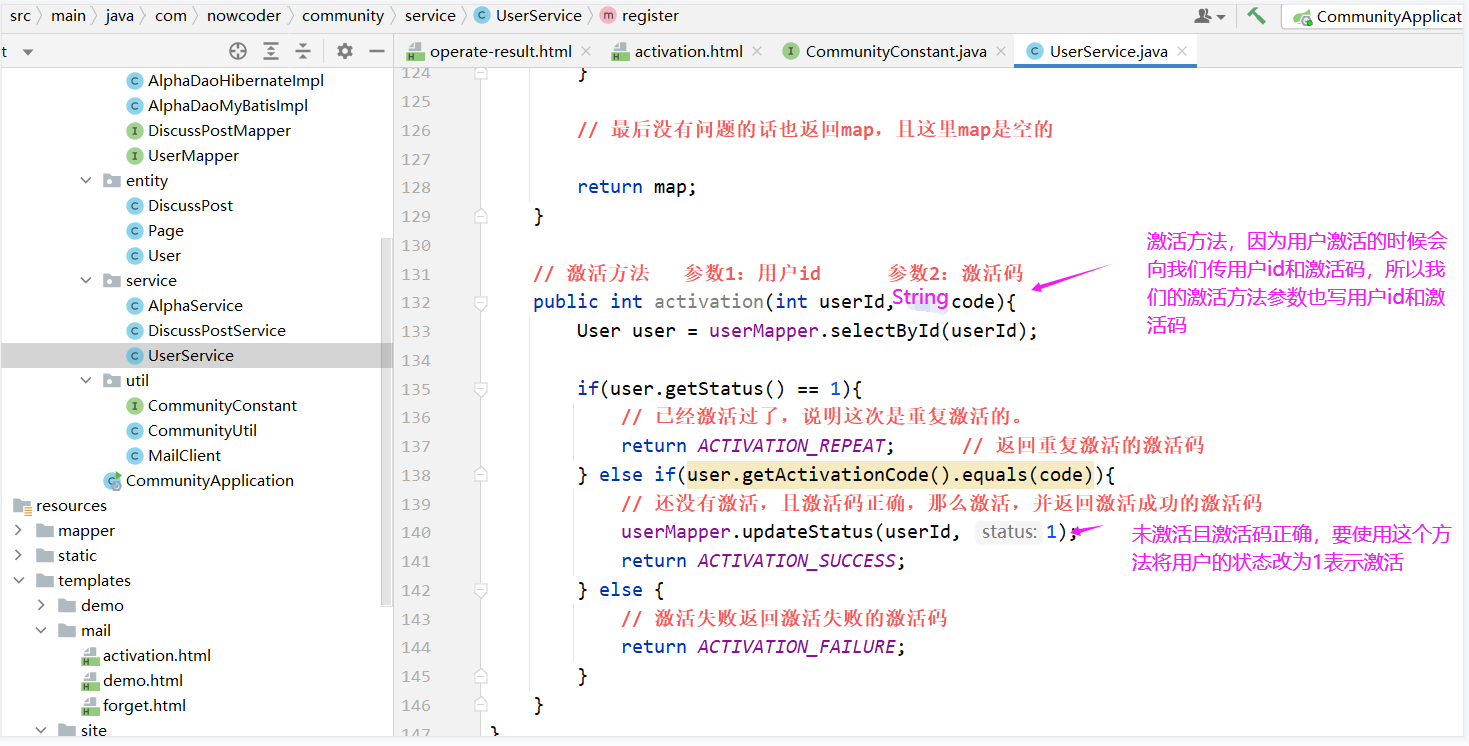
@Service public class UserService implements CommunityConstant { @Autowired private UserMapper userMapper; @Autowired private MailClient mailClient; @Autowired private TemplateEngine templateEngine; @Value("${community.path.domain}") // @Value 注解会将 application.properties 配置文件中的指定值注入给它 private String domain; // 域名 @Value("${server.servlet.context-path}") private String contextPath; // 项目名 public User findUserById(int id){ return userMapper.selectById(id); } // 注册方法:注册需要 username、password、email,所以传入一个 user // 返回的应该是相关信息,比如“账号已存在、邮箱不能为空”等等,所以为了封装多个内容,返回Map public Map<String, Object> register(User user){ Map<String, Object> map = new HashMap<>(); // 先进行空值处理 user 为 null // (username为null、password为null、email为null 或者 全部为 null) // 空值处理 if(user == null){ throw new IllegalArgumentException("参数不能为空"); } // 账号/密码/邮箱 为空是业务上的漏洞,但是不是程序的错误,因此我们把信息封装到map里面返回给客户端 if(StringUtils.isBlank(user.getUsername())){ map.put("usernameMsg", "账号不能为空!"); return map; } if(StringUtils.isBlank(user.getPassword())){ map.put("passwordMsg", "密码不能为空!"); return map; } if(StringUtils.isBlank(user.getEmail())){ map.put("emailMsg", "邮箱不能为空!"); return map; } // 验证账号是否已存在 User u = userMapper.selectByName(user.getUsername()); if(u != null){ map.put("usernameMsg", "该账号已存在!"); return map; } // 验证邮箱是否已被注册 u = userMapper.selectByEmail(user.getEmail()); if(u != null){ map.put("emailMsg", "该邮箱已被注册!"); return map; } // 如果可以执行到这里说明账号/密码/邮箱都不为空,且账号/邮箱都未注册 // 这里我们要对用户输入的密码后面加一个salt(随机字符串)(password+salt 之后md5加密之后才真正存到数据库的) // salt 一般 5 位就够了 user.setSalt(CommunityUtil.generateUUID().substring(0, 5)); user.setPassword(CommunityUtil.md5(user.getPassword() + user.getSalt())); user.setType(0); // 0 表示普通用户 user.setStatus(0); // 0 表示没有激活 user.setActivationCode(CommunityUtil.generateUUID()); // 设置激活码 // 图片url:https://images.nowcoder.com/head/0t.png 注:从 0 - 1000 都是图片 user.setHeaderUrl(String.format("https://images.nowcoder.com/head/%dt.png", new Random().nextInt(1000))); //设置图片的路径 user.setCreateTime(new Date()); // 设置注册时间 userMapper.insertUser(user); // 存入数据库,本来user的id是null,直行这句之后mysql生成id赋值给了它 // 给用户发送 html 激活邮件,好带有链接 // 给用户发送发送邮件 // 给 themeleaf 模板传参 Context context = new Context(); // themeleaf 包下的 Context context.setVariable("email", user.getEmail()); // 项目路径下某个功能哪个用户在激活激活码是什么 // http://localhost:8080/community/activation/101/code String url = domain + contextPath + "/activation/" + user.getId() + "/" + user.getActivationCode(); // 由于拼接url可能会造成空格问题,空格在浏览器地址栏中会解析成 %20 ,造成错误,所以我们要将url中的空格去掉 url = url.replaceAll(" ", ""); context.setVariable("url", url); // 调模板引擎生成动态网页 参数1:模板引擎的路径 参数2:数据 // 会生成一个动态网页,其实就是一个字符串,模板引擎主要的作用就是生成动态网页 String content = templateEngine.process("/mail/activation", context); // 发邮件 参数1:收件人 参数2:邮件标题 参数3:邮件内容 System.out.println(user.getEmail()); try { mailClient.sendMail(user.getEmail(), "激活账号", content); } catch (Exception e) { e.printStackTrace(); } // 最后没有问题的话也返回map,且这里map是空的 return map; } // 激活方法 参数1:用户id 参数2:激活码 public int activation(int userId, String code){ User user = userMapper.selectById(userId); if(user.getStatus() == 1){ // 已经激活过了,说明这次是重复激活的。 return ACTIVATION_REPEAT; // 返回重复激活的激活码 } else if(user.getActivationCode().equals(code)){ // 还没有激活,且激活码正确,那么激活,并返回激活成功的激活码 userMapper.updateStatus(userId, 1); return ACTIVATION_SUCCESS; } else { // 激活失败返回激活失败的激活码 return ACTIVATION_FAILURE; } } }- 1
- 2
- 3
- 4
- 5
- 6
- 7
- 8
- 9
- 10
- 11
- 12
- 13
- 14
- 15
- 16
- 17
- 18
- 19
- 20
- 21
- 22
- 23
- 24
- 25
- 26
- 27
- 28
- 29
- 30
- 31
- 32
- 33
- 34
- 35
- 36
- 37
- 38
- 39
- 40
- 41
- 42
- 43
- 44
- 45
- 46
- 47
- 48
- 49
- 50
- 51
- 52
- 53
- 54
- 55
- 56
- 57
- 58
- 59
- 60
- 61
- 62
- 63
- 64
- 65
- 66
- 67
- 68
- 69
- 70
- 71
- 72
- 73
- 74
- 75
- 76
- 77
- 78
- 79
- 80
- 81
- 82
- 83
- 84
- 85
- 86
- 87
- 88
- 89
- 90
- 91
- 92
- 93
- 94
- 95
- 96
- 97
- 98
- 99
- 100
- 101
- 102
- 103
- 104
- 105
- 106
- 107
- 108
- 109
- 110
- 111
- 112
- 113
- 114
- 115
- 116
- 117
- 118
- 119
- 120
- 121
- 122
- 123
- 124
- 125
- 126
- 127
- 128
- 129
- 130
- 131
- 132
- 133

然后我们需要在controller里面把请求处理一下
收到的邮件就是html,那个页面我们之前已经做好了。
然后我们在 LoginController 中 再加一个方法处理请求。
我们还需要处理的是登录页面
还需要给 login.html 声明为 themeleaf 模板,然后处理一下 login.html 样式文件的路径就可以了


最后还要修改一下 首页index.html 的登录按钮,使其可以使用

最后我们再处理一下登录页面 login.html 的验证码

3. 会话管理

Cookie和Session各有各的优点和缺点
1. Cookie
Cokie诞生原因
- HTTP 是无状态,有会话的
HTTP 是无状态的:在同一个连接中,两个执行成功的请求之间是没有关系的。这就带来了一个问题,用户没有办法在同一个网站中进行连续的交互,比如在一个电商网站里,用户把某个商品加入到购物车,切换一个页面后再次添加了商品,这两次添加商品的请求之间没有关联,浏览器无法知道用户最终选择了哪些商品。而使用 HTTP 的头部扩展,HTTP Cookies 就可以解决这个问题。把 Cookies 添加到头部中,创建一个会话让每次请求都能共享相同的上下文信息,达成相同的状态。
注意,HTTP 本质是无状态的,使用 Cookies 可以创建有状态的会话。
# HTTP Cookie HTTP Cookie(也叫 Web Cookie 或浏览器 Cookie)是服务器发送到用户浏览器并保存在本地的一小块数据,它会 在浏览器下次向同一服务器再发起请求时被携带并发送到服务器上。通常,它用于告知服务端两个请求是否来自同一浏 览器,如保持用户的登录状态。Cookie 使基于无状态的 HTTP 协议记录稳定的状态信息成为了可能。- 1
- 2
- 3
- 4
- 5
- 6
Cookie应用场景
Cookie 主要用于以下三个方面:
- 会话状态管理(如用户登录状态、购物车、游戏分数或其它需要记录的信息)
- 个性化设置(如用户自定义设置、主题等)
- 浏览器行为跟踪(如跟踪分析用户行为等)
Cookie 曾一度用于客户端数据的存储,因当时并没有其它合适的存储办法而作为唯一的存储手段,但现在随着现代浏览器开始支持各种各样的存储方式,Cookie 渐渐被淘汰。由于服务器指定 Cookie 后,浏览器的每次请求都会携带 Cookie 数据,会带来额外的性能开销(尤其是在移动环境下)。新的浏览器 API 已经允许开发者直接将数据存储到本地,如使用 Web storage API (本地存储和会话存储)或 IndexedDB 。
cookie优缺点
优点:可以解决HTTP 无状态的问题
缺点:Cookie存在在客户端,可能会造成隐私泄露;
另外浏览器每次发送给服务器Cookie会对流量产生影响

当浏览器发送cookie给服务器时,服务器接收cookie以后可能取里面的值用一下,或者在模板里用一下。
演示cookie
通过上面的文字,相信我们对 Cookie 已经有了简单的认识,下面写几个简单的小例子体会一下相关语法。
因为只是简单的小例子,不是什么业务,所以写到 AlphaController里,这里装着一些演示的小demo。
@Controller @RequestMapping("/alpha") public class AlphaController { // cookie 示例 @RequestMapping(path = "/cookie/set", method = RequestMethod.GET) @ResponseBody public String setCookie(HttpServletResponse response){ // 创建cookie,必须传入参数(没有无参构造器),且必须都是字符串 // 并且每一个cookie对象只能存一组字符串,即一个key-val Cookie cookie = new Cookie("code", CommunityUtil.generateUUID()); // 设置cookie生效的范围,服务器首先发送给浏览器cookie,然后浏览器给服务器发请求需要发cookie //需要指定浏览器给服务器的哪些路径请求发cookie,不必每个路径都发,因为可能不需要,会浪费网络资源 cookie.setPath("/community/alpha"); // 设置cookie只有在这个路径及子路径才有效 // cookie默认发到浏览器,浏览器关掉就消失 // 一旦给cookie设置了生存时间,它会存在硬盘里,长期有效,直到超过这个时间才会无效 // 设置cookie的生存时间 cookie.setMaxAge(60 * 10); // 单位是秒 // 将cookie放到response头里发送 response.addCookie(cookie); return "set cookie"; } @RequestMapping(path = "/cookie/get", method = RequestMethod.GET) @ResponseBody // @CookieValue("code")是获取cookie中key为"code"的value // cookie需要在服务器和客户端之间传,所以只能存少量,另外客户端可以识别字符串,其他java类型无法识别,所以用key-value public String getCookie(@CookieValue("code") String code){ System.out.println(code); return "get cookie"; } }- 1
- 2
- 3
- 4
- 5
- 6
- 7
- 8
- 9
- 10
- 11
- 12
- 13
- 14
- 15
- 16
- 17
- 18
- 19
- 20
- 21
- 22
- 23
- 24
- 25
- 26
- 27
- 28
- 29
- 30
- 31
- 32
- 33
- 34
- 35
- 36

测试:
首先浏览器访问Controller的cookie/set方法,可以看到请求里面没有cookie,但是响应里面有cookie

然后浏览器访问Controller的cookie/get方法可以看到请求里面也有了cookie

2. Session
Sesson定义
是JavaEE的标准,用于在服务端记录客户端信息。
注:Session本质是依赖于cookie的,浏览器和服务器之间是多对一的关系,浏览器和Session之间的对应关系怎么找是依赖于cookie的(将sessionId存到cookie里发送)。

Session 优缺点
优点:
可以解决http无状态的问题
数据存放在服务器更加安全
缺点:
数据存放在服务器会增加服务器的压力
演示Session
@Controller @RequestMapping("/alpha") public class AlphaController { // session 示例 @RequestMapping(path = "/session/set", method = RequestMethod.GET) @ResponseBody public String setSession(HttpSession session){ // session 创建不需要我们手动创建,SpringMVC会自动创建session并帮我们注入进来,所以只需声明即可 // session 是一直存在在服务端的,所以它里面存什么数据都可以 session.setAttribute("id", 1); session.setAttribute("name", "Test"); return "set session"; } @RequestMapping(path = "/session/get", method = RequestMethod.GET) @ResponseBody public String getSession(HttpSession session){ System.out.println(session.getAttribute("id")); System.out.println(session.getAttribute("name")); return "get session"; } }- 1
- 2
- 3
- 4
- 5
- 6
- 7
- 8
- 9
- 10
- 11
- 12
- 13
- 14
- 15
- 16
- 17
- 18
- 19
- 20
- 21
- 22
- 23
- 24


3. 分布式使用Session存在什么问题,解决方案是什么
访问分布式中之前没访问过的服务器时,服务器里面没有存在之前的session,浏览器得不到之前的session
- 解决:黏性session,对于一个固定ip的请求,固定分给一个服务器处理。
缺点:分布式本来是解决负载均衡问题的,这种解决方法会导致负载不均衡问题。
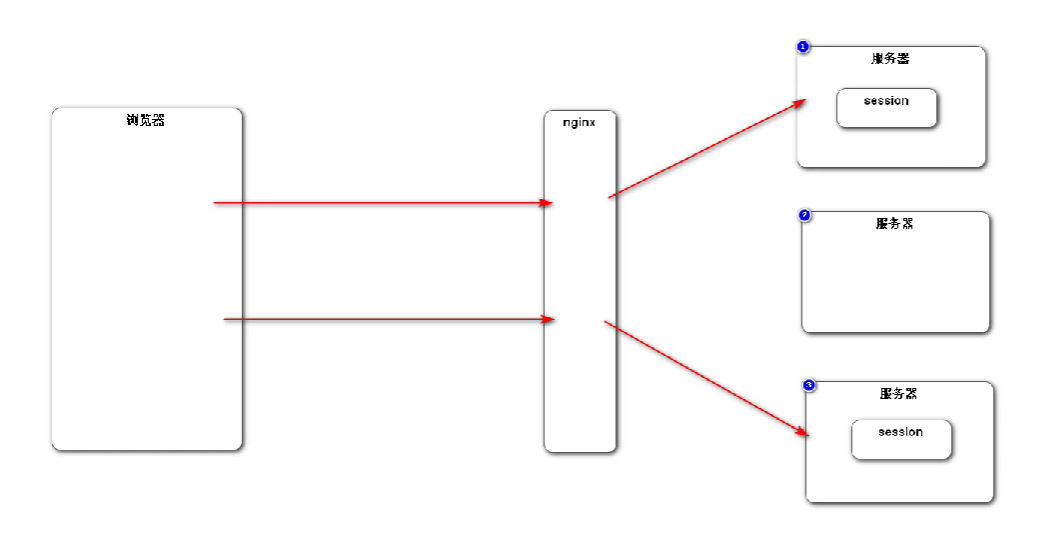
- 解决:同步session,某一个服务器创建session并且存了数据之后,它会把这个session同步给其他的服务器
缺点:这种方法会对服务器性能产生一定的影响;服务器和服务器之间有了一定的关系,产生耦合,之间不是那 么的独立了。

- 解决:共享session,搞一台共享服务器,这个服务器不是处理业务的,而是专门用来存session的,
其他服务器都向这台服务器获取session,
缺点:如果共享session服务器宕机了,其他服务器都没办法工作了。

目前解决方案,能存到cookie就存到cookie,不能存到cookie的数据就存到关系型数据库里,数据库的数据存在硬盘里,存取比较慢,性能慢。但是存到 非关系型数据库NoSQL比如redis就快很多了

我们在前面开发的时候会话数据先存到数据库或者session(不适合存到mysql里的先存到session)里,在后面学习了redis之后的再迁移到redis里
4. 生成验证码

https://code.google.com/archive/p/kaptcha
1. 导入 jar 包
<dependency> <groupId>com.github.pengglegroupId> <artifactId>kaptchaartifactId> <version>2.3.2version> dependency>- 1
- 2
- 3
- 4
- 5
2. 编写 Kaptcha 配置类
因为SpringBoot没有整合Kaptcha ,所以我们要自己写配置类将Kaptcha注入Spring容器
// 配置 Kaptcha 的工具类 // Kaptcha可以生成验证码图片 @Configuration public class KaptchaConfig { @Bean public Producer kaptchaProducer(){ // 这个类其实可以从properties配置文件里读数据,但是我们不这样做,我们直接往里面塞数据 Properties properties = new Properties(); properties.setProperty("kaptcha.image.width", "100"); // 设置图片宽度,单位:像素 properties.setProperty("kaptcha.image.height", "40"); // 设置图片高度 properties.setProperty("kaptcha.textproducer.font.size", "32"); // 设置字号为 32 号字 properties.setProperty("kaptcha.textproducer.font.color", "black"); // 设置字的颜色 // 设置验证码从这些字符串中挑字符拼接用 properties.setProperty("kaptcha.textproducer.char.string", "0123456789ABCDEFGHIJKLMNOPQRSTUVWXYZ"); // 设置验证码长度 properties.setProperty("kaptcha.textproducer.char.length", "4"); // 设置使用哪个干扰类(对图片造成干扰) properties.setProperty("kaptcha.noise.impl", "com.google.code.kaptcha.impl.NoNoise"); // Producer是个接口,DefaultKaptcha是它的实现类 // Producer有两个方法,一个是创建图片,一个是生成验证码,但是要通过Config对象做一些配置 DefaultKaptcha kaptcha = new DefaultKaptcha(); // 所有的配置都是通过config配的,config又依赖于Properties Config config = new Config(properties); kaptcha.setConfig(config); return kaptcha; } }- 1
- 2
- 3
- 4
- 5
- 6
- 7
- 8
- 9
- 10
- 11
- 12
- 13
- 14
- 15
- 16
- 17
- 18
- 19
- 20
- 21
- 22
- 23
- 24
- 25
- 26
- 27
- 28
- 29
- 30
- 31
- 32


3. 测试生成验证码的方法
- Kaptcha生成验证码的方法写在哪里?
不是在LoginController中的getLoginPage访问登录方法之中写的,getLoginPage这个方法是给浏览器返回一个html,而这个html里面会包含一个图片的路径,浏览器会依据路径再次访问服务器获得这个图片,所以我们需要再单独写一个请求(LoginController中的方法)向浏览器返回图片,当然登录页面的html会引用这个方法的路径。
@Controller public class LoginController implements CommunityConstant { private static Logger logger = LoggerFactory.getLogger(LoginController.class); @Autowired private UserService userService; @Autowired private Producer kaptchaProducer; @RequestMapping(path = "/register", method = RequestMethod.GET) public String getRegisterPage(){ return "/site/register"; } // 处理请求,因为是浏览器向我们提交数据,所以请求是POST方式 @RequestMapping(path = "/register", method = RequestMethod.POST) public String register(Model model, User user){ // 注意:因为User声明在了方法的参数里,SpringMVC会自动把user存到model里 Map<String, Object> map = userService.register(user); // map为空说明注册成功,我们应该提示浏览器注册成功,然后跳转到首页页面,之后激活之后才跳转到登录页面 if(map == null || map.isEmpty()){ model.addAttribute("msg", "注册成功,我们已经向您的邮箱发送了一封激活邮件,请尽快激活!"); model.addAttribute("target", "/index"); return "/site/operate-result"; } else { // 有错误,传给页面信息并返回登录页面 model.addAttribute("usernameMsg", map.get("usernameMsg")); model.addAttribute("passwordMsg", map.get("passwordMsg")); model.addAttribute("emailMsg", map.get("emailMsg")); return "/site/register"; } } // http://localhost:8080/community/activation/101/code @RequestMapping(path = "activation/{userId}/{code}", method = RequestMethod.GET) public String activation(Model model, @PathVariable("userId") int userId, @PathVariable("code") String code){ // 这个结果的含义可以从结果中识别,所以也需让LoginController实现CommunityConstant接口 int result = userService.activation(userId, code); // 无论成功还是失败,都跳转到中转页面只是返回给中转页面的提示信息不同,然后从中转页面跳转到哪里根据激活是否成功决定 if(result == ACTIVATION_SUCCESS){ // 激活成功跳转到登录页面 model.addAttribute("msg", "激活成功,您的账号已经可以正常使用了!"); model.addAttribute("target", "/login"); // 返回给服务器,服务器跳转到登录的controller } else if(result == ACTIVATION_REPEAT){ // 邮箱之前已经激活过了,重复了 model.addAttribute("msg", "无效操作,该账号已经激活过了!"); model.addAttribute("target", "/index"); // 跳转到展示首页的controller } else { // 激活失败 model.addAttribute("msg", "激活失败,您提供的激活码不正确!"); model.addAttribute("target", "/index"); // 跳转到展示首页的controller } return "/site/operate-result"; } @RequestMapping(path = "/login", method = RequestMethod.GET) public String getLoginPage(){ return "/site/login"; } @RequestMapping(path = "/kaptcha", method = RequestMethod.GET) public void getLKaptcha(HttpServletResponse response, HttpSession session){ // 生成验证码 String text = kaptchaProducer.createText(); BufferedImage image = kaptchaProducer.createImage(text); // 将验证码传入生成图片 // 将验证码存入session session.setAttribute("kaptcha", text); // 将图片输出给浏览器 response.setContentType("image/png"); // 声明返回给浏览器的是什么可视的数据 // response向浏览器做响应我们需要获取它的输出流 try { ServletOutputStream os = response.getOutputStream(); // 这个流不用关,因为是SpringMVC维护,会自动关 ImageIO.write(image, "png", os); // 输出哪个图片; 格式; 哪个流输出 } catch (IOException e) { logger.error("响应验证码失败:" + e.getMessage()); } } }- 1
- 2
- 3
- 4
- 5
- 6
- 7
- 8
- 9
- 10
- 11
- 12
- 13
- 14
- 15
- 16
- 17
- 18
- 19
- 20
- 21
- 22
- 23
- 24
- 25
- 26
- 27
- 28
- 29
- 30
- 31
- 32
- 33
- 34
- 35
- 36
- 37
- 38
- 39
- 40
- 41
- 42
- 43
- 44
- 45
- 46
- 47
- 48
- 49
- 50
- 51
- 52
- 53
- 54
- 55
- 56
- 57
- 58
- 59
- 60
- 61
- 62
- 63
- 64
- 65
- 66
- 67
- 68
- 69
- 70
- 71
- 72
- 73
- 74
- 75
- 76
- 77
- 78
- 79
- 80
- 81
- 82
- 83
- 84
- 85
- 86
- 87
- 88


# 为什么方法的返回值是 void 呢? 因为我们向浏览器输出的是特殊的东西,是一个图片,不是一个字符串,也不是一个网页,所以这个方法比较特别,我们需要自己用 response 对象手动的向浏览器输出,所以方法的返回值为 void 。 # 将验证码存入session 生成验证码之后,服务端要把它记住,浏览器登陆的时候好验证验证码对不对,又因为它是敏感数据,所以我们将它存 到 session里。- 1
- 2
- 3
- 4
- 5
- 6
- 7
- 8
- 9
4. 将生成验证码的方法应用到登录页面上


<script> function refresh_kaptcha() { var path = CONTEXT_PATH + "/kaptcha?p=" + Math.random(); $("#kaptcha").attr("src", path); } </script>- 1
- 2
- 3
- 4
- 5
- 6

测试:

点击 “刷新验证码”

-
相关阅读:
竞赛开源项目汇总
[分类讨论]Bit Transmission 2022牛客多校第5场 C
多卡GPU训练时的问题
ConfigMaps-1
MySQL库表占用空间排序
K8S篇之简述K8S底层原理
火狐拖放后,总会默认打开百度搜索,如果是图片,则会打开图片。
Bwapp权限和session管理有关漏洞
数据结构:ArrayList类和顺序表
GDB调试方法汇总
- 原文地址:https://blog.csdn.net/qq_50313418/article/details/126114166
