-
webpack 自定义loader与插件
Loader 原理
#loader 概念
帮助 webpack 将不同类型的文件转换为 webpack 可识别的模块。(webpack只能识别js文件 loader能帮助他识别css等文件)
#loader 执行顺序
- 分类
- pre: 前置 loader
- normal: 普通 loader
- inline: 内联 loader
- post: 后置 loader
- 执行顺序
- 4 类 loader 的执行优级为:
pre > normal > inline > post。 - 相同优先级的 loader 执行顺序为:
从右到左,从下到上。
例如:
// 此时loader执行顺序:loader3 - loader2 - loader1 module: { rules: [ { test: /\.js$/, loader: "loader1", }, { test: /\.js$/, loader: "loader2", }, { test: /\.js$/, loader: "loader3", }, ], },- 1
- 2
- 3
- 4
- 5
- 6
- 7
- 8
- 9
- 10
- 11
- 12
- 13
- 14
- 15
- 16
- 17
// 此时loader执行顺序:loader1 - loader2 - loader3 module: { rules: [ { enforce: "pre", test: /\.js$/, loader: "loader1", }, { // 没有enforce就是normal test: /\.js$/, loader: "loader2", }, { enforce: "post", test: /\.js$/, loader: "loader3", }, ], },- 1
- 2
- 3
- 4
- 5
- 6
- 7
- 8
- 9
- 10
- 11
- 12
- 13
- 14
- 15
- 16
- 17
- 18
- 19
- 20
- 使用 loader 的方式
- 配置方式:在
webpack.config.js文件中指定 loader。(pre、normal、post loader) - 内联方式:在每个
import语句中显式指定 loader。(inline loader)
- inline loader
用法:
import Styles from 'style-loader!css-loader?modules!./styles.css';含义:
- 使用
css-loader和style-loader处理styles.css文件 - 通过
!将资源中的 loader 分开
inline loader可以通过添加不同前缀,跳过其他类型 loader。!跳过 normal loader。
import Styles from '!style-loader!css-loader?modules!./styles.css';- 1
-!跳过 pre 和 normal loader。
import Styles from '-!style-loader!css-loader?modules!./styles.css';- 1
!!跳过 pre、 normal 和 post loader。
import Styles from '!!style-loader!css-loader?modules!./styles.css';- 1
#开发一个 loader
#1. 最简单的 loader
/* loader就是一个函数 当webpack解析资源时,会调用相应的loader去处理 loader接受到文件内容作为参数,返回内容出去 content 文件内容 map SourceMap meta 别的loader传递的数据 */ // loaders/loader1.js module.exports = function loader1(content) { console.log("hello loader"); return content; };- 1
- 2
- 3
- 4
- 5
- 6
- 7
- 8
- 9
- 10
- 11
- 12
- 13
它接受要处理的源码作为参数,输出转换后的 js 代码。
#2. loader 接受的参数
content源文件的内容mapSourceMap 数据meta数据,可以是任何内容
#loader 分类
#1. 同步 loader
同步loader中不能处理异步 会报错
module.exports = function (content, map, meta) { return content; };- 1
- 2
- 3
this.callback方法则更灵活,因为它允许传递多个参数,而不仅仅是content。module.exports = function (content, map, meta) { // 传递map,让source-map不中断 // 传递meta,让下一个loader接收到其他参数 /* 第一个参数:err 代表是否有错误 第二个参数:content 处理后的内容 第三个参数:source-map 继续传递source-map 第四个参数:meta 给下一个loader传递参数 */ this.callback(null, content, map, meta); return; // 当调用 callback() 函数时,总是返回 undefined };- 1
- 2
- 3
- 4
- 5
- 6
- 7
- 8
- 9
- 10
- 11
- 12
#2. 异步 loader
module.exports = function (content, map, meta) { const callback = this.async(); // 进行异步操作 setTimeout(() => { callback(null, result, map, meta); }, 1000); };- 1
- 2
- 3
- 4
- 5
- 6
- 7
由于同步计算过于耗时,在 Node.js 这样的单线程环境下进行此操作并不是好的方案,我们建议尽可能地使你的 loader 异步化。但如果计算量很小,同步 loader 也是可以的。
#3. Raw Loader
默认情况下,资源文件会被转化为 UTF-8 字符串,然后传给 loader。通过设置 raw 为 true,loader 可以接收原始的 Buffer。
module.exports = function (content) { // content是一个Buffer数据 return content; }; module.exports.raw = true; // 开启 Raw Loader- 1
- 2
- 3
- 4
- 5
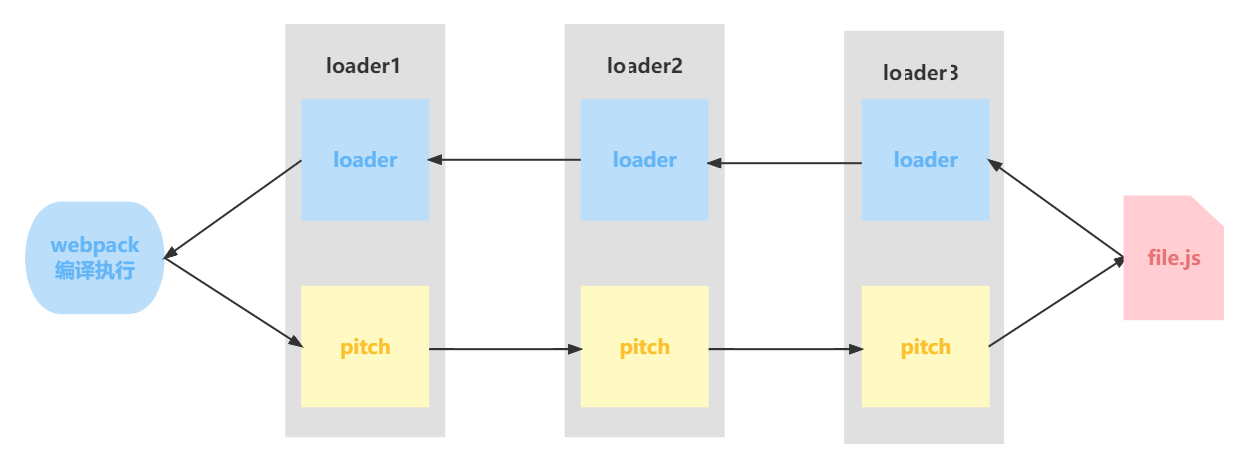
#4. Pitching Loader
module.exports = function (content) { return content; }; module.exports.pitch = function (remainingRequest, precedingRequest, data) { console.log("do somethings"); };- 1
- 2
- 3
- 4
- 5
- 6
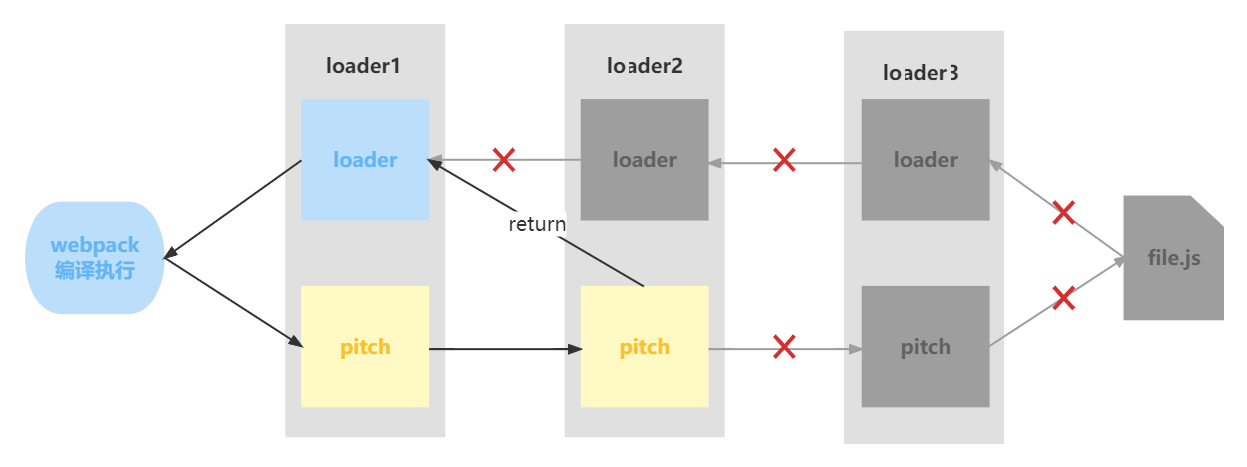
webpack 会先从左到右执行 loader 链中的每个 loader 上的 pitch 方法(如果有),然后再从右到左执行 loader 链中的每个 loader 上的普通 loader 方法。

在这个过程中如果任何 pitch 有返回值,则 loader 链被阻断。webpack 会跳过后面所有的的 pitch 和 loader,直接进入上一个 loader (这里是pitch2发生了退出)。
#loader API
方法名 含义 用法 this.async 异步回调 loader。返回 this.callback 作用是将loader变为异步函数 const callback = this.async() this.callback 可以同步或者异步调用的并返回多个结果的函数 this.callback(err, content, sourceMap?, meta?) this.getOptions(schema) 获取 loader 的 options schema是规则 this.getOptions(schema) this.emitFile 产生一个文件 this.emitFile(name, content, sourceMap) this.utils.contextify 返回一个相对路径 this.utils.contextify(context, request) request表示处理的路径 this.utils.absolutify 返回一个绝对路径 this.utils.absolutify(context, request) #手写 clean-log-loader
作用:用来清理 js 代码中的
console.log// loaders/clean-log-loader.js module.exports = function cleanLogLoader(content) { // 将console.log替换为空 return content.replace(/console\.log\(.*\);?/g, ""); };- 1
- 2
- 3
- 4
- 5
#手写 banner-loader
作用:给 js 代码添加文本注释
- loaders/banner-loader/index.js
const schema = require("./schema.json"); module.exports = function (content) { // 获取loader的options,同时对options内容进行校验 // schema是options的校验规则(符合 JSON schema 规则) const options = this.getOptions(schema); const prefix = ` /* * Author: ${options.author} */ `; return `${prefix} \n ${content}`; };- 1
- 2
- 3
- 4
- 5
- 6
- 7
- 8
- 9
- 10
- 11
- 12
- 13
- 14
- 15
- loaders/banner-loader/schema.json
{ "type": "object", "properties": { "author": { "type": "string" } }, "additionalProperties": false }- 1
- 2
- 3
- 4
- 5
- 6
- 7
- 8
- 9
#手写 babel-loader (完成了一部分)
作用:编译 js 代码,将 ES6+语法编译成 ES5-语法。
- 下载依赖 babel的预设
npm i @babel/core @babel/preset-env -D- 1
-
webpack.config,js
module: { rules: [ // { // test: /\.js$/, // loader: "./loaders/test-loader.js", // }, { test: /\.js$/, // 执行顺序:从右到左,从下到上 // use: ["./loaders/demo/test1", "./loaders/demo/test2"], // use: ["./loaders/demo/test2", "./loaders/demo/test1"], // loader: "./loaders/demo/test3.js", // use: ["./loaders/demo/test4", "./loaders/demo/test5", "./loaders/demo/test6"], loader: "./loaders/clean-log-loader", }, // { // test: /\.js$/, // loader: "./loaders/banner-loader", // options: { // author: "老王", // // age: 18, // 不能新增字段,不然会报错 // }, // }, { test: /\.js$/, loader: "./loaders/babel-loader", options: { presets: ["@babel/preset-env"], }, },- 1
- 2
- 3
- 4
- 5
- 6
- 7
- 8
- 9
- 10
- 11
- 12
- 13
- 14
- 15
- 16
- 17
- 18
- 19
- 20
- 21
- 22
- 23
- 24
- 25
- 26
- 27
- 28
- 29
- 30
-
loaders/babel-loader/index.js
const schema = require("./schema.json"); const babel = require("@babel/core"); module.exports = function (content) { const options = this.getOptions(schema); // 使用异步loader const callback = this.async(); // 使用babel对js代码进行编译 babel.transform(content, options, function (err, result) { if (err) callback(err); else callback(null, result.code); }); };- 1
- 2
- 3
- 4
- 5
- 6
- 7
- 8
- 9
- 10
- 11
- 12
- 13
- 14
- loaders/banner-loader/schema.json (验证规则)
{ "type": "object", "properties": { "presets": { "type": "array" } }, "additionalProperties": true }- 1
- 2
- 3
- 4
- 5
- 6
- 7
- 8
- 9
#手写 file-loader
作用:将文件原封不动输出出去
- 下载包
npm i loader-utils -D- 1
- loaders/file-loader.js
const loaderUtils = require("loader-utils"); module.exports = function (content) { // 1. 根据文件内容生成带hash值文件名 let interpolatedName = loaderUtils.interpolateName(this, "[hash].[ext][query]", { content, }); interpolatedName = `images/${interpolatedName}` // console.log(interpolatedName); // 2. 将文件输出出去 this.emitFile(interpolatedName, content); // 3. 返回:module.exports = "文件路径(文件名)" return `module.exports = "${interpolatedName}"`; }; // 需要处理图片、字体等文件。它们都是buffer数据 // 需要使用raw loader才能处理 module.exports.raw = true;- 1
- 2
- 3
- 4
- 5
- 6
- 7
- 8
- 9
- 10
- 11
- 12
- 13
- 14
- 15
- 16
- 17
- 18
- 19
const loaderUtils = require("loader-utils"); function fileLoader(content) { // 根据文件内容生产一个新的文件名称 const filename = loaderUtils.interpolateName(this, "[hash].[ext]", { content, }); // 输出文件 this.emitFile(filename, content); // 暴露出去,给js引用。 // 记得加上'' return `export default '${filename}'`; } // loader 解决的是二进制的内容 // 图片是 Buffer 数据 fileLoader.raw = true; module.exports = fileLoader;- 1
- 2
- 3
- 4
- 5
- 6
- 7
- 8
- 9
- 10
- 11
- 12
- 13
- 14
- 15
- 16
- 17
- 18
- 19
- loader 配置
{ test: /\.(png|jpe?g|gif)$/, loader: "./loaders/file-loader.js", type: "javascript/auto", // 解决图片重复打包问题 阻止webpack默认处理图片资源, },- 1
- 2
- 3
- 4
- 5
#手写 style-loader
作用:动态创建 style 标签,插入 js 中的样式代码,使样式生效。
-
loaders/style-loader.js
module.exports = function (content) { /* 1. 直接使用style-loader,只能处理样式 不能处理样式中引入的其他资源 use: ["./loaders/style-loader"], 2. 借助css-loader解决样式中引入的其他资源的问题 use: ["./loaders/style-loader", "css-loader"], 问题是css-loader暴露了一段js代码,style-loader需要执行js代码,得到返回值,再动态创建style标签,插入到页面上 不好操作 3. style-loader使用pitch loader用法 */ // const script = ` // const styleEl = document.createElement('style'); // styleEl.innerHTML = ${JSON.stringify(content)}; // document.head.appendChild(styleEl); // `; // return script; }; module.exports.pitch = function (remainingRequest) { // remainingRequest 剩下还需要处理的loader // console.log(remainingRequest); // C:\Users\86176\Desktop\webpack\source\node_modules\css-loader\dist\cjs.js!C:\Users\86176\Desktop\webpack\source\src\css\index.css // 1. 将 remainingRequest 中绝对路径改成相对路径(因为后面只能使用相对路径操作) const relativePath = remainingRequest .split("!") .map((absolutePath) => { // 返回相对路径 return this.utils.contextify(this.context, absolutePath); }) .join("!"); // console.log(relativePath); // ../../node_modules/css-loader/dist/cjs.js!./index.css // 2. 引入css-loader处理后的资源 // 3. 创建style,将内容插入页面中生效 const script = ` import style from "!!${relativePath}"; const styleEl = document.createElement('style'); styleEl.innerHTML = style; document.head.appendChild(styleEl); `; // 中止后面loader执行 return script; };- 1
- 2
- 3
- 4
- 5
- 6
- 7
- 8
- 9
- 10
- 11
- 12
- 13
- 14
- 15
- 16
- 17
- 18
- 19
- 20
- 21
- 22
- 23
- 24
- 25
- 26
- 27
- 28
- 29
- 30
- 31
- 32
- 33
- 34
- 35
- 36
- 37
- 38
- 39
- 40
- 41
- 42
- 43
- 44
- 45
- 46
- 47
- 48
- 49
- 50
- 51
- 52
const styleLoader = () => {}; styleLoader.pitch = function (remainingRequest) { /* remainingRequest: C:\Users\86176\Desktop\source\node_modules\css-loader\dist\cjs.js!C:\Users\86176\Desktop\source\src\css\index.css 这里是inline loader用法,代表后面还有一个css-loader等待处理 最终我们需要将remainingRequest中的路径转化成相对路径,webpack才能处理 希望得到:../../node_modules/css-loader/dist/cjs.js!./index.css 所以:需要将绝对路径转化成相对路径 要求: 1. 必须是相对路径 2. 相对路径必须以 ./ 或 ../ 开头 3. 相对路径的路径分隔符必须是 / ,不能是 \ */ const relativeRequest = remainingRequest .split("!") .map((part) => { // 将路径转化为相对路径 const relativePath = this.utils.contextify(this.context, part); return relativePath; }) .join("!"); /* !!${relativeRequest} relativeRequest:../../node_modules/css-loader/dist/cjs.js!./index.css relativeRequest是inline loader用法,代表要处理的index.css资源, 使用css-loader处理 !!代表禁用所有配置的loader,只使用inline loader。(也就是外面我们style-loader和css-loader),它们被禁用了,只是用我们指定的inline loader,也就是css-loader import style from "!!${relativeRequest}" 引入css-loader处理后的css文件 为什么需要css-loader处理css文件,不是我们直接读取css文件使用呢? 因为可能存在@import导入css语法,这些语法就要通过css-loader解析才能变成一个css文件,否则我们引入的css资源会缺少 const styleEl = document.createElement('style') 动态创建style标签 styleEl.innerHTML = style 将style标签内容设置为处理后的css代码 document.head.appendChild(styleEl) 添加到head中生效 */ const script = ` import style from "!!${relativeRequest}" const styleEl = document.createElement('style') styleEl.innerHTML = style document.head.appendChild(styleEl) `; // style-loader是第一个loader, 由于return导致熔断,所以其他loader不执行了(不管是normal还是pitch) return script; }; module.exports = styleLoader;- 1
- 2
- 3
- 4
- 5
- 6
- 7
- 8
- 9
- 10
- 11
- 12
- 13
- 14
- 15
- 16
- 17
- 18
- 19
- 20
- 21
- 22
- 23
- 24
- 25
- 26
- 27
- 28
- 29
- 30
- 31
- 32
- 33
- 34
- 35
- 36
- 37
- 38
- 39
- 40
- 41
- 42
- 43
- 44
- 45
- 46
- 47
- 48
- 49
- 50
- 51
- 52
- 53
- 54
Plugin 原理
#Plugin 的作用
通过插件我们可以扩展 webpack,加入自定义的构建行为,使 webpack 可以执行更广泛的任务,拥有更强的构建能力。
#Plugin 工作原理
webpack 就像一条生产线,要经过一系列处理流程后才能将源文件转换成输出结果。 这条生产线上的每个处理流程的职责都是单一的,多个流程之间有存在依赖关系,只有完成当前处理后才能交给下一个流程去处理。 插件就像是一个插入到生产线中的一个功能,在特定的时机对生产线上的资源做处理。webpack 通过 Tapable 来组织这条复杂的生产线。 webpack 在运行过程中会广播事件,插件只需要监听它所关心的事件,就能加入到这条生产线中,去改变生产线的运作。 webpack 的事件流机制保证了插件的有序性,使得整个系统扩展性很好。 ——「深入浅出 Webpack」
站在代码逻辑的角度就是:webpack 在编译代码过程中,会触发一系列
Tapable钩子事件,插件所做的,就是找到相应的钩子,往上面挂上自己的任务,也就是注册事件,这样,当 webpack 构建的时候,插件注册的事件就会随着钩子的触发而执行了。#Webpack 内部的钩子
#什么是钩子
钩子的本质就是:事件。为了方便我们直接介入和控制编译过程,webpack 把编译过程中触发的各类关键事件封装成事件接口暴露了出来。这些接口被很形象地称做:
hooks(钩子)。开发插件,离不开这些钩子。#Tapable
Tapable为 webpack 提供了统一的插件接口(钩子)类型定义,它是 webpack 的核心功能库。webpack 中目前有十种hooks,在Tapable源码中可以看到,他们是:// https://github.com/webpack/tapable/blob/master/lib/index.js exports.SyncHook = require("./SyncHook"); exports.SyncBailHook = require("./SyncBailHook"); exports.SyncWaterfallHook = require("./SyncWaterfallHook"); exports.SyncLoopHook = require("./SyncLoopHook"); exports.AsyncParallelHook = require("./AsyncParallelHook"); exports.AsyncParallelBailHook = require("./AsyncParallelBailHook"); exports.AsyncSeriesHook = require("./AsyncSeriesHook"); exports.AsyncSeriesBailHook = require("./AsyncSeriesBailHook"); exports.AsyncSeriesLoopHook = require("./AsyncSeriesLoopHook"); exports.AsyncSeriesWaterfallHook = require("./AsyncSeriesWaterfallHook"); exports.HookMap = require("./HookMap"); exports.MultiHook = require("./MultiHook");- 1
- 2
- 3
- 4
- 5
- 6
- 7
- 8
- 9
- 10
- 11
- 12
- 13
Tapable还统一暴露了三个方法给插件,用于注入不同类型的自定义构建行为:tap:可以注册同步钩子和异步钩子。tapAsync:回调方式注册异步钩子。tapPromise:Promise 方式注册异步钩子。
#Plugin 构建对象
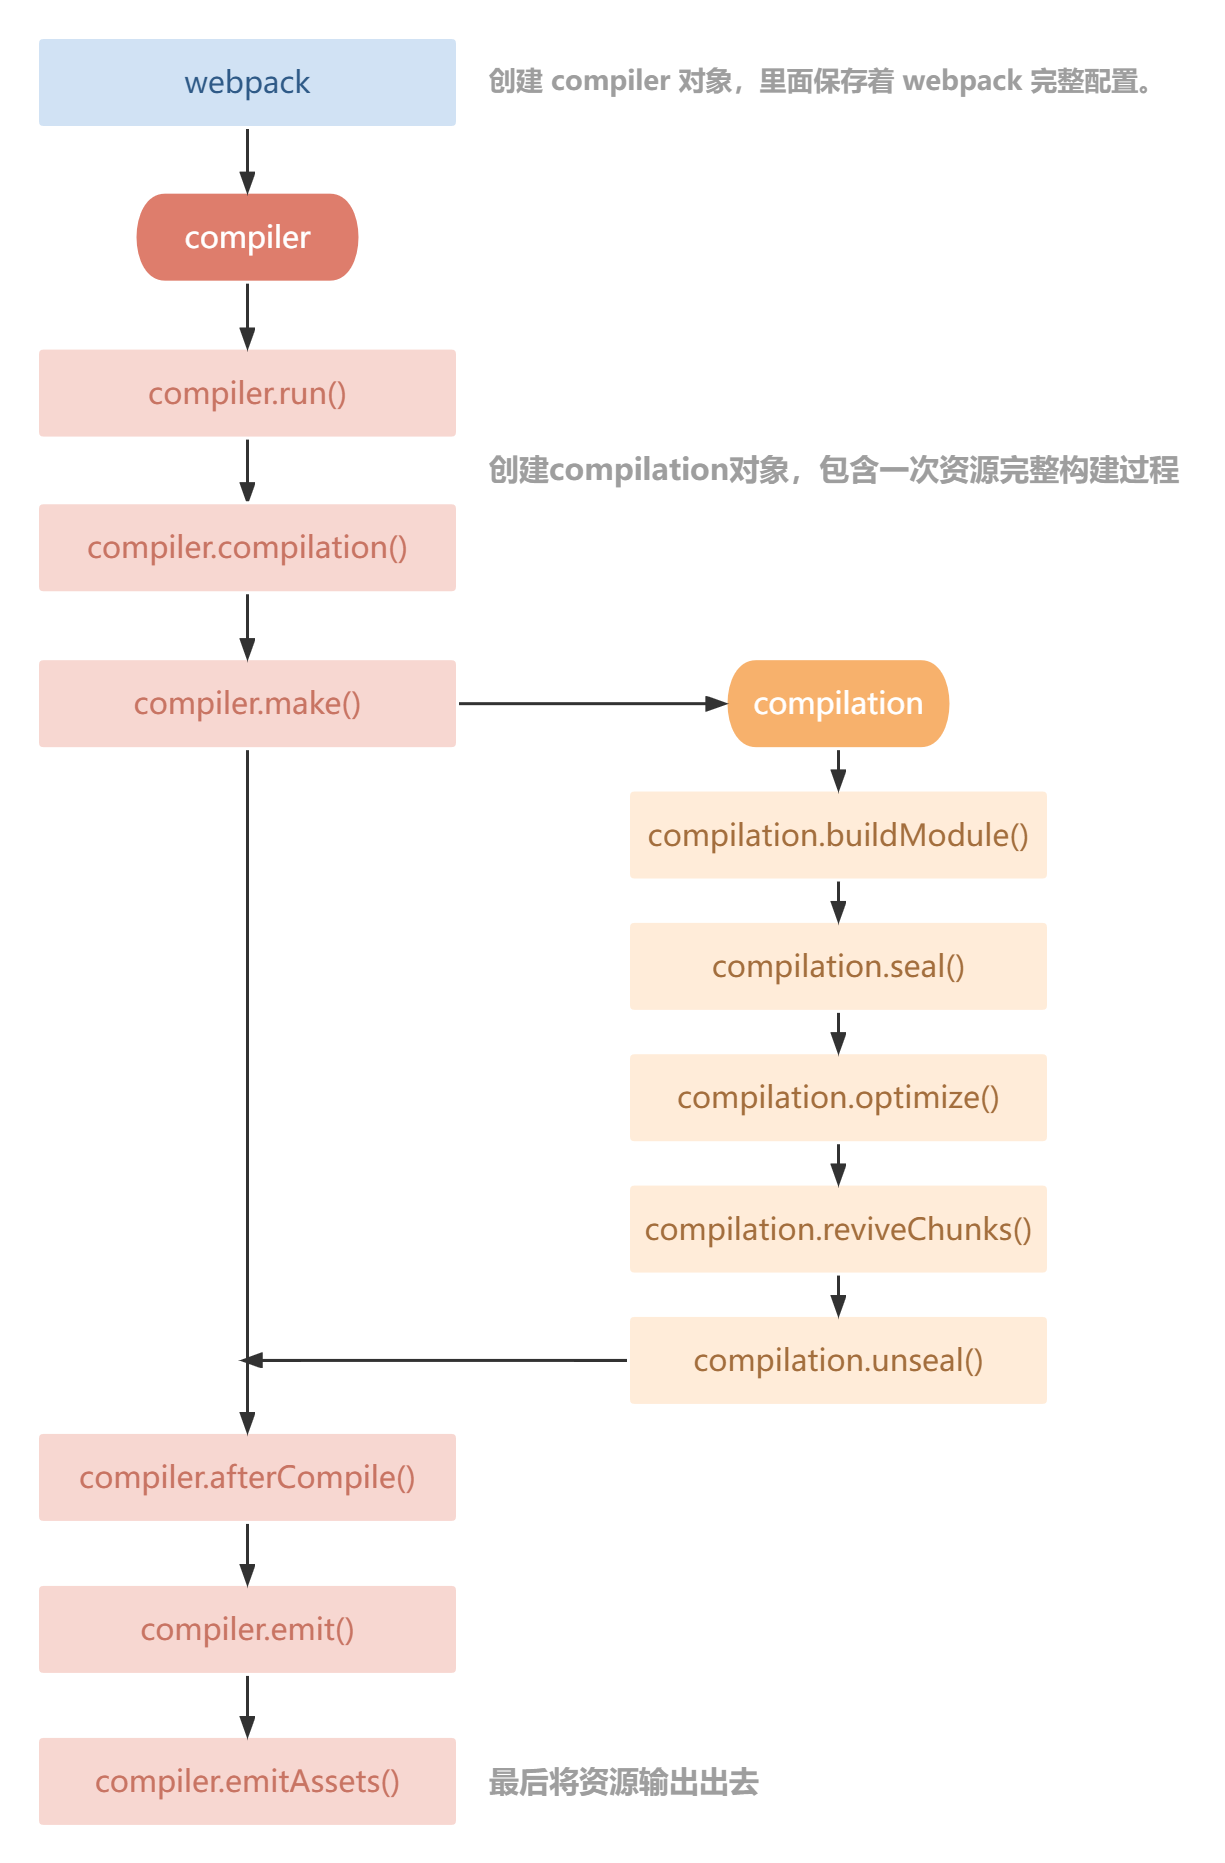
#Compiler
compiler 对象中保存着完整的 Webpack 环境配置,每次启动 webpack 构建时它都是一个独一无二,仅仅会创建一次的对象。
这个对象会在首次启动 Webpack 时创建,我们可以通过 compiler 对象上访问到 Webapck 的主环境配置,比如 loader 、 plugin 等等配置信息。
它有以下主要属性:
compiler.options可以访问本次启动 webpack 时候所有的配置文件,包括但不限于 loaders 、 entry 、 output 、 plugin 等等完整配置信息。compiler.inputFileSystem和compiler.outputFileSystem可以进行文件操作,相当于 Nodejs 中 fs。compiler.hooks可以注册 tapable 的不同种类 Hook,从而可以在 compiler 生命周期中植入不同的逻辑。
#Compilation
compilation 对象代表一次资源的构建,compilation 实例能够访问所有的模块和它们的依赖。
一个 compilation 对象会对构建依赖图中所有模块,进行编译。 在编译阶段,模块会被加载(load)、封存(seal)、优化(optimize)、 分块(chunk)、哈希(hash)和重新创建(restore)。
它有以下主要属性:
compilation.modules可以访问所有模块,打包的每一个文件都是一个模块。compilation.chunkschunk 即是多个 modules 组成而来的一个代码块。入口文件引入的资源组成一个 chunk,通过代码分割的模块又是另外的 chunk。compilation.assets可以访问本次打包生成所有文件的结果。compilation.hooks可以注册 tapable 的不同种类 Hook,用于在 compilation 编译模块阶段进行逻辑添加以及修改。
#生命周期简图
#开发一个插件
#最简单的插件
- plugins/test-plugin.js
/* 1. webpack加载webpack.config.js中所有配置,此时就会new TestPlugin(), 执行插件的constructor 2. webpack创建compiler对象 3. 遍历所有plugins中插件,调用插件的apply方法 4. 执行剩下编译流程(触发各个hooks事件) */ class TestPlugin { constructor() { console.log("TestPlugin constructor()"); } apply(compiler) { console.log("TestPlugin apply()"); } } module.exports = TestPlugin;- 1
- 2
- 3
- 4
- 5
- 6
- 7
- 8
- 9
- 10
- 11
- 12
- 13
- 14
- 15
- 16
#注册 hook
类似于
class TestPlugin { constructor() { console.log("TestPlugin constructor()"); } // 1. webpack读取配置时,new TestPlugin() ,会执行插件 constructor 方法 // 2. webpack创建 compiler 对象 // 3. 遍历所有插件,调用插件的 apply 方法 apply(compiler) { console.log("TestPlugin apply()"); // 从文档可知, compile hook 是 SyncHook, 也就是同步钩子, 只能用tap注册 compiler.hooks.compile.tap("TestPlugin", (compilationParams) => { console.log("compiler.compile()"); }); // 从文档可知, make 是 AsyncParallelHook, 也就是异步并行钩子, 特点就是异步任务同时执行 // 可以使用 tap、tapAsync、tapPromise 注册。 // 如果使用tap注册的话,进行异步操作是不会等待异步操作执行完成的。 compiler.hooks.make.tap("TestPlugin", (compilation) => { setTimeout(() => { console.log("compiler.make() 111"); }, 2000); }); // 使用tapAsync、tapPromise注册,进行异步操作会等异步操作做完再继续往下执行 compiler.hooks.make.tapAsync("TestPlugin", (compilation, callback) => { setTimeout(() => { console.log("compiler.make() 222"); // 必须调用 callback(); }, 1000); }); compiler.hooks.make.tapPromise("TestPlugin", (compilation) => { console.log("compiler.make() 333"); // 必须返回promise return new Promise((resolve) => { resolve(); }); }); // 从文档可知, emit 是 AsyncSeriesHook, 也就是异步串行钩子,特点就是异步任务顺序执行 compiler.hooks.emit.tapAsync("TestPlugin", (compilation, callback) => { setTimeout(() => { console.log("compiler.emit() 111"); callback(); }, 3000); }); compiler.hooks.emit.tapAsync("TestPlugin", (compilation, callback) => { setTimeout(() => { console.log("compiler.emit() 222"); callback(); }, 2000); }); compiler.hooks.emit.tapAsync("TestPlugin", (compilation, callback) => { setTimeout(() => { console.log("compiler.emit() 333"); callback(); }, 1000); }); } } module.exports = TestPlugin;- 1
- 2
- 3
- 4
- 5
- 6
- 7
- 8
- 9
- 10
- 11
- 12
- 13
- 14
- 15
- 16
- 17
- 18
- 19
- 20
- 21
- 22
- 23
- 24
- 25
- 26
- 27
- 28
- 29
- 30
- 31
- 32
- 33
- 34
- 35
- 36
- 37
- 38
- 39
- 40
- 41
- 42
- 43
- 44
- 45
- 46
- 47
- 48
- 49
- 50
- 51
- 52
- 53
- 54
- 55
- 56
- 57
- 58
- 59
- 60
- 61
- 62
- 63
- 64
- 65
- 66
#启动调试
通过调试查看
compiler和compilation对象数据情况。-
package.json 配置指令
关键在于添加这一项
“scripts”: {
“debug”: “node --inspect-brk ./node_modules/webpack-cli/bin/cli.js”
},
{ "name": "source", "version": "1.0.0", "scripts": { "debug": "node --inspect-brk ./node_modules/webpack-cli/bin/cli.js" }, "keywords": [], "author": "xiongjian", "license": "ISC", "devDependencies": { "@babel/core": "^7.17.10", "@babel/preset-env": "^7.17.10", "css-loader": "^6.7.1", "loader-utils": "^3.2.0", "webpack": "^5.72.0", "webpack-cli": "^4.9.2" } }- 1
- 2
- 3
- 4
- 5
- 6
- 7
- 8
- 9
- 10
- 11
- 12
- 13
- 14
- 15
- 16
- 17
- 18
- 运行指令
npm run debug- 1
此时控制台输出以下内容:
PS C:\Users\86176\Desktop\source> npm run debug > source@1.0.0 debug > node --inspect-brk ./node_modules/webpack-cli/bin/cli.js Debugger listening on ws://127.0.0.1:9229/629ea097-7b52-4011-93a7-02f83c75c797 For help, see: https://nodejs.org/en/docs/inspecto- 1
- 2
- 3
- 4
- 5
- 6
- 7
- 打开 Chrome 浏览器,F12 打开浏览器调试控制台。
此时控制台会显示一个绿色的图标

- 点击绿色的图标进入调试模式。
- 在需要调试代码处用
debugger打断点,代码就会停止运行,从而调试查看数据情况。
#BannerWebpackPlugin
- 作用:给打包输出文件添加注释。
- 开发思路:
- 需要打包输出前添加注释:需要使用
compiler.hooks.emit钩子, 它是打包输出前触发。 - 如何获取打包输出的资源?
compilation.assets可以获取所有即将输出的资源文件。
- 实现:

class BannerWebpackPlugin { constructor(options = {}) { this.options = options; } apply(compiler) { // 在资源输出之前触发 compiler.hooks.emit.tap("BannerWebpackPlugin", (compilation) => { // debugger; const extensions = ["css", "js"]; // 1. 获取即将输出的资源文件:compilation.assets // 2. 过滤只保留js和css资源 const assets = Object.keys(compilation.assets).filter((assetPath) => { // 将文件名切割 ['xxxx', 'js'] ['xxxx', 'css'] const splitted = assetPath.split("."); // 获取最后一个文件扩展名 const extension = splitted[splitted.length - 1]; // 判断是否包含 return extensions.includes(extension); }); const prefix = `/* * Author: ${this.options.author} */ `; // 3. 遍历剩下资源添加上注释 // console.log(assets); assets.forEach((asset) => { // 获取原来内容 const source = compilation.assets[asset].source(); // 拼接上注释 const content = prefix + source; // 修改资源 compilation.assets[asset] = { // 最终资源输出时,调用source方法,source方法的返回值就是资源的具体内容 source() { return content; }, // 资源大小 size() { return content.length; }, }; }); }); } } module.exports = BannerWebpackPlugin;- 1
- 2
- 3
- 4
- 5
- 6
- 7
- 8
- 9
- 10
- 11
- 12
- 13
- 14
- 15
- 16
- 17
- 18
- 19
- 20
- 21
- 22
- 23
- 24
- 25
- 26
- 27
- 28
- 29
- 30
- 31
- 32
- 33
- 34
- 35
- 36
- 37
- 38
- 39
- 40
- 41
- 42
- 43
- 44
- 45
- 46
- 47
- 48
- 49
- 50
#CleanWebpackPlugin
- 作用:在 webpack 打包输出前将上次打包内容清空。
- 开发思路:
- 如何在打包输出前执行?需要使用
compiler.hooks.emit钩子, 它是打包输出前触发。 - 如何清空上次打包内容?
- 获取打包输出目录:通过 compiler 对象。
- 通过文件操作清空内容:通过
compiler.outputFileSystem操作文件。
- 实现:
// plugins/clean-webpack-plugin.js class CleanWebpackPlugin { apply(compiler) { // 2. 获取打包输出的目录 const outputPath = compiler.options.output.path; const fs = compiler.outputFileSystem; // 1. 注册钩子:在打包输出之前 emit compiler.hooks.emit.tap("CleanWebpackPlugin", (compilation) => { // 3. 通过fs删除打包输出的目录下的所有文件 this.removeFiles(fs, outputPath); }); } removeFiles(fs, filepath) { // 想要删除打包输出目录下所有资源,需要先将目录下的资源删除,才能删除这个目录 // 1. 读取当前目录下所有资源 const files = fs.readdirSync(filepath); // console.log(files); // [ 'images', 'index.html', 'js' ] // 2. 遍历一个个删除 files.forEach((file) => { // 2.1 遍历所有文件,判断是文件夹还是文件 const path = `${filepath}/${file}`; const fileStat = fs.statSync(path); // console.log(fileStat); if (fileStat.isDirectory()) { // 2.2 是文件夹,就得删除下面所有文件,才能删除文件夹 this.removeFiles(fs, path); } else { // 2.3 是文件,直接删除 fs.unlinkSync(path); } }); } } module.exports = CleanWebpackPlugin;- 1
- 2
- 3
- 4
- 5
- 6
- 7
- 8
- 9
- 10
- 11
- 12
- 13
- 14
- 15
- 16
- 17
- 18
- 19
- 20
- 21
- 22
- 23
- 24
- 25
- 26
- 27
- 28
- 29
- 30
- 31
- 32
- 33
- 34
- 35
- 36
#AnalyzeWebpackPlugin
- 作用:分析 webpack 打包资源大小,并输出分析文件。
- 开发思路:
- 在哪做?
compiler.hooks.emit, 它是在打包输出前触发,我们需要分析资源大小同时添加上分析后的 md 文件。
- 实现:
class AnalyzeWebpackPlugin { apply(compiler) { compiler.hooks.emit.tap("AnalyzeWebpackPlugin", (compilation) => { // 1. 遍历所有即将输出文件,得到其大小 /* 将对象变成一个二维数组: 对象: { key1: value1, key2: value2 } 二维数组: [ [key1, value1], [key2, value2] ] */ const assets = Object.entries(compilation.assets); /* md中表格语法: | 资源名称 | 资源大小 | | --- | --- | | xxx.js | 10kb | */ let content = `| 资源名称 | 资源大小 | | --- | --- |`; assets.forEach(([filename, file]) => { content += `\n| ${filename} | ${Math.ceil(file.size() / 1024)}kb |`; }); // 2. 生成一个md文件 compilation.assets["analyze.md"] = { source() { return content; }, size() { return content.length; }, }; }); } } module.exports = AnalyzeWebpackPlugin;- 1
- 2
- 3
- 4
- 5
- 6
- 7
- 8
- 9
- 10
- 11
- 12
- 13
- 14
- 15
- 16
- 17
- 18
- 19
- 20
- 21
- 22
- 23
- 24
- 25
- 26
- 27
- 28
- 29
- 30
- 31
- 32
- 33
- 34
- 35
- 36
- 37
- 38
- 39
- 40
- 41
- 42
- 43
- 44
- 45
- 46

#InlineChunkWebpackPlugin
- 作用:webpack 打包生成的 runtime 文件太小了,额外发送请求性能不好,所以需要将其内联到 js 中,从而减少请求数量。
- 开发思路:
-
我们需要借助html-webpack-plugin来实现
- 在
html-webpack-plugin输出 index.html 前将内联 runtime 注入进去 - 删除多余的 runtime 文件
- 在
-
如何操作
html-webpack-plugin?官方文档open in new window
- 实现:
// plugins/inline-chunk-webpack-plugin.js const HtmlWebpackPlugin = require("safe-require")("html-webpack-plugin"); class InlineChunkWebpackPlugin { constructor(tests) { this.tests = tests; } apply(compiler) { compiler.hooks.compilation.tap("InlineChunkWebpackPlugin", (compilation) => { const hooks = HtmlWebpackPlugin.getHooks(compilation); hooks.alterAssetTagGroups.tap("InlineChunkWebpackPlugin", (assets) => { assets.headTags = this.getInlineTag(assets.headTags, compilation.assets); assets.bodyTags = this.getInlineTag(assets.bodyTags, compilation.assets); }); hooks.afterEmit.tap("InlineChunkHtmlPlugin", () => { Object.keys(compilation.assets).forEach((assetName) => { if (this.tests.some((test) => assetName.match(test))) { delete compilation.assets[assetName]; } }); }); }); } getInlineTag(tags, assets) { return tags.map((tag) => { if (tag.tagName !== "script") return tag; const scriptName = tag.attributes.src; if (!this.tests.some((test) => scriptName.match(test))) return tag; return { tagName: "script", innerHTML: assets[scriptName].source(), closeTag: true }; }); } } module.exports = InlineChunkWebpackPlugin;- 1
- 2
- 3
- 4
- 5
- 6
- 7
- 8
- 9
- 10
- 11
- 12
- 13
- 14
- 15
- 16
- 17
- 18
- 19
- 20
- 21
- 22
- 23
- 24
- 25
- 26
- 27
- 28
- 29
- 30
- 31
- 32
- 33
- 34
- 35
- 36
- 37
- 38
- 39
- 40
- 41
-
相关阅读:
leetcode_22括号匹配
VSCODE的常用插件
Erasure Code - EC纠删码原理
python基于django的智能短视频推荐系统 nodejs 前后端分离
浅析诊断数据库—ODX
《最新出炉》系列入门篇-Python+Playwright自动化测试-52- 字符串操作 - 下篇
IO口电路种类
Rust中的结构体
canvas 基础 和 动图案例
Java —— 多态
- 原文地址:https://blog.csdn.net/a2274001782/article/details/126027464
